1
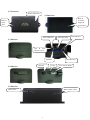
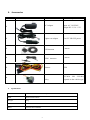
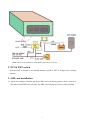
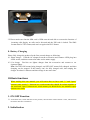
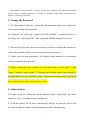
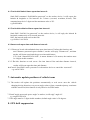
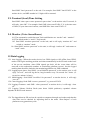
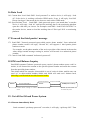
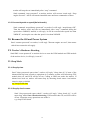
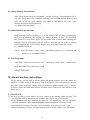
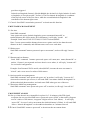
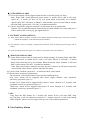
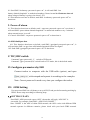
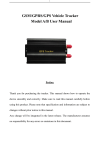
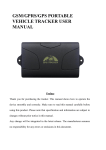
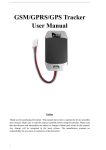
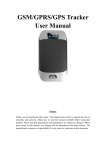
GSM/GPRS/GPS PORTABLE VEHICLE TRACKER USER MANUAL TK 104-B Preface Thank you for purchasing the tracker. This manual shows how to operate the device smoothly and correctly. Make sure to read this manual carefully before using this product. Please note that specification and information are subject to changes without prior notice in this manual. Any change will be integrated in the latest release. The manufacturer assumes no responsibility for any errors or omissions in this document. Contents I. Introduction .................................................................................................................................................... 3 1. Main Features ............................................................................................................................................. 3 2. Applications ................................................................................................................................................ 3 3. Hardware Description ................................................................................................................................. 3 II. 4. Accessories ............................................................................................................................................ 5 5. Specifications ......................................................................................................................................... 5 Installation and operating ............................................................................................................................... 6 1. Production installation ................................................................................................................................ 6 2. INT & EXT switch ..................................................................................................................................... 7 3. SIM card installation .................................................................................................................................. 7 4. Battery Charging......................................................................................................................................... 8 III. Basic functions ............................................................................................................................................... 8 1. ON/OFF Function....................................................................................................................................... 8 2. Initialization................................................................................................................................................ 8 3. Change the Password .................................................................................................................................. 9 4. Authorization .............................................................................................................................................. 9 5. Single Locating ......................................................................................................................................... 10 6 Auto track continuously............................................................................................................................. 10 6.1 Track with limited times upon time interval: .................................................................................. 11 6.2 Track with unlimited times upon time interval: .............................................................................. 11 6.3 Smart track upon time and distance interval: .................................................................................. 11 7. Automatic update positions of vehicle turns ............................................................................................. 11 8. GPS drift suppression ............................................................................................................................... 11 9. Exact street address .................................................................................................................................. 12 10. Location based service (LBS) / Cell-ID Locating. ................................................................................. 12 11 Check the Vehicle State. .......................................................................................................................... 12 12. Check IMEI ............................................................................................................................................ 12 13. Terminal (local) Time Setting ................................................................................................................. 13 14. Monitor (Voice Surveillance) ................................................................................................................. 13 15 Data logging ............................................................................................................................................ 13 16 Data Load ................................................................................................................................................ 14 17 Forward the third parties’ message .......................................................................................................... 14 18 SIM card Balance Inquiry........................................................................................................................ 14 19. Cut off the Oil and Power System .......................................................................................................... 14 19.1 Execute immediately Mode .......................................................................................................... 14 19.2. Execute depends on speed(Default mode) ................................................................................... 15 20. Resume the Oil and Power System......................................................................................................... 15 21. Tracker’s Hardware Resetting ................................................................................................................ 15 22. Sleep Mode............................................................................................................................................. 15 22.1. Sleep by time ............................................................................................................................... 15 1 22.2. Sleep by shock sensor .................................................................................................................. 15 22.3 Deep Sleep by Shock Sensor ........................................................................................................ 16 22.4 Start Work on specific time ........................................................................................................... 16 22.5 No sleep mode .............................................................................................................................. 16 IV. Alarm Function and settings ......................................................................................................................... 16 1. Geo-fence ................................................................................................................................................. 16 2 Multi-area management ............................................................................................................................. 17 3 Movement alarm........................................................................................................................................ 17 4. Over Speed Alarm .................................................................................................................................... 18 5. Accident alarm (Option) ........................................................................................................................... 18 6. Shock Sensor Alarm ................................................................................................................................. 18 7. SOS........................................................................................................................................................... 18 8. Low battery alarm..................................................................................................................................... 18 9. Power off alarm ........................................................................................................................................ 19 10. GPS blind Spot alert ....................................................................................................................................... 19 V. TCP/UDP switch .............................................................................................................................................. 19 VI. Configure parameters by USB ........................................................................................................................ 19 VII. GPRS Setting................................................................................................................................................ 19 7.1 Setting up APN ....................................................................................................................................... 19 7.2 GPRS User Name and password Setup .................................................................................................. 20 7.3 IP and Port Setup .................................................................................................................................... 20 7.4 Switch to GPRS mode ............................................................................................................................ 20 7.5 Less GPRS traffic ................................................................................................................................... 20 7.6 Web platform and mobile APP instructions ............................................................................................ 20 VIII. Cautions........................................................................................................................................................ 21 IX. Simple Faults & the Solutions ...................................................................................................................... 21 XI. LED indicator status ..................................................................................................................................... 22 2 I. Introduction This tracker is a new product based on the GSM / GPRS network and GPS satellite positioning system, which set multiple functions of security, positioning, monitoring surveillance, emergency alarms and tracking in its entirety. It can track and monitor remote target by SMS or internet. 1. Main Features 1.1 Waterproof shell 1.2 Built-in large capacity 6000MA battery, standby about 4 months in sleep mode and 12 months in deep sleep mode. 1.3 Powerful magnets to absorb to vehicle firmly. 1.4 Real-time tracking, retrieve of lost vehicles, cargo. 1.5 Movement alarm, Geo-fence alarm, shock sensor alarm, remote monitoring. 1.6 Support map viewing on mobile phone screen, get absolute address by SMS, GPRS real time tracking on web based server. 1.7 Built-in high sensitivity GPS and GSM antenna to make it can be used alone without installation, convenient and quick. 1.8 Support for external GSM antenna, GPS antenna, and external power supply for the tracker to be installed on the device which can provide power for long-term using. 2. Applications Application: Locating and tracking service for cars, trucks, container trucks, special vehicles, cargo and criminal investigation officer. 3. Hardware Description 3 3.1 Front face Built-in GPS ANT 3.2 Rear face Built-in Built-in powerful magnet & large Battery GSM ANT EXT. GSM ANT 3.3 Side face INT & EXT. GPS ANT LED Indicator 灯 EXT antenna switch SIM Slot 3.4 Side face ON/OFF USB MicroSD Slot EXT. Power, Relay 3.5 Side face Built-in shock sensor Built-in Mic 4 4. Accessories No. Pictures Name 1 2 3 AC Adapter Input: AC 110-220V, Output DC: 1.5A,12V Lighter car adapter Car 12V OR 24V power GPS Antenna 4 GSM 5 6 5. Antenna 94mm*60mm*38mm Weight 300g Network GSM/GPRS Band 850/900/1800/1900Mhz 5 2 meters 4PIN Relay 12V/40A OR 24V/40A depends on the vehicle type specifications DIM. 2 meters Harness Specifications Content Specs GPS sensitivity -159dBm GPS Accuracy 5m Cold status 45s Hot status 1s GPS Start time EXT. power Operating Current DC 12 V -24V Sleep Current 1.8mA Deep sleep 0.6mA GSM operating Current 68mA±3mA GPRS Current(data transfer) 82mA±10mA Battery 3.7V Charge current 1A±0.2A Charge time 7h Standby time 6000mA/h Polymer Li-Battery Sleep 4 months Deep sleep 12 months Storage Temp. -40°C to +85°C Operation Temp. -20°C to +65°C Humidity 5%--95% non-condensing II. Installation and operating 1. Production installation 1.1 The product is easy to install. The built-in powerful magnet can make it to be directly adsorbed on the iron objects. 1.2 Built-in GPS and GSM antenna, external antenna can be optional. 1.3 The tracker is waterproof, but please still avoids the long-term placement in the places of water infiltration. 1.4 If you need an external power supply, cut oil & power system and SOS feature, please find 4PIN main wire, wiring diagram as follows: 6 Note: Please install SOS button on the hidden place driver can touch. 2. INT & EXT switch Switch to INT to change to use internal antenna; switch to EXT to change to use external antenna 3. SIM card installation 3.1 Open the waterproof sealant and insert SIM card as following picture shows, push it to the end to install SIM card correctly. The SIM card will pop up if press it after installed. 7 3.2 Please make sure that the SIM card is GSM network and able to execute the function of incoming calls display, no calls can be diverted and the PIN code is locked. The SMS format must be TXT format, and can’t recognize the PDU format. 4. Battery Charging Please fully charge the product for the first use and charge as following: 4.1 Home charge: Find the AC adapter from the accessories and connect 4-PIN plug into 4-PIN socket, and then connect the other end to mains supply. 4.2 Car charge: Find the car lighter charger from the accessories and connect to car cigarette lighter. Note: Red LED ON means being charged, and LED OFF means fully charged, and then charging can be stopped. If the battery can’t be fully charged once, then unplug the charger for about 10 minutes and then charge it one more time. III. Basic functions When reading this user manual, you will notice that we have used "+" and "space" between some words;"+" between two words means they should be written together as one word and "space" between two words means you should leave one character space between two words. 1. ON/OFF Function 1.1 In the OFF state, switch ON/OFF to ON position, then the three LED will flash 1 time, which means the tracker has been switched on. 2. Initialization 8 Send SMS "begin+password" to tracker, it will reply "begin ok" and return to the default factory settings. (Default password is: 123456). For example: Send SMS "begin123456" to tracker, it will reply "begin ok". 3. Change the Password 3.1 Set Password: Send sms: “password+old password+space+new password” to the unit to change the password. For Example, pls send sms: “password123456 888888” to terminal device, it will reply sms: “password OK”. New password 888888 changed in success. 3.2 Be sure keep the new password in mind, you have to upload the software to restore the original setting in case of losing the new password. 3.3 Make sure the new password is in 6 digits Arabic numbers, or the tracker can not recognize the password. 3.4 When reading this user manual, you will notice that we have used "+" and "space" between some words;"+" between two words means they should be written together as one word and "space" between two words means you should leave one character space between two words. 4. Authorization You must setup the authorized phone number before using SOS, geo-fence alarm, etc. Up to 5 numbers can be authorized. 4.1 Call the tracker for 10 times continuously and get its position, then it will save the cell phone number as the authorized number automatically. 9 4.2 Send SMS:“ admin+password+space+cell phone number” to set up a authorized number. The other authorized numbers should be set by the first authorized number. If the number is successfully authorized, the unit will reply “admin ok!” in SMS. 4.3 Send SMS: “ noadmin+password+space+authorized number” to delete the authorized number. 4.4 If you want to track the target when it enters into another country, you must add the country code before the cell phone number. You should authorize your number in international format as follows: “admin123456 008613322221111” to tracker to set 13322221111 as an authorized number. 5. Single Locating Any number call the tracker device, it will reply a SMS including the position of latitude and longitude if don’t set up the authorized number. If authorized number has set successfully, the device won’t reply when the unauthorized number call it. Dialing the tracker device from the authorized number, it will hang up your calling and reply a real-time location as following: *When lost fix to satellites, it will track by LBS / CELL-ID. And the SMS will include two positions: - GPS coordinates of the last known position. -LAC code. Open www.gpstrackerxy.com find “manual track”, and put the received code in LAC and Cell-ID fields to location by LBS technology. 6 Auto track continuously 10 6.1 Track with limited times upon time interval: Send SMS command “fix030s005n+password” to the tracker device, it will report the latitude & longitude at 30s intervals for 5 times. (s:second, m:minute, h:hour). This command must be in 3 digits and the maximum value is 255. e.g fix030s005n 6.2 Track with unlimited times upon time interval: Send SMS “fix030s***n+password” to the tracker device, it will reply the latitude & longitude continuously at 30 seconds intervals. Note: the interval must not less than 20s. e.g. fix030s***n123456 6.3 Smart track upon time and distance interval: 6.3.1 Please set "track with unlimited times upon time interval" before this function, and send "distance+password+space+distance", tracker will reply "Distance ok", and then tracker will locate upon both the pre-set time and distance. E.G: Send "distance123456 0050", it means distance is 50 meters; the number must be 4 digits Arabic numbers. 6.3.2 Set this function on web server: Set time interval first and then distance interval, tracker will locate upon the time and distance. 6.4 Cancel: Send SMS “nofix+password” to the tracker device to cancel the “auto track”. e.g. nofix123456 7. Automatic update positions of vehicle turns 7.1 The tracker will update the positions automatically to web server once the vehicle changing driving direction over pre set angle value to form a smooth trajectory consistent with the actual road, this function is only effective in GPRS mode. 7.2 Send "angle+password+space+angle" to tracker, it will reply" angle ok". e.g. angle123456 030 7.3 The angle must be 3 digits Arabic numbers, default angle value is 30 degrees. 8. GPS drift suppression 11 8.1 This function is deactivated as default, send "suppress+password" to tracker to activate, it will reply" suppress drift ok". The GPS data stop updating if vehicle is not moving and latitude and longitude always keep same, and GPS data updates automatically when vehicle is moving. e.g. suppress123456 8.2 Cancel: send "nosuppress+password" to tracker, it will reply" nosuppress ok ". e.g. nosuppress123456 9. Exact street address You must set up the APN of your local GSM network for the SIM card in tracker first before using this function, if your local GSM network needs user name and password for gprs, please setup according to the GPRS instructions in chapter VII. Send SMS “address+password” to tracker after setup APN, tracker will reply detailed absolute address including street name. e.g. address123456 10. Location based service (LBS) / Cell-ID Locating. If the tracker cannot establish a solid GPS Fix, it will calculate its location using Cell-ID GSM locating, Location reports will include the GPS coordinates of the last known positions as well as a LAC code, Entering the LAC code to the “Manual Track” menu of web tracking platform www.gpstrackerxy.com will enable you to see the tracker’s current location. You can also send command “address+password” to the tracker to request exact address, track will automatically switch to tracking by LBS in GPRS mode. Accuracy of LBS depends on the distance to the nearest GSM Network Cell Tower or Base Station. Note: This feature can be used normally in most areas according to the signal of GSM network. It may not be available in some areas. 11 Check the Vehicle State. Send SMS “check+password” to tracker to check charge status, battery status, GPS status, GSM reception status. For example, send SMS “check123456”, and following information will be returned after execute the command: Power: Power off /charging/charge finish Battery: 100% GPS: OK/NO GPS GSM Signal: 1-32 (The higher digit it shows; the stronger of GSM signals it receives.) 12. Check IMEI 12 Send SMS "imei+password" to the unit. For example, Send SMS "imei123456" to the tracker device, an IMEI number in 15 digits will be returned. 13. Terminal (local) Time Setting Send SMS “time+space+zone+password+space+time” to the tracker unit, If succeed, It will reply “time OK”. For example: Send SMS “time zone123456 8”, 8 is the time zone of China, If your time zone is minus, send SMS like “time zone123456 -8”. 14. Monitor (Voice Surveillance) 14.1 The command to switch between Track and Monitor are “tracker” and “ monitor”. 14.2 The default mode is “track” (Track mode). 14.3 Send SMS “monitor+password” to the unit, and it will reply “monitor ok!” and switch to “monitor” mode. 14.4 Send SMS “tracker+password” to the unit, it will reply “tracker ok!” and restore to “track” mode 15 Data logging 15.1 Auto logging:When the tracker device lost GSM signals or fall offline from GPRS, tracker will log the tracking position and alerts automatically in the SD card on the basis of the pre-set condition, when GSM signals get back, all the event alerts will be auto-sent to the authorized numbers or monitoring platform (server), but the logged tracking data should be loaded to the monitoring platform via SMS command. 15.2 Logging upon times: Send SMS: “save030s005n+password” to the tracker unit, it will reply “save ok”, and will log the lat, long locations every 30 seconds for 5 times. (S: second, m: minute; h: hour). 15.3 Multi-logging:Send SMS:”save030s***n+password” to tracker device, it will reply “save ok”. 15.4 Cancel logging: Send SMS “nosave+password”, e.g. nosave123456 15.4 Logging Clearance: send SMS: “clear+password” to tracker device, it will reply “clear ok”. 15.5 Logging Volume: Built-in flash (store about 16,000 positions); expanded volume depends on the SD card inserted. 15.6 The logged data in SD card can be copied to computers through card reader, and then the data route can be checked by importing data in the menu “Data Import” of web platform www.gpstrackerxy.com 13 16 Data Load 16.1 Current date Load: Send SMS: “load+password” to tracker device, it will reply: “load ok” if the device is working well under GPRS mode; if not, it will reply “load fail! Please check gprs” that means device does not work under GPRS mode. 16.2 Specified date Load: Send SMS: “load+password+space+year month date” to tracker device, it will reply: “load ok” and load the tracking data to the monitoring platform upon the valid time you choose. For Example: send SMS: “load123456 20110425” to the tracker device, means to load the tracking data of 25th April 2011 to monitoring platform. 17 Forward the third parties’ message 17.1 Send SMS "forward+password+space+third parties phone number" from authorized phone number, tracker will reply "forward ok", and supports 1 third parties phone numbers at most. For example, set the phone number of the service provider of the simcard in the tracker, when charge remind message coming in, tracker will forward it to authorized phone number. 17.2 Cancel: Send SMS command "noforward+password". 18 SIM card Balance Inquiry Send SMS command "balance+password+space+carrier’s phone number+space+code" to tracker, it will forward the content to the specified phone number and return the content from the specified phone number. Take china mobile for example, china mobile is one of carrier in china, mobile users can send “ye” to china mobile number 10086, and 10086 will send user ’s balance back, following is an illustration how this function works. Received and execute Mobile balance123456 10086 ye Send ye out to 10086 Tracker 10086(China mobile) Send balance back Forward balance message to mobile Received Balance message phone Received ye from number in the tracker and process 19. Cut off the Oil and Power System 19.1 Execute immediately Mode Send command “quickstop+password” to tracker, it will reply “quickstop OK”. Then 14 tracker will stop the car immediately after “stop” command. Send command “stop+password” to tracker, tracker will execute it and reply “Stop engine Succeed”. And it will remain immobile state until next command to resume. 19.2. Execute depends on speed(Default mode) Send command “noquickstop+password” to tracker, It will reply “noquickstop OK”, Then the tracker won’t stop the car immediately after “stop” command during the speed above 20KM/H, instead, it will reply “it will be executed after speed less than 20KM/H”, and stop the car when the speed is less than 20KM/H. 20. Resume the Oil and Power System Send “resume+password" to tracker, it will reply "Resume engine succeed", that means vehicle has resume the oil supply. 21. Tracker’s Hardware Resetting Send SMS “reset+password” to tracker device to reset the GSM module and GPS module of the tracker device, it will reply “reset ok”. 22. Sleep Mode 22.1. Sleep by time Send "sleep+password+space+time", tracker will reply "sleep time ok" if none of the alarms/alerts has been set and no operations in 5 minutes, tracker will fall asleep, GPS module shut off, and LED will be off too. Calling or SMS can awake the tracker. If alarms have been set, tracker will enter sleep by detecting shock sensor. And tracker sleeps by time as default. e.g. sleep123456 time 22.2. Sleep by shock sensor Send "sleep+password+space+shock", tracker will reply "sleep shock ok", it will enter sleep mode if no vibration detecting, GPS module shut off, and LED will be off too. Vibration or any operations can awake it. e.g. sleep123456 shock 15 22.3 Deep Sleep by Shock Sensor Send "sleep+password+space+deepshock", tracker will reply "sleep deepshock ok" it will enter sleep mode if no vibration detecting, GPS & GSM module shut off, and LED will be off too. Only vibration can awake it, and tracker will send awake message automatically after wake up. e.g. sleep123456 deepshock 22.4 Start Work on specific time Send "schedule+password+space+1h ", It will awake every one hour, automatically send location message after waking. (m: minute; h: hour; d: day). The maximum time interval is set to three digits, and not more than 30 days. After sending this message, GPS & GSM module shut off Calls or messages can not awake it. Alarms can be triggered and work normally. Restore deep sleep until disarm the alarms. e.g. schedule123456 1h Cancel: After the tracker awake, send “noschedule+password” to deactivate the function. e.g. noschedule123456 22.5 No sleep mode Send SMS “sleep+password+space+off”, it will reply “sleep off ok”. Tracker won’t sleep and GSM, GPS, LED always work Sleep123456 off IV. Alarm Function and settings All the alarms will be send to all the authorized phone numbers once the alarms are triggered in SMS mode, if the tracker keep in triggered status and alarms are not be cancelled, tracker will keep sending alarms to authorized phone numbers every 3 minutes. If tracker works in GPRS mode instead of SMS mode, tracker will send alarms to web based server. 1. GEO-FENCE 1.1 Set up a geo-fence for the tracker device to restrict its movements within a district. The unit will send SMS to the authorized numbers when it goes out of this district. Set up: When the unit stays immobile in a place for 3-10 minutes, the user can send SMS “stockade+password+space+latitude,longitude;latitude,longitude” to unit to set the restricted district. In case of breach, it will send SMS “stockade!+geo-info” to the authorized numbers. Tracker will stop sending alarm if tracker returns to the fence after 16 geo-fence triggered Latitude and longitude format is like dd.dddddd, the decimal is 6 digits, latitude of south or longitude of west please add"-" before it. The first latitude & longitude is coordinate of the top left corner of the Geo-fence, while the second latitude & longitude is the coordinate of the bottom right corner 1.2 Cancel: Send SMS “nostockade+password” to deactivate this function. 2 MULTI-AREA MANAGEMENT 2.1 Set Area Send SMS command "area+password+space+latitude,longitude+space+areaname,distanceM" to tracker(distance unit: M for meter, K for kilometer), it will reply "area01 ok". Example: Send "area123456 22.353648,113.543678 school,800M". Note: 5 areas at most and the distance between two points can't be less than the total distance in the 2 commands, and different areas can't cover each other. 2.2 Delete areas Send SMS command:"noarea+password+space+area name", tracker will reply:"noarea ok". 2.3 Rename and set distance Send SMS command "rename+password+space+old name;new name,distanceM" to tracker, if name is not repeated and area doesn't cover others, it will reply "rename ok!" for successful configuration. Example: Send"rename123456 area01;school,800M", it means the new area name is "school", and covers area of a radius of 800 meters. 2.4 Activate multi-area management Send SMS command "area+password+space+on" to tracker, it will reply "Area on ok!", when tracker enter the pre set area, it will send SMS "area name+latitude & longitude" to all the authorized phone number, and send same SMS when goes out of the area. 2.5 Deactivate Multi-area management Send SMS command "area+password+space+off" to tracker, it will reply "area off ok!" 3 MOVEMENT ALARM 3.1 Set up: when the unit stays immobile in a place for 3-10 minutes with GPS signal reception, the user can send SMS“move+password+space+0200” to the tracker (Suppose area of a radius of 200 meters, it supports 4 digits at most. Unit: Meter). It will reply “move OK”. In case of such a movement (the default distance is 200m), it will send SMS “Move+ latitude & longitude” to the authorized numbers at 3 minutes interval. 3.2 Cancel: Send SMS “nomove+password” to deactivate the movement alarm. 17 4. OVER SPEED ALARM 4.1 Over speed alarm will be triggered when tracker exceed the speed you setup. Setup: Send SMS “speed+password+space+speed” to tracker device and it will reply “speed ok!”, it means you have set up over speed alarm successfully. For example: “speed123456 080” 080 refers to 80km/h, when tracker’s speed exceed 80km/h, tracker will send SMS “speed+080!+ Geo-info” to authorized numbers. 4.2 Cancel: Send SMS “nospeed+password” to deactivate the over speed alarm. Remark: The recommended speed should be not less than 30km/h. For below that rate, it will be effected the accuracy by gps signals drift etc. 5. ACCIDENT ALARM (OPTION) 5.1 .When tracker detects accident occurred (severe impact) during normal driving, it will send “Accident! + latitude & longitude " to all authorized phone numbers. 5.2 This function is active by default. To disable this functions, send "Accident+password+space+off" to tracker. 5.3. Send "Accident+password+space+on" to tracker, when need to active this function. 6. SHOCK SENSOR ALARM 6.1 Setup: Shock sensor alarm is deactivated in default settings. If needed, please send SMS “shock+password” to tracker device, and it will reply “Shock is activated!”, it means shock sensor alarm has set up successfully. When the tracker detect vibration, it will send SMS “Sensor alarm+Geo-info” to authorized numbers. Note: Shock sensor detect vibration one time for each 3 minutes, it will start to detect the second shock sensor alarm 3 minutes after the first alarm. 6.2 Cancel: Send "noshock+password" to cancel the shock sensor alarm. 6.3 Shock sensor sensitivity configuration: The sensitivity of the built-in shock sensor has three different level: First level: Alarm will be triggered after detect slight vibration, send command" sensitivity+password+space+1" . Second level: Alarm will be triggered after detect 8 times vibration in 2 seconds, send command" sensitivity+password+space+2". Third level: Alarm will be triggered after detect 25 times vibration in 5 seconds, send command" sensitivity+password+space+3". 7. SOS Long Press the SOS button for 3 seconds, the tracker device will send SMS “help me!+lat./long. to all the authorized numbers in 3 minutes interval. It will stop sending SMS “help me” when received a reply from any one of the authorized numbers. 8. Low battery alarm 18 8.1 Send SMS “lowbattery+password+space+on”, it will send SMS “low battery+latitude/longitude” to authorized numbers 2 times in total in 15 minutes interval when voltage of battery is going to be about 3.55V. 8.2 This function activates as default, send SMS “lowbattery+password+space+off” to deactivate. 9. Power off alarm 9.1 This function deactivate as default, send “ extpower+password+space+on” to activate, it will send SMS “power alarm+latitude/longtitude” to authorized numbers every 3 minutes when external power is cut off. 9.2 Cancel: Send SMS “ extpower+password+space+off” to deactivate it. 10. GPS blind Spot alert 10.1 This function deactivates as default, send SMS “gpssignal+password+space+on”, it will send alert SMS “no gps+last valid latitude/longitude before lost signal” 10.2 Send SMS “gpssignal+password+space+off” to deactivate. V. TCP/UDP switch Command:"gprs+password,1,1" switch to UDP mode. Command: "gprs+password,0,0" switch back to TCP mode, this is the default mode. VI. Configure parameters by USB Connect tracker to computer with the USB cable (option), and open with notepad and operate it according to the examples. Note: Correct password is need every time you configure the tracker. VII. GPRS Setting User must send SMS via cell phone to set up APN, IP and port before starting tracking by GPRS. Please setup according to following steps 7.1 SETTING UP APN Send SMS “APN+password+space+APN”, the tracker will reply “APN OK” is succeeded. For example: Send SMS “ APN123456 CMNET”. Note: CMNET is the APN of china GSM network, the APN varies with different GSM network operator in different countries, please check with your local GPRS network 19 operator to get the correct APN. 7.2 GPRS USER NAME AND PASSWORD SETUP In most countries, the user name and password involving GPRS login are not compulsorily necessary, therefore, the entry can be skipped. For those countries requiring user name and password, please configure as following: Send SMS “up+password+space+user+space+password”, If succeeded, tracker will reply “user, password ok!”, for example: send SMS “up123456 jonnes 666666” Note: 123456 is password of tracker, jonnes is the user name for GPRS login, 666666 is the password for GPRS login. 7.3 IP AND PORT SETUP Send SMS “adminip+password+space+IP+space+port”, tracker will reply “adminip ok” if succeed. For example: send SMS “adminip123456 202.104.150.75 9000”, tracker will reply “adminip ok” if succeed. Note: 123456 is the password of tracker, and 202.104.150.75 is the ip, 9000 is the port. 7.4 SWITCH TO GPRS MODE 7.4.1 The default mode is “SMS”. 7.4.2 Send SMS “GPRS+password” to the unit, and it will reply “GPRS ok!” it means tracker device has switched to “GPRS” mode. 7.4.3 Send SMS “SMS+password” to the unit, it will reply “SMS ok!” and restore to “SMS” mode. 7.5 LESS GPRS TRAFFIC 7.5.1 Tracker will change to less GPRS traffic mode after parking 10 minutes, GPRS disconnect and connect again when alarm being triggered or start driving. 7.5.2 Activate this function: Send "less gprs123456 on", tracker will reply "less gprs on ok". 7.5.3 Deactivate this function: Send "less gprs123456 off", tracker will reply" less gprs off ok". Note: 123456 is the password of tracker, and replace it with the new if you have changed. 7.6 WEB PLATFORM AND MOBILE APP INSTRUCTIONS You must register your account at www.gpstrackerxy.com. before using the web service and the mobile APP, The user id and password for web platform and mobile APP is sa me. 7.6.1 Login www.gpstrackerxy.com. and choose the server to register to. 7.6.2 Filling the user id you like, password and the 15 digits IMEI of the tracker to complete the registration. 7.6.3 Login your account and you will see your tracker appears in the terminal list, but the status is offline (grey color). If you want to track more than one tracker in the same account, please click “system settings” “terminal management” to add more trackers. 7.6.4 Configure your tracker to web platform to track it online 20 Step I: Configure APN, please refers to 7.1 Step II: Configure user name and password of gprs, please refers to 7.2 Step III: Configure IP and port, please use the corresponding IP and port of the server you choose, refers to 7.3 for details. Step IV: Switch to GPRS mode, please refers to 7.4 Please wait about 1 minute after received “GPRS Ok”, then you will see you tracker become online (Green color), and now you can click the commands menu on the web platform or Mobile APP to configure the trackers. VIII. Cautions 1. 2. 3. 4. 5. 6. IX. Don’t put the unit in overheated or overcooled places. Handle carefully. Don’t vibrate or shake it violently. Clear the unit with a piece of dry cloth. Don’t clean in chemicals, detergent. Don’t paint the unit, this may cause some foreign materials left in between the parts. Don’t disassemble or refit the unit.。 Please read the user manual carefully before installation and operation, learn something more about the voltage range. Otherwise, it won’t work properly or destroy the product. Simple Faults & the Solutions Faults Fail to turn on Analyze Solution Battery power is low Connect with charger 1.GSM Antenna is not connect 1.Check GSM antenna connection well NO GSM signals 2. check SIMCARD installation 2. SIM card is not properly or change SIMCARD. placed Hang up Fail In existence of an authorized Please delete the authorized number or number, an unauthorized number initialize the unit. dials up the unit. Monitor Fail In existence of an authorized Please delete the authorized number or number, an unauthorized number initialize the unit. dials up the unit. GPS Fix Fail 1. GPS reception is poor. 1.Put GPS in an open area 2. GPS antenna is not connected 2.Check connection of GPS antenna well. 21 GPRS Connecting Fail XI. 1. APN, IP address and port may be wrong. 1, Configure APN, IP and port again. 2.No GPRS subscription 2, Subscribe GPRS service service 3, Topped up the SIMCARD. 3. No credit for the SIMCARD LED indicator status LED Indicator Power LED (Red) Status Red LED flash Low power Red LED ON Charging Red LED OFF Fully charged ON NO GSM reception GSM LED(Green) Quick flash for each second GSM Mode Slowly flash for each 3 seconds GPRS Mode OFF No GPS reception Quick flash for each second Good GPS reception GPS LED(Blue) 22