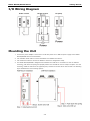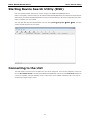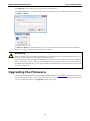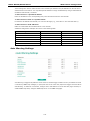
1
MGate W5108/W5208 Series Modbus/DNP3 Gateway User’s Manual Edition 1.0, October 2015 www.moxa.com/product © 2015 Moxa Inc. All rights reserved. MGate W5108/W5208 Series Modbus/DNP3 Gateway User’s Manual The software described in this manual is furnished under a license agreement and may be used only in accordance with the terms of that agreement. Copyright Notice © 2015 Moxa Inc. All rights reserved. Trademarks The MOXA logo is a registered trademark of Moxa Inc. All other trademarks or registered marks in this manual belong to their respective manufacturers. Disclaimer Information in this document is subject to change without notice and does not represent a commitment on the part of Moxa. Moxa provides this document as is, without warranty of any kind, either expressed or implied, including, but not limited to, its particular purpose. Moxa reserves the right to make improvements and/or changes to this manual, or to the products and/or the programs described in this manual, at any time. Information provided in this manual is intended to be accurate and reliable. However, Moxa assumes no responsibility for its use, or for any infringements on the rights of third parties that may result from its use. This product might include unintentional technical or typographical errors. Changes are periodically made to the information herein to correct such errors, and these changes are incorporated into new editions of the publication. Technical Support Contact Information www.moxa.com/support Moxa Americas Moxa China (Shanghai office) Toll-free: 1-888-669-2872 Toll-free: 800-820-5036 Tel: +1-714-528-6777 Tel: +86-21-5258-9955 Fax: +1-714-528-6778 Fax: +86-21-5258-5505 Moxa Europe Moxa Asia-Pacific Tel: +49-89-3 70 03 99-0 Tel: +886-2-8919-1230 Fax: +49-89-3 70 03 99-99 Fax: +886-2-8919-1231 Moxa India Tel: +91-80-4172-9088 Fax: +91-80-4132-1045 Table of Contents 1. Introduction ...................................................................................................................................... 1-1 Overview ........................................................................................................................................... 1-2 Package Checklist ............................................................................................................................... 1-2 Product Features ................................................................................................................................ 1-3 2. Getting Started ................................................................................................................................. 2-1 Connecting the Power ......................................................................................................................... 2-2 Connecting Serial Devices .................................................................................................................... 2-2 RS-485 Termination and Pull High/Low Resistors ............................................................................. 2-2 First Time Configuration ............................................................................................................... 2-3 Installing the Software ................................................................................................................. 2-3 Wiring Requirements ........................................................................................................................... 2-3 LED Indicators .................................................................................................................................... 2-4 Dimensions ........................................................................................................................................ 2-5 MGate W5108 ............................................................................................................................. 2-5 MGate W5208 ............................................................................................................................. 2-6 Adjustable Pull High/Low Resistors for the RS-485 Port ........................................................................... 2-6 Pin Assignments ................................................................................................................................. 2-7 I/O Wiring Diagram ............................................................................................................................. 2-8 Mounting the Unit ............................................................................................................................... 2-8 Specifications ..................................................................................................................................... 2-9 microSD Card ................................................................................................................................... 2-13 Backing Up a Configuration......................................................................................................... 2-13 Configuring an MGate (Mass deployment/Replacement) ................................................................. 2-13 microSD card Write Failure ......................................................................................................... 2-13 3. Device Search Utility ......................................................................................................................... 3-1 Installing the Software ........................................................................................................................ 3-2 Starting Device Search Utility (DSU) ..................................................................................................... 3-5 Connecting to the Unit......................................................................................................................... 3-5 Broadcast Search ........................................................................................................................ 3-6 Search IP ................................................................................................................................... 3-8 Locate ....................................................................................................................................... 3-8 Upgrading the Firmware ...................................................................................................................... 3-9 4. Web Console Configuration ............................................................................................................... 4-1 Overview ........................................................................................................................................... 4-2 Basic Settings .................................................................................................................................... 4-2 Network Settings ................................................................................................................................ 4-3 General Settings ......................................................................................................................... 4-3 WLAN Settings ............................................................................................................................ 4-4 Serial Settings .................................................................................................................................... 4-8 RTS Toggle ................................................................................................................................. 4-8 Protocol Settings ................................................................................................................................ 4-9 Protocol Assignment .................................................................................................................... 4-9 Protocol Settings ......................................................................................................................... 4-9 DNP3 Protocol .................................................................................................................................. 4-15 Raw TCP Socket ............................................................................................................................... 4-17 System Management ................................................................................................................. 4-20 System Monitoring ............................................................................................................................ 4-26 Serial Status ............................................................................................................................. 4-26 System Status .......................................................................................................................... 4-27 Protocol Status ......................................................................................................................... 4-30 Restart ............................................................................................................................................ 4-30 MXView ........................................................................................................................................... 4-30 MXconfig ......................................................................................................................................... 4-31 A. Federal Communication Commission Interference Statement ........................................................... A-1 1 1. Introduction Welcome to the MGate W5108/W5208 series WiFi Modbus/DNP3 gateways, which are used to connect Modbus or DNP3 serial devices to a wireless LAN. The MGate W5108/5208 series gateway is an ideal choice for connecting the Modbus/DNP3 serial devices to a wireless LAN. With IEEE 802.11a/b/g/n support, you can use fewer cables in difficult wiring environments. To ensure that your data transmissions are secure, the MGate W5108/5208 series gateway supports WEP/WPA/WPA2, and the rugged design is suitable for industrial application such as oil & gas, power, process automation, and factory automation. In this chapter, we give an introduction to the MGate W5108/W5208. The following topics are covered: Overview Package Checklist Product Features MGate W5108/W5208 Series Introduction Overview The MGate W5108/W5208 wireless Modbus/DNP3 protocol gateways provide maximum flexibility for integrating industrial Modbus/DNP3 networks of all types and sizes. The MGate W5108/W5208 gateways are designed to integrate Modbus TCP, ASCII, and RTU devices in almost any master and slave combination, including serial master to serial slave, or simultaneous serial and Ethernet masters. The gateways also support protocol conversion between DNP3 serial to DNP3 IP. A special priority control feature allows urgent commands to get an immediate response. All models are ruggedly constructed and are DIN-rail mountable, and some models support a wide operating temperature. Windows-Based Utility and Web Console for Easy Setup A Windows-based utility is provided to make it easy to search for and locate devices, assign IP addresses, import/export configuration files, and upgrade the the MGate W5108/W5208’s firmware. The utility automatically connects to all available MGate W5108/W5208 units on the LAN. A user-friendly web console is provided to configure the device from a web browser. Package Checklist All models in the MGate W5108/W5208 series are shipped with the following items: Standard Accessories • 1 MGate W5108 or MGate W5208 WiFi gateway • 1 antenna • Documentation and software CD • Quick installation guide (printed) • Product warranty statement Optional Accessories NOTE • Mini DB9F-to-TB Adapter: DB9 female to terminal block adapter for RS-422/485 applications • WK-51-01: Wall mounting kit • DR-4524: 45W/2A DIN rail 24 VDC power supply with universal 85 to 264 VAC input • DR-75-24: 75W/3.2A DIN rail 24 VDC power supply with universal 85 to 264 VAC input • DR-120-24: 120W/5A DIN rail 24 VDC power supply with 88 to 132 VAC/176 to 264 VAC input by switch Notify your sales representative if any of the above items are missing or damaged. 1-2 MGate W5108/W5208 Series Introduction Product Features • Retrieve Modbus/DNP3 serial data through an 802.11 network • Serial tunneling communication (supports TCP Server/Client modes) • Slave mode supports 16 TCP masters and up to 31 or 62 serial slaves at the same time • Embedded Modbus traffic monitor • Dual DC power inputs for redundancy and relay output supported • Secure data access with WEP/WPA/WPA2 • 2 kV serial port isolation • microSD card for configuration backup and event log • -40 to 75°C wide operating temperature models available • Supports 2 digital inputs and 2 digital outputs 1-3 2 2. Getting Started This chapter provides basic instructions for installing the MGate W5108/W5208. The following topics are covered in this chapter: Connecting the Power Connecting Serial Devices RS-485 Termination and Pull High/Low Resistors First Time Configuration Installing the Software Wiring Requirements LED Indicators Dimensions MGate W5108 MGate W5208 Adjustable Pull High/Low Resistors for the RS-485 Port Pin Assignments I/O Wiring Diagram Mounting the Unit Specifications microSD Card Backing Up a Configuration Configuring an MGate (Mass deployment/Replacement) microSD card Write Failure MGate W5108/W5208 Series Getting Started Connecting the Power The unit can be powered by connecting a power source to the terminal block. 1. We recommend using 24 to 16 AWG wire. Strip 9 to 10 mm of insulation off the end of the wire before inserting it into the terminal block hole. 2. The power input range is from 12 to 48 VDC. To remove the wire from the terminal block, use a flathead screwdriver to push the orange slot next to the terminal block hole, and then pull the wire out. Note that the unit does not have an on/off switch. It automatically turns on when it receives power. The PWR LED on the front panel will glow to indicate that the unit is receiving power. There are two DC power inputs for redundancy. WARNING This product is intended to be supplied by a Listed Direct Plug-In Power Unit Tma = 75°C. If you need assistance with purchasing a power supply, please contact Moxa for information. Connecting Serial Devices The unit’s serial port(s) are located on the front panel. If you are connecting an RS-485 multidrop network with multiple devices, note the following: • All devices that are connected to a single serial port must use the same protocol (i.e., either Modbus RTU, Modbus ASCII, or DNP3). • Each master device must connect to its own port on the unit. If you are connecting to a network with both master and slave devices, the master must be connected to a separate port from the slaves. For serial port pin assignments, refer to the Pin Assignments section. RS-485 Termination and Pull High/Low Resistors In some critical RS-485 environments, you may need to add termination resistors to prevent the reflection of serial signals. When using termination resistors, it is important to set the pull high/low resistors correctly so that the electrical signal is not corrupted. For each serial port, DIP switches or jumper settings are used to set the pull high/low resistor values. A built-in 120 Ω termination resistor can also be enabled. To modify the termination and pull high/low resistor settings, refer to the hardware reference chapter for your model. ATTENTION Do not use the 1 KΩ pull high/low setting on the MGate W5108/W5208 when using the RS-232 interface. Doing so will degrade the RS-232 signals and reduce the effective communication distance. 2-2 MGate W5108/W5208 Series Getting Started First Time Configuration To configure the gateway for the first time, use an Ethernet cable to connect the 10/100BaseT Ethernet port located on the front panel to a PC. The unit’s Link LED will light up to indicate a live Ethernet connection. To connect to the MGate to the web console, open a web browser and enter the MGate gateway's IP address. http://<MGate IP address> The default IP address is 192.168.127.254. The default user name and password are Admin and Moxa, respectively. The welcome page shows information relevant to the gateway. Installing the Software If you are unable to log in to the unit, you can use the Moxa Device Search Utility to search for the unit. The Device Search Utility (DSU) can be installed from the Documentation and Software CD. Follow the onscreen instructions after inserting the CD. For additional details, refer to Chapter 3: Device Search Utility. Wiring Requirements ATTENTION Safety First! Be sure to disconnect the power cord before installing and/or wiring your MGate W5108/W5208. Wiring Caution! Calculate the maximum possible current in each power wire and common wire. Observe all electrical codes dictating the maximum current allowable for each wire size. If the current goes above the maximum ratings, the wiring could overheat, causing serious damage to your equipment. Temperature Caution! Be careful when handling the MGate W5108/W5208. When plugged in, the MGate W5108/W5208’s internal components generate heat, and consequently the board may feel hot to the touch. 2-3 MGate W5108/W5208 Series Getting Started You should also observe the following common wiring rules: • Use separate paths to route wiring for power and devices. If power wiring and device wiring paths must cross, make sure the wires are perpendicular at the intersection point. NOTE: Do not run signal or communication wiring and power wiring in the same wire conduit. To avoid interference, wires with different signal characteristics should be routed separately. • You can use the type of signal transmitted through a wire to determine which wires should be kept separate. The rule of thumb is that wiring that shares similar electrical characteristics can be bundled together. • Keep input wiring and output wiring separate. • When necessary, we strongly advise labeling wiring to all devices in the system. LED Indicators Name Color Function PWR 1, PWR Green Power is being supplied to the power input. 2 Off Power cable is not connected. Ready Green Steady on: Power is on and unit is functioning normally. Red Steady on: Power is on and the unit is booting up. Blinking: Unit is responding to DSU’s locate function. Blinking: IP conflict, DHCP, or BOOTP server did not respond properly, or a relay output occurred. Off P1, P2 Ethernet WLAN Power is off. Green Serial port is transmitting data. Amber Serial port is receiving data. Off Data is not being transmitted. Green Indicates a 100 Mbps Ethernet connection. Amber Indicates a 10 Mbps Ethernet connection. Off Ethernet cable is disconnected. Green Steady On: Unit is properly connected with the AP. Red Indicates an IP conflict, or DHCP or BOOTP server is not responding properly. Green 3 LEDs = signal strength is between 67% and 100%. Blinking: Unit is trying to connect to the AP. RF 2 LEDs = signal strength is between 34% and 66%. 1 LED = signal strength is between 0% and 33%. 2-4 MGate W5108/W5208 Series Getting Started Dimensions MGate W5108 2-5 MGate W5108/W5208 Series Getting Started MGate W5208 Adjustable Pull High/Low Resistors for the RS-485 Port In some critical environments, you may need to add termination resistors to prevent the reflection of serial signals. When using termination resistors, it is important to set the pull high/low resistors correctly so that the electrical signal is not corrupted. The MGate W5108/W5208 uses DIP switches to set the pull high/low resistor values for each serial port. Tear open the screws and find the DIP switches located at the back side of the PCB. To add a 120 Ω termination resistor, set switch 3 on the port’s assigned DIP switch to ON; set switch 3 to OFF (the default setting) to disable the termination resistor. To set the pull high/low resistors to 150 KΩ, set switches 1 and 2 on the port’s assigned DIP switch to OFF. This is the default setting. To set the pull high/low resistors to 1 KΩ, set switches 1 and 2 on the port’s assigned DIP switch to ON. ATTENTION Do not use the 1 KΩ pull high/low setting on the MGate W5108/W5208 when using the RS-232 interface. Doing so will degrade the RS-232 signals and reduce the effective communication distance. 2-6 MGate W5108/W5208 Series Getting Started Pin Assignments The MGate W5108/W5208 uses DB9 serial ports to connect to Modbus RTU/ASCII or DNP3 devices. Each port supports three serial interfaces that select by software: RS-232, RS-422, and RS-485 (both 2 and 4-wire). RJ45 (Ethernet) Pin Ethernet 1 Tx+ 2 Tx- 3 Rx+ 4 – 5 – 6 Rx- 7 – 8 – Male DB9 (Serial port) Pin RS-232 RS-422/RS-485-4W RS-485-2W 1 2 DCD TxD-(A) – RxD TxD+(B) – 3 TxD RxD+(B) Data+(B) 4 DTR RxD-(A) Data-(A) 5 GND GND GND 6 DSR – – 7 RTS – – 8 CTS – – 9 – – – Power Input and Relay Output Pinouts V2+ V2- DC Power Input 2 DC Power Input 2 N.O. Common N.C. V1+ V1- DC Power Input 1 DC Power Input 1 DI/DO Pinouts COM DI0 DI1 GND DO0 DO1 Common Digital Input 0 Digital Input 1 Ground Digital Output 0 Digital Output 1 2-7 MGate W5108/W5208 Series Getting Started I/O Wiring Diagram DI Dry Contact DI Wet Contact DO (Sink) Mounting the Unit 1. Connect the power adaptor. Connect the 12–48 VDC power line or DIN-rail power supply to the MGate W5108/W5208 device’s terminal block. 2. Use a Modbus serial cable to connect the MGate to a Modbus slave device. 3. Use an Ethernet cable to connect the MGate to the PC for configuration setup. 4. The MGate W5108/W5208 is designed to be attached to a DIN rail or mounted on a wall. For DIN rail mounting, push down the spring and properly attach it to the DIN rail until it “snaps” into place. For wall mounting, install the wall mount kit (optional) first, and then screw the device onto the wall. The following figure illustrates the two mounting options: 2-8 MGate W5108/W5208 Series Getting Started Specifications Ethernet Interface Protocols: Modbus TCP, DNP3, TCP Server/Client modes supported Number of Ports: 1 Speed: 10/100 Mbps, Auto MDI/MDIX Connector: 8-pin RJ45 Magnetic Isolation Protection: 1.5 kV (built-in) Serial Interface Protocols: Modbus RTU/ASCII Master/Slave, DNP3 Number of Ports: MGate W5108: 1 MGate W5208: 2 Serial Standards: RS-232/422/485, software selectable Connectors: DB9 male Pull High/Low Resistor for RS-485: 1 kΩ, 150 kΩ Terminator for RS-485: 120 Ω Isolation: 2 kV (built-in) Serial Communication Parameters Data Bits: 7, 8 Stop Bits: 1, 2 Parity: None, Even, Odd, Space, Mark Flow Control: RTS/CTS, XON/XOFF (for RAW TCP only), RTS Toggle (for RS-232 only) Baudrate: 50 bps to 921.6 Kbps Serial Signals RS-232: TxD, RxD, RTS, CTS, DTR, DSR, DCD, GND RS-422: Tx+, Tx-, Rx+, Rx-, GND RS-485-4w: Tx+, Tx-, Rx+, Rx-, GND RS-485-2w: Data+, Data-, GND Wireless Network Standards Compliance: 802.11a/b/g/n Network Modes: Infrastructure, Ad-Hoc Transmission Rate: 802.11a/g: 65, 54, 48, 36, 24, 18, 12, 9, 6 Mbps, auto rate 802.11b: 11, 5.5, 2, 1 Mbps, auto rate 802.11n 2.4 GHz: HT20, MCS 0-7 802.11n 5 GHz: HT20 & HT40 MCS 0-7 Transmission Distance: Up to 100 meters (in open areas) Antenna Connector: Reverse SMA TX Transmit Power (per antenna port): 2.4 GHz • 802.11b: 1 to 11 Mbps, Typ. 16 (±1.5 dBm) • 802.11g: 6 to 36 Mbps, Typ.16 (±1.5 dBm) 48 Mbps, Typ. 15 (±1.5 dBm) 54 Mbps, Typ. 14 (±1.5 dBm) • 802.11n (20 MHz): MCS0-3: Typ. 16 dBm (± 1.5 dBm) MCS4-5: Typ. 14 dBm (± 1.5 dBm) MCS6-7: Typ. 12 dBm (± 1.5 dBm) 2-9 MGate W5108/W5208 Series Getting Started 5 GHz • 802.11a: 6 to 36 Mbps, Typ.15 (±1.5 dBm) 48 Mbps, Typ. 15 (±1.5 dBm) 54 Mbps, Typ. 14 (±1.5 dBm) • 802.11n (20/40 MHz): MCS0-3: Typ. 15 dBm (± 1.5 dBm) MCS4-5: Typ. 14 dBm (± 1.5 dBm) MCS6-7: Typ. 12 dBm (± 1.5 dBm) RX Sensitivity: 2.4 GHz • 802.11b: -92 dBm @ 1 Mbps, -88 dBm @ 2 Mbps, -87 dBm @ 5.5 Mbps, -84 dBm @ 11 Mbps • 802.11g: -91 dBm @ 6 Mbps, -90 dBm @ 9 Mbps, -88 dBm @ 12 Mbps, -86 dBm @ 18 Mbps, -80 dBm @ 24 Mbps, -80 dBm @ 36 Mbps, -74 dBm @ 48 Mbps, -73 dBm @ 54 Mbps • 802.11n(20MHz): -89 dBm @ MCS0 -87 dBm @ MCS1 -85 dBm @ MCS2 -81 dBm @ MCS3 -78 dBm @ MCS4 -74 dBm @ MCS5 -73 dBm @ MCS6 -71 dBm @ MCS7 5 GHz • 802.11a: -91 dBm @ 6 Mbps, -90 dBm @ 9 Mbps, -88 dBm @ 12 Mbps, -86 dBm @ 18 Mbps, -82 dBm @ 24 Mbps, -81 dBm @ 36 Mbps, -75 dBm @ 48 Mbps, -74 dBm @ 54 Mbps • 802.11n (20MHz): -89 dBm @ MCS0 -87 dBm @ MCS1 -85 dBm @ MCS2 -81 dBm @ MCS3 -78 dBm @ MCS4 -74 dBm @ MCS5 -73 dBm @ MCS6 -71 dBm @ MCS7 2-10 MGate W5108/W5208 Series Getting Started • 802.11n (40MHz): -85 dBm @ MCS0 -84 dBm @ MCS1 -81 dBm @ MCS2 -77 dBm @ MCS3 -75 dBm @ MCS4 -70 dBm @ MCS5 -69 dBm @ MCS6 -67 dBm @ MCS7 Spread Spectrum and Modulation (Typical): OFDM (54, 48, 36, 24, 18, 12, 9, 6 Mbps) OFDM (MCS0, MCS1, MCS2, MCS3 MCS4, MCS5, MCS6, MCS7) CCK (11 Mbps, 5.5 Mbps) DQPSK (2 Mbps) DBPSK (1 Mbps) Operating Channels (Central frequency): • US: 2.412 to 2.462 GHz (11 channels) 5.180 to 5.240 (4 channels) 5.260 to 5.320 (4 channels) 5.500 to 5.700 GHz (8 channels, excludes 5.600 to 5.640 GHz) 5.745 to 5.825 GHz (5 channels) • EU: 2.412 to 2.472 GHz (13 channels) 5.180 to 5.240 (4 channels) 5.260 to 5.320 (4 channels) 5.500 to 5.700 GHz (11 channels) • JP: 2.412 to 2.484 GHz (14 channels, DSSS) 5.180 to 5.240 (4 channels) 5.260 to 5.320 (4 channels) 5.500 to 5.700 GHz (11 channels) Digital Input/Output Number of DI/DO: 2 DIs and 2 DOs Connectors: 6-pin terminal blocks Digital Input: • Dry Contact Level: On: Short to GND Off: Open • Wet Contact Level (Source type), (COM to DI): Sensor Type: NPN Off: +3 VDC max. On: +10 to 30 V Digital Output (Sink Type): On: Short to GND Off: OPEN to GND Driver Current: Max. 200 mA per channel On-state voltage: 24 VDC nominal, open collector to 30 V Storage Card Slot: 1 microSD (SDHC) card slot supports up to 32 GB 2-11 MGate W5108/W5208 Series Getting Started Software Configuration Options: Web console, Serial console, Telnet console Utilities: Device Search Utility (DSU) for Windows 95, 98, ME, NT, 2000, Windows XP, Server 2003, Vista, Server 2008 (x86/x64), Windows Server 2008 R2, Windows 7/8/8.1 (x86/x64), Windows Server 2012 (x64), Windows 2012 R2 Network protocols: TCP/IP, UDP, HTTP, SMTP, NTP, DNS, DHCP Client, SNMP (v1, v2, v3), Private MIB, ARP, Telnet Security Authentication: WEP encryption ( 64 or 128 bit), WPA / WPA2-Personal and Enterprise (IEEE 802.1X/RADIUS, TKIP and AES) Encryption: 128-bit TKIP/AES-CCMP EAP-TLS, PEAP/GTC, PEAP/MD5, PEAP/MSCHAPV2, EAP-TTLS/PAP, EAP-TTLS/CHAP, EAP-TTLS/MSCHAP, EAP-TTLS/MSCHAPV2, EAP-TTLS/EAP-MSCHAPV2, EAP-TTLS/EAP-GTC, EAP-TTLS/EAP-MD5, LEAP Physical Characteristics Housing: Metal (IP30) Weight: MGate W5108: 589 g MGate W5208: 738 g Dimensions: MGate W5108: 45.8 x 105 x 134 mm (1.8 x 4.13 x 5.28 in) MGate W5208: 59.6 x 101.7 x 134 mm (2.35 x 4 x 5.28 in) Environmental Limits Operating Temperature: Standard Models: 0 to 60°C (32 to 140°F) Wide Temp. Models: -40 to 75°C (-40 to 167°F) Storage Temperature: -40 to 85°C (-40 to 185°F) Ambient Relative Humidity: 5 to 95% (non-condensing) Power Requirements Input Voltage: 9 to 60 VDC Power Connector: Terminal block Power Consumption: 495 mA @ 9 V 202 mA @ 24 V 114 mA @ 48 V 99 mA @ 60 V Standards and Certifications Safety: UL 61010-2-201, EN 60950-1 Hazardous Location: UL/cUL, Class 1 Division 2, ATEX Zone 2, IECEx Note: Certification process is underway. Please contact a Moxa sales representative for details. EMC: EN 55022/24 EMI: FCC Part 15B Class A EMS: EN 61000-4-2 (ESD) Contact: 6 kV; Air: 8 kV EN 61000-4-3 (RS) 80 MHz to 1 GHz, 10 V/m EN 61000-4-4 (EFT) Power 4 kV; Signal 2 kV EN 61000-4-5 (Surge) Power 2 kV; Signal: 1 kV EN 61000-4-6 (CS) Level 3 EN 61000-4-8 (PFMF) Level 3 Shock: IEC 60068-2-27 Freefall: IEC 60068-2-23 Vibration: IEC 60068-2-6 Radio: EN 300328, EN 301893, TELECOM CE (ETSI EN 301 893, ETSI EN 300 328), ARIB RCR STD-33, ARIB STD-66 2-12 MGate W5108/W5208 Series Getting Started Reliability MTBF (mean time between failures): 668,518 hrs Alarm Functions: SMS, relay, e-mail Alert Tools: Built-in buzzer Warranty Warranty Period: 5 years Details: See www.moxa.com/warranty microSD Card The MGate W5108/W5208 series gateway is equipped a microSD card slot for easy configuration. The microSD card can be used to store an MGate’s system configuration settings and the MGate’s system log. In addition, a configuration stored on a microSD card can be uploaded automatically to an MGate. NOTE Inserting a microSD card into an MGates microSD slot results in one of two actions, depending on what kind of data is currently stored on the card: 1. If the microSD card contains a valid configuration file, the configuration will be automatically copied to the MGate. 2. If the microSD card does not contain a valid configuration file (e.g., if it’s empty), the MGate’s configuration will be copied to the microSD card. Backing Up a Configuration Use the following procedure to copy the configuration of an MGate gateway to a microSD card: 1. Use a PC to format the microSD card to support FAT file systems, and delete all of the data on the card. 2. Power off the MGate and insert the microSD card (make sure the microSD card is empty). 3. Power on the MGate. The current settings will be copied to the microSD card. 4. If you modify the MGate’s configuration using MGate Manager or the Web Console while the microSD card is installed in the gateway, your configuration changes will be automatically saved to the microSD card when you save the configuration. Configuring an MGate (Mass deployment/Replacement) Use the following procedure to copy the configuration stored on a microSD card to an MGate gateway for mass deployment or to replace a faulty unit: 1. Power off the MGate device (often a new device) and insert the microSD card. 2. Power on the MGate device. 3. The configuration file stored on the microSD card will be copied automatically to the MGate gateway. microSD card Write Failure The following events will cause the microSD card to experience a write failure. 1. The microSD card has less than 20 MB of free space. 2. The MGate configuration file is read-only. 3. The microSD card’s file system is corrupted. 4. The microSD card is damaged. 2-13 MGate W5108/W5208 Series Getting Started The MGate gateway will halt the write action if any of the above conditions exists. The MGate’s Ready LED will flash and the beeper will sound to inform the user of the write failure. If you are replacing the microSD card, the microSD card will be synchronized with the configurations stored on the MGate device. Note that the microSD card should not contain any configuration files; otherwise, the configuration will be copied from the microSD card to the MGate device. WARNING If your intention is to back up the configuration of an MGate gateway, it is best practice to only insert an empty microSD card into the microSD slot. If the card contains a valid configuration file, that configuration will automatically (without warning) overwrite the MGate’s current configuration. 2-14 3 3. The following topics are covered in this chapter: Installing the Software Starting Device Search Utility (DSU) Connecting to the Unit Broadcast Search Search IP Locate Upgrading the Firmware Device Search Utility MGate W5108/W5208 Series Device Search Utility Installing the Software The following instructions explain how to install the Device Search Utility (abbreviated DSU), a utility for configuring and monitoring MGate W5108/W5208 units over the network. 1. Insert the Document and Software CD into the CD-ROM drive. Locate and run the following setup program to begin the installation process: dsu_setup_[Version]_Build_[DateTime].exe The latest version might be named dsu_setup_Ver2.0_Build_xxxxxxxx.exe, for example: 2. You will be greeted by the Welcome window. Click Next to continue. 3. When the Select Destination Location window appears, click Next to continue. You may change the destination directory by first clicking on Browse.... 3-2 MGate W5108/W5208 Series Device Search Utility 4. When the Select Additional Tasks window appears, click Next to continue. You may select Create a desktop icon if you would like a shortcut to DSU on your desktop. 5. Click Install to start copying the software files. 3-3 MGate W5108/W5208 Series Device Search Utility 6. A progress bar will appear. The procedure should take only a few seconds to complete. 7. A message will indicate that DSU is successfully installed. You may choose to run it immediately by selecting Launch DSU. 8. You may also open DSU through Start Programs MOXA DSU, as shown below. 3-4 MGate W5108/W5208 Series Device Search Utility Starting Device Search Utility (DSU) DSU is a Windows-based utility that is used to configure the MGate W5108/W5208 Series. Before running DSU, make sure that your PC and the MGate W5108/W5208 are connected to the same network. Alternatively, the MGate W5108/W5208 Series may be connected directly to the PC for configuration purposes. Refer to Chapter 2 for more details. You may open DSU from the Windows Start menu by clicking Start Programs MOXA DSU. The DSU window should appear as shown below. Connecting to the Unit The DSU needs to connect to the unit before the unit can be configured. There are two methods to connect to the unit. Broadcast Search is used to find all MGate W5108/W5208 units on the LAN. Search IP attempts to connect to a specific unit by IP address, which is useful if the unit is located outside the LAN or can only be accessed by going through a router. 3-5 MGate W5108/W5208 Series Device Search Utility Broadcast Search Click Search and a new Search window will pop up. 3-6 MGate W5108/W5208 Series Device Search Utility When the search is complete, every MGate W5108/W5208 found on the LAN will appear in the DSU window. The MAC address, IP address, and Firmware version of each unit will be shown. Select the one you would like to configure. 3-7 MGate W5108/W5208 Series Device Search Utility Search IP Click Search IP if you know the IP address of the unit and wish to connect to it directly. Enter the unit’s IP address and click OK. If the search is successful, the unit will be listed in the DSU window. Right click the unit to open a popup list of possible actions, or double click a unit to open the web console. Locate The Locate function will cause the unit to beep so you can determine which unit is the target. 3-8 MGate W5108/W5208 Series Device Search Utility The Assign IP function allows you to change the unit’s IP addresses. Use the Un-Lock function to execute Import, Export, and Upgrade actions. The default account and password are Admin and Moxa. To Import or Export the configuration file, click the icons to Import the configuration file from a laptop or Export the currently used unit’s configuration file to a laptop. ATTENTION If Search IP fails to locate the MGate W5108/W5208, the IP address that you entered might be incorrect. Try doing the search again and re-entering the IP address carefully. Another possibility is that the MGate W5108/W5208 is located on the same LAN as your PC, but on a different subnet. In this case, you can modify your PC’s IP address and/or netmask so that it is on the same subnet as the MGate W5108/W5208. After your PC and the MGate W5108/W5208 are on the same subnet, DSU should be able to find the unit. Upgrading the Firmware You can obtain the latest firmware for the MGate W5108/W5208 from www.moxa.com. After downloading the new firmware file to your PC, you can use the DSU to write it to your MGate W5108/W5208. Select the desired unit from the DSU list and then click Upgrade to begin the process. 3-9 4 4. Web Console Configuration The MGate W5108/W5208 provides a web console for easy configuration through a web browser such as Microsoft Internet Explorer or Google Chrome. The following topics are covered in this chapter: Overview Basic Settings Network Settings General Settings WLAN Settings Serial Settings RTS Toggle Protocol Settings Protocol Assignment Protocol Settings DNP3 Protocol Raw TCP Socket System Management System Monitoring Serial Status System Status Protocol Status Restart MXView MXconfig MGate W5108/W5208 Series Web Console Configuration Overview To connect to the MGate web console, open a web browser and enter the MGate gateway’s IP address. http://<MGate IP address> The default IP addresses is 192.168.127.254. If you are unable to log in to the unit, you can use the DSU to first search for the unit. Refer to the Device Search Utility. When the login page pops up, enter the account name and password. The default Account and Password are Admin and moxa, respectively The welcome page shows information relevant to the MGate W5108/W5208. Basic Settings Server Settings and Time Settings are shown on the Basic Settings page. Click Submit to save the current changes to the unit and click Save/Restart once all the settings have been changed. The unit will reboot immediately to use the new settings. 4-2 MGate W5108/W5208 Series Web Console Configuration Network Settings General Settings The Network tab is where the unit’s network settings are configured. You can modify the IP Configuration, IP Address, Netmask, Default Gateway, and DNS. Parameter Value Notes IP configuration Static IP, DHCP, BootP, or Select “Static IP” if you are using a fixed IP address. DHCP/BootP Select one of the other options if the IP address is set IP address 192.168.127.254 The IP (Internet Protocol) address identifies the server (or another 32-bit number) on the TCP/IP network. Netmask 255.255.255.0 Identifies the server as belonging to a Class A, B, or C (or another 32-bit number) network. 0.0.0.0 The IP address of the router that provides network (or another 32-bit number) access outside the server’s LAN. 0.0.0.0 This is the IP address of the primary domain name (or another 32-bit number) server. 0.0.0.0 This is the IP address of the secondary domain name (or another 32-bit number) server. dynamically. Gateway DNS server 1 DNS server 2 When you click the submit button, the system will reboot immediately to activate the changes to the network configuration. 4-3 MGate W5108/W5208 Series Web Console Configuration WLAN Settings The MGate can operate in Ad-hoc mode or Infrastructure Mode. For all wireless networking devices, there are two network types for communication with another wireless device. Devices that are configured for Ad-hoc Mode automatically detect and communicate directly with each other and do not require a wireless access point (AP) or gateway. Wireless devices that are configured for Infrastructure Mode do not communicate directly with each other, but through a wireless access point (AP). Devices must be configured for the same mode in order to communicate with each other. Devices in Ad-Hoc Mode will only recognize other devices in Ad-Hoc Mode, and likewise for devices in Infrastructure Mode. Parameter Value Notes Operation mode Auto, 802.11a, 802.11b/g This field determines which wireless standard will be Mixed, 802.11 a/n Mixed, used 802.11g/n Mixed. SSID (Text) This field specifies the SSID, or name, of the wireless network (SSID) that will be used by the MGate. In Ad-Hoc mode, wireless devices must use the same SSID in order to communicate with each other. Channel (Ad-hoc 1, 2, 3, 4, 5, 6, 7, 8, 9, 10, 11, The radio channel to use for the wireless network mode only) 12, 13 under Ad-hoc mode. 4-4 MGate W5108/W5208 Series Web Console Configuration Parameter Value Notes Authentication Open System, Shared Key, This field specifies how wireless devices will be WPA, WPA-PSK, WPA2, authenticated. If a RADIUS server is used, this setting WPA2-PSK must match the setting on the RADIUS server. Open System: The MGate will simply announce a desire to associate with another station or access point. No authentication is required. For Ad-hoc Mode, this is the only option for authentication, since Ad-hoc Mode was designed for open communication. Shared Key: This option is only available in Infrastructure Mode. Authentication involves a more rigorous exchange of frames to ensure that the requesting station is authentic. WEP encryption is required. WPA: This is a managed authentication option that is only available in Infrastructure Mode. WPA was created by the Wi-Fi Alliance, the industry trade group that owns the Wi-Fi trademark and certifies devices with the Wi-Fi name. Each user uses a unique key for authentication, distributed from an IEEE 802.1X authentication server, also known as a RADIUS server. This option is also referred to as WPA Enterprise Mode, since it is intended to meet rigorous enterprise security requirements. Tunneled authentication is supported, depending on the EAP method selected. WPA-PSK: This is an unmanaged authentication option that is only available in Infrastructure Mode. Instead of a unique key for each user, a pre-shared key (PSK) is manually entered on the access point to generate an encryption key that is shared among all users. Consequently, this method does not scale well for enterprise. A PSK that uses a mix of letters, numbers and non-alphanumeric characters is recommended. This option is also referred to as WPA Personal Mode, since it is designed for the needs and capabilities of small home and office WLANs. WPA2: This is a managed authentication option that is only available in Infrastructure Mode. WPA2 implements the mandatory elements of 802.11i. Supported encryption algorithms include TKIP, Michael, and AES-based CCMP, which is considered fully secure. Since March 13, 2006, WPA2 has been mandatory for all Wi-Fi-certified devices. This option may also be referred to as WPA Enterprise Mode. Tunneled authentication is supported, depending on the EAP method selected. WPA2-PSK: This is an unmanaged authentication option that is only available in Infrastructure Mode. It employs WP2 encryption algorithms but relies on a PSK for authentication. A PSK that uses a mix of letters, numbers and non-alphanumeric characters is recommended. This option can also be referred to as WPA Personal Mode. 4-5 MGate W5108/W5208 Series Web Console Configuration Parameter Value Notes Encryption Disable, WEP, TKIP, AES-CCMP This field specifies the type of encryption to use during wireless communication. Different encryption methods are available depending on the Authentication setting. Also, each encryption method has its own set of parameters that may also require configuration. Disable: No encryption is applied to the data during wireless communication. This option is only available if Authentication is set to Open System. WEP: Wired Equivalent Privacy (WEP) is only available for Open System and Shared Key authentication methods. Data is encrypted according to a key. The MGate supports both 64 and 128-bit keys. This method may deter casual snooping but is not considered very secure. TKIP: Temporal Key Integrity Protocol (TKIP) is only available for WPA, WPA2, WPA-PSK, and WPA2-PSK authentication methods. TKIP is part of a draft standard from the IEEE 802.11i working group and utilizes the RC4 stream cipher with 128-bit keys for encryption and 64-bit keys for authentication. TKIP improves on WEP by adding a per-packet key mixing function to de-correlate the public initialization vectors (IVs) from weak keys. AES-CCMP: This is a powerful encryption method that is only available for WPA, WPA2, WPA-PSK, and WPA2-PSK authentication methods. Advanced Encryption Standard (AES) is the block cipher system used by the Robust Secure Network (RSN) protocol and is equivalent to the RC4 algorithm used by WPA. CCMP is the security protocol used by AES, equivalent to TKIP for WPA. Data undergoes a Message Integrity Check (MIC) using a well-known and proven technique called Cipher Block Chaining Message Authentication Code (CBC-MAC). The technique ensures that even a one-bit alteration in a message produces a dramatically different result. Master keys are not used directly but are used to derive other keys, each of which expire after a certain amount of time. Messages are encrypted using a secret 128-bit key and a 128-bit block of data. The encryption process is complex, but the administrator does not need to be aware of the intricacies of the computations. The end result is encryption that is much harder to break than even WPA. WEP Key Length 64, 128 This field specifies the length of the WEP key. 64bits is the industry standard for WEP, but 128bits provides better protection. WEP key Index 1, 2,3,4 The primary WEP key to use for the WLAN 4-6 MGate W5108/W5208 Series Web Console Configuration Parameter Value Notes WEP key source Manual, Generate WEP keys by This field specifies whether the WEP key will be passphrase generated manually or through a user-specified passphrase. A passphrase is equivalent to a free-text password that will be used to generate the WEP key. A passphrase is typically easier to remember and enter than a long and complicated WEP key. WEP key 1~4 (text in ASCII or HEX) These fields are only available if WEP key source is set to “Manual”. Enter each WEP key in ASCII or HEX as specified in WEP key format. The number of characters required for each key depends on WEP key length and WEP key format. EAP Method TLS: Transport Layer Security (TLS) was created by TLS, PEAP, TTLS, LEAP Microsoft and accepted by the IETF as RFC 2716: PPP EAP TLS Authentication Protocol. Passwords and tunneled authentication are not used. A user certificate and user private key are used to identify the MGate. The MGate’s user certificate and user private key must already be installed on the RADIUS server. PEAP: Protected Extensible Authentication Protocol (PEAP) is a proprietary protocol which was developed by Microsoft, Cisco and RSA Security. TTLS: Tunneled Transport Layer Security (TTLS) is a proprietary protocol which was developed by Funk Software and Certicom, and is supported by Agere Systems, Proxim, and Avaya. TTLS is being considered by the IETF as a new standard. For more information on TTLS, read the draft RFC EAP Tunneled TLS Authentication Protocol. LEAP: Lightweight Extensible Authentication Protocol (LEAP) is a proprietary protocol which was developed by Cisco. LEAP doesn’t check certificate during the authentication process. Tunneled GTC, MD5, MSCHAP V2 (when The encryption method used during the authentication Authentication using PEAP) process. Different methods are available depending on PAP, CHAP, MSCHAP, MSCHAP the EAP Method setting V2, EAP-MSCHAP V2, EAP-GTC, EAP-MD5 (when using TTLS) Anonymous (Text) This field specifies the anonymous username to use username when initiating authentication. After the RADIUS Server has been verified by certificate, the true username and password will be used to complete the authentication process. Verify Server Disable: The certificate from the RADIUS server will Disable, Enable Certificate be ignored. Enable: The certificate from the RADIUS server will be used to authenticate access to the WLAN. The RADIUS server’s trusted server certificate must already be installed on the MGate. To install a trusted server certificate, visit the corresponding page in the System Management > Certificate folder. 4-7 MGate W5108/W5208 Series Web Console Configuration Parameter Value Notes Trusted Server (Text) This field is available for PEAP, TLS, and TTLS EAP Certificate. methods only. It displays information on the trusted server certificate that is installed on the MGate. To install a trusted server certificate, visit the corresponding page in the System Management > Certificate folder. Client Certificate (Text) This field is available only when EAP method has been set to TLS. It displays information on the user certificate that is installed on the MGate. To install a user certificate, visit the corresponding page in the System Management > Certificate folder. Client Private Key -- This field is available only when EAP method has been set to TLS. It displays information on the user private key on the MGate. Serial Settings The Serial tab is where each serial port’s communication parameters are configured. You can configure Baud Rate, Parity, Stop Bit, Flow Control, FIFO, Interface, RTS on delay, and RTS off delay. Parameter Value Baud Rate 50 bps to 921600 bps Parity None, Odd, Even, Space, Mark Stop Bits 1, 2 Flow Control None, RTS/CTS, DTR/DSR, RTS Toggle UART FIFO Enable, Disable Interface RS-232 RS-422 RS-485, 2W RS-485, 4W RTS On Delay 0 to 100 ms RTS Off Delay 0 to 100 ms RTS Toggle The RTS Toggle function is used for RS-232 mode only. This flow control mechanism is achieved by toggling the RTS pin in the transmission direction. When activated, data will be sent after the RTS pin is toggled ON for the specified time interval. After data transmission is finished, the RTS pin will toggle OFF for the specified time interval. 4-8 MGate W5108/W5208 Series Web Console Configuration Protocol Settings Detailed protocol settings for the communication protocols used by the gateway. Protocol Assignment The MGate W5108/W5208 series gateways support three kinds of communication protocols: Modbus, DNP3, and Raw TCP. For the MGate W5208 series, two serial ports can be set to different protocols. In Modbus mode, the MGate converts Modbus RTU/ASCII to Modbus TCP through the WiFi interface. In DNP3 mode, the MGate converts DNP3 serial to DNP3 IP through the WiFi interface. In addition, the MGate can be set to Raw TCP mode, which provides TCP server mode and TCP client mode to transmit raw data from the serial device to the Ethernet network. Protocol Settings You will see one or two protocol tabs, depending on the protocol assignment. Click on the protocol tab to see detailed settings. 4-9 MGate W5108/W5208 Series Web Console Configuration Modbus Protocol Choose from 4 detailed settings: Mode, Slave ID Map, Priority Control, and Advanced Settings. Mode Click on one of the serial ports to select the role of the Modbus serial device connected to that port. The following detailed Modbus settings page will appear when you click on one of the serial ports. Parameters Description Connected serial device Select the role of the device that is connected to the serial port. Response timeout According to the Modbus standard, the time it takes for a slave device to respond to a request is defined by the device manufacturer. Based on this response time, a master can be configured to wait a certain amount of time for a slave’s response. If no response is received within the specified time, the master will disregard the request and continue operation. This allows the Modbus system to continue operation even if a slave device is disconnected or faulty. The MGate W5108/W5208 can also auto-detect the response timeout. Instead of manually figuring out the appropriate setting, you can click “Auto Detection” to have the MGate figure out the setting for you. Once a value has been recommended, you can fine-tune it to get the best performance. If you would like to use a specific Modbus function and starting address, click method to select a specific setting. 4-10 MGate W5108/W5208 Series Web Console Configuration Parameters Description Inter-character timeout Use this function to determine the timeout interval between characters for Modbus (only for Modbus RTU) devices that cannot receive Rx signals within an expected time interval. If the response is timed out, all received data will be discarded. The MGate W5108/W5208 will automatically determine the timeout interval if the timeout value is set to 0. Inter-frame delay The users can determine the time-delay to transmit the data frame received from (only for Modbus RTU) the slave device to the upstream. The MGate W5108/W5208 will automatically determine the time interval if it is set to 0. Slave ID Map The Slave ID Map tab is where slave IDs are managed. The definitions on this tab determine how requests will be routed by the unit. To configure the Slave ID Map, double click the row of the serial port to configure, or click Edit to enter the settings page. How Slave IDs are Mapped on the MGate W5108/W5208 With the slave ID table, smart routing is achieved for units with multiple serial ports. Since each virtual slave ID is routed to a specific Modbus network, requests are not broadcast over all serial ports. This keeps communication efficient and prevents devices on one port from slowing down the entire system. When a Modbus master requests information from a Modbus slave device, the request is addressed to the desired slave’s ID, which must be unique on the network. When Modbus networks are integrated by a Modbus gateway, complications can arise if the same slave ID is being used on different networks. If this is not properly addressed, a request sent to that slave ID would receive more than one response, causing communication problems. With the MGate W5108/W5208, this situation is addressed by using a slave ID map. While configuring the MGate, users set up a range of “virtual” slave IDs that are mapped to slave devices on a specific Modbus network. To send a request to a slave device that is on a different Modbus network, a Modbus master would address the request to the appropriate (virtual) slave ID. The MGate then routes that request as specified by the slave ID map. For example, if a TCP master needs information from an ASCII slave, it addresses the request to the corresponding virtual slave ID as defined on the MGate’s slave ID map. The MGate identifies the request as within its virtual slave ID range and forwards the request to the Modbus ASCII by the device’s actual slave ID. Virtual slave IDs must not conflict with each other or with other TCP slave IDs. 4-11 MGate W5108/W5208 Series Web Console Configuration How Slave ID Map is Defined The slave ID map consists of entries (channels), the range of virtual ID versus real ID, and the destination of the serial port. Setting Value Notes This specifies the range of IDs that will be routed to the (numeric range from Virtual Slaves ID Range 1 to 254) selected set of slave devices. For example, you can specify that IDs between 8 and 24 be routed to the devices on Port 3. The ID 255 is reserved for the gateway itself This specifies the difference between the virtual slave ID Slave ID Offset (number between and the actual slave ID. If a slave’s virtual ID is 16 and the -253 and 253) actual ID is 5, you would set the offset to -11. This offset is applied to the entire range of virtual slave IDs. When a serial port is set to RTU slave or ASCII slave mode, a virtual ID range will already be created for you. Simple select the entry in the table and modify the range and offset as needed. For TCP slaves, you can add an entry that assigns a range of virtual IDs to a specific IP address, using the Remote TCP Slave IP setting. ATTENTION The MGate W5108/W5208 will disregard any request that is not addressed to a virtual slave ID on its slave ID map. If a device has not been assigned a virtual slave ID, it will not be accessible by masters on the other side of the Modbus gateway. Slave ID Map Example Suppose you have two ASCII slave devices on port 1 assigned to slave IDs 3 and 5. The MGate will automatically create a virtual ID range for port 1, which you will need to modify. If slave IDs 3 and 5 are already in use by TCP slaves, the virtual ID range should be set to IDs that are not in use, such as 20 through 22. In that case, you would specify a slave ID offset of -17, since that is the difference between the virtual ID range and the actual slave IDs. The formula is as follows: (Real Slave ID) - (Virtual Slave ID) = (Slave ID Offset) 3 - 20 = -17 With the slave ID map configured, a master that wants information from one of the ASCII slaves would address the request to slave ID 20 or 22. The MGate would identify that the request was addressed to a virtual slave ID in the slave ID map. The MGate would then forward the request to port 1, applying the -17 offset to obtain the actual ID of the desired device. 4-12 MGate W5108/W5208 Series Web Console Configuration Priority Control The Priority Control tab is where emergency requests are enabled and configured. Priority control is designed for requests that are sent to Modbus RTU/ASCII slaves. Since Modbus RTU/ASCII slaves cannot handle multiple requests, the Modbus gateway must send each request individually and wait for the response before sending the next request. As requests stack up, the response time can suffer. This can cause problems for certain critical requests that require an immediate response. With priority control, you can specify that certain requests are sent to the front of the queue for more immediate response times. Priority requests can be specified by master (IP address or serial port), TCP port, or command type (slave ID, function code, or data). When the Modbus gateway identifies a priority request, the request will immediately be placed at the front of the queue. To define a priority request, enable the appropriate priority scheme (i.e., Specified Masters, Specified TCP Port, or Specified Requests). Then, specify the parameter(s) that will indicate a priority request. Finally, click Add/Modify to apply this definition. (This last step is not necessary for Specified TCP Port.) Advanced Settings The Advanced Modbus tab is where certain adjustments can be made to fine tune the communication between different Modbus networks. You can configure Initial Delay, Modbus TCP Exception, Modbus TCP listen port, Modbus TCP Response Time-out, and Self-Slave ID for digital I/O control. 4-13 MGate W5108/W5208 Series Web Console Configuration Parameter Value Initial delay 0-30000 ms Modbus TCP exception Enable or Disable Modbus TCP listen port 1-65535 Modbus TCP response timeout 10-120000 ms Self-Slave ID for digital I/O control 1-255 Initial Delay Some Modbus slaves may take more time to boot up than other devices. For certain environments, this may cause the entire system to suffer from repeated exceptions during the initial boot-up. You can force the MGate to wait after booting up before sending the first request with the “Initial Delay” setting. Modbus TCP Exception The MGate W5108/W5208 is a protocol gateway that transparently passes requests and responses between the Ethernet and serial interfaces. In some situations, it may be necessary for the gateway to return an exception in response to a request from a Modbus TCP master. This is enabled or disabled with the “Modbus TCP Exception” setting. When enabled, the unit can return two types of exception: Exception Timeout Conditions There is no response from the slave. Maybe the device is off-line or the serial cable is broken. There are two situations that will result in this exception: Request dropped The request queue is full (32 request queue for each master) The destination ID not included in the slave ID map. Not all Modbus TCP masters require this exception, so it is up to you to determine if this setting should be enabled. Modbus TCP Listen Port Allow you to change Modbus TCP listen port from the default value (502). Modbus TCP Response Timeout According to the Modbus standard, the time that it takes for a slave device to respond to a request is defined by the device manufacturer. Based on this response time, a master can be configured to wait a certain amount of time for a slave’s response. If no response is received within the specified time, the master will disregard the request and continue operation. This allows the Modbus system to continue operation even if a slave device is disconnected or faulty. On the MGate W5108/W5208, the Modbus TCP response timeout field is used to configure how long the gateway will wait for a response from a Modbus ASCII or RTU slave. Refer to your device manufacturer’s documentation to manually set the response time-out. Self-Slave ID for Digital I/O Control The MGate supports 2 DIs and 2 DOs, which communicate using Modbus commands. The MGate is treated as a Modbus slave device with a user-selectable slave ID in the range 1 to 255. You can read the DI value by sending a Modbus read coil (01) command with address 0x0000 to the MGate. The DO state can be changed by sending a Modbus write single coil (05) with address 0x0010 to the MGate. 4-14 MGate W5108/W5208 Series Web Console Configuration DNP3 Protocol The MGate W5108/W5208 series gateways support DNP3 protocols. The MGate converts Outstation and Master’s data between DNP3 IP and DNP3 serial. If the serial port is connecting with an Outstation device, set the operation mode of the port as Outstation. On the contrary, if the serial port is connecting with a Master device, set the operation mode of the port as Master. Outstation and Master devices have a logical device address for identification in the DNP3 system. You need to set the address table to indicate the routing destination of DNP3 packet frames received by the gateway. A default device address routing table is shown in the Address table page. Double click on the intended row to edit the existing setting, or click on the intended row and click Edit to modify. For DNP3 packet frames from Ethernet side, you need to assign a serial port along with related ranges of DNP3 addresses to receive these DNP3 data packets. 4-15 MGate W5108/W5208 Series Web Console Configuration Similarly, for DNP3 packet frames coming from the serial side, you need to assign the DNP3 device’s address and IP address. The default IP address is 192.168.1.1; modify the IP address based on your DNP3 equipment settings. If there are multiple Master (or Outstation) devices on the Ethernet side, you will need to add these devices’ IP addresses and DNP3 addresses to the routing table. The gateway will drop a DNP3 packet frame if the destination DNP3 device address or IP address is not defined in the gateway. The default DNP3 TCP listen port is 20000; you can change it to any number between 1 and 65535. 4-16 MGate W5108/W5208 Series Web Console Configuration Raw TCP Socket The MGate W5108/W5208 series gateways support a raw data transmission mechanism for user-developed programs. It includes TCP Server mode and TCP Client mode. The timing for using these two modes depends on whether the connection is initiated from the gateway or from the network host. In TCP Server mode, the gateway is assigned an IP address that is unique on your TCP/IP network. The gateway waits for the host computer to establish a connection with it and then communicate to the attached serial device. In TCP Client mode, the gateway actively establishes a TCP connection to a specific network host when data is received from the attached serial device. After the data has been transferred, the gateway can automatically disconnect from the host computer based on the Inactivity time settings. Click on the operation mode of the target serial port for additional settings. 4-17 MGate W5108/W5208 Series Web Console Configuration Parameters Value Description TCP alive check time Default: 7 minutes This field specifies how long the MGate will wait for a 0~99 minutes response to “keep alive” packets before closing the TCP connection. The MGate checks connection status by sending periodic “keep alive” packets. Inactivity time 0 to 65535 ms This field specifies the time limit for keeping the connection open if no data flows to or from the serial device. Max connection 1 to 8 This field specifies the maximum number of connections that will be accepted by the serial port. Ignore jammed IP Disable/Enable This field specifies how an unresponsive IP address is handled when there are simultaneous connections to the serial port. Disable: All transmission will be suspended if one IP address becomes unresponsive. Transmission will only resume when all hosts have responded. Enable: Data transmission to the other hosts will not be suspended if one IP address becomes unresponsive. TCP port 1 to 65535 This field specifies the TCP port number that the serial port will use to listen to connections, and that other devices must use to contact the serial port. 4-18 MGate W5108/W5208 Series Web Console Configuration Parameters Value Description Connection goes down always low, This field specifies what happens to the RTS and DTR RTS/DTR always high signals when the Ethernet connection goes down. For some applications, serial devices need to know the Ethernet link status through RTS or DTR signals sent through the serial port. Always low: The selected signal will change to low when the Ethernet connection goes down. Always high: The selected signal will remain high when the Ethernet connection goes down. Packet length 0 to 1024 This field specifies the maximum amount of data that is allowed to accumulate in the serial port buffer before sending. 0: Packet length is disregarded and data in the buffer will be sent as specified by the delimiter settings or when the buffer is full. 1 to 1024: Data in the buffer will be sent as soon it reaches the specified length. Delimiter 1, Delimiter 2 Enable with 1 byte hex These fields are used to define special delimiter value character(s) for data packing. Enable Delimiter 1 to control data packing with a single character; enable both Delimiter 1 and 2 to control data packing with two characters received in sequence. When these fields are enabled, serial data will accumulate in the serial port’s buffer until the buffer is full or until the specified delimiter character(s) are received. For example, the carriage return character could be used as a delimiter in order to transmit each sentence or paragraph in a separate packet. Data will be packed according to Delimiter process. Delimiters must be incorporated into the data stream at the software or device level. Delimiter process Do Nothing, This field specifies how data is packed when delimiter Delimiter + 1, characters are received. This field has no effect if Delimiter + 2, Delimiter 1 is not enabled. Do nothing: Data accumulated in the serial port’s Strip Delimiter buffer will be packed, including delimiters. Delimiter + 1: One additional character must be received before the data in the serial port’s buffer is packed. Delimiter + 2: Two additional characters must be received before the data in the serial port’s buffer is packed. Strip Delimiter: Data accumulated in the serial port’s buffer will be packed, but the delimiter character(s) will be stripped from the data. 4-19 MGate W5108/W5208 Series Web Console Configuration Parameters Value Description Force transmit 0 to 65535 ms This field controls data packing by the amount of time that elapses between bits of data. When using this field, make sure that Inactivity time is disabled or set to a larger value. Otherwise the connection may be closed before the data in the buffer can be transmitted. 0: If serial data is not received, the MGate will wait indefinitely for additional data. 1 to 65535: If serial data is not received for the specified amount of time, the data that is currently in the buffer will be packed for network transmission. The optimal force transmit time depends on your application, but it must be at least larger than one character interval within the specified baudrate. For example, assume that the serial port is set to 1200 bps, 8 data bits, 1 stop bit, and no parity. In this case, the total number of bits needed to send a character is 10 bits, and the time required to transfer one character is 8.3 ms, so the force transmit time to be larger than 8.3 ms. System Management This configuration tab includes several system level settings. Most of these settings are optional. Accessible IP Settings 4-20 MGate W5108/W5208 Series Web Console Configuration These settings are used to restrict access to the module by IP address. Only IP addresses on the list will be allowed access to the device. You may add a specific address or range of addresses by using a combination of IP address and netmask, as follows: To allow access to a specific IP address Enter the IP address in the corresponding field; enter 255.255.255.255 for the netmask. To allow access to hosts on a specific subnet For both the IP address and netmask, use 0 for the last digit (e.g., “192.168.1.0” and “255.255.255.0”). To allow access to all IP addresses Make sure that Enable the accessible IP list is not checked. Additional configuration examples are shown in the following table: Desired IP Range IP Address Field Netmask Field Any host Disable Enable 192.168.1.120 192.168.1.120 255.255.255.255 192.168.1.1 to 192.168.1.254 192.168.1.0 255.255.255.0 192.168.1.1 to 192.168.255.254 192.168.0.0 255.255.0.0 192.168.1.1 to 192.168.1.126 192.168.1.0 255.255.255.128 192.168.1.129 to 192.168.1.254 192.168.1.128 255.255.255.128 Auto Warning Settings Auto Warning is triggered by different events. When a checked trigger condition occurs, the MGate can send e-mail alters, SNMP Trap messages, or open/close the circuit of the relay output and trigger the Fault LED to start blinking. To enable an e-mail alert, configure the e-mail address on the E-mail Alert page. Likewise, to enable SNMP Trap alerts, configure SNMP trap server on the SNMP Trap page. 4-21 MGate W5108/W5208 Series Web Console Configuration Email Alert Settings Parameters Description Mail server The mail server’s domain name or IP address. User name This field is for your mail server’s user name, if required. Password This field is for your mail server’s password, if required. From e-mail address This is the e-mail address from which automatic e-mail warnings will be sent. To e-mail address 1 to 4 This is the e-mail address or addresses to which the automatic e-mail warnings will be sent. SNMP Trap Settings Parameters Description SNMP trap server IP Use this field to indicate the IP address to use for receiving SNMP traps. Trap version select the trap version used in SNMP Sever. Trap community Use this field to designate the SNMP trap community. 4-22 MGate W5108/W5208 Series Web Console Configuration SNMP Agent Settings Parameters Description SNMP To enable the SNMP Agent function, select the Enable option, and enter a community name (e.g., public). Contact name The optional SNMP contact information usually includes an emergency contact name and telephone or pager number. Read community string This is a text password mechanism that is used to weakly authenticate queries to agents of managed network devices. Write community string This is a text password mechanism that is used to weakly authenticate changes to SNMP agent version The MGate 5105-MB-EIP supports SNMP V1, V2c, and V3. agents of managed network devices. Read-only and Read/write access control The following fields allow you to define user names, passwords, and authentication parameters for two levels of access: read-only and read/write. The name of the field will indicate which level of access it refers to. For example, Read only authentication mode allows you to configure the authentication mode for read-only access, whereas Read/write authentication mode allows you to configure the authentication mode for read/write access. For each level of access, you may configure the following: Parameters Description User name Use this optional field to identify the user name for the specified level of access. Authentication mode Use this field to select MD5 or SHA as the method of password encryption for the specified level of access, or to disable authentication. Privacy mode Use this field to enable or disable DES_CBC data encryption for the specified level of access. Password Use this field to set the password for the specified level of access. Privacy Use this field to define the encryption key for the specified level of access. 4-23 MGate W5108/W5208 Series Web Console Configuration LLDP Parameters Description Message transmit Default is 30 seconds. The allowable range is from 5 through 32,768 seconds. interval Misc. Settings This page includes console settings, password, RADIUS Server, and User Table. Console Settings Parameters Value Description HTTP/HTTPS Enable/Disable This setting is to enable/disable the web console. For security issue, users can only enable the HTTPS or just disable all settings. SSH console Enable/Disable This is to enable/disable the SSH mechanism when using Telnet console Enable/Disable This setting is to enable/disable the telnet console. Reset button Disable after 60 sec, The MGate provides a reset button to clear the password Always enable or load factory default settings. For security reasons, you web console. can disable this function. In disabled mode, the MGate will still enable this function within 60 seconds after power-up; 60 seconds later, the function will be disabled. Auto logout time 60-3600 sec Set the auto logout time period. Change Password You can modify the password for the account Admin. The default password is moxa. To change the password, type the existing password and then type the new password twic. Click submit to activate the new password. Maintenance Other gateway maintenance settings. Ping To test the network status with the PING function, enter the PING server IP address, click start, and wait for a response. Firmware Upgrade Firmware updates for the MGate W5108/W5208 are located at www.moxa.com. After you have downloaded the new firmware onto your PC, you can use DSU to write it onto your MGate W5108/W5208. Select the desired unit from the list and click to begin the process. Choose the correct file and click submit to upgrade the firmware. 4-24 MGate W5108/W5208 Series Web Console Configuration ATTENTION DO NOT turn off the MGate power before the firmware upgrade progress completes. The MGate will be erasing the old firmware to make room for the new firmware to flash memory. If you power off the MGate and terminate the progress, the flash memory will contain corrupted firmware and the MGate will fail to boot. If this happens, call Moxa RMA services. Configuration Import/Export There are three main reasons for using the Import and Export functions. • Applying the same configuration to multiple units The Import/Export configuration function is a convenient way to apply the same settings to units located in different sites. You can export the configuration as a file, and then import the configuration file onto other units at any time. • Backing up configurations for system recovery The export function allows you to export configuration files that can be imported onto other gateways to restore malfunctioning systems within minutes. • Troubleshooting Exported configuration files can help administrators to identify system problems provide useful information for Moxa’s Technical Service Team when maintenance visits are requested. The import or export function saves all the configuration settings and parameters of the MGate W5108/W5208 in a *.ini file. To begin, click the Import or Export button. Once the file has been saved, it can be imported into your target unit to duplicate the same settings. Select the target unit first and then click the Import button to complete the import action. Load Factory Default To clear all the settings on the unit, use the Load Default button to reset the unit to its initial factory default values. 4-25 MGate W5108/W5208 Series Web Console Configuration Click Submit to restore the unit to factory default values. ATTENTION Load Default will completely reset the configuration of the unit, and all of the parameters you have saved will be discarded. Do not use this function unless you are sure you want to completely reset your unit. Certificate Use this function to load the Ethernet SSL certificate. Select or browse for the certificate file in the Select SSL certificate/key file field. This function is only available in the web console. System Monitoring The MGate W5108/W5208 series gateways support three system monitoring functions: Serial Status, System Status, and Protocol status. Serial Status Serial port status The Serial Port Status page is located under Serial Status in the System Monitoring folder. On this page, you can monitor the signal and data transmission status for each serial port. • TxCnt: number of Tx packets (to device) for the current connection • RxCnt: number of Rx packets (from device) for the current connection • TxTotalCnt: number of Tx packets since the MGate was powered on • RxTotalCnt: number of Rx packets since the MGate was powered on 4-26 MGate W5108/W5208 Series Web Console Configuration Serial Port Error Count The Serial Port Error Count page is located under Serial Status in the System Monitoring folder. On this page, you can view the current frame number, parity, overrun, and break errors for each serial port. Serial Port Settings The Serial Port Settings page is located under Serial Status in the System Monitoring folder. On this page, you can view the current communication settings for each serial port. System Status Network Connection Go to Network Connections under System Status to view network connection information. 4-27 MGate W5108/W5208 Series Web Console Configuration System Log Relay Status The MGate gateway includes a built-in relay circuit that is triggered in the event of a power failure or if the Ethernet link is down. You can view the relay status on this page. When a warning event occurs, the relay circuit will activate the warning device, such as a beeper. The field engineer can click the Acknowledge Event button to temporarily deactivate the relay circuit, and then take some time to troubleshoot the problem. Once the abnormality has been resolved, the relay will return to normal status. Digital I/O State The MGate W5108/W5208 series gateways provide 2 DIs and 2 DOs. Click Digital I/O State to check the DI/DO status. 4-28 MGate W5108/W5208 Series Web Console Configuration LLDP Table The page displays LLDP related information, including Port, Neighbor ID, Neighbor Port, Neighbor Port Description, and Neighbor System. WLAN status The WLAN status can be checked on this page, including IP address, SSID, Channel, security setting, etc. 4-29 MGate W5108/W5208 Series Web Console Configuration Protocol Status The MGate W5108/W5208 series gateways now support Modbus/DNP3/Raw data traffic monitoring. For troubleshooting or management purposes, you can monitor the protocol’s data passing through the MGate W5108/W5208 on the network. Rather than simply echoing the data, this traffic monitoring function shows the data in an intelligent, easy-to-understand format with clearly designated fields, including source, type, destination, contents, and more. Events can be filtered in different ways, and the complete log can be saved to a file for later analysis. Restart All changes will be activated by clicking the Submit button first and then restarting the gateway. If a lot of settings need to be changed, you can click Submit for each setting, and then click the Submit button on Restart page again to activate all the changes. MXView The Moxa MXview network management software gives you a convenient graphical representation of your Ethernet network, and allows you to configure, monitor, and diagnose Moxa networking devices. MXview provides an integrated management platform that can manage Moxa MGate series products as well as Ethernet switches and wireless APs, and SNMP-enabled and ICMP-enabled devices installed on subnets. MXview includes an integrated MIB complier that supports any third-party MIB. It also allows you to monitor third-party OIDs and Traps. Network and Trap components that have been located by MXview can be managed via web browsers from both local and remote sites—anytime, anywhere. 4-30 MGate W5108/W5208 Series Web Console Configuration MXconfig Moxa’s MXconfig is a comprehensive Windows-based utility that is used to install, configure, and maintain multiple Moxa devices in industrial networks. This suite of useful tools helps users set the IP addresses of multiple devices with one click, configure the redundant protocols and VLAN settings, modify multiple network configurations of multiple Moxa devices, upload firmware to multiple devices, export/import configuration files, copy configuration settings across devices, easily link to web and telnet consoles, and test device connectivity. MXconfig gives device installers and control engineers a powerful and easy way to mass configure devices, and effectively reduces the setup and maintenance cost. For more detailed information regarding MXview, download the MXview user’s manual from Moxa’s website at http://www.moxa.com 4-31 A A. Federal Communication Commission Interference Statement This equipment has been tested and found to comply with the limits for a Class B digital device, pursuant to Part 15 of the FCC Rules. These limits are designed to provide reasonable protection against harmful interference in a residential installation. This equipment generates, uses and can radiate radio frequency energy and, if not installed and used in accordance with the instructions, may cause harmful interference to radio communications. However, there is no guarantee that interference will not occur in a particular installation. If this equipment does cause harmful interference to radio or television reception, which can be determined by turning the equipment off and on, the user is encouraged to try to correct the interference by one or more of the following measures: • Reorient or relocate the receiving antenna. • Increase the separation between the equipment and receiver. • Connect the equipment into an outlet on a circuit different from that to which the receiver is connected. • Consult the dealer or an experienced radio/TV technician for help. CAUTION: Any changes or modifications not expressly approved by the grantee of this device could void the user’s authority to operate the equipment. FCC RF Radiation Exposure Statement This equipment complies with FCC RF radiation exposure limits set forth for an uncontrolled environment. This equipment should be installed and operated with a minimum distance of 20cm between the radiator and your body. This device complies with Part 15 of the FCC Rules. Operation is subject to the following two conditions: 1. This device may not cause harmful interference and 2. This device must accept any interference received, including interference that may cause undesired operation. Labeling requirements This device complies with Part 15 of the FCC Rules. Operation is subject to the following two conditions: (1) this device may not cause harmful interference, and (2) this device must accept any interference received, including interference that may cause undesired operation. RF exposure warning This equipment must be installed and operated in accordance with provided instructions and the antenna(s) used for this transmitter must be installed to provide a separation distance of at least 20 cm from all persons and must not be co-located or operating in conjunction with any other antenna or transmitter. End-users and installers must be provide with antenna installation instructions and transmitter operating conditions for satisfying RF exposure compliance. End Product Labeling This transmitter module is authorized only for use in devices where the antenna may be installed such that 20 cm may be maintained between the antenna and users. The final end product must be labeled in a visible area with the following: “Contains FCC ID: SLE-W5x08 “ MGate W5108/W5208 Series Federal Communication Commission Interference Statement Information for the OEMs and Integrators The following statement must be included with all versions of this document supplied to an OEM or integrator, but should not be distributed to the end user. 1. This device is intended for OEM integrators only. 2. Please see the full Grant of Equipment document for other restrictions. This radio transmitter FCCID: SLE-W5X08 has been approved by FCC to operate with the antenna types listed below with the maximum permissible gain and required antenna impedance for each antenna type indicated. Antenna types not included in this list, having a gain greater than the maximum gain indicated for that type, are strictly prohibited for use with this device. Antenna List No. Manufacturer Model No. Antenna Type Peak Gain 1 KINSUN ANT-WDB-ARM-02 Dipole Antenna 1.21 dBi for 2.4 GHz 1.73 dBi for 5 GHz A-2