1
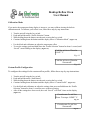
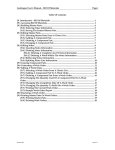
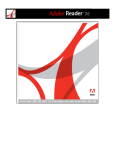
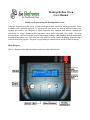
Desktop Reflow Oven
User Manual
Thank you for purchasing the Desktop Reflow Oven.
When we designed our reflow ovens, we had two things in mind: simplicity, and budget priced. So we
decided to take a different approach. To help keep the costs down, we used an ordinary toaster oven,
stripped the insides, and designed a digital controller that monitors and directly controls the
temperature by using a thermocouple temperature sensor and a solid state relay (SSR). By using
thermocouples, it allowed us to get accurate temperature readings, while handling the high temperature
demands of the reflow oven. The solid state relay (SSR) is used to control the heating elements using a
software based PID program. Our goal is to get hobbyists entered into the world of SMD Soldering.
Block Diagram
Here is a diagram of the different buttons and areas on the controller unit.
Desktop Reflow Oven
User Manual
Getting Started
After unpacking the reflow oven, you will find two trays. Choose which one you would like to use, and
place it inside the oven on the top rack. Unpack the power adapter and plug it into the back of the
controller unit. Unpack the thermocouple and carefully insert the end of the thermocouple into the hole
in the back of the oven. Connect the thermocouple to the screw terminals on the back of the controller
unit. If the temperature on the display decreases when the oven is heating up, reverse the connections to
correct the polarity. Plug in the RCA cable into the RCA jack on the back of the unit. Plug in both the
controller unit and the reflow oven to a standard 110 volt wall outlet. Turn on the power key switch on
the front of the controller unit using the key provided. The unit should beep once, the status light
should light up for about 2 seconds, and the LCD Display should illuminate, and display a splash
screen for about 2 seconds, then it will return to the normal display (Figure 1).
Ready
25.5° C
Fig. 1
Selecting a Solder Profile
To choose a solder profile, push the “Profile Selection” button to select a solder profile. The LCD
Display will show the Selected Profile for about 2 seconds (Figure 2.1 and 2.2).
Solder Profile:
Leaded (Pb)
Solder Profile:
Lead-Free (Lf)
Fig. 2.1
Fig. 2.2
Starting the Reflow Process
1. Place the PCB(s) to be reflowed on the tray, and put the tray inside the oven.
2. Place the thermocouple as close to the PCB(s) as possible.
3. Close the oven door. Turn on the controller unit using the key switch located on the front of the
controller unit using the key provided.
4. Select the solder profile, if you haven't done so already (See Above).
5. Push the “Start Button” to start the reflow process. The Status LED will start blinking indicating
the reflow is in progress.
Desktop Reflow Oven
User Manual
LCD Display
•
Once the reflow process is started, the oven will enter Pre-Heat Stage (Figure 3.1), where it will
ramp up the temperature.
•
The oven will then enter Soak Stage (Figure 3.2), where it will soak the PCB(s) for period of
time. (60 Seconds for Leaded or 90 Seconds for Lead-Free). The LCD will display the time
remaining for the soak period, and the real-time temperature slope.
•
Once the soak period is complete, it will then enter Reflow Mode (Figure 3.3), where it will ramp
up the temperature to the wet zone. The LCD will display how long the oven is in the wet zone,
and the real-time temperature slope.
•
The next stage is the cool down stage (Figure 3.4), where the oven will cool down to a safe
temperature. You may want to open the oven door to help with the cool down process, or the
PCB(s) may be damaged due to excessive heat. (If your reflow oven came with a cooling fan,
then this does not apply to you.)
Figures 3.1 – 3.4
Pre-Heat
25.5° C
^+2.5° C
Fig. 3.1
Reflow
208.5° C
Wet: 0:10 ^+2.6° C
Fig. 3.3
Soak
150.5° C
Rem: 0:59 ^+1.0° C
Fig. 3.2
Cool
130.0° C
Wet: 0:50
^-1.7° C
Fig. 3.4
Desktop Reflow Oven
User Manual
Calibration Mode
If you notice the temperature being display is incorrect, you may calibrate it using the built-in
calibration mode. To calibrate your reflow oven, follow these step by step instructions.
1.
2.
3.
4.
Turn the unit off using the key switch.
Push and hold down the “Profile Selection” button.
While holding down the button, turn the unit on using the key switch.
Continue holding down the button until the display shows “Calibration Mode”. (Figure 4.1)
•
•
Use the black and red buttons to adjust the temperature offset.
To save the settings, push and hold down the “Profile Selection” button for about 1 second, until
“Saved!” starts flashing on the display. (Figure 4.2)
Calibration Mode
+4.0° C
Fig. 4.1
Calibration Mode
Saved!
Fig. 4.2
Custom Profile Configuration
To configure the settings for the custom reflow profile, follow these step by step instructions.
1.
2.
3.
4.
Turn the unit off using the key switch.
Push and hold down the “Start Button”.
While holding down the button, turn the unit on using the key switch.
Continue holding down the button until the display shows “Custom Profile”. (Figure 5.1)
•
Use the black and red buttons to adjust the settings, then press and hold down the “Profile
Selection” button for about 1 second to move to the next setting.
After all the settings have been saved, the word “Saved!” will flash 3 times on the display.
•
(Figure 5.2)
Custom Profile
Max Temp: 250° C
Fig. 5.1
Custom Profile
Saved!
Fig. 5.2