Transcript
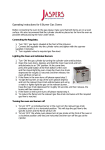
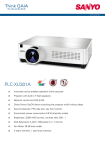
GAS CONVERSION KIT FROM NG TO LP, PN: CKLP-TESB
FOR MODELS: TWIN EAGLES SIDE BURNERS
(TESB131-B, TESB132-B, TPSC-1, TPSC-2)
1.
All gas connections/conversions should be made by a qualified technician and in
accordance with local codes and ordinances.
2.
Before conducting a conversion to a gas appliance, verify that the main gas is shut off
and disconnected from the appliance.
3.
Make sure that you have the Side Burner Gas Conversion Kit as follows:
a.
b.
c.
d.
e.
f.
P/N: 12602, Coupling 3/8 Flare x ½ FIP
P/N: 13317, Orifice, Defendi 0.50 LP Center
P/N: 13318, Orifice, Defendi, 1.00 LP Outside
P/N: 15302, Regulator LP with Hose
P/N: 18528L, Installation Instruction
P/N: 18351, Label, Conversion, Gas
(1pcs)
(2pcs)
(2pcs)
(1pcs)
(1pcs)
(1 pc)
4.
Remove the burner cap, burner ring and burner hub to expose the burner base and center
orifice.
5.
Remove the orifice cover plate to expose the outside orifice.
6.
Remove the center orifice and outside orifice using a 7-mm. wrench.
7.
Replace the orifices for the type of gas use as follows:
ORIFICE
LP GAS
Center
0.50mm (to replace NG orifice no. 0.82mm)
Outside
1.00mm (to replace NG orifice no. 1.75mm)
8.
Replace the regulator to the type of gas use.
a. For Built-in models, the side cooker must have individual regulator.
b. For Freestanding models, the side cooker is attached to the gas grill and
uses the same regulator with the grill.
9.
Check for leaks.
10. NEVER USE THE SIDE BURNER WITHOUT FIRST LEAK TESTING THE
GAS CONNECTION.
a. Prepare a leak testing solution of sudsy water by mixing in a spray bottle
with half liquid soap and half water.
b. Confirm that all control knobs are in the “OFF” position.
c. Turn the main gas valve supply “ON”.
d. Apply leak testing solution by spraying on the pipe joints, fittings, and
hose.
e. A gas leak is detected if;
i. there is a faint gas smell and/or
ii. growing bubbles appear on any of the connection points and/or
hose. DO NOT attempt to ignite the grill and IMMEDIATELY
turn off the gas supply valve.
f. When there is a gas leak, call a qualified service technician. DO NOT use
the grill until the leak is corrected.
11. Turn on burners. Set burners to low setting and check for burner flame height. If the
flames are too high for simmering or too low that they would not stay lit, adjust the low
flame setting.
12. To adjust low flame setting, pull out burner knob towards you. This will expose the
valve stem.
13. Insert a flat, skinny screw driver into the stem and turn the adjusting screw to the left to
increase the flame or to the right to decrease the flame. DO NOT OPEN THE SCREW
TOO MUCH: THE SCREW COULD FALL OFF THE STEM AND CAUSE
LEAK.
14. The conversion is complete. Fill up the Conversion Label. Next, paste it next to the
original Serial Plate. Please refer back to the User’s Manual
P/N: 18528LB, 04/11