1
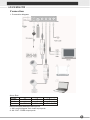
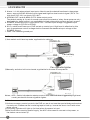
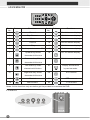
4CH H.264 Mobile DVR
User manual
V2.55(2013.12.06)
This instruction applies to DVR series products. Please read it carefully before using the products!
CHAPTER 1: Product introduction
1. Attentions before use........................................................................ ..........2
2. Product Overview.......................................................................................2
3. Fe atures..................................................................................... ..............2
4. Contents of package...................................................................................3
5. App lications...............................................................................................4
CHAPTER 2 Installations
1. Specif ication s....... ......... ......... ......... ......... ......... ......... ......... ......... ..............4
2. Conne ction.. ......... ......... ......... ......... ......... .................. ......... ......... ......... .....6
3. Interfa ce exp lanati on...... ......... .................. ......... ......... ......... ......... ......... .....8
CHAPTER 3 Main M enu
1 Syste m Log in..... ......... ......... ......... ......... .......... ......... ......... ......... ......... ..... 16
2 Shortcut Menu.... ......... ......... ......... ......... ......... ......... ......... ......... ...... ........ 16
2.1 Main M enu......................................................................................... 16
2.2 Record Mode........ ......... ......... ......... ......... ......... ......... ......... ......... ..... 17
2.3 Playba ck..... ......... ......... ......... ......... ......... ......... ......... ......... ......... ..... 17
2.4 PTZ C ontrol. ......... ......... .................. ......... ......... ......... ......... ......... ..... 18
2.5 High Speed PTZ...................... ......... ......... ......... ......... ......... ......... ..... 18
2.6 Alarm output......... ......... ......... ......... ......... ......... ......... ......... ......... ..... 19
2.7 Color Setting........ ......... ......... ......... .................................................. 19
2.8 Outpu t Adjus t.................................................................................... 19
2.9 Logou t........ ......... ......... ......... ......... .................................................. 19
3 Main Menu........................................................................................... .... 21
3.1 Record........ ......... ......... ......... ......... ......... .................. ......... ......... .... 21
3.1.1 Record Conf ig....... ......... ......... ......... ......... ......... ......... ......... .... 22
3.1.2 Snaps hot Sto rage.. ......... ......... ......... ......... ......... ......... ......... .... 22
3.1.3 Playba ck..... ......... ......... ......... ......... ......... ......... ......... ......... ..... 23
3.1.4 Backup................. ......... ......... ......... ......... ......... ......... ......... ..... 23
3.2 Alarm. ......... ......... ......... ......... ......... ......... ......... ......... ......... ......... ..... 23
3.2.1 M otion Detec t........ ......... ......... ......... ......... ......... ......... ......... .... 23
3.2.2 Video Blind.. ......... ......... ......... ......... ......... ......... ......... ......... ..... 24
3.2.3 Video Loss... ......... ........ ......... ......... .......... ......... ......... ......... ..... 25
3.2.4 Alarm Input.. ......... ......... ......... ......... ......... ......... ......... ......... ..... 25
3.2.5 Alarm Outpu t......... ......... ......... ......... ......... ......... ......... ......... .... 26
3.2.6 Abnorm ality. ......... ......... ......... ......... ......... ......... ......... ......... ..... 26
3.2.7 Car Status... ......... ......... ......... .............................................. .... 26
3.3 System.................................................... ......... ......... ......... ......... ..... 27
3.3.1 General....... ......... ......... ......... ......... ......... ......... ......... ......... ..... 27
3.3.2 . .................. ......... ......... ......... ......... ......... ......... ......... ......... ..... 28
3.3.3 Netwo rk....... ......... ......... ......... ......... ......... ......... ......... ......... ..... 28
3.3.4 Net Se rvice.. ......... ......... ......... ......... ......... ......... ......... ......... ..... 29
3.3.5 GUI Di splay. ......... ......... ......... .................................... ......... ..... 31
3.3.6 PTZ Config.. ......... ......... ......... ..................................... ......... .... 32
3.3.7 RS232......... ......... ......... ......... ......... ......... ......... ......... ......... ..... 32
3.3.8 Tour... ......... ......... ......... ......... ......... ......... ......... ......... ......... ..... 32
3.4 Advan ced.... .................. ......... ......... ......... ......... ......... ......... ......... ..... 33
3.43... ......... ......... ......... ......... ......... ............................................. ..... 33
3.4.1 HDD M anage......... ......... ......... ......... ......... ......... ......... ......... ..... 33
3.4.2 Accoun t.................................................................................... 33
3.4.3 Online User.. ......... ......... ......... .................................................. 34
3.4.4 Output Adjust............................................................................ 34
3.4.5 Auto Maintain............................................................................ 34
3.4.6 Restore........ ......... ......... ......... ......... ......... .................. ......... .... 35
3.4.7 Upgrad e....... ......... ......... ......... ......... ......... ......... ......... ......... ..... 35
3.4.8 Device Info... ......... ......... ......... ......... ......... ......... ......... ......... ..... 35
3.5 Info.... ......... .................. ......... ......... ......... ......... ......... ......... ......... .... 36
3.5.1 HDD In fo...... ......... ......... ......... .................................................. 36
3.5.2 BPS.... ......... ......... ......... ......... ......... ......... ......... ......... ......... ..... 36
3.5.3 L OG...................... ......... ......... ......... ......... ......... ......... ......... ..... 36
3.5.4 Version........ ......... ......... ......... .................................................. 37
3.6 Logou t........ ......... ......... ......... ......... .................................................. 37
1
Attentions before use
1. Bef ore po wering on th e DVR , pleas e con nect a ll the e xterna l devices cor rectly.
2. Ple ase di sconn ect or r einsta ll all th e exte rnal de vices after p ower is off
3. Ple ase re move or rein stall th e stor age de vices after p ower i s off
4. Do not tou ch the meta l parts of the SD Ca rds,
5. Kee p the unit aw ay fro m water or a ny liqu id;
6. To ensure the D VR wo rk pro perly, please do no t press two o r more keys simultaneously.
7. Ple ase m ake su re the workin g voltage an d curr ent is u nder t he cor rect ra nge.
8. Ple ase do not a ssemb le, ma intain, upgra de or r eplace the compon ents without permission,
9. For the pr ofessi onal e quipm ent, re gular m ainte nance to cab le con nectio n and storag e
dev ice, fa n dust remov al and work enviro nment testin g are n ecessary.
Product Overview
The DVR Series produ ctsis a new g enera tion h igh performa nce, lo w con sumpt ion 2ch full
D 1 real time m obile survei llance DVR b ased on h.264 vide o com pression technolo gy, sup ports
the ope ration mode includ ing IR remot e, USB mous e, Key board s and web in terface . Supp orts
1 28GB high c apacit y high speed SD Card devices (2PCS 64GB SD Ca rd), Su pport s extensible
GPS, W i-Fi a nd G- Senso r funct ions.
GPS func tion: Users c an rea d long itude, latitud e and movin g spee d of ve hicles and m oving
p ath on googl e map s when playb ack th e vide os with playb ack so ftware on PC.
G- Senso r (the g ravity senso r tech nology ): Use rs can get th e G-Sensor inform ation a nd
the curve grap h for the date whe n play back v ideos with pl aybac k software.
Wi- Fi fun ction: Suppo rts the video , audio wireless tra nsmission within th e coverage of
Wi-Fi n etwor k. Prov ided w ith the matc hed CMS sof tware, Users can c heck t he rea l time
s urveill ance v ideo a nd audio and alarm information of veh icles.
The DVR Series produ cts ca n com patible with a ny CC D or CMOS input a nd output de vices in
P AL or NTSC system, incl uding the cameras and vi deo ou t device. Th e DVR Series produ cts also
s uppor t centr al mon itoring via LA N net work, Cloud techno logy r emote view a nd mo bile
m onito ring function.
Features:
1. Real time surveillance
DVR equipped with the standard analog audio& video signal output p ort: AV-OUT (nam ed
CVBS signal), whic h sup ports to connect the external monitor to realize real time monitoring
with larger s creen. The max output resolutio n is: 1440*9 00. With Wi-Fi function, supports
LAN c entral monitoring and administration.
2. Compression tech nology
DVR adopts advanced H.264 video co mpression technology, each channel`s video and
audio adopts independent real time c ompression technology, make sure th at the audio and
video to be saved synchronously, and save the sto rage space. It save s abo ve 2/3 memo ry
space compare to the MPEG-4 comp ressio n technology.
3. Safety storage:
DVR supports 128GB high speed SD Card devices , stored videos ado pts professional
encryption format, Users can not mod ify the data privately to ensure the data`s authenti city
and safety.
4. Video Playb ack
Supports real time local playback function for all c hannels, and supports files sea rch, events
search, single channel playback, multiple ch annels play back,Selected cha nnels playback,
Videos could be played b ack with the special desig ned s oftware, the software can play back
the GPS dat a and moving path on google maps, users can also back up the videos via the
special play er, showing the G-Sensor curve graph on player. Support play back via network.
5. Data back up:
Users can back up the videos v ia USB 2.0 p ort, the USB back up device could be USB flash
2
Drive, removable HDD, USB- DVDR W, supports back up via playba ck software and ne twork,
when there are several storag e devices, us ers ca n set one storage device s as redundancy
disk to back up th e videos.
6. Alarm function.
DVR support motion detect, video bl ind, video loss, 2 channels alarm inpu ts and abnormal
detect function, s upport linkage recording, showing message on screen, b uzzer, taking
snapshot; can send snapshots via E-mail or upload snapshots via FTP; Support one
channel rel ay ala rm out put switches , and a pair normal open or normal clo se control port.
7. Network function: DVR suppo rt remo te vie w via web browser in LAN, with centra l moni toring
platform in LAN, Support Cloud serv ice and mobile monitor function.
8. Human-ba sed manage ment:
DVR support multi users and passwo rds lo gin management style, support 14 spe cies of
languages, support USB mouse and keyboard op eration mod es, with RS4 85 port, with PTZ
function, can imp ort and export the parameter configurations for volume s ettings and m anag
ements, with syst em log function for checking an d managing the device easier, can show
the s tream data for all channe ls, easier for user to choose the storage device wit h
appropriate capa city, support regular maintenan ce function, suppo rt multi-devices ce ntral
monitoring management in LAN.
9. Char acteris tics design:
DVR adopts 6 groups of power supply syst em and spec ial cooling system design to ensure
the whole system operates stably with high efficiency, device adopt s modularized design
philosophy , easy to add optional fun ctions such as GPS, G-Sensor and Wi-Fi. DVR adopts
the philoso phy of driving direction trigger t he corresponding channel?s full screen display,
DVR adopt s whol e aluminum alloy u ltrathin hous ing, with anti -theft screw and s ecurity
protection panel to protect two SD Cards? Slots.
Contents of package
1. Basic A ccess ories
Ser ial
num ber
Ac cesso ries
Ser ial
number
On e DVR
One IR remote
5
1
One Mini U SB to standa rd USB
port adapto r
Two AVP cables with aviation
connector
6
2
One AV cable wi th aviation co nnector
One CD for manuals a nd software
7
3
Four Anti-vibration kits
On e Power cab le with fuse
4
3
Acce ssories
8
2. O ptiona l acce ssorie s
Se rial
num ber
Se rial
number
Accesso ries
One GPS ante nna
Accessori es
Stor age de vice (SD Ca rd)
3
1
One WIF I ante nna
On e print ed use r man ual
4
2
N otes:The o ptiona l acce ssorie s will b e prov ided a ccord ing to custom er`s n eeds
Applications
The DV R Ser ies products are pr ofessi onal 2 ch full D1 du al SD Card M obile DVR which
ado pts Em bedde d Linu x ope ration System , bas ed on h.264 digital high d efinitio n tech nolog y,
which is a lso a a dvanc ed pla tform which suppo rts ext ended functi ons su ch as GPS, W i-Fi
and G-Se nsor.
This device a pplica ble for buses , taxi cabs, ships, vans, trains, etc. it is also applicable
for t he sur veillan ce in f ixed p laces s uch a s offices, fac tories, home , build ings.
Specifications
Param eters
Mo del
Desc ription s
The DVR
B asic m odel
The DVR
W ith G PS
The DVR
With W I-FI
The DVR
W ith G PS,WIFI
Note s: For above mode ls, the G-Se nsor f unctio n is als o ava ilable
Power suppl y Car batter y(For car us e)/Power a daptor(For other applications)
Power inp ut
Working
cur rent
DC1 2V~D C36V(Stan dard working volta ge:DC 12V~D C24V ,
limi t volta ge: DC 8V~DC38V)
Mod el
t he refe rence voltag e: DC 24V
The DVR
3 00 ±1 0 mA
The DVR
3 20 ±1 0 mA
The DVR
3 50 ±1 0 mA
The DVR
3 70 ±1 0 mA
Power outpu t DC1 2V/1.5 A (Pro vide p ower for cam eras)
4
Wor king
- 10℃~+ 50℃ (limit t emperature: - 20℃~+ 60℃)
tempe rature
Video
technology
Stor age
H.26 4(Da ta enc ryptio n, need to us e the playba ck soft ware t o play the videos
SD c ard an d USB devic e(U- Disk/USB re movab le HDD/USB -DVD etc)
interface
Stor age
128GB SD /SDHC Card(2pcs 64GB SD Card,SD Card over Class6 is
capacity
reco mmen ded)
Stor age
Stop when full or overwrite
mo de
Camera
TV
CCD and CMOS
PAL /NTSC (All c hanne ls sho uld connect t he same sta ndard camer as)
Stan dard
Video input
Inpu t stan dard: i nput fr equen cy: Vp -p=1. 0V, input imp edance: 75Ω
Resolution
2 ch annel D1/Ha lf D1/CIF rea l time recoding, an d support the playback
function w hile re cordin g
Vi deo
PAL(1~100FP S optional)and NTSC(1~120FPS optional)
frame rate
Vi deo
Mul ti-grade adjustable
quality
Ou tput
CVBS(2 c h vide o + 2 c h audio, but only su pport 1ch au dio ou tput at a same
signal
time
Net work
One 10M/ 100M Ethern et por t(RJ4 5)
p ort
Al arm
4 ch alarm input port (is olatin g function)
in put
Al arm
1ch relay alarm output , supp ort 1ch norm al open contact
ou tput
USB
Standard
IR rec eiver1
Wo rking
indicator
2 U SB 2.0 port(Supp ort US B mou se/Key board operation mode, suppor t
US B back up
1 IR recei ver terminal (upsid e of DVR)
On the up side of the dvr mainframe , nearby the coolin g fan.
main frame
si ze
137(Len gth)*105(Width)*25(Heigh t)
Main frame
Aro und 4 45 g
wei ght
5
Connection
1. Conne ction d iagram
A larm Port :
PI N No.
Fu nction
PIN No.
Fu nction
2
4
6
ALARM-I N2 A LARM -IN4 ALARM-OUT1
1
3
5
ALARM-I N1 A LARM -IN3 ALARM-OUT2
De finition s and descriptions of por ts:
1. AV1 an d AV2 ports: 2ch v ideo in put po rts
2. AV-OUT: CVBS ou tput ports
6
3. Alarm 1-4: 4 ch alarm signal inp ut port s. Need to set the r elated functi ons in the system
menu; suppo rt NO/NC sw itch control s ignal and high/low level control signal(DC 0.7V <
high le vel <D C 12V , low level< DC 0.6V)
4. ALARM-OUT1 and ALARM-OUT2: Al arm output p orts.
The de fault s etting is: A pair of n ormal open control contacts of relay; these ports are onl y
applica ble for signal control, not applic able f or high voltage high current device`s control.
5. POWER: Power input port. supports DC 12V~DC 36V input vol tage. Suggested in put
power voltage is: DC12V or DC24V.
6. ACC+ cable from P ower port: DVR`s s tart up control port , High level is effective fo r this
port, the max imum contro l voltage shall not e xceed the maximu m input voltage of t he
POWER-IN port.
7. GND: The co mmon groun d port
2. Startu p cont rol mo de:
①Auto switch on/off start up mode, applicable fo r vehi cles.
Car battery
Car cigarette lighter
②Manuall y switc h on/o ff control mode, applicab le for the use in fixed places.
Car battery
Notes:ACC+ Cable is the device startup contro l wire, effect ive when triggered by high level,
usually works with the car cigarette lighter.
3. Attenti ons:
①As t here a re man y con trol po rts for the DVR, so we do not us e the special desig ned te rminal
for e ach p ort, Please u se the insula ting ta pe to b ind up , in ca se the short circuit with o ther
wire s occu rs.
②The power indica tor wi ll light up (in blue) w hen th e pow er is in put.
③Afte r the D VR co nnecti ng power su pply, the ACC+ also need to con nect t o the p ower, or
the device can n ot start up.
7
Interface explanation
1. Interface
①Front side view
②Side p anel A
③Side p anel B
SD Cart slot
USB 2.0 Port
Note s:
1. B ecause some funct ions are opti onal, t he vac ant po rts will cover ed wit h rubb er sea l
2. P lease c onnec t the W i-Fi a nd 3G anten na to t he correct so cket
3. The definition s of po rts on the sid e pane l have been printe d at th e botto m case, plea se
re fer to the guidance to ins tall the DVR.
2 . IR re mote contro l
8
Serial
No .
1
Butt ons
Funct ions
Record
Serial
No .
13
Buttons
Functions
2
Stop Record
14
Ch2 full screen display
3
Menu
15
Ch3 full screen display
4
Confirm
16
Ch4 full screen display
5
Pl ay
17
Ch5 full screen display
6
Back to previous me nu /Exit
18
Ch6 full screen display
7
Up ward k ey/Video
19
Ch7 full screen display
20
Ch8 full screen display
21
Di splay all cha nnels
Ch1 full screen display
channels s hift button
8
Downward key/Video
channels s hift button
9
Left side k ey/ Video
channels s hift button
10
Righ t side k ey/ Video
in prev iew mode
22
PTZ function
channels s hift button
11
Rewind
23
PTZ zoom out
12
Fast forward
24
PTZ zoom in
Notes : All th e func tions only work aft er get the pe rmissi on to a ccess the DV R.
3. I ndicat ors
9
P OWE R:Wo rking indica tor, ke eps on once power on
I R:IR receiv er, rec eiving IR rem ote c ontrol signal
S D1: S D card 1 wor king in dicato r, it ke eps on when SD ca rd is d etecte d, flash whe n
DVR i s reco rding.
S D2: S D Car d 2 wo rking indicator, it ke eps o n when SD c ard is d etecte d, flash whe n
DVR i s reco rding.
R EC in dicato r: Rec indica tor fla shes w hen D VR is r ecord ing, Re c indi cator g oes ou t
when DVR is not in recor d mod e.
4. Sto rage d evice install ation
Atte ntions before insta llation :
① D iscon nect power o f DVR before installing an d rem oving SD Ca rds.
② T o prev ent th e SD Cards f rom da magin g by s tatic e lectricity,
Y ou ca n use the ele ctrosta tic rin g or to uch grounde d obje cts/
M etal o bjects befor e touching S D card s. Suc h as m etal fa ucets.
N otes:
① For newly i nstalle d SD Cards, the DVR will format them automatical ly.
If the stora ge device ca n not suppor t recording, please enter into th e men u and set the
insta lled storage device as "Read/Write" disc. If user wants to save the snapshot triggered
by alarm, please set the stora ge device as "snapshot" disc. If user wants t o use the
redu ndant back up function, please set the stora ge device as "redundant" disc.
② If user nee ds to u se SD Card or USB devic e to save the recordings, please tick "SD Ca rd
reco rd" and "USB recor d" in the sub menu "Reco rd con fig", and then r estart the system .
③ If user wan ts to use USB device to b ack up the video files, ple ase cancel the "USB record"
optio n in menu firstly, or the system will regard th e USB as storage device and wi ll format
it after DVR starting.
5 . Mem ory oc cupan cy cal culatio n
When y ou install the 2ch dual SD Card DVR for the first time, please check if an y
SD Cards are insta lled. And check t he write pro tect s witch.
The Ca pacity of SD Card storag e devi ce:
Th e DVR Serie s 2ch dual SD Card mobi le DVR supports maximu m 128GB sto rage
device (2 pcs 64GB SD Cards), User c an cho ose th e appropriate SD C ard accordi ngly.
How to choos e SD Card`s capacity?
Formula for Stora ge spa ce occupation:
Total st orage capac ity(M)=
n umber s of ch annel s(CH)* req uired time(H)* occupied capa city per hour(M/H)
Formula for recording time:
Recording time(H)=
Total st orage capac ity(M)T/【numbe rs of channels(CH)* occupied capacity
per ho ur(M/ H)】
Please notes :
The DVR Seri es products a dopt H.264 compr ession techn ology, with c omparativel y
wide dynami c range, and differe nt video input devi ces wi ll affec t the b it stream statistics
obviou sly. So when user calcula te the above param eters , please refer to all chann els` bit
stream info in menu , to make sure the calcul ation a s accu rate as possible, a nd assist
user to choos e more appr opriat e stora ge devices.
For ins tance:
User us e a 64GB/C6 stand ard SD Card, take 2ch fu ll real t ime D1 /25FPS high quali ty
recording as an exa mple, the SD Card will re cord f or arou nd 50hours, each single channel
will tak es aro und 300MB capacity per hour, t he rec ording time o f 2ch real tim e high quali ty
recording wil l be: 64GB /( 300 M/B * 4C H) ≈50H
8
10
1. System Login
You w ill be r equire d to enter th e Password while trying to access th e setu p men u. Init ially,
there a re three use rs fro m thre e grou ps: " a dmin", " gue ss ", a nd " de fault ", and all thre e use rs
have n o password s. The supper user " adm in" is able to add, modify or de lete groups or
other u ser accounts, cha nge the password s, and even define the " Autho rity " o f other users
in the setup menu. Please refe r to 3.4.2.
2. Shortcut Menu
Rig ht click the m ouse after you en ter " Pr eview Mode ", a sh ortcu t menu
wil l pop o ut as shown; from here y ou can go to Main Menu , Reco rd Mo de,
Pla y Bac k , PTZ Cont rol , Hi gh -S peed P TZ , A larm Outpu t ,
Co lor Se tting , Outpu t Adj ust , or Logo ut pag es.
2.1 Main Menu
Click
in shortcu t menu and g o to " M ain M enu " d irectly as sho wn;
2.2 Record Mode
Click
i n short cut me nu and go to " Reco rd Mo de" se tup pa ge as shown;
Sched ule : S tart recording acco rding to confi guratio n;
Manu al : Sta rt reco rding r egardl ess of config uration ;
Stop : Stop re cording.
Note: the sma ll circle would turn white when selected.
11
2.3 Playback
Click
in s hortcu t men u and g o to " P layba ck " in terface as sh own;
1. files li st
2. file inform ation
3. search
4. back up
5. control button s
Bu tton
F uncti on
Butt on
Fun ction
Bu tton
Fun ction
play /pause
backward
stop
slow play
fa st play
pre vious frame
next frame
previous file
nex t file
circu lation
fu ll scre en
2.31 File Searching
Click
, the " Search C ondition " dialog box will pop
out; set the search conditions and start to search.
2.32 File B ackup
Connect a storage device (USB Disc or SD card) to th e
DVR in adva nce, c lick
and then " Detect "; select a
device , and click " Backup " to go to t he next step,
please refer to 3.4.
12
Choose " File Type ", " Channel ", "Start Time ", " End
Time ", " Backup Format ", and th en click " Start" to
execute.
2.4 PTZ Control
Click
in shortc ut men u and go to " PTZ C ontrol " page as sho wn;
Here you can adjust " Speed ", " Zoom ", " Focus ", " Iris ",
Change the directio n, Check " PTZ Trace " or d o more
by clicking
to go to other pages.
N ote: please make sure th e PTZ has be en co rrectly
c onnec ted, an d all p arame ters p roperly set in " PTZ
C onfig" in adv ance.
In P icture 3.10
Click
shown;
, yo u will go to " PTZ Config " page a s
Here you ca n mod ify the settin gs of " Prese t ", "
Tour ", " Patter ", a nd "B order " .
2.5 High Speed PTZ
Click
in sh ortcut menu , the ca mera which has be en con necte d to PT Z will be
sho wn in f ull scre en; yo u can chang e the d irectio n of th e PTZ by clic king th e mou se or z oom
in/o ut the image by rot ating th e mou se.
Note: Please make sure the PTZ connected supports high-speed operation.
13
2.6 Alarm output
Cl ick
in s hortcu t menu and g o to " A larm Outpu t " setu p pag e as sh own;
C onfigu ration : Alarm on a ccord ing to config uration ;
M anual : Open Alarm outp ut rega rdless of configura tion;
S top: Close A larm o utput.
No te: the small circle would turn w hite wh en se lected .
2.7 Color Setting
Click
in shortc ut menu and go to " Color Setting " pa ge as shown;
Here you can ad just th e " Brig htness", " C ontrac t",
" Sa turation "," Hue ", a nd " Ga in "of the im age. You
can set two diffe rent gr oups o f setti ngs fo r differ ent
time perio ds.
2.8 Output Adjust
C lick
in shortc ut me nu and go to " Outp ut Ad just " p age as shown;
Here you can adjust the " Top Deflate ", " Bottom
Defla te ", " L eft Deflate " and " Right D eflate " of
video outpu t.
2.9 Logout
C lick
in sho rtcut m enu, the " Lo gout " dialog box w ill pop out a s show n;
Logout : exit " Logout " menu;
Shutdown : Turn off the DVR;
Rebo ot : Restart the DVR.
14
3. Main Menu
C lick
in shortcut menu or pre ss "Me nu" on IR remote control; there are six subm enu
items: Record , Alarm, System, Advanced, Info and Logout; see menu naviga tion as follows;
Recor d
Alar m
Config
playbac k
backup
Mo tion
detec tio n
Video
bli nd
Video
los s
Alar m
input
Set the r ec or ding configuration, r ec or ding t ype, r ecor ding ti me sec tion
Set rec ording look-up, recordin g play, v ideo fi le storage
Detec t or format backup equi pment, back the sele ctive fil es
Set motion det ect alarm ch annel, sensitivity , area, linka ge parameters:
Defendin g time s ec tion, alarm outp ut, scr een h int , recording, PTZ ,patrol
Se t ca mera mask alarm c hannel, se nsi tivi ty, li nkag e param et ers:
de fe nd ing time section, al arm out put, screen hint, recording, PT Z, pa trol
Set video loss alarm channel , linkage paramete rs : de fe nd ing time
section, a larm output, s cree n hint, recording, PT Z, patr ol
Set alarm input channel, equipment type, linkag e param et er s:defendi ng
time sect ion, al arm output, s cree n hint, re cord ing, PT Z, patr ol
Ala rm outp ut Set ala rm mode: configur ati on, man ual, shut down
G en er al Set system t ime, d at a fo rmat, la nguage, h ar d disk full time oper ati on ,
configurat ion machi ne number, video format, outpu t mode, sum mertim e, s tay tim e
Se t main(assi stant)coding param et er : co de mode, resolving abil ity,
Encode
fram e rate, code stream control, image qual ity type, code stream
configurat ion
value, fr am e b etween value, vi deo/audio enable
Network Set basic network parameters, DHCP and D NS pa rameters, networ k
configuration high speed download
System
configur ation NetServi ce PPPO E、NTP、E mail、IP purview、DDNS paramet er
S et chann el n ame, preview hint icon stat e, tra nspar ency, cover a rea,
GUI d isplay
t ime title, chan nel time fold
PTZ
configurat ion
Set channel, P TZ pr otoco l, a ddre ss, b aud ra te, date b it, stop bit, che ck
Serial p ort
con figurati on
(Rs23 2)
Se t se rial port funct ion, baud r ate, date bit, stop bit, ch eck
Tour
Hard disk
S et patrol mode and in terval time
Set appointed h ard disk as read-writ e disc, read-only disc or
Manageme nt r edun dant disc, clea r data, r esume da te and so on
User
Manageme nt Mo dify user, t eam or password. A dd user or team. Dele te user or te am.
Manag ement Online use r
tools
TV a djust
Au toma tic
Manageme nt
Restore
Break the con nection with the alrea dy lo gin user. L ock the accoun t after
b reak unt il bo oting up again.
Adjust T V upsid e, d ownside, n earside, starboard distance
Set a utomatic rebo ot system and a utomatic deleting f iles.
Resume setup state : co mmon set up, code set up, recordin g se tup, alarm
se tup, net work setup , network service, preview playback, serial port
se tup, user management
Ha rd disk
Display hard disk capabilit y a nd recording time
I nformatio n
Codestrea m
Display code stream information
Sta tistics
S ystem
Log
infor mation
Cle ar all log informatio n according t o the log video and t ime
I nformatio n
Edit ion
Display e dition informat ion
in formation
L ogout, sh ut down or re boot
Shut down
15
3. 1 Record
There are 4 subm enu ite ms un der " R ecord ": " Record
Conf. ", " Sn apsho t Storage ", " Playb ack " a nd " Ba ckup ".
3. 1.1 Record Config
Here you can co nfigure the r ecordi ng set ting fo r every chan nel. Yo u can define " Vide o Clip
Len gth ", " Pre-Record Time ", " Re cord M ode ", and e ven se t " Recording Sche dule " for
eve ryday, 4 periods a day.
Chann el: Se lect 1 chann el or all 4 ch anne ls for
config uratio n;
Redun dancy: Whe n two stora ge dev ices a re installed,
select "Redu ndancy", th e vide files w ill be backe d up to
all two disks ;
Lengt h: Define len gth of video clip; the de fault value is
60 min utes;
Pre-Record : Defin e pre -recording t ime, 1 -30 se cond s
select able;
Record Mo de: Define"R ecord Mod e", there are 3 options;
A. Sched ule: S tart re cordin g durin g the time p eriods set in the be low sc hedule s
Regu lar : Start regular recording during the p reriod
set; the video file type is "R";
Dete ct : Start recording only when triggered b y
"MotionDetection" , "Camera Mask", or "Video Loss"
durin g the period s et; the video file type is "M";
Alarm : Start recor ding while trig gered by external alarm
signal during the period s et; the video filetype is "A ".
B. Ma nual : Start re cordin g no m atter h ow the sched ule is set.
C. Stop : Sto p recording.
No te: the config uratio n is on ly vali d to th e selec ted ch annel (s).
3.1.2 Snapshot Storage
Here you ca n confi gure th e " Sn apsho t Stora ge " se tting
for ev ery cha nnel. Please note t hat the re sho uld be at
least o ne sto rage d evice set as "Snapshot Disk" if y ou
want t o store snapshots, please refer t o 3.4.1 .
Chan nel : Se lect 1 chann el or al l 4 cha nnels for
config uratio n;
Presn ap : Se t "Pre-snaps hot Pi cture N umbe r"; the DVR
will ta ke sna pshots as se t before recor ding h appen s;
Recor d: define Snapshot Mode s; there are 3 option s;
16
A. Sched ule : Enable " Snapshop " function dur ing the time periods set i n the below s chedules;
Regular : Store snaps hots during the period set
when "R egular" recording is happening;
Detect : Store snapsh ots during the period set when "
Detect" r ecording is h appening, wh ich are trigge red by
"Motion Detect", "Camera Mask" or "Video Loss";
Alarm: S tore snapsh ots during the period set w hen
"Alarm" r ecording is h appening, w hich are trigg ered by exte rnal alarm s ignal;
B. M anua l : Enab le "Sn apsho t" func tion in any c ases;
C. S top : D isable "Snap shot" functio n in any cas es.
3.1.3 Playback
Plea se ref er to 2 .3.
3.1.4 Backup
Here you can back up re corde d vide o files to exte rnal
stora ge de vice, e ither a SD ca rd or a Hard Drive.
Plea se make sure you h ave co nnect ed the storag e
devices to the DV R in a dvance .
Click " Dete ct " to search Stora ge De vices,
Sele ct one disk fo r vide o back up;
Click "Back up"to go to t he next page to Ch oose
" File Type ", " Cha nnel " , " Start Time ", "En d Tim e ",
" Bac kupFo rmat " as sh own, a nd the n click " Start "
to ba ck up files.
Note : you c an als o do ot her op eratio n whil e Vide o
Back up is b eing p rocessed.
3.2 Alarm
The re are 7 subm enu it ems un der " A larm":
"Motion D etect. ", " Vid eo Blind ", " V ideo L oss "
and " Alarm Inpu t ", "Al arm Output " ,
"Ab norm ality" a nd "Ca r Stat us ".
17
3.2.1 Motion Detect
Here yo u can config ure the " Mot ion De tect "setting
for every chan nel.
Chan nel: S elect 1 chan nel or all 4 ch annels for
conf igurati on;
Enab le: En able/Disable " Motion De tect " functio n;
Sensitivity : Sele ct "Sensitivi ty " Le vel; the re are 6
optio ns;
Region: Set " Motio n Detect "ar ea .
Period : Set " Motion Dete ct " schedule s.
Interva l: Set " Motion Detect Interval "; only one motion c an be det ected during the set
interval;
Alarm output : Start the externa l alarm equipment which is con nected to Alarm ou tput
once motions are detected ;
Alarm Delay : Set " Alarm " signal duration;
Record Channel : Th e selected channel (s) would start recording when motio ns are
detected;
Tour : The selected chann el (s) will be shown in full screen in turn, when motions are
detected, refers to 3.3.8 for " Tour Inte rval Setting " ;
Snapshot : The selected channel (s) would ta ke snapshots when motions are dete cted;
PTZ Activation : Activate the PTZ equipment when motions are detec ted; the PTZ
equipment would work as s et, refer to 3.3.6;
Record Delay : Set " Record Delay Time "after alarm ends;
Shown Message: When motions are detected, the alarm dialog box would po p out;
Send Email : When a motion is detected, the DVR would s end an email to the user, refer
to 3.3.4 for "Email Setting" ;
Buzzer : open the buzzer when motions are detected.
18
3.2.2 Video Blind
Here you can configu re " Vi deo B lind " Alarm Settin gs;
whe n the image is inf luence d by the en virom ent or by
human be havio r, the alarm would be activate d. For
sett ings o f linka ge op tions, please refe r to 3. 2.1
" Motion Detec t".
3.2.3 Video Loss
He re you can configu re" Vid eo Lo ss" ala rm se ttings;
wh en the video input signal is lost on the selec ted
ch annel (s), the alarm would be ac tivate d. For
se ttings o f linka ge op tions, please refer to
3.2 .1 " Motion Detect ".
3.2.4 Alarm Input
Here you can con figure " Alar m inpu t" ala rm
setti ngs; th e DVR supp orts w hen th e vide o
inpu t signa l is lost on th e, the alarm would be
activ ated. For se ttings of linkage op tions,
plea se refe r to 3. 2.1 " M otion Dete ct".
3.2.5 Alarm Output
Plea se refe r to 2. 6.
3.2.6 Abnormality
When it is se t in th is opti on, th e DVR will a nalyze the
hardw are an d soft ware a nd re act to the ab norma l
pheno mena , show the a larm d ialog b ox or open the
buzze r.
19
3.2.7 Car Status
Here you ca n conf igure t he 4 a larm in puts a nd
conne ct the m to th e doors or lig hts of your vehicle ;
for ex ample , when the do or is o pen, o r the tu rn left
light is on, th e correspon ding a larm in put wo uld be
detec ted.
3.3 System
There are 8 subme nu item s und er " Sy stem " :
" Gene ral ", " Encod e " , " N etwork " , " Net Service "
and " G UI Display " , " PTZ Confi g.", " R S232 " and
" Tour ".
3.3.1 General
Here you ca n con figure " Gene ral Se ttings " for th e
DVR system;
Men u Lan guag e : 14 languages o ption al, Eng lish, French,
Portugueses, Russian , Itali an, S- Chine se, T-Chin ese,
Spa nish, Thai, G reek, Japa nese, Germ an, an d Polish;
HDD Full : Memory St orage Mode s; " Stop Wh en Fu ll "or
" Ov erwrite Wh en Fu ll ";
Vide o Sta ndar d : PAL or NT SC;
Auto Log out: S et me nu aut o log o ut time ; "0" m eans "never logou t auto matica lly".
3.3.2 Encode
H ere you can set v ideo/ a udio " Encode " pa ramet ers.
T here a re 2 g roups of " Encode " Setti ngs; G enera lly
speaking, the first group is for h igh quality local video
storage and the oth er gro up ca lled " E xtra S tream " is
for rem ote v ideo t ransm issio n whic h is re lative ly low
q uality so as to ens ure th e flue ncy of the vid eo st ream;
C hannel : Sel ect 1 c hanne l or al l 4 cha nnels for set tings;
C ompression : Com pression for mat; th e default
format is H.26 4;
Resolution : V ideo r esolut ion, D1 / HD1 / CIF/ QCIF a djusta ble;
Frame R ate : A djusta ble; Maximu m Frame Ra te: 25F PS (NTSC) or 30FPS (PAL);
Bit Rate Type : VBR (Varia ble Bit Rate) or CBR (Constant Bit Rate) sel ectabl e;
20
Qual ity: Vi deo Q uality, 6 leve ls adju stable ;
Bit Rate: select a bit rat e valu e once "CBR" Bit R ate Ty pe is selecte d; D1 (512~2 560kb ps)/
HD1 (384~2048k bps)/ C IF (64 ~1024 kbps) / QCIF (64~5 12kbp s);
Vide o/ Audio: Re cord"Video" or "Audio", or both .
3.3.3 Network
Here y ou can configure " Wired Network " settings if
you ne ed to use the internet function;
Net Card : Wire Netcard;
DHCP Enable : Automatically Attain IP Address (No t
recomm ended);
Note: please make sure the DHCP Server is built in
advance if you nee d to use this function.
IP Address : set IP address for the device;
Media Port : Set " TCP Port " for the device;
HTTP Po rt : Set " HTTP Port "for the devic e;
HS Down load: High Speed Downl oad fro m Inte rnet;
Tra nsfer Policy : Tran sfer Priority; Quali ty Pref erred, Fluen cy Pre ferred or Ada ptive;
3.3.4 Net Service
He re you can c onfigu re Advanced Netwo rk Se ttings
for the de vice. Double click each item an d the
co rrespo nding dialog box w ould p op out .
a. PPPoE
Ente r the " User Name " and " P assw ord" p rovide d by IS P
(Inte rnet S ervice Provi der), re boot t he DV R, it w ill build
the c onnec tion to the In ternet via " P PPoE " and a ttain th e
" IP a ddres s " aut omatically.
b. EM AIL
Ente r the e mail in forma tion he re, an d the DVR w ill be
able to sen d ema ils with alarm inform ation or sna pshot
to th e appo inted receivers (maximum 3 em ail addresse s)
when alarm s hap pen.
21
c. IP FIL TER
You can pu t IP ad dresses in th e " Bla cklist " or " White
List ". IP Ad dresses in th e " Wh ite Lis t" are able t o
acce ss the device ; on th e contrary, I P Addresses in the
" Blac k List "Will b e blocked; y ou can set m aximu m 64
IP Ad dress es.
d. DDNS
e. FTP
" DD NS "is short f or " Dy namic Dom ain Na me Se rver ". If
" DD NS " se tting i s successful ly conf igured , you can vis it
the Device via th e Dom ain Na me wi th the IE Browser;
D DNS T ype: S elect " DDNS Type ";
D omain Name : Ente r the " DDNS doma in na me ";
User Na me/ P assword : E nter th e DDN S " Us er Nam e "
an d " Pas swor d".
" FTP" is for uploading video files or snapshot to the
appointed FTP Server when ala rms happen or
recording, snapshot triggered by alarm s.
S erver IP : Ent er the IP add ress o f FTP Server;
Port : En ter the Domain port of FT P Server;
User Na me : E nter User Na me;
Passwo rd : En ter User Pas sword ;
M ax File Leng th : Se t Max File Le ngth f or unlo adng ;
D irNam e : File Directory fo r uploa ding.
f. Wir eless Config
The DVR suppor ts rem ote m onitori ng via 3G ne twork.
here you c an configure the "3 G" Se ttings;
T ype : S elect 3 G "Dia l Mod e";
W ireles s AP: Enter 3 G Acc essPo int;
D ial Nu mber : Enter 3G Dia l Num ber;
User Na me : E nter 3G User Name;
Passwo rd : En ter 3G User Passw ord.
Note: 1. Mak e sure there is a 3G mod ule bu ilt-in the DV R;
2. A sk you r 3G S ervice Provi der for the ab ove p arame ters; f or example, the se ttings for Ch ina
Uni com a re as follows :Wirel ess AP : 3gne t; Dial Numb er: *9 9#; Us er Nam e: no ; Pass word: no
g. W ifi
Th e DVR supp orts " r emote moni toring " via W ifi ne twork,
he re you can c onfigu re the "Wifi" Setting s;
Sea rch : S earch Wirele ss Ne twork in loca l area , and
the n doub le clic k to ch oose one of them;
Password : Ente r the " Passw ord" o f the W ireles s Rou ter;
IP A ddres s : Ent er the IP add ress o f the D evice;
Sub net : Enter t he Sub net M ask of the De vice;
Ga teway : Enter the Gatewa y of th e Devi ce.
Note:Make sure th ere is a Wifi Module built-in the DVR before you u se thi s function.
22
3.3.5 GUI Display
Here you can co nfigure the s ettings for OSD Ite ms,
Tra nspare ncy, R esolu tion, a nd so on.
C ar Info : Ente r an ID for th e Device;
C hannel Title : Ente r a title name for ea ch cha nnel;
[ Choos e OSD items] Click the square on the right to
show/ h ide the corre spond ing ite m, suc h as " T ime
D isplay ", " Ch annel Title ", "Reco rd Sta tus ", " Alarm
S tatus " and so on;
Tra nspar ency : Move the horizontal scro ll bar to adjust the transparency of the
Menu inte rface;
Resolution : Set video outpu t resulotion;
3.3.6 PTZ Config.
C hanne l: Sele ct the video c hanne l whic h is co nnecte d
to PTZ d evice;
Protoco l: Set the " Protoco l"of th e PTZ device ;
A dress : Enter the " A ddres s" of th e PTZ device ;
Baudrat e: Sel ect the " Baudrate " used b y the the PT Z
device;
D ata Bit s: Sel ect " Data bit s" for t he PTZ devic e;
Stop Bits: Set " Stop Bits "for the PTZ de vice;
Pari ty : Se t " Pair ty " for the PT Z device, " Odd ", " E ven", " Mark ", "Sp ace " o r " Non e ".
3.3.7 RS232
In gene ral, we use " RS232 " inte rface for GPS function
only. Se lect " GPS " in the f irst bl ank, e nter Baudrate
"9 600 ", Data Bits " 8 ", Stop Bits " 1 " and Sele ct Par ity
"N one", the G PS will work.
N ote: the setting is only valid for the m odels which
support GPS functio n.
3.3.8 Tour
Here yo u can config ure th e" Tou r " set tings, for exa mple,
if interv al is set " 5 " second s, CH 1, CH2, CH3 , CH 4 are
selecte d, then the im age would cycle among the 3
channe ls, tou r from one to another every 5 s econd s;
and you can a lso se t " Inte rval " for " Alarm T our" h ere.
23
3.4 Advanced
T here a re 8 su bmenu items unde r " Adv anced ":
" H DD M anage ", " Ac count ", " Onl ine User ", "
Output Adjus t ", " Au to Ma intain ", "Restore ",
" U pgra de " an d " Dev ice Inf o ".
3.4.1HDD Manage
Here you c an ma nage a ll Mem ory S torage Devices. All
devices (H DD, USB Dis k or SD card ) inform ation will be
shown in th e form on th e left, includi ng " HD D No . ",
" Type "," St atus ", and s o on.Y ou can defin e a disk as
" Rea d & Write D isk ", " Snapshot Disk", " R ead o nly
Disk ", or " R edun dant Disk ", you ca n " For mat "th e Disk,
" Rec over " the Dis k, or " Partit ion " th e disk with t hose
butto ns on the rig ht side .
Note: Make su re at l east th ere is one "Read Write Disk".
3.4.2 Account
H ere yo u can mana ge all User A ccou nts. Al l User
Informa tion is show n in th e form on th e left, includ ing"
User Name ", " Use r Group ", " User Status ". You can
" Modif y Use r ", "M odify Goup ", " Mo dify P asswo rd ",
" Add G roup ", " Del ete User ", " Delete Grou p ", or
" Updat e Use r " with those butto ns on the rig ht sid e.
【Modify Passwo rd】
【D elete Group】
【Add User】
【Add Group】
24
3.4.3 Online User
He re you can see all " Onlin e Net work Users " who are
vis iting th e DVR devi ces. S elect o ne on line user,
clic k" Disconne ct ", t he con nectio n will be cut , and the
use r will be blo cked u ntil th e devi ce boo t up n ext tim e.
3.4.4 Output Adjust
Please refe r to 2.8 "Outp ut Ad just".
3.4.5 Auto Maintain
He re you can se t " Aut o Reb oot " a nd " Au to De lete
Files " tim e for the dev ice.
3.4.6 Restore
Here you can res tore a ll setti ngs to " Factory Se ttings ".
Sele ct the corres ponding item s, an d click " OK" t o
exe cute.
3.4.7 Upgrade
Plug in a U SB dis k with Upgra de Fir mware , the D VR
will detect the up grade file au tomatically. Naviga te
to th is pag e, and click " Upgra de " to execu te. Th e DVR
will reboot autom atical ly whe n the" U pgra de " is done.
3.4.8 Device Info.
Here you can see the " Device information " of the
DVR, inc luding " Audio in Channels ", " Alarm in
Channels ", " Alarm out Channels ", " GUI Theme "
and so on.
25
3.5 Info.
There are 4 sub menu items under " Info.": " HDD Info",
" BP S ", " LOG " and " Ve rsion".
3.5.1 HDD Info
Here y ou can see in forma tion o f all St orage Device s,
including " Di sk Typ e", " Capaci ty ", " L eft Ca pacity ",
and " S tatus " .
Note: If the d isk is in good cond ition, a circle " " w ill
be sho wn on the to p correspondingly; otherwise, a
wrong mark " X " wi ll be sh own; if no d isk con necte d,
then a dash m ark " -" .
3.5.2 BPS
Here you can see real-time " Bit Stream Info " (Kb/S)
of each c hannel and " Memo ry Take-up Rate "(MB/H).
3.5.3 LOG
Here y ou ca n chec k all " E ven L og Inf ormat ion " o f this
device , inclu ding " Log Ti me ", " Log Type ", a nd " Lo g
Detailed Info "
3.5.4 Version
Here you can check Hardware and Firmware
inf ormati on of t he Device.
3.6 Logout
Please refer to 2 .9 .
26
Mouse operation
The DVR support s Mouse Ope ration, here i s the o peratio n instr uction .
Ope ratio n
Dou ble le ft cl ick
Function
Dou ble click one item to pl ay in the files list.
Dou ble click o ne channel to show in full screen or 1/4 screen
L eft c lick
Se lect one i tem
Right click
P op o ut Shortcut Menu
Ro ll the whe e
T our f rom one i mag e to a noth er a t Pre view Pag e
Preview
201 2-05-1 0 11:10 :00
20 12-0 5-10 11 :10 :00
R ecord Icon
Motion Detec t I con
C hann el ID
C A M01
C A M02
201 2-05-1 0 11:10 :00
20 12-0 5-10 11 :10 :00
Audio outpu t Icon
Snapshot Icon
Video Loss Icon
C A M03
C A M04
FAQ
1. Can not boot up normally
2. C an n ot detect Hard Drive
Possible reasons are as follows;
A. The power supply is not right;
B. The connection of power cable is bad;
C. Error happened during fir mware upgrade;
D. The Hard Drive is broken;
Possible reasons are as follows;
A. The Hard D rive is broken;
B. The Hard D river is not properly connected;
C. The SATA connector on the main PCB
board is damaged.
3. C rash or reboo t automaticallylly
4. No color/ distorted Image
Possib le reasons are as fol lows;
A. The i nput po wer voltage i s not st abl e or
too low;
B. The Hard D rive is broken;
C. Bad heat radi ator or too much dust or bad
runni ng circumst ance;
D. Some problem with the D VR hardware.
Possible r easons are as follows;
A. The color settings of the monit or is not r ight;
B. The video signal is too weak after long
distance transmission;
C. T V standar d mismatched; check if DVR,
camera, and monitor ar e in the same TV
stan dard, PAL or NTSC ;
5. No video output
Possible reasons are as follows;
A. Video output cable is broken or
not properly connected;
B. There is no video input signal or the signal
is too weak;
C. The image brightness is set “0”;
D. TV channel mismatched; please switch
the monitor to AV channel.
27
DiskPlayer
A. Con tr ol Tool Bar
2012-05-10 11:10:00
2012-05-10 11: 10:00
B. C ontr ol Bu ttons
CA M 01
CA M0 2
2012-05-10 11:10:00
2012-05-10 11: 10:00
C . Speed Di s pl ay Bar
D. Googl e M ap Z one
CA M 03
CA M0 4
E. C al endar/H our Bar/ M inu te Bar
A. Control Tool Bar
1. F ile
a. O pen l ocal fil es
b. Exi t
Exit D iskPl ayer.
28
2. E dit
a. Cu t file
Note: here you c an bac k up v ideo to your compu ter, se lect "S tart T ime", " End Ti me",
"Channel", and a path f or saving file s.
b. Modify Pa ssword
3. Navigatio n Setti ng
Sele ct "Op en Nav igatio n", you will s ee Goo gle M ap at t he bot tom rig ht sho wing
the p osition of the vehic le.
29
B. Control Buttons
Ple ase re fer to the for m for functio n of ea ch bu tton;
Butto n
Funct ion
Butto n
F unctio n
Slo w x1/x 2/x3/x4
Play
No Use
Pause
Fast x1/x2 /x3/x4
Stop
Pla y Fram e by Frame
C. Speed Display Bar
Speed(KM/H)
V ehicle Movin g Sta tus
D. Google Map Zone
I f the "Open Naviga tion" i s selec ted, y ou will be abl e to se e the vehicle position,
while p laying video.
E. Calendar/Hour Bar/Minute Bar
Calendar
Hour Bar
Minute Bar
Doub le clic k the n umber in Cal endar , the H our ba r and t he Min ute Ba r will
change corr espon dingly .
1. Re d num ber in Calend ar me ans th ere wa s reco rding during the co rrespo nding day;
2. Green in Hour Bar me ans th ere wa s reco rding d uring the co rrespo nding hours;
3. Blu e in M inute B ar me ans th ere wa s reco rding during the co rrespo nding minut e.
30
GUARANTEE CA RD
ITEM:
MO DEL:
ITEM NO.:
DA TE OF PURCHASE:
CL IENT NAME:
CO NT ACT ADDRESS:
CO NT ACT TEL
IMPORTANT NOTICE
1 . Plea se fill out the Guarantee Card s trictly accord ing to the facts;
2 . Only will th is Gua rantee Card be valid whe n seal ed by our
franc hisers ;
3 . We p rovide 1 yea r warr anty to the product . If pro duct fa ils to
work prope rly und er wa rranty period , our f actory will he lp
repa ir it fre e of charge;
4 . This limited warranty do es no t apply to:
(1). Damag e to a produ ct that is out of warranty;
(2). Cosmetic da mage, such as scratches, nicks and d ents;
(3). Damag e cau sed by accid ent, ab use, m isuse , wate r, floo d,
fire, or other acts o f natur e;
(4). Damag e cau sed by servic e perf ormed by an yone w ho is
not an autho rized s ervice provi der;
(5). Damag e to a produ ct that has b een modified or alt ered
without perm ission ;
(6). Damag e to a produ ct that has b een us ed in d amp, high/lo w
tempe rature or any other harsh envir onmen ts;
(7). Any ot her da mages that a re not cause d by o ur fact ory.
5 . Plea se kee p the Guaran tee Card properly . We re serve the ri ght
to Re fuse warran ty in ca se of no Guarante e Card provi ded.