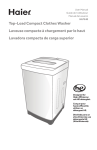
1
User Manual
Guide de l’utilisateur
Manual del usuario
HLP24E
Top-Load Compact Clothes Washer
Laveuse à chargement par le haut
Lavadora de ropa con carga superior
Designed for
use HE detergent.
Conçue pour
utiliser un
détergent HE.
Diseñada para un
detergente HE
TABLE OF CONTENTS
IMPORTANT SAFETY INSTRUCTIONS ................................................................. 2
Installation Safety Precautions ..................................................................................... 2
General Safety Precautions .......................................................................................... 3
PARTS AND FEATURES ....................................................................................... 4
INSTALLATION INSTRUCTIONS.......................................................................... 5
Tools Needed ................................................................................................................. 5
Parts Supplied ................................................................................................................ 5
Location Requirements................................................................................................. 5
Drain System Requirements ......................................................................................... 6
Electrical Requirements ................................................................................................ 7
STEP BY STEP INSTRUCTIONS............................................................................ 8
Step 1 - Unpack the Washer.......................................................................................... 8
Step 2 - Connect and Secure the Drain Hose .............................................................. 9
Step 3 - Connect the Water Hoses............................................................................... 9
Step 4 - Level the Washer ...........................................................................................11
Step 5 - Complete Installation ....................................................................................11
CONTROL PANEL AND FEATURES .................................................................... 12
OPERATING INSTRUCTIONS............................................................................. 15
Step 1 - Prepare and Sort Laundry..............................................................................15
Step 2 - Add Fabric Care Products..............................................................................16
Step 3 - Load the Washer ............................................................................................17
Step 4 - Start the Washer ............................................................................................17
CARE AND CLEANING GUIDE............................................................................ 18
Cleaning and Maintenance ..........................................................................................18
Vacationing Precautions .............................................................................................18
Moving or Storage Preparation ...................................................................................18
TROUBLESHOOTING ........................................................................................ 20
LIMITED WARRANTY ........................................................................................ 22
RECORD KEEPING
Thank you for purchasing this Haier
product. This user manual will help you
get the best performance from your
new washer.
For future reference, record the model
and serial number located on back of
the washer, and the date of purchase.
Staple your proof of purchase to this
manual to aid in obtaining warranty
service if needed.
___________________________________
Model number
___________________________________
Serial number
___________________________________
Date of purchase
1
IMPORTANT SAFETY INSTRUCTIONS
WARNING
To reduce the risk of fire, electric shock, or injury to persons when using
your appliance, follow the basic precautions, including the following:
r Read all of the instructions before using this appliance.
r Use this appliance only for its intended purpose as described in this user
r
r
manual.
Do not use the washer for commercial clothes washing.
Under certain conditions, hydrogen gas may be produced in a hot-water
system that has not been used for 2 weeks or more. HYDROGEN GAS
IS EXPLOSIVE. If the hot water system has not been used for such a
period, before using a washing machine, turn on all hot-water faucets
DQGOHWWKHZDWHUǍRZIURPHDFKIRUVHYHUDOPLQXWHV7KLVZLOOUHOHDVH
DQ\DFFXPXODWHGK\GURJHQJDV$VWKHJDVLVǍDPPDEOHGRQRWVPRNH
RUXVHDQRSHQǍDPHGXULQJWKLVWLPH
INSTALLATION SAFETY PRECAUTIONS
DANGER
Before you throw away your old appliance, remove the door or lid so
that children cannot hide or get trapped inside your old appliance.
r This appliance must be properly installed and located in accordance with
r
r
2
the installation instructions before it is used.
Do not store or install this appliance where it will be exposed to
temperatures below freezing or exposed to weather, which can cause
damage to the appliance.
The appliance must be properly grounded to conform with all electrical
codes and ordinances. See “Electrical Requirements” section.
GENERAL SAFETY PRECAUTIONS
r Keep the area around your appliance free from combustible materials
such as lint, paper, rags or chemicals.
r Close supervision is necessary if this appliance is used by or near
children. Do not allow children to play on, with, or inside this appliance.
r Do not place articles that have been previously cleaned in, washed in,
soaked in, or spotted with gasoline, dry-cleaning solvents or other
ǍDPPDEOHRUH[SORVLYHVXEVWDQFHVLQWKHZDVKZDWHU7KHVHVXEVWDQFHV
JLYHRNjYDSRUVWKDWFRXOGLJQLWHRUH[SORGH
r 'RQRWDGGJDVROLQHGU\FOHDQLQJVROYHQWVRURWKHUǍDPPDEOHRU
H[SORVLYHVXEVWDQFHVWRWKHZDVKZDWHU7KHVHVXEVWDQFHVJLYHRNj
vapors that could ignite or explode.
r Do not reach into the appliance if the wash basket, tub or agitator is
moving.
r Do not tamper with the controls.
r Never unplug your washer by pulling on the power cord. Always grasp
WKHSOXJnjUPO\DQGSXOOVWUDLJKWRXWIURPWKHRXWOHW
r To minimize the possibility of electric shock, unplug this appliance from
the power supply before attempting any maintenance or cleaning.
NOTE: 7XUQLQJWKHF\FOHVHOHFWRUNQREWRWKHţ2NjŤSRVLWLRQGRHV127
disconnect the appliance from the power supply.
r Do not attempt to service, repair or replace any part of the appliance
r
XQOHVVVSHFLnjFDOO\UHFRPPHQGHGLQWKLVXVHUPDQXDORULQSXEOLVKHG
repair instructions that you understand and have the skills to carry out.
Before discarding or removing from service, remove the washer door or
lid.
SAVE THESE INSTRUCTIONS
HOUSEHOLD USE ONLY
3
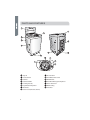
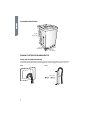
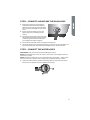
PARTS AND FEATURES
A
J
F
B
C
I
D
G
H
E
M
N
O
L
P
Top Lid
Control Panel
Cold Water Inlet Value
Cabinet
Wash Basket
Cabinet Handle
Powdered Detergent Dispenser
Leveling Feet (2)
Outer Tub Cover
Liquid Beach Dispenser
Balance Ring
Drain Port
Lint Filter
Power Cord (120 Volt/ 60 Hz)
4
Access Panel
INSTALLATION INSTRUCTIONS
TOOLS NEEDED
Ţ
Ţ
Ţ
Pliers
Wrench
Flat-blade Screwdriver
Ţ
Ţ
Measuring Tape
Carpenter’s Level
Ţ
Water Hoses (1)
Ţ
User Manual
PARTS SUPPLIED
Ţ
Ţ
Ţ
Drain Hose Clamp
Drain Hose Hook
Drain Hose
LOCATION REQUIREMENTS
Ţ
Ţ
Ţ
A suitable location is protected from direct sunlight and heat sources such as
radiators, baseboard heaters, or cooking appliances.
Ţ
Ţ
Do not install on carpeting.
Ţ
Hot and cold water faucets must be present within 3 ft. (0.9 m) of the hot and
cold connections on the washer.
Ţ
A water heater must supply hot water with a temperature of at least 120°F
(49°C).
Ţ
The water pressure should be between 20 and 100 psi (138 and 690 kPa).
The location must have a grounded electrical outlet located within 4 ft. (1.2 m) of
power cord on the back of the washer.
WARNING
Do not install or operate the washer where it will be exposed to
temperatures below 32°F (0°C). Water remaining in the washer will
freeze and cause damage to the washer.
5
WASHER DIMENSIONS
37ƅ"
(95.6 cm)
{ŧŰŵ"
(56.0 cm)
tƁű"
(55.0 cm)
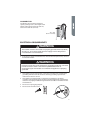
DRAIN SYSTEM REQUIREMENTS
WALL OR FLOOR STANDPIPE
The height of the standpipe must be between 39” (99 cm) and 60” (153 cm) from the
bottom of the washer. The minimum diameter of the standpipe must be 2” ( 5 cm).
Wall
Floor
39" – 60"
)
6
LAUNDRY TUB
The laundry tub must have a minimum
capacity of 20 gal. (76 L). The height of the
laundry tub must be at least 39” (99 cm)
and no more than 48” (122 cm).
39" – 48"
(99 cm – 122cm)
ELECTRICAL REQUIREMENTS
WARNING
The washer must be connected to a properly grounded 120 volt, 60 Hz.,
AC only, 15- or 20-amp, fused electrical supply. A time-delay fuse or
circuit breaker is recommended.
r
If the electric supply provided does not meet the above requirements, contact a
licensed electrician.
WARNING
Improper connection of the equipment-grounding conductor can result
in a risk of electric shock. Check with a qualified electrician or
serviceman if you are in doubt as to whether the appliance is properly
grounded.
r
This appliance must be grounded. In the event of malfunction or breakdown,
grounding will reduce the risk of electric shock by providing a path of least
resistance for electric current.
r
This appliance is equipped with a cord having an equipment-grounding
conductor and a grounding plug. The plug must be plugged into an appropriate
outlet that is properly installed and grounded in accordance with all local codes
and ordinances.
r
r
Do not use a 3 prong plug adapter.
Do not use an extension cord.
7
STEP BY STEP INSTRUCTIONS
INSTALLING YOUR WASHER
:HUHFRPPHQGWKDW\RXUQHZZDVKHUEHLQVWDOOHGE\DTXDOLnjHGDSSOLDQFH
technician. If you feel that you have the skills to install the washer, please read the
installation instructions carefully before installing.
CAUTION: If, after completing these steps, you are unsure that the washer is
SURSHUO\LQVWDOOHGFRQWDFWDTXDOLnjHGDSSOLDQFHWHFKQLFLDQ
WARNING
If your washer was just delivered and the outside temperature was
below freezing, do not operate until the washer warms up to room
temperature.
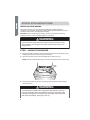
STEP 1 - UNPACK THE WASHER
1. Remove all packing materials. This includes the foam base and all adhesive tape
holding the washer accessories inside and outside.
2. Open the top lid to remove the wash basket brace. Pull to remove.
NOTE: Save the wash basket brace to use when moving the washer in the future.
3. Inspect and remove any remains of packing, tape or printed materials before
using the washer.
WARNING
To avoid danger of suffocation, keep plastic bag and other packing
material away from babies and children. Do not use this bag in cribs,
carriages and playpens. The plastic bag could block nose and mouth
and prevent breathing. This bag is not a toy.
8
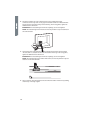
STEP 2 - CONNECT AND SECURE THE DRAIN HOSE
1. Enlarge the opening by squeezing the
ends of the drain hose clamp together.
Slide the clamp over the end of the drain
KRVHDQGRQWRWKHǍH[LEOHVHFWLRQRIWKH
hose.
2. Fit the end of the drain hose over the
plastic drain port extending from the
washer.
3. Squeeze the ends of the clamp to enlarge
the opening and slide the clamp over the
connection of the drain hose and drain
port. Release the clamp to tighten.
4. Put the drain hose hook end in a drain pipe or laundry tub.
5. Secure the drain hose in place by fastening it to a water hose, the standpipe, or a
leg on the laundry tub. See “Drain System Requirements” for illustrations.
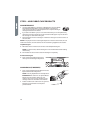
STEP 3 - CONNECT THE WATER HOSES
IMPORTANT: Only use new hoses when installing the washer.
NOTE: Periodically inspect hoses for cracks, cuts, leaks or wear. Replace with new
hoses every 5 years.
NOTE: Hot water needs to be set at a temperature of at least 120ºF - 140ºF. (49ºC60ºC) for the soap to dissolve and to avoid soap residue remaining on clothes.
1. &KHFNWKDWDǍDWZDVKHULVSUHVHQWDQGnjUPO\LQSODFHLQHDFKHQGRIWKHZDWHU
inlet hoses. Flat washers are pre-installed at the factory.
A
Washer
9
2. The hose couplers are color coded to assist you in making the proper
connections. You may want to use gray for cold and red for hot. Thread the inlet
hoses onto the water faucets by hand until snug. Then using pliers, tighten an
additional two-thirds turn.
IMPORTANT: To avoid damage to the hose couplings, do not overtighten.
NOTE: To avoid damage to the faucets do not use plumber’s tape or sealants on
the valve threads.
3. Thread the other end of the inlet hoses by hand onto the inlet valves marked
“H” (hot) and “C” (cold) on the back of the washer until snug. Then using pliers,
tighten an additional two-thirds turn.
IMPORTANT: To avoid damage to the hose couplings, do not overtighten.
NOTE: To avoid damage to the washer inlet valves, do not use plumber’s tape or
sealants on the valve threads.
4. Turn on the hot and cold water faucets and check for leaks. If there is any leaking,
check steps 1 through 3 again.
10
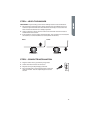
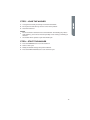
STEP 4 - LEVEL THE WASHER
IMPORTANT: Proper leveling of the washer will help reduce noise and vibration.
1. 3ODFHZDVKHULQLWVnjQDOORFDWLRQ&KHFNWKDWWKHZDWHUDQGGUDLQOLQHVDUHQRW
VWUDLQHGRUSLQFKHG0DNHVXUHWKDWDOOIRXUIHHWDUHnjUPO\LQFRQWDFWZLWKWKH
ǍRRUDQGWKDWWKHZDVKHUUHVWVVROLGO\LQSRVLWLRQ
2. Using a carpenter’s level, check to make sure the washer is level from side to
side and from front to back.
3. If the washer is not level, adjust the leveling feet. Turn clockwise to extend (raise
the washer) or counterclockwise to retract (lower the washer).
Raise
Lower
STEP 5 - COMPLETE INSTALLATION
1. Plug the washer into a grounded 3 prong outlet.
2. Check that water faucets are turned on.
3. Dispose of/recycle all packaging materials.
4. Run a normal wash cycle using detergent to test and
clean the washer. See the ”Operating Instructions”
section.
11
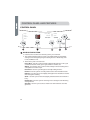
CONTROL PANEL AND FEATURES
CONTROL PANEL
Super
Heavy Duty
Large
Delicate
Normal
Quick
Medium
Small
c
D
E
WASH CYCLE BUTTON
Ţ
Ţ
Use this button to select the desired cycle for your wash load.
Ţ
There are 8 cycles to choose from:
The standard default settings of each cycle will be displayed; the default
settings can be changed by using the Setting buttons - Wash Temp, Soil
Level, and Water Level.
Heavy Duty - Use this cycle for heavily soiled durable garments. This cycle
can also be used for towels, sports gear, children’s clothes, etc.
Whites - Use this hot water cycle for white and light colored clothing that is
susceptible to transfer of dye.
Perm Press - Use this cycle for light to normally soiled garments.
Normal - Use this cycle for normally soiled cottons and mixed fabric loads.
Delicate - Use this cycle to wash lightly soiled garments and delicate clothes
that need gentle washing.
Quick - Use this cycle to wash small, lightly soiled loads that are needed in a
hurry.
Rinse & Spin - Use this cycle for removing excess detergent and refreshing
clean garments.
Spin Only - Use this cycle to extract water from sink washed or clean wet
garments.
12
DELAY START BUTTON
Ţ
Press this button to delay the start of your wash cycle between 1 - 24 hours
in one hour increments.
Ţ
Use this button to select a delayed start of the washer. The number of hours
will be shown in the Estimated Time Remaining Display. Each press of the
Delay Wash Button will increase the time by 1 hour.
Ţ
One button press after 24 will cancel the delay wash feature. You can also
Power Button.
Ţ
The Start/Pause Button must be selected to begin the countdown.
CYCLE STATUS INDICATORS
Ţ
The Cycle Status lights indicate the stages of the selected cycle.
START/PAUSE BUTTON
Ţ
Press this button to start a selected cycle or to pause an operating cycle.
NOTE: After starting the wash cycle, you must pause the operating cycle to
change the Wash Temp, Soil Level and Water Level settings.
POWER BUTTON
Ţ
Press the power button to turn on the washer.
NOTE: If the washer is turned on, but START is not pressed, the power will
13
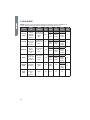
CYCLE GUIDE
NOTE: To protect your wash load, all options and settings are not available for all
cycles. The shaded boxes indicate the default settings for each cycle.
CYCLE
FABRIC
TYPE
WASH
PROCESS
Heavy
Duty
Heavily
soiled,
durable
colorfast
fabrics
12 Min Soak
25 Min Wash
Rinse
Spin
Normal
Cottons,
linens and
mixed
garments
16 Min Wash
Spray Rinse
Spin
Delicate
Lingerie,
sheer
fabrics
with lace
trim
10 Min Wash
Rinse
Spin
Quick
Cottons,
linens and
mixed
garments
9 Min Wash
Rinse
Spin
Rinse &
Spin
Unsoiled
garments
Rinse
Spin
Spin
Only
Clean
soaking
wet
garments
Spin
EST
TIME
1:08
:40
:37
:31
WASH
TEMP
SOIL
LEVEL
WATER
LEVEL
Warm
Normal
Medium
Hot
Cold
Heavy
Light
Super
Large
Small
Warm
Normal
Medium
Hot
Cold
Heavy
Light
Super
Large
Small
Warm
Normal
Medium
Cold
Heavy
Light
Super
Large
Small
Warm
Normal
Medium
Hot
Cold
Heavy
Light
Super
Large
Small
EXTRA
RINSE
Ţ
Ţ
Ţ
Ţ
Medium
14
:29
Cold
only
n/a
Super
Large
Small
:06
n/a
n/a
n/a
Ţ
OPERATING INSTRUCTIONS
STEP 1 - PREPARE AND SORT LAUNDRY
PREPARE LAUNDRY
r
r
r
r
r
r
r
r
Check garment labels for manufacturer’s washing instructions.
Empty pockets and turn them inside out.
7XUQGRZQFXNjVDQGUHPRYHDQ\OLQWRUGLUW
Tie strings and sashes so they don’t tangle.
Close zippers, snaps and hooks to avoid snagging.
Remove pins or other sharp objects from clothes to prevent scratching of the
wash basket.
Pretreat all stains and heavily soiled areas.
Turn synthetic and wool knits inside out to avoid pilling.
SORT LAUNDRY
r
Sort laundry by the type of wash cycle required (water temperature and wash
action).
r
Separate light colors from dark colors and colorfast items from non-colorfast
items.
r
r
r
Separate heavy duty fabrics from light weight fabrics.
6HSDUDWHIDEULFVWKDWDWWUDFWOLQWIURPIDEULFVWKDWJLYHRNjOLQW
Separate bulky items such as blankets or pillows.
15
STEP 2 - ADD FABRIC CARE PRODUCTS
ADD DETERGENT
r
VHRQO\+LJK(ǎFLHQF\GHWHUJHQW+(GHWHUJHQWVDUHVSHFLnjFDOO\
8
formulated with ingredients to avoid problems caused by too
many soap suds. Excess suds will prevent the complete rinsing of
detergent residue from clothes.
r
If you select the Quick cycle, it is recommended that you use a liquid laundry
detergent to achieve optimum results. Powdered detergent may not dissolve
fast enough to clean well in this cycle.
r
Determine the amount of detergent. Follow the detergent use instructions on
the container.
NOTE: The proper amount of detergent depends on the size of the load, the soil
level of the clothes, and the softness of the water being supplied to the washer.
Liquid Detergent
1. Fill washer with a small amount of water and add liquid detergent.
NOTE: For best results, add the detergent to the wash basket before loading
with laundry.
2. Run washer for 30 seconds to dissolve detergent completely.
Powdered Detergent
1. Pour measured powdered detergent
directly into the detergent dispenser.
$''%/($&+,)'(6,5('
r
Pour measured liquid chlorine bleach into the
liquid chlorine bleach dispenser.
NOTE: Use only liquid bleach in this dispenser.
IMPORTANT: Be careful not to spill undiluted
bleach onto the washer cabinet or your
clothes. Since it is a strong chemical, it may
GDPDJHFORWKHVRUWKHnjQLVKRIWKHZDVKHU
r
16
Follow manufacturer’s directions on garment
label for recommended use of liquid or
powder bleach.
STEP 3 - LOAD THE WASHER
1. Load garments loosely and evenly around the wash basket.
2. Do not place clothes directly over the center of the pulsator.
3. Close the washer lid.
NOTES:
r 'RQRWRYHUORDGRUVWXNjLWHPVLQWRWKHZDVKEDVNHW2YHUORDGLQJPD\UHGXFH
ZDVKHǎFLHQF\FDXVHH[FHVVZHDUDQGSRVVLEO\FDXVHFUHDVLQJRUZULQNOLQJRI
the load.
r
The washer will not pulsate or spin with the lid open.
STEP 4 - START THE WASHER
1. Press the POWER button to turn the washer on.
2. Select a wash cycle.
3. Modify the default settings and options if desired.
4. Press the START/PAUSE button to start the wash cycle.
17
CARE AND CLEANING GUIDE
WARNING
Always unplug your washer to avoid electric shock before cleaning.
Ignoring this warning may result in death or injury.
Before using cleaning products, always read and follow manufacturer’s
instructions and warnings to avoid personal injury or product damage.
CLEANING AND MAINTENANCE
GENERAL CARE
r
r
Only use a damp or sudsy cloth for cleaning the control panel.
r
Do not use abrasive cleansers, harsh chemicals, ammonia, chlorine bleach,
concentrated detergent, or solvents to clean the washer. These chemicals may
dissolve, damage, or discolor the washer.
r
After washing clothes, leave the lid open so that moisture inside the machine
can evaporate and to prevent the growth of mold or mildew.
If you spill liquid/powdered softener, bleach or detergent on the cabinet, wipe
WKHFDELQHWLPPHGLDWHO\WRDYRLGGDPDJHWRWKHnjQLVK
DETERGENT DISPENSER
1. Pull the dispenser drawer out to the stop and lift up slightly to remove.
2. Rinse the dispenser with warm water and dry it thoroughly with a soft cloth.
3. Insert the drawer at a slightly downward angle and push it back into place.
LINT FILTER
1. 3
XVKGRZQRQWKHWDEDWWKHWRSRIWKHnjOWHUWRUHOHDVH
WKHnjOWHUIURPWKHZDVKEDVNHW
2. 7
XUQWKHnjOWHURYHUVRWKHEDFNVLGHRIWKHnjOWHULVIDFLQJ
upward.
3. :
KLOHKROGLQJWKHnjOWHUnjUPO\ZLWKRQHKDQGOLIWXSRQ
WKHERWWRPRIWKHnjOWHUWRVHSDUDWHWKHIURQWRIWKHnjOWHU
IURPWKHEDFNVR\RXFDQDFFHVVWKHnjOWHUVFUHHQ
4. &OHDQWKHnjOWHUVFUHHQDQGUHSODFHWKHEDFNRIWKHnjOWHU
5. 6OLGHWKHnjOWHULQWRWKHZDVKEDVNHWDQGnjUPO\SUHVVLWLQWRSODFH
IMPORTANT:%RWKOLQWnjOWHUVPXVWEHLQSODFHGXULQJWKHZDVKF\FOHV&OHDQWKHOLQW
screens after each wash load.
18
VACATIONING PRECAUTIONS
r
XUQRNjERWKWKHFROGZDWHUDQGKRWZDWHUVXSSO\IDXFHWV7KLVZLOOHOLPLQDWHWKH
7
potential for damage to your home if a water hose ruptures or leaks.
r
r
r
Unplug the washer from the electrical outlet.
Dry the wash basket.
Leave the lid open so that moisture inside the machine can evaporate and to
prevent the growth of mold or mildew.
MOVING OR STORAGE PREPARATION
In addition to performing the “Vacationing Precautions,” complete the following
additional steps.
r
Disconnect the water hoses and the drain hose and place them into the wash
basket.
r
r
Turn the leveling feet so that they are fully retracted into the washer cabinet.
r
r
Move and store your washer in an upright position only.
If moving the washer, place the wash basket brace from the original packing
materials back into the top of the washer opening. Use masking tape to secure
the washer lid.
Do not store your washer in a cold environment where temperatures fall below
freezing; store at room temperature.
19
TROUBLESHOOTING
WASHER DOES NOT OPERATE
r
r
r
r
Check that the power cord is plugged into a grounded 3 prong outlet.
r
r
Check that the washer lid is properly closed.
Check that the electrical wall receptacle is of proper voltage.
Check if the circuit breaker needs to be reset or if the fuse needs to be replaced.
Check that the washer is not overloaded. Laundry may need to be redistributed
to re-balance the load.
The washer pauses in some cycles. This is normal in the Delicate cycle, which
has short periods for laundry to soak. You will not hear the washer operating
during that period of time. When the soak time ends, the washer will restart
automatically.
PROBLEMS WITH WATER
:DWHUƫRZLVVORZRUƩOOLQJWDNHVDORQJWLPH
r Check to make sure that the water faucets are fully turned on.
r
Check the water hoses to make sure that they are not tangled, kinked, or
pinched.
Water temperature is incorrect:
r Check your water heater temperature. Hot water needs to be at a temperature
of at least 120ºF -140ºF (49ºC - 60ºC).
r
Check that the inlet hoses are properly connected (hot to hot and cold to cold).
Water leaks:
r Check that the inlet hoses connections at the faucets and washer are tight.
r
Check that the drain hose connection at the washer is secure and that the drain
hose is properly positioned at the drain location.
r
Check the plumbing or call a plumber.
Water will not drain:
r Check that the drain hose is properly connected to the washer.
r
Check the position of the drain hose. In order to drain properly, the top of drain
RXWOHWPXVWEHDWOHDVWŤFPDERYHWKHǍRRU
r
Check that the sink or drainpipe is not clogged.
20
WASHER IS MAKING NOISE
Thumping Sound:
r The wash load may be unbalanced. Pause the washer and redistribute items in
the wash basket.
Rattling or clanking noises:
r Foreign objects may be in the washtub. Stop the washer and check for foreign
objects such as keys or loose change.
Squealing Sounds:
r Wash basket may be overloaded. Stop the washer and remove part of the wash
load.
Vibration Noises:
r :DVKHUPD\QRWEHOHYHO&KHFNWKDWDOOOHYHOLQJIHHWDUHUHVWLQJnjUPO\RQWKH
ǍRRUDQGWKDWWKHZDVKHULVOHYHO
PROBLEMS WITH CLOTHING
Wrinkling:
r Wrinkling can occur because of improper sorting, overloading or washing at the
wrong water temperature.
r
Avoid overloading and re-sort your load. Do not mix heavy clothes such as work
clothes with light clothes such as blouses, light shirts and delicate items. You
may need to wash them in warm or cold water.
Detergent Residue:
r Detergent may not completely dissolve in extremely cold water. Select a warm
water wash temperature and check to make sure your hot water heater is
providing hot water; at least 120ºF (49ºC ).
r
Add detergent before loading clothes. Do not pour detergent directly on
garments.
&ORWKHV$UH*UD\HGRU<HOORZHG
r Separate darks from lights and whites to avoid the transfer of dyes.
r
Large and heavily soiled laundry may need more detergent. Refer to detergent
manufacturer’s directions for recommended usage.
Garment Damage:
r Tearing and snagging - Tie strings and sashes. Empty pockets, fasten belts, and
close zippers, metal snaps or hook fasteners before loading.
r
Bleach stains - Do not pour or splash bleach directly on clothes. If you are using
the dispenser and still notice stains, try using diluted bleach.
r
Excessive wear and tear - Follow manufacturer’s instructions for garment care.
21
LIMITED WARRANTY
IN-HOME SERVICE
FULL ONE YEAR WARRANTY
For 12 months from the date of original
retail purchase, Haier will repair or replace
any part free of charge including labor
that fails due to a defect in materials or
workmanship.
LIMITED WARRANTY
After one year from the original retail
purchase date, Haier will provide a part at
no cost, as indicated below, to replace said
part as a result of a defect in materials or
workmanship. Haier is solely responsible
for the cost of the part. All other costs
such as labor, trip charge, etc are the
responsibility of the owner.
Second through Fifth Year
Haier will provide the outer washtub and
related outer tub assembly parts should
the part fail to hold water.
Second through Seventh Year
Haier will provide the inner stainless steel
wash basket if defective in material or
workmanship.
NOTE: This warranty commences on
the date the item was purchased, and
the original purchase receipt must be
presented to the authorized service
representative before warranty repairs are
rendered.
Exceptions: Commercial or Rental Use
Warranty
GD\VODERUIURPGDWHRIRULJLQDO
purchase
GD\VSDUWVIURPGDWHRIRULJLQDO
purchase
1RRWKHUZDUUDQW\DSSOLHV
FOR WARRANTY SERVICE
Contact your nearest authorized service
center. All service must be performed
by a Haier authorized service center. For
the name and telephone number of the
nearest authorized service center, please
call 1-877-337-3639.
Before calling please have available the
following information:
Model number and serial number of your
appliance. The name and address of the
dealer you purchased the unit from and the
date of purchase.
A clear description of the problem.
A proof of purchase (sales receipt).
22
7KLVZDUUDQW\FRYHUVKRPHDSSOLDQFHVHUYLFHV
within the contiguous United States and
Canada and where available in Alaska, Hawaii
and Puerto Rico.
:KDWLVQRWFRYHUHGE\WKLVZDUUDQW\
Replacement or repair of household fuses,
circuit breakers, wiring or plumbing.
A product whose original serial number has
been removed or altered.
$Q\VHUYLFHFKDUJHVQRWVSHFLnjFDOO\LGHQWLnjHGDV
normal such as normal service area or hours.
Damage to clothing.
Damage incurred in shipping.
Damage caused by improper installation or
maintenance.
'DPDJHIURPPLVXVHDEXVHDFFLGHQWnjUH
ǍRRGRUDFWVRIQDWXUH
Damage from service other than an authorized
Haier dealer or service center.
Damage from incorrect electrical current,
voltage or supply.
Damage resulting from any product
PRGLnjFDWLRQDOWHUDWLRQRUDGMXVWPHQWQRW
authorized by Haier.
Adjustment of consumer operated controls as
LGHQWLnjHGLQWKHRZQHUšVPDQXDO
Hoses, knobs, lint trays and all attachments,
accessories and disposable parts.
Labor, service transportation, and shipping
charges for the removal and replacement of
defective parts beyond the initial 12-month
period.
Damage from other than normal household use.
Any transportation and shipping charges.
THIS LIMITED WARRANTY IS GIVEN
IN LIEU OF ALL OTHER WARRANTIES,
EXPRESS ED OR IMPLIED, INCLUDING BUT
NOT LIMITED TO, THE WARRANTIES OF
MERCHANTABILITY AND FITNESS FOR A
PARTICULAR PURPOSE
The remedy provided in this warranty is
exclusive and is granted in lieu of all other
remedies.
This warranty does not cover incidental
or consequential damages, so the above
limitations may not apply to you. Some states
do not allow limitations on how long an implied
warranty lasts, so the above limitations may not
apply to you.
7KLVZDUUDQW\JLYHV\RXVSHFLnjFOHJDOULJKWV
and you may have other rights, which vary from
state to state.
Haier America
New York, NY 10018