1
Important User
Information
Solid-state equipment has operational characteristics differing
from those of electromechanical equipment. “Application
Considerations for Solid-State Controls” (Publication SGI- 1.1)
describes some important differences between solid-state
equipment and hard wired electromechanical devices. Because
of this difference, and also because of the wide variety of uses for
solid-state equipment, all persons responsible for applying this
equipment must satisfy themselves that each intended
application of this equipment is acceptable.
In no event will Allen-Bradley Company be responsible or liable
for indirect or consequential damages resulting from the use or
application of this equipment.
The examples and diagrams in this manual are included solely
for illustrative purposes. Because of the many variables and
requirements associated with any particular installation,
Allen-Bradley Company cannot assume responsibility or
liability for actual use based on the examples and diagrams.
No patent liability is assumed by Allen-Bradley Company with
respect to use of information, circuits, equipment, or software
described in this manual.
Reproduction of the contents of this manual, in whole or in part,
without written permission of the Allen-Bradley Company is
prohibited.
0 1991 Allen-Bradley
Company
-,
Table
of Contents
Title
Page
CVIM MATH- PAK: Installation and
Configuration
MATH-PAK User Manual: Objectives ..............
...................
MATH-PAK Option:
Definition
User Experience .................................
...................
MATH-PAK Option: Overview
.....................
Installing MATH-PAK Option
MATH-PAK Option: Menu/Display Changes
.......
Gages and Windows:
Range/Reference
..............................
Popup Menu
Mist Popup Menu ............................
Exit Popup Menu .............................
Range Fail Menu Box ......................
Disp. Formulas Menu Box ..................
Results Page Display .......................
Stat 1 Page Display ........................
I/O Page Display ...........................
..........................
All Tools Display
................
Configuring
MATH-PAK Formulas
...
Definitions:
MATH-PAK Terms and Concepts
......
Definitions:
Formula Entry Key Functions
Digit Keys: 0 to 9 .........................
Operand Keys ............................
OperatorKeys
............................
Control Keys ..............................
Using Control Keys ...........................
Del (Delete) Key ..........................
Clr (Clear) Key ............................
..........................
Ret(Return)Key
Esc (Escape) Key ...........................
Cursor Keys: (t) and (+) ...................
Keyboard Select Keys( 7) and (J) ...........
Using Operator and Operand Keys .............
ABSKey ..................................
ATNKey
.................................
AVGKey
.................................
COSKey ..................................
DSTKey ..................................
MAX, MIN Keys ...........................
MEDKey
.................................
MODKey
.................................
SINKey
..................................
SQRKey ..................................
SQKey ...................................
TANKey
.................................
VARKey
.................................
..........
Arithmetic Operator Keys: + ,-,*,l
6
7
9
9
9
10
11
12
12
13
16
18
18
19
21
22
23
23
24
25
26
26
27
28
28
30
35
37
39
41
43
45
47
48
50
51
53
55
Table of Con tents
ii
Title
Page
Parenthesis Keys: () ......................
Modulo Operator Key: % .................
Unary Operator Key: + ...................
Comma Key: , ............................
Logic Operator Keys .......................
Setting Formula Name .......................
Enabling Formula ............................
Assigning Range Limits and Outputs ...........
Results Data: Size and Rounding Constraints
MATH-PAK Application Examples ................
Figure
...
Title
55
56
56
56
56
59
60
62
68
69
Page
List of Figures
1.1
1.2
.......... _ 2
CVIM System Without MATH-PAK Formulas
.............._ 3
CVIM System With MATH-PAK Formulas
.Tit/e
Appendix A
Cl//M Communications
Page
With MATH-PAK
Objectives . . . .._................................
CVIM With MATH-PAK Communications
Location of Formula Results . . . . . . . . . . . . : : : : : : : : : :
Data Formats For Formula Results
Obtaining Formula Results and Statistics - : : : : : : : : : :
Statistics Block . . . . . . . . . . . . . . . . . . . . . . . . . . . . . . . . . .
Configuration Blocks . . . . . . . . . . . . . . . . . . . . . . _ . . . . .
Fail/Warning Ranges: Formulas # g-16,25-32,
41-56 in Toolset 1 . . . . . . . . . . . . . . . . . . . . . . . . . . . . . .
Fail/Warning Ranges: Formulas # l-8, 17-24,
33-40 in Toolset 1 . . . . . . . . . . _ _ _ . . . . . . . . . . . . _ . . . .
Fail/Warning Ranges: Formulas # 9-l 6,25-32,
41-56 in Toolset 2 . . . . . . . . . . _. . . . . . . . . . . . . _ . . . _
Fail/Warning Ranges: Formulas # 1-8, 17-24,
33-40 in Toolset 2 . . . . . . . . . . . . . . . . . . . . . . . . _ . . . . _
Discrete Bit Inputs
. . . . . . . . . . . . . . . . . . . . . . . . _. . . . .
A-l
A-l
A-l
A-6
A-6
A-6
A-7
A-8
A-9
A-10
A-l 1
A-l 2
Cl//M’” MATH- PA KTU:
Installation and Configuration
MATH-PAK User Manual:
Objectives
The objectives of this manual are to introduce you to the
MATH-PAK’”
option for the Allen-Bradley 5370-CVIM
(Configurable Vision Input Module) machine vision system
and provide the information and procedures you need to
install the MATH-PAK option in your CVIM system and
configure the system for mathematics applications.
Here are the major sections in this manual:
MATH-PAK Option: Overview describes briefly how the
CVIM system handles inspection results data when using
MATH-PAK formulas.
Installing MATH-PAK Option shows you how to install the
MATH-PAK option on your CVIM system.
MATH-PAK Option: MenulDisplay Changes shows you how
the MATH-PAK option affects the menus and display tables.
Configuring MATH-PAK Formulas describes the
mathematical and logical operators available with the
MATH-PAK option and shows you how to use them to
construct MATH-PAK formulas.
MATH-PAK Application Examples shows you how MATHPAK formulas can be used in various combinations to solve
real-world application problems.
-
NOTE: It is beyond the scope of this manual to show you
how to configure the CVIM system for specific MATH-PAK
applications.
Appendix A provides information needed to access MATHPAK results data using the CVIM communication ports.
This information supplements the CVIM Communications
Manual, Catalog No. 5370-ND002.
MATH-PAK Option:
Definition
User Experience
MATH-PAK is an option that enables your CVIM system to
perform mathematical and/or logical operations, using
formulas that you specify, on results data from any of
CVIM’s analysis tools. Your inspection application can use
results data from these operations instead of, or in addition
to, results data from individual analysis tools, according to
your specific requirements.
Before using MATH-PAK, you should be familiar with the
CVIM system and its configuration procedures. The CVIM
User’s Manual, Catalog No. 5370-NDOOl, provides detailed
information about the system’s configuration and operation
procedures. Chapters 9 and 10 are particularly relevant to
MATH-PAK configuration and operation.
If your application uses the CVIM communications ports on
the chassis backplane and/or front panel, refer also to the
CVIM Communications Manual, Catalog No. 5370-ND002.
CVIM MATH-PAK:
2
installation
and Configuration
Following each inspection, the CVIM system stores in its
memory the inspection results data from each enabled
analysis tool (light probe, reference tools, gages, and
windows). These data are available (until overwritten by the
next inspection) to devices connected to the chassis
backplane, the 1771 remote I/O port, the RS-232 port, and
the discrete output port.
MATH-PAK Option:
Overview
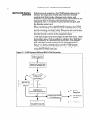
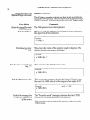
When operating ulithout MATH-PAK formulas, the CVIM
system compares the results data from each tool to the tool’s
specific warning and fault limits, Whenever the results data
are above or below one of these limits, the system sets a
discrete bit and routes it to the assigned output.
(Note that range limits do not apply to reference tools. These
tools either pass or fail according to whether they find their
edge or feature. If a reference tool fails, the CVIM system
sets a discrete bit and routes it to the assigned output.)
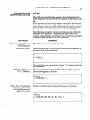
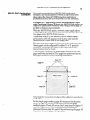
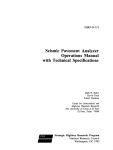
Figure 1.1 shows, symbolically, how the CVIM system
handles inspection results data when operating without
using MATH-PAK formulas.
Figure 1 .l CVIM System Without
MATH-PAK
Formulas
CVIM Inspection
Inspection Results Data
from One AnalysisTool
No
Fault/Warning
Cleared
Bit(s)
Yes
7
Appropriate
Fault/Warning
Bit(s) Set
.
Results Data Stored
in CVIM Memory
Bit(s) Sent to
Assigned Output(s)
To: Chassis
Backplane
To:
1771 Remote
I/O Port
I
b To: RS-232 Port
-
Cl//M MATH-PAK:
Installation
and Configuration
3
-
MATH-PAK Option:
OVWVk
W(continued)
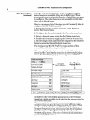
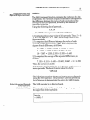
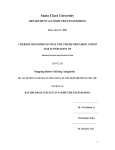
When the MATH-PAK option is installed in the CVIM
system, you can configure formulas to perform mathematical
and/or logical operations on the inspection results data from
one or more analysis tools. The CVIM system processes the
results data from the formula’s operation in the same way
that it handles results data from tools.
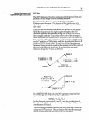
Figure 1.2 shows how the CVIM system handles inspection
results data when the MATH-PAK option is installed and
formulas are configured to manipulate results data from one
or more tools.
Fiqure 1.2 CVIM System With MATH-PAK
Formulas
Inspection Results
Data from One or
+
\
MATH-PAK
affects
7
Results Data from
Formula Manipulation
Appropriate
FaultWarning
Bit(s) Set
Results Data Stored
in CVIM Memory
To:
1771 Remote
I/O Port
v
Bit(s) Sent to
Assigned Output(s)
I
b
To: RS-232 Port
CVlM MATH-PAK:
Installation
and Configuration
4
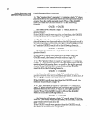
The MATH-PAK option is provided on a memory card. You
can install the option in your CVIM system by inserting the
memory card into the Archive Memory slot on the CVIM
module’s front panel and applying power to the module.
NOTE: The CVIM system must have Revision CO1 (or
higher) firmware before the MATH-PAK option can be
installed. (The firmware revision can be seen in the banner
message on the monitor screen following powerup.)
The following steps assume that the CVIM system contains
Revision CO1 (or higher) firmware and is currently powered
up. Use these steps to install the MATH-PAK option in your
CVIM system.
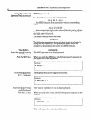
Your Action
Comments
PuZZthe DC/PWR LOCK
handle out as far as it will go.
This removes DC power from the CVIM module.
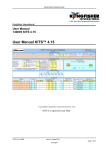
lnsert the memory card into the
Archive Memory slot on the
CVIM module.
The metal strip (and the arrow on the card label) must be
facing right.
CVIM Module
B
MATH-PAK Memory Card
Card Label ’
Metal Strip
Push in the DCIPWR LOCK
handle.
Be sure the lock handle is in as far as possible. This applies
DC power to the CVIM module and begins loading the
MATH-PAK software.
-
CVlM MATH-PAK:
Installation
and Configuration
5
Installing MATH-PAK
OptiOf7(continued)
Comments
Your Action
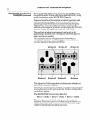
Observe the LEDs during
software loading.
The top three LEDs on the CVIM module indicate the
progress of the three-phase software loading process, as
follows:
Vision
0
Processor
Pass/Fai I
Trigger
1
I
Trigger
2
-
MATH-PAK
Loading
Phase
LEDs
1
Pass/Fail
Red-to-yellowto-green.
2
Green
3
Red-to-yellowto-green.
Trigger
1
Green
Green
Off
Trigger
2
Off
Green
Green
The MATH-PAK software loading process requires about 45
seconds, with each phase taking about 15 seconds. When the
loading process is complete, the CVIM system begins its
normal powerup sequence.
CWM MATH-PAK:
Installation
and Configuration
6
MATH-PAK Option:
Menu/Display Changes
Since the MATH-PAK option adds functions to the basic
CVIM system, installing the option changes the appearance
of some of the menus and display tables in the user interface.
-
This section describes the changes resulting from the
installation of the MATH-PAK option.
Gages and Windows:
Range/Reference
Popup Menu
When you pick the Range/Reference menu box in the Gage
(or Window) popup menu, the Range/Reference popup menu
appears with a new menu box, as follows:
Range/Outputs
Env.
Camera A
0.0
Ref. Line
Ref. Win
ita&
Window
Mist
Exit
The Range menu box indicates the status of range checking
for the currently selected gage or window. When “Disabled
appears in the menu box, the CVIM system does not perform
range checking for the tool. This is true in any of the
following situations:
8 When the currently selected tool is disabled.
When the selected tool is enabled, but you intentionally
select “Disabled” in the Range menu box.
l
l When an enabled formula preempts range checking for the
selected tool. Thus, when formula #1 is enabled, range
checking for window #l is disabled.
“Enabled” appears in the Range menu box (and the CVIM
system performs range checking for the currently selected
tool) only when you complete the following steps:
l Disable the formula number that can preempt range
checking for the currently selected tool. Thus, when formula
#l is disabled, range checking for window #l can be
enabled. (For more information about this subject, refer to
the Enabling Formula heading in this manual.)
l
Enable the selected tool.
l
Enable range checking for the selected tool.
~-
CVIM MAW-PAK:
Installation
and Configuration
7
Gages and Windows:
Range/Reference
POpup Menu (continued)
When either of the first two conditions is not satisfied,
“Disabled” appears in the Range menu box in black ty e,
indicating that you cannot toggle the menu box to “Ena t led.”
Thus, you cannot enable range checking for the selected tool.
When the first two conditions are satisfied, you can enable
range checking for the selected tool by picking the Range
menu box so that it reads “Enabled .” Picking the menu box
repeatedly causes it to toggle between Enabled and Disabled.
Mist Popup Menu
When you pick the Mist menu box in the Main menu, the
M isc popup menu appears with a new menu box called
Config.
Env.
Results.
Camera A
Ref. Line
Ref. Win
Gage
Window
Exit
I$$
When you pick the Config. Results menu box in the Mist
menu, the Config. Results popup menu box appears. This is
the menu that you use to configure MATH-PAK formulas.
Archival
0.0
Snapshot
l .e
Analysis
0.0
Registration
0.0
Env.
Camera A
Ref. Line
4----
Mist
Popup Menu
Ref. Win
Gage
Window
‘&liic”
:
Exit
CUM MATH-PAK:
8
Mix Popup Menu
(con timed)
Installation
and Configuration
Initially, only the Set Formula, Jump, and Previous/Next
menu boxes are accessible (they are in light type). These
boxes enable you to select the formula number that you want
to configure. The other boxes are not accessible at this time
(they are in black type).
-
Here is a summary list of the steps you will normally take to
configure MATH-PAK formulas:
1. Select the formula number using the Jump, Previous,
and/or Next menu boxes.
2. Configure the formula using the Set Formula menu box.
3. Select a formula name using the Set Name menu box.
4. Enable the formula by toggling the Formula # menu box.
5. Set the range limits and select the outputs for the enabled
formula using the Range/Outputs
menu box.
The Configuring MATH-PAK Formulas section of this
manual describes these steps in detail.
When you pick the Analysis menu box in the Mist popup
-
1Snap &Analyze
IAnalyze
Image
C
0 No Tools
I
I
0 Ref. Lines
ISnapshot
Env.
0.0
Camera A
Ref. Line
Ref. Win
Gage
Window
:&Ii%.
.: ... . .
Exit
Included in the Tool Display popup menu is the Formulas
menu box, which enables you to analyze the process time for
all enabled formulas.
When you pick Formulas, all enabled tools appear on the
monitor screen (as they do when you pick All Tools). When
you then pick the Continuous S&A, Snap & Analyze, or
Analyze Image menu box, the process time for all enabled
formulas appears after “Time = ” in the box above the
Analysis popup menu. (The color of the tools indicates their
pass/warning/fail
status.)
-
Cl//M MATH- PAK: Installation
-
Exit Popup Menu
and Configuration
9
When you pick the Exit menu box in the Main menu, and
then pick the Runtime Init. menu box in the Exit popup menu,
the Runtime Init. popup menu appears with two new menu
boxes, as follows:
Ib
Range Fail : Stats
Stat. Samples:
Disp. Probe:
Halt:
a*.
0
Disp. Formulas:
Range Fail
Met& Box
2
0.0
-
Disp. Formulas
Menu Box
Runtime Init.
Popup Menu
Disabled
Disabled
Freeze:
Disabled
h;z;‘,
Display
-
Env.
Camera A
1;:
1
Ref. Line
_
Exit
Popup Menu
Ref. Win
Gage
Window
Mist
‘@::
Range hi/ Menu Box
The Range Fail menu box gives you two options for
calculating inspection results statistics:
1. Using results from all inspected parts, including those
that fail the range checks, or
2. Using results only from parts that pass the range checks.
The Range Fail menu box displays either “Stats”or “No
Stats.” When “Stats” appears in the menu box, statistics are
based both on results that puss the range checks and those
that fail. When “No Stats” appears, statistics are based only
on results that puss the range checks.
If you pick the Range Fail menu box repeatedly,
between Stats and No Stats.
it will toggle
Disp. Formdas Menu Box
The Disp. Formulas menu box enables you to display formula
results and statistics on the Result Page and Stat 1 Page
display tables.
CVlM MATH-PAK:
Installation
and Configuration
10
Exit Popup Menu (continued)
Disp. Formulas Menu Box (continued)
By picking the Disp. Formulas menu box, you can specify the
number of formulas whose results are to be displayed on each
page of the Results Page and Stat. Page 1 display tables.
(This menu box operates in the same manner as the other
“Disp.” menu boxes, which are described in Chapter 10 of the
CVIM User Manual .)
If you pick the help message icon. . .
. . . the help message box will appear in the upper left corner
of the monitor screen and contain a message, such as the
following, . . .
Select the number
to be displayed on
and Statistics Page
Current maximum:
3
0
11
of formulas per page
both the Results Page
1.
8 formulas
. that indicates the current maximum number of formulas
that can appear on each page of the Results Page and Stat 1
Page display tables. The number varies according to how
many gages and windows been selected in the Disp. Gages
and Disp. Windows menu boxes, and whether or not the light
probe results are to be displayed.
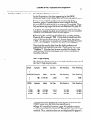
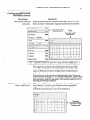
Results Page Display
The following illustration is an example showing page one of
the Results Page display table.
FAU LTS
TRIGGERS
Accepted
Missed:
Total :
:
GAGE
1.
Faults
0
WINDOW
1.
2.
FORM.
1.
2.
Y POS 1
YPOS2
XPOS 1
123456
0
4
1
Master Fault:
Light Probe:
Reference
1.
2.
3.
Lines
2
/ Windows
1.
2.
3.
123456
Fail Low
Warn
Low
Reading
127.000
Warn
Hi
Fail Hi
Faults
0
Fail Low
3000
Warn
Low
3100
Reading
3182
Warn Hi
3300
Fail Hi
3400
Faults
Fail Low
Warn
Low
Reading
Warn
Fail Hi
127.000
124.000
152.000
140.000
135.000
160.000
0
0
0
110.000
105.000
130.000
120.000
115.000
140.000
Hi
150.000
145.000
170.000
1
-
CVIM MATH-PAK:
Installation
and Configuration
17
Exit Popup
Menu
(continued)
Results Page Display
(continued)
In the illustration, the data appearing in the GAGE,
WINDOW, and FORM. boxes have the following significance:
Gage # 1 is enabled and has returned results data;
however, gage #l results data are not ranged checked
because formula #9 (which is on page two) is enabled. Thus,
fail and warning range limits are not displayed for gage # 1.
l
l Window #l is enabled and has returned results data. Its
results are ranged checked, since formula # 1 is not enabled.
Window #2 is disabled; thus, no data appear.
l Formulas #1 and #2 are disabled; thus, no data appear.
Formula #3 is named Y POS 1. Note that its results are the
same as the results from gage #l, shown above, but since
Y POS 1 is a formula, its results are range checked. Formula
#4 is named Y POS 2, and formula #5 is named X POS 1.
Note that the results data from the light probe are not
displayed in the example (the Disp. Probe menu box reads
“Disabled.“). If probe results were enabled for display, the
total number of formulas, gages, and windows displayed
would be reduced.
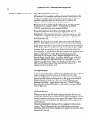
Stat 1 Page Display
The following illustration is an example showing page one of
the Stat 1 Page display table.
Samples
Mean
Std. Dev.
Min.Reading
Max. Reading
I/INDOW Samples
Mean
Std. Dev.
Min.Reading
Max. Reading
186
3179.105
2.063
Samples
Mean
Std. Dev.
AGE
1.
1.
2.
ORM.
Y’iOS 1
YPOS2
XPOSl
186
186
186
122.284
133.182
152.000
0.613
1.741
0.000
3171
Min.Reading
121.000
127.000
152.000
3186
Max. Reading
124.000
137.000
152.000
The statistics data appearing in the GAGE, WINDOW, and
FORM. boxes have the following significance:
l Gage #l is enabled; however, gage #l statistics cannot
be accumulated because formula #9 (which is on page tzuo) is
enabled. Thus, statistics data are not displayed for gage #l.
CVlM MATH-PAK:
installation
I Page Disp/ay
(continued)
and Configuration
-
Exit Popup
Menu
(continued)
Stat
Window #l is enabled and has returned results data. Its
results are ranged checked, and, since formula #l is not
enabled, statistics data are displayed for window # 1.
Window #2 is disabled; thus, no data appear.
l
Formulas #l and #2 are disabled; thus, no data appear.
Formula #3 is named Y POS 1, formula #4 is named
Y POS 2, and formula #5 is named X POS 1.
l
Note that statistics data from the light probe are not
displayed in the example (the Disp. Pro be menu box reads
“Disabled.“). If probe results were enabled for display, the
total number of formulas, gages, and windows displayed
would be reduced.
NOTE: During the run mode, when you select the Results
Page (or Stat 1 Page) display table, you must pick the Page 4
(page down) box one or more times in order to see the results
(or statistics) from any formula whose number is beyond the
number that you selected in the Disp. Formulas menu box.
For example, if you want to see the results from formula #12
and you selected “5” in the Disp. Formulas menu box,
formulas #l through #5 will appear on page one of the
Results Page display table, formulas #6 through #lO will
appear on page two, and formulas #ll through #15 will
appear on page three. Thus, you must pick the Page 4 box
two times to reach page three and see the results (or
statistics) from formula #12.
110 Page Display
A second page has been added to the I/O Page display table in
order to display the I/O status of all 56 formulas. The
formula display box on page two provides the same kind of
pass/warn/fail status information as the gage and window
display boxes on page one. You can access page two by
picking the Page J (page down) box once. (The I/O Page
display table is described fully in Chapter 10 of the CVIM
User’s Manual.)
All Tools Disp/ay
When you select the All Tools display function for the run
mode, the names of all of the enabled formulas appear on the
monitor screen, starting in the upper left corner. On a color
monitor, the color indicates the pass/warn/fail condition of
each formula.
Note that disabled formulas will not appear in the screen
listing. Thus, if formulas #l and #56 are the only ones
enabled, only those two formulas will appear in the list, with
formula #l on top.
_-
Cl//M MATH-PAK:
Installation
and Configuration
13
Configuring MA TH-PAK
formdas
As indicated earlier, the MATH-PAK option adds a menu
box called Config. Results, and it is your entry point for
configuring MATH-PAK formulas.
Use the following steps to configure MATH-PAK
formulas.
Comments
Your Action
Pick the Mist menu box
in the Main Menu.
When you pick the Mist menu box in the Main Menu, the
M isc popup menu shows the Conf ig . Results menu box, as
follows:
Config.
Results
l
Archival
..a
Snapshot
l eo
Analysis
l .e
Registration
l *o
Env.
Pick the Config. Results
menu box.
...
Camera A
Config. Results
Menu Box
+--.
Mist
Popup Menu
Ref. Line
Ref. Win
Gage
Window
When you pick the Config. Results menu box, the Config.
Resu Its popup menu appears, as follows:
l eo
Jump
IPrevious
I Next
I
Archival
0.0
Snapshot
l .e
Analysis
l a@
Registration
0.0
. +.,,-Mist
Popup Menu
1
Env.
Camera A
Ref. Line
Ref. Win
Gage
Window
.... .. . . :
kjisc.
Exit
When no formula has been configured for the current
formula number, the Config. Results popup menu appears as
shown above. In this case, the Set Name menu box has no
name in it, and the Formula # menu box shows that the
selected formula number is Disabled. In addition, the menu
boxes labeled Range/Outputs,
Set Name, and Formula#
appear in black type (meaning that you cannot pick them).
Only the Set Formula menu box is accessible at this time.
CVIM MATH-PAK:
installation
and Configuration
14
-
Configuring MATH-PAK
FOrIWl/aS
(continued)
Comments
Your Action
Look at the Formula
#
menu box.
The Formula # menu box shows the selected formula number
and its current status (Disabled or Enabled).
If the current formula number is not the one you want, select
the desired formula number by using the Previous or Next
function and/or the Jump function, as follows:
Pick the Next menu box to
select the next higher
formula number.
Pick the Next menu box once for each increment in the
formula number.
or,
Pick the Previous menu box
to select the next lower
formula number.
Pick the Jump menu box.
Pick the Previous menu box once for each decrement in the
formula number.
When you pick the Jump menu box, a “calculator
appears on the monitor screen, as follows:
pad”
0.0
Set Name:
Formula
1: Disabled
1Archival
ISnapshot
--;I
IAnalysis
0.0
Registration
L
,
Env.
Pick each digit of the new
formula number.
Pick the Enter key.
Camera A
Ref. Line
Ref. Win
Gage
u
Window
‘Mi$
Exit
As you pick each digit, it appears in the calculator “display.”
When you pick the Enter key, the new formula number in the
calculator display appears in the Formula # menu box. This
means that the new formula number has been selected.
CVlM MATH-PAK:
-
Installation
and Configuration
15
Configuring MATH-PAK
fOi’f77U/ilS
(continued)
Comments
Your Action
Pick the Set Formula
menu box.
When you pick the Set Formula menu box, the first of two
formula entry “keyboards” appears on the monitor screen:
789+
-1111 !
Archival
5
Registration
Env.
Camera A
0.0
<
>
G
I
6
-
I
Clr
tIeI
w
I
I
<=
IN
I
Ref. Line
Ref. Win
Gage
Window
$$sc#
Exit
The upper box in the keyboard displays the name of the
currently selected formula and the formula itself. In this
case, no formula has been configured nor formula name
entered.
The lower box in the keyboard displays the “keys” that are
used to select the digits (0 - 91, the mathematical, logical, and
tool operators, and the operands. The remaining keys are for
editing and saving formulas.
Pick the up arrow ( t ) in the
lower-right corner.
When you pick the up arrow ( 7 ), the up arrow changes to a
down arrow ( J ), and a second formula entry keyboard
appears in which the rightmost six columns of keys have
different functions than in the first keyboard:
Second
Formula Entry
“Keyboard”
CVIM MATH-PAK:
Installation
and Configuration
16
Confi’ uring MA TH-PAK
s Ol7T?UkS
(continued)
As stated earlier, most of the keys in both keyboards are
used to select the various elements that make up a formula.
The remaining keys are used to edit and store a formula.
The next four sections contain the following information:
l Definitions:
MATH-PAK Terms and Concepts describes
the key terms and concepts applicable to MATH-PAK
formulas.
Definitions: Formula Entry Key Functions describes
briefly the specific functions of the keys in each category:
control, operand, and operator keys.
l
Using Control Keys describes, in detail, the procedure for
using each control key. Simple examples are included to
illustrate the procedures.
l
Using Operator and Operand Keys describes, in detail, the
procedure for using each operand and operator key. Simple
examples are included, where appropriate, to illustrate these
procedures.
l
Definitions: MATH-PAK
Terms and Concepts
This section briefly defines some of the key terms and
concepts as they apply to the MATH-PAK option.
MATH-PAK formulas consist of combinations of operators
and operands that act together toproduce a result.
a symbol (such as ” + ” ) or a term (such as
“AND”) that represents a mathematical or logical
operation upon one or more operands. (All of the operators
are listed under the Operator Keys heading.)
l Operator:
Operators are further classified as arithmetic, logical, and
conditional, as follows:
Arithmetic operators, such as + , -, *, + , and TAN perform
addition, subtraction, multiplication, division, tangent,
and other operations.
Logical operators, such as AND, along with conditional
operators, such as < > (not equal), produce Boolean results,
where the results are always either true (logic 1) or false
(logic 0).
l
Operand: a quantity or value (such as a constant, a tool
result, or a result from a formula operation) upon which a
mathematical or logical operation is performed. (Operands
are listed in a table under the Operand Keys heading.)
l
Result: the value generated by operators acting upon
operands.
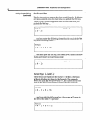
The following examples demonstrate the use of various
operands and operators, and the results they produce, in
arithmetic and logical formulas.
-
CVIM MATH-PAK:
installation
and Configuration
77
-
Definitions: MATH-PAK
Terms and Concept5
(continued)
Arithmetic
examples:
Here are a few examples of how the
terms operand, operator and result are used within various
arithmetic formula constructions:
(1)
GAGE1 + GAGE2
In this formula, GAGE 1 and GAGE2 are operands that
represent results data from gages #l and #2, and + is an
arithmetic operator.
(2)
(3 * WINl)
+ WIN2
In this formula, (3 * WIN 1) and WIN2 are both operands, and
+ is an arithmetic operator.
The expression (3 * WIN 1) is itselfan operand representing
the multiplication of the window #1 results data by the
constant 3. WIN 1 and 3 are operands in the expression,
and * is an arithmetic operator.
MAX(GAGEl,WIN1,750)
In this formula, GAGE 1,WI N 1 and 750 are all operands, and
MAX is an arithmetic operator.
In the expression, the MAX operator causes the values of the
three operands (gage #l and window #l measurements, and
the constant 750) to be compared. The formula result will be
the largest value.
Logic examples:
Results from logic formulas are either
true (logic l), if the logic condition is satisfied, or false (logic
O), if the logic condition is not satisfied.
NOTE: From the standpoint of the discrete outputs, a “true”
(logic 1) result is equivalent to a “pass” condition, and a
“false” (logic 0) is equivalent to a “fail” condition.
Here are a few examples of how the terms operand, operator
and result are used within various logical formula
constructions:
(1)
GAGE1 < 5
In this formula, the left operand (the measurement result
from gage #l) is compared to the right operand (the constant
5). If the gage #l result is less than 5, the formula result will
be true (logic 1). If the gage #l result is equal to or greater
than 5, the formula result will be false (logic 0).
(2)
GAGE1 > GAGE2
In this formula, the left operand (the measurement result
from gage #l) is compared to the right operand (the
measurement result from gage #2). If the gage #l result is
greater than the gage #2 result, the formula result will be
true (logic 1). If the gage #l result is equal to or less than the
gage #2 result, the formula result will be false (logic 0).
CVIM MATH- PA K: Ins talla tion and Configuration
78
Definitions: MATH-PAK
Terms and Concepts
(con timed)
(3)
GAGE1 = (GAGE2/4)
In this formula, the left operand (the measurement result
from gage # 1) is compared to the right operand (the
expression in which the gage #2 measurement result is
divided by 4). If the gage #l result equals the expression
result, the formula result will be true (logic 1). If the gage #l
result is not equal to the expression result, the formula
result will be false (logic 0).
(4)
GAGE1.l AND GAGE2.1
In this formula, the left operand (the warning range result
from gage #l> is ANDed with the right operand (the warning
range result from gage #2). These operands will always be
either true (logic 1) or false (logic 0).
If both warning range results are logic 1, the formula result
will be true (logic 1). If either warning range result is logic 0,
the formula result will be false (logic 0).
(5)
(GAGE1 = 7)OR(GAGEl
= 12)
In this formula, the left operand (the first expression)
compares the measurement result from gage #l to 7. The
expression result is then ORed with the right operand (the
second expression), which compares the gage #l result with
12. The expression result will always be either true (logic 1)
or fake (logic 0).
_
If either measurement result is logic 1, the formula result
will be true (logic 1). If both measurement results are logic 0,
the formula result will be false (logic 0).
Definitions:
Formula Entry
Key Functions
This section briefly defines the function of each formula
entry key. The Using Control Keys and Using Operator and
Operand Keys sections describe the use of each key in detail.
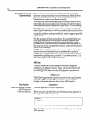
Digit Keys: 0 to 9
These keys are used to enter all of the numeric values to be
used in a formula.
Here are some limitations
on entering and using constants:
The largest positive integer that the system can accept is
32,767. The system blocks any attempt to enter a larger
positive integer.
l
l The largest negative integer that the system can accept is
-32,767. The system blocks any attempt to enter a “larger”
negative integer.
The largest positive fixed point number that the system can
accept is 32,767.999. The system blocks any attempt to enter
a larger positive fixed point number.
l
The largest negative fixed point number that the system
can accept is -32,767.999. The system blocks any attempt to
enter a “larger” negative fixed point number.
l
-
CUM MATH-PAK:
installation
and Configuration
79
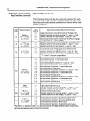
Definitions: Formula Entry
Key Functions (continued)
Operand Keys
These keys are used to enter operands (variable data) into a
formula. When entered into a formula, these operands can
supply inspection results data from specific analysis tools,
results data from the operation of specific formulas, and
statistical data from the operation of specific formulas.
The following table lists these operands and briefly describes
their functions.
I Key
I
I
TS
I
Operand
Name
Operand Function
I
Tool set
change
Used with the following
operands (G, W, RL, etc.) to obtain
I results data from the alternate (non-active) tool set.
G
Gage
Provides inspection
results data from one of the 32 gages.
W
Window
Provides inspection
results data from one of the 24 windows.
Provides inspection
reference Ii nes.
results data from one of the three
RL
Reference
line
RW
Reference
window
Provides inspection
reference windows.
results data from one of the three
LP
Light probe
Provides inspection
results data from the light
probe.
Provides results data from the operation
possible formulas or inspection tools.
of one of the 56
Provides statistical data from the operation
possible tools and formulas.
Provide integer
or fixed point
constants
of one of the 56
in a formula.
The operands are further defined according to the specific
type of results data to be supplied to a formula. As an
example, you can specify that a particular gage operand (one
of 32) sup ly its basic measurement value (number of pixels,
number o f!edges, and so on), or its pass/fail result for the
warning or fault range (1 or O), or a second coordinate (for X
and Y position functions only).
You can specify results data in a formula by appending a
decimal point and a number to the operand number(s). For
example, if you select the gage #l operand, GAGEl.1
returns the pass/fail result for the warning range, GAGE 1.2
returns the pass/fail result for the fault range, and so on.
NOTE: Some inspection results are always returned in fixed
point format (linear gaging, luminance), while others are
always returned in integer format (# white pixels, # edges).
In all cases, if one of the operands in a formula returns fixed
point results, the formula will always return a fixed point
result.
CVlM MATH-PAK:
Installation
and Configuration
20
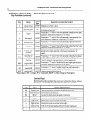
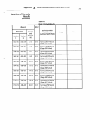
Definitions: Formula En try
Key Functions (continued)
Operand Keys (continued)
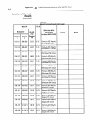
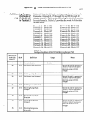
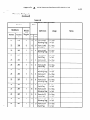
The following table lists the key code and subcodes for each
operand, along with a brief description of the type of results
data that each code/subcode combination returns when used
within a formula.
Key
:ode
G
“Operand Name
Gage measurement value (#of pixels, # of edges, etc.).
Pass/fail condition for warning range (1 = pass, 0 = fail).
Pass/fail condition for fault range (1 = pass, 0 = fail).
Second coordinate value (Y coordinate for X Position gage;
X coordinate for Y Position gage).
n.0
n.1
n.2
Window measurement value (# of pixels, # of objects, etc.).
Pass/fail condition for warning range (1 = pass, 0 = fail).
Pass/fail condition for fault range (1 = pass, 0 = fail).
n.0
n-1
n.2
n.3
X coordinate value of edge position on
Y coordinate value of edge position on
Pass/fail condition for reference line (1
Theta from a reference line configured
“Y-Y then X” rotation compensation.
n.0
r-i.1
n.2
n.3
n.4
n.5
n.6
n.7
n.8
n.9
n.10
n.11
n.12
n.13
n.14
n.15
Cumulative position: X coordinate value.
Cumulative position: Y coordinate value.
Cumulative angle (0).
Cumulative pass/fail condition (1 = pass, 0 = fail).
Active feature #I position: X coordinate value.
Active feature #l position: Y coordinate value.
Active feature #l score value.
Active feature #I pass/fail condition (1 = pass, 0 = fail).
Active feature #2 position: X coordinate value.
Active feature #2 position: Y coordinate value.
Active feature #2 score value.
Active feature #2 pass/fail condition (1 = pass, 0 = fail).
Active feature #3 position: X coordinate value.
Active feature #3 position: Y coordinate value.
Active feature #3 score value.
Active feature #3 pass/fail condition (1 = pass, 0 = fail).
LPRB.s
(5 = 0 to 2)
.O
.l
.2
Light probe brightness value.
Pass/fail condition for warning range (1 = pass, 0 = fail).
Pass/fail condition for fault range (1 = pass, 0 = fail).
RSLTn.s
(n = 1 to 56)
(5 = 0 to 2)
n.0
t-l.1
n.2
Formula (n) results data value.
Pass/fail condition for warning range (1 = pass, 0 = fail).
Pass/fail condition for fault range (1 = pass, 0 = fail).
STATn.s
(n = 1 to 56)
(s = 0 to 4)
n.0
n.1
n.2
n.3
n.4
Formula/tool
Formula/tool
Formula/tool
Formula/tool
Formula/tool
W1Nn.s
REFLn.s
RL
‘(: = 0’ to31
to3)
LP
RES
Type of Results Data Returned to Formula
n.0
n.1
n.2
n.3
GAGEn.s
(n = 1 to 32)
(5 = 0 to 3)
w
RW
*Subcode(s)
REFWns
(n = 1 to 3)
(5 = oto 15)
(n)
(n)
(n)
(n)
(n)
statistics:
statistics:
statistics:
statistics:
statistics:
reference line.
reference line.
= pass, 0 = fail).
for “X-X then Y” or
Number of samples taken.
Minimum reading value.
Maximum reading value.
Mean value.
Standard deviation value.
tern = operana number; 5 = operand subcode. The Operand Name column shows how
each operand appears when entered into a formula.
CVlM MATH-PAK:
Installation
and Configuration
27
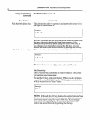
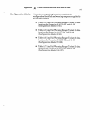
Definitions: Formula Entry
Key Functions (continued)
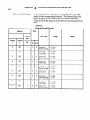
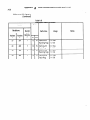
Operator Keys
The operator keys are used to select the mathematical,
logical, and other operators in a formula. The next two tables
list these operators-and briefly describe their functions.
-
ears more than once, MOD
*
-1
?h
--.. III..-___
.e:iunrypes:
Subtract
INT/FP
Subtracts
the right operand
Multiply
INT/FP
Multiplies
the left operand
Divide
INT/FP
Divides the left operand
Modulo
INT/FP
I.I-r
:.-L--.--.
INI = Integer;
returns the lowest
value.
from the left operand.
by the right operand.
by the right operand.
Produces the remainder of the division of the left operand
by the right operand.
rn
f! --I --: AL-. ..-I.-.-.
-..I
. .
rr = rrxea pornr; 1~1mr = earner rnreger or frxea point.
l .
I
.
.
CVlM MATH-PAK:
Installation
and Configuration
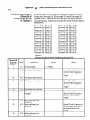
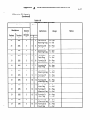
Operator Keys (continued)
Definitions: Formula En&v
Key Functions (continue;)
1 Key1
*Result
Operator
Functions (Part 2 od 2)
Type
Unary minus
lNT/FP
Decimal point
FP
Equal
INTIFP
Producesa “1” result if the left operand is equal to the right
operand; otherwise, produces a “0” result.
Not equal
I NT/FP
Produces a “1” result if the left operand is not equal to the
right operand; otherwise, produces a “0” result.
Greater than
INT/FP
Produces a “1” result if the left operand is greater than the
right operand; otherwise, produces a “0” result.
Less than
lNT/FP
Produces a “1” result if the left operand is less than the right
operand; otherwise, produces a “0” result.
Greater than
or equal
INT/FP
Produces a “1” result if the left operand is greater than or
equal to the right operand; otherwise, produces a “0”
result.
Less than or
equal
I NT/FP
Produces a “1” result if the left operand is less than or equal
to the right operand; otherwise, produces a “0” result.
Comma
INT/FP
Used to separate the operands in a list of operands.
INT/FP
Produces a “l* result if both the left and right operands are
nonzero; otherwise, produces a “0” result.
INT/FP
Produces a ” 1” result if either the left or right operand is
nonzero; otherwise, produces a “0” result.
I NT/FP
*Result types: INT = inte !gt ?r; FP =
Negates a numeric value.
Used to enter a fixed point number. Also used to designate
an operand subtype.
Used to invert a logical result.
ixed point; INT/FP = either integer or fixed point.
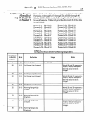
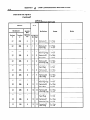
Control Keys
Both keyboards contain the same set of control keys, whose
functions are briefly described in the following table.
Key
Name
Del
Delete item
Clr
Clear formula
Ret
Return
Causes the formula to be saved in memory.
Esc
Escape
Restores the formula to its condition when last saved.
Control Key Functions
Deletes the formula item to the leftof
the cursor.
Clears the entire formula.
t
Left arrow
+
Right arrow
Moves the cursor one item to the right.
-1
Down arrow
Selects the second keyboard from the first keyboard.
t
Up arrow
Selects the first keyboard from the second keyboard.
Moves the cursor one item to the left.
CVlM MATH-PAK:
-
Using Control Keys
Installation
and Configuration
23
The control keys enable you to edit a formula and store it
in memory.
This section describes the use of the control
provides the requirements and limitations
The keys are discussed in the order of their
the preceding table.Where appropriate, an
provided to illustrate the use of a key.
keys and
for using them.
appearance in
example is
It is assumed at this point that you have selected an unused
formula number, and the first formula entry keyboard is on
the screen, as described earlier in the Configuring MATHPAK Formulas section.
Del (Delete) Key
The Del key operates as a backspace/delete key. It can delete
an item previously entered into a formula. When you pick
the Del key, the CVIM system deletes the item to the left of
the cursor (A) and moves the cursor one space to the left.
To use the Del key, you must lirst position the cursor (using
the left arrow (t) or right arrow (+> key) to the immediate
right of the formula item to be deleted. You then pick the Del
key to delete the item from the formula.
The following procedure shows you how to use the Del key.
The example shows the entry of a formula that adds two
integers, then changes the formula to subtract two integers
by changing the add ( +) operator to a subtract (-1 operator.
Comments
Your Action
Select either formula
entry keyboard.
The Del key is on both keyboards.
Pick th.ese three keys:
4 + 2.
This enters a simple “formula” for adding 4 and 2. Note that
the cursor (A) is to the right of the number 2.
Formula:
=4+2~
Now, suppose you want the formula to subtract 2 from 4.
This means you must change the add ( + >operator to a
subtract (-1 operator. Continue as follows.
Pick the left arrow (+I key.
This moves the cursor (A) to the left one space. It should now
be to the left of the add ( + ) operator:
Formula:
=4+~2
CVIM MATH-PAK:
24
Installation
and Configuration
Using Control Keys
Del (De/e te) Key (continued)
(con timed)
Comments
Your Action
Pick the Del (delete) key.
This deletes the add ( + ) operator and moves the cursor (A) to
the right of the number 4:
Formula:
= 4A ? 2
NOTE: Although the Del key can delete formula items from
the box, it does not delete the item from memory if the
formula was previously saved using the return (Ret) key. If
you change your mind after picking the Del key, you can
restore the entire last-saved formula by picking the Esc key.
Pick the - (minus) key.
This enters the subtract (-> operator into the formula:
Formula:
=4-A
2
The formula is now reconfigured
-
to subtract 2 from 4.
C/r (C/ear) Key
The Clr (clear) key can delete an entire formula. The cursor
(A) position is not important.
To use the Clr key, just pick the key. When you do, all items
currently entered in the formula will disappear, and the box
will be restored to its “clear” state:
IFormula:
=A
?
NOTE: Although the Clr key deletes the entire formula from
the box, it does not delete it from memory if the formula was
previously saved using the return (Ret) key. If you change
your mind after picking the Clr key, you can restore the
entire last-saved formula by picking the Esc key.
CVlM MATH-PAK:
-
Using Control Keys
(continued)
Installation
and Configuration
25
Ret (Return) Key
The Ret (return) key performs two functions at the same
time: It performs a computation using a correctly entered
formula, and it stores the formula in the CVIM system’s
memory.
NOTE: When you pick the Ret key, a previously entered
formula is overwritten.
To use the Ret key, be sure the formula is entered correctly,
to the best of your knowledge, then pick the Ret key. Using
the example under the Del key, the result of the computation
appears in the box as follows:
r ~~~
Formula:
result = 2
=4-A2
At the same time, a message box appearing in the upper left
corner of the screen indicates that the formula has been
saved in memory:
Formula saved.
I
At this point, a previously entered formula will have been
overwritten by the new formula.
If you pick the Ret key with an incomplete or incorrectly
entered formula, the CVIM system will respond with this
message:
WARNING: A formula error will cause deletion.
Reselect to confirm.
NOTE: Before picking the Ret key, check the formula for a
question mark (?). If the formula is correct (so far as the
system is concerned), the question mark will not be present.
CVIM MATH-PAK:
Installation
and Configuration
26
Using Control Keys
(continued)
Esc (Escape) Key
The Esc (escape) can restore the last-saved formula. It deletes
all items entered since the last time you picked the Ret key.
Thus, if your formula appeared like this the last time you
picked the Ret key. . .
result
Formula:
= 4-
= 2
2A
and you enter the following items (but do not pick the Ret
key after entering them) . . .
Formula:
=4-
2 + 6 +12~
and then pick the ESC key, the formula will delete the new
items and return to its previous state:
. ..
Formula:
result
= 2
=4-2/I
Cursor Keys: (+) and (+)
These keys can reposition the cursor (A) within a formula
without deleting any item in the formula. For example,
when you pick the left arrow key (t), the cursor moves one
item to the left. If your formula looks like this initially. . .
Formula:
=4-2+6+12/\
. . . and you pick the left arrow key, the cursor will move to
the left of the add ( + 1 operator:
Formula:
-
=4-2+6+~12
I
I
CVIM MATH-PAK:
Installation
and Configuration
27
-
Using Control Keys
(continued)
Keyboard Select Keys: ( 1) and (& )
The up arrow ( t ) and down arrow ( 4 ) are used to display the
alternate formula entry keyboard.
The up arrow ( t ) appears on the first keyboard - this is the
one that appears right after you pick the Set Formula menu
box:
First
-Formula
Entry
“Keyboard”
Up Arrow
Key
When you pick the up arrow key, the second keyboard
appears. This keyboard contains the down arrow ( J ):
-
MIN
Ii
1
i
2
i
3
:
MAX
Del
Clr
DST
SIN
cos
MED
Ret
VAR
*
%
ABS
TAN
ATN
MOD
I
0
SQ
SQR
+
+
+-
-
Second
Formula Entry
“Keyboard”
Down Arrow
Key
You may need to alternate between the two keyboards
occasionally as you enter your MATH-PAK formulas.
CVIM MATH-PAK:
Installation
andconfiguration
28
Using Operator and
Operand Keys
-
This section provides detailed information for using the
operator and operand keys to enter formulas. Most of these
keys require that you observe certain procedures and
limitations in order to use them correctly.
Note that the limitations applying to the digit keys (0 to 9),
when these keys are used to enter constant numeric values,
were described earlier under the Digit Keys: 0 to 9 heading.
The following operator key procedures are presented in the
order of their appearance in the preceding Operator Function
tables. These procedures use example formulas to illustrate
using the operator and operand keys, and to suggest possible
applications.
For the purpose of these procedures, it is assumed that you
have just selected an unconfigured formula number and
picked the Set Formula menu box, which displays a clear
formula entry box and the first formula entry keyboard on
the monitor screen (as described earlier under the Keyboard
Select Keys heading).
NOTE: In the following procedures, you will occasionally
need to alternate between the two keyboards in order to
configure some of the formulas. You can select the alternate
keyboard by icking the up arrow ( t ) or down arrow ( J ) in
the lower-rig ii t corner of the keyboard.
-
ABS Key
The ABS (absolute value) function converts a negative
number to its absolute value. Thus, -45 is converted to 45.
In a MATH-PAK formula, the ABS operator requires one
operand. The basic formula takes this form:
ABS(value)
The following procedure shows you how to set up a formula
using the ABS operator. The procedure uses a negative
integer to demonstrate the entry of an ABS formula.
Your Action
Select the second formula
entry keyboard.
Pick the ABS key.
Comments
The ABS operator is on this keyboard.
When you pick the ABS key, the following
the upper box of the keyboard:
entry appears in
Formula:
= ABS(r\ ?
I
Note that the open parenthesis
ABS operator.
1
symbol, “(“, appears with the
-
CVIM MATH-PAK:
Installation
and Configuration
29
Using Operator and
Operand Keys (continued)
A BS Key (continued)
Comments
Your Action
Select the first formula
entry keyboard.
Pick the (31) key.
The “unary” operator (z!z) is on this keyboard.
When you pick the 3~ key, the following
display:
entry appears in the
Formula:
= ABS( --A?
This will negate the value that follows it.
Pick these%
keys:
4 5.
This enters the value (-45) in the formula. The display
should now appear as follows:
Formula:
= ABS(-
Select the second formula
entry keyboard.
Pick the “close parenthesis”
key, ,)“.
Pick the Ret (return) key.
45~?
The parenthesis keys are on this keyboard.
This completes the ABS formula entry.
This causes the system to display the “result.” Note that the
original value, - 45, is converted to the absolute value 45.
Formula:
= ABS(-
Look at the message box
in the upper left corner
of the screen.
result = 45
45 )A
The “Formula saved” message indicates that the CVIM
system has saved the ABS formula in its memory.
This completes the procedure for entering and saving the
ABS formula.
CVlM MATH-PAK:
Installation
and Configuration
30
Using Operator and
Operand Keys (continued)
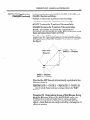
ATN Key
The ATN operator computes the angle 0 (in degrees) of a line
relative to the X axis of the image field, as follows:
\
Line Direction
/
X Axis of
\;,Direction
The ATN function computes the angle 8 by first computing
the tangent of the angle.
The tangent of unknown angle 8 (in a right angle triangle) is
the ratio between the side opposite the angle and the side
adjacent to the angle. . .
Y (Side opposite
0)
Arc Tangent:
The angle (Cl)whose tangent
= Side Y t Side X
and the arc tangent is the angle (e) whose tangent is
e&al to a given number. In the illustration above, that
number is the length of Y divided by the length of X.
CVlM MATH-PAK:
Installation
and Configuration
31
Using Operator and
Operand Keys (continued)
ATN Key (continued)
In order to compute the tangent of 8, and from that the arc
tangent (0 itself), the ATN operator must be given the length
of the two sides, Y and X, of the right triangle formed
between a line and the X axis of the image field.
Thus, if you can supply the length of Y and X, the ATN
function can compute the tangent of the unknown angle 9
and, consequently, the arc tangent - the angle 8 itself.
In a MATH-PAK formula, the ATN operator requires the two
operands, AY and AX. The basic formula takes this form:
ATN(AY,AX)
The AY operand represents the length of side Y, and the AX
operand represents the length of side X. Values for AY and
AX must be computed and made available to the ATN
formula.
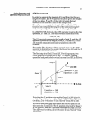
Example: The objective of this example is to use the ATN
operator to determine the angle 8 between line AB and the X
axis in the illustration below.
-
The first step is to find AY and AX. For this purpose, two
linear gages are configured for the “Y Position” gagin
operation and positioned vertically across line AB, as B0110~s:
Gage 2
I
Y position
X position
I
= 260
= 130
Note that the Y position returned by Gage 1 is 260 (pixels),
and the Y position returned by Gage 2 is 120. The difference
(or delta, A) is -140, since Y has “moved” from 260 to 140.
Note also that each gage can return the second position (in
this case, the X position). The X position returned by Gage 1
is 130 (pixels), and the X position returned by Gage 2 is 320.
The difference (or delta, A) is 190, since X has “moved” from
130 to 320.
CVlM MATH-PAK:
Installation
and Configuration
32
-
Using Operator and
Operand Keys (continued)
ATN Key (continued)
By altering the basic formula to compute AY and AX from
the differences in the two X and two Y positions, the formula
looks like this:
ATN(GAGE2 - GAGE 1, GAGE 2.3 - GAGE 1.3)
In this formula, GAGE2 - GAGE 1 returns AY, and GAGE 2.3 GAGE 1.3 returns AX. The AY value is -140, and the AX
value is + 190.
In general, the signs of AY and AX relate to the quudrant in
which the angle lies as follows:
[YAxis(
-90”
-AY
-AX
-AY
+AX
,,,.~.o.
+AY
-AX
pz-,
+AY
+AX
+ 90”
Since AY is negative and AX is positive in this example, the
ATN function calculates 6 to be a negative angle, -36.3”,
which in the 1st quadrant.
NOTE: The ATN operator in this example uses the same
frame of reference for measuring an angle that the reference
windows and reference lines use for measuring rotation
angles.
The following procedure shows you how to set up a formula
using the ATN operator. The procedure uses the preceding
formula, ATN(GAGE2 - GAGE 1, GAGE 2.3 - GAGE 1.3), to
demonstrate the entry of an ATN formula.
Your Action
Select the second formula
en try keyboard.
Pick the ATN key.
Comments
The ATN operator is on this keyboard.
When you pick the ATN key, the following entry appears in
the upper box of the keyboard:
Formula:
= ATN(r\ ?
CVlM MATH-PAK:
installation
and Configuration
33
-
Using Opera tar and
Operand Keys (continued)
A TN Key (continued)
Comments
Your Action
Select the Frst formula entry
keyboard, then pick the “G”
(for Gage) key.
This is the first step in assigning a gage operand. The display
should appears as follows:
Formula:
= ATN ( ? GAGEOA
Pick the “2” key.
This assigns gage #2 as the first operand. When configured
as GAGEZ, this operand returns gage #2 measurement data
to the formula. In this example, it returns Y position data,
since gage #2 would have been configured earlier for that
gage operation.
Formula:
= ATN ( GAGEZA ?
-
Pick these folly keys:
-(minus)
G 1 , (comma).
This sets up gage #l as the second operand, and thereby
completes the requirement for “AY” in the ATN formula.
Gage #I returns Y position data.
Formula:
= ATN (GAGE2
Pick these four keys:
G 2 . (decimal) 3.
- GAGEl,/\
?
This sets up gage #3 as the third operand. The “2.3” causes
gage #2 to return second coordinate data to the formula. In
this case, it is X position data. (For more information, refer
to the “result data types” table under the Operand Keys
heading.)
Formula:
= ATN (GAGE2
- GAGEl,
GAGE2.3r\
?
CVlM MATH-PA K: Installation
and Configuration
34
-
Using Operator and
Operand Keys (continued)
A TN Key (continued)
Your Action
Pick these five keys:
- (minus) G 1 . (decimal) 3.
Comments
This sets up gage #l as the fourth operand, and thereby
completes the requirement for the “AX” in the ATN formula.
In this case, the “1.3” causes gage #l to return second
coordinate data to the formula. Since gage #l is configured
for the Y position gage operation, it returns Xposition data
to the formula.
Formula:
= -GAGE2
- GAGEl,
GAGE2.3 - GAGE~.~A ?
NOTE: A left arrow (t) has appeared at the left side of the
display, and the “ATN (“has disappeared. This indicates that
the remainder of the formula has been shifted off the display
because of space limitations.
Generally, any time a formula is too large to be displayed
completely, a left or right arrow appears in the left or right
side of the display, indicating the location of the remainder
of the formula.
Select the second formula
entry keyboard.
Pihk the “close parenthesis”
key, “,I”.
The parenthesis
keys are on this keyboard.
This completes the ATN formula entry.
Formula:
=
Pick the Ret (return) key.
+GAGEZ
- GAGEl,
This causes the system to display a “result”; however, the
number displayed is not correct since the “GAGE n .3”
operands cannot operate correctly except in the run mode.
Thus, you should disregard the “result” number in this case.
Formula:
= -GAGE2
Look at the message box
in the upper left corner
of the screen.
GAGE2.3 - GAGE1.3 )A
result = -90.000
- GAGEl,
GAGE2.3 - GAGE1.3 )A
The “Formula saved” message indicates that the CVIM
system has saved the ATN formula in its memory.
This completes the procedure for entering and saving the
ATN formula.
Cl//M MATH-PAK:
installation
and Configuration
35
-
Using Operator and
Operand Keys (continued)
A VG Key
The AVG (average) function causes a list of operands to be
added together and divided by the number of operands in the
list.
If all operands in the list are integers, the result will also be
an integer, rounded down. If any operand in the list is a fixed
point number (such as 2.000), the result will also be a fixed
point number, rounded to three places (such as 53.833).
The following procedure shows you how to set up a formula
using the AVG operator. The procedure uses a list of six
integers, then changes one of them to a fixed point equivalent
to demonstrate the entry of an AVG formula.
Comments
Your Action
Select the second formula
entry keyboard.
Pick the AVG key.
The AVG operator is on this keyboard.
When you pick the AVG key, the following entry appears in
the upper box of the keyboard:
Formula:
= AVG(A ?
Note that the open parenthesis symbol, Y”, appears with the
AVG operator.
Pick these three keys:
8 9 , (comma).
This enters the first operand (89) in the list. The upper box
should now appear as follows:
Formula:
= AVG(89,A?
Enter the remaining five
operands, and insert a
comma between each:
49,36,15, 20,114.
When you finish, the display should appear as follows:
Formula:
= AVG (89, 49, 36, 15, 20, 114~ ?
I
-1
I
CUM MATH-PAK:
Installation
and Configuration
36
Using Operator and
Operand Keys (continued)
A VG Key (continued)
Comments
Your Action
Pick the “close parenthesis”
key, ??)“.
This completes the AVG formula entry.
Formula:
= AVG(89,
Pick the Ret (return) key.
49, 36,
15, 20, 114)~
This causes the system to compute the average and display
the “result” (53) in the box as follows:
result
Formula:
= AVG ( 89, 49, 36,
15, 20,
= 53
114 )A
Note that since all operands in the list are integers, the
result is also an integer; that is, the result is truncated.
Pick the left arrow (+-I key.
This causes the cursor (A) to move to the left one item. It
should now be to the left of the close parenthesis. Note that
the “result” has disappeared:
-
Formula:
= AVG ( 89, 49, 36,
15, 20,
114~ )
I
Pick the Del (delete) key.
This deletes integer 114 and moves the cursor (A) to the
right of the last comma:
Formula:
= AVG ( 89, 49, 36,
15, 20,‘~
? )
I
Pick these&
keys:
0.
1 1 4 . (decimal)
This reenters 114 as a fixed point number: 114.0.
Formula:
= AVG ( 89, 49, 36,
15, 20,
114.0~
)
-
CVIM MATH-PAK:
Installation
and Configuration
37
Using Operator and
Operand Keys (continued)
A VG Key (continued)
Comments
Your Action
Pick the Ret (return) key.
This causes the system to recompute the average and display
the “result” (53.833) as a fixed point number. Note that the
result has three digits to the right of the decimal point, and
the number 114.0 now has two additional zeros:
Formula:
result
= 53.833
= AVG ( 89, 49, 36, 15, 20, 114.000~
Look at the message box
in the upper left corner
of the screen.
)
The “Formula saved” message indicates that the CVIM
system has saved the formula in its memory.
This completes the procedure for entering and saving the
AVG formula.
COS Key
-
The COS (cosine) function computes the cosine of an angle
(where the angle is stated in degrees).
The cosine of an unknown angle (in a right angle triangle) is
the ratio between the side adjacent to the angle and the
hypotenuse.
Line -------I
1Cosine of 8 = Side X + Hypotenuse 1
-s-m-.-.+
XAxis
(Side adjacent to 8)
In a MATH-PAK formula, the COS operator requires one
operand. The basic formula takes this form:
COS(angle in degrees)
The following procedure shows you how to set up a formula
using the COS operator. The procedure uses a positive angle,
stated in degrees, to demonstrate the entry of a COS formula.
CVIM MATH-PAK:
Installation
and Configuration
38
-
Using Operator and
Operand Keys (continued)
COS Key (con timed)
Comments
Your Action
Select the second formula
entry keyboard.
Pick the COS key.
The COS operator is on this keyboard.
When you pick the COS key, the following entry appears in
the upper box of the keyboard:
Formula:
= COS(A
Pick these two keys:
6 0.
?
This enters the value of the positive angle in degrees. The
display should now appear as follows:
Formula:
= COS(GOr\
Pick the “closeparenthesis”
key, “j”.
?
-
This completes the COS formula entry.
Formula:
= COS(60
Pick the Ret (return) key.
)A
This causes the system to display the “result.” In this case,
the result is 0.500, which is the cosine of an angle of 60”.
result
Formula:
= COS(60
Look at the message box
in the upper left corner
of the screen.
= 0.500
)A
This indicates that the CVIM system has saved the COS
formula in its memory.
This completes the procedure for entering and saving the
COS formula.
CVlM MATH-PAK:
Installation
and Configuration
39
-
Using Operator and
Operand Keys (continued)
DST Key
The DST (distance) function computes the distance from one
position in the image field to another position.
It performs the distance computation by using the
Pythagorean theorem: The square ofthe hypotenuse of a
right angle triangle is equal to the sum of. the squares of the
two sides.
Thus, to find the distance between two points in the image
field (the hypotenuse of a right angle triangle), the DST
function squares the distance along the X axis (one side of
the triangle) and the Y axis (the other side of the triangle),
then computes the square root of the sum of the two squares.
For example, if the first point has an X position of 100 pixels
and a Y position of 150 pixels, and the second point has an X
position of 175 pixels and a Y position of 100, the distance
between these points is equal to the square root of the sum of
the squared distance along the X axis and the squared
distance along the Y axis, as follows:
l
X position = 100
Y position = 150
Point 2
2
X position = 175
Y position = 100
Distance
between points
Point 1
Distance =
d of 752 + 502 =
0 Point 2
/I
Side Y = 50
Point 1
Side X = 75
In a MATH-PAK formula, the DST operator requires four
operands. The basic formula takes this form:
DWX,, Y,, X,, Y, 1
In the formula, operands X and Y, are the coordinates of
Point 1 in the illustration above; operands X, and Y, are the
coordinates of Point 2.
The following procedure shows you how to set up a formula
using the DST operator. The procedure follows the example
above to demonstrate the entry of a DST formula.
CVIM MATH-PAK:
Installation
and Configuration
40
Using Operator and
Operand Keys (continued)
LIST Key (continued)
Comments
Your Action
Select the second formula
entry keyboard.
Pick the DST key.
The DST operator is on this keyboard.
When you pick the DST key, the following entry appears in
the upper box of the keyboard:
Formula:
= DST(/\?
Pick these four keys:
1 0 0 , (comma).
This enters the X position of the first point in the image
field. The display should now appear as follows:
Formula:
= DST(lOO/\ ?
Enter the values for Y,, X2
and Y, with commas between
them: 150,175,100.
This enters the Y position of the first point and the X and Y
positions of the second point. The display should now appear
as follows:
Formula:
=
Pick the %Zoseparenthesis”
key, ,)“.
DST(100, 150, 175, 100~ ?
This completes the DST formula entry.
Formula:
= DST(lOO, 150, 175, 100 )A
Pick the Ret (return) key.
This causes the system to display the “result.” In this case,
the result is 90.138, which is the distance (in pixels) between
the two points.
Formula:
= DST(lOO,
result = 90.138
150, 175, 100 )A
1
1
CVIM MATH-PAK:
-
Using Operator and
Operand Keys (continued)
DST
and Configuration
41
Key (con timed)
Comments
Your Action
Look at the message box
in the upper left corner
of the screen.
Installation
The “Formula saved” message indicates that the CVIM
system has saved the DST formula in its memory.
This completes the procedure for entering and saving the
DST formula.
MAX, M/N Keys
The MAX (maximum) and MIN (minimum) functions find the
largest and smallest values, respectively, in a list of
operands.
In a MATH-PAK formula, the MAX and MI N operators
require two or more operands. The basic formulas take this
form:
MAX(list) and MIN(list)
The following procedure shows you how to set up a formula
using the MAX or MIN operator. The procedure uses a list of
integers to demonstrate the entry of these formulas.
_-
Comments
Your Action
Select the second formula
entry keyboard.
Pick the MAX key.
The MAX and MIN operators are on this keyboard.
When you pick the MAX key, the following entry appears in
the upper box of the keyboard:
Formula:
= MAX(A ?
Pick these three keys:
1 2 , (comma).
This enters the first operand in the list, along with a comma.
The display should now appear as follows:
Formula:
= MAX( 12,~ ?
Select the first formula
entry keyboard.
The “unary” ( + ) operator is on this keyboard.
CVIM MATH-PAK:
Installation
and Configuration
42
Using Operator and
Operand Keys (continued)
MAX, /WIN Keys (continued)
Comments
Your Action
Enter three mot-e operands:
5,89,-l 00.
This enters the remaining operands in the list. Use the
unary key ( &) to enter the minus (-) sign ahead of the “100.”
The display should now appear as follo&:
Formula:
= MAX ( 12, 5, 89, - 100~ ?
Select the second formula
entry keyboard.
Pick the “closeparenthesis”
key, ‘,)“.
The parenthesis keys are on this keyboard.
This completes the MAX formula entry.
Formula:
= MAX( 12, 5, 89, - 100 )A
I
I
Pick the Ret (return) key.
This causes the system to display the “result.” In this case,
the result is 89, which is the maximum value in the list.
Formula:
result = 89
= MAX( 12, 5, 89, - 100 )A
Look at the message box
in the upper left corner
of the screen.
This indicates that the CVIM system has saved the formula
in its memory.
This completes the procedure for entering and saving the
MAX formula.
Now, use the following steps to change to the MIN operator
and demonstrate its operation.
Pick the left arrow (+) key
repeatedly until the CUFSOF
is to the right of MAX (.
This causes the cursor (A) to move to the left. The display
should appear as follows:
Formula:
= MAX (A 12, 5, 89, - 100 )
CVIM MATH-PAK:
Installation and Configuration
43
-
Using Operator and
Operand Keys (continued)
MAX, MI/V Keys (continued)
Your Action
Pick the Del (delete) key.
Comments
This deletes the MAX operator and moves the cursor (A) to
the left as follows:
Formula:
= A 12?, 5, 89, - 100 )
Pick the MI N key.
When you pick the M IN key, the MIN operator appears. The
display should now appear as follows:
Formula:
= MIN (A 12, 5, 89, - 100 )
Pick the Ret (return) key.
This causes the system to display the “result.” In this case,
the result is -100, which is the minimum value in the list.
result
Formula:
= -100
= MIN (A 12, 5, 89, - 100 )
Look at the message box
in the upper left corner
of the screen.
The “Formula saved” message indicates that the CVIM
system has saved the formula in its memory.
This completes the procedure for entering and saving the
MAX (or MIN) formula.
MED Key
The M ED (median) function sorts a list of operands in
ascending order, then returns the value at the center position
for an odd number of operands, or the higher order of the two
center values for an euen number of operands.
For example, in a list with an odd number of operands . . .
82,3,86,2,43
. . . the MED function first sorts their values in ascending
order. . .
2,3,43,82,86
. . . then returns the center value, 43.
CVIM MATH- PA K: Installation
and Configora tion
44
Using Operator and
Operand Keys (continued)
MED Key (continued)
In a list with an euen number of operands. . .
82,3,86,2,
-X,8
. . . the MED function first sorts their values in ascending
order. . .
-15,2,3,8,82,86
then returns the high order value of the two center values.
In-the preceding list, the two center values are 3 and 8; thus,
the high order value is 8.
The basic formula takes this form:
M ED(list)
The following procedure shows you how to set up a formula
using the M ED operator. The procedure uses a list of six
integers to demonstrate the entry of a M ED formula.
Comments
Your Action
Select the second formula
entry keyboard.
Pick the MED key.
The ME D operator is on this keyboard.
When you pick the M ED key, the following entry appears in
theupperboxofthekeyboard:
Formula:
= MED(/\?
Pick these three keys:
8 2 , (comma).
The display should now appear as follows:
Formula:
= MED(82,r\
Select the first formula
entry keyboard.
Pick the (k)
key.
?
The “unary” operator (2~) is on this keyboard.
When you pick the AZkey, the following entry appears in the
display:
Formula:
= MED( 82, -A?
This will negate the value that follows it.
-
CVlM MATH-PAK:
Using Operator and
Operand Keys (continued)
Installation
and Configuration
45
MED Key (continued)
The display should now appear as follows:
Formula:
= MED(82,
Select the second formula
entry keyboard.
Pick the “close parenthesis”
key, “)“.
- 15, 3, 86, 2, 8~ ?
The parenthesis
keys are on this keyboard.
This completes the M ED formula entry.
Formula:
= MED ( 82, - 15, 3, 86, 2, 8 )A
Pick the Ret (return) key.
This causes the system to display the “result.” In this case,
the result is 8, which is the “median” value in this list.
Formula:
result
= 8
= MED ( 82, - 15, 3, 86, 2, 8 )A
Look at the message box
in the upper left corner
of the screen.
The “Formula saved” message indicates that the CVIM
system has saved the formula in its memory.
This completes the procedure for entering and saving the
M ED formula,
MOD Key
The MOD (mode) function finds the value in a list of
operands that appears most often. If no value appears any
more often than any other value, the MOD function returns
the lowest value in the list.
For example, in the following list of operands.
..
2,3,2,3,3
the MOD function returns 3, since it occurs more often
ihHn 2.
The basic formula takes this form:
MOD(list)
CVIM MATH-PAK:
Installation
and Configuration
46
-
Using Operator and
Operand Keys (continued)
MOD Key (continued)
The following procedure shows you how to set up a formula
using the MOD operator. The procedure uses the preceding
list of five integers to demonstrate the entry of a MOD
formula.
Comments
Your Action
Select the second formula
entry keyboard.
Pick the MOD key.
The MOD operator is on this keyboard.
When you pick the MOD key, the following entry appears in
the upper box of the keyboard:
Formula:
= MOD(r\?
Pick these two keys:
2 , (comma).
The display should now appear as follows:
formula:
= MOD(2,/\
Enter the remaining operands
(with a comma between each):
3,2,3,3.
?
The display should now appear as follows:
Formula:
= MOD (2, 3, 2, 3, 3~ ?
Pick the “closeparenthesis”
key, “)“.
This completes the MOD formula entry.
Formula:
= MOD (2, 3, 2, 3, 3 )A
Pick the Ret (return) key.
This causes the system to display the “result.” In this case,
the result is 3, which is the “mode” value in this list.
Formula:
=
MOD ( 2, 3, 2, 3, 3 )A
result = 3
I
CVIM MATH-PAK:
1
Using Operator and
Operand Keys (continued)
Look at the message box
in the upper left corner
of the screen.
installation
and Configuration
47
MOD Key (continued)
The “Formula saved” message indicates that the CVIM
system has saved the formula in its memory.
This completes the procedure for entering and saving the
MOD formula.
SIN Key
The SIN (sine) function computes the sine of an angle (where
the angle is stated in degrees).
The sine of an unknown angle (in a right angle triangle) is
the ratio between the side opposite the angle and the
hypotenuse.
ide optosite
0)
Sine of 8 = Side X + Hypotenuse
r.w--.-.-.+
)(Axis
In a MATH-PAK formula, the 51N operator requires one
operand. The basic formula takes this form:
51N(angle in degrees)
The following procedure shows you how to set up a formula
using the SIN operator. The procedure uses a positive angle,
stated in degrees, to demonstrate the entry of a SIN formula.
Comments
Your Action
Select the second formula
entry keyboard.
Pick the SIN key.
The SIN operator is on this keyboard.
When you pick the SIN key, the following entry appears in
the upper box of the keyboard:
Formula:
= SIN(r\?
CVIM MATH- PAK. lnstalla tion and Configuration
48
-
Using Operator and
Operand Keys (continued)
SIN
Key (continued)
Comments
Your Action
Pick these two keys:
3 0.
This enters the value of the positive angle in degrees. The
display should now appear as follows:
Formula:
= SIN ( 30~ ?
I
I
Pick the “close parenthesis”
key, “)“.
This completes the 51N formula entry.
Formula:
= SIN (30 )A
Pick the Ret (return) key.
This causes the system to display the “result.” In this case,
the result is 0.500, which is the sine of an angle of 30”.
result
Formula:
= 0.500
= SIN ( 30 )A
Look at the message box
in the upper left corner
of the screen.
The “Formula saved” message indicates that the CVIM
system has saved the formula in its memory.
This completes the procedure for entering and saving the SIN
formula.
SQR Key
The SQR (square root) function computes the square root of a
value. It always returns a fixed point number, regardless of
whether the original value was an integer or a fixed point
number.
For example, if the value entered is 49, the SQR function
returns 7 .OOO.
In a MATH-PAK formula, the SQR operator requires one
operand. The basic formula takes this form:
SQR(value)
The following procedure shows you how to set up a formula
using the SQR operator.
-
CVIM MATH-PAK:
Installation
and Configuration
49
-.
Using Operator and
Operand Keys (continued)
SQR
Key (con timed)
Comments
Your Action
Select the second formula
entry keyboard.
Pick the SQR key.
The SQR operator is on this keyboard.
When you pick the SQR key, the following entry appears in
the upper box of the keyboard:
Formula:
= SQR(r\ ?
Pick these two keys:
4 8.
The display should now appear as follows:
Formula:
= SQR(48,/\
-
Pick the “closeparenthesis”
key, “)“.
?
This completes the SQR formula entry.
Formula:
= SQR(48)r\
Pick the Ret (return) key.
This causes the system to display the “result.” In this case,
the result is 6.927, which is the square root of 48.
Formula:
result
= 6.927
= SQR(48)r\
Look at the message box
in the upper left corner
of the screen.
The “Formula saved” message indicates that the CVIM
system has saved the formula in its memory.
This completes the procedure for entering and saving the
SQR formula.
CVIM MATH-PAK:
Installation
and Configora tion
50
Using Operator and
Operand Keys (continued)
SQ Key
The SQ (square) function computes the square of a value. It
returns an integer if the value squared is an integer, and
returns a fixed point number if the value squared is a fixed
point number.
For example, if the value to be squared is 7, the SQ function
returns 49. If the value to be squared is 7.000, the SQ
function returns 49.000.
In a MATH-PAK formula, the SQ operator requires one
operand. The basic formula takes this form:
SQ(value)
The following procedure shows you how to set up a formula
using the SQ operator.
Comments
Your Action
Select the second formula
entry keyboard.
Pick the SQ key.
The SQ operator is on this keyboard.
When you pick the SQ key, the following entry appears in the
upper box of the keyboard:
Formula:
=
Pick these two keys:
1 2.
SQ(A?
The display should now appear as follows:
Formula:
= SQ(~ZA?
Pick the “close parenthesis”
key, ‘?)“.
This completes the SQ formula entry.
Formula:
= SQ( 12)~
I
Pick the Ret (return)
key.
1
This causes the system to display the “result.” In this case,
the result is 144, which is the square of 12.
Formula:
= SQ( 12)~
result
= 144
-
CUM MATH-PAK:
installation
and Configuration
51
Using Operator and
Operand Keys (continued)
SQ Key (continued)
Comments
Your Action
Look at the message box
in the upper left corner
of the screen.
The “Formula saved” message indicates that the CVIM
system has saved the formula in its memory.
This completes the procedure for entering and saving the SQ
formula.
TAN Key
The TAN (tangent) function computes the tangent of an
angle (where the angle is stated in degrees).
The tangent of an unknown angle (in a right angle triangle)
is the ratio between the side opposite the angle and the side
adjacent to the angle.
Y (Side opposite 8)
Tangent of 8 = SideY + SideX
r-
.-.-.-.+
)(Axis
(Side adjtcent to 8)
In a MATH-PAK formula, the TAN operator requires one
operand. The basic formula takes this form:
TAN(angle in degrees)
CVlM MATH-PAK:
lnstal/ation
and Configuration
52
Using Operator and
Operand Keys (continued)
TAN Key (continued)
The following procedure shows you how to set up a formula
using the TAN operator. The procedure uses a positive angle,
stated in degrees, to demonstrate the entry of a TAN formula.
Comments
Your Action
Select the second formula
entry keyboard.
Pick the TAN key.
The TAN operator is on this keyboard.
When you pick the TAN key, the following entry appears in
the upper box of the keyboard:
Formula:
= TAN(/\ ?
Pick these two keys:
4 5.
This enters the value of the positive angle in degrees. The
display should now appear as follows:
1
Formula:
=TAN(45r\?
Pick the “close parenthesis”
key, “)“.
-
This completes the TAN formula entry.
Formula:
= TAN (45 )A
Pick the Ret (return) key.
This causes the system to display the “result.” In this case,
the result is 1.000, which is the tangent of an angle of 45”.
Formula:
=
Look at the message box
in the upper left corner
of the screen.
result
= 1.000
TAN (45 )A
The “Formula saved” message indicates that the CVIM
system has saved the formula in its memory.
This completes the procedure for entering and saving the
TAN formula.
-
CWM MATH-PAK:
Using Operator and
Operand Keys (continued)
Installationand Configuration
53
VA!? Key
The VAR (variance) function computes the variance of a list
of operands. The variance is equal to the sum of the square of
the difference between the value of each operand and the
average value of all operands, divided by the number of
operands in the list.
Using the following list of operands.
..
5,8,10
. . .
the VAR function processes the list as follows:
1. It computes the average value of all operands. Thus, 5 + 8
+ 10 = 23, and 23 + 3 = 7.667, the average value of the
three operands.
2. It computes the difference between the value of each
operand and the list average, 7.667, then computes the
square of each difference, as follows:
5 -7.667
= -2.667;
8 - 7.667
= 0.333;
-2.667
0.333
X
-2.667
= 7.113
X 0.333
= 0.111
10-7.667= 2.333;2.333
X 2.333= 5.443
3. It computes the average of the squared differences,
follows:
as
7.113+ 0.111+ 5.443= 12.667;12.667
+ 3 = 4.222
Thus, the variance is 4.222.
In a MATH-PAK formula, the VAR operator requires two or
more operands. The basic formula takes this form:
VAR(list)
The following procedure shows you how to set up a formula
using the VAR operator. The procedure uses the preceding
list of integers to demonstrate the entry of a VAR formula.
Select the second formula
entry keyboard.
Pick the VAR key.
The VAR operator is on this keyboard.
When you pick the VAR key, the following entry appears in
the upper box of the keyboard:
Formula:
= VAR(r\
L
?
t
CVIM MATH-PAK:
Installation
and Configuration
54
-
Using Opera tar and
Operand Keys (continued)
VA R Key (con timed)
Comments
Your Action
Pick these two keys:
5 , (comma).
This enters the first value in the list, along with a comma.
The display should now appear as follows:
Formula:
= VAR( 5,~ ?
Enter the remaining operands
(with a comma between each):
8,lO.
The display should now appear as follows:
Formula:
= VAR(5,
8, lo,-,?
,
Pick the “close parenthesis”
key, “)“.
This completes the VAR formula entry.
Formula:
= VAR(5,
8, 10 )A
I
Pick the Ret (return) key.
This causes the system to display the “result.” In this case,
the result is 4.221, which is the variance value for this list.
Formula:
result
= 4.221
= VAR ( 5, 8, 10 )A
I
Because of rounding errors that sometimes occur with fixed
point calculations, the result is 4.221 instead of 4.222, as
shown earlier. Normally, this will not affect the usefulness of
these calculations.
Look at the message box
in the upper left corner
of the screen.
The “Formula saved” message indicates that the CVIM
system has saved the formula in its memory.
This completes the procedure for entering and saving the
VAR formula.
W/M
MATH-PAK:
installation
and Configuration
55
-
Using Operator and
Operand Keys
(continued)
Arithmetic
Operator Keys:
+ , -, *, I
The arithmetic operators are used between two values to
perform addition, subtraction, multiplication, and division
functions, as shown in the following examples.
Addition:
By placing the addition operator (+> between the
following integers . . .
52 + 34
. the system adds the two integers and computes a result of
s’6.
Subtraction: By placing the subtraction operator (-)
between the following integers. . .
52-34
. the system subtracts the right integer from the left
integer and computes a result of 18.
Multiplication: By placing the multiplication
between the following integers. . .
operator (*)
52*34
. the system multiplies
result of 1768.
-
the two integers and computes a
Division: By placing the division operator (0 between the
following two integers , . .
52134
. the system divides the left integer by the right integer
knd computes a result of 1 (the result is truncated). (If one of
the two numbers were fixed point, the result would also be
fixed point: 1.529.)
Paren thesis Keys: ()
The parenthesis are used to enclose an arithmetic or logical
expression within a formula. This ensures that the formula
will evaluate the contents of the expression as an entity.
For example, in the following formula . . .
3+6*5
. the formula evaluates “6 * 5” first; thus, in this case the
result is 33 (6 * 5 = 30, and 30 + 3 = 33).
By placing parenthesis around “3 + 6”. . .
(3 + 6) * 5
. the formula evaluates it as a single entity (3 + 6 = 9);
thus, in this case the result is 45 (9 * 5 = 45).
CVlM MATH- PAK: lnstalla tion and Configuration
56
Using Operator and
Operand Keys (continued)
Module Operator Key: %
The modulo operator is used between two values to return a
remainder, if any resulting from the division operation.
For example, by placing the modulo operator (%) between
the following two integers. . .
52%34
. . . the system divides the left integer by the right integer,
then returns the remainder from the division operation.
Since 34 goes into 52 once, the remainder is 52 - 34 = 18.
Thus, the system returns a result of 18.
Mary
Operator Key:
f
The unary operator can be entered just ahead of an operand
in a formula in order to negate the value of the operand.
For example, when entering the following list of integers . . .
15,-27,133,6
. . . press the unary key ( &) to place a minus sign (-) before
entering the integer 27. This causes 27 to become a negative
integer.
Comma Key: ,
The comma is used to separate the operands in a list, such as
in an AVG formula:
AVG( 21,54,101,3)
f ogic Operator Keys
The logic operators can perform logical operations when
placed between two values in a formula. The result from
these operations is either a logic “1” or logic “0,” according to
whether or not the logic condition is satisfied for the
particular logic operator and values used.
The following examples show how the logic operators work.
AND: Assume that the inspection result from GAGE1 is 6
and the result from GAGE2 is 3. By placing the “AND”
operator between GAGE1 and GAGE2 . . .
GAGE1 AND GAGE2
. . . the formula will return a logic “1” result, since both
values are nonzero.
If either value were zero, or if both values were zero, the
formula would return a logic “0” result.
CVIM MATH-PAK:
Using Operator and
Operand Keys (continued)
Installation
and Configuration
57
Logic Operator Keys (continued)
OR: Assume that the inspection result from GAGE1 is 0 and
the result from GAGE2 is 3. If you place the “OR” operator
between GAGE1 and GAGE2.. .
GAGE1 OR GAGE2
. . . the formula will return a logic “1” result, since at least
one value is nonzero.
If both values were zero, the formula would return a logic “0”
result.
NOT: The “not” operator (NOT) is used with expressions
containing other logic operators. Its effect is to invert the
normal logic result. For example, if the normal result of an
“AND” operation were a logic “1,” the “NOT” operator will
invert it to a logic “0.”
Assume that the inspection result from WIN1 is 400 and the
result from WIN2 is 500. Assume further that these tools are
“ANDed” in a formula. If you place the “NOT” operator
ahead of the “AND” expression . . .
NOT (WIN1 AND WIN2)
-
. the formula will return a logic “0.” (In this case, since
both values are nonzero, the normal “AND” operation result
is a logic “1”; however, the “NOT” operator inverts the result
to a logic “0.“)
= : The “equal” operator ( =) returns a logic “1” when placed
between two operands whose results are equal. Thus, if the
C+fzflf and GAGE2 results are both 6 in the following
...
GAGE1
= GAGE2
. the formula will return a logic “1” result, since the two
gage results are equal.
If the two gage results were not equal,
return a logic “0.”
the formula would
< >: The “not equal” operator ( < > > returns a logic “1”
when placed between two operands whose results are not
equal. Thus, if the GAGE1 result is 5 and the GAGE2 result
is 3 in the following formula. . .
GAGE1 < > GAGE2
the formula will return a logic “1” result, since the two
gage results are not equal.
If the two gage results were equal, the formula would return
a logic “0.”
CVIM MATH-PAK:
installation
and Configuration
58
-
Using Operator and
Operand Keys (continued)
logic Operator Keys (continued)
>: The “greater than” operator (>) returns a logic "1"when
placed between two operands where the left operand result is
greater than the right operand result. Thus, if the GAGE1
result is 8 and the GAGE2 result is 7 in the following
formula . . .
GAGE1 > GAGE2
the formula will return a logic “1” result, since 8 is
&eater than 7.
If the GAGE1 result were equal to, or less than, the GAGE2
result, the formula would return a logic “0.”
<: The “less than” operator ( <) returns a logic “1” when
placed between two operands where the left operand result is
less than the right operand result. Thus, if the GAGE1 result
is 7 and the GAGE2 result is 8 in the following formula. . .
GAGE1 < GAGE2
the formula will return a logic “1” result, since 7 is
greater than 8.
If the GAGE1 result were equal to, or greater than, the
GAGE2 result, the formula would return a logic “0.”
-
> = : The “greater than or equal to” operator ( > = ) returns
a logic “1” when placed between two operands where the left
operand result is greater than, or equal to, the ri ht operand
result. Thus, if the GAGE1 result is 46 and the 6 AGE2
result is 45 in the following formula. . .
GAGE1 > = GAGE2
. the formula will return a logic “1” result, since 46 is
beater than 45. The result would be the same, in this case, if
the two gage results were both 45 or 46
If the GAGE1 result were less than the GAGE2 result, the
formula would return a logic “0.”
= : The “less than or equal to” operator ( < = ) returns a
l:gic “1” when placed between two operands where the left
operand result is less than, or equal to, the right operand
result. Thus, if the GAGE1 result is 32 and the GAGE2
result is 33 in the following formula . . .
GAGE1 > = GAGE2
the formula will return a logic “1” result, since 32 is less
than 33. The result would be the same, in this case, if the two
gage results were both 32 or 33
If the GAGE1 result were greater than the GAGE2 result,
the formula would return a logic “0.”
-
CUM MATH-PAK:
lnstalla
tion and Configuration
59
-
Setting f:ormula Name
Use this function to name the current formula. You can
choose any name consisting of up to seven alphanumeric,
punctuation, and miscellaneous printable characters,
including the “space” character.
Comments
Your Action
Pick the Se-t Names menu
box, if appropriate.
IFormula
When you pick the Set Name menu box, a “keyboard”
appears alongside the Config. Results popup menu, as
follows:
1: Disabled
I
Archival
-
-
Snapshot
Analysis
Lfqegistration
[I
Env.
Camera A
0.0
Ref. Line
’
Ref. Win
Gage
Window
. . :.:
i$:$$”
Exit
The default name is always the number of the current
formula. In the example above, it is F1.
The keyboard has five function keys:
1. The backspace key (t) deletes the last character entered
and moves the cursor (A) left one space.
2. The Esc (“escape”) key returns to the Set Archive Names
popup menu without changing the current name, if any.
3. The Cl (“clear”) key sets the “New name” line to all blanks.
4. The Ret (“return”) key enters the new name into the
appropriate menu box in the Set Archive Names popup menu.
5. The shift keys ( t 4 ) select alternate “keyboards” by
causing several of the keyboard keys to change. The alphabet
characters, however, remain the same on both keyboards.
CVlM MATH-PAK:
Installation
and Configuration
60
Setting Formula Name
(continued)
Comments
Your Action
The preceding keyboard illustration shows the first
keyboard, while the following illustration shows the second
keyboard.
Pick each character of the
new name.
Pick the Ret key to enter
the new formula name.
As you pick the characters, they will appear after New
name.
When you pick the Ret key, the new name will appear in the
Set Name menu box in the Config. Results menu.
-
Note also that the “Formula saved” message appears in the
message box on the monitor screen:
Formula saved.
This indicates that the name has been saved in memory.
Enabling Formula
Use this function to enable the currently selected formula.
NOTE: When you enable a formula, the CVIM system
prevents an associated gage or window from sending its
results to the discrete outputs.
For example, if you enable formula #l, the results of its
operation will be available to the discrete outputs instead of
the results from a window #l inspection. The CVIM system
will use the range limits and discrete outputs assigned to
formula #1 and send the results of its operation to those
outputs. (Window #l results data are still available through
the other I/O ports, however.)
-
Cl//M MATH- PA K: hstalla tion and Configuration
Enabling Formula
(con timed)
Your Action
Pick the Formula XX
menu box.
The following table relates each formula number to the
number of the gage or window whose results it replaces.
Comments
When you pick the Formula XX menu box (“XX” is the
formula number), a warning message appears in the
message box, as follows:
WARNING: Enabling this formula will
prevent Window #l from being range
checked or assigned to outputs.
Reselect to confirm.
Note ‘Window #l”in the box. The actual tool and number
depend on which formula number is currently selected.
Pick the Forrnula XX menu
box again, if appropriate.
When you pick the Formula XX menu box again, the warning
message disappears, and “Enabled” replaces “Disabled” in
the menu box.
NOTE: If you decide to disable a currently enabled formula,
another warning message will appear when you pick the
Formu la XX menu box, as follows:
-
WARNING: Disabling this formula will
allow Window #l to be range checked.
The range for this window must be enabled.
Reselect to confirm.
To disable the formula, you must pick the Formula XX menu
box a second time.
CVIM MATH- PA K: installation
62
Assigning Range Limits
and Outputs
and Configuration
Range Limits - the term range limit, as it applies to a
MATH-PAK formula, refers to a formula result above or
below which the CVIM system might not (or cannot)
successfully perform an inspection.
In general, range limits specify the upper and lower
boundaries of acceptable inspection results.
The CVIM system provides two sets of range limits: warning
range limits, and fault range limits. Warning range limits
must always lie at or within
fault range limits.
The two sets of range limits have this relationship:
LF<=LW<=NOMINAL<=UW<=UF
The NOMINAL value refers to a desired middle-of-therange value. LW and UW are the lower and upper warning
limits. LF and UF are the lower and upper fault limits.
Here is a general example, using a nominal value of 100, to
demonstrate the concept:
l
The LW value (lower warning limit) could be set to 95.
l
The UW value (upper warning limit) could be set to 105.
l
The LF value (lower fault limit) could be set to 90.
l
The UF value (upper fault limit) could be set to 110.
During an inspection, if the formula result goes outside
either warning limit, the CVIM system will generate a
warning signal. If the formula result goes outside both a
warning limit and a fault limit, the CVIM system will
generate a warning signal and a fault signal.
In a practical application, a warning signal can function as
an early indication of a deteriorating condition. A fault
signal can indicate a “hard” failure, such as a broken part. In
each case, the signal that results when a range limit is
exceeded can be used to alert operations personnel to fix the
problem.
Outputs - the term outputs refers to the 14 discrete outputs
that you can configure to carry various signals to your
production equipment. Of these signals, the “results” signals
indicate whether or not any of the warning and/or fault
range limits have been exceeded.
The CVIM User’s Manual (Catalog No. 5370-NDOOl),
Chapter 4, Operating Environment, shows you how to assign
signal functions to the discrete outputs.
In this section, you can select warning and fault limits for
your formula results and assign them to any of the discrete
outputs that you designated earlier for “results” outputs.
CVIM MATH-PAK:
Installation
and Configuration
63
Assigning Range Limits
and Outputs (continued)
Your Action
Prepare to run a series
of “trial” inspections.
The following steps describe a procedure for performing a
trial series of inspections using a representative sample of
workpieces in order to accumulate a statistical basis for
setting the range limits for the formulas.
Comments
Refer to the CVIM User’s Manual, Chapter 10, Runtime
Operations, for more details about the following steps.
For these trial inspection series, you should have on hand a
sufficiently large quantity of representative workpieces.
If you cannot use the actual factory-floor setting to perform
these trial inspections, you can manually position each
workpiece in front of the camera and use a manual trigger,
or use some type of automatic positioning and triggering
mechanism that approximates the factory-floor situation.
Pick the Exit menu box in the
Main Configuration menu.
When you pick the Exit menu box, the Exit popup menu
will appear.
Pick the Runtime Display
menu box in the Exit menu.
When you pick the Runtime Display menu box, the Runtime
Display popup menu will appear.
Pick theStat. Page 1 menu
box in the Runtime
Display menu.
This causes the Stat. Page 1 statistics table to appear on the
monitor screen when you activate the run mode. Stat. Page 1
can be configured to display “results” statistics for all
enabled formulas, gages, and windows.
Pick the Runtime Init. menu
box in the Exit menu.
When you pick the Runtime Init. menu box, the Runtime Init.
popup menu appears.
Look at the Mode menu box
in the Runtime Init. menu.
If “Standard” appears, pick the box once to toggle to “Learn.”
This activates the “learn” mode during the trial inspection
series and ensures the accumulation of “results” data for this
formula in the Stat. Page 1 table.
Look at the Disp. Formulas
menu box in the
Runtime Init.menu.
If “0” appears, pick the box to display the “calculator” pad.
Enter “1” (or higher) in order to display statistics from at
least one formula (per page) in the Stat Page 1 table.
For example, if you enter “1” and you want to see the
statistics from formula #5, after activating the run mode you
must “page down” the Stat Page 1 table four times in order to
see the formula #5 statistics.
Look at the Stat. Samples
menu box in the
Runtime Init. menu.
This menu box enables you to specify the number of
inspections that you want the CVIM system to perform
before it displays accumulated statistical data in the Stat
Page 1 table.
CVIM MATH-PAK:
Installation
and Configuration
64
Assigning Range Limits
and Outputs (continued)
Your Action
Pick the Stat. Samples
menu box, if appropriate.
Pick the Runtime menu
box in the Exit menu.
Pick the Goto Runmode menu
box in the Runtime menu.
Look the Stat. Page 1 table.
When the desired number
of inspections appears under
“samples” in the Stat. Page 1
table, pick the Setup menu
box to stop the run mode.
Look at the four statistics
columns in the Stat.
Page 1 table.
Comments
When you pick the box, the “calculator” pad appears. Enter
the number of inspections to be performed for each sample.
When you pick the Runtime
menu appears.
menu box, the Runtime
When you pick the Goto Runmode
system begins running inspections
Auto/Internal as the trigger source.
await trigger inputs from whatever
selected.
popup
menu box, the CVIM
ifyou selected
If not, the system will
trigger source you
As the inspections continue, the Stat. Page 1 table displays
accumulated “results” data for each enab2ed gage, window,
and/or formula.
Picking the Setup menu box stops the run mode and returns
the CVIM system to the configuration mode.
At this time, the final data appearing in the Stat. Page 1
table are recorded in the Inspection Statistics table for the
currently selected formula. You will see this when you pick
the Range/Outputs menu box for the appropriate formula.
These columns show the mean, standard deuiation,
minimum reading, and maximum reading statistics for the
trial inspection series.
These statistics are your basis for configuring the range
limit values for the currently selected formula.
Pick the Mist menu box.
This restores the M isc popup menu.
Pick the Config. Results
menu box.
This restores the Config. Results popup menu.
CVIM MATH-PAK:
installation
and Configuration
65
--
Use the following steps to configure the appropriate
limits for your MATH-PAK formulas.
Assigning! Range Limits
and Outputs (continued)
Your Action
range
Comments
When you pick the Range/Outputs
appear on the screen, as follows:
Pick the Range/Outputs menu
box in the Config. Results
popup menu.
menu box, two tables will
N/A
200
6.268
-0.727
2.346
1.713
:: :..:
,.
t
Inspection
Statistics Table
0.0
Set Name:
-
Formula
-Config.
Results
Popup Menu
1: Disabled
Jump
Previous
Next
Archival
Analysis
loa
Registration
Env.
Camera A
Ref. Line
Ref. Win
Gage
Window
$@(
Exit
The Range/Output Setup table is the one you will use to set
the range limits and assign the discrete outputs. The
numbers appearing in it now are the limits and outputs set
previously. Note that each box in the table has the three dots
(moo), which indicates that you will need to pick each box, one
at a time, in order to set its value.
The Inspection Statistics table shows “results” data from a
series of trial inspections performed while the CVIM system
ran inspections in the “learn” mode. These numbers can help
you choose the best values for the range limits. Refer to the
CVIM User’s Manual, Chapter 10, Runtime Operations, for
more information about this subject.
CVlM MATH-PAK:
installation
and Configuration
66
-
The next steps show you how to select values for the range
limits.
Assigning Range Limits
and Outputs (continued)
NOTE: The order in which these steps are presented may
not be appropriate in all cases. If not, a message will appear
that says: VALUE OUT OF RANGE. For example, this
message will appear if you try to change the upper warning
range limit to a value below the lower warning range limit.
Comments
Your Action
This is the fault range upper (“High”) limit. When you
pick this box, the calculator pad appears on the screen:
Pick the upper box under
FAULT RANGE.
..,.,,:,:,
.,
: ;,::
.:’,..:
..),..
.I..
::::
::.:i:,
,..
:j:i:; :‘!j ;.: &.&Lf y:: ;; .;j: 1..$/Y&N(NG~.: .;m
1.,.
::’ .,:: :.: ..:
:: ...I.;:: ::.:
~~‘~i:!~~‘~;RcCFj$E
‘,i I.;; ‘;
..,:..
::
:: :
: ....:.. :::
:::: ,,ij:j
::: :.:..fi~~i;i~.’
:.::
,.. ;, .,::,,,
.:
I
:
t
:_
:.I:‘&‘:
0.0
Set Formula
Next
Previous
Inspktion
Statistics Table
t
-
Range/Outpu
Setup Table
II
I
I
I
I
:: j’,, .:::.j.
j:.::; .::j :,
: .;j,:l’,:;j:j:::: i.j ::,,j,:::i
j:::;:.:. ,j: ;: ,. ;:; 1; : ;,:j ; ; ; :. :... :,
ij~aa~!ii.~R~~:l~s.ii:;‘i’~‘.
i:;::
s::j
$::j
ici;fi j
j j :j ‘:j; j::j :’::’: ::’
:::j:::;:
,.,.,
.../.
., ,,.,.
:...:.:”. :;:.....:...:;:...
Archival
Snapshot
Analysis
Registration
Env.
Pick each digit of the upper
fault limit value.
Pick the Enter key.
Pick the middle box under
FAULT RANGE.
Pick each digit of the lower
fault limit value.
di5
-
Camera A
As you pick each digit, it appears in the calculator “display.”
Thus, for a value of 7.5, pick “7,” “. (decimal),” and “5.”
When you pick the Enter key, the new value will appear in
the upper box under FAULT RANGE.
This is the fault range lower (“Low”)
limit.
As you pick each digit, it appears in the calculator “display.”
-
Cl//M MATH-PAK:
Installation
and Configuration
67
-
Assigning Range Limits
and Outputs (continued)
Comments
Your Action
When you pick the Enter key, the new value will appear in
the middle box under FAULT RANGE.
Pick the Enter key.
This is the warning range upper (“High”) limit.
Pick the upper box under
WARNING RANGE.
As you pick each digit, it will appear in the calculator
“display.”
Pick each digit of the upper
warning limit value.
When you pick the Enter key, the new value will appear in
the upper box under WARNING RANGE.
Pick. the Enter key.
This is the warning range lower (“Low”) limit.
Pick the -middle box under
WARNING RANGE.
As you pick each digit, it will appear in the calculator
“display.”
Pick each di@t of the lower
warning limit value.
When you pick the Enter key, the new value will appear in
the middle box under WARNING RANGE.
Pick the Enter key.
When you pick this box, a variation of the Output
Assignment popup menu appears on the screen, as follows:
Pick the -lower box under
WARNING RANGE.
-
j: jjjj j ,:j: I:!,‘:: >; ; .I :, ::j
,, ; ; ‘. :. :j: .:,i: :.:,:. :...: .:... :. .:: :. :.jjj ; :. ;.j j; j:
: :’:: :jr ; ;:..; .:: j:
:, j: ii) ,,::
: .. ,.::.,.(Z’ :>: ; ,..,i :; FAUitT
,.:. : j : .:ji
:. .;:j
:. ;.; ;; ;. ~P;JWy$.;, ;.j.:-k:$;I;
:, .::..::.
::y:.
.. ,.......jY&~:~;e:~;;
,;:;.j:j:;5;
..:,.:::
.:I;@Qi$~,~ .;I:‘jii ,:;y:..,;i;:ij:,
.jj
::.,...)
: .,:: :.:j j,.j:.:::
:i ~
:., .:.:::
:.:j.i... . . .j. y:;j:I: ..::..: .. . ...j:jj : ..... .:‘I ;y.::y::.i:
.:::
,{..j
.j.
>,I:
..,...
,.
.,...:.::.
:::
.:
:
,.....,:..,:
.
.
.
::.:
:,;;:::.>:::.:
.::
.... :... ....:.:
..:
j j ,....:...:... :.
.. : ...:
..:.;:::;::
:.. . ‘.
,..
.; :: .,:I: : ::::,
\: f&&i~~“~@&
j::, : j : j ; :.j j I::
: j :. j
j
j ; :; j,jiij:: jj; :, ;$ ;:,: ji+&
.‘:.:. ..:: : .: ,. ...... .. : 5. :::‘: ‘, .I:.‘. I:.: ::.
I Set Formula
I
ISet
.a.
Name:
t
I
Rat-me/Output
asrup [able
I
Next
Previous
1q
2
l/Results
Ic]
I0
I0
I0
I0
Ic]
Iq
I0
3
l/Results
I
4
l/Results
I
5 Z/Results
I
6 Z/Results
I
7
Not Used
I
8
Not Used
I
9
Not Used
I
10
Not Used
I
11
NotUsed
12
Not Used
10
13
NotUsed
lo
14
Not Used
10
I
Registration
Env.
Camera A
q
0.0
Ref. Line
Ref. Win
Gage
Window
:: ii :.j j :
:m$~i
.. : : :
Exit
I
CVIM MATH-PAK:
installation
and Configuration
68
Assigning Range Limits
and Outputs (continued)
Comments
Your Action
This is the Output Selection popup menu. It shows the
output functions that you assigned to the Output
Assignment popup menu. (Refer to the CVM User’s Manual,
Chapter 4, Operating Environment.)
NOTE: This menu shows that only the outputs that you
designated in Chapter 4 as “l/Results” (or “Z/Results” if this
formula is in tool set #2) are available to this formula. The
available outputs appear in light type, and all others appear
in black type (meaning that you cannot pick them).
Note also that the No Output box in the Output Selection
popup menu has a shaded square (0). This indicates that no
output is currently assigned to carry WARNING RANGE
signals for this formula.
Pick the output number for
the WARNING RANGE.
From the Output Selection popup menu, pick one of the
available output boxes labeled ” 1/Resu Its” (or “Z/Resu Its,” if
appropriate). When you pick the appropriate box, the shaded
square shifts to it.
In addition, the output number appears in the lower box
under WARNING RANGE.
Pick the lower box under
FAULT RANGE.
Pick the output number
for the FAULT RANGE.
From the Output Selection popup menu, pick one of the
available output boxes labeled ” l/Resu Its” (or “Z/Resu Its,” if
appropriate). When you pick the appropriate box, the shaded
square will shift to it.
In addition, the output number appears in the lower box
under FAULT RANGE.
Results Data: Size and
Rounding Constraints
The limits on the size of formula results data - the numbers
resulting from a formula’s operation - are a function of the
memory space allocated to those results.
Here are the specific limits:
l The “1argest”positiue
fixed point result value that the
system can return is 32,767.999.
The “largest” negative fixed point result value that the
system can return is -32,768.OOO.
l
The largest positive inte er result from a formula’s
operation cannot exceed 251 - 1, or 2,147,483,647.
l
The largest negative inte er result from a formula’s
operation cannot exceed -2 51 , or -2,147,483,648.
l
Results from fixed point calculations sometimes contain
rounding errors. Normally, these errors will not affect the
usefulness of the results for your applications.
l
-
CVIM MATH-PAK:
Installation
and Configuration
69
MA T/f- PAK’Ap lica tion
Pxamples
This section provides three MATH-PAK application
examples, the main purpose of which is to give you some
ideas about, the types of CVIM inspection application
problems that you can solve with MATH-PAK formulas.
Example #l: Replacing Linear Measurement Gages
with Positional Gages Without the MATH-PAK option, an
inspection application normally uses a single linear gage to
perform a distance measurement.
With the MATH-PAK option, however, some applications
could perform the same measurement, using two “positional”
line gages and a MATH-PAK formula.
A potential benefit of this method is faster measurement,
particularly when the gaging mode is gray scale and the
measurement crosses most of the image field.
The two-gage measurement can be set up by positioning
linear gages, each configured for either X- or Y-position
operation, across the two edges on the object where the
measurement is to be made.
two
This example compares the single-gage method to the twogage-and-formula method. The gages are positioned across
the object as shown in the following illustration:
-
Gage #I :
Edge #I
,j!.:
:..
;::
:,
:
:
Note that the measurement
each other.
:
:j
:
:.
:.
edges of the object are parallel to
In the single-gage method, gage #l measures the distance
between edge #1 and #2 of the object. In the two-gage
method, gages #2 and #3 return the X positions for edges #l
and #2, respectively. The formula then calculates the
distance between edge #l and #2 by subtracting the gage #2
X position from the gage #3 X position.
CVIM MATH-PAK:
70
Installation
and Configuration
-
MA TH- PA K Application
Examples (continued)
Here are two example formulas that use the X-position
results from gages #2 and #3 to calculate the distance
between edges #l and #2:
GAGE 3 - GAGE 2
This formula produces a positive result since gage #2 is to
the right of gage #l, and the X-position values increase from
left to right40 to 511 pixels).
ABS(GAGE
(2)
2 -GAGE
3)
This formula does not depend on gage #2 being to the right
of gage #l. In the expression (GAGE 2 - GAGE 31, the result
of the subtraction is a negative number; however, the ABS
operator causes the formula to return the absolute value of
the difference between the two gages.
In some cases, a measurement must be made that is neither
horizontal nor vertical, such as measuring the distance
between edges #1 and #2 on the following object:
Gage #l
The two “position” gages can still be used, but the formula
will be more complex since it must take into account the Yaxis component of the measurement distance in addition to
the X-axis component.
Here is an example formula that uses both the X-axis and Yaxis results from gages # 1 and #2 to calculate the distance
between edges #1 and #2 in the above illustration:
(3)
DST(GAGE
l,GAGE
1.3,GAGE2,GAGE2.3)
This formula uses the DST (distance) operator, which
calculates the distance between the two edges by using the
Pythagorean theorem (refer to the discussion of the DST
operator under the DST Key heading).
CVIM MATH-PAK:
lnstalla tion and Configuration
71
-
MA TH- PA K Appka tion
~XafTlpkS
(continued)
In this formula, operands GAGE 1, GAGE1.3,
GAGE2.3 function as follows:
GAGE2, and
l
GAGE 1 returns the X position of the first edge.
l
GAGE1.3 returns the Y position of the first edge.
l
GAGE 2 returns the X position of the second edge.
l
GAGE2.3 returns the Y position of the second edge.
NOTE: The GAGE1.3 and GAGE2.3 operands are
functional only during the run mode. During the setup mode,
these operands always return a 0 (zero).
The effect of the DST formula is to return the length of the
hypotenuse of a right angle triangle. In the present example,
this hypotenuse is also the “distance” between two sides of
the object:
Position
Y Position
GAGE1 = X Position
GAGE1.3 = Y Position
Note that the DST formula is functionally
following formula . . .
SQR(SQ(GAGE
equivalent
1 - GAGE 2) + SQ(GAGE1.3
to the
- GAGE2.3))
. but it is both faster and more compact than the “SQR”
formula.
Areas of Odd Shapes Using
Example #2: Determining
Multiple Widows Without the MATH-PAK option, the
CVIM system would normally require using a polygon
window to count pixels or objects on (or in) “odd-shaped”
objects - those that are not easily covered by a rectangular or
elliptical window.
Cl//M MATH-PAK:
installation
and Configuration
72
MATH- PAK Application
fXZ?mpkS
(continued)
With the MATH-PAK option, however, the CVIM system
can perform some of these odd-shape applications by using
multiple windows and a MATH-PAK formula.
Potential benefits of this method are faster operation and
easier setup than polygon windows. Also, this method
provides greater flexibility in accommodating changing
applications. Thus, by simply adding (or subtracting)
individual rectangular windows and changing the formula,
you can change the application quickly and easily.
The multiple window measurement can be set up by
positioning a window over a workpiece wherever pixel or
object counts are needed.
This example uses an odd-shaped part fastened to a
workpiece with six rivets. These appear as small, black
circular objects on the part, as follows:
Window
#4
Window
#5
Window
#6
The objective of this inspection is to determine whether or
not the six rivets are in place.
Instead of a single polygon window, six rectangular windows
are positioned over the part as shown. Each is configured to
count black objects.
The MATH-PAK
formula looks like this:
WIN1 + WIN2 + WIN3 + WIN4 + WIN5 + WIN6
The formula sums the black object count from the six
windows. Since the correct count from each window is one
(black object), the only correct sum is six. Thus, all range
limits for the formula would be set to six.
-
CVIM MA TH- PA K: Ins talla tion and Configuration
73
-
MATH-PAK’
~Xaf@eS
Application
(continued)
Example #3: Making Complex Inspection Decisions
Using MATH-PAK
Logic Operators Some inspection
decisions require more than using inspection results data
from tools as the direct basis for making the decision.
With the MATH-PAK option, as shown in Examples #l and
#2, results data from several tools can be combined in a
mathematical formula, and the results from the formula
used, along with range checks, as the basis for a GO-NOGO
decision.
Some applications, however, can make use of one or more
MATH-PAK logical formulas to produce a GO-NOGO
decision.
In this example, the requirement is to measure the distance
across a trianglular object at three different angles. If two of
the three measurements meet or exceed the minimum
distance of 15 units, the part’s shape is considered to be
uniform. In addition, a window is used to measure the
object’s area. If the area meets or exceeds 100 square units,
the part’s area is considered to be adequate.
Window
#I
Two formulas are used, as follows:
(1)
(2)
(GAGE1
> 15) + (GAGE2
> 15) + (GAGE3
(WIN1 > 100) AND (RSLTl
> 15)
> = 2)
In formula #l, each expression makes the statement, “If
GAGEn is greater than 15, then return a logic 1 (true);
otherwise, return a logic 0 (false).”
Formula #l adds the three expressions; thus, if all three
expressions are true (logic l), the formula returns a result of
3. In this example, the result is acceptable if any two
expressions are true; that is, the formula result is at least 2.
CVIM MATH-PAK:
Installation
and Configuration
74
MATH- PAK Application
Exampks (continued)
In formula #2, the first expression makes the statement, “If
WIN1 is greater than 100, then return a logic 1; otherwise,
return a logic 0.” The second expression makes the
statement, “If RSLTl is greater than or equal to 2, then
return a logic 1; otherwise, return a logic 0. Note that RSLTl
is the result from formula #l.
Formula #2 ANDs the expressions (WIN1 > 100) and
(RSLTl > = 2). If all range limits are set to 1 and both
expressions are true (logic 11, the formula returns a result of
logic 1 (true) and the inspection passes; otherwise, the
formula returns a logic 0 (false) and the inspection fails.
-
Appendix
Objectives
CVIM with MA TH-PAK
Communications
A
CVIM Communications
With MATH-PAK
This appendix describes:
l
CVIM Communications
with MATH-PAK.
l
Location and format of formula results.
l
Formula statistics.
0
Setting formula range limits.
l
How to access formula results and set configuration.
The CVIM Communications Manual (Catalog No. 5370ND002) with Addendum (40062-191-01(A))
describe how to
access results data. With MATH-PAK, this information still
applies with the following exceptions:
l
Results for Windows 1-8 and Gages 1-8 (Block 1)
are replaced by
Formulas 1-16
l
Results for Windows 9-24 and Gages 9-22 (Block 2)
are replaced by
Formulas 17-46
l
Results for Gages 23-32 (Block 3)
are replaced by
Formulas 47-56
l
Fail/Warning
Ranges apply to formulas.
l
Warning and Fault Flags apply to formulas.
Note: The formula results only replace window or gage
results if the formula is enabled. If you want to obtain
window or gage results that are replaced by formula
results, use the configurable results block (block #4).
Location of F;;yUyE
When enabled, the formula results replace window and gage
results.
l
Table A.1 shows the location of the Block 1 formula
results.
l
Table A.2 shows the location of the Block 2 formula
results.
l
Table A.3 shows the location of the Block 3 formula
results.
Note: You cannot program the programmable
(block #4) to contain formula results.
results block
Appendix
A
Cl//M Communications
With MATH-PAK
A-2
Location of F;wyuuhg
(continued)
Table A.1
Rlnrlt
Toolset
1
48-49
Toolset
RS-232
and
Remote
312-313
24-25
2
Fnrmnlla
Definition With
MATH-PAK
(without MATH-PAK)
I/O
o-15
Formula
(Window
50-5 1
314-315
26-27
o-15
Formula
(Window
52-53
316-317
28-29
o-15
Formula
(Window
54-55
318-319
30-31
o-15
Formula
(Window
56-57
320-321
32-33
o-15
Formula
(Window
58-59
322-323
34-35
o-15
Formula
(Window
60-6 1
324-325
36-37
o-15
Formula
(Window
62-63
326-327
38-39
o-15
Formula
(Window
64-65
328-329
40-4 1
o-15
Formula
(Gage #l
66-67
330-33 1
Rncalltc
Bit #
Word #
Backplane
It1
42-43
o-15
Formula
#l
Results
#l Value)
#2 Results
#2 Value)
#3 Results
#3 Value)
#4 Results
#4 Value)
#5 Results
#5 Value)
#6 Results
#6 Value)
#7 Results
#7 Value)
#8 Results
#8 Value)
#9 Results
Value)
#l OResuIts
(Gage #2 Value)
68-69
332-333
44-45
o-15
Formula
#ll
Results
(Gage #3 Value)
70-7 1
334-335
46-47
o-15
72-73
336-337
48-49
o-15
Formula #12 Results
(Gage #4 Value)
Formula
#13 Results
(Gage #5 Value)
74-75
338-339
50-51
o-15
Formula
#14 Results
(Gage #6 Value)
76-77
340-341
52-53
o-15
Formula
#15 Results
(Gage #7 Value)
78-79
342-343
54-55
o-15
Formula
#16 Results
(Gage #8 Value)
Usage
Notes
Appendix
A
CVIM Communications
With MATH-PAK
A-3
-
Location of Formula
Results
(continued)
Table A.2
Block 2 Formula Results
Bit #
Word #
Bacl<plane
Toolset
1
Toolset
RS-232
and
Remote
2
I/O
90-91
354-355
2-3
Definition With
MATH-PAK
(without MATH-PAK)
o-15
Formula #17
(Window
92-93
94-95
356-357
358-359
4-5
6-7
o-15
o-15
Formula
360-361
8-9
o-15
98-99
362-363
10-11
o-1 5
102- 103
364-365
366-367
12-13
14-15
o-15
o-15
Formula
#19 Results
368-369
16-17
o-15
Formula
370-37 1
18-19
o-15
Value)
#21 Results
#13 Value)
Formula
#22 Results
(Window
#14Value)
Formula
#23 Results
Formula
(Window
106- 107
#ll
Formula #20 Results
(Window # 12 Value)
(Window
104- 105
Results
#lOValue)
(Window
100-101
#18
(Window
(Window
96-97
Results
#9 Value)
Formula
#15 Value)
#24 Results
#16 Value)
#25 Results
(Gage #9 Value)
108-l 09
372-373
20-2 1
o-15
Formula
#26 Results
(Gage #lO Value)
110-l 11
374-375
22-23
o-15
Formula
#27 Results
(Gage # 11 Value)
112-l 13
376-377
24-25
o-15
Formula
#28 Results
(Gage #12 Vaiue)
114- 115
378-379
26-27
o-15
Formula
#29 Results
(Gage # 13 Value)
116- 117
380-381
28-29
o-15
Formula
#30 Results
(Gage # 14 Value)
118-119
382-383
30-31
o-15
Formula
#31 Results
(Gage # 15 Value)
Usage
Notes
Appendix
A
CVIM Communications
With MATH-PAK
A-4
Location of Formula
Results
(con timed)
Table A.2
Dnr..l+r
Word
Bit #
#
Backplane
Definition With
MATH-PAK
(without MATH-PAK)
RS-232
and
Remote
I/O
Toolset
1
Toolset
2
120-121
384-385
32-33
o-15
Formula #32 Results
(Gage #16 Value)
122- 123
386-387
34-35
o-15
Formula #33 Results
(Window #17 Value)
124-l 25
388-389
36-37
o-15
Formula #34 Results
(Window #18Value)
126- 127
390-39 1
38-39
o-15
Formula #35 Results
(Window #19Value)
128- 129
392-393
40-4 1
o-15
Formula #36 Results
(Window #20 Value)
130-131
394-395
42-43
o-15
Formula #37 Results
(Window #21 Value)
132- 133
396-397
44-45
o-15
Formula #38 Results
(Window #22 Value)
134- 135
398-399
46-47
o-15
Formula #39 Results
(Window #23 Value)
136- 137
400-40 1
48-49
o-15
Formula #40 Results
(Window #24 Value)
138- 139
402-403
SO-51
o-15
Formula #41 Results
(Gage #17 Value)
140-141
404-405
52-53
o-15
Formula #42 Results
(Gage #18Value)
142- 143
406-407
54-55
o-15
Formula #43 Results
(Gage #19 Value)
144- 145
408-409
56-57
o-15
Formula #44 Results
(Gage #20 Value)
146-147
410-411
58-59
o-15
Formula #45 Results
(Gage #21 Value)
148-149
412-413
60-6 1
o-15
Formula #46 Results
(Gage #22 Value)
Usage
Notes
Appendix
A
CVIM Communications
With MATH-PAK
A-5
Location of Formula
Results
(continued)
Table A.3
-.
._Block 3 Fs
Word #
Backplane
.-
I
Bit #
Definition With
MATH-PAK
(without MATH-PAK)
RS-232
1
and
Remote
I/O
Toolset
1
Toolset
2
154-155
418-419
2-3
o-15
Formula #47 Results
(Gage #23 Value)
156- 157
420-42 1
4-5
o-15
Formula #48 Results
(Gage #24 Value)
158- 159
422-423
6-7
o-15
Formula #49 Results
(Gage #25 Value)
160-161
424-425
8-9
o-15
Formula #SO Results
(Gage #26 Value)
162- 163
426-427
10-11
o-15
Formula #51 Results
(Gage #27 Value)
164-l 65
428-429
12-13
o-15
Formula #52 Results
(Gage #28 Value)
166- 167
430-43 1
14-15
o-15
Formula #53 Results
(Gage #29 Value)
168- 169
432-433
16-17
o-15
Formula #54 Results
(Gage #30 Value)
170-171
434-435
18-19
o-15
Formula #55 Results
(Gage #3 1 Value)
172-l 73
436-437
20-2 1
o-15
Formula #56 Results
(Gage #32 Value)
-
Usage
Notes
Appendix
A
CVIM Communications
With MATH-PAK
A-6
-
Data Formats For
Formula
Results
Obtainin
Formula
Results an c?Statistics
Statistics
B/O&
The data type for each formula is determined by the
equation:
l
If the formula contains any items that are fixed point
values, the formula results will be a fixed point value
(16.16).
l
If the formula only contains integer values, the
formula results will be an integer value (32.0)
Obtain formula results and statistics the same way you
would toolset results. Refer to Publication 5370-ND002 and
Addendum (40062-191-01(A)).
When using the statistics block and formulas are enabled,
please note that an enabled formula takes the place of the
corresponding tool in the statistics block.
For example:
If you request statistics for Gage # 1 and
formula #9 is enabled, the statistics for the
formula will appear in the statistics block.
-
Appendix
A
Cl//M Communications
With MATH-PAK
A-7
-
Configuration
Blocks
When the corresponding formula is enabled, the
configuration block fail and warning ranges are applied to
the formula results.
l
Table A.4 lists Fail/Warning Range (Toolset 1) data
locations for Formulas g-16,25-32, and 41-56
(Configuration blocks 10-41).
l
Table A.5 lists Fail/Warning Range (Toolset 1) data
locations for Formulas l-8,17-24, and 33-40
(Configuration blocks 42-65).
l
Table A.6 lists Fail/Warning Range (Toolset 2) data
locations for Formulas g-16,25-32, and 41-56
(Configuration blocks 72-103).
l
Table A.7 lists Fail/Warning Range (Toolset 2) data
locations for Formulas g-16,25-32, and 41-56
(Configuration blocks 104-127).
Appendix
A
CVIM Communications
With MATH-PAK
A-8
Fail/Warning Ran es:
Formu ?as #
9- 16,25-32,41-56
in Too/set 7
Table A.4 lists the fail and warning range data locations for
Formulas 9 through 16,25 through 32, and 41 through 56
(blocks 10-41). Refer to the following for the block number
of each formula. Table A.4 provides the word # of the data in
each block.
Formula
Formula
Formula
Formula
Formula
Formula
Formula
Formula
Formula
Formula
Formula
Formula
Formula
Formula
Formula
Formula
9loll12131415162526272829303132-
Table A.4
Configuration
Remote I/O
& RS-232
Word #*
Bit #
1
14
17
O-15
Fail Range High (Integer)
18
O-15
Fail Range High (Fraction)
19
O-15
Fail Range Low (Integer)
20
O-15
Fail Range Low (Fraction)
21
O-l 5
Warning
(Integer)
22
O-l 5
Warning Range High
(Fraction)
23
O-l 5
Warning
(Integer)
24
O-15
Warning Range Low
(Fraction)
Definition
Formula Enable
Range High
Range Low
Block
Block
Block
Block
Block
Block
Block
Block
Block
Block
Block
Block
Block
Block
Block
Block
10
11
12
13
14
15
16
17
18
19
20
21
22
23
24
25
Blocks #lo-41
Formula
Formula
Formula
Formula
Formula
Formula
Formula
Formula
Formula
Formula
Formula
Formula
Formula
Formula
Formula
Formula
41424344454647484950515253545556-
Block
Block
Block
Block
Block
Block
Block
Block
Block
Block
Block
Block
Block
Block
Block
Block
26
27
28
29
30
31
32
33
34
35
36
37
38
39
40
41
FaiVVVarninq Ranaes (TSI)
Usage
Notes
1 = Enable
Words 17 and 18 represent a
16(bit).l6
(bit) fixed point
decimal value or 32 bit
integer.
Words 19 and 20 represent a
16 (bit).16 (bit) fixed point
decimal value or 32 bit
integer.
Words 2 1 and 22 represent a
16(bit).l6 (bit) fixed point
decimal value or 32 bit
integer.
Words 23 and 24 represent a
16(bit).16 (bit) fixed point
decimal value or 32 bit
integer.
Appendix
A
CVIM Communications
With MATH- PAK
A-9
-
Fail/Warning Ran es:
Formu Pas #
1-8, 17-24,33-40
in Too/set 1
Table A.5 lists the fail and warning range data locations for
Formulas 1 through 817 through 24, and 33 through 40
(blocks 42-65). Refer to the following for the block number
for each formula. Table A.5 provides the word # of the data
in each block.
Formula
Formula
Formula
Formula
Formula
Formula
Formula
Formula
Formula
Formula
Formula
Formula
l234567817181920-
Table A.5
Configuration
-
Remote I/O
& RS-232
Word #*
Definition
Bit #
Formula Enable
28
o-15
Fail Range High (Integer)
Block
Block
Block
Block
Block
Block
Block
Block
Block
Block
Block
Block
42
43
44
45
46
47
48
49
50
51
52
53
Formula
Formula
Formula
Formula
Formula
Formula
Formula
Formula
Formula
Formula
Formula
Formula
Blocks #42-65 Fail/Warning
Usage
212223243334353637383940-
Block
Block
Block
Block
Block
Block
Block
Block
Block
Block
Block
Block
54
55
56
57
58
59
60
61
62
63
64
65
Ranqes (TSI)
Notes
1 = Enable
Words 28 and 29 represent a
16 (bit). 16 (bit) fixed point
decimal value or 32 bit
integer.
Fail Range High (Fraction)
30
o-15
Fail Range Low (Integer)
31
o-15
Fail Range Low (Fraction)
32
o-15
Warning
(Integer
33
o-15
Warning Range High
(Fraction
34
o-15
Warning
(Integer)
35
o-15
Warning Range Low
(Fraction)
Range High
Range Low
Words 30 and 31 represent a
16 (bit). 16 (bit) fixed point
decimal value or 32 bit
integer.
Words 32 and 33 represent a
16 (bit). 16 (bit) fixed point
decimal value or 32 bit
integer.
Words 34 and 35 represent a
16 (bit). 16 (bit) fixed point
decimal value or 32 bit
integer.
Appendix
A
CVlM Communications
With MATH-PAK
A-10
Fail/ Warning Ran es:
Formu Pas #
9- 16,25-32,41-56
in Too/set 2
Table A.6 lists the fail and warning range data locations for
Formulas 9 through 16,25 through 32, and 41 through 56
(blocks 72-103). Refer to the following for the block number
for each formula. Table A.6 provides the word # of the data
in each block.
Formula
Formula
Formula
Formula
Formula
Formula
Formula
Formula
Formula
Formula
Formula
Formula
Formula
Formula
Formula
Formula
9loll12131415162526272829303132-
Table A.6
Configuration
Remote I/O
& RS-232
Word #*
Bit #
1
14
17
O-l 5
Fail Range High (Integer)
18
O-l 5
Fail Range High (Fraction)
19
O-l 5
Fail Range Low (Integer)
20
O-l 5
Fail Range Low (Fraction)
2,l
O-l 5
Warning
(Integer)
22
O-l 5
Warning Range High
(Fraction)
23
O-l 5
Warning
(Integer)
24
O-l 5
Warning Range Low
(Fraction)
Definition
Formula Enable
Range High
Range Low
Block
Block
Block
Block
Block
Block
Block
Block
Block
Block
Block
Block
Block
Block
Block
Block
72
73
74
75
76
77
78
79
80
81
82
83
84
85
86
87
Blocks #72-103
Usage
Formula
Formula
Formula
Formula
Formula
Formula
Formula
Formula
Formula
Formula
Formula
Formula
Formula
Formula
Formula
Formula
Fail/Warning
41424344454647484950515253545556-
Block
Block
Block
Block
Block
Block
Block
Block
Block
Block
Block
Block
Block
Block
Block
Block
88
89
90
91
92
93
94
95
96
97
98
99
100
101
102
103
Ranges (TS2)
Notes
1 = Enable
Words 17 and 18 represent a
16 (bit). 16 (bit) fixed point
decimal value or 32 bit
integer.
Words 19 and 20 represent a
16 (bit).16 (bit) fixed point
decimal value or 32 bit
integer.
Words 2 1 and 22 represent a
16(bit).l6(bit)fixed
point
decimal value or 32 bit
integer.
Words 23 and 24 represent a
16 (bit).16 (bit) fixed point
decimal value or 32 bit
integer.
Appendix
A
CVIM Communications
With MATH-PAK
A-11
-
Fail1Warning Ran es:
Formu Pas #
I-8, ‘17-24,33-40
in Too/set 2
Table A.7 lists the fail and warning range data locations for
Formulas 1 through 8,17 through 24, and 33 through 40
(blocks 104-127). Refer to the following for the block number
for each formula. Table A.7 provides the word # of the data
in each block.
Formula
Formula
Formula
Formula
Formula
Formula
Formula
Formula
Formula
Formula
Formula
Formula
r
-
I
I
Remote I/O
& RS-232
Word #*
l2345
678171%
1920-
Table A.7
Confiquration
I
I I[Sit #
Definition
1
14
Formula Enable
28
O-15
Fail Range High (Integer)
29
O-l 5
Fail Range High (Fraction)
30
O-l 5
Fail Range Low (Integer)
31
O-l 5
Fail Range Low (Fraction)
32
O-l 5
Warning
(Integer
33
O-l 5
Warning Range High
(Fraction
34
O-l 5
Warning
(Integer)
35
O-l 5
Warning Range Low
(Fraction)
Range High
Range Low
Block
Block
Block
Block
Block
Block
Block
Block
Block
Block
Block
Block
I
104
105
106
107
108
109
110
111
112
113
114
115
Blocks #104-127
Usage
Formula
Formula
Formula
Formula
Formula
Formula
Formula
Formula
Formula
Formula
Formula
Formula
Fail/Warning
21222324333435
36373%
3940-
Block
Block
Block
Block
Block
Block
Block
Block
Block
Block
Block
Block
116
117
118
119
120
121
122
123
124
125
126
127
Ranges (TSZ)
Notes
1 = Enable
Words 28 and 29 represent a
16 (bit).16 (bit) fixed point
decimal value or 32 bit
integer.
Words 30 and 3 1 represent a
16 (bit).16(bit) fixed point
decimal value or 32 bit
integer.
Words 32 and 33 represent a
16 (bit).16 (bit) fixed point
decimal value or 32 bit
integer.
Words 34 and 35 represent a
16 (bit).16 (bit) fixed point
decimal value or 32 bit
integer.
Appendix
CVlM Communications
A
With MATH- PA K
A-12
When formulas are enabled, the Warning and Fault flags
apply to the corresponding formula. The formula bits only
take the place of the toolset bits if a formula is enabled.
Table A.8 lists the location of the formula warning and fault
bits.
Discrete Bit Inputs
Table A.8
Fore.Bi:lnoutz
Bit#
Word #
Backplane
Toolset
1
Toolset
2
17
281
17
RS-232
and
Remote
I/O
Definition
Usage
PI
PLC
1
0
0
Formula 1
Warning Flag
0 = Pass
1 = Fail
281
1
1
1
formula 1
Fault Flag
0 = Pass
1 = Fail
17
281
1
2
2
Formula 2
Warning Flag
0 = Pass
1 = Fail
17
281
1
3
3
Formula 2
Fault Flag
0 = Pass
1 = Fail
17
281
1
4
4
Formula 3
Warning Flag
0 = Pass
1 = Fail
17
281
1
5
5
Formula 3
Fault Flag
0 = Pass
1 = Fail
17
281
1
6
6
Formula 4
Warning Flag
0 = Pass
1 = Fail
17
281
1
7
7
Formula4
Fault Flag
0 = Pass
1 = Fail
17
281
1
8
10
Formula 5
Warning Flag
0 = Pass
1 = Fail
Notes
Appendix
CVlM Communications
A
With MATH- PA K
Discrete Bit Inputs
(continued)
Table A.8
Disc
Bit #
Definition
Usage
PI
PLC
-
I
17
1
281
1
9
11
10
‘ormula 5
-auk Flag
0 = Pass
1 = Fail
12
11
-ormula 6
Narning Flag
0 = Pass
1 = Fail
13
-ormula 6
-ault Flag
0 = Pass
1 = Fail
-0rmula 7
tiarning Flag
0 = Pass
1 = Fail
Formula 7
Fault Flag
0 = Pass
1 = Fail
1
12
--i
-
-
13
14
16
Formula 8
uVarning Flag
0 = Pass
1 = Fail
15
17
Formula 8
Fault Flag
0 = Pass
1 = Fail
0
0
Formula 17
Warning Flag
0 = Pass
1 = Fail
1
1
Formula 17
Fault Flag
0 = Pass
1 = Fail
--T
2
Formula 18
Warning Flag
0 = Pass
1 = Fail
3
Formula 18
Fault Flag
0 = Pass
1 = Fail
4
Formula 19
Warning Flag
0 = Pass
1 = Fail
5
Formula 19
Fault Flag
0 = Pass
1 = Fail
6
Formula 20
Warning Flag
0 = Pass
1 = Fail
7
Formula 20
Fault Flag
0 = Pass
1 = Fail
-
-
-
-
-
-
I
18
I
282
I
2
-
I l8 I 282
I 2
118
-
-
Notes
A-13
Appendix
Cl//M Communications
A
With MATH-PAK
A-74
Discrete Bit Inputs
(con timed)
Word
Backplane
Toolset
1
Toolset
2
#
RS-232
and
Remote
Usage
Definition
110
PI
PLC
21
Flag
0 = Pass
1 = Fail
18
282
2
8
10
Formula
Warning
18
282
2
9
11
Formula 21
Fault Flag
0 = Pass
1 = Fail
18
282
2
10
12
Formula
Warning
0 = Pass
1 = Fail
18
282
2
11
13
Formula 22
Fault Flag
0 = Pass
1 = Fail
18
282
2
12
14
Formula
Warning
0 = Pass
1 = Fail
18
282
2
13
15
Formula 23
Fault Flag
0 = Pass
1 = Fail
18
282
2
14
16
Formula24
Warning
Flag
0 = Pass
1 = Fail
18
282
2
15
17
Formula 24
Fault Flag
0 = Pass
1 = Fail
19
283
3
0
0
Formula
Warning
0 = Pass
1 = Fail
19
283
3
1
1
Formula 33
Fault Flag
0 = Pass
1 = Fail
19
283
3
2
2
Formula
Warning
0 = Pass
1 = Fail
19
283
3
3
3
Formula 34
Fault Flag
0 = Pass
1 = Fail
19
283
3
4
4
Formula
Warning
0 = Pass
1 = Fail
19
283
3
5
5
Formula 35
Fault Flag
0 = Pass
1 = Fail
19
283
3
6
6
Formula
Warning
0 = Pass
1 = Fail
22
Flag
23
Flag
33
Flag
34
Flag
35
Flag
36
Flag
Notes
Appendix
Cl//M Communications
A
With MATH-PAK
A-75
-
Discrete Bit Inputs
(continued)
Table A.8
Dir
Bit #
Word #
Backplane
Toolset
2
RS-232
and
Remote
I/O
19
283
3
19
283
3
19
2,83
3
19
253
3
19
283
3
Toolset
1
Definition
-
PI
-
I‘LC
Formula 36
Fault Flag
D = Pass
1 = Fail
Formula 37
Warning Flag
0 = Pass
1 = Fail
Formula 37
Fault Flag
0 = Pass
1 = Fail
Formula 38
Warning Flag
0 = Pass
1 = Fail
Formula 38
Fault Flag
0 = Pass
1 = Fail
Formula 39
Warning Flag
0 = Pass
1 = Fail
Formula 39
Fault Flag
0 = Pass
1 = Fail
Formula 40
Warning Flag
0 = Pass
1 = Fail
Formula 40
Fault Flag
0 = Pass
1 = Fail
Formula 9
Warning Flag
0 = Pass
1 = Fail
1
Formula 9
Fault Flag
0 = Pass
1 = Fail
2
Formula 10
Warning Flag
0 = Pass
1 = Fail
Formula 10
Fault Flag
0 = Pass
1 = Fail
7
7
8
10
9
11
10
12
11
13
12
14
13
15
14
16
15
17
0
0
-
I *OI 284
I 4
-
1
-
2
3
-
Usage
T
-
Notes
Appendix
CVlM Communications
A
With MATH-PAK
A-76
Discrete Bit Inputs
(continued)
Table A.8
mm- -.- Ia:*..-.-.
ulsq~
w-c IrlDUTS conrlnuea
.I-
Bit #
Word #
Backplane
Toolset
1
Toolset
2
20
P--L!-..--1
RS-232
and
Remote
Definition
Usage
I/O
PI
PLC
284
4
4
4
Formula 11
Warning Flag
0 = Pass
1 = Fail
20
284
4
5
5
Formula 11
Fault Flag
0 = Pass
1 = Fail
20
284
4
6
6
Formula 12
Warning Flag
0 = Pass
1 = Fail
20
284
4
7
7
Formula 12
Fault Flag
0 = Pass
1 = Fail
20
284
4
8
10
Formula 13
Warning Flag
0 = Pass
1 = Fail
20
284
4
9
11
Formula 13
Fault Flag
0 = Pass
1 = Fail
20
284
4
10
12
Formula 14
Warning Flag
0 = Pass
1 = Fail
20
284
4
11
13
Formula 14
Fault Flag
0 = Pass
1 = Fail
20
284
4
12
14
Formula 15
Warning Flag
0 = Pass
1 = Fail
20
284
4
13
15
Formula 15
Fault Flag
0 = Pass
1 = Fail
20
284
4
14
16
Formula 16
Warning Flag
0 = Pass
1 = Fail
20
284
4
‘15
17
Formula 16
Fault Flag
0 = Pass
1 = Fail
21
285
5
0
0
Formula 25
Warning Flag
0 = Pass
1 = Fail
21
285
5
1
1
Formula 25
Fault Flag
0 = Pass
1 = Fail
Notes
Appendix
Cl//M Communications
A
With MA TH- PA K
A-17
Table A.8
Dkste
Bit #
Wolrd #
Backplane
Toolset
1
Toolset
12
21
Bit lnoutsw
RS-232
and
Remote
Definition
Usage
110
PI
PLC
285
5
2
2
Formula 26
Warning Flag
0 = Pass
1 = Fail
21
285
5
3
3
Formula 26
Fault Flag
0 = Pass
1 = Fail
21
285
5
4
4
Formula 27
Warning Flag
0 = Pass
1 = Fail
21
285
5
5
5
Formula 27
Fault Flag
0 = Pass
1 = Fail
21
285
5
6
6
Formula 28
Warning Flag
0 = Pass
1 = Fail
21
285
5
7
7
Formula 28
Fault Flag
0 = Pass
1 = Fail
21
285
5
8
IO
Formula 29
Warning Flag
0 = Pass
1 = Fail
21
285
5
9
11
Formula 29
Fault Flag
0 = Pass
1 = Fail
21
285
5
IO
12
Formula30
Warning Flag
0 = Pass
1 = Fail
21
285
5
11
13
Formula 30
Fault Flag
0 = Pass
1 = Fail
21
285
5
12
14
Formula 31
Warning Flag
0 = Pass
1 = Fail
21
285
5
13
15
Formula 31
Fault Flag
0 = Pass
1 = Fail
21
285
5
14
16
Formula 32
Warning Flag
0 = Pass
1 = Fail
21
285
5
15
17
Formula 32
Fault Flag
0 = Pass
1 = Fail
-
Notes
Appendix
CVIM Communications
A
With MATH-PAK
A-78
Table A.8
a:* ,rrm,+..
Bit #
Word #
Backplane
*
Toolset
1
Toolset
2
22
r
t
RS-232
and
Remote
Definition
Usage
I
I/O
PI
PLC
286
6
0
0
Formula 41
Warning
Flag
0 = Pass
1 = Fail
22
286
6
1
Formula 41
Fault Flag
0 = Pass
1 = Fail
22
286
6
2
Formula
Warning
0 = Pass
1 = Fail
22
286
6
3
3
Formula 42
Fault Flag
0 = Pass
1 = Fail
22
286
6
4
4
Formula
Warning
0 = Pass
1 = Fail
22
286
6
5
5
Formula 43
Fault Flag
0 = Pass
1 = Fail
22
286
6
6
6
Formula
Warning
0 = Pass
1 = Fail
22
286
7
7
Formula 44
Fault Flag
0 = Pass
1 = Fail
22
286
8
10
Formula
Warning
0 = Pass
1 = Fail
22
286
6
9
11
Formula 45
Fault Flag
0 = Pass
1 = Fail
22
286
6
10
12
Formula
Warning
0 = Pass
1 = Fail
22
286
6
11
13
Formula 46
Fault Flag
0 = Pass
1 = Fail
22
286
6
12
14
Formula
Warning
0 = Pass
1 = Fail
22
286
6
13
15
Formula 47
Fault Flag
42
Flag
43
Flag
44
Flag
45
Flag
46
Flag
47
Flag
0 = Pass
1 = Fail
Notes
Appendix
CVIM Communications
A
Discrete Bit Inputs
(continued)
Table A.8
-
23
2137
4
4
Formula 51
Warning Flag
0 = Pass
1 = Fail
23
287
5
5
Formula 51
Fault Flag
0 = Pass
1 = Fail
23
2137
6
6
Formula 52
Warning Flag
0 = Pass
1 = Fail
23
287
7
7
Formula 52
Fault Flag
0 = Pass
1 = Fail
23
287
8
10
Formula 53
Warning Flag
0 = Pass
1 = Fail
23
287
9
11
Formula 53
Fault Flag
0 = Pass
1 = Fail
23
207
10
12
Formula 54
Warning Flag
0 = Pass
1 = Fail
23
287
11
13
Formula 54
Fault Flag
0 = Pass
1 = Fail
With MATH-PAK
Appendix
CVIM Communications
A
With MATH-PAK
A-20
Discrete Bit Inputs
(continued)
Table A.8
3
.
,te
Word
#
I
I
Bit #
Definition
1Toylset
I
23
(Tozset
I
287
1 Reylte
I
7
lp
I 12 I 14
Formula 55
Warning Flag
0 = Pass
1 = Fail
Formula 55
Fault Flag
23
28;
7
Notes
Usage
Formula 56
Warning Flag
g-t---
Formula 56
Fault Flag
0 = Pass
1 = Fail
I
ALLEN-BRADLEY
A ROCKWELL
INTERNATIONAL
COMPANY
A subsidiary of Rockwell International, one of the world’s largest technology companies,
Allen-Bradley meets today’s automation challenges with over 85 years of practical plant floor
experience. More than 13,000 employees throughout the world design, manufacture and
apply a wide range of control and automation products and supporting services to help our
customers continuously improve quality, productivity and time to market. These products and
services not only control individual machines, but also integrate the manufacturing process
while providing access to vital plant floor data that can be used to support decision-making
throughout the enterprise.
With offices in major cities worldwide.
WORLDHEADQUARTERS
1201 South Second Street
Milwaukee, WI 53204 USA
Tel: (414)382-2000
Telex: 43 11 016
FAX: (414)382-4444
EUROPEMDDLEEASTl
AFRICAHEADQUARTERS
Allen-Bradley Europe B.V.
Amsterdamseweg 15
1422 AC Uithoorn
The Netherlands
Tel: (31)2975/43500
Telex: (844) 18042
FAX: (31)2975/60222
Catalog No. 5370-ND005
Series A
ASVdPACIFICHEADQUARTERS
Allen-Bradley (Hong Kong) Limited
Room 1006, Block B, Sea View Estate
2-8 Watson Road
Hong Kong
Tel: (852)887-4788
Telex: (780) 64347
FAX: (852)510-9436
CANADAHEADQUARTERS
Allen-Bradley Canada Limited
135 Dundas Street
Cambridge, Ontario Ni R 5X1
Canada
Tel: (519)623-1810
FAX: (519)623-8930
LATINAMERICA
HEADQUARTERS
1201 South Second Street
Milwaukee, WI 53204 USA
Tel: (414)382-2000
Telex: 43 11 016
FAX: (414)382-2400
40062-194-01(A)