1
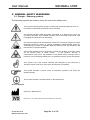
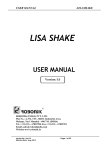
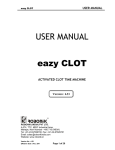
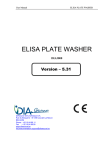
User Manual
WASHWELL STRIP
washwell STRIP
ELISA Strip Washer
User Manual
Version No.:- 3.21
ROBONIK (India) Pvt Ltd.
A-374, TTC, MIDC, Mahape,
Navi Mumbai – 400 710 (INDIA)
Tel: +91-22-67829700, Fax: +91-22-67829701
Email: s a l e s @ r o b o n i k i n d i a . c o m
Website: www.robonik.in
Version No.: 03.21
Effective Date: Nov, 2011
Page No. 1 of 26
User Manual
WASHWELL STRIP
TABLE OF CONTENTS
1. GENERAL INFORMATION................................................................................5
1.1. WARRANTY INFORMATION: ...............................................................................5
1.2. TECHNICAL SERVICE:........................................................................................5
1.3. DISPOSAL INSTRUCTION: ..................................................................................5
1.4. CONTACTS:........................................................................................................5
2. GENERAL SAFETY WARNINGS .....................................................................6
2.1. DANGER – WARNING SYMBOLS........................................................................6
2.2. USE OF THE INSTRUMENT: ................................................................................7
3. INTRODUCTION ...................................................................................................8
3.1. DESCRIPTION: ...................................................................................................8
3.2. SPECIAL FEATURES :.........................................................................................8
3.3. SPECIFICATIONS:...............................................................................................9
4. PACKING, TRANSPORT AND STORAGE................................................ 10
4.1. PACKING:.........................................................................................................10
4.2. INSTRUMENT TRANSPORTATION: ....................................................................10
4.3. STORAGE OF THE INSTRUMENT: .....................................................................10
5. INSTRUMENT DESCRIPTION..................................................................... 11
5.1. PERSPECTIVE VIEW : .......................................................................................11
5.2. REAR PANEL VIEW : ........................................................................................11
5.3. TUBING DIAGRAM : ..........................................................................................12
5.4. KEYBOARD: .....................................................................................................13
5.5. PRIMING AREA: ...............................................................................................13
5.6. MICRO-STRIP CARRIAGE:...............................................................................13
5.7. PRIMING AND RINSING AREA:.........................................................................14
5.8. MANIFOLD: ......................................................................................................14
6. INSTALLATION AND START-UP INSTRUCTIONS ........................ 15
6.1. PLACING THE INSTRUMENT: ............................................................................15
6.2. POWER SUPPLY:..............................................................................................15
6.3. PROTECTIVE GROUNDING:..............................................................................15
6.4. START UP INSTRUCTIONS ................................................................................15
6.5. SETTING DATE AND TIME:................................................................................16
6.6. WASTE BOTTLE CONNECTIONS: .....................................................................16
7. PRECAUTIONS.................................................................................................... 17
Version No.: 03.21
Effective Date: Nov, 2011
Page No. 2 of 26
User Manual
WASHWELL STRIP
8. GENERAL KEY OPERATIONS ...................................................................... 18
8.1. FUNC KEY.....................................................................................................18
8.1.1 Deleting test ................................................................................................19
8.1.2. Setting Date and Time...............................................................................19
8.1.3. Storing the Test: .........................................................................................19
8.2. MENU KEY:...................................................................................................20
8.2.1. Recalling the saved test: ...........................................................................20
8.3. PRIME KEY:..................................................................................................20
8.4. RINSE KEY: ..................................................................................................20
8.5. TIMER KEY: ..................................................................................................20
9. PROGRAMMING ................................................................................................. 21
9.1. STRIP WASH:...................................................................................................21
9.2. WELL WASH:...................................................................................................22
9.3. INCUBATION:....................................................................................................23
9.4. PRIMING:..........................................................................................................23
9.5. RINSING:..........................................................................................................23
10. TROUBLESHOOTING .................................................................................... 24
11. DECONTAMINATION.................................................................................... 25
11.1. DECONTAMINATION PROCEDURE: ................................................................25
11.2. PURPOSE OF DECONTAMINATION: ...............................................................25
11.3. GENERAL CONSIDERATIONS : .......................................................................25
11.4. DECONTAMINATION PROCEDURE: ................................................................25
12. SAFETY CLEARANCE CERTIFICATE:.................................................... 26
Version No.: 03.21
Effective Date: Nov, 2011
Page No. 3 of 26
User Manual
WASHWELL STRIP
The contents of this manual with all figures, tables and graphics are intellectual
property of ROBONIK (INDIA) PVT. LTD. Unauthorized commercial or non-commercial
excerption or copying of contents and use of this manual (in total or in parts) are
strictly forbidden unless the editor gives written permission for it.
Wash Well manual was written and produced with the utmost care. However, errors
cannot be fully excluded. Robonik does not take any responsibility and accepts no
liabilities of any kind that may occur because of errors in the manual.
Manufacturer:
ROBONIK (INDIA) PVT LTD
A-374, TTC, MIDC,
Mahape –Navi Mumbai 400710
Thane (District) INDIA
Tel: +91-22-67829700,
Fax: +91-22-67829701
Email: [email protected]
Website: www.robonik.in
washwell STRIP, Version – 3.21
Version No.: 03.21
Effective Date: Nov, 2011
Page No. 4 of 26
User Manual
WASHWELL STRIP
1. GENERAL INFORMATION
1.1. Warranty Information:
Each Instrument is completely tested and guaranteed for twelve months from delivery. The
warranty applies to all the mechanical and electrical parts. It is valid only for proper installation,
use, and maintenance in compliance with the instructions given in this manual.
ROBONIK will, at its discretion repair or replace parts, which may be found defective in the
warranty period. The warranty does not include any responsibility for direct or indirect personal
and material damages, caused by improper use or maintenance of the instrument.
Parts that are inherently subject to deterioration are excluded from the warranty. In case of
defects due to misuse of the instrument, any travel and man-hour expenses will be charged
extra.
1.2. Technical Service:
ROBONIK is always accessible to the customers for any kind of information about installation,
use, maintenance, etc. When asking for service, please refer to this manual, and report the data
reported on the identification label (Serial No. and Model Name).
Only qualified technicians are entitled to fix the instrument; the user, as described in this manual,
should carry out ordinary maint enance.
ROBONIK’s technical service or an authorized service center with specialized technicians, with
suitable instrumentation and original spare parts are always available for extraordinary
maintenance (repair), under an annual maintenance contract or on specific demand.
1.3. Disposal instruction:
In case of removal or disposal of instrument, following instructions need to be followed
•
•
Do not dispose in municipal waste; follow local regulations for instrument disposal.
Plastic parts, Electronic PCBs and components can be recycled, so return back the instrument to
manufacturer.
1.4. Contacts:
Manufacturer:
ROBONIK (INDIA) PVT LTD
A-374, TTC, MIDC Industrial Area,
MAHAPE, NAVI MUMBAI – 400710
INDIA
Tel: +91-22-67829700,
Fax: +91-22-67829701
Email: [email protected]
Website: www.robonik.in
Version No.: 03.21
Effective Date: Nov, 2011
Page No. 5 of 26
User Manual
WASHWELL STRIP
2. GENERAL SAFETY WARNINGS
2.1. Danger – Warning symbols
The following symbols are used to inform the user of the safety rules.
This symbol indicates generic danger. It means that, serious damage can occur to
the operator if described precautions are not observed.
This symbol indicates HIGH ELECTRIC VOLTAGE. It is dangerous to touch any
part having this label. Only qualified operators can access these components, after
unplugging the instrument from the Supply.
This symbol indicates that the instrument makes use of chemical reagents and other
dangerous (Corrosive, irritant, or harmful) CHEMICAL SUBSTANCES, which can
cause damage to people or materials. When this label is found, pay attention to the
manufacturer’s recommendations.
This symbol indicates that the instrument involves the handling of samples, which
can be infected (urine or human serum).
In this condition, infection or
contamination might occur. Pay attention to the general safety warnings when in
presence of such biological substances. Use Protective clothes, gloves and glasses.
This symbol in the user manual indicates that damages to the instrument or
erroneous results could occur if the given warnings are not followed.
This symbol indicates a portion, which is particularly important, and should be
studied carefully.
This symbol indicates a Protective Earth or Ground terminal.
General Symbols
Symbol for “Manufacturer”
Symbol for “ IN VITRO DIAGNOSTIC MEDICAL DEVICE”
Version No.: 03.21
Effective Date: Nov, 2011
Page No. 6 of 26
User Manual
WASHWELL STRIP
2.2. Use of the instrument:
Ø
The instrument should be used for the designed purposes only and under
specified conditions by qualified personnel, following proper procedures and
safety rules provided in this manual.
Ø
THIS MANUAL CONTAINS INSTRUCTIONS FOR OPERATION BY QUALIFIED
PERSONNEL ONLY.
Ø
A qualified user has to make sure that environmental condition is suitable, the
installation correct, the use and maintenance is proper, according to the general
safety rules as well as to the particular precautions described in the manual
(However the user is not entitled to repair the instrument).
Ø
A qualified technician only, is entitled to maintain and fix the instrument, according
to the instructions given in this manual, using the original spare parts only.
Ø
The room temperature and humidity should be maintained as specified in the
manual.
Ø
The instrument has to be used as described in this manual. If it is not use the
protection provided by the instrument may be impaired.
Ø
Alterations to the instrument by unauthorized personnel are strictly
prohibited. The user is liable & solely responsible for any improper
modification to the instrument, and for the consequences derived as a
result.
Ø
Should the instrument need extraordinary maintenance, please contact Robonik
service or an authorized service center. Specialized technicians equipped to
repair the instrument using original spare parts will carry out the maintenance.
Ø
An advisory that the electromagnetic environment should be evaluated prior to
operation of the device.
Ø
Warning : Do not use this device in close proximity to sources of strong
electromagnetic radiation (e.g. unshielded international RF sources), as these
may interfere with the proper operation.
Version No.: 03.21
Effective Date: Nov, 2011
Page No. 7 of 26
User Manual
WASHWELL STRIP
3. INTRODUCTION
3.1. Description:
Washwell STRIP
is an automatic ELISA strip washer with optional built-in
Incubator & programmable timer. Its unique co-axial probe allows user to
wash single well or a strip with user defined number of wash cycles, soak
time, wash volume etc.
It is designed to be used to wash single or multiple wells by automated
procedure, Hence eliminating errors in assays rising due to cumbersome
manual wash method. It is intended for in vitro diagnostic use.
3.2. Special Features:
•
Built-in stabilizer.
•
Ability to wash single well / Multiple wells.
•
Waste bottle with acoustic signal for bottle full indication.
•
Ability to wash U, V and Flat bottom wells.
•
Overflow protection through continuous aspiration.
•
Cross wash facility.
•
Auto detection of bottom of well and collision prevention.
•
Optional built-in Incubator 370C (Factory set) with programmable timer.
Version No.: 03.21
Effective Date: Nov, 2011
Page No. 8 of 26
User Manual
WASHWELL STRIP
3.3. Specifications:
Device
High quality stainless steel co-axial probe.
Dispensing
Method
Specially designed Peristaltic pump
Volume
25 to 400 µl
Aspirating
Method
Continuous through diaphragm pump
Residual Volume
< 3 µl
Waste Bottle
One (Capacity 1 liter) with audible alarm
Wash Bottle
One (Capacity 1 liter)
Rinse Bottle
One (Capacity 1 liter)
Memory
35 Open Channels
Display
Single line backlit LCD, 16 characters
Number of Wash cycle
1 to 99
Soak Time
1 to 999 sec.
Liquid contact materials
Silicon, Stainless Steel, Derline
Washing Method
Well Wash / Short Wash
Strip Wash / Long Wash
Cross Wash
Rinsing
Priming
Incubator (Optional)
For One ELISA Plate, 370 C
Weight
4 Kg.
Size (cms)
32 x 35 x 11.5 (l x b x h)
Version No.: 03.21
Effective Date: Nov, 2011
Page No. 9 of 26
User Manual
WASHWELL STRIP
4. PACKING, TRANSPORT AND STORAGE
4.1. Packing:
Packaging of the instrument is needed whenever to be transported or shipped
by courier or other means.
To pack the instrument please follow the instructions as below described:
•
•
•
Decontaminate the instrument as explained on chapter 11 of this manual.
Put the instrument into the original packaging box; Instrument has to be
properly protected by plastic protective material. Put copy of safety
clearance certificate (copy of Safety clearance certificate is attached at the
end of this manual).
Mark the package with address, instrument identification and warning
labels.
4.2. Instrument transportation:
The transportation of the instrument in unpacked condition must be limited
within the room where it is used, to avoid damage.
4.3. Storage of the instrument:
Before storing the instrument for a long period, please pack it carefully as
described above and store indoors.
Version No.: 03.21
Effective Date: Nov, 2011
Page No. 10 of 26
User Manual
WASHWELL STRIP
5. INSTRUMENT DESCRIPTION
Components of different views of the instrument in picture below:
5.1. Perspective View:
Front view
•
•
•
•
•
Display,
Alphanumerical key-pad
Wash Bottle
Waste Bottle
Rinse Bottle
Rinse bottle
Wash bottle
Waste bottle
Keyboard & Dis play
Micro Strip
Manifold
5.2. Rear Panel View:
(Please refer diagram of point No. 5.3)
•
•
Ensure that the main power switch is in OFF position before connecting.
Plug the instrument to the A C mains. Confirm proper grounding for
trouble free operation.
The washwell STRIP is provided with an inbuilt voltage stabilizer to take care of
voltage fluctuations.
Version No.: 03.21
Effective Date: Nov, 2011
Page No. 11 of 26
User Manual
WASHWELL STRIP
5.3. Tubing Diagram:
REAR PANEL TUBING CONNECTIONS
Power Supply
Rinse
Bottle
(Washer)
Wash
Bottle
(Washer)
Waste
Bottle
(Washer)
Waste
Bottle
(Manifold)
Contrast Knob
Sensor
Wash
Rinse
Waste
MANIFOLD TUBING CONNECTIONS
Green Wash
Manifold
Red Wash
Note : Load Elisa Strip carefully in the slot provided for correct washing
Version No.: 03.21
Effective Date: Nov, 2011
Page No. 12 of 26
User Manual
WASHWELL STRIP
5.4. Keyboard:
5.5. Priming Area:
Carriage Strip has a built-in priming area.
Priming is essential immediately after starting the instrument, and before
shutting down the instrument. It helps smooth flow of buffer and prevents
crystallization.
5.6. Micro-Strip Carriage:
Movement of Strip is precisely controlled by stepper motor and timing belt
to position the Strip exactly below the manifold for washing
(Ref Fig a)
Version No.: 03.21
Effective Date: Nov, 2011
Page No. 13 of 26
User Manual
WASHWELL STRIP
5.7. Priming and Rinsing Area:
Carriage Strip has built-in priming and rinsing area, priming and
rinsing is essential immediately after starting the instrument, and
before shutting down the instrument. It helps smooth flow of buffer
solution and prevents crystallization. (Ref Fig a)
5.8. Manifold:
Instrument has a specially designed 1-way manifold.
The manifold has a provision to clean the liquid path conveniently
hence avoiding common clogging problem because of crystallization,
etc.
Manifold is moved vertically up and down by well-controlled stepper
motor for proper placement. Manifold needles are laboratory grade
steel smooth ends to prevent scratching of the well bottom.
Version No.: 03.21
Effective Date: Nov, 2011
Page No. 14 of 26
User Manual
6.
WASHWELL STRIP
INSTALLATION AND START-UP INSTRUCTIONS
While installing and setting up the instrument, the safety warnings and general
precautions described in section 8 must be observed.
6.1. Placing the instrument:
•
•
•
•
The instrument has to be placed on a level bench
A min. distance of 1m should be maintained from the rear panel to
avoid damage to power cord and instrument
Room temperature has to be between 18ºC and 35ºC with a relative
humidity below 85%.
Protect it from direct sunshine.
6.2. Power supply:
Once the instrument has been placed, plug it into a power source by the
locally available approved plug-in cable. Power cord should be CE, CSA
and UL marked.
Voltage -115 - 230 Volts ± 10%, 50- 60 Hz
6.3. Protective Grounding:
Warning: Please make sure that electrical power source is properly
grounded.
6.4. Start up Instructions
Instrument Starting Procedure
1. Switch on the instrument. The instrument will display WASH WELL.
2. The instrument carries out a Power on Self Test to check all the
internal parameters.
3. It displays ROBONIK and the time indicating that initialization is
complete.
4. If the date and time are not correctly displayed, switch off the
instrument and switch it on once again.
The instrument is now ready for use.
Version No.: 03.21
Effective Date: Nov, 2011
Page No. 15 of 26
User Manual
WASHWELL STRIP
6.5. Setting date and time:
Setting of date and time can be done with the help of FUNC key
Display
How to operate
Set TIME Y/N
Yes
Press YES Key
No
Date DD.MM.YY
Enter Date in Same format
Press ENTER key
Enter Time in same format
Time HH.MM.SS
Press ENTER key
Exit
6.6. Waste Bottle connections:
Please refer point No. 5.3, Tubing Diagram.
Version No.: 03.21
Effective Date: Nov, 2011
Page No. 16 of 26
User Manual
WASHWELL STRIP
7. PRECAUTIONS
Always check for proper grounding, during installation. Never operate
the instrument with ground wire removed.
Do not attempt to open the instrument and make repair without proper
technical training. Do not allow unauthorized persons to operate or
repair the instrument.
Place the ELISA Strip carefully on the tray
Ensure that the main power switch is in OFF position before
connecting.
Prime the manifold before and after use.
Always Prime immediately after switching ON the instrument.
Always rinse before switching OFF.
Keep wash, waste and rinse bottles clean.
Disconnect the tubing before opening wash, waste and rinse
bottle caps.
Version No.: 03.21
Effective Date: Nov, 2011
Page No. 17 of 26
User Manual
WASHWELL STRIP
8. GENERAL KEY OPERATIONS
Check whether all the tubing is properly connected. Switch on the instrument.
8.1. FUNC KEY
Idle Mode
Load wash Strip Y/N
Programming Mode
YES
Place Strip & press Enter
Save Test Y/N
YES
NO
YES
Delete Test Y/N
(Ref.8.1.1)
Delete Option
NO
YES
Set Time Y/N
(Ref.8.1.2)
NO
Modify Time Option
Exit Y/N
NO
Version No.: 03.21
Effective Date: Nov, 2011
Page No. 18 of 26
(Ref.8.1.3)
)
Save Option
NO
User Manual
8.1.1
WASHWELL STRIP
Deleting test
Display
How to operate
Press FUNC Key
Delete Test Y/N
Yes
Press YES Key
Enter the Test No. of the
test to be Deleted
Test No.
Deleting Test
Yes
Test Deleted
Exit
8.1.2. Setting Date and Time
(Refer point No. 6.5)
8.1.3. Storing the Test:
To save the programmed test under any programming Mode
Display
How to operate
Save Test Y/N
Yes
Press YES
KeyYES
Name Tests Y/N
Yes
ABCDEFGHIJKL
Yes
Exit
Version No.: 03.21
Effective Date: Nov, 2011
Press YES Key to Enter Name
Save Test
without name
Test Number will be
printed on the paper
Select Arrow Keys to select Alphabets
Press Enter after selection and
proceed
Press Enter twice after completing
selection
Page No. 19 of 26
User Manual
WASHWELL STRIP
8.2. MENU KEY:
This key is used to recall the test number to be performed.
8.2.1. Recalling the saved test:
Press MENU Key
Choose Test
Enter the test No to be recalled
And Press ENTER
8.3. PRIME KEY:
Pressing the ‘Prime key’, Peristaltic pump#1 operates continuously for few
seconds. Wash buffer from wash bottle primes the tubing and manifold needles.
8.4. RINSE KEY:
Pressing Rinse key peristaltic pump 2 operates continuously for few seconds.
Distilled water from rinse bottle, rinses the tubing and manifold needles.
8.5. TIMER KEY:
Press Timer Key
NO
Set timer Y/N
YES
Time in Seconds
Reset timer Y/N
YES
Timer Resets
Version No.: 03.21
Effective Date: Nov, 2011
Page No. 20 of 26
User Manual
WASHWELL STRIP
9. PROGRAMMING
9.1. Strip Wash:
Display
S-Wash
How to operate
Press S wash key
Soak Time in Seconds
Enter soak time in sec should be >50
secs and Press ENTER
No of Cycles
Enter no of wash cycles required (min
1, max 999.) and press ENTER
WASH VOLUME 25 ul Y/N
Flat Well Y/N
Select required volume of wash buffer
volumes available (25-400 ul)
Select the type of the well to be
washed
No
Round Well Y/N
No of Wells
Load Strip and press
ENTER
Select the type of the well to be
washed
Enter number of Wells to be
washed (min. 1 max. 12) &
press ENTER
Load Strips/Strip and press
ENTER
Instrument aspirates the waste solution from the well. Dispenses the programmed
volume in to the micro-strip well. Aspiration is continuously kept ‘on’ to prevent the over
flow. After completing dispensing cycle, depending on soak time it starts aspirating the
solution. After this the instrument transports the micro-Strip back to home position.
Version No.: 03.21
Effective Date: Nov, 2011
Page No. 21 of 26
User Manual
WASHWELL STRIP
9.2. Well Wash:
Display
How to operate
Press W wash key
W-Wash
Soak Time Y/N
No
Yes
Soak Time in Seconds
Enter soak time in sec should be > 50
secs and Press ENTER
No of Cycles
Enter no of wash cycles required (min
1, max 999.) and press ENTER
WASH VOLUME 25ul Y/N
Flat Well Y/N
Select required volume of wash buffer
volumes available (25-400 ul)
Select the type of the well to be
washed
No
Round Well Y/N
No of Wells
Load Strip and press
ENTER
Select the type of the well to be
washed
Enter number of wells to be
washed (min. 1 & max. 12) &
press ENTER
Load Strips/Strip and press
ENTER
Instrument aspirates the waste solution from the well. Dispenses the programmed
volume in to the micro-strip well. Aspiration is continuously kept on to prevent the over
flow. After completing dispensing cycle, depending on soak time it starts aspirating the
solution. After this the instrument transports the micro-Strip back to home position.
Version No.: 03.21
Effective Date: Nov, 2011
Page No. 22 of 26
User Manual
WASHWELL STRIP
9.3. Incubation:
WASH WELL consists of a One Plate incubator which can be programmed
individually. After the set time elapses, the instrument gives an audible alarm as
well as notification on display indicating the elapse of time. Both the timers can
be programmed separately.
Incubator is activated when the instrument is in power on condition. It takes 1015 minutes to attain 37º C Temperature (This temperature is factory set).
Procedure to program incubator time is as follows:
(Please refer point No. 8.5)
9.4. Priming:
(Please refer point No. 8.3)
9.5. Rinsing:
(Please refer point No. 8.4)
Version No.: 03.21
Effective Date: Nov, 2011
Page No. 23 of 26
User Manual
WASHWELL STRIP
10. TROUBLESHOOTING
PROBLEM
The Manifold does not dispense
SOLUTION
•
•
•
The Manifold does not aspirate
•
•
•
The Instrument beeps
continuously
•
•
•
Clean the path of the steel
tubes using needle cleaner
provided.
Check Wash bottle tubing
connections.
Check valve direction.
Clean the path of the steel
tubes using needle cleaner
provided.
Check the Waste bottle cap
and tighten them properly.
Check waste bottle tubing
connections.
Check the Sensor cable
connection.
Check whether waste bottle is
full.
Check the waste bottle cap
and clean the cap.
Movement Jam
Reset the instrument by pressing the
CLEAR key twice or Switch OFF and
Switch ON the instrument. Insert the
Strip properly and return.
Memory Full
If Number of saved tests exceeds 35
tests then delete the unwanted test
and save the test.
Version No.: 03.21
Effective Date: Nov, 2011
Page No. 24 of 26
User Manual
WASHWELL STRIP
11. DECONTAMINATION
Check whether all the tubing is properly connected. Switch on the instrument.
11.1. Decontamination procedure:
If the instrument is to be shipped after being exposed to potentially hazardous
material, it should be decontaminated. The following procedure outlines the
method to decontaminate the instrument before packaging and shipment.
11.2 . Purpose of Decontamination:
Decontamination minimizes the risk to all who come in contact with the
instrument during shipping, handling, and servicing.
11.3. General Considerations:
•
Any laboratory instrument that has been used for clinical analysis is
considered a bio-hazard and should be decontaminated prior to handling.
Intact skin is generally considered an effective barrier against infectious
organisms; however, small abrasions and cuts may not be always visible.
Prophylactic gloves must be worn when handling instruments that have not
been decontaminated. Gloved hands should be considered contaminated
and must be kept away from eyes mouth and nose at all times.
•
Mucous membranes are considered as the prime entry routes for infectious
agents. Wear eye protection and a surgical mask when there is a
possibility of aerosols.
•
Eating and/or drinking while decontaminating instruments is not advisable.
11.4. Decontamination procedure:
•
A solution of 0.5% Sodium Hypo Chlorite (NaOCL) solution (Bleach) is
used. Commercial bleach is 5% NaOCL; household bleach is 3% NaOCL.
When using commercial bleach, use a 10:1 mixture; if using household
bleach, a 6:1 mixture is required. This is a caustic solution. It is important
to wear gloves and eye protection when handling it.
•
Wipe down the carrier and all exposed surfaces of the unit with the bleach
solution. Remove the top shroud of the instrument and wipe down the top
surface of the instrument base, as well as the inside of the top shroud.
•
Reassemble the unit and discard the used gloves and towels.
Version No.: 03.21
Effective Date: Nov, 2011
Page No. 25 of 26
User Manual
WASHWELL STRIP
12. SAFETY CLEARANCE CERTIFICATE:
Please complete all information requests on this form prior to returning the instrument
to the manufacturer or your local distributor for servicing, repairs or return. Thank you
for your co-operation.
Customer
Contact
Address
Position
Dept
Tel:
Country
Fax:
Post Code
Model No.
Serial No.
Accessories
Returned
Date of Purchase (if known)
Complaint
Has the equipment been exposed to any of the following:
(*delete as applicable)
a) Blood, body fluids, pathological specimens
If YES, please specify
*YES/NO
b) Other Biohazard
if YES, Please specify
*YES/NO
Version No.: 03.21
Effective Date: Nov, 2011
Page No. 26 of 26