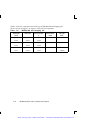
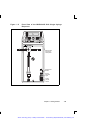
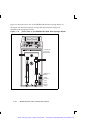
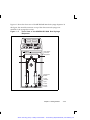
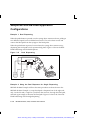
1
Artisan Technology Group is your source for quality
new and certified-used/pre-owned equipment
• FAST SHIPPING AND
DELIVERY
• TENS OF THOUSANDS OF
IN-STOCK ITEMS
• EQUIPMENT DEMOS
• HUNDREDS OF
MANUFACTURERS
SUPPORTED
• LEASING/MONTHLY
RENTALS
• ITAR CERTIFIED
SECURE ASSET SOLUTIONS
SERVICE CENTER REPAIRS
Experienced engineers and technicians on staff
at our full-service, in-house repair center
WE BUY USED EQUIPMENT
Sell your excess, underutilized, and idle used equipment
We also offer credit for buy-backs and trade-ins
www.artisantg.com/WeBuyEquipment
InstraView REMOTE INSPECTION
LOOKING FOR MORE INFORMATION?
Visit us on the web at www.artisantg.com for more
information on price quotations, drivers, technical
specifications, manuals, and documentation
SM
Remotely inspect equipment before purchasing with
our interactive website at www.instraview.com
Contact us: (888) 88-SOURCE | [email protected] | www.artisantg.com
The MICROLAB® 500 Series:
MICROLAB 501A, MICROLAB 503A, and MICROLAB 504A
User’s Manual
R
THE MEASURE OF EXCELLENCE. SM
Part Number 69175 (Rev. E)
Artisan Technology Group - Quality Instrumentation ... Guaranteed | (888) 88-SOURCE | www.artisantg.com
B Hamilton
Company Instrument Warranty
Hamilton Company warrants this equipment (except valves*) to be free of defects in material
and workmanship for 12 months from the date of receipt. This warranty is extended to the buyer
of record on the original purchase order to Hamilton Company. Hamilton Company or an
authorized Hamilton representative agrees to repair or replace, at its option and free of charge
to the buyer at a normal place of business or at a Hamilton repair facility, any part or parts that
under proper and normal use prove to be defective during the warranty period.** Abuse,
unauthorized replacement of parts, modifications, or adjustments made by other than Company
or its assigned representatives voids this warranty.
This warranty gives you specific rights. No other warranties, expressed or implied, including
implications of warranties of merchantability and fitness for a particular product, are made.
Hamilton Company's liability on the sale of all products shall be limited to repair, replacement,
or refund of price of any defective product.**
Hamilton Company endeavors to provide prompt and satisfactory service.
*All Hamilton Company valves are warranted to be free of defects in material and
workmanship at the time of delivery.
**Hamilton Company reserves the right to refuse to accept the return of any instrument or valve
that has been used with radioactive or microbiological substances, or any other material that
may be deemed hazardous to employees of Hamilton Company.
© July 1999 by Hamilton Company
GASTIGHT is a trademark of Hamilton Company.
MICROLAB is a trademark of Hamilton Company.
SANI-CLOTH is a trademark of Professional Disposables, Inc.
ii
Artisan Technology Group - Quality Instrumentation ... Guaranteed | (888) 88-SOURCE | www.artisantg.com
Instruction to the User
This equipment has been tested and found to comply with the limits for a class B
digital device, pursuant to part 15 of the FCC Rules. These limits are designed to
provide reasonable protection against harmful interference in an installation. This
equipment generates, uses, and can radiate radio frequency energy, and if not
installed and used in accordance with the instructions, may cause harmful
interference to radio communications. However, there is no guarantee that
interference will not occur in a particular installation. If this equipment does cause
harmful interference to radio or television reception, which can be determined by
turning the equipment off and on, the user is encouraged to try to correct the
interference by one or more of the following measures:
•
Reorient or relocate the receiving antenna.
•
Increase the separation between the equipment and receiver.
•
Connect the equipment into an outlet on a circuit different from that to which
the receiver is connected.
•
Consult the dealer or an experienced radio/TV technician for help.
This equipment has been verified to comply with the limits for a class B computing
device, pursuant to FCC Rules. In order to maintain compliance with the FCC
regulations, shielded cables must be used with this equipment . Operation with
non-approved equipment or unshielded cables is likely to result in interference to
radio and TV reception. The user is cautioned that changes and modifications made
to the equipment without the approval of the manufacturer could void the user’s
authority to operate this equipment.
Artisan Technology Group - Quality Instrumentation ... Guaranteed | (888) 88-SOURCE | www.artisantg.com
Artisan Technology Group - Quality Instrumentation ... Guaranteed | (888) 88-SOURCE | www.artisantg.com
Contents
Figures and Tables . . . . . . . . . . . . . . . . . . . . . . . . . . . . . . . . . . . . . . . . . . . . . . . . . . . . . . . . . . . . . . . . . ix
Preface
.................................................................... P R – 1
About the MICROLAB 500 Series of Instruments ...................PR–2
Upgrading Your MICROLAB 500 System..............................PR–3
About This Manual................................................................. PR–4
Conventions Used in This Manual ...........................................PR–5
A Word About Single Syringe Instruments...............................PR–5
Chapter 1
Getting Started . . . . . . . . . . . . . . . . . . . . . . . . . . . . . . . . . . . . . . . . . . . . . . . . . 1 – 1
MICROLAB 500 Parts Lists........................................................1–2
A Brief Introduction to the MICROLAB 500A...............................1–8
Drive Unit ..............................................................................1–8
Power Cord Connector Receptacle....................................1–13
Hand Probe or Footswitch Connector Receptacle...............1–13
Fuse Box .........................................................................1–13
Language Selection Switch...............................................1–13
Controller Unit Connector Receptacle ................................1–14
Power On/Off Switch and Power Indicator Light..................1–14
Step/Prime Switch............................................................1–14
Valve Assembly................................................................1–15
Syringe Drive Arms ...........................................................1–15
v
Artisan Technology Group - Quality Instrumentation ... Guaranteed | (888) 88-SOURCE | www.artisantg.com
The Controller Unit..................................................................1–16
Message Display Windows ................................................1–17
Function Control Keys ......................................................1–17
Increase and Decrease Keys ..........................................1–17
Syringe Size Keys .........................................................1–18
Volume Keys.................................................................1–18
Speed Keys..................................................................1–19
Operation Keys ................................................................1–20
Run/Stop Key ..................................................................1–21
Pipettors/Probes....................................................................1–22
Concorde Push-button Hand Pipettor/Probe .....................1–22
Dual Push-button Hand Pipettor/Probe..............................1–22
Disposable Tip Push-button Hand Pipettor/Probes.............1–23
Luer Lock Tip Push-button Pipette Hand Pipettor/Probe ....1–23
Viscous Sample Push-button Hand Pipette
Pipettor/Probe .................................................................1–24
Footswitch ..........................................................................1–24
Probe Button Functions.......................................................1–24
Chapter 2
Installing the MICROLAB 500 System . . . . . . . . . . . . . . . . . . . 2 – 1
Overview of Installation Procedures ...........................................2–3
Selecting a Location .................................................................2–3
Installing the Accessory Holder ..................................................2–3
Selecting a Language ...............................................................2–4
Installing Electrical Connections.................................................2–4
Installing Valve Assemblies........................................................2–6
Installing the Valve Assembly on the MICROLAB 501A ............2–6
vi
Artisan Technology Group - Quality Instrumentation ... Guaranteed | (888) 88-SOURCE | www.artisantg.com
Installing Valve Assemblies on the
MICROLAB 503A and 504A...................................................2–7
Selecting, Installing, and Removing Syringes .............................2–8
Preparing Syringes for Installation.........................................2–10
Installing Syringes................................................................2–10
Removing Syringes .............................................................2–12
Selecting and Installing Tubing ................................................2–14
Selecting Tubing .................................................................2–14
Installing Tubing ..................................................................2–15
Chapter 3
Using the MICROLAB 500 System. . . . . . . . . . . . . . . . . . . . . . . . 3 – 1
Using the System—An Overview...............................................3–3
Powering on the MICROLAB 500 ..............................................3–3
Priming and Checking ...............................................................3–4
Default Values..........................................................................3–5
Using the Control Keys .............................................................3–6
Setting Syringe Sizes ............................................................3–7
Setting Syringe Volumes .......................................................3–8
Setting Syringe Drive Speeds ................................................3–9
Running Operations ..............................................................3–9
Pausing Operations ..........................................................3–10
Sample MICROLAB 501A Application Configurations ...............3–11
Single Syringe Dispensing .............................................3–11
Sample MICROLAB 503A Application Configurations ...............3–12
Example 1: Dilutions ......................................................3–12
Example 2: Dilutions ......................................................3–13
Sample MICROLAB 504A Application Configurations ...............3–14
Example 1: Dual Dispensing...........................................3–14
vii
Artisan Technology Group - Quality Instrumentation ... Guaranteed | (888) 88-SOURCE | www.artisantg.com
Example 2: Using the Dual Dispenser for
Single Dispensing .........................................................3–14
Chapter 4
Caring for the MICROLAB 500 . . . . . . . . . . . . . . . . . . . . . . . . . . . . . . 4 – 1
Deciding When to Clean the MICROLAB 500............................4–2
Cleaning the Fluid Path of the MICROLAB 500...........................4–2
Cleaning Syringes and Tubing...................................................4–3
Cleaning the Exterior of the MICROLAB 500 ..............................4–4
Chemical Compatibility ..............................................................4–5
Storing the MICROLAB 500 ......................................................4–5
Chapter 5
Troubleshooting the MICROLAB 500. . . . . . . . . . . . . . . . . . . . 5 – 1
Message Code Guide ...............................................................5–2
Audible Messages ....................................................................5–4
Troubleshooting Guide .............................................................5–5
Getting Technical Support.........................................................5–9
Returning Instruments for Repair .............................................5–10
Appendixes
Appendix A Technical Specifications for the MICROLAB 500........................ A–1
Appendix B Instrument Performance Test Reports....................................... B–1
Appendix C Ordering Parts and Accessories for the
MICROLAB 500....................................................................... C–1
Appendix D Chemical Compatibility of the MICROLAB 500 ........................... D–1
Glossary
.................................................................... GL–1
Index
..................................................................... IN–1
viii
Artisan Technology Group - Quality Instrumentation ... Guaranteed | (888) 88-SOURCE | www.artisantg.com
Figures and Tables
Preface
Figure PR–1 The MICROLAB 500 Series of Instruments.........PR–2
Chapter 1
Figure 1–1
MICROLAB 500A System Components ................1–3
Figure 1–2
MICROLAB 500 Shipping Kit Components ...........1–5
Figure 1–3
Small Parts Kit......................................................1–6
Figure 1–4
Tubing Kit ...........................................................1–7
Figure 1–5
Front View of the MICROLAB 501A Single Syringe
Dispenser ...........................................................1–9
Figure 1–6
Front View of the MICROLAB 503A Dual Syringe
Diluter...............................................................1–10
Figure 1–7
Front View of the MICROLAB 504A Dual Syringe
Dispenser .........................................................1–11
Figure 1–8
Rear View of the MICROLAB 501A, 503A,
and 504A ..........................................................1–12
Figure 1–9
The Controller Unit.............................................1–16
Figure 1–10 The Concorde, the Disposable Tip, and the Dual Hand
Pipettor/Probes.................................................1–23
Table 1–1
MICROLAB 500 System Descriptions ...................1–2
Table 1–2
MICROLAB 500 Shipping Kit................................1–4
Table 1–3
Small Parts Kit #35888.........................................1–6
Table 1–4
Tubing Kit #35887...............................................1–7
ix
Artisan Technology Group - Quality Instrumentation ... Guaranteed | (888) 88-SOURCE | www.artisantg.com
Chapter 2
Figure 2–1
Overview of Installation Procedures ......................2–2
Figure 2–2
Installing Electrical Connections............................2–5
Figure 2–3
Installing a Valve Assembly on the
MICROLAB 501A ................................................2–6
Figure 2–4
Installing a Valve Assembly on the MICROLAB 503A
and 504A...........................................................2–7
Figure 2–5
The TLL-type Dispenser/Diluent Syringe ..............2–9
Figure 2–6
The TLLX-type Dispenser/Diluent Syringe ............2–9
Figure 2–7
The DX-type Sample Syringe................................2–9
Figure 2–8
Installing a Syringe .............................................2–11
Figure 2–9
Removing a Syringe...........................................2–13
Figure 2–10 MICROLAB 501A Valve and
Tubing Connections ..........................................2–16
Figure 2–11 MICROLAB 503A Valve with a D Configuration
Syringe.............................................................2–17
Figure 2–12 MICROLAB 503A Valve with Two TLLX or
TLL Syringes.....................................................2–17
Figure 2–13 MICROLAB 504A Valve and
Tubing Connectors............................................2–18
Figure 2–14 Using the Tubing Reducer with the Dual Hand
Probe ...............................................................2–19
Table 2–1
Language Selection Switch Positions...................2–4
Table 2–2
Reagent/Diluent Syringes....................................2–8
Table 2–3
Sample Syringes .................................................2–9
Table 2–4
Tubing Selection Guide .....................................2–14
x
Artisan Technology Group - Quality Instrumentation ... Guaranteed | (888) 88-SOURCE | www.artisantg.com
Chapter 3
Figure 3–1
Using the MICROLAB 500....................................3–2
Figure 3–2
Single Syringe Dispensing .................................3–11
Figure 3–3
Dilutions............................................................3–12
Figure 3–4
Serial Dilutions...................................................3–13
Figure 3–5
Dual Dispensing ................................................3–14
Figure 3–6
Using the Dual Dispenser for Single Dispensing ..3–15
Table 3–1
Default Syringe Speed Values..............................3–6
Table 5-1
Message Code Guide ..........................................5–2
Table 5-2
Audible System Messages ...................................5–4
Table 5–3
Troubleshooting Guide ........................................5–5
Table A–1
Technical Specifications for the MICROLAB 500 . A–1
Table A–2
Accuracy and Precision....................................... A–2
Figure B–1
Sample Performance Test Report........................ B–2
Table C–1
Reagent/Diluent Syringe Replacement Parts........ C–1
Table C–2
Sample Syringe Replacement Parts..................... C–1
Table C–3
Valve Assemblies ............................................... C–2
Table C–4
Tubing............................................................... C–2
Chapter 5
Appendix A
Appendix B
Appendix C
xi
Artisan Technology Group - Quality Instrumentation ... Guaranteed | (888) 88-SOURCE | www.artisantg.com
Table C–5
Pipettors/Probes .............................................. C–3
Table C–6
Parts and Accessories ....................................... C–3
Table D–1
Chemical Compatibility ...................................... D–1
Appendix D
xii
Artisan Technology Group - Quality Instrumentation ... Guaranteed | (888) 88-SOURCE | www.artisantg.com
Preface
Welcome to the World of
Hamilton Precision
Instruments
Congratulations on your purchase of a Hamilton MICROLAB 500
system. The Hamilton MICROLAB 500 is a versatile, semiautomatic, precision liquid processor. Various models of the
MICROLAB 500 function as either single- or dual-syringe
diluter/dispensers.
The MICROLAB 500 functions on the principal of liquid/liquid
displacement. At the heart of each MICROLAB 500 system is a
highly efficient, precision stepper motor drive that is combined
with world-famous Hamilton GASTIGHT syringes. The result is
a precise and accurate instrument that is very easy to set up
and use.
With proper care and maintenance, your new MICROLAB 500
system will serve you faithfully. To learn about the proper care
and maintenance of your investment, please take the time to read
this manual. Also, please read the warranty information that
appears on the copyright page in this manual and on the
separate warranty sheet that is included in your MICROLAB 500
shipping kit.
The Hamilton Company thanks you for purchasing this
Hamilton product. Welcome to the world of Hamilton precision
instruments!
P R –1
Artisan Technology Group - Quality Instrumentation ... Guaranteed | (888) 88-SOURCE | www.artisantg.com
About the MICROLAB 500 Series of Instruments
All of the MICROLAB 500 systems feature four common pipette modes: fill,
dispense, auto-refill, and prime. The systems are capable of performing accurate
and precise transfer pipetting, and of performing automated dilutions up to 1:25,000.
The instruments can also dispense up to 50 mL per cycle. Figure PR–1 provides an
overview of the MICROLAB 500 Series of Instruments.
Figure PR–1 The MICROLAB 500 Series of Instruments
The Microlab 500 Series of Instruments
Single Syringe Instruments
Controller without memory:
• Microlab 501A dispenser
Dual Syringe Instruments
Controller without memory:
• Microlab 503A diluter
• Microlab 504A dispenser
Controller with memory:
• Microlab 510B diluter/dispenser
Controller with memory:
• Microlab 530B diluter/dispenser
• Microlab 540B dispenser
Computer-controlled:
• Microlab 511C diluter/dispenser
Computer-controlled:
• Microlab 531C diluter/dispenser
• Microlab 541C dispenser
The MICROLAB 500 Series of instruments consists of three different lines of
diluter/dispensers.
•
Controller without memory: Use the controller unit to manually enter methods.
This controller unit does not have memory, so methods cannot be stored.
PR-2
MICROLAB 501A, 503A, and 504A User’s Manual
Artisan Technology Group - Quality Instrumentation ... Guaranteed | (888) 88-SOURCE | www.artisantg.com
•
Controller with memory: This controller unit has memory, allowing you to
program and store your own custom methods. Or, use the controller unit to run
manual methods.
•
Computer controlled: No controller unit is included; use a computer to operate
the instrument.
The MICROLAB 501A, 503A, and 504A are described in this manual.
•
The MICROLAB 501A is a single syringe dispenser designed for single precision
dispensing applications.
•
The MICROLAB 503A is a dual syringe diluter designed for repetitive dilution
applications.
•
The MICROLAB 504A is a dual syringe dispenser designed for precision
dispensing applications that require more than one liquid to be dispensed at a
time.
Upgrading Your MICROLAB 500 System
Both the MICROLAB 501A and 503A systems can be upgraded to MICROLAB 504A
systems. For upgrade information or for information about purchasing any of the
MICROLAB 500 models, contact your authorized Hamilton sales representative or
contact Hamilton Company.
In the United States:
Hamilton Company, P.O. Box 10030, Reno, Nevada 89520–0012
Telephone Numbers (in the USA and Canada):
Technical/Customer Service +1–800–648–5950 8 a.m. to 5 p.m. PST
Instrument Service +1–800–527–5269
Outside the USA and Canada:
+1–775–858–3000
Fax Number:
+1–775–856–7259
Preface
PR-3
Artisan Technology Group - Quality Instrumentation ... Guaranteed | (888) 88-SOURCE | www.artisantg.com
In Switzerland:
Hamilton Bonaduz AG, Ch–7402, P.O. Box 26,
Bonaduz, Switzerland
Telephone Number:
+41–81–660–60–60
Fax Number:
+41–81–660–60–70
About This Manual
This manual provides technical information about the MICROLAB 501A, 503A, and
504A, and is divided into chapters that cover the following topics:
•
Chapter 1, Getting Started, provides an overview of the MICROLAB 500
system, including a complete parts list and a brief description of the system
components.
•
Chapter 2, Installing the MICROLAB 500, describes how to set up the system.
•
Chapter 3, Using the MICROLAB 500, provides step-by-step instructions for
using the system. It also provides sample applications.
•
Chapter 4, Caring for the MICROLAB 500, describes everyday maintenance
techniques.
•
Chapter 5, Troubleshooting, contains tables that list system messages and their
meanings, and common problems and their solutions.
•
The Appendixes provide detailed information, such as technical specifications,
ordering information, etc.
•
The Glossary defines terms used in this manual.
•
The Index provides a quick-reference to the topics described in this manual.
PR-4
MICROLAB 501A, 503A, and 504A User’s Manual
Artisan Technology Group - Quality Instrumentation ... Guaranteed | (888) 88-SOURCE | www.artisantg.com
Conventions Used in This Manual
Throughout this manual symbols are used to call your attention to various kinds of
information.
A
Warning! Information that is essential for avoiding personal
injury is flagged with the International Warning Symbol
and appears like this in the text. A
▲ Important
Information that is essential for avoiding damage to
equipment appears like this in the text. ▲
✱ Note: Interesting information or information that can help improve
system performance appears like this in the text. ✱
System messages or prompts that appear in the message display windows are
shown in courier font.
A Word About Single Syringe Instruments
Throughout this manual you will see references to multiple syringes, volumes,
speeds, and to the right-side controls. If you are using a MICROLAB 501A single
syringe dispenser, please disregard these references. The right-side controls are not
functional on single syringe instruments. The right display window, however, is
active.
Any operational differences between the single and the dual syringe instruments
are called out in the text.
Preface
PR-5
Artisan Technology Group - Quality Instrumentation ... Guaranteed | (888) 88-SOURCE | www.artisantg.com
Artisan Technology Group - Quality Instrumentation ... Guaranteed | (888) 88-SOURCE | www.artisantg.com
Chapter 1
Getting Started
This chapter provides a brief overview of the MICROLAB 500
system. Information in this chapter includes:
• MICROLAB 500 parts lists
• MICROLAB 500 components
–
the drive unit
–
the controller unit
–
hand pipettors/probes
All MICROLAB 500 instruments come with everything you need
to start using the system, with the exception of syringes. You
must separately purchase syringes for use with the MICROLAB
500 systems. For complete lists of syringes, accessories, and
replacement parts for the MICROLAB 500, see Appendix C,
Ordering Parts and Accessories for the MICROLAB 500.
✱ Note: Contact your local delivery company if you
notice any visual damage to the MICROLAB 500
shipping package or to its contents. Also, you may
want to save the shipping container in case you
ever need to return the instrument for service. ✱
1 –1
Artisan Technology Group - Quality Instrumentation ... Guaranteed | (888) 88-SOURCE | www.artisantg.com
MICROLAB 500 Parts Lists
This section includes complete parts lists for the MICROLAB 501A, 503A, and 504A
systems. After you unpack your MICROLAB 500, check to see that you have
received all parts before attempting to set up the system. The parts lists are
presented in four separate tables with four corresponding figures.
Table 1–1 lists the non-programmable models in the MICROLAB 500 series, their
components, and each component’s part number. Figure 1–1 shows these components.
Table 1–1
MICROLAB 500 System Descriptions
Model
Part #
Drive
Unit
Part #
Controller
Unit &
Cord
Part #
Manual Part #
Power
Cord
Shipping
Kit
Part #
MICROLAB
ML501115
35895
35894
69175 (English)
6541000
35889
501A 115V
69181 (French)
69179 (German)
69185 (Portuguese)
69187 (Spanish)
MICROLAB
ML501220
35895
35894
same as above
355010
35889
ML503115
35896
35894
same as above
6541000
35790
ML503220
35896
35894
same as above
355010
35790
ML504115
35897
35894
same as above
6541000
35791
ML504220
35897
35894
same as above
355010
35791
501A 220V
MICROLAB
503A 115V
MICROLAB
503A 220V
MICROLAB
504A 115V
MICROLAB
504A 220V
1 –2
MICROLAB 501A, 503A, and 504A User’s Manual
Artisan Technology Group - Quality Instrumentation ... Guaranteed | (888) 88-SOURCE | www.artisantg.com
Figure 1–1
MICROLAB 500A System Components (items shown are
not to scale)
R
25
10
5.0
2.5
1.0ml
500
250
100
50
25ul
R
25
10
5.0
2.5
1.0ml
500
250
100
50
25ul
Size
Volum
e
Increa
Spee
se
d
Size
Dec
rease
Volum
e
Spee
Up
STEP
d
Down
Auto-
Refill
Run
Stop
PRIME
R
POWER
Controller Unit and Cord
Part # 35894
Dual Drive Unit
Part # 35896 or 35897
(Microlab 503A/Microlab 504A)
Power Cord
Part # 6541000 or 355010
R
Shipping Kit
Part # 35889 (Microlab 501A)
Part # 35790 (Microlab 503A)
Part # 35791 (Microlab 504A)
R
STEP
PRIME
R
POWER
Single Drive Unit
Part # 35895
(Microlab 501A)
Manual
Part # 69175
Chapter 1 Getting Started
1-3
Artisan Technology Group - Quality Instrumentation ... Guaranteed | (888) 88-SOURCE | www.artisantg.com
Table 1–2 lists the components that make up the MICROLAB 500 Shipping Kit
(shown as a box in Figure 1–1). Figure 1–2 shows these components.
Table 1–2
MICROLAB 500 Shipping Kit
Shipping Kit
Part #
Valve Part #
Hand Probe Part
#
MICROLAB 501A
HV Valve
Concorde Probe
35889
35825
35529
MICROLAB 503A
Diluter Valve
Concorde Probe
35790
35844
35529
MICROLAB 504A
Dispenser Valve
Dual Hand Probe
35791
35842
35767
1 –4
Small Parts Kit
Part #
Tubing Kit
Part #
35888
35887
35888
35887
35888
35887
2 items
MICROLAB 501A, 503A, and 504A User’s Manual
Artisan Technology Group - Quality Instrumentation ... Guaranteed | (888) 88-SOURCE | www.artisantg.com
Figure 1–2
MICROLAB 500 Shipping Kit Components (items shown
are not to scale)
Small Parts Kit
Part # 35888
Concorde Probe
Part # 35529
(Microlab 501A/Microlab 503A)
Tubing Kit
Part # 35887
Dual Hand Probe
Part # 35767
(Microlab 504A)
Dispenser Valve
Part # 35842
R
HV Valve
Part # 35825
(Microlab 501A)
Diluter Valve
Part # 35844
Chapter 1 Getting Started
1-5
Artisan Technology Group - Quality Instrumentation ... Guaranteed | (888) 88-SOURCE | www.artisantg.com
Table 1–3 lists the components that make up the MICROLAB 500 Small Parts Kit
(shown as a box in Figure 1–2). Figure 1–3 shows these components.
Table 1–3
Small Parts Kit #35888 (For All Models)
Tubing Clips
Part #
1 AMP Fuses
Part #
Accessory
Holder
Part #
Screws
Part #
Tubing
Reducers
Part #
230010
2 items
1524-01
2 items
35783
1 item
16500
2 items
35770
2 items
Figure 1–3
Small Parts Kit (items shown are not to scale)
(2) Tubing Clips
Part # 230010
Accessory
Accessory
Accessory
Holder
Holder
Holder
Part
Part
35783
Part###110231
35783
Tubing Reducers
Part # 35770
(2) Screws
Part # 16500
1 –6
(2)
(2)Fuses
Fuses
Part
Part# #6540000
1524-01
MICROLAB 501A, 503A, and 504A User’s Manual
Artisan Technology Group - Quality Instrumentation ... Guaranteed | (888) 88-SOURCE | www.artisantg.com
Table 1–4 lists the components that make up the MICROLAB 500 Tubing Kit (shown
as a box in Figure 1–2). Figure 1–4 shows these components.
Table 1–4
Tubing Kit #35887 (For All Models)
12 ga. x 650 mm
Fill Tubing (not
tapered)
Part #
18 ga. x 650 mm
Fill Tubing (not
tapered)
Part #
12 ga. x 900 mm
Dispense Tubing
(tapered)
Part #
18 ga. x 900 mm
Dispense Tubing
(tapered)
Part #
240000*
240010*
240360*
240130*
Figure 1–4
Tubing Kit (items shown are not to scale)
12 ga. Fill Tubing
Part # 240000
12 ga. Dispense Tubing
Part # 240360
18 ga. Fill Tubing
Part # 240010
18 ga. Dispense Tubing
Part # 240130
* M6 threaded hubs are used on all tubing.
For complete lists of syringes, accessories, and replacement parts for the
MICROLAB 500, see Appendix C, Ordering Parts and Accessories for the
MICROLAB 500.
Chapter 1 Getting Started
1-7
Artisan Technology Group - Quality Instrumentation ... Guaranteed | (888) 88-SOURCE | www.artisantg.com
A Brief Introduction to the MICROLAB 500A
The MICROLAB 501A, 503A, and 504A systems each consist of three basic units.
These units include:
•
a drive unit
•
a controller unit
•
a hand probe
This section briefly describes these units and the individual components that
comprise each unit. See Chapter 2, Installing the MICROLAB 500, for complete
installation instructions; see Chapter 3, Using the MICROLAB 500, for complete
usage instructions.
Drive Unit
The drive unit is the heart of each MICROLAB 500 system. The drive unit contains
a precision drive motor, the syringe drive arms, the valve assembly, and the power
switches and connector receptacles. These features allow you to control other subassemblies, and together they create a very versatile and functional instrument.
Figure 1– 5 shows the front view of the MICROLAB 501A single syringe dispenser.
In this figure, the controller unit rests on top of the drive unit and a syringe is
attached to the syringe drive arm.
A
Warning! This warning label appears on the front panel of the
ML500. It indicates that a pinch hazard exists when
the syringe drive is moving. A
1 –8
MICROLAB 501A, 503A, and 504A User’s Manual
Artisan Technology Group - Quality Instrumentation ... Guaranteed | (888) 88-SOURCE | www.artisantg.com
Figure 1–5
Front View of the MICROLAB 501A Single Syringe
Dispenser
25
10
5.0
2.5
1.0ml
500
250
100
50
25ul
25
10
5.0
2.5
1.0ml
500
250
100
50
25ul
Size
Size
Increase
Volume
Volume
Decrease
Speed
Speed
Run
Stop
Up
Down
Auto-Refill
R
R
R
Hand Probe
Connector
Receptacle
R
STEP
PRIME
Step/Prime
Switch
Power
Indicator
Light
POWER
Power
On/Off
Switch
Chapter 1 Getting Started
1-9
Artisan Technology Group - Quality Instrumentation ... Guaranteed | (888) 88-SOURCE | www.artisantg.com
Figure 1–6 shows the front view of the MICROLAB 503A dual syringe diluter. In
this figure, the controller unit rests on top of the drive unit and syringes are
attached to the syringe drive arms.
Figure 1–6
Front View of the MICROLAB 503A Dual Syringe Diluter
25
10
5.0
2.5
1.0ml
500
250
100
50
25ul
25
10
5.0
2.5
1.0ml
500
250
100
50
25ul
Size
Size
Increase
Volume
Volume
Decrease
Speed
Speed
Run
Stop
Up
Down
Auto-Refill
R
R
Hand Probe
Connector
Receptacle
R
STEP
PRIME
Step/Prime
Switch
Power
Indicator
Light
POWER
1 –1 0
Power
On/Off
Switch
MICROLAB 501A, 503A, and 504A User’s Manual
Artisan Technology Group - Quality Instrumentation ... Guaranteed | (888) 88-SOURCE | www.artisantg.com
Figure 1–7 shows the front view of the MICROLAB 504A dual syringe dispenser. In
this figure, the controller unit rests on top of the drive unit and syringes are
attached to the syringe drive arms.
Figure 1–7
Front View of the MICROLAB 504A Dual Syringe
Dispenser
25
10
5.0
2.5
1.0ml
500
250
100
50
25ul
25
10
5.0
2.5
1.0ml
500
250
100
50
25ul
Size
Size
Increase
Volume
Volume
Decrease
Speed
Speed
Run
Stop
Up
Down
Auto-Refill
R
Hand Probe
Connector
Receptacle
R
R
STEP
PRIME
Step/Prime
Switch
Power
Indicator
Light
POWER
Power
On/Off
Switch
Chapter 1 Getting Started
1-11
Artisan Technology Group - Quality Instrumentation ... Guaranteed | (888) 88-SOURCE | www.artisantg.com
Figure 1–8 shows the rear view of all units.
Figure 1–8
Rear View of the MICROLAB 501A, 503A, and 504A
Hand Probe
Connector
Receptacle
LR-52122
R
SERIAL
NO.
!
100-240
V 50-60 HZ 150 VA
MANUFACTURED BY
FUSE: T 1A/250 V
LABEL NO. 10652
R
RENO, NEVADA
56
234
CONTROLLER
LANGUAGE SELECTION SWITCH
0 = ENGLISH
1 = FRENCH
2 = GERMAN
3 = PORTUGUESE
4 = SPANISH
78
Controller Unit
Connector
Receptacle
WARNING: DISCONNECT SUPPLY BEFORE SERVICING.
HIGH LEAKAGE CURRENT-ENSURE PROPER GROUNDING.
AVERTISSEMENT: COUPER L ALIMENTATION AVANT L ENTRETIEN ET DEPANNAGE.
COURANT DEFUITE ELEVE-FOURNIER UNE MISE A LA TERRE EFFICACE.
WARNUNG: FUER SERVICEARBEITEN STROMZUFUHR UNTERBRECHEN.
HOHER LECKSTROM-GUTER ERDUNGSANSCHLUSS GEWAEHRLEISTEN.
901
Language
Selection
Switch
R
PART
NO.
Fuse Box
Power Cord
Connector
Receptacle
1 –1 2
MICROLAB 501A, 503A, and 504A User’s Manual
Artisan Technology Group - Quality Instrumentation ... Guaranteed | (888) 88-SOURCE | www.artisantg.com
Power Cord Connector Receptacle
The power cord connector receptacle is located on the back of the drive unit; the
power cord fits into this receptacle only one way. The receptacle accepts cords for
either 115V or 220V without any adaptation of the drive unit. See Figure 1–4 for
the location of the power cord connector receptacle.
Hand Probe or Footswitch Connector Receptacle
The hand probe connector receptacle is located on the upper right side of the drive
unit. You can insert either a hand probe jack or a footswitch jack into this
receptacle. See Figures 1–1 through 1–3 for the location of the hand probe connector
receptacle.
Fuse Box
The fuse box is located at the top of the power cord connector receptacle. To gain
access to the fuse box, you must first remove the power cord. See Figure 1–4 for the
location of the fuse box.
Language Selection Switch
The Language Selection switch is located on the back of the drive unit below the
serial number label. See Figure 1–4 for the location of this switch.
Use the Language Selection switch to choose the language that message codes will
appear in. (Messages codes provide you with system status and appear in the
message display windows, located on the controller unit.) You can select from five
different languages, including English, French, German, Portuguese, and Spanish.
Chapter 1 Getting Started
1-13
Artisan Technology Group - Quality Instrumentation ... Guaranteed | (888) 88-SOURCE | www.artisantg.com
Controller Unit Connector Receptacle
The controller unit connector receptacle is located on the back of the drive unit just
below the serial number plate. Insert the controller unit cable connector into this
receptacle; the cable fits only one way. See Figure 1–4 for the location of the
controller unit connector receptacle.
Power On/Off Switch and Power Indicator Light
The Power On/Off switch and the Power Indicator light are located on the front of
the drive unit in the lower right-hand corner. See Figures 1–1 through 1–3 for the
locations of the switch and the indicator light.
The Power On/Off switch is a two-position rocker switch.
•
To power-on the MICROLAB 500, press the upper half of the switch. The
system beeps twice when it is powered on.
•
To power-off the MICROLAB 500, press the lower half of the switch.
The Power Indicator light is a small green LED located directly above the
Power On/Off switch. It is lit when the unit is powered on.
Step/Prime Switch
C/D
The Step/Prime switch is located on the front of the drive unit in
the lower right-hand corner, directly above the power indicator
light. See Figures 1–1 through 1–3.
The Step/Prime switch is a three-position rocker switch.
•
When the Step/Prime switch is in the middle position, the ML500 is inactive.
1 –1 4
MICROLAB 501A, 503A, and 504A User’s Manual
Artisan Technology Group - Quality Instrumentation ... Guaranteed | (888) 88-SOURCE | www.artisantg.com
D
C
• When you press the lower part of the Step/Prime switch , the
ML500 goes into prime mode. When in prime mode, the syringe
drive arms automatically move up and down, opening the
valve ports, and moving fluid through the system. The ML500
stays in prime mode until you press the upper or the middle
part of the Step/Prime switch.
• When you press the upper part of the Step/Prime switch , the
ML500 goes into Step mode. When in Step mode, the drive
arms move only as long as you depress the Step/Prime switch.
When you release the switch, movement stops.
Use the Step mode to move the syringe drive arm down and away from the
home position before installing or removing syringes.
✱ Note: Use the Step mode to return the syringes back to the Home
position. This good habit ensures that the syringes will be in the
correct position for your next command. ✱
Valve Assembly
The valve assembly controls the flow of liquid through the fluid path. The 501A,
503A, and 504A models each use a different valve assembly; you must attach the
assembly to the drive unit. See Figures 1–1 through 1–3 for the location of the
valve assembly. See “Installing the Valve Assembly” in Chapter 2 for installation
instructions.
Syringe Drive Arms
You attach syringes to the MICROLAB’s syringe drive arms. The syringe drive arms
are engineered to drive Hamilton precision syringes with high-resolution stepper
motors; the motors and drive arms are connected by a precision lead screw. See
“Selecting, Installing, and Removing Syringes” in Chapter 2 for syringe
installation instructions.
Chapter 1 Getting Started
1-15
Artisan Technology Group - Quality Instrumentation ... Guaranteed | (888) 88-SOURCE | www.artisantg.com
The Controller Unit
The controller unit is a portable device that connects to the syringe drive unit via
the controller connector cord. The controller unit sends display information and
instructions to the drive unit. Figure 1–9 shows the controller unit.
Two message display windows are located at the top of the unit and three main
groups of controls are located across the center and the bottom of the unit. The
controls are divided into three functional groups:
•
function control keys
•
operation keys
•
Run/Stop key
Figure 1–9
The Controller Unit
Left Side Message
Display Window
Left Syringe
Size Indicator
Right Side Message
Display Window
Right Syringe
Size Indicator
Increase Key
25
10
5.0
2.5
1.0ml
500
250
100
50
25ul
25
10
5.0
2.5
1.0ml
500
250
100
50
25ul
Left Side Syringe
Size Selector Key
Right Side Syringe
Size Selector Key
Left Volume
Control Key
Size
Left Speed
Control Key
Volume
Right Volume
Control Key
Size
Increase
Volume
Decrease
Speed
Operation
Mode Indicator
Lights
Run
Stop
Up
Right Speed
Control Key
Speed
Down
Run/Stop Key
Auto-Refill
R
Operation Mode
Keys
1 –1 6
Decrease Key
MICROLAB 501A, 503A, and 504A User’s Manual
Artisan Technology Group - Quality Instrumentation ... Guaranteed | (888) 88-SOURCE | www.artisantg.com
For ease of use and for everyday storage, the controller unit is designed to fit on top
of the drive unit.
Message Display Windows
The message display windows, located at the top of the controller unit, show the
status of the instrument and provide information about current control settings:
•
the size of the left or the left and right syringes
•
the selected volume for the left or the left and right syringes
•
the drive speed for the left or the left and right syringes
•
the volumes being pipetted, when the MICROLAB is in operation
•
all system information or error messages
See Figure 1–9 for the location of the display windows.
Function Control Keys
The keys by which you send information to the drive unit are marked with images,
or icons, that represent each key’s function. Use the keys to enter information about
the syringes, volumes, speeds, and operations.
Increase and Decrease Keys
M
To increase syringe size, pipetting volume, or syringe drive
speed, press the Increase key.
N
To decrease syringe size, pipetting volume, or syringe drive
speed, press the Decrease key.
Increase
Decrease
After you select a specific function key and then press the Increase or Decrease key,
the new size, volume, or speed displays in the message display windows.
Chapter 1 Getting Started
1-17
Artisan Technology Group - Quality Instrumentation ... Guaranteed | (888) 88-SOURCE | www.artisantg.com
Syringe Size Keys
The Syringe Size keys allow you to select either or both (on a two-syringe
instrument) the left or the right syringe. Once a syringe is selected, you can adjust
its size, volume, or speed. You can select either the left or the right syringe in any
order; the system defaults to the left syringe. You must select a syringe size before
you can change its volume or speed.
G
Press the left Syringe Size key to select the left syringe. Then
press the Increase or the Decrease key to change its size.
H
Press the right Syringe Size key to select the right syringe. Then
press the Increase or the Decrease key to change its size.
When you select either the left or the right Syringe Size key, a green LED indicates
which of the keys is active. As you change the size of a syringe, notice that the
syringe size indicator lights, located on either side of the message display
windows, move to reflect the size of the syringe.
✱ Note: The syringe size indicators show syringe sizes over 500 µL
in milliliters, but the message display windows show the syringe size
in microliters. ✱
Volume Keys
To set the volumes you wish to pipette, press either the left or the right Volume
key and then press the Increase or the Decrease key.
✱ Note: You must enter a syringe size before you can change its
volume. ✱
1 –1 8
MICROLAB 501A, 503A, and 504A User’s Manual
Artisan Technology Group - Quality Instrumentation ... Guaranteed | (888) 88-SOURCE | www.artisantg.com
I
J
Press the left Volume key to select the left syringe. Then press
the Increase or the Decrease key to change the volume to be
pipetted by the left syringe.
Press the right Volume key to select the left syringe. Then press
the Increase or the Decrease key to change the volume to be
pipetted by the right syringe.
When you select either the left or the right Volume key, a green LED indicates
which of the keys is active.
✱ Note: The message display windows show the volume settings in
microliters. ✱
Speed Keys
To set the speed of a syringe drive arm, press either the left or the right Speed key;
then press the Increase or the Decrease key. You must enter a syringe size before you
can change its speed.
L
K
Press the left Speed key to select the left syringe. Then press the
Increase or the Decrease key to change the speed of the left
syringe drive arm.
Press the right Speed key to select the right syringe. Then press
the Increase or the Decrease key to change the speed of the right
syringe drive arm.
When you select either the left or the right Speed key, a green LED indicates
which of the keys is active.
✱ Note: Drive arm speeds represent the number of seconds needed
to drive a syringe full stroke (6 cm). Therefore, the smaller the
speed number the faster the speed. The fastest speed is two
seconds, while the slowest speed is 20 seconds. ✱
Chapter 1 Getting Started
1-19
Artisan Technology Group - Quality Instrumentation ... Guaranteed | (888) 88-SOURCE | www.artisantg.com
Operation Keys
The operation keys are located in the lower left corner of the controller unit. When
you select an operation, a green LED next to the operation key lights up. To start an
operation, press the Run/Stop key or press the probe button. When an operation
starts, the system beeps once.
N
The Down operation moves the syringe drive arms down from the
Home position, pulling a specified volume of liquid into the
syringes.
•
In the MICROLAB 501A dispenser or the MICROLAB 503A diluter/dispenser,
liquid is pulled in from the left side inlet valve port.
•
In the MICROLAB 504A dispensers, liquid is pulled in from both the left and
right outside ports.
When the Down stroke is complete (this could be at any location within the drive
arm’s range of movement, depending on your specific application), the operation
automatically switches to Up. The LED automatically indicates that the Up
operation is active.
M
The Up operation moves the syringe drive arms up, forcing a
specified volume of liquid out of the syringes and through the
dispense tubing.
When the Up stroke is complete, and the syringe drive arms (both arms, if using a
dual syringe instrument) return to the Home position, the operation automatically
switches to the Down operation. The LED automatically indicates that the Down
operation is active. If both arms do not return to the Home position, the Up
operation remains active.
F
1 –2 0
The Auto-Refill operation moves the drive arms down to
automatically refill the syringes after liquid is dispensed.
When in the Auto-Refill operation, unlike the Up or the Down
operations, the syringe drive arms complete an entire cycle, not
just a stroke.
MICROLAB 501A, 503A, and 504A User’s Manual
Artisan Technology Group - Quality Instrumentation ... Guaranteed | (888) 88-SOURCE | www.artisantg.com
•
Selecting the Auto-Refill operation when the drive arm is in the Home
position moves the drive arm to the Down position.
•
Selecting the Auto-Refill operation when the drive arm is already in the Down
position moves the drive arm one full cycle: from the Down position, up to
Home, and down once again.
The Auto-Refill operation is useful for dispense functions, since it automatically
refills syringes for the next dispense. Therefore, you can complete a fill and
dispense function with one command. The Auto-Refill operation is also useful for
doing serial dilutions.
Run/Stop Key
E
The Run/Stop key is located in the bottom right corner of the
controller unit. The first time you press this key after the system
is powered on and the syringe sizes are selected, the system will
initialize itself. Until the system initializes itself, Up is the
only active operation (to move the drive arms to the Home
position.)
After initialization, use the Run/Stop key to start an operation. Choose an
operation (Up, Down, or Auto-Refill), then press Run/Stop to start.
•
If Up, Down, or Auto-Refill is selected, you can pause in the middle of a stroke
by pressing the Run/Stop key once. Resume an operation at the same place in
the stroke by pressing the Run/Stop key again.
•
If the Step/Prime switch (on the drive unit) is in use and is in the Prime mode,
you cannot use the Run/Stop key to pause in the middle of a stroke or a cycle.
Instead, the drive arms continue until they reach the Home position before
they stop.
The Run/Stop key generates a command signal that activates the next step of an
operation. You can generate this same command signal by pressing the button on a
hand probe or by using a footswitch.
See Chapter 3, Using the MICROLAB 500, for complete instructions about using the
function keys.
Chapter 1 Getting Started
1-21
Artisan Technology Group - Quality Instrumentation ... Guaranteed | (888) 88-SOURCE | www.artisantg.com
Pipettors/Probes
Each MICROLAB 500 system comes with a remote push-button, hand-held
pipettor/probe. The standard accessory probes include:
•
the Concorde Push-button Hand Pipettor/Probe (ships with the MICROLAB
501A and the MICROLAB 503A)
•
the Dual Push-button Hand Pipettor/Probe (ships with the MICROLAB 504A)
Additionally, three other optional probes may be ordered separately for use with
any MICROLAB 500 system. These probes include:
•
the Disposable Tip Push-button Hand Pipettor/Probe
•
the Luer Lock Tip Push-button Pipette Hand Pipettor/Probe
•
the Viscous Sample Push-button Hand Pipettor/Probe
Concorde Push-button Hand Pipettor/Probe
The Concorde Push-button Hand Pipettor/Probe is a single-dispense pipette probe
that features a slim, comfortable design. Use this probe with MICROLAB 501 and
503 systems. The Concorde probe attaches directly to a sampling syringe or to the
valve assembly. This probe accommodates both 12- or 18-gauge tubing and features
adjustable extension lengths beyond the probe tip. See Figure 1–10.
Dual Push-button Hand Pipettor/Probe
The Dual Push-button Hand Pipette Probe is a dual-dispense pipette that features
a pistol grip design with push-button actuator. Use this probe with MICROLAB 504
systems. This probe accommodates both 12- and 18-gauge tapered tubing lines with
independent extensions. You can extend the tubing out the end of the probe to the
length that is convenient for your application; either the right-side or the left-side
tubing can be extended to pick up sample. Figure 1–10 shows the Dual Push-button
Hand Pipette Probe.
1 –2 2
MICROLAB 501A, 503A, and 504A User’s Manual
Artisan Technology Group - Quality Instrumentation ... Guaranteed | (888) 88-SOURCE | www.artisantg.com
Disposable Tip Push-button Hand Pipettor/Probes
The Disposable Tip Push-button Hand Pipette Probe is a single-dispense tube
pipette that features disposable tips and push-button tip ejection. The Disposable
Tip Push-button Hand Pipette Pipettor/Probe is an optional accessory. Use this
probe when sample-to-sample carryover is a concern. See Figure 1–10.
Figure 1–10 shows the Concorde, the Disposable Tip, and the Dual Hand
Pipettor/Probe.
Figure 1–10
The Concorde, the Disposable Tip, and the Dual Hand
Pipettor/Probes
Concorde
Pipettor
Probe
Disposable Tip
Pipettor
Probe
Dual Hand
Pipettor
Probe
Luer Lock Tip Push-button Pipette Hand Pipettor/Probe
The Luer Lock Tip Push-button Pipette Hand Pipettor/Probe is an optional
accessory that dispenses liquids through needles of different lengths and gauges.
This probe is useful for controlling very small dispense volumes with a high degree
of accuracy. It is also ideal for administering injections to small animals and for
piercing septa.
Chapter 1 Getting Started
1-23
Artisan Technology Group - Quality Instrumentation ... Guaranteed | (888) 88-SOURCE | www.artisantg.com
Viscous Sample Push-button Hand Pipette Pipettor/Probe
The Viscous Sample Push Button Hand Pipettor/Probe is an optional accessory.
This single-dispense tube pipette is designed to accommodate highly viscous
samples, such as motor oil. This accessory features a disposable 5 mL tip that
eliminates sample carryover. Air displacement ensures accurate dilutions.
Footswitch
In addition to the hand-activated probes, a footswitch is also available. The
footswitch allows you to operate the MICROLAB 500 via a foot-activated control
pedal. This is useful when you need to keep both hands free, as when doing handsampling.
Refer to Appendix C for information about ordering the footswitch or any other
optional accessories.
Probe Button Functions
The probe button (on any model of hand probe) serves basically the same function as
the Run/Stop key on the controller unit. However, you cannot use the probe button to
pause an operation or to reinitialize the system after an error occurs.
1 –2 4
MICROLAB 501A, 503A, and 504A User’s Manual
Artisan Technology Group - Quality Instrumentation ... Guaranteed | (888) 88-SOURCE | www.artisantg.com
Chapter 2
Installing the MICROLAB 500
System
This chapter contains information about installing the
MICROLAB 500 system, including the following topics:
• an overview of installation procedures
• how to select an installation location
• how to install the accessory holder
• how to select the language system messages will display in
• how to install electrical connections
• how to install the valve assembly
• how to select, install, and remove syringes
• how to select and install tubing
▲ Important
Be sure to read the instructions in this chapter before
installing your MICROLAB system.
• Never install or use syringes incorrectly. Incorrect use
may result in damage to the syringes. See “Selecting,
Installing, and Removing Syringes” later in this chapter
for more information.
• Never over-tighten tubing. Over-tightening may result in
damage to the valves or tubing. See “Selecting and
Installing Tubing” later in this chapter for more
information.
• Call Hamilton Company’s Technical/Customer Service
Department at (800) 648–5950 (in the United States and
Canada) if you have questions about installing your
MICROLAB 500 system. ▲
2 –1
Artisan Technology Group - Quality Instrumentation ... Guaranteed | (888) 88-SOURCE | www.artisantg.com
Figure 2–1
Overview of Installation Procedures
Unpack the instrument;
check all parts against packing list
Select an installation location
Install the accessory holder
Set the language selection switch
Plug in electrical connections:
• power cord
• hand probe
• controller unit cord
Install the valve assembly
Select
syringe
sizes
Install syringe(s)
Select
tubing
sizes
Install the fill tubing
Install the tubing clip
Install the dispense tubing
Run the dispense tubing through the hand probe
Fill out and return warranty card
Installation
is complete
2 –2
MICROLAB 501A, 503A, and 504A User’s Manual
Artisan Technology Group - Quality Instrumentation ... Guaranteed | (888) 88-SOURCE | www.artisantg.com
Overview of Installation Procedures
Figure 2–1 provides an overview of the MICROLAB 500 installation procedures.
These procedures are described in detail in this chapter.
Selecting a Location
Install your MICROLAB 500 system in a clean, dry, level area away from
hazardous fumes. Leave space around the unit for ventilation; three inches is
sufficient.
Installing the Accessory Holder
All MICROLAB systems come with an accessory holder. You can mount the
accessory holder on either the right or the left side of the instrument. Generally,
the accessory holder is mounted on the right side and is used to hold a hand probe
when the probe is not in use. To install the accessory holder, follow these steps:
1.
Locate the threaded holes on either the right or the left side of the instrument.
2.
Use a hex wrench and screws (screws are provided) to attach the holder.
Chapter 2 Installing the MICROLAB 500 System
2 –3
Artisan Technology Group - Quality Instrumentation ... Guaranteed | (888) 88-SOURCE | www.artisantg.com
Selecting a Language
The Language Selection switch is located on the back of the drive unit below the
serial number label; see Figure 2–2.
To change the displayed language, power the instrument off. Then use a
screwdriver to change the switch position. The small bump on the switch indicates
the selected position.
By changing the position of the Language Selection switch, you can view message
codes in five different languages, including English, French, German, Portuguese,
and Spanish. Switch positions for each language are shown in Table 2–1.
Table 2–1
Language Selection Switch Positions
Switch Position
Language
0
English
1
French
2
German
3
Portuguese
4
Spanish
Installing Electrical Connections
Refer to Figure 2–2 and follow these steps to install electrical connections:
1.
Plug the power cord into the power connector receptacle on the back of the drive
unit. The power cord fits into the receptacle only one way.
The power connector receptacle accepts cords for either 115V or 220V.
2.
2 –4
Plug the hand probe (or foot pedal) jack into the probe connector receptacle. The
probe connector receptacle is located on the upper right side of the drive unit.
MICROLAB 501A, 503A, and 504A User’s Manual
Artisan Technology Group - Quality Instrumentation ... Guaranteed | (888) 88-SOURCE | www.artisantg.com
3.
The controller connector receptacle is located on the back of the drive unit below
the serial number plate.
Plug the controller cord into the receptacle just as you plug a telephone cord into
a telephone outlet. Pinch the plastic locking device on the cord and insert it
into the connector receptacle. Then release the plastic locking device, firmly
attaching the cord.
Figure 2–2
Installing Electrical Connections
Accessory
Holder
Hand Probe
Connector
Receptacle
LR-52122
R
SERIAL
NO.
!
100-240
V 50-60 HZ 150 VA
MANUFACTURED BY
FUSE: T 1A/250 V
LABEL NO. 10652
CONTROLLER
R
RENO, NEVADA
LANGUAGE SELECTION SWITCH
0 = ENGLISH
1 = FRENCH
2 = GERMAN
3 = PORTUGUESE
4 = SPANISH
234
56
78
Controller Unit
Connector
Receptacle
WARNING: DISCONNECT SUPPLY BEFORE SERVICING.
HIGH LEAKAGE CURRENT-ENSURE PROPER GROUNDING.
AVERTISSEMENT: COUPER L ALIMENTATION AVANT L ENTRETIEN ET DEPANNAGE.
COURANT DEFUITE ELEVE-FOURNIER UNE MISE A LA TERRE EFFICACE.
WARNUNG: FUER SERVICEARBEITEN STROMZUFUHR UNTERBRECHEN.
HOHER LECKSTROM-GUTER ERDUNGSANSCHLUSS GEWAEHRLEISTEN.
901
Language
Selection
Switch
R
PART
NO.
Fuse Box
Power Cord
Connector
Receptacle
Chapter 2 Installing the MICROLAB 500 System
2 –5
Artisan Technology Group - Quality Instrumentation ... Guaranteed | (888) 88-SOURCE | www.artisantg.com
Installing Valve Assemblies
The MICROLAB 501A, 503A, and 504A all use different valve assemblies.
Instructions for installing valve assemblies follow.
Installing the Valve Assembly on the MICROLAB 501A
The MICROLAB 501A uses a single active valve assembly. To install the valve
assembly, follow these steps:
1.
Pick up the valve assembly. Make sure the CTFE luer fitting that attaches
to the syringe is on the bottom of the assembly.
2.
Holding the valve assembly, align the valve stem opening with the valve
motor drive port on the drive unit. Press the valve assembly into place.
3.
Push down on the valve lever to lock the valve assembly to the drive unit.
Figure 2–3
Installing a Valve Assembly on the MICROLAB 501A
Valve Stem
Valve
CTFE
Luer Fitting
R
R
Valve Motor
Drive Port
Valve Lever
Lock
2 –6
MICROLAB 501A, 503A, and 504A User’s Manual
Artisan Technology Group - Quality Instrumentation ... Guaranteed | (888) 88-SOURCE | www.artisantg.com
Installing Valve Assemblies on the MICROLAB 503A and
504A
Although the valve assemblies for the 503A and 504A units are different from one
another, their installation procedures are the same. To install a valve assembly on
either the MICROLAB 503A or 504A, follow these steps:
1.
Pick up the valve assembly. Make sure the CTFE luer fittings that attach to
the syringes are on the bottom of the assembly.
2.
Holding the valve assembly, align the valve stem openings with the valve
motor drive ports on the drive unit. If they do not align, power on and initialize
the drive unit. The valve stem openings and the drive ports align when the unit
is initialized.
3.
Insert the valve assembly into the valve motor drive ports and press the valve
assembly into place.
4.
Tighten the thumbscrew until it is finger-tight to secure the valve assembly to
the drive unit.
Figure 2–4
Installing a Valve Assembly – MICROLAB 503A and
504A
Valve Motor
Drive Ports
Valve Stem
Valve
Thumbscrew
Chapter 2 Installing the MICROLAB 500 System
2 –7
Artisan Technology Group - Quality Instrumentation ... Guaranteed | (888) 88-SOURCE | www.artisantg.com
Selecting, Installing, and Removing Syringes
Before you install syringes on any MICROLAB instrument, you must first decide
what syringes to use. Use Tables 2–2 and 2– 3 to select the best syringe for your
application. See Figures 2–5 through 2–7 for examples of different syringe types.
•
The MICROLAB 501A uses one dispenser/diluent-type syringe in the left
position. (TLL-type or TLLX-type syringes.)
•
The MICROLAB 504A uses two dispenser/diluent-type syringes—one each in
the left and right positions. (TLL-type or TLLX-type syringes.)
•
The MICROLAB 503A uses one reagent/diluent syringe in the left position and
one sample syringe in the right position. (DX-type sample syringe.)
•
As a general rule, to ensure high accuracy and precision, try to use 10% or more
of a syringe’s total volume. Consider using a different size syringe if your
application calls for driving a syringe less than 10% of its total volume and
high accuracy and precision are required.
Table 2–2
Reagent/Diluent Syringes (TLL and TLLX-types)
Syringe Sizes
Model Number
Part Number
Optimal Ranges
(µL)
25 µL
1702 TLLX
80222
2.5–25
50 µL
1705 TLLX
80922
5–50
100 µL
1710 TLLX
81022
10–100
250 µL
1725 TLLX
81122
25–250
500 µL
1750 TLLX
81222
50–500
1 mL
1001 TLLX
81323
100–1000
2.5 mL
1002 TLL
81420
250–2500
5 mL
1005 TLL
81520
500–5000
10 mL
1010 TLL
81620
1000–10,000
25 mL
1025 TLL
82521
2500–25,000
2 –8
MICROLAB 501A, 503A, and 504A User’s Manual
Artisan Technology Group - Quality Instrumentation ... Guaranteed | (888) 88-SOURCE | www.artisantg.com
Table 2–3
Sample Syringes (DX-type)
Syringe Sizes
Model Number
Part Number
Optimal Ranges
(µL)
25 µL
1702 DX
80226
2.5–25
50 µL
1705 DX
80926
5–50
100 µL
1710 DX
81026
10–100
250 µL
1725 DX
81126
25–250
500 µL
1750 DX
81226
50–500
1 mL
1001 DX
81326
100–1000
See Appendix C for information regarding replacement parts for TLL, TLLX, and
DX syringes.
Figure 2–5
The TLL-type Dispenser/Diluent Syringe
Figure 2–6
The TLLX-type Dispenser/Diluent Syringe
Figure 2–7
The DX-type Sample Syringe
Chapter 2 Installing the MICROLAB 500 System
2 –9
Artisan Technology Group - Quality Instrumentation ... Guaranteed | (888) 88-SOURCE | www.artisantg.com
Preparing Syringes for Installation
When you unpack a new syringe, notice that the syringe plunger is packed
separately from the syringe barrel. You must condition the plunger tip before
inserting the plunger into the barrel.
▲ Important
Before using a new syringe for the first time, you must
condition the syringe’s PTFE plunger tip and glass
barrel. To condition the tip and barrel, wet the plunger
tip with distilled water or a solvent. (Medical-type
silicone lubricants may be used to extend the lives of
PTFE plunger tips. However, silicone may
contaminate the plunger tips.) Do NOT use viscous
oils to lubricate plunger tips.
After wetting the plunger tip, insert the plunger into the
glass barrel. Move the plunger in and out of the glass
barrel approximately 10 times. Apply steady and even
pressure; avoid twisting movements. ▲
Installing Syringes
Follow these steps to install syringes on any MICROLAB 500 system.
1.
Condition all syringes before installation by following the procedure described
in “Preparing Syringes for Installation.”
2.
Power on the MICROLAB system using the Power On/Off switch.
3.
Press and hold the Step/Prime switch in the Step position, and move the
syringe drive arm down from the Home position. Release the switch when the
drive arm is about half-way between Home and the Down position.
2 –1 0
MICROLAB 501A, 503A, and 504A User’s Manual
Artisan Technology Group - Quality Instrumentation ... Guaranteed | (888) 88-SOURCE | www.artisantg.com
4.
Fasten the thumbscrew on the drive arm to the bottom of the syringe plunger. To
fasten the thumbscrew, hold the plunger and screw the thumbscrew into the
threaded fitting at the bottom of the syringe.
5. Pull the glass barrel up straight to the threaded female luer fitting that
extends down from the bottom of the valve. Insert the male luer fitting into the
valve fitting and turn the glass barrel clockwise until it is “finger-tight.”
See Figure 2–8, Installing a Syringe, for an illustration of these steps.
Figure 2–8
Installing a Syringe
Then, mount the Luer
Lock.
First, mount the
Thumbscrew.
Chapter 2 Installing the MICROLAB 500 System
2 –1 1
Artisan Technology Group - Quality Instrumentation ... Guaranteed | (888) 88-SOURCE | www.artisantg.com
▲ Important
Always tighten syringes so they are “finger-tight.”
Syringes that are over- or under-tightened can cause
problems for your MICROLAB 500 system.
• Syringes that are over-tightened may cause leaks or
may damage the valve.
• Syringes that are under-tightened may cause leaks.
• Syringes that are not screwed on straight may leak
and cause lateral strain on the syringe luer fitting as
it connects to the bottom of the valve. ▲
Removing Syringes
To remove syringes, reverse the installation procedure.
1.
Power on the system using the Power On/Off switch.
2.
Use the Step/Prime switch to move the syringe drive arm down from the Home
position. Release the switch when the drive arm is about half way between
Home and the Down position.
3.
Release the glass barrel by turning it counterclockwise.
4.
Unfasten the thumbscrew on the drive arm at the bottom of the syringe plunger.
To unfasten the thumbscrew, hold the plunger and unscrew the thumbscrew from
the threaded fitting at the bottom of the syringe.
Refer to Figure 2–9, Removing a Syringe, for an illustration of the removal
procedure.
2 –1 2
MICROLAB 501A, 503A, and 504A User’s Manual
Artisan Technology Group - Quality Instrumentation ... Guaranteed | (888) 88-SOURCE | www.artisantg.com
Figure 2–9
Removing a Syringe
First, remove the
Luer Lock
Then, remove the
Thumbscrew.
A
Warning!
Avoid the risk of injury or infection! Use extreme
caution when removing cracked or splintered syringes.
Always wear thick gloves and protective eye wear when
replacing syringes. A
Chapter 2 Installing the MICROLAB 500 System
2 –1 3
Artisan Technology Group - Quality Instrumentation ... Guaranteed | (888) 88-SOURCE | www.artisantg.com
Selecting and Installing Tubing
This section provides information about selecting and installing tubing on all
MICROLAB 500 systems.
Selecting Tubing
Each MICROLAB system includes two gauges of fill and dispense tubing: 12- and 18gauge. Fill tubing has a 90˚ cut on the end opposite the fitting; dispense tubing has a
tapered end opposite the fitting.
When selecting tubing, consider the volume and the viscosity of the liquid you plan
to pipette. Refer to Table 2–3, Tubing Selection Guide, for help in selecting tubing.
Table 2–4
Syringe
Size
Tubing Selection Guide
Tubing Gauge for
Standard Aqueous
Solutions
Tubing Gauge for
Viscous and
Foaming Liquids
25 µL
18
18
50 µL
18
18
100 µL
18
18
250 µL
18
18
500 µL
18
18
1 mL
18
18
2.5 mL
18
12
5 mL
12
12
10 mL
12
12
25 mL
12
12
2 –1 4
MICROLAB 501A, 503A, and 504A User’s Manual
Artisan Technology Group - Quality Instrumentation ... Guaranteed | (888) 88-SOURCE | www.artisantg.com
✱ Note: If you have a MICROLAB 503A diluter and plan to use
syringes of two different sizes, choose tubing to accommodate the
syringe with the larger volume. ✱
See Appendix C for information about ordering extra tubing.
Installing Tubing
1.
Before installing tubing lines, wet the tubing fittings.
2.
Make sure the tubing lines do not contain crimps or blockages. Crimps or
blockages can cause leaks or can cause the system to overload. If tubing is
crimped, replace it with new tubing.
▲ Important
Fasten tubing so it is finger-tight and snug enough to
prevent leaks. Avoid using tools to tighten tubing.
Excessive tightening may damage tubing or valve
fittings or flanges. ▲
3.
4.
Install the fill tubing. You can differentiate fill tubing and dispense tubing since
dispense tubing has a tapered end.
–
For all MICROLAB 500 models, install the fill tubing on the left side of the
valve. Thread the tubing fitting into the left valve port, and screw it in so
it is finger-tight.
–
For the MICROLAB 504A only, install a second fill tubing line on the right
side of the valve. Thread the tubing fitting into the right valve port, and
screw it in so it is finger-tight, just as you did on the right side.
Once the fill tubing is installed, attach a tubing clip to it. Slip the tubing clip
over the end of the tubing, then attach the clip to the side of the reservoir.
Chapter 2 Installing the MICROLAB 500 System
2 –1 5
Artisan Technology Group - Quality Instrumentation ... Guaranteed | (888) 88-SOURCE | www.artisantg.com
5.
Install the dispense tubing. You can recognize dispense tubing by its tapered end.
–
If you are using a MICROLAB 501A, install the dispense tubing on the right
side of the valve. Thread the tubing fitting into the right valve port and
screw it in so it is finger-tight. See Figure 2–10 for an illustration of the
valve and tubing connectors.
Figure 2–10
MICROLAB 501A Valve and Tubing Connections
R
–
2 –1 6
If you are using a MICROLAB 503A with a D syringe, install the dispense
tubing on the side port of the D syringe. See Figure 2–11. When using a TLL
syringe as a sampling syringe, install dispense tubing directly onto the
valve assembly. To do this, remove the valve plug and replace the plug
with dispense tubing. See Figure 2–12.
MICROLAB 501A, 503A, and 504A User’s Manual
Artisan Technology Group - Quality Instrumentation ... Guaranteed | (888) 88-SOURCE | www.artisantg.com
Figure 2–11
MICROLAB 503A Valve with a D Configuration Syringe
Insert Valve
Plug First
Figure 2–12
MICROLAB 503A Valve with Two TLLX or TLL Syringes
Remove Valve
Plug First
Chapter 2 Installing the MICROLAB 500 System
2 –1 7
Artisan Technology Group - Quality Instrumentation ... Guaranteed | (888) 88-SOURCE | www.artisantg.com
–
If you are using a MICROLAB 504A, install a tapered dispense tubing line
into each of the valve’s front ports. The front ports are located on the
bottom of the valve between the two syringes. Thread the tubing fittings
into the front ports, and screw the fittings in so they are finger-tight. See
Figure 2–13.
Figure 2–13
▲ Important
MICROLAB 504A Valve and Tubing Connectors
There are two methods of using the MICROLAB 504A
dual dispenser as a single dispenser.
Method 1: Install dispense tubing on the unused side of
the instrument and pull in distilled water from a
reservoir. Cycle the distilled water through the unused
side. Dispense the water back into the same reservoir
or into a waste container. Do not run the unused side
dry.
Method 2: Set the syringe size on the left or the right
side syringe to 0 (zero). The side that is set to 0
remains idle when you operate the instrument. ▲
2 –1 8
MICROLAB 501A, 503A, and 504A User’s Manual
Artisan Technology Group - Quality Instrumentation ... Guaranteed | (888) 88-SOURCE | www.artisantg.com
6.
Install the dispense tubing to the hand probe.
–
If you are using the MICROLAB 501A or the MICROLAB 503A, the
Concorde Probe comes as standard equipment. This probe uses a single
dispense tube. To attach the dispense tubing into the probe, loosen the
knurled screw at the upper end of the probe. Slide the tapered end of the
dispense tube through the probe so that the tubing passes out the end of the
probe. When enough tubing for you to work with extends from the probe,
tighten the knurled screw to secure the tubing line.
–
If you are using the MICROLAB 504A, the Dual Hand Probe comes as
standard equipment. This probe is designed for both 18- and 12-gauge
tubing. Use the tubing reducer (Part # 35770) that is provided with the dual
hand probe if you wish to use 18-gauge tubing. See Figure 2–14.
Figure 2–14
Using the Tubing Reducer with the Dual Hand Probe
7.
Fill out the warranty card and return it to Hamilton Company.
8.
You are now ready to use your MICROLAB 500 system.
Chapter 2 Installing the MICROLAB 500 System
2 –1 9
Artisan Technology Group - Quality Instrumentation ... Guaranteed | (888) 88-SOURCE | www.artisantg.com
Artisan Technology Group - Quality Instrumentation ... Guaranteed | (888) 88-SOURCE | www.artisantg.com
Chapter 3
Using the MICROLAB 500
System
This chapter contains information about the following topics:
• using the system—an overview
• powering on the MICROLAB 500 and default values at start
up
• priming and checking the system
• using the control keys:
–
setting syringe sizes
–
setting syringe volumes
–
setting syringe drive speeds
• sample applications
✱ Note: When using the MICROLAB 500 system,
always take care to keep the instrument clean.
Follow all instructions for using and handling the
system. ✱
3 –1
Artisan Technology Group - Quality Instrumentation ... Guaranteed | (888) 88-SOURCE | www.artisantg.com
Figure 3–1
Using the MICROLAB 500
Press the Prime Switch and start priming the instrument
Yes
Clean the
fluid path
1st time use?
No
Check the fluid path for leaks
Any leaks in
the fluid path?
Yes
Adjust
tubings,
fittings, and
syringes
No
Any bubbles
on the plunger
tip?
Yes
Clean the
fluid path
No
Halt the priming cycle
Use the control keys:
• Set syringe size(s)
• Set syringe volume(s)
• Set syringe drive speed(s)
Select an operation mode:
• Press the Up key OR
• Press the Down key OR
• Press the Auto-Refill key
Press the Run/Stop key or the
probe button to start the operation
Finished
using the
instrument?
No
Select
another
operation
Yes
When finished, flush the fluid line
and turn the instrument off
3 –2
MICROLAB 501A, 503A, and 504A User’s Manual
Artisan Technology Group - Quality Instrumentation ... Guaranteed | (888) 88-SOURCE | www.artisantg.com
Using the System—An Overview
Before using your MICROLAB 500 system, be sure you have followed the
installation instructions in Chapter 2, Installing the MICROLAB 500. Figure 3–1
provides an overview of using the system.
Powering On the MICROLAB 500
To power on the MICROLAB 500, press the Power On/Off switch located on the
front panel of the drive unit. When the instrument powers up, it performs an
electronic self-test, beeps twice, and displays the following message on the
controller unit:
Size?
✱ Note: The actual text of this message will vary according to the
language you selected using the language selection switch. For
more information, refer to “Selecting a Language” in Chapter 2. ✱
This message means that the MICROLAB is ready and waiting for you to enter the
sizes of the syringes that are installed on the drive unit (see Chapter 2, Installing
the MICROLAB 500). If you wish to run an operation, you must enter a size for at
least one of the installed syringes. Until you enter a size, only the Syringe Size keys
and the Increase and Decrease keys are available for use. The MICROLAB 500 will
not operate without at least one syringe size value. See “Setting Syringe Sizes”
later in this chapter for information about setting syringe sizes.
The first time you press the Run/Stop key after the system is powered on and after
you have entered at lease one syringe size, the system will initialize itself. Until
the system initializes itself, Up is the only available operation.
✱ Note: You can prime the instrument without entering a syringe
size, however, you cannot run an operation without first entering at
least one syringe size. ✱
Chapter 3 Using the MICROLAB 500 System
3 –3
Artisan Technology Group - Quality Instrumentation ... Guaranteed | (888) 88-SOURCE | www.artisantg.com
Priming and Checking
Prime the MICROLAB system before using it for the first time, at the start of a
work day, and between fluid changes. Run fluid through the tubing lines to ensure
that there are no bubbles or air gaps in the tubing. Check the fluid path for leaks
and clean the fluid path, if necessary.
To prime the MICROLAB and check the fluid path for leaks, follow these steps:
1.
Fill a reservoir with deionized water. Place the end of the inlet tubing in
the reservoir. Use the tubing clip to attach the tubing to the side of the
reservoir.
2.
Place the hand probe over the same reservoir or over a waste container.
3.
Push the Prime switch on the drive unit.
4.
Run the instrument in Prime mode until water flows through the entire system.
5.
If the system is airtight, the fluid path will contain a solid column of water.
–
If you see air bubbles in the fluid path, the system is not airtight. Adjust
the tubing fittings or syringes. Check that all parts are snug and fingertight.
–
If you do not see air bubbles in the fluid path, the system is airtight.
6.
If you do not see air bubbles in the fluid path, but small bubbles appear on the
PTFE surface of the syringe, clean the internal fluid path with a mild
syringe cleaner. Empty out the soapy water and rinse with deionized water to
rid the system of cleaning fluid. To clean the fluid path, follow the steps in
Chapter 4, Caring for the MICROLAB 500.
7.
After cleaning, reprime with deionized water to rinse the fluid path. Continue
priming until you do not see any bubbles.
8.
Remove the inlet tubing from the reservoir and prime air through the system.
Priming air through the system clears the fluid path of the deionized water
that you used as a rinse.
3 –4
MICROLAB 501A, 503A, and 504A User’s Manual
Artisan Technology Group - Quality Instrumentation ... Guaranteed | (888) 88-SOURCE | www.artisantg.com
9.
When the fluid path is free of deionized water, place the inlet tubing into a
reservoir of the liquid you wish to dispense or use as a diluent. Prime this fluid
through the system.
✱ Note: When priming reagent after a deionized water rinse, dispense
the first shot into a waste container, since it will contain a certain
amount of the water droplets that remained in the tubing line. ✱
10. Your MICROLAB system is clean and ready for use.
▲ Important
When priming the MICROLAB 504A dual dispenser,
always prime both syringes at the same time, or set the
volume of the unused side to zero. Do not operate
either syringe dry, as this may cause excessive wear
on the syringes and valves. ▲
Default Values
The MICROLAB 500 assumes certain default values when it is powered on. The
system uses these speeds unless you change the speed of the syringe drive arm by
using the Syringe Speed keys and the Increase or the Decrease key.
•
The Syringe Size key is active by default with a value of 1000 mL. If you are
using a dual syringe instrument, the left-side Syringe Size control is active. You
must enter a size for at least one of the installed syringes before you can operate
the instrument. If you are using a dual-syringe instrument and do not enter a size
for the second syringe, it remains inactive.
•
Syringe Volume defaults to 100% of the volume of the installed syringe, if you
do not enter a specific volume.
•
Drive arm Speed defaults to various values based on the size of the installed
syringe. See Table 3–1, Default Syringe Speed Values, for a list of the default
speed values.
Chapter 3 Using the MICROLAB 500 System
3 –5
Artisan Technology Group - Quality Instrumentation ... Guaranteed | (888) 88-SOURCE | www.artisantg.com
Table 3–1
Default Syringe Speed Values
Syringe
Size
Syringe Speed
(seconds per
stroke)
25 µL
2
50 µL
2
100 µL
2
250 µL
2
500 µL
3
1 mL
3
2.5 mL
4
5 mL
5
10 mL
6
25 mL
8
Using the Control Keys
Use the control keys to enter specific information about your application, such as
the sizes of the installed syringes, the volumes to be pipetted, the drive arm
speeds, and the desired operation.
You can change the value of any control key or you can switch operations after the
current operation completes.
3 –6
MICROLAB 501A, 503A, and 504A User’s Manual
Artisan Technology Group - Quality Instrumentation ... Guaranteed | (888) 88-SOURCE | www.artisantg.com
Setting Syringe Sizes
✱ Note: You must enter a size for the syringe(s) that are installed on
the drive unit. If you are using a dual syringe instrument, you must
enter a size for at least one of the syringes. If you do not enter a
size for the second syringe, it remains inactive. ✱
To enter a syringe size, follow these steps:
1.
Press the left or the right Syringe Size key. (The left-side Syringe Size key is
active by default when you power-on the MICROLAB 500.)
When you press a Syringe Size key, the Control Indicator, a small green light
next to the key, lights up to show you that the key is active.
2.
To increase a syringe size, press the Increase key; to decrease a syringe size,
press the Decrease key. As you press either of these keys, the Syringe Size
Indicator lights move to indicate the selected size and the size itself appears in
the Message Display Windows. As you press the Increase/Decrease key, the
displays change continuously. When either the highest or the lowest size limit
is reached, the displays automatically “wraps around”, enabling you to quickly
select the correct size for your needs.
When setting syringe sizes, you can choose from 10 different sizes that
correspond to Hamilton syringes: 25 µL, 50 µL, 100 µL, 250 µL, 500 µL, 1000 µL,
2500 µL, 5000 µL, 10,000 µL, and 25,000 µL. The default value is 1000 µL.
✱ Note: Above 500 µL, the Syringe Size Indicator light shows the
syringe size in milliliters, while the display window shows the same
size in microliters. ✱
3.
When you reach the size you need, release the Increase or the Decrease key.
4.
Verify your selection by checking the size that appears in the message display
windows.
5.
If you are using a dual syringe instrument, repeat steps 1 through 4 for the
second syringe.
Chapter 3 Using the MICROLAB 500 System
3 –7
Artisan Technology Group - Quality Instrumentation ... Guaranteed | (888) 88-SOURCE | www.artisantg.com
Setting Syringe Volumes
You can specify a volume only after you have selected and entered a size for the
corresponding syringe.
To set a volume, follow these steps:
1.
Press the left or the right Volume key. When you press the Volume key, the
Control Indicator, a small green light next to the key, lights up to show you
that the key is active.
By default, volume appears as 100% of the corresponding syringe; 100% is the
maximum allowable volume.
If you enter a volume of 0 (zero), the corresponding syringe remains inactive.
Enter a volume greater than zero to activate the syringe.
2.
To increase or decrease a volume, press the Increase or Decrease key. You can
select any volume in increments of 0.1% of the corresponding syringe. As you
press the Increase/Decrease key, the display changes continuously. When
either the highest or the lowest volume limit is reached, the display
automatically “wraps around”, enabling you to quickly select the correct
volume for your needs.
3.
When you reach the volume you need, release the Increase or the Decrease key.
4.
Verify your selection by checking the volume that appears in the message
display windows.
✱ Note: If you enter a new size for a syringe, volume automatically
changes to 100% of the new size. ✱
5.
3 –8
If you are using a dual syringe instrument, repeat steps 1 through 4 for the
second syringe.
MICROLAB 501A, 503A, and 504A User’s Manual
Artisan Technology Group - Quality Instrumentation ... Guaranteed | (888) 88-SOURCE | www.artisantg.com
Setting Syringe Drive Speeds
To change the speed of a drive arm, follow these steps:
1.
Press the left or the right drive arm Speed key by pressing it. When you press a
Speed key, the Control Indicator, a small green light next to the key, lights up
to show you that the key is active.
2.
To increase or decrease the Speed, press the Increase key or press the
Decrease key. As you press the Increase/Decrease key, the display changes
continuously. When either the highest or the lowest speed limit is reached,
the display automatically “wraps around”, enabling you to quickly select the
correct speed for your needs. Choose a drive speed anywhere from 2 to 20 seconds
per full stroke.
✱ Note: Use slower drive speeds when pipetting large volumes and/or
viscous or volatile liquids. Slower drive speeds improve accuracy
and precision. ✱
3.
When you reach the desired speed, release the Increase or the Decrease key.
4.
Verify your selection by checking the speed that appears in the message
display windows.
5.
If you are using a dual syringe instrument, repeat steps 1 through 4 for the
second syringe.
Running Operations
When you press the Run/Stop key the first time after the system is powered on and
after you have entered syringe sizes, the system initializes itself. (That is, the
drive arms move up to the Home position.) Until the system initializes itself, Up is
the default operation. After initialization, Down becomes the default operation.
Chapter 3 Using the MICROLAB 500 System
3 –9
Artisan Technology Group - Quality Instrumentation ... Guaranteed | (888) 88-SOURCE | www.artisantg.com
After you have entered any required values for the control keys, and the system has
initialized itself, you may select an operation (Down or Auto-Refill). Press the
desired operation key and then press the Run/Stop key or the probe button to start
the operation. The system beeps once at the start of each new operation.
When a Down stroke completes (this could be at any location within the drive
arm’s range of movement, depending on your specific application), the operation
automatically changes to Up. When the Up stroke completes and the syringe drive
arms return to the Home position, the operation automatically changes to Down. If
using a dual syringe instrument, both drive arms must return to the Home position.
Otherwise, Up remains the active operation.
When an operation completes, and if no volume settings have been changed, the
volume settings will be reused for the next operation. If the volume settings exceed
the volumes remaining in the syringes, the operation will not execute. Instead, the
“Exceeds Volume” error message will appear in the display windows. Use the
Run/Stop key or the Step/Prime switch to reinitialize the system, then enter new
volume settings.
Press the Run/Stop key to reinitialize the system after any error occurs. You cannot
use a probe button to reinitialize the system after an error occurs. See Chapter 5 for
more information about system messages and error recovery.
Pausing Operations
If Up, Down, or Auto-Refill is selected, you can pause the instrument during a stroke
by pressing the Run/Stop key once. Resume the operation by pressing the Run/Stop
key again. To cancel a paused operation, press any key except the Run/Stop key. If
you cancel an operation and then press the Run/Stop key, the drive arms will move
to the Home position.
If the Step/Prime switch (on the drive unit) is in use and is in the Prime position,
you cannot use the Run/Stop key to pause during a stroke or a cycle. Instead, pressing
Run/Stop causes the drive arms to continue their movement until they reach the
Home position. Then they stop.
You cannot use a probe button to pause an operation.
3 –1 0
MICROLAB 501A, 503A, and 504A User’s Manual
Artisan Technology Group - Quality Instrumentation ... Guaranteed | (888) 88-SOURCE | www.artisantg.com
Sample MICROLAB 501A Application
Configurations
Single Syringe Dispensing
When the probe button is pressed once, fluid is pulled from the reservoir into the
TLL syringe. The valve then switches to connect the fluid path from the TLL
syringe to the hand probe.
When the probe button is pressed a second time, liquid is dispensed out of the probe
tip. Figure 3–2 shows the Concorde Probe being used for single syringe dispensing.
Figure 3–2
Single Syringe Dispensing
R
Diluent
Chapter 3 Using the MICROLAB 500 System
3 –1 1
Artisan Technology Group - Quality Instrumentation ... Guaranteed | (888) 88-SOURCE | www.artisantg.com
Sample MICROLAB 503A Application
Configurations
Example 1: Dilutions
When the probe button is pressed once, the syringe drive arms move down, pulling
diluent in from the reservoir, and aspirating sample into the probe tip. Then, the
valve reverses and connects the fluid path from both syringes to the hand probe.
When the probe button is pressed a second time, the syringe drive arms move up.
Sample and diluent are dispensed and mixed together, creating a dilution.
Figure 3–3 shows the Disposable Tip Probe being used for dilutions.
Figure 3–3
Dilutions
Aspirate
Sample
3 –1 2
Dispense
Diluted
Sample
MICROLAB 501A, 503A, and 504A User’s Manual
Artisan Technology Group - Quality Instrumentation ... Guaranteed | (888) 88-SOURCE | www.artisantg.com
Example 2: Dilutions
MICROLAB 503A Example 2 follows the same procedures as those shown in
the MICROLAB 503A Example 1, except that two TLL syringes are used and the
dispense tubing is connected directly to the side of the valve assembly. To attach
tubing directly to the valve assembly, remove the plug on the side of the valve.
Replace the plug with tubing. Figure 3–4 shows the Concorde Hand Probe being used
for serial dilutions.
Figure 3–4
Serial Dilutions
Diluent
Serial Dilutions
Chapter 3 Using the MICROLAB 500 System
3 –1 3
Artisan Technology Group - Quality Instrumentation ... Guaranteed | (888) 88-SOURCE | www.artisantg.com
Sample MICROLAB 504A Application
Configurations
Example 1: Dual Dispensing
When the probe button is pressed once, the syringe drive arms move down, pulling in
two different liquids from two different reservoirs. The valves then reverse and
connect the fluid path from the syringes to the hand probe.
When the probe button is pressed a second time, the syringe drive arms move up,
dispensing the two liquids out of separate tubing lines. Figure 3–5 shows the Dual
Hand Probe being used for dual dispenses.
Figure 3–5
Diluent
Dual Dispensing
Diluent
Example 2: Using the Dual Dispenser for Single Dispensing
MICROLAB 504A Example 2 follows the same procedures as those shown in the
MICROLAB 504A Example 1, except that liquid is dispensed out of the right side
only. On the left side, a liquid is cycled from the reservoir, through the fluid path,
and back again simply to lubricate the fluid path. Figure 3–6 shows the Concorde
Hand Probe being used for single dispensing.
3 –1 4
MICROLAB 501A, 503A, and 504A User’s Manual
Artisan Technology Group - Quality Instrumentation ... Guaranteed | (888) 88-SOURCE | www.artisantg.com
Figure 3–6
Using the Dual Dispenser for Single Dispensing
Diluent
Cycle back to
reservoir
Dispense from
single reservoir
✱ Note: After the syringe size is set, the right or left syringe can
remain idle if the fill and the dispense volume for that syringe is set
to 0 (zero). Do not operate either syringe dry, as this may cause
excessive wear on the syringes and valves. ✱
Chapter 3 Using the MICROLAB 500 System
3 –1 5
Artisan Technology Group - Quality Instrumentation ... Guaranteed | (888) 88-SOURCE | www.artisantg.com
Artisan Technology Group - Quality Instrumentation ... Guaranteed | (888) 88-SOURCE | www.artisantg.com
Chapter 4
Caring for the MICROLAB 500
This chapter contains instructions on routine maintenance
procedures for the MICROLAB 500, including the following
topics:
• deciding when to clean the MICROLAB 500
• how to clean the fluid path
• how to clean syringes and tubing
• how to clean the exterior of the system
• how to store the system
• chemical compatibility of the system
✱ Note: Call Hamilton Company’s Technical Customer
Service Department at (800) 648–5950 (in the United
States and Canada) if you have questions about
maintaining your MICROLAB 500 system. ✱
4 –1
Artisan Technology Group - Quality Instrumentation ... Guaranteed | (888) 88-SOURCE | www.artisantg.com
Deciding When to Clean the MICROLAB 500
How often you clean the MICROLAB depends upon how you use the instrument and
what you use in it.
We recommend that, if you use the instrument daily, the tubing and syringes should
be purged and primed at the end of each experiment and each work shift. Clean the
system by flushing it with Hamilton Syringe Cleaner, ethanol, or a with a 10%
chlorine bleach and deionized water solution. Avoid using caustic or acidic cleaning
solutions.
▲ Important
Leave the syringes and tubing filled with deionized
water overnight. This is important if you are using
buffers or other salt solutions which could accumulate
or crystallize in the system. If buffers or other salt
solutions are left in the fluid path overnight, crystals
may form and damage the syringe plunger tip. ▲
See “Cleaning the Fluid Path of MICROLAB 500” for complete details on cleaning
the fluid path. If you still have questions, contact Hamilton Company’s
Technical/Customer Service Department at (800) 648-5950.
Cleaning the Fluid Path of the MICROLAB 500
Clean the MICROLAB 500’s fluid path before using it for the first time. Use
Hamilton Syringe Cleaning Solution to clean the fluid path. See Appendix C for
information on ordering Hamilton Syringe Cleaner.
To clean the fluid path, follow these steps:
1.
Prepare a reservoir of cleaning fluid and place the fill tubing in the cleaning
fluid reservoir. Use a tubing clip to secure the tubing to the side of the reservoir.
2.
Place the hand probe into the cleaning fluid reservoir or a waste container.
4 –2
MICROLAB 501A, 503A, and 504A User’s Manual
Artisan Technology Group - Quality Instrumentation ... Guaranteed | (888) 88-SOURCE | www.artisantg.com
3.
Press the Step/Prime switch on the drive unit to start the priming cycle.
4.
Continue the priming cycle until the fluid path is clean. The number of cycles
needed to clean the fluid path will depend on the sizes of the syringes and the
dirtiness of the system.
5.
When the fluid path is clean, press the Step/Prime switch back to the middle
position to stop the priming cycle.
6.
Move the inlet tubing from the cleaning fluid reservoir and place it into a
reservoir of deionized water.
7.
Press the Step/Prime switch to continue the priming cycle.
8.
Continue the priming cycle until the fluid path is free of all cleaning fluid.
Dispense the rinse fluid into a waster reservoir.
9.
Press the Step/Prime switch to the inactive position to stop the priming cycle.
10. Press the Step/Prime switch to the Step position and advance the syringe drive
arm to the Home position.
11. The system is now clean and ready for use.
✱ Note: When priming reagent after a deionized water rinse, dispense
the first shot into a waste container, since it will contain a certain
amount of the water droplets that remained in the tubing line. ✱
Cleaning Syringes and Tubing
A
Warning! Follow your laboratory’s safety procedures if you use the
MICROLAB 500 system to handle hazardous materials. A
When tubing and syringes come in contact with contaminated or hazardous samples,
follow safe laboratory practices in selecting and using a cleaning fluid to flush out
the tubing and syringes. Purge, clean, and decontaminate the MICROLAB 500 by
thoroughly flushing out all portions of the tubing and syringes.
Chapter 4 Caring for the MICROLAB 500
4 –3
Artisan Technology Group - Quality Instrumentation ... Guaranteed | (888) 88-SOURCE | www.artisantg.com
Use a cleaner that is compatible with the fluids previously run through the system.
Depending on the sample that is being run, you may want to use de-ionized water,
urea, ethanol, or a 10% chlorine bleach and deionized water solution as a cleaning
fluid.
Clean syringe plunger tips by soaking them in Hamilton Syringe Cleaning Solution.
If you still have questions, contact Hamilton Company’s Technical/Customer
Service Department at (800) 648-5950 (in the United States and Canada).
Cleaning the Exterior of the MICROLAB 500
A
Warning! Follow your laboratory’s safety procedures if you use the
MICROLAB 500 system to handle hazardous
materials. A
The MICROLAB 500 housing is moderately inert to chemical exposure. However,
some chemicals may discolor the surface of the unit.
If a spill occurs on the instrument’s exterior, wipe the surface immediately. Wash
the surface using a damp cloth with water and soap or use a SANI-CLOTH™. Then
dry the area. Take care that liquids do not enter the interior of the MICROLAB
500.
To disinfect the exterior surface, wipe it down with a 10% chlorine bleach and
deionized water solution. Then dry the area.
✱ Note: The cleaning guidelines presented here are meant as
guidelines only. If your particular applications require different
cleaning solutions, contact Hamilton Company for more information. ✱
4 –4
MICROLAB 501A, 503A, and 504A User’s Manual
Artisan Technology Group - Quality Instrumentation ... Guaranteed | (888) 88-SOURCE | www.artisantg.com
Chemical Compatibility
The MICROLAB 500’s fluid path consists of PTFE-based materials and
borosilicate glass. These materials are resistant to a wide variety of acids and
bases at room-to-moderate temperatures. Most chemicals do not affect PTFE at
normal operating temperatures.
▲ Important
Do not use the MICROLAB 500 for prolonged periods at
high temperatures with aromatic or highly halogenated
compounds. These compounds may cause the
MICROLAB’s fittings to swell, adversely affecting
performance and reducing the life of system
components. Appendix D, Chemical Compatibility of the
MICROLAB 500, provides a list of chemicals and their
compatibility with the MICROLAB 500 system. ▲
If you have any questions about chemical resistance to specific compounds, please
contact the Hamilton Company; check out any unusual or reactive compounds before
using them with your MICROLAB 500 system.
Storing the MICROLAB 500
For long-term storage, prime and purge the system with methanol to facilitate
drying. Remove the tubes and syringes. Cover the instrument to protect it from
damage. Store syringes in their original containers.
Chapter 4 Caring for the MICROLAB 500
4 –5
Artisan Technology Group - Quality Instrumentation ... Guaranteed | (888) 88-SOURCE | www.artisantg.com
Artisan Technology Group - Quality Instrumentation ... Guaranteed | (888) 88-SOURCE | www.artisantg.com
Chapter 5
Troubleshooting the
MICROLAB 500
This chapter contains information about the following topics:
• message codes
• troubleshooting
• technical support
• returning instruments for repair
Please read this chapter; some problems may be easily resolved
by using the information found in the message code and
troubleshooting guides.
5 –1
Artisan Technology Group - Quality Instrumentation ... Guaranteed | (888) 88-SOURCE | www.artisantg.com
Message Code Guide
The MICROLAB’s display windows provide you with system status and with error
message information.
If an error occurs, an error message appears, the system beeps three times, and all
operation and function keys are disabled. To recover from the error, reinitialize the
system by pressing the Run/Stop key. You cannot use the probe button on a hand
probe to reinitialize the system.
Table 5-1 lists the messages that may appear in the message display windows.
Table 5–1
Message Code Guide
Left Side
Display
Right Side
Display
Meaning/Action
Size?
Size?
This message appears before initialization. By
default, the size prompt appears in the left
display panel.
The system is prompting you to enter a syringe
size. If you are using a single syringe unit, enter
the syringe size.
If you are using a dual syringe unit, enter the
size of the left syringe, or press the right
syringe size selection control to enter a size for
the right syringe.
Spd xx
Spd xx
The system displays the current default speed
setting, where “xx” represents a speed from 2 to
20.
Unit
Paused
This message appears when the Run/Stop key
or the probe button is pressed during an
operation to pause the instrument. The prime
switch is inactive when the unit is paused.
continued
5 –2
MICROLAB 501A, 503A, and 504A User’s Manual
Artisan Technology Group - Quality Instrumentation ... Guaranteed | (888) 88-SOURCE | www.artisantg.com
Table 5–1
Message Code Guide (continued)
Left Side
Display
Right Side
Display
Meaning/Action
Syr
Stall
This message appears only on single-syringe
units.
The syringe is stalled.
R. Syr
Stall
This message appears only on dual-syringe
units.
The right syringe is stalled.
L. Syr
Stall
This message appears only on dual-syringe
units.
The left syringe is stalled.
Val
Stall
This message appears only on single-syringe
units.
The valve is stalled.
R. Val
Stall
This message appears only on dual-syringe
units.
The right valve is stalled.
L. Val
Stall
This message appears only on dual-syringe
units.
The left valve is stalled.
Over
Temp
The unit is overheated. Power off the unit and
allow it to cool down.
Check for the reason—is ventilation adequate?
Is the room temperature appropriate? See
Appendix A, Technical Specifications, for
information about appropriate environmental
conditions.
Resume use at a lower duty cycle.
continued
Chapter 5 Troubleshooting
5 –3
Artisan Technology Group - Quality Instrumentation ... Guaranteed | (888) 88-SOURCE | www.artisantg.com
Table 5–1
Message Code Guide (continued)
Left Side
Display
Right Side
Display
Meaning/Action
Priming
Priming
The unit is in prime or step mode. This message
is displayed until the mode is stopped.
Exceeds
Volume
The specified volume exceeds the capacity of
the syringe. Enter a new volume that is within
the capacity of the syringe.
Audible Messages
When a MICROLAB 500 system is operated via the controller unit, the system will
provide audible messages—beeps, that indicate certain events. These events are
listed in Table 5–2.
Table 5–2
Number
of Beeps
Audible System Messages
Event
2
The system beeps twice upon power-up (at the end of power-up
diagnostics).
1
The system beeps once at the start of an operation.
3
The system beeps three times if an error occurs.
5 –4
MICROLAB 501A, 503A, and 504A User’s Manual
Artisan Technology Group - Quality Instrumentation ... Guaranteed | (888) 88-SOURCE | www.artisantg.com
Troubleshooting Guide
Table 5-3 provides quick answers to help you troubleshoot your MICROLAB 500.
Table 5–3
Troubleshooting Guide
Problem
Possible Causes
Corrective Action
instrument does not
power-up
• disconnected
power cord or
faulty power
outlet
• connect power cord and check
power source
• main fuse is
blown
• check main fuse on instrument’s
rear panel; replace fuse if
necessary
instrument
functions normally,
but indicators or
message display
windows fail to
illuminate
• faulty LED or
LCD
• check to see that the controller
unit is plugged into the drive
unit
keys are nonfunctional
• instrument is in
pause mode
• if Unit Paused appears in
the display windows, press
the Run/Stop key to finish the
stroke
valve or syringe is
stalled
• internal fault
• if a Stall message appears in
the display windows,
reinitialize the system by
pressing the Run/Stop switch
• call the Hamilton Service
Department
• if message persists, call the
Hamilton Service Department
(continued)
Chapter 5 Troubleshooting
5 –5
Artisan Technology Group - Quality Instrumentation ... Guaranteed | (888) 88-SOURCE | www.artisantg.com
Table 5–3
Troubleshooting Guide (continued)
Problem
Possible Causes
Corrective Action
instrument does not
fill or dispense
• faulty or blocked
tubing; blocked or
leaky fluid path
• check tubing, valve, and
syringes for blockages, crimps,
or loose fittings; replace
tubing; either replace or reseal
valve and syringes; tighten
valve and syringes
• incorrect tubing or
syringe
connections
• check that appropriate tubing,
fittings, and syringes are used
and that they are finger-tight
• faulty keys
• call the Hamilton Service
Department
• non-functional
syringe drive(s)
• call the Hamilton Service
Department
• valves do not
rotate (valve
drives are not
engaged or valve
is faulty)
• remove and reseat valve;
tighten thumbscrew; or replace
valve
(continued)
5 –6
MICROLAB 501A, 503A, and 504A User’s Manual
Artisan Technology Group - Quality Instrumentation ... Guaranteed | (888) 88-SOURCE | www.artisantg.com
Table 5–3
Troubleshooting Guide (continued)
Problem
Possible Causes
Corrective Action
instrument gives
inaccurate or
imprecise results
• air exists in the
fluid path
• check to see that tubing ends
are totally submerged in
reagent bottles
• check to see that tubing
connections are tight; replace
if necessary
• check to see that the syringe is
installed correctly and that it
is not leaking
• replace worn or leaking valve
or tubing
• reduce the syringe drive speed
to eliminate cavitation
problems
small air gap
appears at tip of
probe tubing after
final aspiration
• incorrect size of
dispense tubing
used with syringe
• check for correct tubing and
fittings
• dirty tubing
• change or clean the tubing
• improper
aspiration
• lower the aspiration speed
• use small tapered tubing
(18-gauge) for small dispense
volumes
(continued)
Chapter 5 Troubleshooting
5 –7
Artisan Technology Group - Quality Instrumentation ... Guaranteed | (888) 88-SOURCE | www.artisantg.com
Table 5–3
Troubleshooting Guide (continued)
Problem
Possible Causes
Corrective Action
persistent air or
leaks in the fluid
path
• cavitation is
occurring; syringe
drive speed is too
high for the
current liquid
• reduce syringe drive speed, use
lower drive speeds for viscous
liquids
• loose, worn, or
incorrect tubing
fittings
• hand-tighten the fittings or
replace old tubing with new or
correct-size tubing
• damaged syringe
plunger tip
• replace plunger tip or syringe
• damaged valve
• replace valve
• inadequate
ventilation, room
temperature too
high, or duty
cycle too high
• the unit is overheated, power
it off and allow it to cool down
unit is overheated
5 –8
• resume use at a lower duty
cycle
• see Appendix A, Technical
Specifications, for information
about appropriate
environmental conditions
MICROLAB 501A, 503A, and 504A User’s Manual
Artisan Technology Group - Quality Instrumentation ... Guaranteed | (888) 88-SOURCE | www.artisantg.com
Getting Technical Support
If a problem persists even after you have attempted to correct it, contact the
Hamilton Company Instrument Service Department. To expedite service, please
have your instrument’s model and serial number ready and available. Also, please
provide application-specific information (such as syringe sizes, drive speeds, and
liquids).
In the United States:
Hamilton Company, P.O. Box 10030, Reno, Nevada 89520–0012
Telephone Numbers (in the USA and Canada):
Technical/Customer Service +1–800–648–5950 8 a.m. to 5 p.m. PST
Instrument Service +1–800–527–5269
Outside the USA and Canada:
+1–775–858–3000
Fax Number:
+1–775–856–7259
In Switzerland:
Hamilton Bonaduz AG, Ch–7402, P.O. Box 26,
Bonaduz, Switzerland
Telephone Number:
+41–81–660–60–60
Fax Number:
+41–81–660–60–70
Chapter 5 Troubleshooting
5 –9
Artisan Technology Group - Quality Instrumentation ... Guaranteed | (888) 88-SOURCE | www.artisantg.com
Returning Instruments for Repair
Before returning an instrument to Hamilton (Reno) for repair, notify Hamilton
Company’s Instrument Service Department at (800) 527–5269 (in the United States
and Canada) and request a Returned Goods Authorization Number (RGA number).
✱ Note: Do not return instruments to Hamilton Company without an
RGA number. This number assures proper tracking of your
instrument. Instruments that are returned without an RGA number
will be sent back to the customer without being repaired. ✱
▲
Important
Decontaminate the instrument and remove health
hazards, such as radiation, infectious diseases,
corrosive agents, etc. Provide a complete description
of any hazardous materials that have been used with
the instrument. ▲
▲
Important
Hamilton Company reserves the right to refuse a return
shipment of any Hamilton product that has been used
with radioactive or microbiological substances or any
other material that could be hazardous to Hamilton
employees. ▲
▲
Important
Do not return syringes, tubing, or valves with your
instrument. Hamilton Company will assume that they
pose a health hazard, and will destroy them. ▲
5 –1 0
MICROLAB 501A, 503A, and 504A User’s Manual
Artisan Technology Group - Quality Instrumentation ... Guaranteed | (888) 88-SOURCE | www.artisantg.com
Appendixes
Artisan Technology Group - Quality Instrumentation ... Guaranteed | (888) 88-SOURCE | www.artisantg.com
Artisan Technology Group - Quality Instrumentation ... Guaranteed | (888) 88-SOURCE | www.artisantg.com
Appendix A
Technical Specifications for the
MICROLAB 500
Appendix A contains the technical specifications for MICROLAB 500.
Table A–1
Technical Specifications for the MICROLAB 500
Reagent/Diluent Syringe
25 µL to 25 mL (TLL- or TLLX-type )
Reagent/Diluent Volume
Range
1 µL–25,000 µL
Sample Syringe
25 µL to 1 mL (DX-type)
Sample Volume Range
1 µL–1,000 µL
Accuracy and Precision*
See Table A-2
Resolution
.1% of syringe drive
Volume Increments
.1% of total syringe volume; adjustable
Speed**
2 to 20 seconds per full syringe stroke;
adjustable
Drive
High-precision lead screws driven by a
highly efficient stepper motor
Power Requirements
115/220 V; 50/60 Hz
(power supply automatically converts)
Power Rating
150 VA
Weight
10 lbs., 6 oz (4.7 kg)
Dimensions
Height: 13 1/8 in (33.34 cm)
Width: 6 1/8 in (15.56 cm)
Depth: 7 in (17.78 cm)
continued
A –1
Artisan Technology Group - Quality Instrumentation ... Guaranteed | (888) 88-SOURCE | www.artisantg.com
Table A–1
Technical Specifications (continued)
Shipping Dimensions
Height: 14 1/4 in
Width: 21 in
Depth: 14 1/2 in
Shipping Weight
20 lbs.
Storage Temperature Range
-20° to 50 °C, -4° to 122 °F
Operating Temperature
Range
5° to 40 °C, 41° to 104 °F
Recommended Operating
Temperature Range
18° to 25 °C, 64° to 77 °F
Humidity Range
10%–90%, non-condensing
Fluid Path
PTFE-based materials and Borosilicate
glass
**Use slower drive speeds and 12-gauge tubing with larger syringes, larger volumes (greater
than or equal to 10 mL), and with viscous or volatile fluids. Syringe sizes of 250 µL to 5 mL may
be run at speed 1.
Hamilton Company reserves the right to alter technical specifications without
notice.
Table A–2 contains specifications for syringe accuracy and precision. This
information is on file at Hamilton Company in Reno, Nevada.
Table A–2
Accuracy and Precision*
1 mL of Deionized Water at 23 °C
Percent
Stroke (%)
Accuracy
(+/-%)
Precision
1%
3%
1.5%
5%
1.2%
.5%
30%
1.0%
.2%
*Best reproducibility and accuracy are achieved at syringe stroke lengths equal to or greater
than 10% of syringe volume using Hamilton syringes. Liquid handling performance may vary
according to viscosity, temperature, and technique.
A –2
MICROLAB 501, 503, and 504 Operator’s Manual
Artisan Technology Group - Quality Instrumentation ... Guaranteed | (888) 88-SOURCE | www.artisantg.com
Appendix B
Instrument Performance Test
Reports
All instruments are subjected to quality control performance testing before they
leave Hamilton Company. Each MICROLAB 500 system is shipped with a copy of
its own performance test report. The report contains the actual results of a
gravimetric test conducted on the instrument by Hamilton Company’s Quality
Control Department.
Keep your MICROLAB 500’s performance test report for use as a benchmark of its
original precision and accuracy. You may wish to periodically test your
MICROLAB 500 and compare its current performance with its out-of-boxperformance. Remember, when you test an instrument, you must test it under the
same conditions it was originally subjected to. See your MICROLAB 500’s own
performance test report for specific details.
✱ Note: When preparing to test a MICROLAB 500 system, do not
include the first shot dispensed after system initialization as part of
the performance test. Discard the first dispensed shot, then start
the performance test. ✱
Figure B–1 shows a sample performance test report.
B –1
Artisan Technology Group - Quality Instrumentation ... Guaranteed | (888) 88-SOURCE | www.artisantg.com
Figure B–1
Sample Performance Test Report
P E R F O R M AN C E T E S T R E P O R T
Test PASSES
GRAVIMETRIC RESULTS FOR 50 Microliters
Balance: Sartorius
Model: R-160-P
Product/Model:ML/501A
Serial NO. :
xx-xxxxxxxx
Syringe Type: 1001
Syringe Maximum Volume:
Syringe Dispense Volume:
Test Method: Dispenser ✓
Part No. : xxxxx
DRIVE: SINGLE
1000 Microliters
50 Microliters
Diluter_____
Liquid Type: H20 Liquid Temperature in Centigrade: 22
Rel. liquid density at Exper. Temp. : .997801 mg/microliters
Actual Measurements in milligrams
49.93
mg
2.
50.00
49.95
mg
4.
49.89
49.91
mg
6.
49.83
49.91
mg
8.
49.81
49.88
mg
10.
49.83
1.
3.
5.
7.
9.
Mean Mass:
49.894
Experimental Vol.=
Parameter
mg
RESULTS
Standard Deviation:
50.00396
Calculated
5.929153E-02
Specification
Pass/Fail
Accuracy in %
0.008
1.200
PASS
0.119
0.500
PASS
MARIA
Date:
mg
microliters
Co of Var in %
Checked by:
mg
mg
mg
mg
mg
12/13/93
Signed:__Maria Doe_________________
The product specified above has been calibrated at ambient pressure. The calibration is performed pursuant
to ML-STD-45662, with an unbroken chain of calibrations traceable to N.I.S.T.
R
THE MEASURE OF EXCELLENCE. SM
P.O. Box 10030, RENO, NEVADA 89520 (775) 858-3000
B –2
MICROLAB 501A, 503A, and 504A User’s Manual
Artisan Technology Group - Quality Instrumentation ... Guaranteed | (888) 88-SOURCE | www.artisantg.com
Appendix C
Ordering Parts and Accessories
for the MICROLAB 500
Appendix C contains information about ordering parts and accessories for
MICROLAB 500 systems.
Table C–1
Syringe
Reagent/Diluent Syringe Replacement Parts
Part #
Description
Barrel
Size
Plunger
Plunger
Plunger
Tip
Assy.
Stop
w/o Stop
Plunger
Tip
O-ring
25 µL
80222
1702TLLX
Syringe
10280
N/A
13269
N/A
N/A
50 µL
80922
1705TLLX
Syringe
10222
N/A
1117-01
N/A
N/A
100 µL
81022
1710TLLX
Syringe
10223
N/A
1117-02
N/A
N/A
250 µL
81122
1725TLLX
Syringe
10339
N/A
1117-03
N/A
N/A
500 µL
81222
1750TLLX
Syringe
10340
N/A
1120-01
N/A
N/A
1.0 mL
81323
1001TLLX
Syringe
10341
N/A
1578-01
N/A
N/A
2.5 mL
81420
1002TLL
Syringe
10227
N/A
1360-01
N/A
N/A
5.0 mL
81520
1005TLL
Syringe
10203
13430
13230
N/A
16114
10.0 mL
81620
1010TLL
Syringe
10204
13431
13231
N/A
16104
25.0 mL
82521
1025TLL
Syringe
10448
N/A
13271
N/A
N/A
C –1
Artisan Technology Group - Quality Instrumentation ... Guaranteed | (888) 88-SOURCE | www.artisantg.com
Table C–2
Syringe
Part #
Sample Syringe Replacement Parts
Desc.
Barrel
Size
Plunger
Plunger
Plunger
Plunger
Tip
Assy.
Stop
Assembly
w/o
Plunger
Tip
O-ring
Stop
25 µL
80226
1702DX
Syringe
10436
N/A
13269
N/A
N/A
N/A
50 µL
80926
1705DX
Syringe
10437
N/A
1117-01
N/A
N/A
N/A
100 µL
81026
1710DX
Syringe
10438
N/A
1117-02
N/A
N/A
N/A
250 µL
81126
1725DX
Syringe
10439
N/A
1117-03
N/A
N/A
N/A
500 µL
81226
1750DX
Syringe
10440
N/A
1120-01
N/A
N/A
N/A
1.0 mL
81326
1001DX
Syringe
10441
N/A
1578-01
N/A
N/A
N/A
Table C–3
Valve Assemblies
Part Number
Description
35825
HV Valve (Model 501A)
35844
Diluter Valve (Model 503A)
35842
Dispenser Valve (Model 504A)
Table C–4
Part Number
Tubing
Description
240000
Fill tubing: 12-gauge 650 mm with Fittings
240010
Fill tubing: 18-gauge 650 mm with Fittings
240360
Dispense tubing: 12-gauge 900 mm with Fittings
240130
Dispense tubing: 18-gauge 900 mm with Fittings
C –2
MICROLAB 501A, 503A, and 504A User’s Manual
Artisan Technology Group - Quality Instrumentation ... Guaranteed | (888) 88-SOURCE | www.artisantg.com
Table C–5
Pipettors/Probes
Part Number
Description
35529
Concorde Push-button Hand Pipettor/Probe, Single Channel
35767
Dual Dispense Push-button Hand Pipettor/Probe
77006
Disposable Tip Push-button Hand Pipettor/Probe, 22-gauge x 900
mm tubing, 1–35 µL
77007
Disposable Tip Push-button Hand Pipettor/Probe, 22-gauge x 900
mm tubing, 1–125 µL
35899
Luer Lock Tip Push-button Hand Pipettor/Probe
35898
Viscous Sample Push Button Hand Pipettor/Probe
35770
Tubing Reducer, 18 gauge, for Dual Dispense Push-button Hand
Pipettor/Probe (1 each)
77004
Footswitch
Table C–6
Parts and Accessories
Part Number
Description
39111
Reagent Bottle Holder
35783
Accessory Holder, also known as a MICROLAB Probe Accessory
Bracket (needed with reagent bottle holder)
16500
Screw, 4–40 x 7/8 (two required to attach bracket)
88990
Tubing Clips (5-pack)
18310
Hamilton Syringe Cleaning Solution 70 cc
18311
Hamilton Syringe Cleaning Solution 500 cc
1524-01
Fuse, Slow Blow, 1 amp
6541000
Power Cord, 115 V, Three-prong, Grounded
355010
Power Cord, 220 V, Schuko
continued
Appendix C Ordering Parts and Accessories for the MICROLAB 500
C –3
Artisan Technology Group - Quality Instrumentation ... Guaranteed | (888) 88-SOURCE | www.artisantg.com
Table C–6
Parts and Accessories (continued)
Part Number
Description
69175
MICROLAB 501A, 503A, 504A User’s Manual (English version)
69181
MICROLAB 501A, 503A, 504A User’s Manual (French version)
69179
MICROLAB 501A, 503A, 504A User’s Manual (German version)
69185
MICROLAB 501A, 503A, 504A User’s Manual (Portuguese
version)
69187
MICROLAB 501A, 503A, 504A User’s Manual (Spanish version)
For more information about ordering parts and accessories, or upgrading your
MICROLAB 500 system, contact your authorized Hamilton dealer or the
Hamilton Company:
In the United States:
Hamilton Company, P.O. Box 10030, Reno, Nevada 89520–0012
Telephone Numbers (in the USA and Canada):
Technical/Customer Service +1–800–648–5950 8 a.m. to 5 p.m. PST
Instrument Service +1–800–527–5269
Outside the USA and Canada:
+1–775–858–3000
Fax Number:
+1–775–856–7259
In Switzerland:
Hamilton Bonaduz AG, Ch–7402, P.O. Box 26,
Bonaduz, Switzerland
Telephone Number:
+41–81–660–60–60
Fax Number:
+41–81–660–60–70
C –4
MICROLAB 501A, 503A, and 504A User’s Manual
Artisan Technology Group - Quality Instrumentation ... Guaranteed | (888) 88-SOURCE | www.artisantg.com
Appendix D
Chemical Compatibility of the
MICROLAB 500
The following table contains information about chemical reactivity with the
MICROLAB 500 system.
Legend
–
=
No data available
0
=
No effect, excellent
1
=
Minor effect, good
2
=
Moderate effect, fair
3
=
Severe effect, not recommended
Table D–1
Chemical Compatibility
Solvent
PTFE
Kel F
Acetaldehyde
0
0
Acetates
0
0
Acetic Acid
0
0
Acetic Anhydride
0
0
Acetone
0
0
Acetyl Bromide
0
–
Ammonia
0
0
Ammonium Hydroxide
0
0
Ammonium Phosphate
0
0
Ammonium Sulfate
0
0
Amyl Acetate
0
1
continued
D –1
Artisan Technology Group - Quality Instrumentation ... Guaranteed | (888) 88-SOURCE | www.artisantg.com
Table D–1
Chemical Compatibility (continued)
Solvent
PTFE
Kel F
Aniline
0
0
Benzene
0
2
Benzyl Alcohol
0
0
Boric Acid
0
0
Bromine
0
0
Butyl Alcohol
0
0
Butyl Acetate
0
2
Carbon Sulfide
0
0
Carbon Tetrachloride
0
1
Chloracetic Acid
0
0
Chlorine
0
1
Chlorobenzene
0
1
Chloroform
0
1
Chromic Acid
0
0
Cresol
0
1
Cyclohexane
0
1
Ethers
0
1
Ethyl Acetate
0
2
Ethyl Alcohol
0
–
Ethyl Chromide
0
1
Formaldehyde
0
0
Formic Acid
0
0
continued
D –2
MICROLAB 501A, 503A, and 504A User’s Manual
Artisan Technology Group - Quality Instrumentation ... Guaranteed | (888) 88-SOURCE | www.artisantg.com
Table D–1
Chemical Compatibility (continued)
Solvent
PTFE
Kel F
Freon
0
1
Gasoline
0
0
Glycerin
0
0
Hydrochloric Acid
0
0
Hydrochloric Acid (conc)
0
0
Hydrofluoric Acid
0
0
Hydrogen Peroxide
0
0
Hydrogen Peroxide (conc)
0
0
Hydrogen Sulfide
0
1
Kerosene
0
0
Methyl Ethyl Ketone (MEK)
0
1
Methyl Alcohol
0
1
Methylene Chloride
0
1
Naphtha
0
0
Nitric Acid
0
0
Nitric Acid (conc)
0
1
Nitrobenzene
0
1
Phenol
0
–
Pyridine
0
1
Silver Nitrate
0
1
Soap Solutions
0
0
Stearic Acid
0
–
continued
Appendix D Chemical Compatibility of the MICROLAB 500
D –3
Artisan Technology Group - Quality Instrumentation ... Guaranteed | (888) 88-SOURCE | www.artisantg.com
Table D–1
Chemical Compatibility (continued)
Solvent
PTFE
Kel F
Sulfuric Acid
0
0
Sulfuric Acid (conc)
0
0
Sulfurous Acid
0
1
Tannic Acid
0
1
Tanning Extracts
–
–
Tartaric Acid
0
1
Toluene
0
1
Triclorethylene
0
3
Turpentine
0
0
Water
0
0
Xylene
0
2
D –4
MICROLAB 501A, 503A, and 504A User’s Manual
Artisan Technology Group - Quality Instrumentation ... Guaranteed | (888) 88-SOURCE | www.artisantg.com
Glossary
active valve
A valve that allows for diversion of liquid flow from the input side to a syringe,
and from a syringe to the output side.
air gap
A segment of air that is aspirated through the probe, used to separate different
liquids in the tubing lines.
aspirate
To pick up a designated volume of sample or air through a pipette or a probe tip.
Auto-Refill
In this operation, the drive arm moves down after fluid is dispensed to
automatically refill syringes.
cavitation
An occurrence caused by applying a high vacuum to a liquid (gas dissolved in liquid
can be pulled out of solution). It generally occurs when large syringes (5 and 10 mL)
are driven at high speeds.
Concorde hand probe
The Concorde hand probe is Hamilton Company’s standard single hand-activated
probe. The tip of this probe is adjustable and allows the user to set the dispense
tubing to an angle that is comfortable for use.
control indicators
LEDs that show the active function on the controller unit.
controller unit
The device that allows the user to send operating instructions to the drive unit.
G L –1
Artisan Technology Group - Quality Instrumentation ... Guaranteed | (888) 88-SOURCE | www.artisantg.com
cycle
A series of two strokes that comprise both the up and down movements of the syringe
drive arm.
Decrease key
A control used to decrease the settings for syringe sizes, volumes, or speeds.
default
A predetermined value in a program or in computer circuitry that an operator may or
may not alter.
diluent
A liquid that is added to a sample to lessen the sample’s concentration (i.e., to
dilute the sample).
diluent syringe
A syringe that delivers a diluent. On a dual syringe unit, the diluent syringe is
usually the syringe on the left.
dilute
To reduce the concentration of solutes in a sample by adding another fluid. The fluid
that is added is called a “diluent” and may be deionized water, for example.
diluter
An instrument used to reduce the concentration of a liquid. The MICROLAB 503A is
a dual syringe diluter.
dispense
To distribute fluid in a single portion or in several increments. A diluent is
dispensed during dilution. Reagents and buffers can be mixed and dispensed
together with a sample before analysis.
dispense tubing
Tapered tubing that is attached to a hand or foot probe to deliver precise amounts of
liquid.
G L –2
MICROLAB 501A, 503A, and 504A User’s Manual
Artisan Technology Group - Quality Instrumentation ... Guaranteed | (888) 88-SOURCE | www.artisantg.com
dispenser
An instrument used to distribute liquid. The MICROLAB 501A is a single syringe
dispenser. The MICROLAB 504A is a dual syringe dispenser.
disposable tip
A throw-away probe tip used to avoid cross-contamination between samples.
display windows
The two areas on the controller unit where system messages and information
appear. Synonymous with message display windows.
Down
Describes the movement of the syringe drive arm as it moves away from the Home
position and stops at the bottom of the downward stroke.
dribbling
Describes the formation of drops at the tip of tubing as liquids are dispensed.
Generally occurs when small volumes are dispensed at low flow rates or when there
is an air leak in the tubing lines. Drop formation can adversely affect accuracy and
precision.
drive speed
Speed of the drive unit; speed is specified in seconds per full stroke. Drive arm
speeds are measured in units from 2 to 20, with 2 being the fastest speed and 20 being
the slowest speed.
drive unit
The basic body of the MICROLAB 500. Contains the electrical connectors and the
syringe drive arms.
dual dispenser
A two-syringe instrument that can dispense two different liquids at the same time.
The volumes of the liquids being dispensed do not have to be equal. The
MICROLAB 504A is a dual syringe dispenser.
duty cycle
The amount of time that an instrument is active and functioning versus the amount
of time it is inactive or idle.
Glossary
G L –3
Artisan Technology Group - Quality Instrumentation ... Guaranteed | (888) 88-SOURCE | www.artisantg.com
fill
To fill a syringe with a volume of liquid that is pulled in from a reservoir via fill
tubing. Drive arms move the syringes down, pulling liquid up through the tubing
and into the syringe.
fill tubing
A tubing line that connects the liquid reservoir to the inlet valve port.
fluid path
The inside surfaces of the valve, syringes, and tubing that contact liquid.
footswitch
A foot-activated device used to operate the MICROLAB 500.
hand probe
See probe
Home position
The position of the syringe drive arms when they are at the top of their range of
movement.
inactive valve
A valve with one fixed flow passage; it cannot be used for liquid distribution.
Increase key
A control used to increase the syringe size, volume, or speed settings.
initialize
To establish the basic conditions for starting an operation.
LED
Light Emitting Diode used for indicator lights on the MICROLAB 500.
luer fitting
The standard “twist and lock” type of fitting..
message display windows
The two areas on the controller unit where system messages and information
appear.
G L –4
MICROLAB 501A, 503A, and 504A User’s Manual
Artisan Technology Group - Quality Instrumentation ... Guaranteed | (888) 88-SOURCE | www.artisantg.com
MICROLAB 501A
Hamilton Company’s single syringe dispenser.
MICROLAB 503A
Hamilton Company’s dual syringe diluter/dispenser.
MICROLAB 504A
Hamilton Company’s dual syringe dispenser.
operation
The Up, Down, Auto-Refill, or Prime functions performed by the MICROLAB 500
systems.
operation indicator lights
LED lights that show the current functions being performed by a MICROLAB 500 system.
operation keys
The Up, Down, and Auto-Refill images on a MICROLAB 500 controller unit. Each
image represents a function; press on the image to activate the function.
overload
A stall in syringe plunger movement that may be caused by excess mechanical
friction, excess syringe speed, or a blockage in the valves, tubing or syringes.
pipette
To measure a fixed amount of liquid with a probe.
power-down
To turn off an electrical device.
Power Indicator light
A LED on the drive unit that shows whether or not the MICROLAB system is
powered on.
Power On/Off switch
A switch used to turn the MICROLAB system on.
power-on
To turn on an electrical device.
Glossary
G L –5
Artisan Technology Group - Quality Instrumentation ... Guaranteed | (888) 88-SOURCE | www.artisantg.com
prime
To make an instrument ready for operation by running fluid through the tubing lines
of an instrument to ensure that neither bubbles nor air gaps exist in the tubing lines.
You must prime the system prior to use and between fluid changes.
prime mode
The process of priming an instrument.
probe
A hand-held device that contains dispense tubing. Each probe also has a button
that can be used to control the drive unit.
reagent/diluent syringes
Syringes that pick up and dispense reagent and diluent. The GASTIGHT TLL-type
and TLLX-type syringes are reagent/diluent syringes.
reservoir
A container that holds system fluid (diluent).
Returned Goods Authorization Number (RGA#)
A number, assigned by the Hamilton Company, that is used to trace your instrument
in the event it is returned for repair.
Run/Stop key
A control used to start, stop, or pause an operation on the MICROLAB 500.
sample syringe
A syringe used to pick up a liquid sample. GASTIGHT “D” configuration syringes
with side ports are sample syringes. On a dual syringe unit, the sample syringe is
usually placed on the instrument’s right side.
Speed key
A key located on the controller unit used to select the speed function.
step
Movement of the drive arms that occurs when the Step/Prime switch is held down.
The Step mode is often used to position the drive arm before changing syringes.
G L –6
MICROLAB 501A, 503A, and 504A User’s Manual
Artisan Technology Group - Quality Instrumentation ... Guaranteed | (888) 88-SOURCE | www.artisantg.com
stroke
Full movement of the syringe drive arm in one direction only; half of the drive
arm’s cycle. See also cycle.
syringe drive arm(s)
The arms to which syringes connect. The movement of the syringe drive arms
displaces fluid, drawing it through the system.
Syringe Size key
A key located on the controller unit used to select the syringe size function.
system fluid
Refers to the fluid originating from a reservoir, pumped through the entire system.
tubing clip
A device that attaches to the side of the reservoir and holds tubing lines in place.
Up
The function that moves the syringe drive arms to the Home position.
valve
The device that directs the flow of liquid through the system.
valve port
Openings in the valve assembly through which liquid flows. As the valve turns,
ports are opened or closed, directing the flow of liquid through the system.
Volume key
A key located on the controller unit used to select the syringe volume function.
Glossary
G L –7
Artisan Technology Group - Quality Instrumentation ... Guaranteed | (888) 88-SOURCE | www.artisantg.com
Artisan Technology Group - Quality Instrumentation ... Guaranteed | (888) 88-SOURCE | www.artisantg.com
Index
I
A
increase key, 1-17
Auto-Refill key, description of,
1-21
installing
accessory holder, 2-3
electrical connections, 2-4
C
syringes, 2-10 to 2-12
checking the system for leaks, 3-4
tubing, 2-15
cleaning. See Instruments, cleaning
Concorde Push-button Hand
Pipettor/Probe, 1-22
valve assemblies, 2-6
instruments
chemical compatibility of, 4-5,
D-1 to D-4
controller unit
connector receptacle, 1-14, 2-5
cleaning
description of, 1-16
exterior of, 4-4
D
default values for drive speeds, 3-6
fluid path of, 4-2
Down key, description of, 1-20
syringes and tubing, 43,
F
footswitch, description of, 1-24
when to clean, 4-2
function control keys, 1-17
performance test reports, B-1 to
B-2
fuse box, 1-13
quality control testing, B-1
H
servicing, 5-9, 5–10
hand probe connector receptacle,
1-13, 2-4
storing, 4-5
L
language selection switch, 1-13,
2-4
I N –1
Artisan Technology Group - Quality Instrumentation ... Guaranteed | (888) 88-SOURCE | www.artisantg.com
M
S
message display windows,
description of, 1-17
selecting
messages,
installation location, 2-3
languages, 1-13, 2-4
audible, 5-4
tubing, 2-14
code guide, 5-2 to 5-4
setting syringe volumes, 3-8
troubleshooting, 5-5
single syringe instruments,
references to, PR-5
MICROLAB 500 system
descriptions, PR-2
MICROLAB 504A, using as a single
dispenser, 2-19
speed size keys, description of,
1-19
step mode, 1-15
O
step/prime switch, description of,
1-14
operation, running, 3-9 to 3-10
syringe drive
operation keys, description of, 1-20
overview of the MICROLAB 500
series of instruments, PR-3
P
arms, 1-15
speeds, setting, 3-9
syringe size keys, description of,
1-18
syringes,
pausing an operation, 3-10
cleaning, 4-3
power cord connector receptacle,
1-13, 2-4
installing, 2-10 to 2-12
power on/off switch, 1-14, 3-3
precautions about removing,
2-13
preparing syringes for installation,
2-10
preparing for installation, 2-10
prime mode, description of, 1-15
priming the system, 3-4
probe button functions, 1-24, 3-10
probes, 1-22 to 1-24
removing, 2-12 to 2-13
selecting, 2-8 to 2-9
system
descriptions, PR-3
overview of, 3-3
R
powering on, 3-3
recovering from errors, 3-10
speed default values, 3-5
removing syringes, 2-12 to 2-13
returned goods authorization
number, 5-10
Run/Stop, description of, 1-21
running an operation, 3-9
I N –2
MICROLAB 501A, 503A, and 504A User’s Manual
Artisan Technology Group - Quality Instrumentation ... Guaranteed | (888) 88-SOURCE | www.artisantg.com
T
technical support, telephone
numbers for, 5-9
troubleshooting guide, 5-5
tubing
cleaning, 4-3
difference between fill and
dispense, 2-14, 15
installing, 2-15 to 2-19
selecting 2-14 to 2-15
U
Up key, description of, 1-20
upgrading the MICROLAB 500
system, PR-3
V
valve assembly, 1-15
valve assembly, installing, 2-6 to
2-7
volume keys, description of, 1-18
W
writing conventions, PR-5
Index
I N –3
Artisan Technology Group - Quality Instrumentation ... Guaranteed | (888) 88-SOURCE | www.artisantg.com
Artisan Technology Group is your source for quality
new and certified-used/pre-owned equipment
• FAST SHIPPING AND
DELIVERY
• TENS OF THOUSANDS OF
IN-STOCK ITEMS
• EQUIPMENT DEMOS
• HUNDREDS OF
MANUFACTURERS
SUPPORTED
• LEASING/MONTHLY
RENTALS
• ITAR CERTIFIED
SECURE ASSET SOLUTIONS
SERVICE CENTER REPAIRS
Experienced engineers and technicians on staff
at our full-service, in-house repair center
WE BUY USED EQUIPMENT
Sell your excess, underutilized, and idle used equipment
We also offer credit for buy-backs and trade-ins
www.artisantg.com/WeBuyEquipment
InstraView REMOTE INSPECTION
LOOKING FOR MORE INFORMATION?
Visit us on the web at www.artisantg.com for more
information on price quotations, drivers, technical
specifications, manuals, and documentation
SM
Remotely inspect equipment before purchasing with
our interactive website at www.instraview.com
Contact us: (888) 88-SOURCE | [email protected] | www.artisantg.com