1
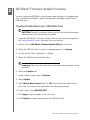
WD BLACK² TM Fusion and Dual Drive Configuration for Mac® Installation Guide WD Service and Support Should you encounter any problem, please give us an opportunity to address it before returning this product. Most technical support questions can be answered through our knowledge base or e-mail support service at http://support.wd.com. If the answer is not available or, if you prefer, please contact WD at the best telephone number shown below. Your product includes 30 days of free telephone support during the warranty period. This 30-day period starts on the date of your first telephone contact with WD technical support. E-mail support is free for the entire warranty period and our extensive knowledge base is available 24/7. To help us keep you informed of new features and services, remember to register your product online at: https://www.wd.com/register. Accessing Online Support Visit our product support website at http://support.wd.com and choose from these topics: Downloads - Download drivers, software, and updates for your WD product. Registration - Register your WD product to get the latest updates and special offers. Warranty & RMA Services - Get Warranty, Product Replacement (RMA), RMA Status, and Data Recovery Information. Knowledge Base - Search by keyword, phrase, or answer ID. Installation - Get online installation help for your WD product or software. WD Community – Share your thoughts and connect with other WD users. Contacting WD Technical Support When contacting WD for support, have your WD product serial number, system hardware, and system software versions available. United States/North America English 800.ASK.4WDC (800.275.4932) Spanish 800.832.4778 Asia Pacific (toll free where +800.6008.6008 available) Asia Pacific (non toll free) +65.6848.6008 Japan 00 531 650442/ 0120 994 120 Australia & New Zealand +800.2275.4932 South America http://support.wd.com/contact Europe (toll free*) 00800.27549338 * Austria, Belgium, Denmark, France, Germany, Ireland, Italy, Netherlands, Norway, Spain, Sweden, Switzerland, United Kingdom Europe (non toll free) Russia Middle East +31.880062100 8 10 8002 335 50110 0031.880062100 Table of Contents 1 Getting Started . . . . . . . . . . . . . . . . . . . . . . . . . . . . . . . . . . . . . . . . . . . . . . . . . . . 1 2 WD Black² Firmware Update Procedure . . . . . . . . . . . . . . . . . . . . . . . . . . . . . . 3 Creating the Bootable Linux USB Flash Drive . . . . . . . . . . . . . . . . . . . . . . . . . . . . . . . . . . . . . . . . . . 3 Installing the Linux ISO Image on the USB Flash Drive . . . . . . . . . . . . . . . . . . . . . . . . . . . . . . . . . . . 4 Update the Drive Firmware . . . . . . . . . . . . . . . . . . . . . . . . . . . . . . . . . . . . . . . . . . . . . . . . . . . . . . . . . 7 3 Setting Up the WD Black² Drive . . . . . . . . . . . . . . . . . . . . . . . . . . . . . . . . . . . . . 9 Preparing your WD Black2 Drive . . . . . . . . . . . . . . . . . . . . . . . . . . . . . . . . . . . . . . . . . . . . . . . . . . . . 10 Configuring the WD Black2 Drive . . . . . . . . . . . . . . . . . . . . . . . . . . . . . . . . . . . . . . . . . . . . . . . . . . . 12 Create a Mac Fusion Drive . . . . . . . . . . . . . . . . . . . . . . . . . . . . . . . . . . . . . . . . . . . . . . . . . . . . . . . . . . . . 12 Create a Dual Drive (Non-Fusion) . . . . . . . . . . . . . . . . . . . . . . . . . . . . . . . . . . . . . . . . . . . . . . . . . . . . . . 14 Verify Creation of a Fusion Drive or Dual Drive (Non-Fusion) . . . . . . . . . . . . . . . . . . . . . . . . . . . . 15 4 Restoring the Master Drive Image to the WD Black² Drive . . . . . . . . . . . . . . 17 Restoring to a Fusion Drive . . . . . . . . . . . . . . . . . . . . . . . . . . . . . . . . . . . . . . . . . . . . . . . . . . . . . . . . 19 Restoring to a Dual Drive (Non-Fusion) . . . . . . . . . . . . . . . . . . . . . . . . . . . . . . . . . . . . . . . . . . . . . . 20 iii WD Black² Fusion and Dual Drive Configuration for Mac Installation Guide iv 1 Getting Started This document is intended to guide you through the process of installing your new WD Black² as a Mac Fusion or dual drive (non-Fusion) configuration. Important: To install the WD Black² dual drive, you must have a Mac System that supports a 9.5 mm (2.5") drive with Mavericks OSX 10.9.x. Items needed to perform this process: A Phillips screwdriver with “0” tip head SATA to USB adapter cable (included in retail box) Image Backup of Mac System drive (Refer to your Apple system documentation for information on using Time Machine.) A blank 2 GB, or larger, USB flash drive Download the following zip files to your local drive. These will be needed in the procedures that follow. WD Black² Firmware Update for Mac WD Black² Configuration Utilities for Mac GETTING STARTED 1 WD Black² Fusion and Dual Drive Configuration for Mac Installation Guide GETTING STARTED 2 2 WD Black² Firmware Update Procedure You must update the WD Black² drive firmware before setting up or configuring the drive. Updating the WD Black² drive firmware requires creating a bootable Linux USB flash drive. Creating the Bootable Linux USB Flash Drive CAUTION: During this procedure, all data on your flash drive will be erased. Please backup your data before you proceed. 1. Locate the WD_Black2_Firmware_Update_Utility zip file that you downloaded in the “Getting Started” section, and unzip it on your desktop. 2. Double-click the WD Black2 Firmware Update Utility file to mount it. 3. Plug in the USB flash drive. If a pop up message appears, click Ignore. 4. Launch the Disk Utility (Applications > Utilities). 5. Select the USB flash drive in the left pane. Important: Verify the correct flash drive is selected or the wrong disk will be formatted. 6. Select the Partition tab. 7. Under Partition Layout, select 1 Partition. 8. Select Options. 9. Select Master Boot Record, then click OK. Enter a temporary name for the flash drive. This name will be overwritten in the following procedure. 10. Under Format, select MS-DOS (FAT). 11. Click Apply to apply changes to your flash drive. 12. Click Partition to create the partition on the USB flash drive. WD BLACK² FIRMWARE UPDATE PROCEDURE 3 WD Black² Fusion and Dual Drive Configuration for Mac Installation Guide Installing the Linux ISO Image on the USB Flash Drive 1. The WD Black2 Firmware Update Utility file should be mounted in Disk Utility under the divider line on the left side. Select the mounted partition WD_LINUX. Note: If WD Black2 Firmware Update Utility is not mounted in Disk Utility, you will need to double click the file to mount it, as stated in Step 2 on page 3. 2. Select the Restore tab. The WD_LINUX volume name appears in the Source field. WD BLACK² FIRMWARE UPDATE PROCEDURE 4 WD Black² Fusion and Dual Drive Configuration for Mac Installation Guide 3. To select a destination volume, drag the partition with the temporary name you gave the flash drive in Step 9 on page 3, from the list on the left to the Destination field. 4. Click Restore. The following message appears. 5. Click Erase to confirm that you want to erase your USB flash drive. The Linux ISO is restored to the USB flash drive which is now bootable. 6. If the following screen appears prompting for a password, Enter the administrator password that you created for the Mac. WD BLACK² FIRMWARE UPDATE PROCEDURE 5 WD Black² Fusion and Dual Drive Configuration for Mac Installation Guide Allow approximately 4 minutes for Linux to load onto the USB flash drive. When complete, the USB bootable Linux flash drive is ready to boot to Linux and update the firmware. WD BLACK² FIRMWARE UPDATE PROCEDURE 6 WD Black² Fusion and Dual Drive Configuration for Mac Installation Guide Update the Drive Firmware 1. Shut down your system. 2. Remove the USB flash drive before performing step 3 of this procedure. 3. Remove the original system drive from your Mac system and replace it with the WD Black². Note: Refer to your Apple System documentation for hard drive removal and installation instructions. 4. Re-insert the USB flash drive in a USB port on your Mac system. 5. Press the power button and hold the option key during boot-up for the boot menu. The following screen appears. 6. Select EFI Boot to boot from the USB flash drive.The drive update will start automatically. Note: The update will take a few minutes. 7. When the update is complete, the message “Drive has been successfully updated” appears. Press any key to shut down your system. 8. Remove the USB flash drive. It is no longer needed. 9. Continue to Chapter 3, “Setting Up the WD Black² Drive.” WD BLACK² FIRMWARE UPDATE PROCEDURE 7 WD Black² Fusion and Dual Drive Configuration for Mac Installation Guide WD BLACK² FIRMWARE UPDATE PROCEDURE 8 3 Setting Up the WD Black² Drive Follow these instructions to boot the Mac system from the original system drive using the SATA to USB cable. 1. Attach the original system drive to your Mac system using the SATA to USB cable. 2. To boot from your original system drive, press the power button while pressing and holding the option key on the keyboard. After the Apple logo appears, the following drive icons will appear. 3. Select the drive icon labeled with your “original drive name”, to continue the boot process. After the boot process completes, the following dialog box may appear. 4. If the above dialog box appears, click Ignore. The drive will be initialized in a subsequent step. SETTING UP THE WD BLACK² DRIVE 9 WD Black² Fusion and Dual Drive Configuration for Mac Installation Guide Preparing your WD Black2 Drive Before configuring the WD Black² Drive in the next section, you must first prepare the drive. This will expand the drive's capacity to 1.12 TB. 1. Locate the WD_Black2_Configuration_Utility zip file that you downloaded in the “Getting Started” section, and unzip it on your desktop. 2. Select and run the WD Black2 Dual Drive Initialize utility to expand the extended drive capacity to 1.12 TB. 3. Read the warning message, then click Continue to initialize the WD Black² Dual Drive. When the Black2 Dual Drive has been initialized, the following screen appears. SETTING UP THE WD BLACK² DRIVE 10 WD Black² Fusion and Dual Drive Configuration for Mac Installation Guide 4. Click Continue to reboot, then press and hold the Mac keyboard option key until the boot option screen appears. Note: The System Reboot allows the Mac OSX to display the extended combined SSD and HDD drive capacity. 5. Select the drive icon labeled with your “original drive name”, to continue the boot process. After the system completes the reboot process, the following dialog box may appear. 6. If the above dialog box appears, click Ignore. The drive will be initialized in a subsequent step. SETTING UP THE WD BLACK² DRIVE 11 WD Black² Fusion and Dual Drive Configuration for Mac Installation Guide Configuring the WD Black2 Drive How you configure a WD Black² drive for use in a Mac system depends on how much control you want over your data. You have two options. Option 1: Creating a Mac Fusion Drive Choose this option if you want your OS to determine which data gets placed on the HDD and SSD. To create a Fusion Drive, see “Create a Mac Fusion Drive.” Option 2: Creating a Dual Drive (Non-Fusion Drive) Choose this option if you want to decide where your data goes (e.g. keep your OS on the SSD, and your data on the HDD). Note: Option 2 is not recommended if you have more than 120 GB on your original device. For example: - Depending on the restore software used, you may not be able to exclude files to make everything fit in the 120 GB partition. -You may also need to re-install some software if your original hard drive image is more than 120GB. To create a Dual Drive, see “Create a Dual Drive (Non-Fusion)” on page 14. Create a Mac Fusion Drive To create a Fusion drive, use the Create Core Storage Volume utility. 1. Locate the WD Black² Configuration Utility that you downloaded from the “Getting Started” section, and unzip it on your desktop. 2. Double-click the Create Core Storage Volume utility. A warning message appears. SETTING UP THE WD BLACK² DRIVE 12 WD Black² Fusion and Dual Drive Configuration for Mac Installation Guide 3. Read the warning message and click OK. In a few minutes the following message will appear, indicating that the Fusion drive was successfully created. 4. Click OK. 5. To verify your configuration, continue to the section, “Verify Creation of a Fusion Drive or Dual Drive (Non-Fusion).” SETTING UP THE WD BLACK² DRIVE 13 WD Black² Fusion and Dual Drive Configuration for Mac Installation Guide Create a Dual Drive (Non-Fusion) To create a Dual Drive (Non-Fusion), use the Create Dual Drive Volumes utility. 1. Locate the WD Black² Configuration Utility that you downloaded from the “Getting Started” section, and unzip it on your desktop. 2. Double-click the Create Dual Drive Volumes utility. A warning message appears. 3. Read the warning message and click OK. In a few minutes the following message will appear, indicating that the Dual Drive was successfully created. 4. Click OK. 5. To verify your configuration, continue to the section, “Verify Creation of a Fusion Drive or Dual Drive (Non-Fusion).” SETTING UP THE WD BLACK² DRIVE 14 WD Black² Fusion and Dual Drive Configuration for Mac Installation Guide Verify Creation of a Fusion Drive or Dual Drive (Non-Fusion) To verify that the Fusion Drive or Dual Drive (Non-Fusion) drive was created properly, do the following: 1. Click the Apple icon located on the top left corner of the screen, and select About This Mac from the drop-down menu. 2. Click the More Info... button and then select the Storage tab. If everything was created correctly, you should see the following images depending on your configuration. Fusion Drive Dual Drive (Non-Fusion) SETTING UP THE WD BLACK² DRIVE 15 WD Black² Fusion and Dual Drive Configuration for Mac Installation Guide SETTING UP THE WD BLACK² DRIVE 16 4 Restoring the Master Drive Image to the WD Black² Drive After successfully configuring your drive, follow the instructions below to restore your original system drive image to the newly setup WD Black2. 1. Shut down your Mac. 2. Press the power button, then press and hold the option key on the keyboard. 3. Select the Recovery drive icon. The OSX Utilities Window appears. RESTORING THE MASTER DRIVE IMAGE TO THE WD BLACK² DRIVE 17 WD Black² Fusion and Dual Drive Configuration for Mac Installation Guide 4. From the OSX Utilities Window, select the Disk Utility icon and click the Continue button. (a) If you are restoring a Fusion Drive, continue to “Restoring to a Fusion Drive.” (b) If you are restoring a Dual Drive (Non-Fusion), skip to “Restoring to a Dual Drive (NonFusion)” on page 20. RESTORING THE MASTER DRIVE IMAGE TO THE WD BLACK² DRIVE 18 WD Black² Fusion and Dual Drive Configuration for Mac Installation Guide Restoring to a Fusion Drive After clicking Continue in Step 4 above, the below screen appears. 1. In the left window pane, select the USB drive partition containing the Mac OSX operating system, and then click the Restore tab at the top of this window, next to the RAID tab. The USB partition will appear in the Source field. 2. In the left window pane, drag the WD Black² partition at the top of the list to the Destination field, and click the Restore button. RESTORING THE MASTER DRIVE IMAGE TO THE WD BLACK² DRIVE 19 WD Black² Fusion and Dual Drive Configuration for Mac Installation Guide 3. A warning message displays informing you that the partition will be erased. Click OK and wait for the restore process to finish. 4. When the restore process is finished, shut down your Mac and disconnect the original USB attached drive. You are now finished and can begin using your Mac. Restoring to a Dual Drive (Non-Fusion) Important: To restore your original disk image to the SSD portion of the Black2 dual drive in a Dual Drive (Non-Fusion) configuration, the original disk image MUST be smaller than 120 GB. Verify this before continuing. After clicking Continue from the OSX Utilities Window in Step 4 on page 18, the below screen appears. 1. In the left window pane, select the USB drive partition containing the Mac OSX operating system, and then click the Restore tab at the top of this window, next to the RAID tab. The USB partition will appear in the Source field. RESTORING THE MASTER DRIVE IMAGE TO THE WD BLACK² DRIVE 20 WD Black² Fusion and Dual Drive Configuration for Mac Installation Guide 2. In the left window pane, drag the SSD partition at the top of the list to the Destination field, and click Restore. 3. A warning message displays informing you that the partition will be erased. Click OK and wait for the restore process to finish. 4. When the restore process is finished, shut down your Mac and disconnect the original USB attached drive. You are now finished and can begin using your Mac. RESTORING THE MASTER DRIVE IMAGE TO THE WD BLACK² DRIVE 21 For service and literature: http://support.wd.com www.wd.com 800.ASK.4WDC North America (800.275.4932) 800.832.4778 Spanish +86.21.2603.7560 Asia Pacific 00800.27549338 Europe (toll free where available) +31.880062100 Europe/Middle East/Africa Information furnished by WD is believed to be accurate and reliable; however, no responsibility is assumed by WD for its use nor for any infringement of patents or other rights of third parties which may result from its use. No license is granted by implication or otherwise under any patent or patent rights of WD. WD reserves the right to change specifications at any time without notice. Western Digital, WD, and the WD logo are registered trademarks of Western Digital Technologies, Inc. in the U.S. and other countries: and WD Black² is a trademark of Western Digital Technologies, Inc. in the U.S. and other countries. Other marks may be mentioned herein that belong to other companies. © 2014 Western Digital Technologies, Inc. All rights reserved. Western Digital 3355 Michelson Drive, Suite 100 Irvine, California 92612 U.S.A. 2779-800001-A05 Aug 2014