1
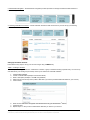
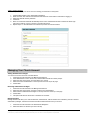
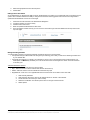
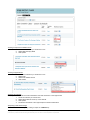
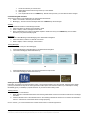
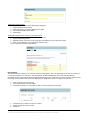
Administrator Training Manual
The Bible Study Manager is the “control room” of LifeBibleStudy. In the Bible Study Manager, the administrator for the church
will be able to add new teachers, manage calendars, communicate with teachers, and much more.
The administrator is defined as the best person to be in charge of managing the teaching calendar and teacher list. Teachers
will also be able to access the system to prepare lessons and preview overviews for the whole year.
Table of Contents
Getting Started
Logging In
Bible Study Manager Home Page
Setting Up the Church Account
1
2
2
Managing Your Church Account
Adding or Changing an Administrator
Manage Teachers
Manage Teaching Schedule
Communicating with Teachers
Viewing and Printing Lessons
Parent Page
Idea Exchange
3
3
4
6
7
8
9
Managing Your Administrator Account
Forgot your Password
Changing your Password
Forgot your Username
Changing your Username
10
10
10
10
Getting Started
Logging-in
You will receive an email from LifeBibleStudy with instructions for logging into your account.
1.
2.
3.
4.
5.
Click the link in the email
Enter your full email address and your password for the NEW Online Delivery System (Note: the password is
password for the first time you log in. You will be prompted to change it once logged in)
Click Login
Accept the terms of the LifeBibleStudy License Agreement
Change your password
Bible Study Manager Home Page
The home page for your account provides an easy layout to all your needed information. The first time you log in you will see
instructions for setting up your account. After the initial setup, the home page will be laid out in 3 main sections:
1. Your Account Information & Help
2. Administrator Navigation
3. Teaching Calendars and Lessons
1.
Your Account Information & Help – modify your account information and access Help at the top right hand corner
Copyright © Clarity Publishers, Inc., 2009. All rights reserved. Permission is granted for reproduction only for the study of LifeBibleStudy 1
curriculum by a licensed church during the licensed year. No online or other duplication is permitted.
2. Administrator Navigation – the administrator navigation provides quick links to manage and utilize the main features of
LifeBibleStudy.
3. Teaching Calendars and Lessons – access calendars and lessons with one click once you have set up your teaching
calendars.
Setting Up the Church Account
Follow these 2 easy steps to set up your account to begin using LifeBibleStudy.
STEP 1: Creating a Calendar
The first step is creating your calendar. A calendar is a teacher or group of teachers teaching a specific study. You can set up
one calendar for your whole group or break up each of your classes into individual calendars.
1.
2.
3.
4.
5.
Click Add New Calendar
Create a Calendar Name (example: John Smithʼs Class)
Enter a description (example: 11:00 AM Young Married)
Select a study from the drop down (Call 877.265.1605 if you wish to purchase additional studies for your account)
Click Continue
6.
7.
8.
Enter the start date for the study (Note: the start date is the day you will teach the 1 lesson)
Click Save Date
Repeat steps 1-7 until you have created all the calendars you need for your account
st
Copyright © Clarity Publishers, Inc., 2009. All rights reserved. Permission is granted for reproduction only for the study of LifeBibleStudy 2
curriculum by a licensed church during the licensed year. No online or other duplication is permitted.
STEP 2: Adding Teachers
The next step to setting up your church account is adding your teachers into the system.
1.
2.
3.
4.
5.
6.
Click Add New Teacher in the Administrator Navigation
Enter first name, last name and email address that will serve as the teacherʼs username for logging in
Select the calendar that they will teach
Click Save
Note: an instructional email will automatically be sent to the email address entered. Uncheck the Send Login
Instruction e-mail box if you do not wish to send the instructions.
Repeat steps 1-7 until all teachers are entered and proceed to instructions below
Managing Your Church Account
Adding Administrator Privileges
Your account can have more than one administrator.
1. Click View Account Teachers in the Manage Teachers box
2. If the Administrator is new to the account, click Add New Teacher and follow prompts
3. Select the name of the person once the teacher is in your list
4. Select “Promote to Administrator” in the drop down box at the top of the page
5. Click Submit
Removing Administrator Privileges
1. Click View Account Teachers in the Manage Teachers box
2. Select the name of the person you wish to remove as an administrator
3. Select “Remove Administrator Privileges” in the drop down box at the top of the page
4. Click Submit
5. This person will still have the access to calendars as a teacher.
Manage Teachers
Manage teachers will allow you to add new teachers, email teachers, remove teachers from calendars, promote or demote
administrator privileges, resend the instructional email and delete teachers from your account.
1.
2.
Click View Account Teachers in the Administrator Navigation
Select the teacher or teachers you need to modify
Copyright © Clarity Publishers, Inc., 2009. All rights reserved. Permission is granted for reproduction only for the study of LifeBibleStudy 3
curriculum by a licensed church during the licensed year. No online or other duplication is permitted.
3.
4.
Select the appropriate task from the drop down
Click Submit
Editing Teacher Information
As an administrator you will have the ability to edit an email address for a teacher if you accidentally enter it incorrectly into the
system. Note: Teachers will have the ability to change their information when logged into their account. Encourage them to
update their email address on their own if it changes.
1.
2.
3.
4.
5.
Click View Account Teachers in the Administrator Navigation
Locate the teacher you need to modify
Click Edit next to their name
Enter the updated email address and click Save
Once the email is entered correctly you can choose to resend the Login Instruction Email from the drop down at the
top of the page.
Manage Teaching Schedule
You will be able to manage your teaching schedule accordingly with the four options below.
• It is important that you utilize these tools throughout your teaching year so that you will not end teaching 4 weeks short
of your renewal date.
• It is equally as important to not modify your calendar too much so as to not push lessons beyond the length of your
subscription. LifeBibleStudy will allow you to use future lessons that are untaught if the church account is renewed
for another year.
Calendar Modification Options
• Postpone – Move the current lesson to the next week
• Skip – Remove a lesson from the calendar and shift the next lesson up
• Delete – Remove a lesson from the calendar and leave that day open
• Supplemental – Insert one of our supplemental lessons and move the current lesson to the next week
1.
2.
3.
4.
5.
Click View My Calendars
Click either the name of the class or the calendar button on the line of the calendar
Locate the lesson and week you need to modify
Select the modification from the drop down menu to the right of the lesson title
Select Update
Copyright © Clarity Publishers, Inc., 2009. All rights reserved. Permission is granted for reproduction only for the study of LifeBibleStudy 4
curriculum by a licensed church during the licensed year. No online or other duplication is permitted.
Undoing a Postponed or Deleted Lesson
1. Locate the modification you would like to undo
2. Select Remove Empty Week
3. Click Update
Undoing a skipped lesson
1. Locate the modification you would like to undo
2. Select Insert
3. Select Insert Deleted Lesson
4. Click Update
Resetting the Calendar
Resetting the calendar will remove all modifications and reset the lessons to the original order.
1. Locate the calendar you need to reset
2. Select Reset Calendar at the top of the calendar
3. Click Update
4. The lessons will reorder to the original sequence without modifications
Requesting a Start Date Change
Your Start Date can be changed by making a request to LifeBibleStudy.
Copyright © Clarity Publishers, Inc., 2009. All rights reserved. Permission is granted for reproduction only for the study of LifeBibleStudy 5
curriculum by a licensed church during the licensed year. No online or other duplication is permitted.
1.
2.
3.
4.
Locate the calendar you need to reset
Select Request Start Date Change at the top of the calendar
Click Update
Your request will be sent to LifeBibleStudy. We will email you when your start date has been changed.
Communicating with Teachers
There are two options for the Administrator to communicate with teachers:
1. Email – send email to teacherʼs personal email
2. Messaging – send and receive messages within the LifeBibleStudy online manager.
Emailing
1. Click Email Teachers under Manage Teachers
2. Select the teacher or teachers you would like to email
3. Enter a subject, create a message and click Send
4. Note: Administrators are copied on all emails. Replies to emails sent from your LifeBibleStudy account will be
directed to your personal email program.
Messaging
1. Click on New Message under Messaging in the Administrator Navigation
2. Select the teacher, teachers or calendar from the list
3. Enter a subject, create a message, and click Send
Viewing Messages
There are two ways to see your new message(s).
1.
2.
Click View Messages under Messaging in the Administrator Navigation
The newest message(s) will be listed at the top
OR
1.
2.
Click View Messages link in the Your account information & Help section
The newest message(s) will be listed at the top
Viewing and Printing Lessons
Preparation for teaching can either take place online or from printed documents from the manager. Preparing online allows
you and your teachers to fully use the online glossaries, media options and features included in your subscription. Printing
immediately gives you flexibility to prepare the lesson at your leisure without being online.
Viewing Lessons
There are two ways to view lessons:
1. Each calendarʼs schedule will be listed in the Teaching Calendars & Lessons box with the current lesson to be taught
that week
2. Click the calendar name or the calendar button in the Teaching Calendars & Lessons box to view the full schedule of
lessons – Click the link of the desired lesson to begin preparing
Once in a lesson, you can click the Previous or Next Lesson button to scroll through lessons.
Copyright © Clarity Publishers, Inc., 2009. All rights reserved. Permission is granted for reproduction only for the study of LifeBibleStudy 6
curriculum by a licensed church during the licensed year. No online or other duplication is permitted.
Printing a Lesson
You can print a lesson immediately to prepare on the go or print after previewing the lesson online. Teaching Plans are
sectioned into:
Complete – all available components to a lesson
College Age – lesson components designed for college age adults
Young Singles – lesson components designed for young single adults
Single Adults – lesson components designed for single adults
Nearly Weds / Newly Weds – lesson components designed for nearly and newly wedded adults
Young Married Adults – lesson components designed for young married couples
Parents of Children – lesson components designed for parents with young children
Parents of Teenagers – lesson components designed for parents with teenagers
Empty Nesters – lesson components designed for empty nesters
Senior Adults – lesson components designed for senior adults
Master Teacher – master teacher formatted lesson
Printing Immediately
1. Locate the calendar from which you need to print a lesson
2. Click the Print button on the right
3. Select the Teaching Plan you prefer from the drop down
4. Click Download Teaching Plan and a PDF will be saved on your computer
5.
If you prefer to customize the teaching plan, select the teaching plan from the drop down you want to
start with and then click Advanced Options
Copyright © Clarity Publishers, Inc., 2009. All rights reserved. Permission is granted for reproduction only for the study of LifeBibleStudy 7
curriculum by a licensed church during the licensed year. No online or other duplication is permitted.
6.
7.
Select either Full or Summary for each desired activity of the lesson. Full will print the entire activity
while Summary will print a summarized version of the activity
Click Download Teaching Plan and a customized PDF will be saved on your computer
Printing after Previewing a Lesson
1. Click Print on the left sidebar
2. Continue with Step 3 above under the “Printing Immediately” section
Printing one Segment of a Lesson
1. Locate the printing page of the desired lesson
2. Click the Advanced Options link towards the bottom of the page
3. Click the Deselect All button at the top of the page
4. Locate the segment or segments you need to print and check either Full or Summary
5. Click Download Teaching Plan and a PDF will be saved on your computer
**You must have Adobe Acrobat Reader 7.0 or higher to view the downloaded PDF files. Go to www.adobe.com and click Get
Adobe Reader for a FREE download.
Family Devotion Page
The family devotion page is a great way to keep parents involved throughout the year. The Family Devotion quick link
associated with each calendar can be sent from our system or copy and paste the link into an email sent from your personal
email program. Teachers can also enter and manage parent information.
Setting up your parents
1. Click the Family Devotion button
2. Click Add New Parent
3. Enter their name and email address
4. Click Save
5. Repeat steps 1-5 until all parents associated with that calendar are entered
Copyright © Clarity Publishers, Inc., 2009. All rights reserved. Permission is granted for reproduction only for the study of LifeBibleStudy 8
curriculum by a licensed church during the licensed year. No online or other duplication is permitted.
Sending the Family Devotion
1. Click View My Calendars in the Administrator Navigation
2. Click the Family Devotion button
3. Select the parents you need to email the parent page
4. Choose Send Family Devotion Email
5. Click Submit
Sending the Family Devotion using your own email system
1. Click View My Calendars in the Administrator Navigation
2. Click the Parent Page button
3. Highlight the URL and copy it by using right+click and selecting copy from the menu options
4. Open an email message in your system and paste the URL
Use your standard process for email delivery
Idea Exchange
The Idea Exchange is a place for you to share your ideas for each lesson. This is an opportunity for you and your teachers to
not only give feedback to our staff, but to also give feedback to other LifeBibleStudy users. (Note: the email address
associated with the account will be attached to the Idea Exchange post you create unless you have reset your username. See
the Change your Username instructions under Managing your Administrator Account to update your username.)
1.
2.
3.
Click on a lesson from your account
Click Idea Exchange on the left sidebar
Topics will be listed for you to preview and reply – click the topic title view and reply
4.
5.
6.
Click New Topic to create a new post for a lesson
Create a subject and enter your idea
Click Save
Copyright © Clarity Publishers, Inc., 2009. All rights reserved. Permission is granted for reproduction only for the study of LifeBibleStudy 9
curriculum by a licensed church during the licensed year. No online or other duplication is permitted.
7.
Once saved, enter a rating for the lesson
Managing Your Administrator Account
Forgot your Password?
If you forget your password, go to the main login page and click Request New Password
1. Enter the email address associated with your account
2. Instructions for resetting your password will be emailed
3. In the email is a link for a one time login. Once logged in, you will be prompted to change your password.
Changing your Password
Once you are logged into your account:
1. Click My Account in the upper right corner
2. Click the Edit Profile tab
3. Enter the new password twice
4. Click Save
Forgot your username?
Call 877-265-1605 and speak with a LifeBibleStudy Connection Team Member.
Change your Username
You can log into your account using your email address or username once your username has been changed. Your username
will default to the email address associated with your account unless you specify otherwise during the ordering process. Once
you are logged into your account you can change your username.
1. Click My Account in the upper right corner
2. Click the Edit Profile tab
3. Enter a new Username
4. Click Save
NOTE: If you post content in the Community Groups and/or Idea Exchange your username will be displayed. You should
decide if you want your username to be your email address or something else.
Copyright © Clarity Publishers, Inc., 2009. All rights reserved. Permission is granted for reproduction only for the study of LifeBibleStudy 10
curriculum by a licensed church during the licensed year. No online or other duplication is permitted.