1
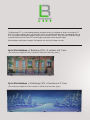
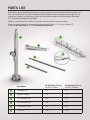
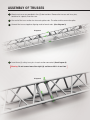
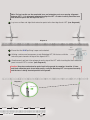
User's Manual
To view an instructional video visit:
www.backdropLIFT.com
The Backdrop LIFT is a telescoping product designed to hoist a backdrop or drape to a height of 17
feet. This unique product gives you the ability to set up a backdrop/drape from a standing position of
5'10" by tying or clamping the product across 25’w sections of truss. Once securely attached, simply
crank the hand winch on each LIFT to telescope the product to the desired height.
All backdrops and drapery hung on this product are meant for indoor use only.
Up to 25'w Backdrop = 2 Backdrop LIFTs + 5 sections of 5' Truss
(The maximum weight for a 25'w section is 50 lbs over the linear span.)
Up to 40'w Backdrop = 3 Backdrop LIFTs + 8 sections of 5' Truss
(The maximum weight for a 40'w section is 100 lbs over the linear span.)
PARTS LIST
Before opening your Backdrop Lift and truss system, perform a visual inspection of the container your
item came in to ensure there is no damage to the packaging. Should you notice any damage, be sure
to note your findings on the delivery receipt of the transport company that delivered your Backdrop
LIFT. If possible photograph the damage.
Perform a check to ensure all parts are included and have arrived in good condition.
Should any parts be missing or damaged, contact our office Mon – Fri, 7am to 5:00pm PST
toll free at 877-363-7998 or via email, [email protected]
E
A
B
F
D
C
Description
25' Backdrop LIFT set
Quantity Included
40' Backdrop LIFT set
Quantity Included
A
Backdrop LIFT
x2
x3
B
Leg with Leveler
x8
x 12
C
18" Extension Post
x2
x3
D
30" Extension Post
x2
x3
E
5' Aluminum Truss
x5
x8
F
Truss Pin
x 15
x 25
BACKDROP LIFT ASSEMBLY
1 Remove LIFT, extension posts and (4) legs from container.
Note: DO NOT discard any packaging, foam or paperwork from cases/boxes. These items may
be used for the return of the product.
2 On level ground clear of obstruction, insert the legs securely into the base of the LIFT by pulling
the spring clip, inserting the leg, releasing the spring clip and pulling back slighly to hear a click
indicating the leg is locked. (See diagram 1)
Pu
ll
Pi
n
Diagram 1
3 Once the four legs are securely in place, level the LIFT by
adjusting the screw feet until the bubble level located at the
base of the tower is centered. (See diagram 2)
4 Repeat procedure for each LIFT required for your backdrop.
Diagram 2
ASSEMBLY OF TRUSSES
1 Aluminum trusses are provided in five (5) foot sections. Remove the trusses and truss pins,
contained in a pouch, from the case.
2 One end of the truss section has two male splice ends. The other end has one male splice.
3 Connect the trusses together aligning male to female ends. (See diagram 3)
Diagram 3
4 Insert three (3) safety truss pins in each section connected. (See diagram 4)
Warning: Do not connect more than eight (8) sections or 40 ft. at one time.
Diagram 4
ATTACHING TRUSS TO BACKDROP LIFT's
1 The flat portion or face of the truss is meant to hang the backdrop or drape. Be sure that in preparing for the following steps that the flat portion of the truss will be facing forward.
2 Space the LIFTs a MAXIMUM of 20 feet apart and recheck bubble level.
3 Select which extension post to insert into truss sleeve.
Note: There are two black extension posts to select from. The larger 30" post will accomplish
a total LIFT height of 17'. For shorter requirements, you may choose to use the 18" extension
post which will accomplish a maximum height of 16'.
4 Insert the black extension post into the second to last truss sleeve of either end of assembled
truss while pulling out silver pin. Allow pin to lock into place and secure extension post.
(see diagram 5)
Note: Maximum span between 2 LIFTs is no more than 20 feet in
width – there will be 2.5 feet overlap beyond the LIFT to accomplish
25' total width. To accomplish 40' wide, span no more than 20 feet
between each of the LIFT’s. End truss not to exceed 2.5' beyond
vertical lift.
Diagram 5
25'w span: To accomplish a 25'w span using two (2) LIFTs, connect five (5)
sections of truss together and secure with safety pins. Insert the black extension
post into the second to last sleeve of the last section of truss on either end.
There will be a 2.5' overlap on either end of the LIFT to accomplish 25 linear feet
(see diagram 6)
40'w span: to accomplish a maximum of 40' span using three (3) LIFTS, connect
eight (8) sections of truss together and secure with safety pins. Insert the black
extension posts into the sleeves of the truss no more than 20'w apart from one
another. (see diagram 7)
Diagram 6
5' Truss
5' Truss
No
more than
2.5'
5' Truss
5' Truss
No more than 20'
5' Truss
No
more than
2.5'
Diagram 7
5' Truss
No
more than
2.5'
5' Truss
5' Truss
No more than 20'
5' Truss
5' Truss
Note: For best results use the completed truss and extension posts as a spacing alignment
between LIFT’s. It is extremely important to align the LIFT’s in order to easily insert the truss
and extension posts into the top of the LIFT’s.
5 Lay truss on floor and align black extension posts to the front leg of each LIFT. (see diagram 8)
Diagram 8
6 Ensure that the BLUE pull ring is open and unlocked.
7 Utilizing a minimum of one person at each Backdrop LIFT, lift the truss with the
extension posts towards the top of the aligned LIFT’s.
Silver
Plunge Pin
Blue Pin
Red Pin
8 Simultaneously pull out silver plunge pin on the top of the LIFT while inserting the black extension
posts into each LIFT in unison. (see diagram 9)
Caution: Keep truss and extension posts level to the ground for seamless insertion. If truss
and black extension posts do not enter easily, verify the Backdrop LIFT’s are spaced correctly
and the truss is being inserted parallel to the ground.
Diagram 9
Pull Silver Pin
5' Truss
No more than 20'
5' Truss
5' Truss
No
more than
2.5'
HANGING THE BACKDROP / DRAPE
1 Your backdrop/drape from Grosh is provided with either grommets and ties or ties only along the
top webbing spaced 12 inches apart. If utilizing backdrops or drapery from other companies, be
certain there is a way to hang the product properly.
2 Unroll the backdrop/drape on a clean surface so that the top webbing is laying directly below the
truss
3 Before beginning to hang your backdrop/drape be sure the LIFT's are on level ground with no
obstructions.
4 Start at the center of the drop, tie or clamp the backdrop or drape onto the top front edge of the
truss. (see diagram 10)
Diagram 10
Center
5 Working out from center in both directions, secure each tie line to the truss until you reach the end
of the backdrop/curtain. Recheck each tie line/clamp to ensure secure attachment to the truss.
Caution: Check that the area above the path of the truss is free of obstructions (light fixtures,
water pipes, etc.)
Diagram 11
6 Unlock the BLUE ring pin on each LIFT to unlock telescoping for the
first section. (see diagram 11 for lock positions)
7 With a person positioned at each LIFT slowly begin to crank the hand
winch clockwise to raise the backdrop/drape while keeping the truss
parallel until you reach the desired height or the maximum height of
the first telescoping piece. (see diagram 12)
Unlocked
Note: Each LIFT has white numbers embedded into the aluminum
extensions indicating the number each LIFT operator should be on
in order to keep the product parallel to the ground.
Note: One team leader should be identified to view the white numbers as the LIFT is telescoping upward to ensure all elements are
raising parallel to the ground.
Locked
Diagram 12
Diagram 13
8 Lock the BLUE pin into the hole just below the #5 or number you are
on to secure the LIFT.
Unlocked
9 If you wish to go HIGHER, unlock the RED ring pin to release the
second telescoping piece, slowly crank the hand winch clockwise to
continue raising the backdrop/drape to the desired height.
10 Lock the RED pin into the hole just below the white number indicated
on the LIFT to secure the product.
Locked
RETRACT LIFT
1 Verify that the area above and surrounding the backdrop/drape and LIFT is clear.
2 Unlock the proper color pin for the extension you wish to retract.
3 With an individual at each LIFT, slowly crank the hand winch counter clockwise to begin lowering
the product. One operator should be viewing both LIFT numbers to ensure the retracting of the
product is parallel to the ground.
a. Verify that each LIFT operator is watching winch to ensure the threaded aircraft cable has not
become slack.
b. If slack occurs, stop retracting the LIFT and grab the telescoping piece by your hand to pull the
piece down towards the ground.
4 Continue retracting the LIFT until you get to the top of the telescoping piece.
5 Lock the pin back into place.
6 Proceed retracting the LIFT in the same manner as previously described.
REMOVING BACKDROP/DRAPE AND TRUSS
1 Carefully untie or unclamp the backdrop/drape from the truss and set aside.
2 With one (1) person at each LIFT, grasp the black extension posts connecting the truss and the LIFT.
3 While pulling the silver plunge pin from the top of the LIFT, remove the extension post with the
truss attached, from the vertical LIFT.
Caution: Keep Truss and Exention pieces level to the ground for seamless removal. If truss
and black exentsion posts do not remove easily verify each operator is lifting the extension
pieces at the same time.
DISMANTLE TRUSS/EXTENSION POSTS
1 With the Truss and Extension posts assembled on the floor, pull the silver pin from the truss and
remove the black extension posts.
2 Set the extension post to the side for packaging.
3 At each 5 foot truss section, unlock and remove the safety lock clips (3 at each truss connection)
4 Once truss pins are removed from each truss section, return pins back in pouch provided. Clip the
pouch to a section of truss for repackaging.
DISMANTLE BACKDROP LIFT
1 With at least 2 people, slightly tilt the LIFT off the floor to allow for easy removal of each leg.
2 Pull silver plunge pin from the base of the LIFT and remove each leg.
REPACKAGE PRODUCTS FOR RENTAL CLIENTS
Confirm that all pieces from the packing list are available for re-packaging. Any missing pieces will
be accounted for upon return and rental customers will be charged replacement fees.
1 Unless otherwise noted, return labels will be supplied inside the case.
2 Remove the original shipping labels from the black plate on the top of the case.
3 Completely cover remnants of the old label with the new return label.
4 Lock the case with metal locks and set aside for pick up by the courier.
5 Contact the courier at least 24 hours in advance to schedule a pick up for the next business day.
Reference your contract for return dates.
www.backdropLIFT.com
877-363-7998
4114 Sunset Boulevard
Los Angeles, California 90029
A division of:
Interested in purchasing the Backdrop LIFT?
Contact Us.