1
PM2700 - Digital Pen Plating
System
Congratulations you have purchased one of the
most advanced Digital Pen Plating Systems
available.
PEPETOOLS Digital Pen Plating System
incorporates:
• State of the art circuitry
• Precise Digital Readout
• Stable Voltage Output (Less than 1%
variance at the max. load)
• Precision Voltage Regulator (In 100mw
increments 0-18V)
• Automatic Current Limitation (500ma - max.)
• Three (3) specially designed Electrode Styluses (Plating Pens)
(Make excellent contact with fiber electrodes. Save Time - use three different pens and solutions-at the
same time. )
• Compact Design (Conveniently placed controls)
• Dual Voltage (115V-60Hz; 220V-50Hz)
User's Manual
General Specifications
INPUT:
OUTPUT
Short circuit protection
Operating temperatures
Overall dimensions
Mass (weight)
115 V AC, 1 A max., 60 Hz;
230 VAC, 0.5A max., 50 Hz
17 VDC, 0.5A max.
Self restoring after elimination of short circuit
+5°C min, +40°C max
200 x 140 x 65mm (7-1/4" x 5-1/2” x 2-1/2")
1.0 kg max (2.2Ib.)
Precautions
1. Do not expose the DPPS (Digital Pen Plating System) to rain or moisture.
2. Do not expose the DPPS to acids or other corrosive chemicals)
3. Do not remove the back cover
4. Do not place DPPS in direct sunshine or near heating source
5. When unplugging the unit from the AC outlet, hold the plastic part.
Do not jerk the power cord and cold the metal part
6. Do not block the ventilation holes. Place the DPPS at least 10 cm away from the walls for good air
circulation
7. Do not stand or place heavy objects on the DPPS. Use DPPS in flat stable position only
8. When DPPS is not used for an extended period of time disconnect the AC cord
Basic Operations
Preparation for work
1. Place the DPPS on horizontal, stable surface avoiding direct sunlight.
2. Place the PS at least 10 cm (4") away from the walls for good air circulation.
3. Verify the specifications of your AC circuit 115V or 230V. Check the position of input voltage value switch
on the back of the unit. Switch to the correct setting, if necessary.
WARNING!!!I
If the input voltage value setting of your unit does not correspond with the voltage value of your electrical
circuit the Power Supply will be permanently damaged.
Do not use the electrical circuits which do not correspond to:
110-120 V or 200 - 240 V, 50-60 Hz.
4. Insert the AC cord into the socket on the back side of the DPPS.
"ON"
•
•
•
•
•
•
Plug the AC cord into the outlet.
Connect the anodes (plating pens) to the output terminals.
Connect the cathode (black lead wire with alligator clip) to the terminal.
Turn the voltage regulator (1) to the left position.
Turn the power switch (5) to "ON" position.
Turn the voltage regulator (1) to set the necessary voltage value.
"OFF"
1. Turn the voltage regulator (1) to the extreme left position.
2. Switch off the power switch (5) to "OFF" position.
3. Unplug from the outlet.
Please be advised, that our recommendations are very general and may not apply to your specific application.
We strongly recommend that you follow ALL THE SAFETY precautions working with an electrical device. Also
follow the plating solutions manufacturer’s recommendations for proper handling, use, and disposal of plating
solution.
The box contents:
1. Power supply.
2. Set of 3 platinum electrodes (plating pens -red, yellow and white)
3. 3 Solution Jars with lids (Empty)
4. Black lead wire with alligator clip (Cathode wire)
5. Power cord.
6. Wire holder
7. 9 Fiber Electrodes
8. User's manual.
Troubleshooting
Problem
1. Indicator light does not come on
1) Check if there is power in the network
2) Check the connection of
AC cord in the outlet
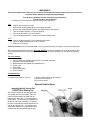
Special Instructions
Inserting the felt tip into the
PEPETOOLS Plating Pen
The felt tips provided for the plating pen are
very slightly oversized by design. This is to
insure that good contact is made with the
platinum wire in the pen. This is essential to
good plating. The tip must be presented at an
angle to the pen (see illustration). Press the
tip down on the platinum wire and push the tip
into the pen at least 1/4". The platinum wire
will make a slight groove on the felt tip which
will allow the tip to be inserted into the pen.
The tip will not be able to be inserted unless this procedure is followed.
Replacement fiber tips available:
#45.405
Standard tip (pkg/5)
#45.40501
Fine point tip (pkg/5)
#45.40502
Chisel tip (pkg/5)
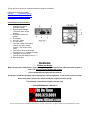
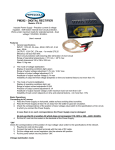
Controls Names and Functions
1. Voltage regulator
Regulate the value of
stabilized voltage.
2. Digital Voltage indicator
(Terminals value voltage
display)
3. Electrolyte Solution Jar
holders
4. Pen holders
5. ON / OFF switch
6. A(' cord socket
7. The input voltage value switch
Controls the value of input
voltage 115V, 60Hz or 230V,
50Hz
8. Terminals to connect electrodes
(Plating pens to "+" stabilized voltage)
9. Terminal to connect anode
(Ground wire with Alligator Clip to "-")
10. Wire holder seat
WARNING:
Before you begin:
Make sure the unit is switched to a correct Voltage. Plugging the system into 230V outlet when system is
set to 115V will permanently damage the system.
1 Year Limited Warranty against factory defects.
Incidental or accidental damages due to improper use and /or negligence - is not covered under warranty.
All warranty claims must he accompanied with the original purchase receipt.
'This warranty is extended to original purchaser only.
***FOR PROFESSIONAL USE ONLY***
FDJ On Time presents the manufacturer’s instructions in a useful, organized form. Original instructions are available with the product.