1
TomTom NAVIGATOR
1.
Before you start...
Before you start...
Setting up
To start using your phone as a navigation device, tap the TomTom button in
the Windows Mobile start menu.
To set up your navigation device, you need to answer a few questions by
tapping the screen.
Important: Take care to select the correct language, since the language you
choose will be used for all menus and written instructions.
Activation
You will be asked how you want to activate the map that comes with
NAVIGATOR. There are two ways to do this:
• Automatically
To activate automatically, your device must have an active wireless data
connection (GPRS, EDGE, UMTS or CDMA).
Tap Automatic, then enter your product code. The product code is printed
on the product code card that is included with your product.
TomTom NAVIGATOR will connect to TomTom using the wireless data
connection and activate the map.
• Manually
To activate a map manually, do the following:
1. Tap Manual.
2. Go to this website: www.ttcode.com
3. Follow the instructions on this page to get an activation code.
4. Enter the activation code on your device to activate the map.
Improving reception
If your TomTom NAVIGATOR takes longer than 5 minutes to find your current
position, make sure that the device is in an open space away from tall objects,
such as buildings or trees.
Important: Some vehicles have heat reflective shielding in the windscreen.
This may prevent your NAVIGATOR from locating your current position.
2
Switching on and off
To switch your TomTom NAVIGATOR on or off, press and hold the On/Off
button for 2 seconds. The first time you switch on, it may take a short while for
your device to start.
Note: In rare cases, your NAVIGATOR may not start correctly. If this happens,
press the reset button, then switch on the device again.
To use your TomTom NAVIGATOR on your telephone, tap the NAVIGATOR
button.
Exit
application
To close TomTom NAVIGATOR, tap Exit application in the Main Menu. We
recommend that you close NAVIGATOR whenever you finish using the
application, since some of the phone settings are managed by NAVIGATOR
to enable you to place and receive phone calls while you are driving.
3
2.
Driving View
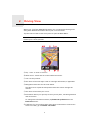
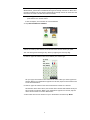
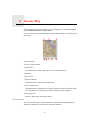
Driving View
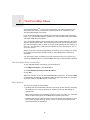
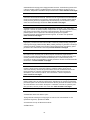
When your TomTom NAVIGATOR starts, you are shown the Driving View
along with detailed information about your current location.
Tap the centre of the screen at any time to open the Main Menu.
Note: The Driving View is shown in black and white until your NAVIGATOR
locates your current position.
A Tap + and - to zoom in and out.
B Quick menu - switch this on in the Preferences menu.
C Your current position.
D The name of the next major road or road sign information, if applicable.
E Navigation instruction for the road ahead.
Tap this area to repeat the last spoken instruction and to change the
volume.
F The name of the street you are on.
G Information about your journey such as journey time, remaining distance
and arrival time.
To change the information shown, tap Status bar preferences in the
Preferences menu.
H Traffic bar. For more information about how to subscribe to and receive
TomTom Traffic, go to tomtom.com/traffic.
4
To set up Traffic information, tap TomTom Traffic in the Main Menu.
5
3.
Making your first journey
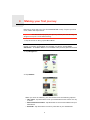
Making your first journey
Planning a route with your TomTom NAVIGATOR is easy. To plan your first
route, follow the steps below.
Important: You should always plan your journey before you start driving. It is
dangerous to plan a route while driving.
1. Tap the screen to bring up the Main Menu.
Note: The buttons on your NAVIGATOR are shown in full colour unless a
button is currently unavailable. For example, the button named Find
alternative... in the Main Menu is not available until you have planned a route.
2. Tap Navigate to...
3. Tap Address.
When you enter an address, you can choose from the following options:
• City centre - tap this button to set your destination as the centre of a city
or town.
• Street and house number - tap this button to set an exact address as your
destination.
• Postcode - tap this button to enter a postcode as your destination.
6
Note: You can enter a postcode for any country. In the UK and the
Netherlands, postcodes are detailed enough to identify a house on their own.
In other countries you can enter a postcode to identify a town or area. You will
then have to enter a street and house number.
• Crossing or intersection - tap this button to set your destination as the
point where two streets meet.
In this example, we will enter an exact address.
4. Tap Street and house number.
Note: When planning a trip for the first time your NAVIGATOR asks you to
choose a country. Your choice is saved and used for all routes you plan.
You can change this setting at any time by tapping the country flag.
5. Start to type the name of the town where you want to go.
As you type, the names of the towns that match what you have typed are
shown. When your destination appears in the list, tap the name of the town
to set the destination.
6. Start to type the name of the street and select it when it is shown.
As with the name of the town, the names of the streets that match what you
have typed are shown. When your destination appears in the list, tap the
name of the street to set the destination.
7. Now enter the house number of your destination and then tap Done.
7
8. Your NAVIGATOR asks if you need to arrive at a particular time. For this
exercise, tap NO.
The route is calculated by your NAVIGATOR.
9. When the route has been calculated, tap Done.
Your NAVIGATOR will immediately begin to guide you to your destination,
using both spoken instructions and on-screen directions.
Arrival times
When you plan a route, your TomTom NAVIGATOR asks you if you need to
arrive at a particular time.
Tap YES to enter a preferred arrival time.
Your NAVIGATOR calculates your arrival time and shows you whether you will
arrive on time.
You can also use this information to work out when you need to leave. If your
NAVIGATOR shows that you will arrive 30 minutes early, you can wait and
leave in 30 minutes time, rather than arrive early.
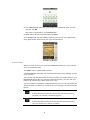
Your arrival time is constantly recalculated during your journey. The status bar
shows whether you will arrive on time or if you are going to be late, as shown
below:
You will arrive 55 minutes before the arrival time you entered.
If the estimated arrival time is more than five minutes before
the time you entered, it is shown in green.
You will arrive 3 minutes before the arrival time you entered.
If the estimated arrival time is less than 5 minutes before the
time you entered, it is shown in yellow.
8
You will arrive 19 minutes late.
If the estimated arrival time is later than the time you entered,
it is shown in red.
Tap Status bar preferences in the Preferences menu, to enable or disable
arrival time notifications.
Status bar
preferences
Select the required options on the first menu screen and then tap Done.
To enable arrival time notifications, select Show leeway to arrival time.
What are the other navigation options?
When you tap Navigate to..., you can set your destination in many ways, not
just by entering the address. The other options are listed below:
Tap this button to navigate to your Home location.
You will probably use this button more than any other.
Home
Tap this button to select a Favourite as your destination.
Favourite
Tap this button to enter an address as your destination.
1 22 3
Address
Tap this button to select your destination from a list of places you have
recently used as destinations.
Recent
destination
Tap this button to navigate to a Point of Interest (POI).
Point of
Interest
Tap this button to select a point on the map as your destination using the
map browser.
Point on map
Tap this button to enter a destination using latitude and longitude values.
Latitude
Longitude
9
Tap this button to navigate to the last known position of a TomTom Buddy.
Don’t forget that the Buddy may move before you reach him.
TomTom
Buddy
Tap this button to navigate to the address of a contact on your device.
Contact
Planning a route in advance
You can also use your NAVIGATOR to plan journeys in advance by selecting
both your starting point and your destination. You could, for example, do the
following:
• Find out how long a journey is going to take before you start.
• Check the route of a journey you are planning.
• Check a route for someone who is coming to visit you, so that you can
explain the route to them.
To plan a route in advance, follow these steps:
1. Tap the screen to bring up the main menu.
2. Tap the arrow button to move to the next menu screen and tap Prepare
route.
Prepare route
3. Select the starting point for your journey in the same way that you would
select your destination.
4. Set the destination for your journey.
5. Choose the type of route that should be planned.
• Fastest route - the route which takes the least time.
• Shortest route - the shortest distance between the locations you set. This
may not be the quickest route, especially if the shortest route is through
a town or city.
• Avoid motorways - a route which avoids motorways.
• Walking route - a route designed for making the journey on foot.
• Bicycle route - a route designed for making the journey on a bicycle.
• Limited speed - a route for a vehicle which can only be driven at a limited
speed. You have to specify the maximum speed.
6. Your TomTom NAVIGATOR plans the route between the two locations you
selected.
More information about a route
You can access these options for the route you last planned by tapping View
route in the Main Menu or the Details button on the route summary screen.
10
You can then select from the following options:
Tap this button for a list of all the turn instructions on the route.
This is very useful if you need to explain a route to someone else.
Browse as
text
Tap this button to see each turn in the journey. Tap the right and left arrows
to move forwards and backwards through the journey.
Browse as
images
Tap the screen to turn off the 3D display and view the map from above.
Tap this button to see an overview of the route using the map browser.
Browse map
of route
Tap this button to open the route summary screen.
Show route
summary
11
4.
Finding alternative routes
Finding alternative routes
Once you have planned a route, you may want to change something about the
route, without changing your destination.
Why change the route?
Maybe for one of these reasons:
• You can see a roadblock or a line of traffic ahead.
• You want to travel via a particular location, to pick someone up, stop for
lunch or fill up with petrol.
• You want to avoid a difficult junction or a road you don’t like.
Tap Find alternative... in the Main Menu to change the route that is
currently planned.
Find alternative...
Then tap one of the options below.
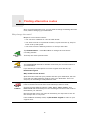
Tap this button to calculate an alternative to the route already planned.
Calculate
alternative
Your NAVIGATOR will look for another route from your current location to
your destination.
If you decide you would prefer to use the original route after all, tap
Recalculate original.
Why would I need to do this?
Apart from the roads near your position and near your destination, the new
route will use totally different roads to reach your destination. This is an
easy way of calculating a totally different route.
Tap this button if you can see a roadblock or a line of traffic ahead. You then
have to choose how much of the route ahead you want to avoid.
Avoid
roadblock
Choose from the different options: 100m, 500m, 2000m, 5000m. Your
NAVIGATOR will recalculate your route avoiding the section of the route for
the distance you selected.
Don’t forget that once a new route is calculated, you may have to turn off
the road you are on very soon.
If the roadblock suddenly clears, tap Recalculate original to return to your
original route.
12
Tap this button to change your route so that it passes a particular location,
perhaps to pick someone up on the way.
Travel via...
You choose the location you want to pass in the same way as you choose a
destination. So you can select from all the same options: for example,
Address, Favourite, Point of Interest and Point on map.
Your NAVIGATOR will calculate a new route to your destination that passes
the location you chose. Unlike your final destination, your NAVIGATOR
does not inform you when you pass by this location.
Using this button, you can only travel via one location. If you want to pass
more than one, use an Itinerary.
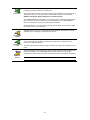
Tap this button to return to the original route without deviations to avoid
roadblocks or travelling via particular locations.
Recalculate
original
Tap this button to avoid a part of the route. Use this button if you see that
your route includes a road or junction you don’t like, or which is wellknown for traffic problems.
Avoid part of
route
You then choose the road you want to avoid from a list of the roads on your
route.
Tap this button to recalculate your route so that it avoids traffic problems as
much as possible. Your NAVIGATOR will check if there are any traffic
problems on your route and work out the best route to avoid the problems.
Minimise
delays
Note: This button is only available with TomTom Traffic enabled.
13
5.
Help me!
Help me!
Help me! provides an easy way to navigate to emergency services centres and
other specialist services and contact them by phone.
For example, if you are involved in a car accident, you could use Help me! to
call the nearest hospital and tell them your exact location.
How do I use Help me! to phone a local service?
You can use Help me! to find and make contact with a service centre.
When you select a service centre, your current location and the phone number
of the POI are shown.
To use Help me! to locate a service centre, contact the centre by phone and
navigate from your current location to the centre, do the following:
1. Tap the screen to bring up the Main Menu.
2. Tap Help me!
3. Tap Phone for help.
4. Select the type of service you require, for example, Nearest hospital.
5. To dial, select a centre from the list, the nearest is shown at the top of the
list.
Once the call is answered your NAVIGATOR shows your position on the
map along with a description of the location. This helps you explain where
you are while making a call.
6. To navigate your way to the centre on foot, tap Walk there.
Your NAVIGATOR starts guiding you to your destination.
14
Options
Use your TomTom NAVIGATOR to find the location of a service, and the
contact details.
Phone for help
• Emergency services
• Emergency breakdown services
• Nearest police station
• Nearest doctor
• Nearest hospital
• Nearest public transport
• Nearest car repair services
• Nearest dentist
• Nearest pharmacy
• Nearest vet
Note: In some countries, information may not be available for all services.
Use your TomTom NAVIGATOR to navigate your way by road to a service
centre.
Drive to help
• Nearest car repair services
• Nearest hospital
• Nearest doctor
• Nearest police station
• Nearest pharmacy
• Nearest dentist
Note: In some countries, information may not be available for all services.
Use your TomTom NAVIGATOR to navigate your way on foot to a service
centre.
Walk to help
• Nearest petrol station
• Nearest public transport
• Nearest police station
• Nearest pharmacy
• Home
• Nearest doctor
Note: In some countries, information may not be available for all services.
15
Your TomTom NAVIGATOR shows your current location.
You can then tap Phone for help to select the type of service you want to
contact.
Where am I?
Tap this button to read the British Red Cross First Aid guide.
First Aid guide
Tap this button to read a selection of useful guides.
Other guides
16
6.
Browse Map
Browse Map
To look at the map in the same way as you might look at a traditional paper
map, tap Browse map in the Main Menu.
You can move the map by touching the screen and moving your finger across
the screen.
A The scale bar
B Your current position.
C GPS button
Tap this button to centre the map on your current position.
D Options
E The cursor
F The Find button
Tap this button to find specific addresses.
G The Cursor button
Tap this button to navigate to the cursor position, make a Favourite of the
cursor position, or find a Point of Interest near the cursor position.
H The zoom bar
Zoom in and out by moving the slider.
Cursor button
You can use the cursor to find addresses and Points of Interest (POIs), for
example, restaurants, train stations and petrol stations.
17
Position the cursor over a location on the map, then tap one of the following
buttons:
Tap this button to navigate to the cursor position. Your NAVIGATOR will
calculate the route.
Navigate
there
Tap this button to find a POI near the cursor position. For example, if you
have found a restaurant to go to, you can search for a parking garage
nearby.
Find POI
nearby
Tap this button to create a Favourite at the cursor position.
Add as
Favourite
Tap this button to create a POI at the cursor position.
Add as POI
Tap this button to correct the location shown at the cursor position.
Correct
location
18
7.
TomTom Map Share
TomTom Map Share
TomTom Map ShareTM is a free service that lets you make updates to your
map and if you want to, share those updates with other members of the
TomTom Map Share community.
If you find a street that has recently been blocked to traffic which was open
before, you can use Map Share to update your map and then share the update
with other Map Share members.
You can use Map Share to send and receive map updates during the first year
after the map’s release date. This means that one year after the release date,
you will no longer be able to send or receive map updates for that version of
the map - You will still be able to make updates to your own map for use on
your own device.
When you join the TomTom Map Share community you can keep your maps
up-to-date with the latest updates made by other Map Share community
members.
You choose the type of updates you want and each time you connect your
TomTom NAVIGATOR to TomTom HOME, the map is automatically updated.
TomTom Map Share community
To join the Map Share community, do the following:
1. Tap Map corrections in the Main Menu.
2. Tap Download corrections made by others.
3. Tap Join.
When you connect your TomTom NAVIGATOR to computer, TomTom HOME
automatically downloads any available map updates and sends any changes
you have made, to the Map Share community.
Map updates
There are two types of map update:
• Updates that are immediately shown on the map. These include, changing
the traffic flow of a street, blocking or renaming a street and adding or
editing POIs.
This type of change is immediately shown on your own map. You can hide
these updates at any time in the Map Share preferences menu.
• Updates that are reported to TomTom but not shown immediately on your
map. These include, missing streets, errors in motorway entrances and
exits and missing roundabouts.
19
This type of update is investigated by TomTom and once verified, is included
in the next map release. These updates are therefore not shared with the Map
Share community.
Making a map update
1. Tap Map corrections in the Main Menu.
2. Tap Correct a map error.
Correct a map
error
A list of possible map updates is shown.
3. Select the type of update you want to report.
Note: If you tap Add missing POI or Report other error you will be asked for
some additional information before the next step.
4. Select the method you want to use for selecting the location of the
update.
5. When you have found the location, tap Done.
6. Enter update or confirmation of update now.
Marking a map error while on the move
If you notice an item on your map that needs attention, you can mark the
location using the Report button and then enter the details when you are no
longer driving.
To show the Report button in the Driving View, do the following:
1. Tap Map corrections in the Main Menu.
2. Tap Correction preferences.
3. Tap Done and then tap Done again.
4. Select Show report button, then tap Done.
The Report button is shown on the left-hand side of the Driving View. After
you mark a location, you can add more information about the change when
you open the Map corrections menu.
For example, you are driving to a friend's house and you notice that the name
of the street you are on is different from the one on your map. To report the
change, tap the Report button and your NAVIGATOR will save your current
location. You can then send the update to TomTom Map Share when you
have finished your journey.
Receiving the latest map updates
When you connect your TomTom NAVIGATOR to your computer, TomTom
HOME automatically downloads any available map updates and sends any
changes you have made, to the Map Share community.
There are several types of updates which can be set in the Correction
preferences menu.
Changing my preferences for map updates
Correction preferences is used to set the way TomTom Map Share runs on
your device.
You can set the following preferences:
20
• Choose what types of updates you want to use on your maps.
• Decide if you want to share your updates with others.
• Show or hide the Report button in the Driving View.
To set your preferences, do the following:
1. Tap Map corrections in the Main Menu.
2. Tap Correction preferences.
A list of update types is shown.
3. Tick the box next to each update type you want use.
4. Tap Done.
5. Choose how you want to share your map updates with the Map Share
community, then tap Done.
6. Choose if you want to see the Report button in the Driving View.
7. Tap Done.
Tip: If you later decide you want to remove updates from the map, clear the
checkbox next to the types of update you want to remove. If you clear all the
checkboxes, your map returns to the original state before the first update.
Map update categories
There are several types of update that you can make to a map.
21
To make an update to your map, tap Map corrections in the Main Menu then
tap Correct a map error. The following types of updates are shown.
Tap this button to block or unblock a street. You can block or unblock the
street in one or both directions.
(Un)block
street
For example, to correct a street near to your current location, do the
following:
1. Tap (Un)block street.
2. Tap Near you to select a street near your current location. You can select
a street by name, a street near your Home location or a street on the
map.
3. Select the street or section of a street you want to correct by tapping it
on the map.
The street you select is highlighted and the cursor shows the name of
the street.
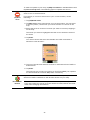
4. Tap Done.
Your device shows the street and whether the traffic is blocked or
allowed in each direction:
5. Tap one of the direction buttons to block or unblock the flow of traffic in
that direction.
6. Tap Done.
The next time you connect your device to TomTom HOME, your updates
are shared with the TomTom Map Share community.
Tap this button to correct the traffic direction of a one-way street, where the
direction of traffic is different to the direction shown on your map.
Reverse traffic
direction
Note: Reverse traffic direction only works for one-way streets. If you select
a two-way street you will be given the chance to block/unblock the street
rather than changing the direction.
22
Tap this button to change the name of a street on your map.
vabckc sdn
vk
fbks
sdjv
Edit street
name
For example, to rename a street near to your current location:
1. Tap Edit street name.
2. Tap Near you.
3. Select the street or section of a street you want to correct by tapping it
on the map.
The street you select is highlighted and the cursor shows the name of
the street.
4. Tap Done.
5. Type the correct street name.
6. Tap Done.
Tap this button to add a new Point of Interest (POI).
For example to add a new restaurant near to your current location:
Add missing
POI
1. Tap Add missing POI.
2. Tap Restaurant in the list of POI categories.
3. Tap Near you.
4. Select the location of the missing restaurant.
You can select the location by entering the address or by selecting the
location on the map. Select Near you or Near home to open the map at
your current location or at your Home location.
5. Tap Done.
6. Type the name of the restaurant then tap OK.
7. If you know the telephone number of the restaurant you can type it, then
tap OK.
If you don’t know the number, just tap OK without typing a number.
Tap this button to edit an existing POI.
You can use this button to make the following changes to a POI:
Edit POI
• Delete the POI.
• Rename the POI.
• Change the telephone number of the POI.
• Change the category that a POI belongs to.
• Move the POI on the map.
Tap this button to report other types of update.
Report other
error
These updates are not immediately corrected on your map. Your
TomTom NAVIGATOR sends a special update report to TomTom Map
Share.
You can report missing streets, errors in motorway entrances and exits and
missing roundabouts. If the update you want to report is not covered by
any of these report types, enter a general description then tap Other.
23
8.
Favourites
Favourites
What are Favourites?
Favourites are places that you often visit. You can create Favourites so that
you don’t have to enter the address every time you want to navigate there.
They don’t have to be places you especially like, just useful addresses.
How can I create a Favourite?
From the Main Menu, tap Add Favourite.
Note: The button Add Favourite may not be shown on the first page of the
Main Menu. Tap the arrow to open other pages in the Main Menu.
You can then select the location of the Favourite from the list below.
Give your Favourite a name that is easy to remember. Your NAVIGATOR will
always suggest a name, usually the address of the Favourite. To enter the
name, just start typing. You don’t have to delete the suggested name.
You can set your Home location as a Favourite.
Home
You cannot create a Favourite from another Favourite. This option will
always be unavailable in this menu.
To rename a Favourite, tap Manage Favourites in the Preferences menu.
Favourite
1 22 3
Address
You can specify an address to be a Favourite. When you enter an address,
you can choose from four options.
• City centre
• Street and house number
• Postcode
• Crossing or intersection
24
Select a Favourite location from a list of places you have recently used as
destinations.
Recent
destination
You can add a Point of Interest (POI) as a Favourite.
Does it make sense to do this?
Point of
Interest
If you visit a POI you particularly like, for example a restaurant, you can add
it as a Favourite.
To add a POI as a Favourite, tap this button, then do the following:
1. Narrow your choice of POIs by selecting the area where the POI is.
You can select one of these options:
• POI near you - to search from a list of POIs near your current position.
• POI in city - to choose a POI in a particular town or city. You have to
specify a town or city.
• POI near Home - to search from a list of POIs near your Home
location.
If you are currently navigating to a destination, you can also select from
a list of POIs which are on your route or near your destination. Choose
one of these options:
• POI along route
• POI near destination
2. Select the category of POI.
Tap the category of POI if it is shown or tap the arrow to choose from
the complete list.
Tap Any POI category to search for a POI by name.
Tap this button to add your current position as a Favourite.
For example, if you stop somewhere interesting, while you are there you
can tap this button to create the Favourite.
My location
Tap this button to create a Favourite using the map browser.
Select the location of the Favourite using the cursor, then tap Done.
Point on map
Tap this button to create a Favourite by entering latitude and longitude
values.
Latitude
Longitude
Tap this button to create a Favourite of the current position of a TomTom
Buddy.
TomTom
Buddy
25
Tap this button to create a Favourite using the address of a contact on your
device.
Contact
How can I use a Favourite?
You will normally use a Favourite as a way of navigating to a place without
having to enter the address. To navigate to a Favourite, do the following:
1. Tap the screen to bring up the Main Menu.
2. Tap Navigate to...
3. Tap Favourite.
4. Select a Favourite from the list.
Your NAVIGATOR calculates the route for you.
5. When the route is calculated, tap Done.
Your NAVIGATOR will immediately start guiding you to your destination with
spoken instructions and visual instructions on the screen.
How can I delete a Favourite?
1. Tap the screen to bring up the Main Menu.
2. Tap Change preferences to open the Preferences menu.
3. Tap Manage Favourites.
4. Tap the Favourite you want to delete.
5. Tap Delete.
How can I change the name of a Favourite?
1. Tap the screen to bring up the Main Menu.
2. Tap Change preferences to open the Preferences menu.
3. Tap Manage Favourites.
4. Tap the Favourite you want to rename.
5. Tap Rename.
26
9.
Points of Interest
Points of Interest
Points of Interest or POIs are useful places on the map. Here are some
examples:
• Restaurants
• Hotels
• Museums
• Parking garages
• Petrol stations
Showing POIs on the map
1. Tap Show POIs on map in the Preferences menu.
Show POI on
map
2. Select the POI categories to display on the map.
Tap Find to search for a POI by name.
3. Tap Done.
The POIs you have selected are shown as symbols on the map.
Calling a POI
Your TomTom NAVIGATOR knows the phone numbers for many POIs. You
can, for example, call a restaurant to book a table.
To call a POI tap Call POI in the Main Menu.
Navigating to a POI
You can use a POI as your destination. For example, if you are travelling to an
unfamiliar city, you could choose a POI to help find a parking garage.
1. Tap the screen to bring up the Main Menu.
2. Tap Navigate to... in the Main Menu.
3. Tap Point of Interest.
4. Tap POI in city.
5. Narrow your choice of POIs by selecting the area where the POI is located.
27
You can select one of these options:
• POI near you - to choose from a list of POIs near to your current location.
• POI in city - to find a POI in a particular town or city.
• POI near Home - to choose from a list of POIs near to your Home location.
You can select from a list of POIs which are along your route or close to your
destination. Choose from one of these options:
• POI along route
• POI near destination
Note: The last POI you viewed is also shown so that you can plan a route there
more quickly.
6. Type the name of the town you want to visit and select the town when it
appears in the list.
7. Select the category of POI:
Tap Any POI category to search for a POI by category name.
Tap the category of POI, if it is shown.
Tap the arrow to choose from the complete list of categories. Select the
category from the list or start to type the name of the category and select it
when it appears in the list.
8. Tap Parking garage.
9. From the list of POIs shown, select the POI you want to navigate to.
The table below explains the distances listed next to each POI.
POI near you
Distance from your current location
POI in city
Distance from the city centre
POI near Home
Distance from your Home location
POI along
route
Distance from your current location
POI near
destination
Distance from your destination
If you know the name of the POI, tap Find and type the name. Select it from
the list when it is shown.
The next screen shows more detailed information including the location of
the POI on the map and the phone number of the POI, if available.
Tap Select to confirm you want to plan a route to this POI.
Once you have selected a POI, the route to the POI is calculated by your
TomTom NAVIGATOR.
28
Managing POIs
Tap Manage POIs from the Preferences menu.
Manage POIs
You can, for example, do the following:
• Create your own POI categories and add POIs to them.
• Set warnings when you get close to POIs.
Why would I want to create my own POIs?
A POI acts like a shortcut - once you have saved a location as a POI you never
have to type the address of that POI again. But when you create a POI you can
save more than just the location.
• Phone number - when you create a POI, you can save a phone number with
it.
• Categories - when you create a POI you have to put it in a category.
For example, you could create a category of POIs called ‘Favourite
restaurants’. With each POI, save their phone number so that you can call
them from your NAVIGATOR to reserve a table.
For example, you could create a category of POIs called ‘Favourite
restaurants’. With each POI, save their phone number so that you can call
them to reserve a table.
How can I create my own POIs?
1. Tap the screen to bring up the Main Menu.
2. Tap Change preferences.
3. Tap Manage POIs.
4. Before you can add a POI, you have to create at least one POI category.
Every POI is assigned to a POI category. You can only add POIs to POI
categories you have created yourself.
Tap Add POI category.
Add POI
category
5. Enter a name for your POI category, for example, ‘Friends’ or ‘Favourite
restaurants’. Then select a marker for your POI category.
6. Tap Add POI.
Tap this button to add a POI.
Add POI
7. You are asked to name the POI.
8. Select the POI category in which you want to add the POI.
29
9. Select the location of your POI from the list below.
You can set your Home location as a POI.
If you want to change your Home location, you can create a POI of the
Home location before you change it.
Home
You can create a POI from a Favourite.
Favourite
1 22 3
Address
You can only create a limited number of Favourites. If you want to create
more Favourites you have to delete some Favourites first. Before you
delete a Favourite, make it into a POI so that you don’t lose the address.
You can specify an address to be a POI. When you enter an address, you
can choose from four options.
• City centre
• Street and house number
• Postcode
• Crossing or intersection
Select a POI location from a list of places you have recently used as
destinations.
Recent
destination
You can add a Point of Interest (POI) as a POI. For example, if you are
creating a category of POIs for your favourite restaurants, use this option
instead of entering the addresses of the restaurants.
Point of
Interest
Tap this button to add your current position as a POI.
For example, if you stop somewhere you like, while you are there you
can tap this button to create the POI.
My location
Tap this button to create a POI using the map browser.
Select the location of the POI using the cursor, then tap Done.
Point on map
Tap this button to create a POI by entering latitude and longitude values.
Latitude
Longitude
Tap this button to make a POI of the current position of a TomTom Buddy.
TomTom
Buddy
30
Tap this button to create a POI using the address of a contact on your
device.
Contact
How can I set warnings for POIs?
1. Tap the screen to bring up the main menu.
2. Tap Change preferences.
3. Tap Manage POIs.
4. Tap Warn when near POI.
Tap this button to receive a warning when you travel near to the location
of a POI.
Warn when
near POI
5. Select the category of POI you want to be warned about.
Select the category from the list or start to type the name of the category
and select it when it is shown in the list.
6. Set how close the POI should be when you receive a warning.
7. Choose the warning sound for the category of POI you selected.
31
10.
Itinerary Planning
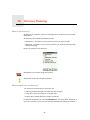
Itinerary Planning
What is an Itinerary?
An Itinerary is a plan for a journey including more locations than your final
destination.
An Itinerary can include the following items:
• Destination - a location on your journey where you want to stop.
• Waypoint - a location on your journey where you want to travel through
without stopping.
Here’s an example of an Itinerary:
Destinations are shown using this symbol.
Waypoints are shown using this symbol.
When would I use an Itinerary?
You could use an Itinerary for trips such as:
• A driving holiday through a country with lots of stops.
• A two day car journey with an overnight stop.
• A short drive which passes by Points of Interest.
In all these examples you could tap Navigate to... for each place. However, if
you use an Itinerary, you can save time by planning everything in advance.
32
Creating an Itinerary
1. Tap the screen to bring up the Main Menu.
2. Tap Itinerary planning.
The Itinerary planning screen opens. At first, there are no items on the
Itinerary.
Itinerary
planning
3. Tap Add and select a location.
Tip: You can add items to your Itinerary in any order and rearrange the order
later.
Following an Itinerary
When you use an Itinerary to navigate, the route will be calculated to the first
destination on the Itinerary. Your TomTom NAVIGATOR calculates the
remaining distance and time to the first destination and not for the whole
Itinerary.
As soon as you start to use an Itinerary, the route is calculated from your
current position. You do not need to set a departure point.
When you have passed a waypoint or reached a destination, it is marked as
visited.
Waypoints are shown on the map. Your NAVIGATOR will not warn you, when
you are approaching a waypoint or when you arrive at a waypoint.
Organising an Itinerary
Tap an item on your Itinerary to open a page of buttons for editing the item.
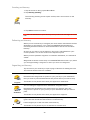
The buttons shown below are available.
You can change a waypoint into a destination using this button.
Remember that waypoints are points on your journey to your destination
that you want to pass and destinations are places where you want to stop.
Mark as
waypoint
This button is only shown if the item you tapped is a destination.
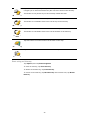
You can change a waypoint into a destination using this button.
Mark as
destination
Remember that destinations are places where you want to stop, and
waypoints are points on your journey to your destination that you want to
pass.
This button is only shown if the item you tapped is a waypoint.
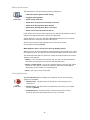
Tap this button to miss out part of your Itinerary. Your NAVIGATOR will
ignore this item and all the items before it in the Itinerary.
It will navigate you to the next item in the Itinerary.
Mark ‘visited’
This button is only shown if you are still due to visit this item.
33
Tap this button to repeat part of your Itinerary. Your NAVIGATOR will
navigate you to this item followed by the rest of the items in the Itinerary.
This button is only shown if you have already visited this item.
Mark ‘to visit’
Tap this button to move the item up the Itinerary.
This button is unavailable if the item is at the top of the Itinerary.
Move item up
Tap this button to move the item down the Itinerary.
This button is unavailable if the item is at the bottom of the Itinerary.
Move item
down
Tap this button to see the location of the item on the map.
Show on map
Tap this button to delete the item from the Itinerary.
Delete item
Start using an Itinerary
Tap Options, then tap Start navigation.
To save an Itinerary, tap Save Itinerary.
To load a saved Itinerary, tap Load Itinerary.
To create a new Itinerary, tap New Itinerary and to delete one, tap Delete
Itinerary.
34
11.
Preferences
Preferences
Use night colours / Use day colours
Tap this button to reduce the brightness of the screen and show darker
colours on the map.
When should I use this?
Use Night
colours
When it’s dark, it is easier to see the screen if the display on your
NAVIGATOR is not brightly lit.
To change back to a brighter screen showing brighter colours on the map,
tap Use day colours.
Use day
colours
Show POI on map
Tap this button to set which categories for the Points of Interest (POIs)
should be shown on the map:
1. Tap Show POIs on map in the Preferences menu.
Show POI on
map
2. Select the POI categories to display on the map.
Tap Find to search for a POI category.
3. Tap Done.
The POIs you have selected are shown as symbols on the map.
35
Safety preferences
Tap this button to set the following safety preferences:
• Hide most menu options while driving
Safety
preferences
• Suggest driving breaks
• Show safety reminders
• Warn when near places of worship or schools
• Warn when driving faster than allowed
• Warn when driving faster than a set speed
• Warn not to leave the device in the car
If you select one or more of the warnings, you will also be asked to select a
sound to be played whenever a warning is displayed.
Select whether or not your TomTom NAVIGATOR should warn you about
which side of the road you should be driving on.
Decide if you want the map display to be turned off in special
circumstances and press Done.
What happens when I use the Turn off map display option?
When you turn off the map display, instead of seeing your position on a map
in the Driving View, you will only see information about the next instruction.
Tap the button and select an option for when the map should be turned off.
These are the options:
• Always - The map will not be shown and you will only see information
about the next instruction and arrows showing direction.
• Above a certain speed - you set the speed at which point the map will be
turned off. This option is useful for situations when the map might be
distracting, such as when you are driving fast.
• Never - the map is never turned off.
Voice preferences
Tap Voice preferences to manage your TomTom voices. The following
options are available:
Voice
preferences
• Change voice - tap this button to change the voice that gives you
instructions.
• Disable voice - tap this button to disable the use of voices. To enable
voices, tap Enable.
• Download voice - tap this button to download new voices from
TomTom Services and transfer them to your TomTom.
36
Turn off sound / Turn on sound
Tap this button to turn off sound. If you turn off the sound, warnings for
upcoming POIs are also turned off.
The button changes to Turn on sound.
Turn off sound
Tips
To change the volume, tap Volume preferences in the Preferences menu.
To change the volume quickly while you are driving, tap the bottom lefthand section of the Driving View and move the slider.
To change the voice being used by your NAVIGATOR, tap Change voice in
the Voice preferences menu.
Volume preferences
Tap this button to change the volume.
Volume
preferences
Manage Favourites
Tap this button to rename or delete Favourites.
To find a Favourite quickly, tap Find, then start to type the name of the
Favourite. As soon as the Favourite is shown in the list, you can select it.
Manage
Favourites
Change Home location
Tap this button to set or change your Home location.
Change Home
location
Do I need to use my actual home address for the Home location?
No. Your Home location can be a place you go often, for example, your office.
It can be your actual home address, but it can be any address you like.
Why should I set a Home location?
Having a Home location means that you have a quick and easy way to navigate
there, by tapping the Home button in the Navigate to... menu
37
Manage maps
Tap this button to do the following:
Manage maps
• Download a map - tap this button to download a map you have bought
using TomTom HOME. It may not be possible to download maps on all
devices.
• Switch map - tap this button to change the map you are using.
• Download free map corrections - tap this button to download map
corrections provided as part of the Map Share service.
Use TomTom HOME to make backups, download, add and delete maps
from your navigation device.
Manage POIs
Tap this button to do the following:
• Set alerts for when you are near POIs.
Manage POIs
For example, your NAVIGATOR can tell you when there is a petrol
station nearby.
• Create your own POI categories and add POIs to them.
For example, you could create a category of POIs called “Friends”, and
add all your friends’ addresses as POIs in the category. You can even add
your friends’ phone numbers with their address so you can call them
from your NAVIGATOR.
Change car symbol
Tap this button to select a car symbol that will be used to show your current
position in the Driving view.
Change car
symbol
Change 2D/3D display / Turn on 2D display
Tap Turn on 2D display to change the perspective for viewing the map.
For example, the 2D view shows a two dimensional view of the map as
though viewed from above.
Turn on 2D
display
To switch the view to a three dimensional perspective, tap Change 2D/3D
display and select a view from the list.
Change 2D/3D
display
When should I use this?
38
In some situations, it is easier to see the map from above. Perhaps if the road
network is complicated or for times when you are walking while using your
NAVIGATOR to navigate.
Compass preferences
Tap this button to configure the compass. The following options are
available:
• None - the compass is not shown.
Compass
preferences
• One with arrow pointing north - the arrow always points towards north
and the direction you are moving is shown at the top of the compass.
• One with arrow showing your heading - the arrow always shows the
direction you are moving.
If you select one of these options, you then need to select the features
that are shown in the middle of the arrow:
• Direction - your direction is shown as a compass point, displayed in
the centre of the compass arrow.
• Degrees - your direction is shown as compass degrees, displayed in
the centre of the compass arrow.
• Nothing
• One with arrow pointing to your destination - the arrow always points
towards your destination. The distance to your destination is displayed
in the compass arrow.
Change map colours
Tap this button to select the colour schemes for day and night map colours.
You can also download more colour schemes from TomTom Services.
Change map
colours
Start-up preferences
Tap this button to select what happens when your NAVIGATOR starts. The
following options are available:
Start-up
preferences
• Show the Driving View - your NAVIGATOR starts and shows the Driving
View.
• Ask for a destination - your NAVIGATOR starts with Navigate to...
menu. You can enter a destination immediately.
• Show the Main Menu - your NAVIGATOR starts with the Main Menu.
39
Status bar preferences
Tap this button to select the information shown on the status bar:
• Remaining time - the estimated time left until you reach your destination.
Status bar
preferences
• Remaining distance - the distance left until you reach your destination.
• Current time
• Arrival time - your estimated arrival time.
• Speed
• Direction
• Show next street name - the name of the next street on your journey.
• Show current street name
• Show leeway to arrival time - your NAVIGATOR shows how late or early
you will be compared with the preferred arrival time that is set during the
planning of a route.
• Show max speed next to speed - only available when speed (above) is
also selected.
• How should the status bar be displayed?
Horizontal - If you choose this option, the status bar will be shown at the
bottom of the Driving view.
Vertical - If you choose this option, the status bar will be shown at the
right-hand side of the Driving view.
Note: The vertical status bar is only available when using NAVIGATOR in
landscape orientation.
Note: If the speed limit for the road you are on is available, it is shown next
to your speed.
If you drive faster than the speed limit, your speed is shown in red.
Automatic zooming
Tap this button to enable or disable automatic zooming in the Driving View.
Automatic
zooming
Quick menu preferences
Tap this button to choose up to six buttons to be used in the Quick menu.
The Quick menu button enables easy access for your most commonly used
buttons.
Quick menu
preferences
The buttons you assign for use with the Quick menu, are shown in the
Driving View.
40
Guided tours
Tap this button to show one of the Guided tours on how to use your
TomTom NAVIGATOR.
Guided tours
Name preferences
Tap this button to set the information that is shown on the map in the
Driving View. The following options are available:
• Show house number before street name
Name
preferences
• Show street names - if you are using a computer voice for spoken
instructions and have selected that street names should be read aloud,
you do not need to select this option, since the street names will be read
aloud even though this option is not selected.
• Show next motorway / signpost - when this option is selected, the next
major road on your route is shown at the top of the screen in the Driving
View.
• Show current street name on map
Set units
Tap this button to set the type of units that will be shown for the following:
• Distance
Set units
• Time
• Latitude and longitude
• Temperature
• Air pressure
Operate left-handed / Operate right handed
Tap this button to move important buttons, for example, the Done and
Cancel buttons as well as the zoom bar, to the left hand side of the screen.
This makes it easier to tap the buttons with your left hand without blocking
the screen.
Operate lefthanded
To move the buttons back to the right hand side of the screen, tap Operate
right-handed.
41
Keyboard preferences
You use the keyboard to enter your destination or to find an item in a list,
such as a POI.
Keyboard
preferences
Tap this button to select the size of the keys on the keyboard and the
keyboard layout. You can select from two sizes:
• Large keyboard
• Small keyboard
Three keyboard layouts are available:
• ABCD keyboard
• QWERTY keyboard
• AZERTY keyboard
Planning preferences
Tap this button to set the kind of route planned when you select a
destination.
The following options are available:
Planning
preferences
• Ask me every time I plan
• Always plan fastest routes
• Always plan shortest routes
• Always avoid motorways
• Always plan walking routes
• Always plan bicycle routes
• Always plan for limited speed
You can then set if the route summary screen closes automatically after you
have planned a route. If you select No, you have to tap Done to close the
route summary screen.
Toll road preferences
Tap this button to set how your NAVIGATOR handles toll roads if they are
on the route to a destination you set. You can choose from the following
options:
Toll road
preferences
• Ask me when there are toll roads on my route - you are asked if you
want to avoid a toll road whenever you plan a route.
• Always avoid toll roads
• Never to avoid toll roads
42
Change language
Tap this button to change the language used for all the buttons and
messages you see on your NAVIGATOR.
Change
language
You can choose from a wide range of languages. When you change the
language, you are also given the opportunity to change the voice.
Show GPS status
Tap this button to view navigational information such as sattelite reception,
map coordinates, current speed and direction.
Show GPS
status
Do not ask arrival time
Tap this button to stop your navigation device asking the arrival time when
you plan a journey.
Do not ask
arrival time
Hide tips / Show tips
Tap this button to stop your NAVIGATOR from showing tips.
To turn tips on again, tap Show tips.
Hide tips
Reset factory settings
Tap this button to restore the factory settings to your TomTom NAVIGATOR.
All your settings, including Favourites, your Home location, warnings for
POIs and any Itineraries you have created are deleted.
Reset factory
settings
43
12.
TomTom Traffic
TomTom Traffic
TomTom Traffic is a TomTom Service for receiving up-to-date traffic
information. TomTom Traffic requires a wireless data connection (GPRS,
EDGE, UMTS, CDMA).
TomTom Traffic uses the most up-to-date information from the best local
sources. For more information about subscribing see tomtom.com/services
Setting up TomTom Traffic
1. Tap TomTom Traffic in the Main Menu.
2. Tap Enable Traffic.
3. Enter your username and password.
The Traffic sidebar is shown on the right-hand side of the Driving View and
your device retrieves the latest traffic information from TomTom.
The following symbols are shown at the top of the Traffic sidebar:
Your device is busy retrieving traffic information.
Traffic information is up to date.
Traffic information has not been updated for at least 15 minutes.
Traffic information has not been updated for at least 30 minutes.
44
Traffic information has not been updated for at least 45 minutes.
Traffic information has not been updated for at least one hour.
No connection is available between your TomTom device and the
TomTom Traffic server.
Using TomTom Traffic
If you have a route planned, the traffic sidebar warns you about any traffic
incidents on your route.
In this example, there is a traffic jam on your route 9 kilometres ahead that
will cause an expected delay of 38 minutes.
To find the quickest route to your destination, do the following:
1. Tap the Traffic sidebar.
Tip: If you have trouble tapping the Traffic sidebar and the Main Menu is
being displayed instead of the traffic menu, try tapping your finger half on
the Traffic sidebar and half off the screen.
2. Tap Minimise delays.
Your device looks for the quickest route to your destination.
It is possible that the new route may also include traffic delays, or may even
be the same route as before. You can re-plan the route to avoid all delays,
but this new route will take longer than the quickest route already shown.
3. Tap Done.
Updating traffic information
With TomTom Traffic, there are two ways to update the traffic information:
• Tap Update traffic info in the Traffic menu.
• Set Traffic to be updated automatically at regular intervals.
To do this, tap Change Traffic preferences in the Traffic menu. Select
Automatically update traffic info while on route, then tap Done.
You are then asked if you want to limit how often Traffic is updated.
If you choose not to limit how often Traffic is updated, then TomTom will
send updated traffic information to your NAVIGATOR as soon as it is
available.
If you choose to limit how often Traffic is updated, you are asked to set a
time.
TomTom saves this time limit and sends new traffic information at the
interval you set. If there is no new traffic information, then TomTom will not
45
send any information to your NAVIGATOR. This saves you money by not
using your wireless data connection when there is no new information.
Using traffic information
Having up-to-date traffic information can help you to reduce your journey
time.
Whenever you plan a route, the latest traffic updated you received from
TomTom is taken into account by your NAVIGATOR when it plans the route.
Your NAVIGATOR can also recalculate your route if the traffic situation
changes after you start a journey:
1. Tap Change Traffic preferences in the Traffic menu.
2. Select Automatically optimise route after every update.
After your NAVIGATOR gets new traffic information, it will automatically
optimise your route.
Note: The best route may be the same as the route originally planned.
46
13.
Introducing TomTom HOME
Introducing TomTom HOME
TomTom HOME is a free application for your computer that helps you manage
the contents of your TomTom device. Connect to HOME frequently to get the
latest updates for your device.
You can, for example, do the following:
• Manage maps, voices, POIs and more.
• Buy TomTom services and manage your subscriptions.
• Update your TomTom with the latest software and services automatically.
• Read the full version of the user manual.
Tip: To get the most from HOME, we recommend using a broadband internet
connection.
Installing TomTom HOME
You can install TomTom HOME in two ways:
• From the CD supplied.
• By downloading it from tomtom.com/home.
47
14.
Addendum
Addendum
Important Safety Notices and Warnings
Global Positioning System
The Global Positioning System (GPS) is a satellite-based system that provides
location and timing information around the globe. GPS is operated and
controlled under the sole responsibility of the Government of the United
States of America which is responsible for its availability and accuracy. Any
changes in GPS availability and accuracy, or in environmental conditions, may
impact the operation of your TomTom device. TomTom does not accept any
liability for the availability and accuracy of GPS.
Use with Care
Use of a TomTom device for navigation still means that you need to drive with
due care and attention.
Aircraft and Hospitals
Use of devices with an antenna is prohibited on most aircraft, in many
hospitals and in many other locations. A TomTom device must not be used in
these environments.
This Document
Great care was taken in preparing this manual. Constant product development
may mean that some information is not entirely up-to-date. The information in
this document is subject to change without notice.
TomTom shall not be liable for technical or editorial errors or omissions
contained herein; nor for incidental or consequential damages resulting from
the performance or use of this material. This document contains information
protected by copyright. No part of this document may be photocopied or
reproduced in any form without prior written consent from TomTom
International B.V.
48
15.
Copyright notices
Copyright notices
© 2008 TomTom International BV, The Netherlands. TomTom™ and the "two
hands" logo are among the trademarks, applications or registered trademarks
owned by TomTom International B.V. Our limited warranty and end user
license agreement for embedded software apply to this product; you can
review both at www.tomtom.com/legal
© 2008 TomTom International BV, Niederlande. TomTom™ und das Logo mit
den »zwei Händen« gehören zu den Warenzeichen, Anwendungen oder
registrierten Markenzeichen von TomTom International B.V. Für dieses
Produkt gelten unsere eingeschränkte Garantie und unsere
Endnutzerlizenzvereinbarung für integrierte Software, die Sie beide auf
www.tomtom.com/legal einsehen und nachlesen können.
© 2008 TomTom International BV, The Netherlands. TomTom™ et le logo
TomTom ("deux mains") comptent parmi les marques commerciales, les
applications ou les marques déposées de TomTom International B.V.
L'utilisation de ce produit est régie par notre garantie limitée et le contrat de
licence utilisateur final relatif aux logiciels embarqués ; vous pouvez consulter
ces deux documents à l'adresse suivante : www.tomtom.com/legal
© 2008 TomTom International BV, Nederland. TomTom™ en het "tweehandenlogo" maken onderdeel uit van de handelsmerken, applicaties of
geregistreerde handelsmerken in eigendom van TomTom International B.V.
Op dit product zijn onze beperkte garantie en licentieovereenkomst voor de
eindgebruiker van toepassing; beide zijn te vinden op www.tomtom.com/
legal
© 2008 TomTom International BV, The Netherlands. TomTom™ e il logo delle
"due mani" fanno parte dei marchi, delle applicazioni e dei marchi registrati di
proprietà di TomTom International B.V. La nostra garanzia limitata e il
contratto di licenza per l'utente finale vengono applicati a questo prodotto, è
possibile consultarli entrambi all'indirizzo www.tomtom.com/legal
© 2008 TomTom International BV, Países Bajos. TomTom™ y el logotipo "dos
manos" son marcas comerciales, aplicaciones o marcas registradas de
TomTom International B.V. Nuestra garantía limitada y nuestro acuerdo de
licencia de usuario final para el software integrado son de aplicación para este
producto; puede consultar ambos en www.tomtom.com/legal
© 2008 TomTom International BV, Países Baixos. TomTom™ e o logótipo das
"duas mãos" fazem parte das marcas comerciais, aplicações ou marcas
49
comerciais registadas cuja proprietária é a TomTom International B.V. A
nossa garantia limitada e contrato de licença de utilizador final relativas ao
software incorporado dizem respeito a este produto; pode consultar ambos
em www.tomtom.com/legal
© 2008 TomTom International BV, Holland. TomTom™ og logoet med "de to
hænder" er blandt de varemærker, produkter og registrerede varemærker, der
tilhører TomTom International B.V. Vores begrænsede garanti og
slutbrugerlicensaftale for indlejret software gælder for dette produkt; begge
dokumenter findes på www.tomtom.com/legal
© 2008 TomTom International BV, Nederländerna. TomTom™ och logotypen
"två händer" tillhör de varumärken, programvaror eller registrerade
varumärken som ägs av TomTom International B.V. Vår begränsade garanti
och vårt slutanvändarlicensavtal för inbyggd programvara kan gälla för denna
produkt. Du kan läsa dem båda på www.tomtom.com/legal
2008 TomTom™ ja "two hands" -logo ovat eräitä TomTom International B.V.:n
omistamia tavaramerkkejä, sovelluksia tai rekisteröityjä tavaramerkkejä.
Rajoitettu takuumme ja loppukäyttäjän käyttösopimuksemme sulautetuille
ohjelmistoille koskevat tätä tuotetta; voit tarkastaa molemmat
verkkosivuillamme www.tomtom.com/legal
© 2008 TomTom International BV, Nederland. TomTom™ og "de to hendene"logoen er blant de varemerker, programvarer og registrerte varemerker som
eies av TomTom International B.V. Vår begrensede garanti og lisensavtale
med sluttbruker for integrert programvare gjelder dette produktet. Du kan
lese om begge på www.tomtom.com/legal
© 2008 TomTom International BV, Holandia. Znak TomTom™ i logo z dwiema
d³oñmi nale¿y do znaków handlowych, aplikacji lub zastrze¿onych znaków
handlowych, których w³aœcicielem jest firma TomTom International B.V. Do
niniejszego produktu zastosowanie ma umowa licencyjna dla koñcowego
u¿ytkownika produktu oraz ograniczona gwarancja na wbudowane
oprogramowanie; oba dokumenty mo¿na przejrzeæ na stronie
www.tomtom.com/legal
© 2008 TomTom International BV, Nizozemsko. TomTom™ a logo se dvìma
dlanìmi patøí mezi obchodní znaèky, aplikace nebo registrované ochranné
známky ve vlastnictví spoleènosti TomTom International B.V. Na tento
produkt se vztahuje omezená záruka a smlouva s koncovým uživatelem pro
vestavìný software; do obou dokumentù mùžete nahlédnout na
www.tomtom.com/legal
© 2008 TomTom International BV, Hollanda. TomTom™ ve "two hands"
logoları TomTom International B.V.'ye ait ticari marka, uygulama veya kayıtlı
ticari markalardır. Sınırlı garantimiz ve katıştırılmış yazılımın son kullanıcı
lisans sözleşmesi bu ürün içindir; www.tomtom.com/legal adresinden
ikisine de göz atabilirsiniz
© 2008 TomTom International BV, Hollandia. A TomTom™ és a "két kéz"
embléma is a TomTom International B.V. által birtokolt védjegyek,
50
alkalmazások és bejegyzett védjegyek közé tartozik. A korlátozott garancia és
a benne foglalt szoftver végfelhasználói licencszerződése érvényes erre a
termékre; melyeket a következő helyen tekinthet át: www.tomtom.com/legal
© 2008 TomTom International BV, Holland. TomTom™ ja "kahe käe" logo
kuuluvad nende kaubamärkide, rakenduste või registreeritud kaubamärkide
hulka, mille omanikuks on TomTom International B.V. Sellele tootele kehtib
meie piiratud garantii ja lõppkasutaja litsentsileping manustarkvara jaoks;
saad tutvuda mõlemaga aadressil www.tomtom.com/legal
© 2008 TomTom International BV, Nīderlande. TomTom™ un "divu roku"
logotips ir vienas no preču zīmēm, lietojumiem vai reģistrētām preču zīmēm,
kas pieder uzņēmumam TomTom International B.V. Šim produktam ir
piemērojama mūsu uzņēmuma ierobežotā garantija un iegultās
programmatūras gala lietotāja licences līgums, ar kuriem var iepazīties
www.tomtom.com/legal
© 2008 TomTom International BV, Nyderlandai. TomTom™ ir dviejų rankų
logotipas yra TomTom International B.V. vienas iš prekių ženklų, programų
arba registruotųjų prekės ženklų. Mūsų ribota garantija ir galutinio naudotojo
sutartis naudotis įdėtąja programine įranga taikoma šiam produktui; galite
peržiūrėti abu dokumentus svetainėje www.tomtom.com/legal
© 2008 TomTom International BV, Països Baixos. TomTom™ i el logotip amb
les "dues mans" formen part de les marques comercials, aplicacions o
marques comercials registrades propietat de TomTom International B.V. La
nostra garantia limitada i l'acord de llicència per a usuaris finals per al
programari inclòs són aplicables a aquest producte. Podeu consultar ambdós
documents a www.tomtom.com/legal
© 2008 TomTom International BV, Holandsko. TomTom™ a logo s "dvoma
rukami" patria medzi ochranné známky, aplikácie alebo registrované
ochranné známky vlastnené spoločnosťou TomTom International B.V. Na
tento produkt sa vzťahuje obmedzená záruka a dohoda s koncovým
užívateľom pre vstavaný softvér; viac informácií o oboch nájdete na
www.tomtom.com/legal
© 2008 TomTom International BV, Holanda. TomTom™ e o logotipo de "duas
mãos" estão entre as marcas comerciais, aplicativos ou marcas registradas
possuídas pela TomTom International B.V. Nossa garantia limitada e acordo
de licenciamento do usuário final para o software incluído se aplicam para
este produto; ambos podem ser vistos em www.tomtom.com/legal
Data Source
© 2008 Tele Atlas N.V. Based upon:
Topografische ondergrond Copyright © dienst voor het kadaster en de
openbare registers, Apeldoorn 2008.
© Ordnance Survey of Northern Ireland.
© IGN France.
51
© Swisstopo.
© BEV, GZ 1368/2008.
© Geonext/DeAgostini.
© Norwegian Mapping Authority, Public Roads Administration /
© Mapsolutions. © DAV.
This product includes mapping data licensed from Ordnance Survey with the
permission of the Controller of Her Majesty’s Stationery Office. © Crown
copyright and/or database right 2008. All rights reserved. Licence number
100026920.
Data Source
© 1984 – 2008 Tele Atlas North America. Inc. All rights reserved.
Canadian Data © DMTI Spatial. Portions of Canadian map data are
reproduced under license from Her Majesty the Queen in Right of Canada
with permission from Natural Resource Canada. Point of Interest data by Info
USA. Copyright 2008.
Data Source
Whereis® map data is © 2008 Telstra® Corporation Limited and its licensors,
Whereis® is a registered trademark of Telstra® Corporation Limited, used
under license.
Some images are taken from NASA’s Earth Observatory.
The purpose of NASA’s Earth Observatory is to provide a freely-accessible
publication on the Internet where the public can obtain new satellite imagery
and scientific information about our home planet.
The focus is on Earth’s climate and environmental change:
earthobservatory.nasa.gov/
Text to Speech technology, © 2008 Loquendo TTS. All rights reserved.
Loquendo is a registered trademark. www.loquendo.com
52