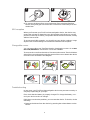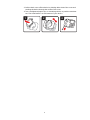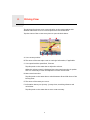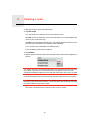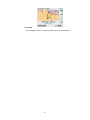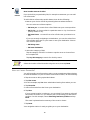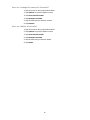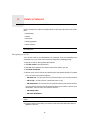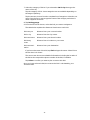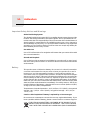
1
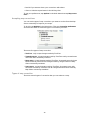
TomTom Start
1.
Getting started
Getting started
Mounting your navigation device
1. Push the EasyPort™ Mount on your TomTom Start against the windscreen
in your car.
1
2
2. Adjust the angle of your device.
3. Lock the EasyPort Mount by twisting the base.
4
3
4. Insert the Car Charger into your device.
5. Insert the Car Charger into the cigarette lighter in your car.
5
6
6. Switch your device on by pressing the On/Off button on the back of your
device.
7. You now have to answer some questions to set up your device. Tap the
screen to answer the questions.
2
8
7
8. To remove the Mount from your windscreen, first unlock the EasyPort
Mount, then gently pull one of the tabs. The Mount comes away from the
windscreen.
GPS reception
When you first start your TomTom Start navigation device, the device may
need a few minutes to determine your GPS position and show your current
position on the map. In future, your position will be found much faster, usually
within a few seconds.
To ensure good GPS reception, you should use your device outdoors. Large
objects such as tall buildings can sometimes interfere with reception.
Changeable covers
You can personalise your TomTom Start by changing the covers. Go to tomtom.com/startskins to check which covers are available.
To remove the cover from the device, first remove the mount. Then hold either
side of the cover and push through the centre of the cover to detach the device
from the cover as shown in the diagram.
Troubleshooting
In rare cases, your TomTom Start navigation device may not start correctly or
may stop responding to your taps.
First, check that the battery is properly charged. To charge the battery, connect your device to the car charger.
If this does not solve the problem, you can reset the device. To do this, do the
following.
1. Remove the Mount from the device by pressing the release button on the
Mount.
3
2. Pull the back cover off the device by holding either side of the cover and
pushing the device through the centre of the cover.
3. Use a straightened paper clip, or something similar, to push the reset button. The reset button is on the bottom of your device.
1
2
4
3
2.
Driving View
Driving View
The Driving View shows your current location on the map together with
detailed information such as current speed and route instructions.
Tap the centre of the screen at any time to open the Main Menu.
A Your current position.
B The name of the next major road or road sign information, if applicable.
C Your speed and the speed limit, if known.
Tap this panel on the status bar to adjust the volume.
When the volume control is displayed, the next route instruction is spoken.
This is a useful way to hear and adjust the current volume level.
D Next route instruction.
Tap this panel on the status bar to switch between 2D and 3D views of the
Driving View.
E The name of the street you are on.
F Information about your journey: journey time, remaining distance and
arrival time.
Tap this panel on the status bar to see a route summary.
5
3.
Main Menu
The Main Menu is the starting point for planning a route, looking at a map or
changing your device settings.
Main Menu
To open the Main Menu from the Driving View, tap the centre of the Driving
View screen.
To return to the Driving View from the Main Menu, tap done.
Main Menu buttons
The following buttons are shown on the Main Menu.
Tap this button to plan a new route.
This button is shown when you have not planned a route.
Plan route
Tap this button to plan a new route.
This button is shown when you have planned a route.
Change route
Tap this button to look at the map.
Browse map
Sound
Tap this button to turn the sound off.
sound
6
Tap this button to turn the sound on.
sound
Night /Day
Tap this button to set the night colour scheme, which reduces the brightness of the screen and shows the map using dark colours.
night
This is useful when driving at night or in dark environments such as long
tunnels.
Tap this button to set the day colour scheme, which increases the brightness of the screen and shows the map using bright colours.
day
Options
Tap this button to adjust the settings for your device.
For more information, see the chapters Options and Advanced settings.
options
Help
Tap this button to see the contact details and plan a route to an emergency
services centre or another specialist service such as a veterinary service.
For more information, see the chapter Help.
help
7
4.
Browse Map
Browse Map
To look at the map in the same way as you might look at a traditional paper
map, tap Browse map in the Main Menu.
You can use your finger to move the map by touching the screen and sliding
your finger across the screen.
A The scale bar
B Marker
Markers point to your current location, your home location and your destination. The marker shows the distance to the location.
Tap a marker to centre the map on the location pointed to by the marker.
C GPS button
Tap this button to centre the map on your current position.
D The POI button
Tap this button to select which POIs are shown.
E The cursor
F The Find button
Tap this button to find specific addresses.
G The Cursor button
Tap this button to plan a route to the cursor position, create a Favourite at
the cursor position or find a Point of Interest near to the cursor position.
H The zoom bar
8
Zoom in and out by moving the slider.
9
5.
Planning a route
Planning a route
1. Tap the screen to open the Main Menu.
2. Tap Plan route.
You are asked if you want to leave from where you are.
Tap YES to plan a route from your current location. You will probably plan
most of your routes this way.
Tap NO to select another starting point. You might decide to do this so you
can view the route before you intend to start travelling.
You can select your destination in different ways.
In this example, we'll enter an address.
3. Tap Address.
4. Start to type the name of the town and tap on the name when it appears in
the list.
Tip: When you plan a route for the first time you are asked to select the country or state. Your choice is saved and used for all future routes. You can
change this setting by tapping on the flag and selecting a new coutry or state.
5. Enter the street name in the same way and then enter the house number.
Tip: The name at the top of the list is a city/town centre. Instead of entering
the street name and house number, you can tap the name at the top of the list
to set the address as the town centre.
The route is planned and a summary of the route is shown.
10
6. Tap Done.
Your navigation device is ready to guide you to your destination.
11
6.
Finding alternative routes
Finding alternative routes
Once you have planned a route, you may want to change something about the
route, without changing your destination.
Why change the route?
Maybe for one of these reasons:
• You can see a roadblock or a line of traffic ahead.
• You want to travel via a particular location, to pick someone up, stop for
lunch or fill up with petrol.
• You want to avoid a difficult junction or a road you don’t like.
Tap this button in the Main Menu to change the currently planned route.
Change route
Tap this button if you can see a roadblock or a line of traffic ahead. You then
have to choose how much of the route ahead you want to avoid.
Avoid
roadblock
Choose from the different options. Your Start will recalculate your route
avoiding the section of the route for the distance you selected.
Don’t forget that once a new route is calculated, you may have to turn off
the road you are on very soon.
If the roadblock suddenly clears, tap Recalculate original to return to your
original route.
Tap this button to calculate an alternative to the route already planned.
Calculate
alternative
Your Start will look for another route from your current location to your
destination.
If you decide you would prefer to use the original route after all, tap Recalculate original.
Why would I need to do this?
Apart from the roads near your position and near your destination, the new
route will use totally different roads to reach your destination. This is an
easy way of calculating a totally different route.
12
Tap this button to return to the original route without deviations to avoid
roadblocks or travelling via particular locations.
Recalculate
original
Tap this button to change your route so that it passes a particular location,
perhaps to pick someone up on the way. When you do this, a marker is
shown on the map for the location you choose the travel via.
Travel via...
You choose the location you want to pass in the same way as you choose a
destination. So you can select from all the same options: for example,
Address, Favourite, Point of Interest and Point on map.
Your Start will calculate a new route to your destination that passes the
location you chose. Unlike your final destination, your Start does not
inform you when you pass by this location.
Tap this button to plan a new route. When you plan a new route, the old
one will be deleted.
Plan route
Tap this button to delete the current route.
Clear route
13
7.
Options
You can change the way your TomTom Start looks and behaves.
Options
Tap Options in the Main Menu.
Change voice
Your navigation device gives spoken warnings and instructions using
voices which have been recorded by actors.
Change voice
To select a different voice on your device, tap Change voice in the Options
menu or in the Voices and images menu. Then select a voice from the list.
You can add and remove voices using TomTom HOME.
Set clock
Tap this button to select the time format and to set the time.
Set clock
The easiest way to set the time is by tapping the Sync button. Your Start
will then take the time from GPS information.
Note: You can only use Sync if you have GPS reception, so you cannot set
the clock in this way when you are indoors.
After using Sync to set the time, you may have to adjust the hours depending on your time zone. Your Start works out your time zone and always
keeps the time correct using GPS information.
Change language
Tap this button to change the language used for all the buttons and messages you see on your Start.
Change
language
You can choose from a wide range of languages. When you change the language, you are also given the opportunity to change the voice.
Home and Favourites
Tap this button to manage your Home and Favourite locations.
For more information, see the chapter Favourites.
Home and
Favourites
14
Voices and images
Tap this button to change your settings for voices and images.
For more information, see the chapter Voices and images.
Voices and
images
Map corrections
Tap this button to make a correction to your map.
Map
corrections
You can download map corrections made by other TomTom users or
restrict your updates to corrections that have been verified by TomTom.
Advanced settings
To change the advanced settings on your TomTom Start, tap the Advanced
button in the Options menu.
Set units
Tap this button to set the units used for the following measurements:
• Distance
Set units
• Time
• Latitude and longitude
Operate left-handed / Operate right handed
Operate lefthanded
Tap this button to move important buttons, for example, the Done and Cancel buttons as well as the zoom bar, to the left hand side of the screen. This
makes it easier to tap the buttons with your left hand without blocking the
screen.
To move the buttons back to the right hand side of the screen, tap Operate
right-handed.
Keyboard preferences
You use the keyboard to enter your destination or to find an item in a list,
such as a POI.
Keyboard
preferences
Tap this button to select the size of the keys on the keyboard and the keyboard layout. You can select from two sizes:
• Large keyboard
• Small keyboard
Several keyboard layouts are available:
• ABCD keyboard
• QWERTY keyboard
• AZERTY keyboard
15
Enable/Disable Safety Alerts
Tap this button to enable or disable TomTom Safety Alerts.
Enable/
Disable Safety
Alerts
TomTom Safety Alerts
Important: Regularly connect your navigation device to TomTom HOME to
update the list of locations for all types of safety alerts. The locations of mobile
cameras are sent directly to your device.
When a safety camera location is shown on the map, a warning sound is
played to warn you that you are approaching an area where a safety camera
is located.
Switch map
Tap this button to change the map you are using.
Switch map
Reset factory settings
Tap this button to restore the factory settings to your TomTom Start.
Reset factory
settings
All your settings, including your Home location and any Favourites, are
deleted.
16
8.
Favourites
Favourites
What are Favourites?
Favourites are places that you often visit. You can create Favourites so that
you don’t have to enter the address every time you plan a route.
They don’t have to be places you especially like, just useful addresses.
How can I create a Favourite?
From the Main Menu, tap Options followed by Home and Favourites and then
tap Add Favourite.
You can then select the location of the Favourite from the list below.
You can type your own name for the Favourite when the keyboard is shown.
To enter the name, there’s no need to delete the suggested name, just start
typing.
You can set your Home location as a Favourite.
Home
You cannot create a Favourite from another Favourite. This option will
always be unavailable in this menu.
Favourite
To rename a Favourite, tap Home and Favourites then Manage Favourites
in the Options menu.
You can specify an address to be a Favourite.
Address
Select a Favourite location from a list of places you have recently used as
destinations.
Recent
destination
17
You can add a Point of Interest (POI) as a Favourite.
Does it make sense to do this?
Point of
Interest
If you visit a POI you particularly like, for example a restaurant, you can add
it as a Favourite.
To add a POI as a Favourite, tap this button, then do the following:
1. Narrow your choice of POIs by selecting the area where the POI is.
You can select one of these options:
• POI near you - to search from a list of POIs near your current position.
• POI in city - to choose a POI in a particular town or city. You have to
specify a town or city.
• POI near Home - to search from a list of POIs near your Home location.
If you are currently navigating to a destination, you can also select from
a list of POIs which are on your route or near your destination. Choose
one of these options:
• POI along route
• POI near destination
2. Select the category of POI.
Tap the category of POI if it is shown or tap the arrow to choose from
the complete list.
Tap Any POI category to search for a POI by name.
Tap this button to create a Favourite using the map browser.
Select the location of the Favourite using the cursor, then tap Done.
Point on map
How can I use a Favourite?
You will normally use a Favourite to plan a route somewhere without having
to enter the address. To plan a route to a Favourite location, do the following:
1. Tap the screen to bring up the Main Menu.
2. Tap Plan route.
3. For this example, tap Yes when asked about leaving from where you are.
4. Tap Favourite.
5. Select a Favourite from the list as your destination.
6. Tap Now.
If your current location is unknown, you are asked if you want to wait until
the location is known or if you want to plan a route using your last known
position. For this example, select Plan using last know position and tap
Done.
The route is planned and a summary of the route is shown.
7. Tap Done.
Your navigation device is ready to guide you to your destination.
18
How can I change the name of a Favourite?
1. Tap the screen to bring up the Main Menu.
2. Tap Options to open the Options menu.
3. Tap Home and Favourites.
4. Tap Manage Favourites.
5. Tap the Favourite you want to rename.
6. Tap Rename.
How can I delete a Favourite?
1. Tap the screen to bring up the Main Menu.
2. Tap Options to open the Options menu.
3. Tap Home and Favourites.
4. Tap Manage Favourites.
5. Tap the Favourite you want to delete.
6. Tap Delete.
19
9.
Points of Interest
Points of Interest
Points of Interest or POIs are useful places on the map. Here are some examples:
• Restaurants
• Hotels
• Museums
• Parking garages
• Petrol stations
Note: Tap Map corrections in the Options menu to report missing POIs or edit
existing POIs.
Navigating to a POI
You can use a POI as your destination. For example, if you are travelling to an
unfamiliar city, you could choose a POI to help find a parking garage.
1. Tap the screen to bring up the Main Menu.
2. Tap Plan route in the Main Menu.
3. Tap Yes when asked if you want to leave from where you are.
4. Tap Point of Interest.
5. Narrow your choice of POIs by selecting the area where the POI is located.
You can select one of these options:
• POI near you - to choose from a list of POIs near to your current location.
• POI in city - to find a POI in a particular town or city.
• POI near Home - to choose from a list of POIs near to your Home location.
You can select from a list of POIs which are along your route or close to your
destination. Choose from one of these options:
• POI along route
• POI near destination
Note: The last POI you viewed is also shown so that you can plan a route there
faster.
6. Type the name of the town you want to visit and select the town when it
appears in the list.
20
7. Select the category of POI or if you selected to POI in city then type the
name of the city.
Tap the category of POI. Some categories are not available depending on
the stage of planning.
Tap the arrow to choose from the complete list of categories. Select the category from the list or start to type the name of the category and select it
when it appears in the list.
8. Tap Parking garage.
9. From the list of POIs shown, select the POI you want to navigate to.
The table below explains the distances listed next to each POI.
POI near you
Distance from your current location
POI in city
Distance from the city centre
POI near Home
Distance from your Home location
POI along
route
Distance from a location on your route
POI near destination
Distance from your destination
If you know the name of the POI, tap Find and type the name. Select it from
the list when it is shown.
The next screen shows more detailed information including the location of
the POI on the map and the phone number of the POI, if available.
Tap Select to confirm you want to plan a route to this POI.
Once you have selected a POI, the route to the POI is calculated by your
TomTom Start.
21
10.
Voices and images
Voices and images
Voices
Your navigation device has different voices which have been recorded by
actors. These voices are used in the following ways:
• Spoken instructions
• Warnings
Volume control
You can control the volume on your navigation device in two ways:
• To adjust the volume level, tap the left-hand section of the status bar in the
Driving View.
The last spoken instruction is repeated and the volume level is shown.
Move the volume slider to adjust the volume.
• To turn the sound on or off, tap volume in the Main Menu.
Set day colour scheme
Tap day in the Main Menu to start using these colours.
You can also download additional colour schemes using TomTom HOME.
Set day colour
scheme
Set night colour scheme
Tap night in the Main Menu to start using these colours.
You can also download additional colour schemes using TomTom HOME.
Set night
colour scheme
Change car symbol
Tap this button to select the car symbol that shows your current position in
the Driving View.
Change car
symbol
You can download additional car symbols using TomTom HOME.
22
Change voice
Your navigation device gives spoken warnings and instructions using
voices which have been recorded by actors.
Change voice
To select a different voice on your device, tap Change voice in the Options
menu or in the Voices and images menu. Then select a voice from the list.
You can add and remove voices using TomTom HOME.
Change start-up image
Tap this button to select the start-up image which is shown every time you
switch on the device.
You can download additional start-up images using TomTom HOME.
Change startup image
Change shutdown image
Tap this button to select the shutdown image which is shown every time
you switch off the device.
You can download additional shutdown images using TomTom HOME.
Change
shutdown
image
23
11.
TomTom Map Share
TM
TomTom Map ShareTM
With TomTom Map Share, you can correct errors on your map and share
those corrections with other people in the TomTom Map Share community,
as well as receiving corrections made by others.
Note: TomTom Map Share is not available in all regions. For more information, go to tomtom.com/mapshare.
Map corrections
There are two types of map correction:
• Corrections that are immediately shown on the map. These include, changing the traffic flow of a street, blocking or renaming a street and adding or
editing POIs.
This type of change is immediately shown on your own map. You can hide
these corrections at any time in the Map Share preferences menu.
• Corrections that are reported to TomTom but not shown immediately on
your map. These include, missing streets, errors in motorway entrances
and exits and missing roundabouts.
This type of correction is investigated by TomTom and once verified, is
included in the next map release. These corrections are therefore not shared
with the Map Share community.
Making a map correction
Important: For safety reasons, you should only mark a location when you are
driving. Do not enter the full details of an error while you are driving.
1. Tap Options in the Main Menu then tap Map corrections.
2. Tap Correct a map error.
Correct a map
error
A list of possible map corrections is shown.
3. Select the type of correction you want to report.
Note: If you tap Add missing POI or Report other error you will be asked for
some additional information before the next step.
4. Select the method you want to use for selecting the location of the correction.
5. When you have found the location, tap Done.
6. Enter correction or confirmation of correction now.
24
Receiving the latest map updates
When you connect your TomTom Start to your computer, TomTom HOME
automatically downloads any available map corrections and sends any
changes you have made, to the Map Share community.
There are several types of corrections which can be set in the Correction
preferences menu.
Marking a map error while on the move
Important: For safety reasons, you should only mark a location when you are
driving. Do not enter the full details of an error while you are driving.
If you notice an item on your map that needs attention, you can mark the location using the Report button and then enter the details when you are no longer
driving.
To show the Report button in the Driving View, do the following:
1. Tap Options in the Main Menu then tap Map corrections.
2. Tap Correction preferences.
3. Tap Done and then tap Done again.
4. Select Show report button, then tap Done.
The Report button is shown on the left-hand side of the Driving View. After
you mark a location, you can add more information about the change when
you open the Map corrections menu.
For example, you are driving to a friend's house and you notice that the name
of the street you are on is different from the one on your map. To report the
change, tap the Report button and your Start will save your current location.
You can then send the correction to TomTom Map Share when you have finished your journey.
TomTom Map Share community
To join the Map Share community, do the following:
1. Tap Options in the Main Menu then tap Map corrections.
2. Tap Download corrections made by others.
3. Tap Join.
When you connect your Start to your computer, TomTom HOME downloads
new corrections and sends your corrections to the Map Share community.
Important: Connect your device to your computer regularly and use TomTom
HOME to check for new updates.
Correction preferences
The correction preferences set the way TomTom Map Share works on your
device.
You can set the following preferences:
• Use the trust level slider to choose the types corrections from the Map
Share community you want to use on your maps.
25
• Decide if you want to share your corrections with others.
• Show or hide the report button in the Driving View.
To set your preferences, tap Options in the Main Menu then tap Map corrections.
Accepting map corrections
You can set the type of map corrections you want to receive from the Map
Share community to improve your maps.
To do this, tap Options in the Main Menu. Then tap Correction preferences
and move the slider to select the type of corrections you want.
There are four types of map correction:
• TomTom - only accept changes made by TomTom.
• Trusted sources - accept changes made by TomTom and by trusted users
who have been verified by TomTom.
• Many users - accept changes made by TomTom, by trusted users who have
been verified by TomTom and changes made by a high number of Map
Share community members.
• Some users - accept changes made by TomTom, by trusted users who
have been verified by TomTom and all changes that have been made by
Map Share community members.
Types of map correction
There are several types of correction that you can make to a map.
26
To make a correction to your map, tap Map corrections in the Options menu
then tap Correct a map error. The following types of corrections are shown.
Tap this button to block or unblock a street. You can block or unblock the
street in one or both directions.
(Un)block
street
For example, to correct a street near to your current location, do the following:
1. Tap (Un)block street.
2. Tap Near you to select a street near your current location. You can select
a street by name, a street near your Home location or a street on the
map.
3. Select the street or section of a street you want to correct by tapping it
on the map.
The street you select is highlighted and the cursor shows the name of
the street.
4. Tap Done.
Your device shows the street and whether the traffic is blocked or
allowed in each direction.
5. Tap one of the direction buttons to block or unblock the flow of traffic in
that direction.
6. Tap Done.
The next time you connect your device to TomTom HOME, your corrections are shared with the TomTom Map Share community.
Tap this button to correct the traffic direction of a one-way street, where the
direction of traffic is different to the direction shown on your map.
Reverse traffic
direction
Note: Reverse traffic direction only works for one-way streets. If you select
a two-way street you will be given the chance to block/unblock the street
rather than changing the direction.
27
Tap this button to change the name of a street on your map.
For example, to rename a street near to your current location:
Edit street
name
1. Tap Edit street name.
2. Tap Near you.
3. Select the street or section of a street you want to correct by tapping it
on the map.
The street you select is highlighted and the cursor shows the name of
the street.
4. Tap Done.
5. Type the correct street name.
6. Tap Done.
Tap this button to change and report incorrect road turn directions.
Change turn
restrictions
Tap this button to change and report road speed limit.
Change road
speed
Tap this button to add a new Point of Interest (POI).
For example to add a new restaurant near to your current location:
Add missing
POI
1. Tap Add missing POI.
2. Tap Restaurant in the list of POI categories.
3. Tap Near you.
4. Select the location of the missing restaurant.
You can select the location by entering the address or by selecting the
location on the map. Select Near you or Near home to open the map at
your current location or at your Home location.
5. Tap Done.
6. Type the name of the restaurant then tap OK.
7. If you know the telephone number of the restaurant you can type it, then
tap OK.
If you don’t know the number, just tap OK without typing a number.
28
Tap this button to edit an existing POI.
You can use this button to make the following changes to a POI:
Edit POI
• Delete the POI.
• Rename the POI.
• Change the telephone number of the POI.
• Change the category that a POI belongs to.
• Move the POI on the map.
Tap this button to report other types of corrections.
Report other
error
These corrections are not immediately applied to your map. Your
TomTom Start sends a special report to TomTom Map Share.
You can report missing streets, errors in motorway entrances and exits and
missing roundabouts. If the correction you want to report is not covered by
any of these report types, enter a general description then tap Other.
29
12.
Help
Help
Help provides an easy way to contact and plan a route to locations that provide emergency services, such as a hospital or to other specialist services.
For example, if you are involved in a car accident, you could use Help to call
the nearest hospital and tell them your exact location.
Note: Information may not be available for all services in all countries.
How do I use Help to phone a local service?
You can use Help to plan a route to local services, make contact by phone and
inform the service about the precise details of your current location.
When you search for a service centre, you are shown a list of the nearest services. Select one of the services in the list to view their address and phone
number and to see your current location on the map.
To use Help to locate an emergency service, contact them by phone and plan
a route to the emergency service location, do the following:
1. Tap the screen to bring up the Main Menu.
2. Tap help.
3. Tap Phone for help.
4. Select the type of service you require. For this example, tap Nearest hospital.
5. Select a service from the list. The nearest service is shown at the top of the
list. For this example, tap the one at the top of the list.
Your current location is shown on the map together with the phone number
of the service. This helps you to explain where you are when you call the
service for help.
6. To plan a route from your current location to the service location, tap Navigate there.
Your navigation device starts guiding you to your destination.
Options
Phone for help
Drive to help
Tap this button to view the location and contact details for a service.
Tap this button to plan a route by car to a service.
30
13.
Using TomTom HOME
Using TomTom HOME
1
3
2
4
TomTom HOME is a free application for your computer that you can use to
update your device, read the Reference Guide, download extras and update
your maps.
1. Remove the EasyPort™ Mount from back of your device by pushing the
release button on the Mount. Turn the Mount around.
2. Reattach the Mount to your device. Push your device against the ball joint
end of the Mount first. Then push the device into the other end of the
Mount.
3. Open the Mount out so you can stand it on a table.
4. Insert the USB cable into your device and into your computer.
Switch your device on. Your device asks you if you want to connect to the
computer. Tap YES. If TomTom HOME is not installed on your computer, it
starts to install. Your computer needs to be connected to the internet.
Note: You can also download TomTom HOME from tomtom.com/home.
31
14.
Addendum
Addendum
Important Safety Notices and Warnings
Global Positioning System
The Global Positioning System (GPS) is a satellite-based system that provides
location and timing information around the globe. GPS is operated and controlled under the sole responsibility of the Government of the United States of
America which is responsible for its availability and accuracy. Any changes in
GPS availability and accuracy, or in environmental conditions, may impact the
operation of your TomTom device. TomTom does not accept any liability for
the availability and accuracy of GPS.
Use with Care
Use of a TomTom device for navigation still means that you need to drive with
due care and attention.
Aircraft and Hospitals
Use of devices with an antenna is prohibited on most aircraft, in many hospitals and in many other locations. A TomTom device must not be used in these
environments.
Battery
This product uses a Lithium-Ion battery. Do not use it in a humid, wet and/or
corrosive environment. Do not put, store or leave your product in or near a
heat source, in a high temperature location, in strong direct sunlight, in a
microwave oven or in a pressurized container, and do not expose it to temperatures over 60 C (140 F). Failure to follow these guidelines may cause the Lithium-Ion battery to leak acid, become hot, explode or ignite and cause injury
and/or damage. Do not pierce, open or disassemble the battery. If the battery
leaks and you come into contact with the leaked fluids, rinse thoroughly with
water and seek medical attention immediately. For safety reasons, and to prolong the lifetime of the battery, charging will not occur at low (below 0 C/32 F)
or high (over 45 C/113 F) temperatures.
Temperatures: Standard operation: -10 C (14 F) to +55 C (131 F); short period
storage: -20 C (-4 F) to + 60 C (140 F); long period storage: -20 C (-4 F) to
+25 C (77 F).
Caution: risk of explosion if battery is replaced by an incorrect type.
Do not remove or attempt to remove the non-user-replaceable battery. If you
have a problem with the battery, please contact TomTom customer support.
THE LITHIUM-ION BATTERY CONTAINED IN THE PRODUCT MUST
BE RECYCLED OR DISPOSED OF PROPERLY. USE YOUR TOMTOM
ONLY WITH THE SUPPLIED DC POWER LEAD (CAR CHARGER/BAT-
32
TERY CABLE) AND AC ADAPTER (HOME CHARGER) FOR BATTERY CHARGING.
Please use this device with the charger provided.
For replacement chargers, go to tomtom.com for information about approved
chargers for your device.
To recycle your TomTom unit please see your local approved TomTom service center.
The stated battery life is a maximum possible battery life. The maximum battery life will only be achieved under specific atmospheric conditions. The estimated maximum battery life is based on an average usage profile.
For tips on extending the battery life, go to the FAQ listed below for your country:
AU: www.tomtom.com/8703
CZ: www.tomtom.com/7509
DE: www.tomtom.com/7508
DK: www.tomtom.com/9298
ES: www.tomtom.com/7507
FI: www.tomtom.com/9299
FR: www.tomtom.com/7506
HU: www.tomtom.com/10251
IT: www.tomtom.com/7505
NL: www.tomtom.com/7504
PL: www.tomtom.com/7503
PT: www.tomtom.com/8029
RU: www.tomtom.com/10250
SE: www.tomtom.com/8704
UK: www.tomtom.com/7502
US: www.tomtom.com/7510
Taking care of your TomTom device
Do not leave your TomTom device or TomTom accessories on view when you
leave your car. They may become an easy target for thieves.
We recommend that you use the safety preferences on your TomTom device,
where available. The safety preferences are available in the Preferences menu.
Take care of your TomTom device and clean it correctly.
• Use a soft cloth to wipe the screen of your device; do not use any liquid
cleaners.
• If your device gets wet, dry it with a soft cloth.
• Do not open the casing of your device under any circumstances. Doing so
may be dangerous and will invalidate your warranty.
• If your device includes a memory card, do not use the memory card with
any device other than a TomTom device. Other devices may damage the
memory card.
• Do not expose your device to high or low temperatures, which can cause
permanent damage. For example, don’t leave it in the car on hot summer
days or during cold winter nights.
R&TTE directive
Hereby, TomTom declares that this personal navigation device is in compliance with the essential requirements and other relevant provisions of the EU
33
Directive 1999/5/EC. The declaration of conformity can be found here:
www.tomtom.com/legal.
Exposure limits
This device complies with radiation exposure limits set forth for an uncontrolled environment. In order to avoid the possibility of exceeding the radio
frequency exposure limits, human proximity to the antenna shall not be less
than 20cm (8 inches) during normal operation.
WEEE directive
This symbol on the product or its packaging indicates that this product shall not be treated as household waste. In line with EU Directive
2002/96/EC for waste electrical and electronic equipment (WEEE),
this electrical product must not be disposed of as unsorted municipal
waste. Please dispose of this product by returning it to the point of
sale or to your local municipal collection point for recycling.
CE Marking
This equipment complies with the requirements for CE marking when used in
a residential, commercial, vehicular or light industrial environment.
C-tick
N14644
This product displays the C-tick to show it complies with relevant Australian and New Zealand regulations.
Warning for Australia
The user needs to switch off the device when exposed to areas with potentially explosive atmospheres such as petrol stations, chemical storage depots
and blasting operations.
Responsible party in Australia
TomTom Australia, Building 1, Suite 3, Level 3 , 3 Richardson Place, North
Ryde NSW 2113, Australia
Tel: +612 8875 1700
This Document
Great care was taken in preparing this manual. Constant product development
may mean that some information is not entirely up to date. The information in
this document is subject to change without notice.
TomTom shall not be liable for technical or editorial errors or omissions contained herein; nor for incidental or consequential damages resulting from the
performance or use of this material. This document contains information protected by copyright. No part of this document may be photocopied or reproduced in any form without prior written consent from TomTom N.V.
34
15.
Copyright notices
Copyright notices
© 2009 TomTom N.V., The Netherlands. TomTom®, and the "two hands" logo,
among others, are Trademarks owned by TomTom N.V. or one of its subsidiaries. Please see www.tomtom.com/legal for warranties and end user
licence agreements applying to this product.
© 2009 TomTom N.V., Niederlande. TomTom®, das 'Zwei Hände'-Logo usw.
sind registrierte Marken von TomTom N.V. oder eines zugehörigen Tochterunternehmens. Die für dieses Produkt geltenden Garantien und Endnutzerlizenzvereinbarungen finden Sie unter www.tomtom.com/legal.
© 2009 TomTom N.V., Pays-Bas. TomTom® et le logo composé de « deux
mains », entre autres, font partie des marques commerciales appartenant à
TomTom N.V. ou l'une de ses filiales. L'utilisation de ce produit est régie par
notre garantie limitée et le contrat de licence utilisateur final, que vous pouvez
consulter à l'adresse suivante : www.tomtom.com/legal
© 2009 TomTom N.V., Nederland. TomTom® en het logo met twee handen
zijn onder andere handelsmerken die eigendom zijn van TomTom N.V. of een
van haar dochterondernemingen. Ga naar www.tomtom.com/legal voor
garanties en licentieovereenkomsten voor eindgebruikers die van toepassing
zijn op dit product.
© 2009 TomTom N.V., The Netherlands TomTom® e il logo delle "due mani",
fra gli altri, sono marchi registrati di proprietà di TomTom N.V. o di una delle
sue filiali. Consultare www.tomtom.com/legal per le garanzie e i contratti di
licenza per l'utente finale applicabili a questo prodotto.
© 2009 TomTom NV, Países Bajos. TomTom™ y el logotipo "dos manos" son
marcas comerciales, aplicaciones o marcas registradas de TomTom NV.
Nuestra garantía limitada y nuestro acuerdo de licencia de usuario final para
el software integrado son de aplicación para este producto; puede consultar
ambos en www.tomtom.com/legal.
© 2009 TomTom International BV, Països Baixos. TomTom™ i el logotip amb
les "dues mans" formen part de les marques comercials, aplicacions o
marques comercials registrades propietat de TomTom International B.V. La
nostra garantia limitada i l'acord de llicència per a usuaris finals per al programari inclòs són aplicables a aquest producte. Podeu consultar ambdós documents a www.tomtom.com/legal
35
© 2009 TomTom N.V., Holanda. TomTom® e o logótipo das "duas mãos",
entre outras, são marcas comerciais detidas pela TomTom N.V. ou por uma
das suas subsidiárias. Vá a www.tomtom.com/legal para consultar as garantias e o contratos de licença do utilizador final aplicáveis a este produto.
© 2009 TomTom NV, Holland. TomTom™ og logoet med "de to hænder" er
blandt de varemærker, produkter og registrerede varemærker, der tilhører
TomTom International B.V. Vores begrænsede garanti og slutbrugerlicensaftale for indlejret software gælder for dette produkt; begge dokumenter
findes på www.tomtom.com/legal.
© 2009 TomTom N.V., Alankomaat. Muun muassa TomTom® ja kaksi kättä logo ovat TomTom N.V:n tai sen tytäryhtiöiden omistamia tavaramerkkejä.
Katso osoitteesta www.tomtom.com/legal tätä tuotetta koskevat takuut ja
käyttöehtosopimukset.
© 2009 TomTom N.V., Nederland. TomTom®, og de "to hender"-logoen, blant
andre, er varemerker eid av TomTom N.V. eller en av deres underleverandører. Vennligst se www.tomtom.com/legal for gjeldende garantier og lisensavtaler for sluttbrukere for dette produktet.
© 2009 TomTom NV, Nederländerna. TomTom™ och logotypen "två händer"
tillhör de varumärken, programvaror eller registrerade varumärken som ägs
av TomTom International B.V. Vår begränsade garanti och vårt slutanvändarlicensavtal för inbyggd programvara kan gälla för denna produkt. Du kan läsa
dem båda på www.tomtom.com/legal.
© 2009 TomTom International BV, Nizozemsko. TomTom™ a logo se dvìma
dlanìmi patøí mezi obchodní znaèky, aplikace nebo registrované ochranné
známky ve vlastnictví spoleènosti TomTom International B.V. Na tento
produkt se vztahuje omezená záruka a smlouva s koncovým uživatelem pro
vestavìný software; do obou dokumentù mùžete nahlédnout na www.tomtom.com/legal
© 2009 TomTom International BV, Hollandia. A TomTom™ és a "két kéz"
embléma is a TomTom International B.V. által birtokolt védjegyek, alkalmazások és bejegyzett védjegyek közé tartozik. A korlátozott garancia és a benne
foglalt szoftver végfelhasználói licencszerződése érvényes erre a termékre;
melyeket a következő helyen tekinthet át: www.tomtom.com/legal
© 2009 TomTom N.V., Holandia. TomTom™ i logo z dwiema dłońmi, oraz
inne, są zarejestrowanymi znakami towarowymi firmy TomTom N.V. lub jednej z jej spółek zależnych. Informacje o gwarancjach i umowach licencyjnych
dla końcowego użytkownika tego produktu znajdują się na stronie www.tomtom.com/legal.
© 2009 TomTom International BV, Holandsko. TomTom™ a logo s "dvoma
rukami" patria medzi ochranné známky, aplikácie alebo registrované ochranné známky vlastnené spoločnosťou TomTom International B.V. Na tento
produkt sa vzťahuje obmedzená záruka a dohoda s koncovým užívateľom pre
36
vstavaný softvér; viac informácií o oboch nájdete na www.tomtom.com/
legal
© 2009 TomTom International BV, Holland. TomTom™ ja "kahe käe" logo kuuluvad nende kaubamärkide, rakenduste või registreeritud kaubamärkide
hulka, mille omanikuks on TomTom International B.V. Sellele tootele kehtib
meie piiratud garantii ja lõppkasutaja litsentsileping manustarkvara jaoks;
saad tutvuda mõlemaga aadressil www.tomtom.com/legal
© 2009 TomTom International BV, Nyderlandai. TomTom™ ir dviejų rankų logotipas yra TomTom International B.V. vienas iš prekių ženklų, programų arba
registruotųjų prekės ženklų. Mūsų ribota garantija ir galutinio naudotojo
sutartis naudotis įdėtąja programine įranga taikoma šiam produktui; galite
peržiūrėti abu dokumentus svetainėje www.tomtom.com/legal
© 2009 TomTom International BV, Hollanda. TomTom™ ve "two hands" logoları TomTom International B.V.'ye ait ticari marka, uygulama veya kayıtlı
ticari markalardır. Sınırlı garantimiz ve katıştırılmış yazılımın son kullanıcı
lisans sözleşmesi bu ürün içindir; www.tomtom.com/legal adresinden ikisine de göz atabilirsiniz
© 2009 TomTom N.V., Holanda. TomTom® e o logotipo "duas mãos" entre
outros, são marcas comerciais de propriedade da TomTom N.V. ou de uma
de suas subsidiárias. Consulte www.tomtom.com/legal para obter garantias
e contratos de licença de usuário final que se aplicam a este produto.
Data Source
© 2009 Tele Atlas N.V. Based upon:
Topografische ondergrond Copyright © dienst voor het kadaster en de openbare registers, Apeldoorn 2006.
© Ordnance Survey of Northern Ireland.
© IGN France.
© Swisstopo.
© BEV, GZ 1368/2003.
© Geonext/DeAgostini.
© Norwegian Mapping Authority, Public Roads Administration / © Mapsolutions.
© DAV, violation of these copyrights shall cause legal proceedings.
This product includes mapping data licensed from Ordnance Survey with the
permission of the Controller of Her Majesty’s Stationery Office. © Crown cop-
37
yright and/or database right 2009. All rights reserved. Licence number
100026920.
© Roskartographia
Data Source
© 2009 Tele Atlas North America. Inc. All rights reserved.
Some images are taken from NASA’s Earth Observatory.
The purpose of NASA’s Earth Observatory is to provide a freely-accessible
publication on the Internet where the public can obtain new satellite imagery
and scientific information about our home planet.
The focus is on Earth’s climate and environmental change: earthobservatory.nasa.gov/
38