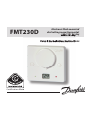
1
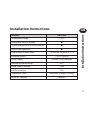
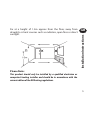
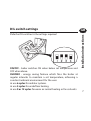
FMT230D
Electronic flush mounted
dial setting room thermostat
with LCD display
User & Installation Instructions
®
Certification Mark
Index
GB Index
2
Installation Instructions
User Instructions
3-11
12-15
Installation Instructions
Temperature Range
FMT230D
5 - 30°C
Setting dial and LCD display
O
Chrono-proportional or On/Off control
O
Heat or cool operation
O
Output relay contact rating
Switching action
Power supply
10-264 Vac, 50/60 Hz, 3 (1) A
1 SPDT Type 1B
230 Vac ± 15%, 50/60 Hz
Maximum ambient temp
45°C
Rated Impulse Voltage
2.5kV
Ball Pressure Test
75°C
Dimensions (mm)
85 wide x 85 high x 35 deep
Pollution Situation
Degree 2
Installation Instructions
Features
GB
3
Installation Instructions
GB Mounting
The product is designed to mount on to a standard one-gang
flush mounted electrical accessory box having a minimum
depth of 25mm. Fixing screws and screw blanking caps are
provided with the product.
Rear View of Thermostat
Terminal Blocks
M3.5 screws
Installer DIL
Switches
Blanking Caps
4
GB
Installation Instructions
Fix at a height of 1.5m approx from the floor, away from
draughts or heat sources such as radiators, open fires or direct
sunlight.
Please Note:
This product should only be installed by a qualified electrician or
competent heating installer and should be in accordance with the
current edition of the IEEE wiring regulations.
5
6
ELECTRONICS
Installation Instructions
GB Wiring
NC
NO COM
L
L
N
230 Vac
N
Slide the DIL switches to the settings required.
ON/OFF - boiler switches ON when below set temperature and
OFF when above.
CHRONO - energy saving feature which fires the boiler at
regular intervals to maintain a set temperature, achieving a
constant ambient environment for the user.
R use 6 cycles for radiator systems.
R use 3 cycles for underfloor heating.
R use 9 or 12 cycles for warm air central heating or fan coil units.
GB
Installation Instructions
DIL switch settings
7
Installation Instructions
GB
8
DIL Switch Settings
1
COOL
HEAT
2
ON/OFF
3
6/12 CYCLES
3/9 CYCLES
4
9/12 CYCLES
3/6 CYCLES
CHRONO
Installation Instructions
Mounting (continued)
GB
9
Installation Instructions
GB Resetting the unit
10
When power is first applied,
remove the dial and press the
RESET button for 2 seconds.
RESET
Button
Locking & Limiting *
Locking - setting the thermostat at a temperature which
cannot be altered by the user.
Limiting - allowing the user to alter the temperature within
a predefined range, which is less than the full range of the
product (i.e. between 18-22°).
User Instructions
GB
Note: A tamperproof dial is
available for the FMT230D.
Please contact the Danfoss
sales office on 0845 1217 400
to order.
* The locking and limiting spring is supplied with the product
and needs to be fitted by the installer.
11
User Instructions
GB
12
What is a room thermostat?
... an explanation for householders
A room thermostat simply switches the heating system on and off
as necessary. It works by sensing the air temperature, switching on
the heating when the air temperature falls below the thermostat
setting, and switching it off once this set temperature has been
reached.
Turning a room thermostat to a higher setting will not make the
room heat up any faster. How quickly the room heats up depends
on the design of the heating system, for example, the size of boiler
and radiators.
Neither does the setting affect how quickly the room cools down.
Turning a room thermostat to a lower setting will result in the room
GB
User Instructions
being controlled at a lower temperature, and saves energy.
The heating system will not work if a timeswitch or programmer has
switched it off.
The way to set and use your room thermostat is to find the lowest
temperature setting that you are comfortable with, and then leave it
alone to do its job.The best way to do this is to set the room thermostat to a low temperature – say 18°C – and then turn it up by one degree each day until you are comfortable with the temperature. You
won’t have to adjust the thermostat further. Any adjustment above
this setting will waste energy and cost you more money.
If your heating system is a boiler with radiators, there will usually be
only one room thermostat to control the whole house. But you can
have different temperatures in individual rooms by installing thermostatic radiator valves (TRVs) on individual radiators. If you don’t
have TRVs, you should choose a temperature that is reasonable for
the whole house. If you do have TRVs, you can choose a slightly higher setting to make sure that even the coldest room is comfortable,
then prevent any overheating in other rooms by adjusting the TRVs.
Room thermostats need a free flow of air to sense the temperature,
so they must not be covered by curtains or blocked by furniture.
Nearby electric fires, televisions, wall or table lamps may prevent the
thermostat from working properly.
13
User Instructions
GB User Instructions
Display
The LCD displays actual room temperature until the setting dial
is moved.
LED Indicators
Power on - Green (left hand LED).
Thermostat output on - Red (right hand LED).
Setting the temperature
Turn setting dial to required temperature. The selected
temperature will flash in the LCD to signify it is showing set
temperature.
After a short period the display stops flashing and shows actual
room temperature.
14
A flame symbol ( ) will be shown whenever the thermostat is
in heating mode, a snowflake symbol ( ) will be lit when the
thermostat is in cooling mode. To change mode please refer to
DIL switch setting on page 8.
GB
User Instructions
Thermostat status
15
www.danfoss.com/BusinessAreas/Heating
This product complies with the following EC Directives:
Electro-Magnetic Compatibility Directive.
(EMC) (2004\108\EC)
Low Voltage Directive.
(LVD) (2006\95\EC)
16
Part No 25937v01 01/08