1
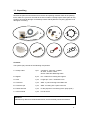
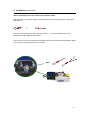
USER'S MANUAL
E&P HYDRAULICS
Air Drop System (Air-suspension interface) EPAL-01
Level System Motorhome
Copyright © 2013, E&P Hydraulics
This manual is copyrighted, with all rights reserved. Under the copyright laws, this may not, in
whole or in part, be copied, photocopied, reproduced, translated or converted to any
electronic medium or machine readable from without prior written consent of E&P Hydraulics.
Limited Warranty
Under all circumstances this manual should be read thoroughly, before installing and/or using
the product. In no event shall E&P Hydraulics be liable for any direct, indirect, special
consequential or incidental damages arising out of the use or inability to use this
documentation or product, even if advised of the possibility of such damages.
In particular, E&P Hydraulics shall not be liable for any hardware, software, or data that is
stored or used with this product, including the cost of repairing, replacing or recovering the
above. E&P Hydraulics reserves the right to change parts of the device at any time without
preceding or direct announcement to the client.
E&P Hydraulics reserves the right to revise the manual(s), and to make changes in the
contents without obligation to notify any person or entity of the revision or change. A
registration number appears on the product. Make sure that this official registration number
has not been removed. It should be used whenever servicing by E&P Hydraulics or an
authorized E&P Hydraulics dealer is necessary.
For CE-countries:
This device is in conformity with the CE standards. Please note that this device can ONLY be
used with the official E&P Hydraulics level system parts to conform to these standards.
P/N EPAL-01 / ams – vers. june 2013
Table of contents
……………………………………………………………...........
Preface
Chapter 1
1
Air Drop system EPAL-01
1.1
Unpacking
.............................…………………
2
1.2
1.3
Introduction
Schematic view
................................…….......……
.....................................………….
3
4
Chapter 2
Installation
…………………………………………………………..
5
Chapter 3
Programming
…………………………………………………………..
9
Chapter 4
Specifications
………………………………………..
11
Chapter 5
Avoid dangerous situations
………………………………………..
12
Preface
The E&P Hydraulics Airsuspension interface works in combination with the E&P Hydraulics
Motorhome levelsystem. The ergonomic design ensures effortless operation and will
automatically enhance the levelling capability of the vehicle.
It is based on proven E&P Hydraulics technology which forms the basis of all our
E&P Hydraulics products. After installation one button operates the entire system…..
Within the E&P Hydraulics strategic vision this products is 100% user friendly and reliable.
This philosophy not only applies to our customers (end users). The technicians installing this
device/system at the E&P Dealers are also very important to us. This product greatly depends
on a proper, professional installation. That’s the reason why E&P Hydraulics do all they can
do to support the people who are responsible for installing our products for you.
This manual is part of our policy. In this manual we explain the general features and how to
install this product as simply as possible within the E&P Hydraulic level system.
Precisely follow these instructions for the installation, because installing the
E&P Hydraulics system is a precise job. Fully installing the system requires a high level of
skill. After all, we are dealing with equipment that must be able to withstand huge forces,
something that is often underrated by people with insufficient technical training. If the
installation is not performed correctly, serious damages could result in a short time, and even
personal injury. Therefore this system may only be installed by professional technicians with
sufficient practical experience and a thorough relevant technical training. At all times, the
installer will bear sole responsibility for the assembly of the system.
This document is based on hundreds of test hours as well as many successful installations.
If you follow this manual step-by-step, you will see what a wonderful, user friendly, quality
product this is. However, there will always be aspects that can be improved. If you have any
suggestions, remarks or questions concerning this product or manual, please do not hesitate
to contact us.
On behalf of E&P Hydraulics
1.
1.1 Unpacking
Remove the parts and accessories from the box and packing material. Refer to the packing
list to make sure you have received all the items ordered. Visually inspect these parts for any
evidence of physical damage. Immediately contact E&P Hydraulics if anything appears to be
damaged, or missing.
1.
4.
5.
2.
3.
6.
7.
Contents:
The system (set) consists of the following components.
1. Airdrop Valve
1pcs.
consists of : valve set, y-splitter,
air-hose, 2 return valves,
electric cable and Mounting frame
2. Nipples
2 pcs. incl. 2 tubes for mounting into nipples
3. Hose
1 pcs. Length apr. 2,5 m. / diameter 8 mm.
4. Connector
1 pcs. AMP - 4 pole mounting to the Main-unit
5. Connector-pin
1 pcs. AMP - mounting into 4 pole connector
6. Faston terminal
1 pcs. for the purpose of connecting to the pump (batt-)
7. User's manual
1 pcs. how to mount
Attention:
● Details may differ from the illustration above, but functionality should be identical.
2.
1.2 Introduction
1.2.1 Purpose
Hereby we would like to inform you about the E&P Hydraulics Air-drop system.
This system makes it possible to keep the vehicle as low as possible to the ground, when
using the automatic leveling system of E&P Hydraulics.
For some time E&P Hydraulics has offered a module to integrate the E&P levelsystem with
the air-suspension system from VB-Airsuspension to enhance the User’s experience when
both systems are fitted to the same vehicle. The part number for this module is EP-L50-01VB.
However, some motorhomes use different air-suspension systems and since, in practice, it is
difficult to predict how this integration/compatibility would work, E&P Hydraulics has now
developed an independently functioning solution – the Air Drop system – which is applicable
to almost all other types of motorhome air-suspension.
1.2.2 General
The system is designed so that it usable both for the front and rear axle air suspension
(where fitted).
The system is designed to lower the motorhome as low as possible to the ground, to create
the lowest step-height possible and to give the hydraulic jacks the maximum leveling stroke
possible.
In other words, when the vehicle floor is as low as possible to the ground, the effectiveness of
the level system will be enhanced.
1.2.3 Definitions
Air Drop system
: Controlled air release to allow the vehicle to be dropped to its
lowest position automatically.
3.
1.3 Schematic view
Schematic view of the components supplied within the E&P Hydraulics Air Drop system:
Note: This is the display for 1 set
B.
Faston
4p. Connector +
Cable pin
A.
- Registration label
Air drop valve set
Air hose
Connecting nipples
C.
A. = Connection to Main-box
B. = Connection to Pump ( Batt - )
C. = Connection to Air - suspension
For traceability and warranty administration the registration number label is placed inside the
product, to be sure it remains undamaged. This official registration number is directly related /
unique to the device.
E&P Hydraulics, or the E&P Dealer, may ask you for this number (e.g. when the product
needs to be serviced), so please familiarise yourself with it.
4.
2. Installation
Before you start the installation procedure of the Air Drop system, you must be sure the E&P
Hydraulic level system is professionally installed and is functioning correctly.
Attention ! Be aware you are dealing with equipment that must be able to withstand huge
forces!
Before: (important)
Before mounting the Air Drop system, check that the E&P Hydraulics levelsystem has the
correct version ** of control unit (Main Unit) supplied.
** this check can be done visually (see below).
If an antenna connection is present on the Main Unit then the E&P Air Drop system can be
installed without problems.
Is this antenna connection is not present, you will need to upgrade the Main Unit.
NEW
- WITH antenna connection
OLD
- WITHOUT antenna connection
5.
2. Installation (continued)
Step 1 : Mounting Nipples and Valve
Mount the angled nipples on the front or rear (emergency) valve ** connections present on
the suspension-bellows.
** In most cases, this emergency valve is provided. If not, the connection is intended to be
effected by interrupting the air conduit, using the T-piece provided.
Determine the length of the air-hose. Place the copper insert, supplied with the nipple set, in
the air-hose (do not forget!) and push the hose firmly into the nipple by pressing.
Step 2 : Mounting to the vehicle
Mount the Air Drop system in the most suitable location (depending on the vehicle type, this
will vary). This location is as close as possible to the front or rear axle and between the two
air-bellows.
Mount the set in such a way that the side walls of the assembly (protection) plate are in the
direction of travel of the vehicle, just to give the valve the maximum protection against splash
water and dirt.
Note: please make sure that you have installed the air-hoses in such a way that they can
move freely through the full suspension travel of the vehicle. Please make sure they do not
get pinched.
DIRECTION OF TRAVEL
6.
2. Installation (continued)
Before: A two-wire electrical cord is mounted to the air outlet valve. It does not matter which
of the 2 cables you are taking for the connection of the connector pin and faston.
Step 3 : Mounting the connector pin into the connector
Strip the electric wire over a distance of approximately 5mm. Mount the connector pin using
an "AMP-tang" to the wire and solder it.
Depending on whether you use the airdrop system for the FRONT and-or REAR of your
vehicle, mount the connector pin in position 1 (front) and-or 4 (rear)
of the 4 pins AMP connector.
Pin 4
Pin 1
Step 4 : Mounting the connector to the Main-unit
Depending on whether you are going to use the airdrop system on the FRONT and-or REAR
of you vehicle, 1 or 2 electric cables are mounted into the 4p. connector.
Pin 1 :
Pin 4 :
Pin 1 and 4 :
Frontside
Rearside
Front and Rearside
Pin 4
Pin 1
Pin 4
Main-unit
Pin 1
- Connector mounted to the Main-unit
7.
2. Installation (continued)
Step 5 : Mounting the electric cable to the hydraulic pump
Strip the electric wire over a distance of approximately 5mm. Mount the faston to the cable
and solder it.
Mount the wire to the pump relay connection ( BATT - ), which is located on the pump
operating the E&P Hydraulic levelsystem.
In the event you have connected two sets (both front and rear Air Drop system fitted) it allows
you to mount the 2 electrical wires into 1 faston.
BATT-
8.
3. Programming
Programming the Air Drop system
3.1 Before
To programme your Air Drop system, you now have two options: operating your system by
the Remote control, or the (built in) Control panel.
The operation of the remote control and control panel is described in the E&P Hydraulics User
manual for the Motorhome.
3.2 Teaching (setting defaults)
Make sure the vehicle is placed on a surface that is as flat as possible. Make sure that the
vehicle's handbrake and ignition is on
● Press the on/off button (No. 5), once, on the
control panel.
The LED of the E&P logo lights up.
If the handbrake is disengaged,
the warning LED (No.3) starts to flash
● Press button frontside (No. 12) five times
● Press button rearside (No. 11) five times
● Press button leftside (No. 10) one time
● Lower the suspension by using the existing control system of the vehicle.
At this stage you have to make the choice of how far you want to lower the vehicle.
This choice is, from now on, the actual (preset) position/angle the vehicle will lower to.
● Press button leftside (No. 10) once
The system is now programmed
Note: the system has been designed so that the air-suspension will only drop air when it
improves the programmed level. (level point)
9.
3. Programming (continued)
What (which vehicle positions) you can expect in practical situations.
Situation A : front EQUAL to rear.
BEFORE airdrop
AFTER airdrop
Situation B : REAR HIGHER than front.......... Method: drop air on the REAR.
BEFORE airdrop
AFTER airdrop
Situation C : FRONT HIGHER than rear.......... Method: drop air on the FRONT.
BEFORE airdrop
AFTER airdrop
The system first lowers the air-suspended axle which is in the higher position.
It is lowered so far, that the second axis can be lowered sufficiently also.
This sequence is necessary to make it possible leveling the vehicle from the lowest point.
When the air drop system is connected, during the programming procedure the preset level
value will automatically be adjusted in the longitudinal direction
If a tilt situation is too severe, the control panel
shows a warning signal (No.1)
10.
4. Specifications
Electrical :
Voltage
12V / 24V
Physical :
Weight (complete set)
apr. 1.000 Gr.
Dimensions :
Length x Width x Height
apr. 150 x 120 x 50 mm.
Environmental :
Operating temperature
Humidity
- 40˚C / + 40˚C
20% - 95% RH (non-condensing)
11.
5. Avoid dangerous situations
5.1 Lowering the Airsuspension system on a rising slope position
- E&P Hydraulics considers dropping air at a rising slope position as a dangerous situation.
When dropping too much air, the rear side of the vehicle could make contact with the
ground.
Note: This problem could be solved by mounting an on/off switch between the Earthwire (-)
of the front and rear axle.
BEFORE airdrop
AFTER airdrop
CAUTION ! Take precautions when you start using the system: Make sure that there are no
persons (or animals) under the vehicle who could get trapped during the level,
and-or airdrop process.
12.
E&P HYDRAULICS
www.ep-hydraulics.nl
Made in Holland