1
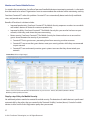
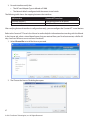
ForeScout CounterACT Evaluator Guide Table of Contents 1. Highlights ......................................................................................................................................................................... 4 2. How It Works ................................................................................................................................................................... 6 3. Evaluation Plan ............................................................................................................................................................. 8 4. Installation ........................................................................................................................................................................ 9 5. Points of Interest .............................................................................................................................................................16 Ease of Installation ................................................................................................................................................... 16 Network Visibility ......................................................................................................................................................16 Create a Guest Networking Policy .................................................................................................................. 22 Monitor and Control Mobile Devices ................................................................................................................ 27 Monitor and Enforce Endpoint Compliance ................................................................................................... 28 Detect and Block Zero-Day Threats .................................................................................................................... 35 Appendix A: Installation Instructions for the CounterACT Virtual Appliance .............................................. 38 Virtual Environment Setup ....................................................................................................................................38 Post-Deployment Verification and VMware Configuration ....................................................................... 46 1. Highlights ForeScout CounterACT is an automated security control platform that delivers real-time visibility and control of all devices on the network. With ForeScout CounterACT, you get: • • • • Network Access Control Mobile Security Endpoint Compliance Threat Prevention Recently ranked by Forrester Research as the industry's top performer in both strength of current product offering and strategy, CounterACT is easy to deploy and manage because it requires no agents, no hardware upgrades or reconfigurations. Everything is in one appliance. Frequent Use-Cases for ForeScout CounterACT • Visibility. You can only secure the things you know about. ForeScout CounterACT gives you realtime visibility into everything on your network—all devices, all operating systems, all users, all applications. Watch the video. • Guest networking. ForeScout CounterACT for Network Access Control lets guests and contractors use their personal computers on the customer’s network without compromising the network security. This provides both security and productivity benefits. CounterACT includes an automated guest registration process and can limit the guests access to just the Internet or to specific network resources. Watch the video. • Mobile Security. IT managers are worried about iPhones, iPads, Android and other mobile devices that can connect to the network. ForeScout CounterACT for Mobile Security provides real-time visibility and control over smartphones, tablets and other mobile devices. This lets enterprises leverage the productivity benefits associated with modern handheld devices while protecting the network from the dangers of such devices. Watch the video. • Endpoint Compliance. ForeScout CounterACT for Endpoint Compliance finds and fixes security gaps, such as endpoint security agents that are not installed or working properly, out-of-date antivirus, etc. Because ForeScout CounterACT is agentless, it works with all type of endpoints–managed and unmanaged, known and unknown, physical and virtual. Watch the video. • Threat Prevention. ForeScout’s patented ActiveResponse™ technology is included in every product that we sell. ActiveResponse blocks both known and unknown attacks with 100% accuracy. This unique technology does not require signature updates or other forms of maintenance, so it requires zero maintenance. ActiveResponse provided zero-day protection against Conficker, Zeus and Stuxnet. Learn more about ActiveResponse here. 4 © 2011 ForeScout Technologies, Inc. All Rights Reserved. The Challenge: Empowering Greater Accessibility while Maintaining Security ForeScout CounterACT is a hot product because IT managers are now dealing with two big security challenges: 1. A huge influx of consumer devices (iPhones, iPads, Androids, etc.) onto enterprise networks. 2. Rapid adoption of virtualization, both in the datacenter and on the desktop. In both cases, ForeScout CounterACT allows organizations to benefit from these transformative technologies without compromising security. ForeScout’s Differentiation Unlike other policy enforcement precuts, ForeScout CounterACT is easy and fast to deploy. • One box, one day to install. Everything is contained in a single appliance. CounterACT is available in both physical appliance and virtual appliance formats. • ForeScout works with existing infrastructure. All your existing switches, routers, firewalls, endpoints, patch management systems, antivirus systems, directories, etc. Previous network access control products required installation of 802.1x agents on endpoint systems and replacement or reconfiguraiton of network switches to support 802.1x. • Agentless. ForeScout CounterACT does not require pre-existing knowledge of network devices or installation of any agent software on the endpoint devices. This allows CounterACT to be effective against all types of endpoints—managed and unmanaged, known and unknown, authorized and rogue. • Non-disruptive. Unlike first generation NAC products that immediately disrupt users with heavyhanded access controls, ForeScout CounterACT can be deployed in a phased approach which minimizes disruption. • Accelerated results. ForeScout CounterACT provides useful results on day one by giving you visibility to problems on your network. A built-in knowledge base helps you configure security policies quickly and accurately. 5 © 2011 ForeScout Technologies, Inc. All Rights Reserved. 2. How It Works The drawing below shows a typical deployment. ForeScout CounterACT is an appliance which sits out-ofband on the network. Each appliance attaches to a distribution or core switch via a span or mirror port. Different size appliances are available to meet the needs of any size organization, and can scale to 400,000 endpoints. Small, remote offices might not need any CounterACT appliance, depending on the customer’s use case. CounterACT Remote Office VPN Client Internet SME or SOHO VPN Concentrator Servers AD/LDAP/RADIUS/DHCP Data Repositories/ Network Resources Wireless Router Wireless Laptops PDAs Core Layer Switch Access Layer Switch Distribution Layer Switch VoIP Wireless LAN CounterACT Enterprise Manager CounterACT CounterACT Production LAN Access Layer Switch USB Devices via Windows Endpoints Firewall 802.1x & Non-802.1x Access Layer Switch Non-OS Devices Guest Laptops Guest LAN Once it has been installed, CounterACT monitors network traffic and can see a device the moment it tries to access your network. CounterACT automatically grants access based on who the user is, what the device is, and the security posture of the device. After the device has been allowed onto the network, CounterACT can limit where the user can go on the network, and CounterACT can fix security problems on the endpoint. CounterACT continuously protects the network by monitoring the behavior of all devices and blocking attacks. 6 © 2011 ForeScout Technologies, Inc. All Rights Reserved. After installing CounterACT, network administrators use the built-in knowledge base and wizards to define security policies that are appropriate for their organization. Through a variety of detection mechanisms, CounterACT listens to the traffic on the network, senses when a device attempts to join the network, and determines whether the device is a “managed” (corporate-owned) device or an “unmanaged” (guest, contractor or unauthorized) device. CounterACT scans each device to determine its security posture, and blocks the device if it is non-compliant or presents a threat. Based on the policy in place, CounterACT can immediately re-assign guest devices and non-OS devices into suitably designated VLANs. Managed devices are placed in their corresponding VLAN and are granted access to the appropriate network resources. In case CounterACT finds a device that is non-compliant with security policies, CounterACT can take appropriate action to fix the problem, notify administrators, and/or quarantine the device. CounterACT continues to monitor devices for compliance and threatening behavior while they are connected to the network. CounterACT gives IT administrators a wide range of actions to choose from, including just-in-time notification to end-users that they have just violated security policy. By tailoring the action to meet the severity of the compliance issue, IT managers can ensure that security does not negatively impact the business. 7 © 2011 ForeScout Technologies, Inc. All Rights Reserved. 3. Evaluation Plan Now that we have told you what ForeScout CounterACT can do and how it works, it is time for you to see it for yourself. Here is a guide to streamline your evaluation process: 1. Install CounterACT on your network per the instructions in chapter 4 of this document. If you want to test CounterACT’s ability to see and control devices on your network, you will need to attach the appliance to a live switch on network containing endpoint devices. 2. Review the points of interest as outlined in Chapter 5. CounterACT lets you automatically enforce many different types of security policies. Creation of the security policies is done using a policy wizard. Chapter 5 walks you through a few of the built-in policy templates, which represent the five most common usage modes as described in Chapter 1. 3. Observe what CounterACT is telling you about your test network. By default, the policies are implemented in “monitor” mode, which means the product tells you what is going on but takes no action. This is a best practice which our customers follow in the real-world. Many customers find that the information alone is worth the price of the product. 4. Turn on enforcement actions. This is an optional step which you can take if you want to actually see CounterACT control network access or remediate endpoint deficiencies. 8 © 2011 ForeScout Technologies, Inc. All Rights Reserved. 4. Appliance Installation In this evaluation, the product is setup as two components: • ForeScout CounterACT Appliance (physical or virtual) • CounterACT Management Console (management and licensing application) The installation requires Internet connectivity for the ForeScout software to see the licensing server. Details for initial configuration of the product and doing an inventory of a network (and associated domain) are included below. For this evaluation, the product will be setup in Layer 3 mode, where it keeps track of devices via their IP address. The only other equipment needed for the evaluation is a switch and its associated network with DHCP server. The installation consists of placing the appliance and switch on a network and giving it the necessary information to perform the NAC function, like logins to domain servers. The switch providing the network information to the ForeScout CounterACT appliance needs to be configured to forward spanned traffic to the appliance. After installing the product, you should configure at least two policies if you want to see the product in action: the policy for network visibility, and the policy for guest networking. These policies are described in Chapter 5. Other policies which you may wish to setup are also described in Chapter 5. Configure Your Switch for Traffic Monitoring ForeScout CounterACT monitors and interacts with traffic from switches using multiple connections: 1. Monitor Port (no IP address required): A monitor/span/mirror of traffic from the switch. a. Single VLAN: In the simplest case, the traffic will be from a single VLAN. Be sure to mirror traffic in both (in/out) directions. b. Multiple VLAN: If the traffic is from more than one VLAN, the span port must be configured so the traffic is 802.1q encoded. . Be sure to mirror both (in/out) directions 2. Management & Response Port (One IP Address on the local LAN and port 13000/TCP access from machines that will be running the CounterACT Console Management application). The CounterACT Appliance responds to traffic using this port. Its configuration depends upon the traffic being spanned. a. Single VLAN: When the spanned traffic is from a single VLAN, the response port must be a member of the same VLAN and CounterACT will require a single IP address in that VLAN. This IP can be assigned statically or via DHCP. b. Multiple VLAN: If, the spanned traffic is VLAN trunked, the response port must also be configured as a 802.1q trunk for the same VLANs. The CounterACT port will require an IP address for each of the VLANs. By default, CounterACT uses DHCP. 9 © 2011 ForeScout Technologies, Inc. All Rights Reserved. Sample switch configuration, assuming the switch contains multiple VLANs: Monitor Port • • • • • • • 802.1q encapsulated interface GigabitEthernet0/2 description “ForeScout Monitor” no IP address switchport monitor session 1 source VLAN 1, 2 – 100 both monitor session 1 destination interface Gi0/2 encapsulation dot1q 10 © 2011 ForeScout Technologies, Inc. All Rights Reserved. Management & Response Port • • • • • • • • • 802.1q trunk port interface GigabitEthernet0/24 description “ForeScout Response” IP address A.B.C.D switchport mode trunk switchport trunk encapsulation dot1q switchport trunk allowed VLAN 1 , 2 - 100 switchport mode trunk switchport nonegotiate Setup and Configure the CounterACT Appliance The CounterACT physical appliance is identical to the virtual appliance in terms of configuration and operation. The virtual appliance looks to the network like two dedicated IP ports on a VMware ESX server, whereas the physical appliance has the physical ports on the appliance. Either product requires the following information for setup. It may be helpful to document it here before starting the wizard that kicks off at power up. Appliance Host Name CounterACT Admin Password Management Interface Appliance IP Address Network Mask Default Gateway IP Address DNS Domain Name DNS Server Addresses Before proceeding, if you are configuring a physical appliance, please check the version of the software on the appliance. The appliance will show its version number when it boots up, or you can also get it from the “Help – About” section of the user interface. If the appliance shows a release number earlier than 6.3.4.0, contact your ForeScout representative who will help you upgrade to the latest software. If you are installing the Virtual Appliance, see Appendix A for VMware system requirements and installation instructions. After power up from the VMware console, the console of the virtual machine running the ForeScout CounterACT instance will show the same install wizard as the physical appliance. From there on, the installations are identical, as described below. Auto-configuration Wizard After Power-Up After power on, you will be prompted to start configuration with the following message: CounterACT Appliance boot is complete. Press <Enter> to continue. 11 © 2011 ForeScout Technologies, Inc. All Rights Reserved. 1. Press <Enter> to display the following menu: 1) Configure CounterACT-6.3.X 2) Restore saved CounterACT-6.3.X configuration 3) Identify network interfaces 4) Configure keyboard layout 5) High Availability Setup 6) Turn machine off Choice (1-6) :1 2. Select 1 – Configure 6.3.x. At the prompt Continue: (yes/no)? press <Enter> to initiate the setup. The CounterACT Component selection prompt appears. 3. At the prompt Choice: select 1 to setup the Appliance. 4. At the prompt Host name: Enter a name. 5. At the prompt Description: Enter a unique description for this Appliance. 6. At the prompt CounterACT Appliance Administrator Password: Enter a password between 6 and 15 characters long and containing at least one non-alphabetic character. Note: Logon to the Appliance as root, and logon to the Console as admin. 7. Enter the network parameters as requested, and after each parameter is defined, press <Enter> to continue. The DNS server should resolve internal IP addresses. While most internal DNS servers may resolve external addresses as well, some may not. As such, it may be necessary to include an externallyresolving DNS server at the end of the list. Additional servers can be entered in the same line, separated by a space. Almost all DNS queries carried out by CounterACT will be for internal addresses, so the internal DNS servers should be listed first. 8. Perform general connectivity tests, reconfigure settings or complete the setup. Note: After the installation is complete, an evaluation license is set for 30 days. If you need longer than this, you must install a permanent license before this period expires. You will be contacted via e-mail regarding the expiration date. License installation instructions are included in Appendix A and are the same for the physical and virtual versions of the appliance. You may also was to look at the CounterACT Console User’s Manual located on the CounterACT CD in the /docs folder for information about installing the license. 9. Verify Connectivity The appliance needs to access the DNS server and the LDAP server. It also needs to see DHCP traffic, and traffic to and from the network endpoints. To verify that the switch’s span is properly setup, run the fstool ifcount command at the Appliance for each interface detected. 12 [root@CounterACT root]# fstool ifcount eth0 eth1 eth2 (separate each interface by a space.) © 2011 ForeScout Technologies, Inc. All Rights Reserved. This tool continuously displays network traffic on the specified interfaces. It works in two modes: per interface or per VLAN. The mode can be changed from the display. The total bits per second and the percentage of each of the following traffic categories is shown. Also verify connectivity to login and management servers using ping. Note: By default, the Appliance itself does not reply to ping. CounterACT Console Installation Completion To setup the ForeScout CounterACT console, use the installation software built into your Appliance. 1. Open a browser window from the Console computer. 2. Type the following into the browser address line (where the IP address is the address of this Appliance): http://A.B.C.D/install. 3. The browser displays the Console installation window. Follow the on-screen instructions. Log In After completing the installation,you can log in to the CounterACT Console. 4. Select the CounterACT icon from the shortcut location you created. 5. In the IP/Name field, enter the IP address or host name of the Appliance. 6. In the User Name field, enter admin. 7. In the Password field, enter the password you created during Appliance installation. 8. Select Login to open Console. Setup Communication to Network Resources Using the Wizard So far, the configuration consists of a mutually communicating monitored switch, a CounterACT Appliance or Virtual Appliance, and a Management console. In the next step, we tell CounterACT about the authentication and management servers on your network. CounterACT uses these network services to help it identify devices, users, and applications. After logging in to the console for the first time, the Initial Setup Wizard will prompt for this information. The Wizard guides you through essential configuration steps to ensure that CounterACT is up and running quickly and efficiently. You may wish to prepare the following information before working with the Setup Wizard: 13 © 2011 ForeScout Technologies, Inc. All Rights Reserved. Location of the license file received from your CounterACT Representative (Hardware ships with a 30-day license) Switch IP Address, vendor and SNMP Parameters Authentication server information Domain credentials including, domain administrative account name and password LDAP user account information and the LDAP server IP address. Monitor and response interfaces. IP address range this Appliance will monitor (all the internal addresses, including unused addresses) For segments/VLANs with no DHCP, the network segment/VLANs to which the response interface is directly connected and a permanent IP address to be used by the Appliance at each such VLAN. The Setup Wizard Here is the first screen of the wizard. It will guide you through the entries. 14 © 2011 ForeScout Technologies, Inc. All Rights Reserved. Update the Plugins CounterACT includes several “plugins” which allow it to communicate with external devices such as switches and endpoints. CounterACT automatically checks to see if updates are available. The Plugin Updates icon appears on the status bar of the Console when updates are available. If you see the icon above, do the following to update your plugins: 1. Double-click the Plugin Updates icon. The Update Software Installation dialog box opens. The dialog box displays available plugin updates. 2. Select all plugins and then select the Install button. 15 © 2011 ForeScout Technologies, Inc. All Rights Reserved. 5. Points of Interest Ease of Installation As described in Chapter 1, ForeScout CounterACT is easier to install than most other network access control products. Everything is contained in one appliance, there is no software to install, no changes to be made to the network, etc. This is probably the single most important reason why ForeScout CounterACT has achieved so much success in the market. The rest of this chapter will guide you in the implementation of some commonly used policies. These policies tell CounterACT what to look for, and how to react. They are the heart of CounterACT’s automated security system. Network Visibility Some network access control products “shoot first and ask questions later”. This is disruptive to users, and it is does not help IT security managers win any popularity contests. ForeScout CounterACT takes a different approach. It starts by giving IT security managers visibility to everything on their network, then it lets them choose from a wide range of actions to remediate the problem. (More on the range of actions later.) The first policy setup tells CounterACT that you want it to start identifying devices. Here is some of the information that CounterACT can show you about devices on your network: Device Information • Device type (printer, wireless network device, laptop, etc.) • Device authentication/NETBIOS/domain membership • MAC/IP address • NIC vendor • Hostname Security Status • Anti-malware agents status (installed/running) and database versions • Patch management agent status (installed/running) • Firewall status (installed/running) • Audit trail of changes to OS/configuration/ application User Information • Username • Full name • Authentication status • Workgroup • Email address • Phone number • Guest/authentication status Device Information • Device type (printer, wireless network device, laptop, etc.) • Device authentication/NETBIOS/domain membership • MAC/IP address • NIC vendo 16 © 2011 ForeScout Technologies, Inc. All Rights Reserved. Operating System Status • Type • Version number • Patch level • Processes and services installed or running • Registry and configuration • File name/size/date/version • Shared directories Security Status • Anti-malware agents status (installed/running) and database versions • Patch management agent status (installed/running) • Firewall status (installed/running) • Audit trail of changes to OS/configuration/ application Application Information • Authorized applications installed/running • Rogue applications installed/running • P2P/IM clients Installed/running • Application name and version number • Registry values • File sizes • Modification date and patch level Peripheral information • Device class (disk, printer, DVD/CD, modem, NIC, memory, phone, etc.) • Connection type (USB, Bluetooth, infrared, wireless, etc.) • Device information (make, model, device ID, serial number, etc.) Network Traffic Information • Malicious traffic (worm propagation, device spoofing, intrusion, spam, etc.) • Traffic source/destination • Rogue NAT/DHCP behavior Physical Layer Information • Switch IP, description, location • Switch port • VLAN • Number of devices on any port • 802.1x authentication status Network Traffic Information • Malicious traffic (worm propagation, device spoofing, intrusion, spam, etc.) • Traffic source/destination • Rogue NAT/DHCP behavior 17 © 2011 ForeScout Technologies, Inc. All Rights Reserved. Screenshots (click to enlarge images) Above: ForeScout CounterACT shows you in real time which PCs on your network contain vulnerabilities. 18 Above: ForeScout CounterACT identifies rogue WiFi devices. © 2011 ForeScout Technologies, Inc. All Rights Reserved. Step-by-step: Policy for Device Identification Before CounterACT will display information about devices on your network, it needs to be configured with two policies that it uses to catalog and manage devices. The first is the “Asset Classification” policy. This policy executes before other policies. The asset classification policy identifies what type of device is attached to each switch port. By knowing this, CounterACT ensures that other policies are applied appropriately to each device on the network. For example, CounterACT will not apply an antivirus policy to a printer. The second policy that needs to be configured is the “Guest Networking” policy. This allows CounterACT separately manage devices that do not have accounts in the domain or authentication system. CounterACT ships with policy wizards and a knowledgebase of device characteristics. Below is a description of how you would use one of the policy wizards to allow CounterACT to classify network devices by type of device. Each policy wizard follows the following structure to setup: • • • • Each policy has a default name that describes its purpose. One click on “All” in the address selection window chooses all addresses Sub policies can be selected as desired The policy is “Activated” and “Accepted” Setup the policy for device identification Select the Asset Classification Template 1. Log into the CounterACT Console. 2. On the Console toolbar select the Policy icon shown by a traffic light. The Policy Manager pane opens. 3. In the Policy Manager pane select Add. The Policy Wizard opens guiding you through policy creation 4. Expand the Classification folder and select the Asset Classification template. 19 5. Select Next. The Policy Name pane opens. A default policy name appears. © 2011 ForeScout Technologies, Inc. All Rights Reserved. Select Next. The Scope pane and the IP Address Range dialog box open. Choose the Hosts to Inspect 1. Use this IP Address Range dialog box to insert the range of IP addresses you want to inspect or select a network segment. Select All to include all addresses in the Internal Network range. These addresses must be within the Internal Network range defined when CounterACT was set up. 2. Select OK. The added range is displayed in the Scope list to be inspected. 3. Select Next. The Sub-Rules pane opens. 20 © 2011 ForeScout Technologies, Inc. All Rights Reserved. Finish Policy Creation The policy sub-rules are displayed in the Sub-Rules pane. Rules instruct CounterACT how to detect hosts (Conditions) and what to do when a device of that condition is found (Actions). 1. Select Finish. The policy automatically appears highlighted in the Policy Manager pane, where it can be activated. Activate the Policy 1. Select the policy from the Policy Manager pane. 21 © 2011 ForeScout Technologies, Inc. All Rights Reserved. 2. Select Apply. 3. A series of confirmation dialog boxes open. Confirm accordingly. On completion, your policy is activated. CounterACT can now detect and categorize different types of assets on your network. Create a Guest Networking Policy One of the most popular uses for ForeScout CounterACT is to control the network access of guests and contractors. (See “Guest Networking” in the overview section of this document.) This policy also needs to be present on the machine for unauthorized devices to be identified and classified. When guests and contractors visit an office, they bring their own computers. To remain productive, they need to access the Internet. Contractors may need more than Internet access, they may need access to certain resources on the network. For example, auditors need access to the financial records and accounting systems. If you leave network ports in conference rooms and work cubes in the “open” state, guests may access your network by simply plugging into the wall. However, this is dangerous because the guest’s device might have malware on it, and the guest may try to access sensitive data on your network. ForeScout CounterACT solves this problem. CounterACT can automatically provide network access for guests and contractors, without compromising internal network security. Automation relieves IT managers from administrative burden. ForeScout CounterACT includes a built-in guest registration system which allows guests to register for access to your network. ForeScout CounterACT can automatically approve guest registration requests, or the request can be routed to one or more individuals in your organization for approval. After admitting a guest device onto the network, CounterACT will limit network access as defined within the CounterACT policy engine, such as: • • • Internet-only access Full network access Limited network access based on who the guest is (e.g. a particular contractor) Above: ForeScout CounterACT allows guests to register for access to your network. 22 © 2011 ForeScout Technologies, Inc. All Rights Reserved. Screenshot (click to enlarge image) Above: ForeScout CounterACT gives you real-time visibility to who is on your network, including the location and security posture of guest computers. Step-by-step: Policy for Guest Networking Before CounterACT will register and control guest devices on your network, it needs to be configured with a guest registration policy. Below is a description of how you would use one of the policy wizards to allow CounterACT to classify network devices by type of device. Select the Corporate/Guest Control Template 1. Log into the CounterACT Console. 2. On the Console toolbar, select the Policy icon. The Policy Manager opens. Choose Add. Choose Guest Networking. 3. Name the policy, and identify its network applicability as “All”. 4. A new windows appears for defining corporate hosts. 23 © 2011 ForeScout Technologies, Inc. All Rights Reserved. Define Corporate Host Criteria Hosts automatically become members of the Corporate Hosts group if they belong to a corporate domain or recently authenticated to an approved server. 1. Enter domain names in the NetBIOS Domain Names field. Separate multiple domain names with commas. 2. Select Next. The Guest pane opens. Define How to Handle Guest Registration Requests The default is to approve guest registration requests via email, but it is simpler to just setup with automatic approval as follows: 1. Select Sign In Guests and choose “Automatically approve…” 24 © 2011 ForeScout Technologies, Inc. All Rights Reserved. 2. Select Next. The Sub-Rules pane opens. 25 © 2011 ForeScout Technologies, Inc. All Rights Reserved. Review SubRules As with other policies, actions are activated when Finish is selected. Select Finish. The policy automatically appears highlighted in the Policy Manager,where it can be activated. Activate the policy. Review Corporate/Guest Detections 1. On the Console toolbar, select the NAC icon. 2. In the Views pane, navigate to the Policy folder and select the policy containing your Corporate/ Guest Control policy. The guests are displayed in the Information Panel. 26 © 2011 ForeScout Technologies, Inc. All Rights Reserved. Monitor and Control Mobile Devices As stated in the introduction, the influx of personal handheld device onto enterprise networks is a hot problem that needs to be solved. Organizations want to accommodate these devices while maintaining security. ForeScout CounterACT solves this problem. CounterACT can automatically detect and classify mobile devices, and provide access control. Benefits of ForeScout’s solution include: • Improved productivity. ForeScout CounterACT for Mobile Security empowers workers to use mobile and wireless devices of choice for maximum productivity. • Improved visibility: ForeScout CounterACT for Mobile Security lets you see who has been on your network, which days, and where they were connecting. • Better security: ForeScout CounterACT for Mobile Security has three mechanisms to ensure that guests do not threaten the security of your network: »» »» CounterACT limits guest access, preventing them from accessing sensitive resources »» CounterACT can continuously monitor guest systems to ensure that they do not attack your network. CounterACT can ensure that guest devices meet your security policies while they are connected to your network Screenshot (click to enlarge image) Above: ForeScout CounterACT identifies handheld devices on your network – iPhone, iPad, Android, Windows Mobile, Blackberry, Nokia Symbian, and more. Step-by-step: Policy for Mobile Security No additional policies need to be created for mobile security. The detection of mobile devices is performed automatically by the policy that you created in the “Network Visibility” section (above). Control of mobile devices is done via the Guest Registration policy that you created. 27 © 2011 ForeScout Technologies, Inc. All Rights Reserved. Monitor and Enforce Endpoint Compliance Organizations spend millions on endpoint security tools – such as antivirus, encryption, data loss prevention (DLP), and so on – only to have end users turn off or disable those tools. Even in well-managed enterprises, host-based security tools typically do not work properly on at least 20% of systems. It can be even worse than 20%: Microsoft issued a report in 2008 that indicated that fewer than 50% of their corporate computers were compliant with security policy. ForeScout CounterACT solves this problem. ForeScout CounterACT can ensure that every endpoint on your network is compliant with your security policy. For example, CounterACT can ensure that antivirus is up-todate, the operating system is properly patched, and the computer is free of illegitimate software such as P2P. Because ForeScout CounterACT is agentless, it works with all type of endpoints–managed and unmanaged, known and unknown, physical and virtual. CounterACT can discover weaknesses in an existing agent-based security system that would otherwise go undetected. Unlike agent-based security systems, ForeScout CounterACT operates in real-time, has no blind spots, and does not require cooperation from the endpoint. Furthermore, CounterACT gives IT administrators a wide range of actions to choose from, including justin-time notification to end-users that they have just violated security policy. By tailoring the action to meet the severity of the compliance issue, IT managers can ensure that security does not negatively impact the business. Screenshot (click to enlarge image) 28 Above: ForeScout CounterACT dashboard shows you compliance trends over time. © 2011 ForeScout Technologies, Inc. All Rights Reserved. Screenshot (click to enlarge image) Above: ForeScout CounterACT identifies security gaps on your network, such as security agents that are not working or not up-to-date. Above: ForeScout Compliance Center shows end user whether their computers are compliant with corporate security policies. 29 © 2011 ForeScout Technologies, Inc. All Rights Reserved. Screenshots (click to enlarge images) Above: ForeScout CounterACT indicates which PCs are running unauthorized processes. 30 Above: ForeScout CounterACT indicates in real time which PCs on the network contain vulnerabilities © 2011 ForeScout Technologies, Inc. All Rights Reserved. On the left: ForeScout CounterACT makes it easy to kill unauthorized software, such as peer-to-peer. On the right: ForeScout CounterACT has many options for enforcing policies. It is not limited to dropping an endpoint from the network or putting the device in a restricted VLAN. A few of the remediation options are shown below. 31 © 2011 ForeScout Technologies, Inc. All Rights Reserved. Step-by-step: Policy to Control Unauthorized Application In this example, you will create a policy for detecting the presence of unauthorized applications such as instant messaging, and you will instruct CounterACT to disable these applications once found. As with other policies we are testing, this section will guide you through creating, naming, spanning, specifying, and activating a polity. Click on the “Policy” icon and choose “Add”. Choose the Instant Messaging type of policy. (P2P applications have a policy that wil setup the same way as the steps below.) This will force a screen to come up to name it as shown below: Choose the default name for the policy. After choosing Next, the scope of the policy is specified by choosing All for all addresses. Note that there are choices for all types of instant messaging applications, but clicking on the All box will limit all the types of IM traffic listed. 32 © 2011 ForeScout Technologies, Inc. All Rights Reserved. As with other policies, sub policies can be specified when you select Next. To complete the policy, activate it and it will show up in the Policy window. 33 © 2011 ForeScout Technologies, Inc. All Rights Reserved. By clicking on a host address, CounterACT will show IM and P2P applications running on that host. Evaluate Host Compliance We now have some policies setup to allow evaluation of host compliance. To view details about non-compliant endpoints and users choose the NAC icon on the Console toolbar. In the Views pane, navigate tot the policy folder for the policy you want to check and choose a host. The asset information will be displayed in the Details pane. 34 © 2011 ForeScout Technologies, Inc. All Rights Reserved. Detect and Block Zero-day Threats Most of today’s attacks come from the inside, from infected PCs. Once a PC has been infected, it can begin to attack the rest of the network, probing for and stealing sensitive data. Traditional firewalls and perimeterbased solutions are useless against these sorts of attacks. ForeScout has a solution. ForeScout’s patented ActiveResponse™ technology is built into CounterACT, which can detect attacks inside the network perimeter from infected PCs. ActiveResponse blocks both known and unknown attacks without signatures. This unique technology does not require any form of maintenance—no signature updates, no testing, no administrative review of event logs—so the total cost of ownership is very low. Screenshot (click to enlarge image) The above screens show the numbers of hosts on a small test network that are being affected by malicious threats. 35 © 2011 ForeScout Technologies, Inc. All Rights Reserved. Step-by-step: Policy for Threat Protection Many types of threats can be detected and mitigated by ForeScout CounterACT. This policy is created like the others, and we are using it to detect malicious hosts. Activating the built-in intrusion prevention just takes a few mouse clicks. Once again a policy is setup, named, spanned, specified, and activated. Create a Policy for Threat Protection by opening the policy wizard menu item and clicking on “Threats”. Choose “Malicious Hosts”. When you click on Malicious Threats as shown above, you will be requested to name the policy. Choose the default name. This brings up a range for the policy, just as in the other policies. Add in the address range of the test network by clicking the “All” box. Add an address range, click OK, and then Next, and a Main Rule screen appears. It is suggested for this test that the default settings be used. The defaults respond to common intrusion information gathering attempts like finger commands and port scans. More advanced settings and combinations can be used. 36 © 2011 ForeScout Technologies, Inc. All Rights Reserved. Now activate this policy like the others for it to become effective. Run a remote finger query and see the results. This policy is reported as are the others in the policy window. 37 © 2011 ForeScout Technologies, Inc. All Rights Reserved. Appendix A: Installation Instructions for the CounterACT Virtual Appliance If you are installing ForeScout CounterACT Virtual Appliance, you will need a system with one of the following versions of VMware: • • • VMware ESX or ESXi v3.5 update 5\ VMware ESX or ESXi v4.0 update 2 VMware ESX or ESXi v4.1 update 1 The minimum hardware requirement is 1GHz CPU, 1 GB of memory, and 80GB of hard disk space. The guest OS is defined as “Other Linux-2.4 32bit kernel”. If you are installing CounterACT Virtual Appliance, you should receive the following information: • • A link to a CounterACT virtual system package image An email from ForeScout with one license file per virtual device to be installed The instructions in this appendix are an abridged version of the Quick Install Guide and Installation Guide. This should be adequate information for simplistic test conditions. If more advanced testing is required, please refer to the CounterACT 6.4.1 Quick Install Guide and complete Installation Guide available from the support site or the evaluation manager. Virtual Environment Setup Verify that you have performed the following: • • Define Real NICs on the VMware Server Create and Configure Virtual Switches Define Real NICs on the VMware Server Verify that the VMware server on which the Appliance is installed is configured with two interface connections are required for Layer 3 deployment. • Management & Response Interface This interface allows you to manage CounterACT and perform queries and deep inspection of endpoints. The interface must be connected to a switch port with access to all network endpoints. The Appliance also responds to traffic using this interface to setup virtual firewalls, etc. • Monitor Interface This interface allows the Appliance to monitor and track network traffic. Traffic is mirrored to a port on the switch and monitored by the Appliance. Depending upon the number of VLANs being mirrored, the traffic may or may not be 802.1Q VLAN tagged. If more than one VLAN is mirrored, the traffic must be 802.1Q VLAN tagged. 38 © 2011 ForeScout Technologies, Inc. All Rights Reserved. Create and Configure Virtual Switches Verify that the VMware server on which the Appliance is installed is configured with interface connections are required for Layer 3 deployment). There are other ways to deploy CounterACT Virtual Appliance: this document describes one alternative. (For example, you do not need a virtual switch for each port as vSwitches are generally trunk ports. The management interface and the response interface could be on one virtual switch with two logical interfaces configured on the vSwitch.) Creating Virtual Switches Select a host on which you want to install the virtual Appliance, and create virtual switches (vSwitches) for the management, monitor and response NICs on the host. To create a virtual switch: 1. Log in to your VMware vSphere Console. 2. Select Home>Inventory>Hosts and Clusters. 3. Select the host (physical device) on which you want to install the CounterACT device. 4. Select the Configuration tab. 5. In the Hardware pane, select Networking. 6. To create a virtual switch, select the Add Networking link. The Connection Type page of the Add Network Wizard opens. 7. Select the Virtual Machine radio button and select Next. The Network Access page of the Add Network Wizard opens. 8. Select the Create a virtual switch radio button, select the available vmnic interface and then select Next. 39 © 2011 ForeScout Technologies, Inc. All Rights Reserved. The Connection Settings page of the Add Network Wizard opens. 9. Type a suitable name in the Network Label field and select Next. For a vSwitch handling mirrored / SPAN traffic (that is, the monitor interface), it is suggested to use SPAN Port. Leave the VLAN ID field empty as you want to SPAN all traffic and not VLAN tag any of it. The Summary page of the Add Network Wizard opens. 10.Select Finish. The vSwitch is created. The wizard closes and returns to the Configuration tab of the Inventory window. The new switch is added in the window. Configuring Virtual Switches After creating virtual switches for the monitor, management and response interfaces, you must configure them: 40 © 2011 ForeScout Technologies, Inc. All Rights Reserved. • For the monitor and response interfaces: • • Verify that the VLAN ID is defined as All. If not, define it as 4095. In the Security section, verify that all three options (Promiscuous Mode, MAC Address Changes and Forged Transmits) are marked Accept. If not, select and Accept them. For the monitor interface for mirrored / SPAN traffic: In the Security section, select and Accept the Promiscuous Mode option. To configure a virtual switch: 1. Select the Properties link for the virtual switch. The vSwitch Properties dialog box opens. 41 © 2011 ForeScout Technologies, Inc. All Rights Reserved. 2. In the Ports tab, select the appropriate Port Group and then select Edit. The <Network_Label> Properties dialog box opens. 3. In the General tab, define the VLAN ID, if necessary. 4. In the Security tab, select Promiscuous Mode and Accept it. 5. Select and Accept other Policy Exceptions, if necessary. 6. Select OK to return to the vSwitch Properties dialog box. 7. Select Close. Extract Deployment Files from the CounterACT Virtual Appliance System Package. Your CounterACT system package is a zip file that contains all the files required to deploy a CounterACT Virtual Appliance. The file includes: • • An OVF template A file containing the virtual machine You should extract the contents of the zip file and note the location of the extracted content. 42 © 2011 ForeScout Technologies, Inc. All Rights Reserved. Deploy CounterACT Virtual Appliance Perform the following once for each CounterACT Virtual Appliance that you plan to deploy. 1. Access the vSphere Console. 2. Select File>Deploy from file (OVF template). A wizard opens at the Source page, and lets you select the location from which to deploy the template. 3. Select a location and select Next. The OVF Template Details page opens. 43 © 2011 ForeScout Technologies, Inc. All Rights Reserved. 4. Select Next. The Name and Location page opens. 5. Specify a name and select Next. The Datastore page opens. 44 © 2011 ForeScout Technologies, Inc. All Rights Reserved. 6. Define the location where you want to store the virtual machine file. You need at least 80 GB free space. Select Next. The Network Mapping page opens. 7. Map the physical and virtual interfaces. Select Next. The Ready to Complete page opens. 8. Select Finish to deploy the CounterACT virtual device. 45 © 2011 ForeScout Technologies, Inc. All Rights Reserved. Post-Deployment Verification and VMware Configuration Verify the virtual host properties after deployment. 1. In the VMware vSphere Console, select the CounterACT virtual machine. 2. Select Edit virtual machine settings. The Virtual Machine Properties dialog box opens. 46 © 2011 ForeScout Technologies, Inc. All Rights Reserved. 3. For each interface verify that: • • The NIC card Adapter Type is defined as E1000. The Network label is configured with the correct virtual switch. The following table shows the mapping between the interfaces. VM Interface Network Adapter 1 Network Adapter 2 CounterACT Interface eth0 (Management & Response) eth1 (Monitor) After verifying that each interface is configured correctly, you can configure the CounterACT virtual devices. Refer to the CounterACT Console User Manual or online Help for information about working with the Wizard. In the License tab, select a virtual demo license that you received from your ForeScout contact, valid for 30 days. See Error! Reference source not found. for details. 1. Select Choose file to install the license you need. 2. The Choose the License File dialog box opens. 47 © 2011 ForeScout Technologies, Inc. All Rights Reserved. 3. Navigate to the license and Select OK. The Install License From File dialog box opens. When working with the initial demo license, you can select any license file for any device; provided that a specific license file is installed on a specific device. This means you should not use the same license file for more than one device. If you do so, the license may be revoked. Moreover, you will be unable to add an Appliance to the Enterprise Manager, if an Appliance with the same license is already connected. You can rename the file if required. Extended demo licenses and permanent licenses are tailored for a specific device. 4. Select the device and select Install. A dialog appears with information about the installation start and end date, and other license details. 5. Select OK and complete the Wizard. 48 © 2011 ForeScout Technologies, Inc. All Rights Reserved. This page left intentionally blank. Contact Information For ForeScout technical support send email to [email protected] or call (708) 237-6591. Illustration courtesy of Intel Corporation. ©2005 Intel Corporation. ©2011 ForeScout Technologies, Inc. Products protected by US Patent #6,363,489, March 2002. All rights reserved. ForeScout Technologies, the ForeScout logo are trademarks of ForeScout Technologies, Inc. All other trademarks are the property of their respective owners. CA6.3.4EG-072511