1
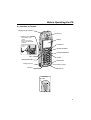
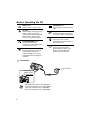
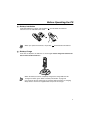
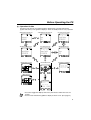
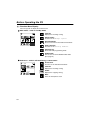
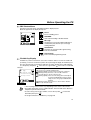
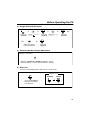
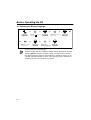
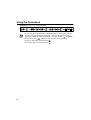
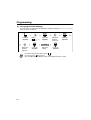
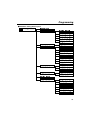
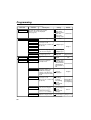
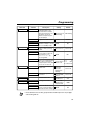
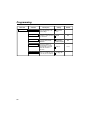
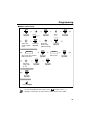
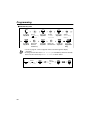
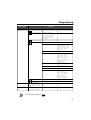
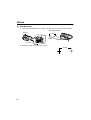
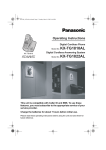
DECT Portable Station
Operating Instructions
Model No.
1
2
4
7
5
8
KX-TCA155
3
6
9
0
Thank you for purchasing the Panasonic KX-TCA155, DECT Portable Station. Please
read this manual carefully before using this product and save this manual for future
use.
This manual is designed to be used with the KX-TCA155 DECT Portable Station and a
Panasonic KX-TDA series Business Telephone System.
Please use only Panasonic R03P (Ni-MH) batteries and charge the
batteries for about 7 hours before initial use.
Table of Contents
Before Initial Use ............................................................................................ 4
Before Operating the PS................................................................................ 5
Location of Controls .................................................................................... 5
Connection .................................................................................................. 6
Battery Installation....................................................................................... 7
Battery Charge ............................................................................................ 7
Power On/Off .............................................................................................. 8
Display Icons............................................................................................... 8
Operation Outline ........................................................................................ 9
Function Menu Display.............................................................................. 10
PBX Feature Menu.................................................................................... 11
Flexible Key Display.................................................................................. 11
Soft Key Display........................................................................................ 12
Ringer Volume Adjustment ....................................................................... 13
Receiver/Speaker Volume Adjustment ..................................................... 13
Key Lock ................................................................................................... 13
Selecting the Display Language................................................................ 14
Making Calls ................................................................................................. 15
Calling Another Extension......................................................................... 15
Calling an Outside Party ........................................................................... 15
Using the Call Log..................................................................................... 16
Using the Phonebook................................................................................ 17
Hot Key Dial .............................................................................................. 19
Receiving Calls............................................................................................. 20
Intercom Calls/Outside Calls/Group Calls................................................. 20
Temporary Ringer Volume Adjustment ..................................................... 20
Caller ID .................................................................................................... 21
During a Conversation................................................................................. 22
Transferring a Call..................................................................................... 22
Holding ...................................................................................................... 22
Turning the Microphone On/Off................................................................. 23
Using the Phonebook .................................................................................. 24
Handset Phonebook.................................................................................. 24
Hot Key Dial .............................................................................................. 27
Entering Characters .................................................................................. 27
Feature List ................................................................................................... 30
Programming ................................................................................................ 34
Changing the Initial Settings ..................................................................... 34
Others............................................................................................................ 42
Walkie-Talkie............................................................................................. 42
Using the Belt Clip..................................................................................... 43
2
Table of Contents
Wall Mounting ........................................................................................... 44
Troubleshooting........................................................................................... 45
Troubleshooting ........................................................................................ 45
Important Information .................................................................................. 46
Battery Information.................................................................................... 46
Safety Instructions..................................................................................... 47
3
Before Initial Use
Please read “Important Information” on page 46 before use. Read and
understand all instructions.
Before Initial Use
Registration
Your PS (Portable Station) must be registered in the Business Telephone System and
you have to determine the extension number before initial use.
Accessories (included)
j AC adaptor
For the KX-TCA155CE users:
PQLV200CE
For the KX-TCA155E users:
PQLV200E
For the KX-TCA155AL users:
PQLV200AL
One
j Charger
j Belt Clip
One
j Rechargeable BatteriesAAA size
(HHR-4EPT/BA2)
j Battery Cover
One
One
j CD-ROM.................. One
j Quick Guide............. One
Two
• In this manual, the suffix of each model number is omitted.
Some of the features described in this manual are not available when the PS is used with a
Panasonic KX-TD816/KX-TD1232 Business Telephone System, only the single line
telephone (SLT) features are available.
4
Before Operating the PS
Before Operating the PS
Location of Controls
Ringing/Charge Indicator
Receiver
Headset Jack
–The headset is an
option.
Please use only the
Panasonic KX-TCA89
headset.
Display
Soft Buttons
Open the
cover.
CANCEL/POWER
CLEAR/TRANSFER
TALK
SPEAKERPHONE
1
2
3
4
5
6
7
8
9
0
Charge Contact
Joystick
INTERCOM
Charge Contact
RECALL
Microphone
Back view
Speaker
5
Before Operating the PS
TALK Button:
Used to make or receive calls.
INTERCOM Button:
Used to make or receive intercom
calls.
Joystick:
Used to adjust the ringer/receiver
volume, select the Function
mode and the function displayed
directly above, and move the
cursor to select a desired item.
CLEAR/TRANSFER Button:
Used to clear digits or characters,
or transfer a call to another party.
CANCEL/POWER Button:
Used to end calls, exit the
Phonebook or Function mode, or
turn on/off the PS.
SPEAKERPHONE Button:
Used for the hands-free
conversation. Press TALK button
to return to the receiver.
Soft Buttons:
Used to select the function
displayed directly above each
button. Functions displayed
depend on the state of use.
RECALL Button:
Used to disconnect the current
call and make another call
without hanging up, or answer
Call Waiting from the telephone
company.
Connection
To AC Outlet
Fasten the AC
adaptor cord to
the cord holder.
AC adaptor
• USE ONLY the Panasonic AC ADAPTOR.
For the KX-TCA155CE users: PQLV200CE
For the KX-TCA155E users: PQLV200E
For the KX-TCA155AL users: PQLV200AL
6
Before Operating the PS
Battery Installation
Insert the batteries as shown. The negative
end should be inserted first.
Close the cover as indicated by the arrow.
• When you replace the batteries, the positive
end should be removed first.
Battery Charge
At the time of shipment, the batteries are not charged. Please charge the batteries for
about 7 hours before initial use.
• When the battery has been completely charged, the charge indicator will
change from red to green. Refer to “Battery Information” on page 46.
• It is normal for the PS and charger to feel warm while the battery is charging.
• Keep devices sensitive to magnetic fields away from the charger.
7
Before Operating the PS
Power On/Off
Power On
Press POWER for about 2 seconds.
Power Off
Press POWER for about 2 seconds.
The display will go blank.
• When the PS is turned on, it will be in standby mode. Standby mode is the state
of the PS when it is not performing any operations and is awaiting calls.
Display Icons
Within range of a Cell Station
301:Paul
Out of range, No registration
3.Jul 10:08
Intercom Indicator
Off-hook Status
Message Waiting
Phonebook Mode
Battery Strength
Hot Line ON
Ringer Volume OFF
Call Forwarding
Do Not Disturb
8
Before Operating the PS
Operation Outline
Functions of the PS are accessed through the display menu, and selected with the
joystick and soft keys. The guidance display is shown in standby mode for easy operation.
<PBX System Phonebook>
<PBX Extension Phonebook>
<Incoming call log group>
01 JUL. 15:03
Panasonic
99998822
Anne
103
<Handset Phonebook>
<Incoming call log>
David Baker
9876543210
<Outgoing call log>
02 JUL. 14:59
David Baker
9876543210
<PBX Feature menu>
James Smith
0123456789
<In standby mode>
Anne
103
<Flexible key display>
Guidance display
1
2
1:Single Line
2:Trunk Group
3:Loop Line
3
0
Pause
<Main menu>
Normal display
Caller ID
301:Paul
New Calls
3.Jul 10:08
• You cannot toggle the displays while in key lock mode or while the PS is on a
charger.
• You can select whether the guidance display is shown or not. (See page 37.)
9
Before Operating the PS
Function Menu Display
Press the joystick to display the function menu.
Main menu – while in standby mode
Caller ID:
Displays the incoming call log.
Ringer Option:
Accesses to the “Ringer Option”.
Caller ID
New Phonebook:
Stores a new item in the Handset Phonebook.
Setting Handset:
Accesses to the “Setting Handset”.
PBX Program:
Enters the PBX programming mode.
Walkie-Talkie:
Sets or turns on/off the Walkie-Talkie mode.
(See page 42.)
Sub menu – while in off-hook/during a conversation
Phone book:
Accesses to the Handset Phonebook.
Caller ID:
Displays the incoming call log.
Phone book
Redial:
Displays the outgoing call log.
Mute:
Turns the microphone on/off.
10
Before Operating the PS
PBX Feature Menu
Functions of the PS can be activated through the display key list.
Move the joystick left to display the key list.
1
2
1
Pause:
Inserts a dialling pause.
2
FWD/DND:
Sets Call Forwarding or Do Not Disturb.
3
Message:
Used to leave a message waiting indication or
call back the party who left you a message
waiting indication.
3
0
Pause
Search Wave:
Searches the strongest radio signal coming
from the Cell Station.
0
PBX Program:
Enters the PBX programming mode.
Flexible Key Display
A flexible key can be used either to seize a line in order to make or receive an outside call
(F-CO key), or used as a function key. Move the Joystick right to display the flexible key list.
The icon shown beside each F-CO key indicates line status similarly to the LED indicators
on a Proprietary Telephone;
is the same as a green LED;
is the same as a red LED.
Example:
1:Single Line
2:Trunk Group
3:Loop Line
key number
Understanding the icons for the F-CO key*
(on): You are currently using this line.
(flashing rapidly): You have an incoming call on this line.
(flashing slowly): You have a call on hold on this line.
(on): This line is in use by someone else.
(flashing rapidly): There is an incoming call received by an
incoming call distribution group to which
“Ring” is set as the group call distribution
method.
(flashing slowly): Someone has a call on hold on this line.
(no icon): This line is idle.
• * The meanings of these icons vary depending on the status of the CO line.
• For further information, refer to “LED Indication” in the KX-TDA series Business
Telephone System Feature Guide.
• To select a key, press its key number, or move the Joystick
to select the
desired key then press
.
• To assign a function to a flexible key, see page 40.
11
Before Operating the PS
Soft Key Display
Icons and information shown on the display will vary depending on the state of use. To
select an item shown on the display, press the corresponding soft buttons.
Opens the Handset Phonebook.
Opens the main menu.
Opens the function menu.
Displays the outgoing call log.
Used to confirm the entry.
Turns the ringer off.
Opens the PBX System
Phonebook.
Opens the PBX Extension
Phonebook.
Opens the incoming call log.
Opens the incoming call log
group.
Displays the next screen.
Clears digits or characters.
Inserts a dialling pause.
Returns to the previous screen.
Used to set the time for memo
alarm.
Used to clear the memo alarm
display setting, or enter an X
when storing the “Line Access
CD”.
Used to select an item when in
setting mode.
Displayed when in
(Alphabetic) character entry
mode.
Displayed when in
(Numeric) character entry mode.
Displayed when in
character entry mode.
(Greek)
Displayed when in
(Extended 1) character entry
mode.
Displayed when in
(Extended 2) character entry
mode.
Displayed when in key lock, and
used to unlock the dialling
buttons.
Used to search for an item in the
Phonebook alphabetically.
Used to place a call on hold.
Used to establish a multiple-party
conversation.
12
Before Operating the PS
Ringer Volume Adjustment
Press the
Joystick.
Select “ Ringer
Option”.
Adjust the volume
level (6 levels/Off).
Press the
Joystick.
Select “Ringer
Volume”.
Press the
Joystick.
Press the
Joystick.
Receiver/Speaker Volume Adjustment
During a conversation
Move the Joystick UP or DOWN to adjust the volume.
(Receiver Volume - 3 levels, Speaker Volume - 6 levels)
Key Lock
You can lock the dialling buttons while the PS is in idle status.
<Display icon>
Unlocked
Locked
Press the Joystick for
more than 2 seconds
to lock/unlock.
13
Before Operating the PS
Selecting the Display Language
Press the
Joystick.
Select “ Setting Press the
Handset”.
Joystick.
Select “Select
Language”.
Press the
Joystick.
Select “Display Press the
Option”.
Joystick.
Select the
Press the
desired language. Joystick.
• You can select one of 16 languages:
Deutsch, English, Español, FRANCAIS, Italiano, Dansk, Nederlands, Svenska,
Suomi, E HNIKA, Magyar, Português, Polski, slovensky, c eština, Hrvatski
• The display language of both the PS and Business Telephone System can be
selected, and both should be set to the same language. Refer to the Business
Telephone System User manual for more details.
14
Making Calls
Making Calls
Calling Another Extension
extension no.
Press TALK.
Dial the extension
number.
Talk.
Press CANCEL.
Calling an Outside Party
Using the line access numbers
0
/
9*
OR
8
Press
TALK.
outside
phone
phone
no. no.
CO line
group no.
Enter the line
access number.
Dial the outside
phone number.
Talk.
Press
CANCEL.
Using Flexible CO keys
X
Press the idle CO
key number (1-3).
OR
Move the
Joystick
RIGHT.
Select the
Press the
idle CO key. Joystick.
outside phone no.
Dial the outside
phone number.
Talk.
Press
CANCEL.
• * The line access number (default) varies depending upon Country/Area.
Consult your dealer for more details.
• You can confirm a number was dialled correctly before calling (Predialling) by
entering the number, then pressing
.
• To clear an entire number while predialling, press and hold
.
• If “ ” flashes, move closer to the Cell Station and dial again.
• To cancel dialling, press
.
15
Making Calls
Using the Call Log
Feature
Description
Display Icon
Outgoing
Call Log
You can make a call using the phone
numbers you have dialled previously.
Incoming
Call Log
You can make a call using the phone numbers
of calls you have received.
Incoming Call
Log Group
You can make a call using the phone
numbers of calls that incoming call
distribution groups have received.
Using the Outgoing Call Log
Press the Right
Soft Key.
Select the
desired item.
Press TALK.
OR
Talk.
To make a call to the
Press
CANCEL.
Press last dialling number.
TALK.
Using the Incoming Call Log
Select the
desired item.
16
Press TALK.
Talk.
Press CANCEL.
Making Calls
Using the Incoming Call Log Group
group no.
Press the Right
Soft Key.
Press the
Joystick.
Press the Right
Soft Key.
Press the Right
Soft Key.
Select the
desired item.
Press
TALK.
Enter the desired
incoming call log
group no.
Talk.
Press
CANCEL.
• An outside number stored with a name in the Handset Phonebook will be
displayed by number and name in the call log.
• When a call is made using the PBX System Phonebook, the called party's name
is not stored in the Outgoing Call Log. To log the name as well as the number,
copy the item into the Handset Phonebook before dialling it. (See page 26.)
Using the Phonebook
Feature
Display Icon
Description
Handset
Phonebook
You can make a call using the numbers
stored in the Handset Phonebook.
PBX
System
Phonebook
You can make a call using the numbers
stored in the Business Telephone System.
PBX
Extension
Phonebook
You can make a call using the extension
numbers stored in the Business Telephone
System.
17
Making Calls
Using the Handset Phonebook
name
Press the
Left Soft Key.
Enter the first
letter of the
desired name.
Select the
desired item.
Press
TALK.
Using the PBX System Phonebook
name
Press the
Left Soft Key.
Press the
Left Soft Key.
Enter the first
letter of the
desired name.
Select the
desired item.
Press
TALK.
Using the PBX Extension Phonebook
name
Press the
Press the
Press the
Left Soft Key. Left Soft Key. Left Soft Key.
18
Enter the first
letter of the
desired name.
Select the
desired item.
Press
TALK.
Making Calls
• You can search for an item stored in the Phonebook, as shown below:
<Index Search-Handset Phonebook>
first letter
Select
“Index Search”.
<Category Search-Handset Phonebook>
Select “Category”.
<Index Search-PBX System Phonebook>
Select the desired
category number
or All.
first letter
<Index Search-PBX Extension Phonebook>
first letter
• To enter characters, see page 27.
Hot Key Dial
You can make a call by simply pressing the assigned number as hot key.
X
Press and hold the dialling button
assigned as a hot key.
Press TALK.
• To assign a phone number as hot key, see page 27.
19
Receiving Calls
Receiving Calls
Intercom Calls/Outside Calls/Group Calls
While receiving a call
Intercom Calls/Outside Calls/Group Calls
To answer a call when the PS is ringing
Talk.
Press TALK.
Press CANCEL.
Intercom Calls
To answer a call when the PS is ringing
Talk.
Press INTERCOM.
Press CANCEL.
Outside Calls
To answer a call on a specific line
X
Press the CO key number (1-3).
(Select a CO line with a flashing icon
.)
OR
Move the
Joystick RIGHT.
Talk.
Select the CO key.
Press the
(Select a CO line with a Joystick.
flashing icon
.)
• You can also answer a call as follows:
– Auto Talk
(See page 37.)
– Any Key Answer (See page 38.)
– Auto Answer
(See page 38.)
Temporary Ringer Volume Adjustment
While receiving a call
OR
Move the Joystick UP or DOWN
to adjust the volume.
20
Press the Joystick to
turn the ringer off.
Press
CANCEL.
Receiving Calls
Caller ID
If an outside call which contains Caller ID information is received, this information will be
logged in the incoming call log.
<Caller ID display>
<Standby mode>
Date
Received
301:Paul
Time
Received
02 JUL. 14:59
Old:Answered
James Smith
0123456789
New Calls
3.Jul 10:08
New calls have been
received.
Phone No.
Status of the
call
James Smith
0123456789
Name
Access to the Incoming Call Log Group
group no.
Press the
Enter the desired
Right Soft Key. group number.
Press the
Joystick.
Calling back to the caller
Select the
desired item.
Press
TALK.
Press
CANCEL.
Talk.
Saving the Caller Information in the Handset Phonebook
name
phone no.
category no.
Select the
Press the Select “Save Press the Enter a name, phone
Press the
desired item. Joystick. Phonebook”. Joystick. number, and select the Joystick.
category number or Off.*
Deleting
Select the
desired item.
• * Press
Press the
Joystick.
Select
“Delete”.
Press the
Joystick.
Select “Yes”.
Press the
Joystick.
to confirm each entries.
21
During a Conversation
During a Conversation
Transferring a Call
Transferring to an extension
During a conversation
extension no.
Dial the extension
number.
Press CLEAR/
TRANSFER.
Talk.
Press
CANCEL.
Transferring to an outside party
During a conversation
0
/
9 *
OR
8
Press CLEAR/
TRANSFER.
outside phone no.
CO line
group no.
Enter the line
access number.
Dial the outside
phone number.
Talk.
Press
CANCEL.
• * The line access number (default) varies depending upon Country/Area.
Consult your dealer for more details.
• To return to the call before the transfer destination answers, press
.
Holding
To hold (Regular Hold)
During a conversation
Press the Left Soft Key.
22
During a Conversation
To hold (Exclusive Call Hold)
You can hold a call exclusively so that other people cannot retrieve the call.
During a conversation
Press the Left Soft Key.
Press the Left Soft Key again.
• The method used to hold a call depends on the Call Hold mode (Regular Hold/
Exclusive Call Hold). Ask your manager what the current mode is.
• When you hold several outside line calls, you need to assign the CO keys
(Single Line/Group Line/Loop Line/ICD Group) to a flexible key as necessary,
beforehand.
To retrieve a call
Intercom Calls
Press
INTERCOM.
Outside Calls
X
Press the CO key number (1-3).
(Select a CO line with a flashing icon
.)
OR
Move the Joystick
RIGHT.
Select the CO key.
(Select a CO line with a
flashing icon
.)
Press the
Joystick.
Turning the Microphone On/Off
During a conversation
Press the
Joystick.
Select “
Mute”.
Press the
Joystick.
23
Using the Phonebook
Using the Phonebook
Handset Phonebook
You can store up to 200 items with names, phone numbers and category numbers in the
handset for easy access. All directory items are stored in alphabetical order.
Incoming Call Identification
You can organise entries in the Handset Phonebook into one of 9 categories. A call from
someone stored in one of these categories will be indicated by the ringer type, light (LED)
colour pattern assigned to the category.
Item
Setting
Ringer pattern
15 ringer type (See page 36.)
LED colour pattern
3 patterns (See page 36.)
Storing a new item
Press the
Joystick.
Name
Select “
New
Phonebook”.
Press the
Joystick.
name
Enter a name
(max. 16 characters).
Phone Number
Press the
Joystick.
phone no.
Enter the phone number*
(max. 24 digits).
Press the
Joystick.
Private Category
Select the desired
category number or Off.
Press the
Joystick.
Press the
Joystick.
• To enter characters, refer to page 27.
• * The valid digits are “0” through “9”, “ ”, “#”, PAUSE.
• When storing numbers for outside parties, you should store a line access
number with each number.
24
Using the Phonebook
Editing
Press the
Left Soft Key.
Select the
desired item.
Press the
Joystick.
Select
“Edit”.
Press the
Joystick.
name
Name
Edit the name
(max. 16 characters).
Phone Number
Press the
Joystick.
phone no.
Edit the
phone number*
(max. 24 digits).
Press the
Joystick.
Private Category
Select the desired
category number or Off.
Press the
Joystick.
Press the
Joystick.
• To enter characters, refer to page 27.
• * The valid digits are “0” through “9”, “ ”, “#”, PAUSE.
• To change a character or digit, press
to highlight it, press
to delete it,
then enter the new character or digit.
• To clear an entire line, press and hold
.
• To move the cursor to the left or right, press
or
, respectively.
Deleting
Press the
Left Soft Key.
Press the
Joystick.
Select the
desired item.
Select “Yes”.
Press the
Joystick.
Select “Delete”.
Press the
Joystick.
25
Using the Phonebook
Storing an item in the Handset Phonebook
Using the Outgoing Call Log
name
phone no.
category no.
Press the
Select the
Press the
Right Soft desired item. Joystick.
Key.
Select “Save Enter a name, phone
Press the
Phonebook”. number, and select the Joystick.
category number or Off.*
Using the Incoming Call Log
name
phone no.
category no.
Select the
desired item.
Press the
Joystick.
Select “Save
Phonebook”.
Press the
Enter a name, phone
number, and select the Joystick.
category number or Off.*
Using the Incoming Call Log Group
group no.
Move the
Joystick
UP or DOWN.
Press the
Right
Soft Key.
Enter the
incoming call
log group no.
Press the
Joystick.
Select the
desired item.
name
phone no.
category no.
Press the
Joystick.
Select “Save
Phonebook”.
Enter a name, phone
number, and select the
category number or Off.*
Press the
Joystick.
Using the PBX System Phonebook
Press the
Press the
Left Soft Key. Left Soft Key.
Select the
desired item.
Press the
Joystick.
Select “Save
Phonebook”.
name
phone no.
category no.
Enter a name, phone
number, and select the
category number or Off.*
Press the
Joystick.
• * Press
to confirm each entries.
• When storing an outside phone number, the line access number will be stored
automatically. The line access number must be identical to the PS’s “Line
Access CD” setting (Call Option). (See page 37.)
26
Using the Phonebook
Hot Key Dial
The phone numbers stored in the Handset Phonebook can be assigned as hot key.
Press the Left
Soft Key.
Select the
desired item.
Press the
Joystick.
Select a blank
Press the Joystick.
hot key number (1-9).
Select “Reg.
to Hot Key”.
Press the
Joystick.
Press the Joystick.
• A “ ” will be displayed next to hot key numbers which have a phonebook item
registered to them.
Entering Characters
You can enter characters and digits using the dialling buttons.
You can select one of 5 character modes by pressing the Right Soft
Key while entering a name. The function icon above the soft key
displays the current character mode.
See “Character Mode Table” (page 29) for available characters.
A, a
B, b
C, c
2
To change the character mode while editing a name in the phonebook, press
the Right Soft Key.
Normal
Numeric
Greek
Extended 1 Extended 2
27
Using the Phonebook
Example: To enter “Anne” in Normal Mode.
2
6
6
6
6
3
3
• To enter a character located on the same dialling button as the previous character,
move the cursor by moving the Joystick
, then enter the desired character.
• If you enter a different character by mistake, move the Joystick
to highlight
the character, press
to delete it, then enter the correct character.
• To clear an entire line, press and hold
• To move the cursor, move the Joystick
28
.
.
Using the Phonebook
•
•
Character Mode Table
29
Feature List
Feature List
R.B. Tone: Ringback Tone
ICD Group: Incoming Call Distribution Group
PIN: Personal Identification Number
Feature
Operation
Making Calls
To store
Select
“
PBX Program”.
One-touch
Dialling
Select
a Flexible Key.
desired no.
2
To dial
Select the key assigned
as a One-touch Dialling
button.
To store
4
7
2
0
desired
phone no.
To set/cancel
Hot Line
4
7
0
1
Set
0
Cancel
To dial
Operator
Call
System
Speed
Dialling
9
/
0
To dial
system speed dial no. (3 digits)
Doorphone
Call
3
1
doorphone no. (2 digits)
To set
While hearing a busy tone
Automatic
Callback
Busy
To cancel
4
6
To answer from an idle extension
While hearing a callback ring
6
To answer from an idle outside line
While hearing a callback ring
outside phone no.
R.B. Tone
30
Feature List
Feature
Operation
During a Conversation
To add another party during a conversation
desired
phone no.
Multiple
Party
Conversation
Talk with multiple
parties.
Talk to the
new party.
To leave a conference
Useful Features
7
Call
Forwarding
Do Not
Disturb
2
3
4
All calls
5
Busy/
No answer
0
Cancel
7
Follow Me
8
Cancel
Follow Me
1
0
All Calls
1
Outside Calls
2
Intercom Calls
extension no.
Busy
OR
No answer
7
CO line
access no.
outside
phone no.
your extension no.
1
0
All Calls
1
Outside Calls
2
Intercom Calls
1
Set
0
Cancel
31
Feature List
Feature
Operation
Useful Features
Directed
Call Pickup
Sending a
Call Waiting
Tone
4
1
4
0
extension no.
Group
group no. (2 digits)
While hearing a busy tone
1
Wait for an answer.
To set/cancel for intercom calls
7
3
1
0
No call
1
Set
0
No tone
1
Tone
To set/cancel for outside calls
Call
Waiting
7
3
2
To talk to the second party
While hearing a call waiting tone
OR
To page
3
3
paging group no. (2 digits)
Announce.
Paging
Wait for an answer.
To answer
4
32
3
Feature List
Feature
Operation
Useful Features
To set
5
7
Absent
Message
message
no. (1-9)
0
parameter
(if required)
To cancel
7
Log-in/
Log-out
Extension
Setting
Clear
5
0
0
7
3
6
1
For Log-in
7
3
6
0
For Log-out
7
9
ICD Group
extension no.
Specified
All
0
To leave a message waiting indication
When the called extension is busy or does not answer
4
OR
Select
“
Message”.
Caller
To cancel a message waiting indication
Message
Waiting
7
0
extension
no.
0
To call back
7
Called
extension
0
2
OR
Select
“
Message”.
To lock
Extension
Lock*
7
7
1
7
7
0
To unlock
extension PIN
(max. 10 digits)
• * If an extension PIN has not been set for the PS, the extension cannot be
locked. (Refer to the Business Telephone System User Manual)
• For further information, refer to the Business Telephone System User Manual or
consult your dealer.
33
Programming
Programming
Changing the Initial Settings
You can customize the handset by editing the settings found under “Setting Handset”
in the menu list, as follows:
Press the
Joystick.
Select
“ Setting
Handset”.
Press the
Joystick.
Select the
desired
main item.
Press the
Joystick.
setting
Select the
desired
sub item.
Press the
Joystick.
Follow the
setting.
Press the
Joystick.
• To return to the previous menu, press
.
• To cancel, press
at any time.
• The unit will beep to indicate that the new settings have been saved.
34
Programming
Handset setting menu layout
Setting Handset
Memo Alarm
Ringer Option
Ringer Volume
EXT Ringer Type
INT Ringer Type
Group Ring Type
Private Ring
Charger
Tone Option
Display Option
Key Tone
Standby Display
Select Language
LED Colour
Private Colour
Category Name
Caller ID Disp
LCD Contrast
Guidance
Call Option
Hot Line No.
Hot Line Mode
Line Access CD
Register H/set
Cancel Base
Registration
Select Base
Other Option
Change H/S PIN
Auto Talk
Reset Handset
Any Key Answer
Auto Answer
Auto Ans Delay
Flex Key Edit
35
Programming
Main Item
Memo Alarm
Ringer Option
Sub Item
Description
An alarm will sound at the set time.
A memo can also be displayed.
(See page 39.)
Ringer Volume
Adjusts the ringer volume.
EXT Ringer Type
Selects the ringer type for
each type of call.
(intercom call, outside call,
group call)
INT Ringer Type
Setting
Alarm no.
Alarm mode
(Off/Once /Daily)
Alarm time
Enter memo.
15 Ringer Type
6 levels/Off
Selects the ringer type for
calls in each category.
Select a Category.
15 Ringer Types
Charger
Selects whether the PS on
a charger rings or not.
Ringer Setting/
Ringer Off
Tone Option
Key Tone
Turns the key tone off or
on.
On/Off
Display Option
Standby Display
Selects the display in
standby mode.
Private Colour
Category Name
36
Level 3
Ringer 1
Private Ring
LED Colour
Not Stored
15 Ringer Types
Group Ring Type
Select Language
Default
Selects the display
language. When set to
AUTO, the language
settings of the Business
Telephone System will be
used.
Selects the LED colour for
each type of call.
(intercom call, outside call,
group call)
Ringer Setting
On
4 Display Type
(Base Number/
Handset Number/ Base & H/S No.
Handset Name/
Base & H/S No.)/
Off
Auto/16
Languages
Call Type
(Ext Ring/
Int Ring/
Group Ring)
Colour
(Green/Red/
Orange)
English
INT Ring-Green,
EXT Ring-Red
Group Ring-Orange
Selects the LED colour for
calls in each category.
“Private Colour”
setting has priority to
“LED Colour” setting.
Select a Category.
Colour
(Green/Red/
Orange)
Edits the category name.
Select a Category. Category 1-9
Green
Programming
Main Item
Sub Item
Display Option
Caller ID Disp
Call Option
Default
H/S Phonebook/
PBX Setting
LCD Contrast
Adjusts the LCD contrast.
3 levels
Level 2
Guidance
Selects whether the
guidance display is shown
or not in standby mode.
On/Off
On
Hot Line No.
Stores a phone number to
make a call by pressing
TALK.
Enter Phone no.
Hot Line Mode
When set to ON, allows
you to make a call to the
stored phone no. in
“Hot Line No.” by
pressing TALK.
On/Off
Enters the trunk access code
(line access code) that matches
the setting of your Business
Telephone System. Three trunk
access code can be stored.
No.1
0
Select a number.+ No.2
8XX*
Enter the code.
No.3 Not stored
PBX Setting
Not stored
Off
Registers a handset with
a base unit.
Base no.
Base PIN
[Personal
Identification
Number]
Not stored
Cancels the registration of
a handset.
H/set PIN
(Default: 0000)
Base no.
Not stored
Selects a base unit.
Auto/Base no.
Auto
Change H/S PIN
Changes the handset PIN.
Enter Old PIN.+
Enter New PIN.+
Verify New PIN.
0000
Auto Talk
When set to ON, allows you to
answer a call by just lifting up
the handset from the charger.
Register H/set
Cancel Base
Select Base
Other Option
Setting
Selects which caller information
is displayed when a call is
received. Either the Handset
Phonebook information or the
information stored in the
Business Telephone System
can be displayed.
Line Access CD
Registration
Description
On/Off
On
• * XX is identical to the CO line group number and 8XX represents any 3-digits
code starting with “8”.
37
Programming
Main Item
Other Option
Sub Item
Description
Setting
Reset Handset
Returns the handset settings
(except Registration) to the
default settings.
Enter H/set
PIN.+Select
“Yes”.
Any Key Answer
When set to ON, allows you
to answer a call by pressing
any dial button.
On/Off
Off
Auto Answer
Selects the type of calls to
be answered by AUTO
ANSWER.
2 Call Types
(Internal Only/
Int&External)/Off
Off
Auto Ans Delay
Selects the number of
seconds before a call is
automatically answered
when Auto Answer is
turned on.
5-20 sec.
Allows you to assign a
function to a flexible key, and
use the key as a shortcut key.
See page 40.
Flex Key Edit
38
Default
6 sec
Programming
Memo alarm setting
Press the
Joystick.
Select the
alarm number
(1-3).
Select
“ Setting
Handset”.
Press the
Joystick.
Press the
Joystick.
Select
“Memo
Alarm”.
Select the
Alarm mode
(Off/Once/Daily).
Press the
Joystick.
Press the
Joystick.
When “Once/Daily” is selected
date/time
memo
Once: Enter date and time.
Daily: Enter time.
Select the
ringer type.
(1-15).
Press the
Joystick.
Press the
Joystick.
Enter memo.
Press the
Joystick.
Press the
Joystick.
When “Off” is selected
Press the
Joystick.
To stop the alarm
Press CANCEL.
• To clear the displayed memo alarm, press
and then select “Yes”.
• During a conversation, an alarm will not sound until the call is ended.
39
Programming
Flexible key edit
Press the
Joystick.
Select
“ Setting
Handset”.
Press the
Joystick.
Select
“Other
Option”.
Press the
Joystick.
Select
“Flex Key
Edit”.
OR
Press the
Joystick.
Select the
desired
flexible key.
Press the
Joystick.
Select the
Press the
desired item.* Joystick.
Press the
Right Soft
Key.
• * Items on page 41 can be assigned, and accessed through the display
operation.
• To assign an item other than “PBX setting” to a flexible key which has already
been used, first set the key to “Not stored”, as shown below.
Select
“
PBX
Program”.
40
Select
a Flexible
Key.
2
Programming
Main Item
Sub-Items
PBX setting
Menu
Caller ID
Ringer Option
Ringer Volume
EXT Ringer Type
INT Ringer Type
Group Ring Type
Private Ring
Charger
New Phonebook
Setting Handset Memo Alarm
Ringer Option
Tone Option
Display Option
Call Option
Ringer Volume
EXT Ringer Type
INT Ringer Type
Group Ring Type
Private Ring
Charger
Key Tone
Standby Display
Select Language
LED Colour
Private Colour
Category Name
Caller ID Disp
LCD Contrast
Guidance
Hot Line No.
Hot Line Mode
Line Access CD
Registration
Select Base
Other Option
Change H/S PIN
Auto Talk
Reset Handset
Any Key Answer
Auto Answer
Auto Ans Delay
Flex Key Edit
PBX Program
Walkie-Talkie
Dialing
Call log
H/set Phonebook
PBX Sys Dialing
PBX EXT Dialing
Redial
Incoming Log
Incoming LogGrp
• To access sub-items, press
.
41
Others
Others
Walkie-Talkie
Using Walkie-Talkie mode, you can communicate with another handset even when out of
range of a base unit. Only Panasonic DECT Portable Station which supports WalkieTalkie can be used. Handsets have to be in Walkie-Talkie mode, and have the same
Walkie-Talkie group number. In Walkie-Talkie mode, you cannot make or receive a call
through the PBX.
Turning the Walkie-Talkie mode on
Press the
Joystick.
Select “
WalkieTalkie”.
Press the
Joystick.
Select “On”.
Press the
Joystick.
Turning the Walkie-Talkie mode off
Press the
Joystick.
Select “Off”.
Press the
Joystick.
• To exit the operation, press
any time.
• When the Walkie-Talkie mode is ON, the handset number is displayed followed
by “Walkie-Talkie”.
42
Others
Setting the Walkie-Talkie mode
Press the
Joystick.
Select
“
WalkieTalkie”.
Press the
Joystick.
group no.
Select
“Setting”.
Press the
Joystick.
handset no.
Press the
Enter the group
number* (3 digits). Joystick.
Enter the handset
number (1-9).
Press the
Joystick.
Press the
Joystick.
• To exit the operation, press
any time.
• * Any combination of three number can be used, make note of your own code.
• Each handset should have its own unique number.
Talking in Walkie-Talkie mode
Answering
Calling
handset no.
Press INTERCOM.
Enter the desired
handset number.*
Press TALK.
• To exit the operation, press
any time.
• * A caller can press
to call all handsets in the same Walkie-Talkie mode.
Using the Belt Clip
You can hang the handset on your belt.
To remove
the belt clip.
43
Others
Wall Mounting
1 Connect the AC adaptor to the charger. 2 Drive the screws into the wall using the
wall template below.
Charger
28 mm
Cord holder
Screws
AC adaptor
To AC Outlet
3 Mount the charger securely on the screws.
28 mm
44
Troubleshooting
Troubleshooting
Troubleshooting
Problem
Description and Solution
The PS does not work.
• The battery is drained.
→ Charge the battery fully. (See “Battery Charge” on page 7.)
• The PS has been cancelled or the PS has not been
registered.
→ Consult your dealer.
• The power is OFF.
→ Turn it ON. (See “Power On/Off” on page 8.)
The PS does not ring.
• Ringer volume is set to “Off”.
→ Adjust the ringer volume level. (See “Ringer Volume
Adjustment” on page 13.)
You cannot make/receive a call.
• The PS is out of range or the Cell Station (CS) is busy.
→ Move closer to the CS or try again later.
• The radio channel is busy or a radio communication error
occurred.
→ Try again later.
You cannot dial.
• The number which you dialled is restricted by the
Business Telephone System.
→ Consult your dealer.
• The key lock mode is ON.
→ To cancel the mode, press the Joystick for about 2
seconds. (See “Key Lock” on page 13.)
• The radio channel is busy or a radio communication error
occurred.
→ Try again later.
Noise is frequently heard.
→ Set the PS and CS away from other electrical appliances.
→ Move closer to the CS.
“CS BUSY” is displayed.
• The Cell Station is busy.
→ Try again later.
“PS Not Connected” is
displayed.
• The called PS is out of range or the PS is power off.
→ Try again later.
The PS stops working during
operation.
→ Turn the power OFF and ON, then try again. (See “Power
On/Off” on page 8.)
→ Reinsert the batteries and try again. (See “Battery
Installation” on page 7.)
45
Important Information
Important Information
Battery Information
After your Panasonic batteries are fully charged [at 25 °C]:
Operation
Operating Time
While in use (TALK)
10 hrs approx.
While not in use (Standby)
120 hrs approx.
•
•
•
•
•
Battery charge may be shortened depending on usage conditions and ambient temperature.
The batteries cannot be overcharged.
The batteries will drain even while the unit is “OFF”.
The PS can receive calls while charging.
Battery consumption increases when the PS is used out of range. If “ ” flashes, power off
the PS.
• Clean the handset and the charger contacts with a soft, dry cloth once a month. Clean
more often if the unit is subject to grease, dust or high humidity. Otherwise the
batteries may not charge properly.
• Read “Important Notice Concerning the Correct Use and Charging of Ni-MH Batteries.”
Low Battery Warning
The batteries need to be charged when “
” flashes or the alarm sounds every one
minute.*
* If the low battery warning occurs during a conversation, you can continue the call for
one minute, then the call will be disconnected automatically.
Replacing the Batteries
If “
” flashes after a few telephone calls even when the batteries have been fully
charged, it is time to replace the batteries with new ones.
Before replacing the batteries, turn the power off to prevent memory loss. Replace the
batteries. Charge the new batteries for at least 7 hours.
If you replace the batteries before the low battery warning appears, the battery strength
icon may display an incorrect reading. In this case, use the PS as normal with the new
batteries installed. When the low battery warning is displayed, charge the batteries for
about 7 hours. The battery strength icon will then display a correct reading.
• Please replace with PANASONIC batteries, part number HHR-4EPT/BA2.
• Replace both batteries and close the cover then charge the handset for about 7 hours.
Please order only Panasonic R03P (Ni-MH) batteries, part number HHR4EPT/BA2.
Caution
To reduce the risk of fire or injury to persons, read and follow these instructions.
1) Use only the batteries specified.
2) Do not use non-rechargeable batteries.
3) Do not mix old and new batteries.
46
Important Information
4) Do not dispose of the batteries in a fire. They may explode. Check with local waste
management codes for special disposal instructions.
5) Do not open or mutilate the batteries. Released electrolyte is corrosive and may
cause burns or injury to the eyes or skin. The electrolyte may be toxic if swallowed.
6) Exercise care in handling the batteries in order not to short the batteries with
conductive materials such as rings, bracelets, and keys. The batteries and/or
conductor may overheat and cause burns.
7) Charge the batteries provided with or identified for use with this product only in
accordance with the instructions and limitations specified in this manual.
Important Notice Concerning the Correct Use and Charging of Ni-MH
Batteries
Batteries, due to their construction, undergo some wear and tear. The lifetime of a battery
also depends on correct maintenance. Charging and discharging are the most important
factors. You should take notice of the following to maintain the life of the battery as long
as possible.
Ni-MH batteries have a kind of memory, the “memory effect.” If fully charged batteries are
used several times only for 15 minutes in the handset and then recharged, the capacity of
the batteries will be reduced to 15 minutes due to the memory effect. Therefore you
should discharge the batteries completely, i.e. use them in the handset until “
” on the
display starts flashing. Then recharge them as described in the manual. After the
memory effect has occurred, it is possible to achieve almost complete capacity of the NiMH batteries by charging and discharging several times one after another.
Ni-MH batteries can also self-discharge. This self-discharge depends on the ambient
temperature. At temperatures under 0 °C, the self-discharge will be the lowest. High
humidity and high temperatures support the self-discharge. Also long-term storage will
lead to self-discharge. A dead Ni-MH battery should not be disposed of normally. They
contain toxic heavy metal hydride and therefore should be recycled.
Safety Instructions
Pay special attention to the safety suggestions listed below.
Safety
1) Power source: The AC adaptor should be connected to a power supply only of the
type as marked on the AC adaptor. The AC adaptor is used as the main disconnect
device, ensure that the AC outlet is located/installed near the unit and is easily
accessible.
2) Non use periods: When the PS is not being used, turn the power off. When left
unused for a long period of time, the charger should be unplugged from the AC outlet.
3) Do not place metal items such as coins or rings on the charger. As they become hot,
you might get burned if you touch them.
47
Important Information
Installation
Environment
1) Water and moisture: Do not use the PS and the charger near water — for example,
near a bathtub, washbowl, sink, etc. Damp basements should also be avoided.
2) Heat: The PS and the charger should be kept away from heat sources such as
radiators, kitchen ranges, etc. They also should not be placed in rooms where the
temperature is less than 5 °C or greater than 40 °C.
3) The apparatus is designed to be installed and operated under controlled conditions of
ambient temperature and a relative humidity.
Placement
1) Stacking: Do not place heavy objects on top of the PS and charger.
2) Foreign material: Care should be taken so that objects do not fall onto and liquids are
not spilled into the PS and charger. Do not subject the PS and charger to excessive
smoke, dust, mechanical vibration, or shock.
3) Surface: Place the charger on a flat surface. If the charger is mounted on the wall,
install it straight.
For best performance
Operating Range
1) The range of operation depends on the topography of your office, weather or usage
conditions, because signals are transmitted between the Cell Station (CS) and the PS
by radio waves.
2) Normally, you get greater range outdoors than indoors. If there are obstacles such as
walls, noise may interfere with your telephone calls. In particular, high metal shelves
or reinforced concrete walls will restrict your operating range.
3) A PS may not work when it is too far from the CS depending on the structure of the
building.
Noise
Occasional noise or interference may occur due to electromagnetic radiation from
objects such as refrigerators, microwave ovens, faxes, TVs, radios, or personal
computers. If noise disturbs your telephone calls, keep the PS away from these electrical
appliances.
WARNING:
TO PREVENT FIRE OR SHOCK HAZARD, DO NOT EXPOSE THIS PRODUCT TO
RAIN OR ANY TYPE OF MOISTURE. TO REDUCE THE RISK OF ELECTRIC SHOCK,
DO NOT DISASSEMBLE THIS UNIT. TAKE THE UNIT TO AN AUTHORISED SERVICE
CENTRE WHEN SERVICE IS REQUIRED.
THE HANDSET IS MAGNETISED AND MAY RETAIN SMALL FERROUS OBJECTS.
When a failure occurs which results in the internal parts becoming accessible, disconnect
the AC adapter immediately and return this unit to the place of purchase or service
centre.
48
Important Information
IMPORTANT NOTICE:
Under power failure conditions, this wireless telephone may not operate. Please ensure
that a separate telephone, not dependent on local power, is available for emergency use
in emergencies.
• This apparatus is designed to aid the visually handicapped to locate dial keys and
buttons.
• 999 and 112 can be dialled on the apparatus after accessing the CO line for the
purpose of making outgoing calls to the BT emergency (999) and (112) services.*1
• This equipment shall not be set to make automatic calls to the Telecom ‘111’
Emergency Service.*2
• The grant of a Telepermit for any item of terminal equipment indicates only that Telecom
has accepted that the item complies with the minimum conditions for connection to its
network. It indicates no endorsement of the product by Telecom, nor does it provide any
sort of warranty. Above all, it provides no assurance that any item will work correctly in
all respects with another item of Telepermitted equipment of a different make or model,
nor does it imply that any product is compatible with all of Telecom's network services.*2
*1 The regulation applied in the United Kingdom only.
*2 The regulation applied in New Zealand only.
RF Specifications
Item
Description
Radio Access Method
Multi Carrier TDMA-TDD
Frequency Band
1880 MHz - 1900 MHz
Number of Carriers
10
Carrier Spacing
1728 kHz
Bit Rate
1152 kbps
Carrier Multiplex
TDMA, 24 (T×12, R×12) slots per frame
Frame Length
10 ms
Modulation
GFSK
Voice Coding
32 kbps ADPCM (CCITT G.721)
Transmission Output
Max. 250 mW
• Specifications are subject to change.
• The illustrations used in this manual may slightly differ from the original device.
49
Following declaration is applicable to KX-TCA155CE/KX-TCA155E only
0436
This device is a DECT Portable station operating in the frequency band of 1880 MHz to 1900 MHz.
The usage of this device is generally allowed in all the EU countries.
We, Panasonic Communications Company (U.K.) Ltd., declare that this equipment is in
compliance with the essential requirements and other relevant provisions of Directive 1999/5/EC.
If you want to get a copy of the original Declaration of Conformity of our products which relates
to the R&TTE, please contact to our web address:
http://doc.panasonic-tc.de
Copyright:
This manual is copyrighted by Panasonic Communications Co., Ltd. (PCC). You may print out
this manual solely for internal use with this model. Except above, you may not reproduce this
manual in any form, in whole or part, without the prior written consent of PCC and its licensee.
© 2003 Panasonic Communications Co., Ltd. All Rights Reserved.
Panasonic Communications Company (U.K.) Ltd.
Pencarn Way, Duffryn, Newport, South Wales, NP10 8YE, United Kingdom
PSQX2983YA KK0703TT1093