1
Operating Instructions
DECT Portable Station
Model No.
KX-TCA275
Thank you for purchasing a Panasonic DECT Portable Station.
Please read this manual carefully before using this product and save this manual for
future use.
Please use only the battery provided and charge the battery for about 5.5 hours before
using the handset for the first time.
Note:
In this manual, the suffix of each model number is omitted unless necessary.
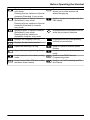
Table of Contents
Table of Contents
Before Initial Use ......................................................................................4
Accessories (included) ..................................................................................4
Installation ......................................................................................................5
Battery Installation ......................................................................................5
Charger Connection ....................................................................................5
Charging the Battery ...................................................................................6
Charger Wall Mounting ...............................................................................6
Attaching the Belt Clip .................................................................................7
Attaching the Phone Strap ..........................................................................8
Setting the Password .....................................................................................8
Before Operating the Handset ................................................................9
Location of Controls ......................................................................................9
Key Lock ...................................................................................................11
Meeting Mode ...........................................................................................11
Power Save Mode .....................................................................................11
Selecting the Display Language .................................................................12
Editing the Standby Display Name .............................................................13
Editing the Names of the Flexible Keys .....................................................14
Adjusting the Ringer Volume ......................................................................15
Adjusting the Ringer Volume or Turning the Ringer off while
Ringing ..........................................................................................................15
Changing the Vibrate Setting ......................................................................16
Adjusting the Receiver/Speaker/Headset Volume ....................................16
Display ..........................................................................................................17
Soft Keys .......................................................................................................18
Operation Outline .........................................................................................20
Function Menus ............................................................................................21
Function Keys ..............................................................................................22
Flexible Keys ................................................................................................24
Operation ................................................................................................25
Making Calls .................................................................................................25
Searching for an item stored in the Phonebook ........................................29
Receiving Calls .............................................................................................33
Caller ID ....................................................................................................34
During a Conversation .................................................................................35
Useful Features ............................................................................................37
Making Use of the Voice Mail Service ........................................................42
Using the Handset Phonebook .............................................................44
Handset Phonebook ....................................................................................44
Private Ring ..............................................................................................44
Storing an Item in the Handset Phonebook ...............................................45
Storing a New Item ...................................................................................45
Editing a Stored Item ................................................................................46
Storing an Item Using the Predialling ........................................................47
Storing an Item Using the Outgoing Call Log ............................................48
2
Table of Contents
Storing an Item Using the Incoming Call Log ............................................49
Storing an Item Using the PBX System Phonebook .................................50
Storing an Item Using the PBX Extension Phonebook .............................51
Editing Category Names ...........................................................................52
Assigning Hot Keys .....................................................................................53
Selecting the Type of Hot Key Dialling ......................................................54
Entering Characters .....................................................................................55
Character Mode Table ..............................................................................56
Locking the Handset Phonebook ...............................................................57
Locking the Handset Phonebook ..............................................................57
Unlocking the Handset Phonebook ...........................................................57
Unlocking the Handset Phonebook Temporarily .......................................57
Deleting Stored Items ............................................................................58
Deleting Stored Items in Handset Phonebook/Hot Key Dial/Outgoing Call
Log/Incoming Call Log ................................................................................58
Handset Phonebook .................................................................................58
Hot Key Dial ..............................................................................................59
Outgoing Call Log .....................................................................................60
Incoming Call Log .....................................................................................60
Configuring Handset Settings ..............................................................61
Changing the Initial Settings .......................................................................61
Handset Setting Menu Layout ...................................................................62
Memo Alarm Setting .................................................................................72
Troubleshooting and Error Messages .................................................75
Troubleshooting ...........................................................................................75
Error Messages ............................................................................................77
Important Information ............................................................................78
Battery Information ......................................................................................78
Important Safety Instructions .....................................................................80
For Your Safety ............................................................................................80
For Best Performance ..................................................................................83
Additional Information .................................................................................87
3
Before Initial Use
Please read "Important Information" on page 78 before using. Read and understand
all instructions. For System Requirements, see page 86.
Before Initial Use
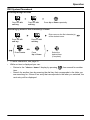
Accessories (included)
AC adaptor: 1
[Part No.]
For KX-TCA275CE users: PQLV219CE
For KX-TCA275UK users: PQLV219E
For KX-TCA275AL users: PQLV209AL
Charger: 1
Battery: 3
[Part No.]
HHR-4EPT
Belt Clip Holder: 1
4
Battery Cover: 1
Belt Clip: 1
Before Initial Use
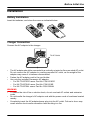
Installation
Battery Installation
Insert the batteries, and close the cover as indicated below.
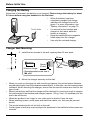
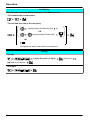
Charger Connection
Connect the AC adaptor to the charger.
To AC Outlet
•
•
•
The AC adaptor should be connected to a vertically oriented or floor-mounted AC outlet.
Do not connect the AC adaptor to a ceiling-mounted AC outlet, as the weight of the
adaptor may cause it to become disconnected.
Fasten the AC adaptor cord to the cord holder.
Use only the included Panasonic AC adaptor.
– For KX-TCA275CE users: Part No. PQLV219CE
– For KX-TCA275UK users: Part No. PQLV219E
– For KX-TCA275AL users: Part No. PQLV209AL
WARNING
• To reduce the risk of fire or electric shock, do not overload AC outlets and extension
cords.
• Do not bundle the charger's AC adaptor cord with the power cords of machines located
nearby.
• Completely insert the AC adaptor/power plug into the AC outlet. Failure to do so may
cause electric shock and/or excessive heat resulting in a fire.
5
Before Initial Use
Charging the Battery
At the time of shipment, the battery is not charged. Please charge the battery for about
5.5 hours before using the handset for the first time.
•
To AC Outlet
•
•
•
When the battery has been
completely charged, the charge
indicator will change from red to
green. For more information, see
"Battery Information" on page 78.
It is normal for the handset and
charger to feel warm while the
battery is charging.
Keep devices sensitive to magnetic
fields away from the charger.
Use only the included charger.
Charger Wall Mounting
1. Install the two screws in the wall, spacing them 25 mm apart.
25 mm
for charger
25 mm
20 mm or longer
•
Space
(2 mm)
Screws
Recommended screw size is
M4 x 20.
2. Mount the charger securely on the wall.
•
•
•
•
•
•
6
When you print out this page for wall mounting purposes, the printed output distance
may deviate slightly from the indicated measurement. In this case, use the measurement
indicated. When mounting the charger, ensure that the correct screws are used for the
type of wall.
Make sure that the wall that the charger will be attached to is strong enough to support
the total weight of the handset and charger (approx. 180 g). If not, it is necessary for the
wall to be reinforced.
When this product is no longer in use, make sure to detach it from the wall.
When inserting screws, avoid pipes and electrical cables, etc, that may be present/
buried.
The screw heads should not be flush to the wall.
Certain types of wall may require plugs to be anchored in the wall before the screws are
inserted.
Before Initial Use
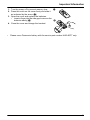
Attaching the Belt Clip
You can attach the handset to your belt by following the steps below.
[To attach]
1
Insert the clip into the designated notches in
the handset.
2
Slide the clip into the holder until it clicks.
[To remove]
1
Make sure to turn the handset 180° when you
take it off.
2
Remove the belt clip.
7
Before Initial Use
Attaching the Phone Strap
Open the battery cover, run the strap through the strap hole, and then loop it around the
hook.
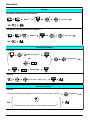
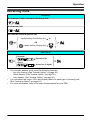
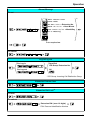
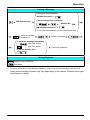
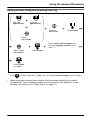
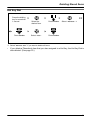
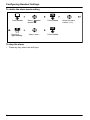
Setting the Password
The handset password is not set by default. You must register a handset password (4 digits)
before use.
You cannot use the following features without setting a password:
– Phonebook lock (See page 57.)
– "Manual&Password" or "Auto&Password" for Key lock type (See "Key Option" on
page 66.)
– Reset Handset (See "Other Option" on page 71.)
Press Centre.
Press Centre.
Select "
Setting
Handset".
Select "Change
Password".
Press Centre.
Press Centre.
Verify new password.
*1 To avoid unauthorised access to this product:
– Set a password that is random and cannot be easily guessed.
– Change the password regularly.
*2 Make a note of the password so that you will not forget it.
8
Select "Other
Option".
Enter new
password.*1*2
(4 digits [0-9])
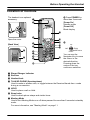
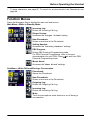
Before Operating the Handset
Location of Controls
Before Operating the Handset
The headset is an optional
A
accessory.
M Press POWER for
more than 2 seconds.
[Power On]
Standby mode
[Power Off]
Blank display
B
K
C
Open the cover.
D
[Back View]
E
F
Q
F
G
H
I
J
L
M
N
O
N
Up
Left
Down
P
Right
Centre
You can use the
Navigator Key to move
the cursor in the
desired direction.
Pressing down the
centre of the key
confirms a selection.
A
B
C
D
Ringer/Charger Indicator
Receiver
Headset Jack
TALK/SP-PHONE (Speakerphone)
Used to make or answer calls, or toggle between the Receiver/Hands-free*1 mode
during a conversation.
E HOLD
Used to place a call on Hold.
F Strap holes
Used to attach phone straps and similar items.
G Meeting Mode
Used to turn Meeting Mode on or off when pressed for more than 2 seconds in standby
mode.
For more information, see "Meeting Mode" on page 11.
9
Before Operating the Handset
H Message
Used to leave a message waiting indication, or to call back the party who left a
message waiting indication.
I Charge Contact
J Microphone
K Display
Refer to "Display" on page 17.
L Left/Right Soft Key
Used to select the function displayed directly above each key. Functions are displayed
based on the current context.
Also used as a Function Key, Flexible Key, or Hot Key when they are assigned. To
edit the soft keys, see "Key Option" on page 66.
M POWER/CANCEL
Used to end calls, exit the Phonebook or Function mode, or turn the handset on or off.
N Navigator Key
Used to adjust the ringer/receiver volume, or move the cursor to select an item.
Pressing down the centre of the key confirms a selection.
O TRANSFER/CLEAR
Used to transfer a call to another party, or to clear digits or characters.
P INTERCOM
Used to make or answer intercom calls.
Q Speaker
*1 You can talk with the other party through the speaker using Hands-free mode.
During a conversation using a headset, Hands-free mode does not work.
10
Before Operating the Handset
Key Lock
You can lock all keys other than the Navigator Key while the handset is in standby mode.
One of 4 key lock types can be selected. (See "Key Option" on page 66.)
[Display Icon]
Unlocked
Locked
Press Centre for more than 2 seconds to lock/
unlock.
•
•
If you select "Manual&Password" or "Auto&Password" for Key lock type, you need
to enter the password for unlocking.
If no password has been set, you cannot select "Manual&Password"
or "Auto&Password" for Key lock type. To set the password, see "Setting the
Password" on page 8.
Meeting Mode
Meeting Mode turns off the ringer and sets the handset to vibrate when calls are received.
This can be useful in situations where you do not want to be disturbed, such as during a
meeting.
When Meeting Mode is active, the microphone’s sensitivity is increased, and the following
features are turned off automatically, regardless of their settings.
– Ringer Volume
– Ring On Charger
– Auto Answer
– Key Tone
– Range Alarm
– Low Battery Alarm
•
If you set the handset on the charger during Meeting Mode, the handset will not
vibrate.*1
*1 Please note that if you set the handset on the charger while receiving an incoming call, vibration
will stop. Once the vibration stops, the handset will not vibrate again for that call, even if the handset
is lifted up again. (If Quick Answer is set, lifting up the handset will answer the call.)
Power Save Mode
Power Save Mode turns off the ringer, LCD backlight, key backlight, or vibration
automatically after a set number of seconds has passed while receiving calls. To adjust
power save mode settings, see "Incoming Option" on page 64.
11
Before Operating the Handset
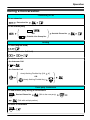
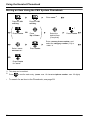
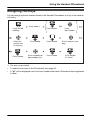
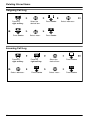
Selecting the Display Language
You can select the language displayed on your handset.
Press Centre.
Select "
Setting
Handset".
Press Centre.
Select "Display
Option".
Press Centre.
Select
"Language".
Press Centre.
Select the desired
language.*1
Press Centre.
*1 You can select "Auto" or one of the 16 languages below:
•
•
12
When set to "Auto", the language settings of the PBX will be used.
The display language of both the handset and PBX can be selected, and both should
be set to the same language. For more information, refer to the user documentation for
your PBX.
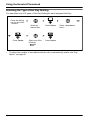
Before Operating the Handset
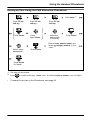
Editing the Standby Display Name
You can edit the name displayed when the handset is in standby mode.
Press Centre.
Select "
Setting
Handset".
Press Centre.
Select "Display
Option".
Press Centre.
Select "Standby
Display".
Press Centre.
Select "Edit".
Enter name.
(max. 16 characters)
Press Centre.
•
Press Centre.
To enter characters, see page 55.
13
Before Operating the Handset
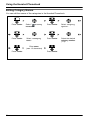
Editing the Names of the Flexible Keys
You can edit a name for each Flexible Key of the handset.
Press Centre.
Select "
Setting
Handset".
Press Centre.
Select "Key
Option".
Press Centre.
Select "Flex
Key Name".
Press Centre.
Select the
desired base.
(Base 1-4)
Press Centre.
Select the desired
Flexible Key.
Press Centre.
Enter name.
(max. 12 characters)
Press Centre.
•
14
To enter characters, see page 55.
Before Operating the Handset
Adjusting the Ringer Volume
Press Centre.
Select "
Ringer
Volume".
Press Centre.
Select the desired
setting.(Step Up/
Step Down/Level
1-6/Off)
Press Centre.
•
To set the ringer pattern, see "Incoming Option" on page 64.
Adjusting the Ringer Volume or Turning the Ringer off
while Ringing
While receiving a call
[To adjust the ringer volume]
Press Up or Down to adjust the volume.*1
[To turn the ringer off]
OR
Press Centre.
Press CANCEL.
*1 The adjusted volume level will also be used for subsequent calls.
•
If you attach the headset while receiving an incoming call, the ring from the handset
does not switch to the headset. If you attach the headset before receiving an incoming
call, and headset tone is set to "On", a tone will be heard from the headset. If Vibrate is
set to on, the handset will vibrate whether a headset is attached or not.
15
Before Operating the Handset
Changing the Vibrate Setting
Press Centre.
Select "
Setting
Handset".
Press Centre.
Select "Incoming
Option".
Press Centre.
Select "Vibrate".
Press Centre.
Select one of the
following:
- Vib.& Ring
- Vib. Ring
- Off
Press Centre.
•
To set Vibrate only, without ringing, select "Vib.& Ring" and set the Ringer Volume
to off, or turn Meeting Mode on. (See page 11, 15.)
Adjusting the Receiver/Speaker/Headset Volume
During a conversation
Press Up or Down to adjust the volume.
(Receiver Volume—Level 1-5, Speaker Volume—Level 1-6, Headset Volume—Level 1-5)
16
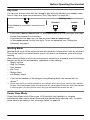
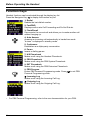
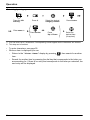
Before Operating the Handset
Display
A
E
B
F
C
D
Pictograph
Within range of a Cell Station (CS) Battery Indicator*1
Out of range
Full
Intercom Indicator
Off-hook Status
Low
Message Waiting
Needs to be charged.
Phonebook
Navigation Key Guidance
Handset Status Information
Auto Answer
Ringer Volume Off (See page 15.)
Call Forwarding (See page 37.)
Meeting Mode (See page 11.)
Do Not Disturb (See page 37.)
Vibrate (See page 16.)
Date and Time Display
Soft Keys
For more information, see page 18.
Extension Number and Name
To edit the standby display name, see page 13.
Incoming Call Log Status
*1 See "Battery Information" on page 78.
•
Example images of the display in this manual are samples only, and the actual screen
on your phone may vary in colour and/or appearance.
17
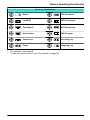
Before Operating the Handset
Soft Keys
Icons and information shown on the display will vary depending on the context. To select
an item shown on the display, press the corresponding soft key.
Opens the Phonebook.
Pressing this key for more than 2
seconds locks the Phonebook.
Displayed when in Phonebook Lock.
Pressing this key and then entering
the password (default: not registered),
unlocks the Phonebook temporarily.
Pressing for more than 2 seconds,
then entering the password (default:
not registered), unlocks the
Phonebook.
If no password has been set, you
cannot lock the Phonebook.
18
Inserts a dialling pause.
CLR
Clears digits or characters.
Stores a new item in the Phonebook.
Turns the microphone mute feature
on or off during a conversation.
Flashes when Mic Mute is on.
Opens the PBX System Phonebook.
Turns the ringer off.
Opens the PBX Extension
Phonebook.
Opens the main menu.
Pressing this key for more than 2
seconds locks all keys.
Displays the caller information stored
in the Handset Phonebook while
receiving a call.
Returns to the previous display.
Displays the caller information stored
in the system while receiving a call.
Opens the list menu (edit/delete in the
Phonebook, etc.).
Establishes a multiple-party
conversation (Conference).
Confirms the entry.
Searches for an item in the
Phonebook alphabetically.
Displayed when in Key Lock mode.
Pressing this key for more than 2
seconds unlocks the keys.
Displayed when in Alphabetic
character entry mode.
Pressing this key switches to Numeric
character entry mode.
Advances to the next display.
Displayed when in Numeric character
entry mode.
Pressing this key switches to Greek
character entry mode.
Used to clear the Memo Alarm display
setting, or enter an "X" when storing
the Line Access CD.
Before Operating the Handset
Displayed when in Greek character
entry mode.
Pressing this key switches to Special
character (Extended 1) entry mode.
Disconnects the current call and
allows you to make another call
without hanging up.
Displayed when in Special character
(Extended 1) entry mode.
Pressing this key switches to Special
character (Extended 2) character
entry mode.
Used to register the handset with the
PBX simply.
Displayed when in Special character
(Extended 2) entry mode.
Pressing this key switches to
Alphabetic character entry mode.
Displayed when it is possible to use an
arrow key to make a selection.
Displays the Outgoing Call Log.
Displayed when the corresponding
soft key has no function.
Displays the last dialled number.
Opens the Incoming Call Log.
Used for System/Personal Speed
Dialling.
Opens the Incoming Call Log Group.
Used to set/clear the Auto Answer
mode.
Used to select an item when in setting
mode.
Used to enter PBX Personal
Programming mode.
Used to select AM or PM when setting
the Memo Alarm feature.
Used to set Call Forwarding and Do
Not Disturb.
19
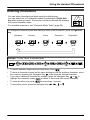
Before Operating the Handset
Operation Outline
Handset functions are accessed through the display menu and selected with the Navigator
Key and soft keys. The guidance display is shown in standby mode for easy operation.
[In standby mode]*1
[Flexible Keys]
[Handset Phonebook]
[Incoming Call Log]*2
[Outgoing Call Log]
[PBX System Phonebook]
[PBX Extension Phonebook]
[Incoming Call Log Group]
[Function Keys]
[Main Menu]
*1 You can select whether the guidance display is shown or not. (See "Display Option" on page
68.)
*2 Pressing the Navigator Key
displays the phone number.
•
20
The selected item changes colour.
Before Operating the Handset
•
To enter characters, see page 55. To search for an item stored in the Phonebook, see
page 29.
Function Menus
Press the Navigator Key to display the main and sub menus.
Main Menu—While in Standby Mode
Incoming Log:
Enters the Incoming Call Log.
Ringer Volume:
Accesses the "Ringer Volume" setting.
New Phonebook:
Stores a new item in the Phonebook.
Setting Handset:
Accesses the "Setting Handset" settings.
PBX Program:
Enters PBX Personal Programming mode.
For PBX Personal Programming, refer to the user
documentation for your PBX. Press
to exit from PBX
Personal Programming mode.
Memo Alarm:
Accesses the "Memo Alarm" settings.
Sub Menu—While Off-hook/During a Conversation
Phonebook:
Opens the Phonebook.
New Phonebook:
Stores a new item in the Phonebook.
Outgoing Log:
Enters the Outgoing Call Log.
Incoming Log:
Enters the Incoming Call Log.
Mute:
Turns the microphone mute feature on or off during a
conversation.
21
Before Operating the Handset
Function Keys
Handset functions can be activated through the display key list.
Press the Navigator Key
to display the function key list.
1: Redial
Redials the last dialled number.
2: Fwd/DND
Displays and/or sets Call Forwarding and Do Not Disturb.
3: Flash/Recall
Disconnects the current call and allows you to make another call
without hanging up.
4: Auto Answer
Answers an incoming call automatically in hands-free mode.
"A.Ans" is displayed in standby mode.
5: Conference
Establishes a multiple-party conversation.
6: Pause
Inserts a dialling pause.
7: H/S Phonebook
Makes a call using the Handset Phonebook.
8: PBX Phonebook
Makes a call using the PBX System Phonebook.
9: EXT Phonebook
Makes a call using the PBX Extension Phonebook.
0: PBX Program
Enters PBX Personal Programming mode. Press
Personal Programming mode.
: Incoming Log
Makes a call using the Incoming Call Log.
: Outgoing Log
Makes a call using the Outgoing Call Log.
•
22
to exit PBX
For PBX Personal Programming, refer to the user documentation for your PBX.
Before Operating the Handset
Shortcut Combinations
•
•
Redial
H/S Phonebook
Fwd/DND
PBX Phonebook
Flash/Recall
EXT Phonebook
Auto Answer
PBX Program
Conference
Incoming Log
Pause
Outgoing Log
For operation, see page 25.
To edit the function key list, see "Key Option" on page 66.
23
Before Operating the Handset
Flexible Keys
A Flexible Key can be used either to seize a line in order to make or receive an outside call,
or used as a function key. Press the Navigator Key
to display the Flexible Key list. Here
you can access the 12 Flexible Keys. The colour of each key number indicates line status
similarly to the LED indicators on a Proprietary Telephone.
[Example]
Key numbers
Understanding the Flexible Keys*1
Colour of key numbers
Green
Red
Line status
on
You are currently using this line.
flashing rapidly
You have an incoming call on this line.
(An outside call is coming in on a single extension.)
flashing slowly
You have a call on hold on this line.
on
This line is in use by someone else.
flashing rapidly
You have an incoming call on this line.
(An outside call is coming in on multiple extensions
simultaneously.)
flashing slowly
No colour
Someone has a call on hold on this line.
This line is idle.
*1 The meanings of these colours of key numbers vary depending on the status of the outside line.
•
To select a key, press its key number, or press the Navigator Key
desired key and press
•
•
24
or
.
To edit the names of Flexible Keys, see page 14.
For more information, refer to the feature documentation for your PBX.
to select the
Operation
Making Calls
Calling
Operation
To an extension
Extension No.
To an outside party
–Using the Line Access Numbers
/
OR
Outside Phone No.
Outside Line Group No.
–Using Flexible Keys
idle Flexible Key No. [0-9, , #]
OR
Outside Phone No.
(idle Flexible Key)
Using the Outgoing Call Log*1
Using the Incoming Call Log
Using the Incoming Call Log Group
Incoming Call Log Group No.
Using the Handset Phonebook*2
Name*3
OR
(if required)
25
Operation
Calling
Using the PBX System Phonebook*1 *2
Name*3
OR
(if required)
Using the PBX Extension Phonebook*2
Name*3
OR
(if required)
One-touch Dialling
To store
("
PBX Program")
(Flexible Key)
OR
Desired No.
To dial
(One-touch Dialling key)
Hot Key Dialling*4
To dial
Press the dialling key assigned as a Hot Key for more than 1 second.
OR
Press a Hot Key No. [0-9] for a set number of seconds.*
26
5
(if required)
Operation
Hot Line
To store
Desired Phone No.
To set/cancel
Set
Cancel
To dial
Operator Call
/
System Speed Dialling
To dial
System Speed Dial No. (3 digits)
Doorphone Call
Doorphone No. (2 digits)
Automatic Callback Busy
To set
While hearing a busy tone
To cancel
To answer from an idle extension
While hearing a callback ring
To answer from an idle outside line
While hearing a callback ring
Outside Phone No.
*1 When a call is made using the PBX System Phonebook, the called party’s name is not stored in
the Outgoing Call Log. To log the name as well as the number, copy the item into the Handset
Phonebook before dialling it. (See page 50.)
*2 To store an item in the Phonebook, see page 45.
To search for an item stored in the Phonebook, see page 29.
*3 This step can be omitted.
*4 To assign a phone number to a Hot Key, see page 53.
*5 This operation is available only when Hot Key dialling is set to "Auto". To select the type of Hot
Key dialling, see page 54.
27
Operation
•
•
•
•
•
•
•
28
To enter characters, see page 55.
You can confirm that the number was dialled correctly before calling (Predialling) by
.
entering the number, then pressing
for more than 1 second.
To clear an entire number while predialling, press
If an outside call is received from a phone number stored in the Handset Phonebook,
the number and name of the caller will be displayed in the call log.
.
To cancel dialling, press
" flashes, move closer to the CS and dial again.
If "
For more information, refer to the user documentation for your PBX.
Operation
Searching for an item stored in the Phonebook
You can search for an item in the Phonebook by following the steps below.
Handset Phonebook
Scrolling through all items
Press the left
soft key.
Press Up or Down repeatedly.
Searching by name or first character(s) of name
Enter name or the first character(s) of the desired name.
Press the left
soft key.
OR
Press Centre.
Press
Up or Down.
Select the
desired item.
(if required)
Searching using first characters of name to narrow down items
Enter the first characters of the desired
name.*1
Press the left
soft key.
Press Centre.
Select the
desired item.
(if required)
29
Operation
Searching by category
Press the left
soft key.
Press #.
Enter name.*2
Select the desired
category number.
Press Centre.
OR
Press Centre.
Press
Up or Down.
Select the
desired item.
(if required)
*1 You can enter up to 5 characters. Corresponding names appear as the characters are entered.
*2 This step can be omitted.
•
•
30
To enter characters, see page 55.
While an item is displayed you can:
–
Return to the "<Enter Name>" display by pressing
–
item.
Search for another item by pressing the dial key that corresponds to the letter you
are searching for. If there is no entry that corresponds to the letter you selected, the
next entry will be displayed.
, then search for another
Operation
PBX System Phonebook
Scrolling through all items
Press the left
soft key.
Press the left
soft key.
Press Up or Down repeatedly.
Searching by name or first character(s) of name
Enter name or the first character(s)
of the desired name.
Press the left
soft key.
Press the left
soft key.
OR
Press Centre.
•
•
Press
Up or Down.
Select the
desired item.
(if required)
To enter characters, see page 55.
While an item is displayed you can:
, then search for another
–
Return to the "<Enter Name>" display by pressing
–
item.
Search for another item by pressing the dial key that corresponds to the letter you
are searching for. If there is no entry that corresponds to the letter you selected, the
next entry will be displayed.
31
Operation
PBX Extension Phonebook
Scrolling through all items
Press the left
soft key.
Press the left
soft key.
Press the left
soft key.
Press Up or Down
repeatedly.
Searching by name or first character(s) of name
Enter name or
the first character(s)
of the desired name.
Press the left
soft key.
Press the left
soft key.
Press the left
soft key.
OR
Press Centre.
•
•
32
Press
Up or Down.
Select the
desired item.
(if required)
To enter characters, see page 55.
While an item is displayed you can:
–
Return to the "<Enter Name>" display by pressing
–
item.
Search for another item by pressing the dial key that corresponds to the letter you
are searching for. If there is no entry that corresponds to the letter you selected, the
next entry will be displayed.
, then search for another
Operation
Receiving Calls
Receiving
An Intercom Call/An Outside Call/A Group Call
An Intercom Call
An Outside Call on a specific line
rapidly flashing Flexible Key [0-9,
, #]
OR
(rapidly flashing Flexible Key)
Call Pickup
Directed
Extension No.
Group
Group No. (2 digits)
•
•
•
You can also answer a call using the following features:
– Any Key Answer (See "Answer Option" on page 65.)
– Quick Answer (See "Answer Option" on page 65.)
– Auto Answer (See "Answer Option" on page 65.)
You can select the ringer, LED, and vibrate pattern for each type of incoming call.
(See "Incoming Option" on page 64.)
For more information, refer to the user documentation for your PBX.
33
Operation
Caller ID
If an outside call that contains Caller ID information (a caller’s name and telephone number)
is received, this information will be logged in the incoming call log and displayed on the
handset in one of the two following ways:
– If the caller’s information is stored in the PBX, that information can be displayed.
Receiving
James Smith
0123456789
–
If the caller’s information is stored in the handset, that information can be displayed.
Receiving
James
0123456789
•
If information is stored in both the PBX and in the handset for the same caller, you can
choose which information will be displayed on the handset. Caller information stored in
the PBX is displayed by default. (See "Display Option" on page 68.) If you set the
handset to display the caller information stored in the handset, caller information stored
in the PBX will only be displayed if the caller information is not stored in the handset.
When receiving a call, you can display the information stored in the handset by pressing
, and display the information stored in the PBX by pressing
•
The caller information can be displayed even if a line access number, outside line
number, or P (
34
.
) is stored in the Phonebook. (See "Other Option" on page 71.)
Operation
During a Conversation
Transferring a Call
To an extension
Extension No.
To an outside party
/
Outside Phone No.
OR
Outside Line Group No.
Holding
To hold (Regular Hold)
To hold (Exclusive Call Hold)
To retrieve a call
–An Intercom Call
–An Outside Call
slowly flashing Flexible Key [0-9,
, #]
OR
(slowly flashing Flexible Key)
Three-party Conference
To add another party during a conversation
Desired Phone No.
(Talk to the new party.)
(Talk with multiple parties.)
To leave a conference
35
Operation
•
•
•
•
36
To return to the call before the transfer destination answers, press
.
The method used to hold a call depends on the Call Hold mode (Regular Hold/Exclusive
Call Hold). Ask your manager what the current mode is.
To hold several outside calls, you need to assign Flexible Keys (Single Line/Loop Line/
Trunk Group) as necessary beforehand.
For more information, refer to the user documentation for your PBX.
Operation
Useful Features
Call Forwarding
Both Calls
Outside Calls
Intercom Calls
Destination
Extension No.
All Calls
Busy
OR
No answer
Busy/No answer
Outside Line
Access No.
Outside
Phone No.
Cancel
Follow Me
Follow Me Cancel
Your Extension No.
Do Not Disturb
Both Calls
Outside Calls
Intercom Calls
Set
Cancel
Sending a Call Waiting Tone*1
While hearing a busy tone
Wait for an answer.
Call Waiting
To set/cancel for intercom calls
No Call
Tone
To set/cancel for outside calls
No Tone
Tone
37
Operation
Call Waiting
To talk to the new party (While hearing the Call Waiting tone)
–To terminate the current status
–To hold and then talk to the new party
rapidly flashing Flexible Key [0-9,
, #]
OR
(rapidly flashing Flexible Key)
OR
Disregard this step if both parties are extensions.
Paging
To page
Paging Group No. (2 digits)
Wait for an answer.
To answer
38
(Announce)
Operation
Absent Message
To set
Will Return Soon
*2
Gone Home
At Ext %%%% + Extension No.
Back at %%:%% + Hour:Minute
Out until %%/%% + Month/Day
In a Meeting
Enter required no.
To cancel
Log-in/Log-out
For Log-in
Specified
ICD Group* Extension No.
For Log-out
All
* ICD Group: Incoming Call Distribution Group
Extension Feature Clear
Extension Dial Lock*3
To lock
To unlock
Extension PIN* (max. 10 digits)
* PIN: Personal Identification Number
39
Operation
Message Waiting
Caller
–To leave a message waiting indication
When the called extension is busy or does not answer
OR
–To cancel a message waiting indication
Desired Extension No.
Called extension
–To call back
OR
–To clear message waiting indications left on your extension*4
Your Extension No.
*1 You cannot send a call waiting tone when:
– the called party has not set the Call Waiting feature.
– the called party has set the Data Line Security feature.
*2 Enter the desired value in the "%" positions. You must enter the correct number of characters as
represented by the "%" using 0 to 9 or .
To change the default messages and create your personal messages (Message no. 9), refer to the
documentation for your PBX.
*3 If you do not set an extension PIN, you cannot lock and unlock your extension.
For more information, refer to the user documentation for your PBX.
*4 You can register a Flexible Key to the clear message waiting indications feature (for one-touch
operation).
To register
("
(Flexible Key)
Your Extension No.
40
PBX Program")
Operation
To clear message waiting indications (one-touch operation)
(One-touch dialling key)
•
For more information, refer to the user documentation for your PBX.
41
Operation
Making Use of the Voice Mail Service
Listening to a Message
From your own extension
VPS* Extension No.
Mailbox Password*1 +
KX-TVM series
Listen to Message
Deliver Message
Mailbox Management
If you have no password, you can skip
the last step.
* VPS: Voice Processing System
•
From someone else’s extension
Automated Attendant
Message Notification
Other Features
End Call
VPS Extension No.
KX-TVP series
Listen to Message
•
Mailbox No.
Deliver Message
Mailbox Password*1 +
Check Mailbox Distribution
If you have no password, you can skip
the last step.
Automated Attendant
Mailbox Management
Other Features
End Call
42
Operation
Leaving a Message
From your own extension
Mailbox Password*1 +
VPS Extension No.
From someone else's extension
Mailbox No.
Mailbox Password*1 +
. If you have no password, you can skip the last step.
Enter the desired
mailbox no.
Leave a message
To send the message immediately
(KX-TVM series)
(KX-TVP series)
Follow the guidance
To set the delivery time
During Playback
Repeat Voice Guidance
Exit Menu
*1 For more information on the Mailbox Password, refer to the user documentation for the VPS.
•
Some feature access numbers may vary depending on the market. Please consult your
local dealer for details.
43
Using the Handset Phonebook
Using the Handset Phonebook
Handset Phonebook
You can store up to 200 items with names, phone numbers, and category numbers in the
handset for easy access. You can set unique Ringer/LED/Vibrate patterns for each category
to identify incoming calls. All Phonebook items are stored in alphabetical order. For security
purposes, you can lock the Phonebook. To make a call using the Phonebook, see page
25.
Note
We recommend that you keep a copy of your Handset Phonebook in case data becomes
unrecoverable due to product malfunction.
Private Ring
You can organise entries in the Phonebook into one of 9 Private Ring Categories. It is
possible to set a different ringer/LED/vibrate pattern*1 for each category. When the
displayed Caller ID*2 matches a phone number or name stored in the Phonebook, the
handset rings according to the Private Ring Category settings.
*1 For Ringer/LED/Vibrate patterns, see "Incoming Option" on page 64.
*2 For Caller ID information, see "Caller ID" on page 34.
44
Using the Handset Phonebook
Storing an Item in the Handset Phonebook
Storing a New Item
Enter name.
(max. 16 characters)
Press Centre.
Select "
New
Phonebook".
Enter phone number.
(max. 32 digits)
OR
Press Centre.
Select the desired
category number
(1-9) or "Off".
Press Centre.
Press Centre.
Press
Up or Down.
Press Centre.
Press Centre
for "Save".
•
To enter characters, see page 55.
•
The valid digits are "0" through "9", " ", "#", "P (
•
When storing an outside phone number, you should first store a line access number.
)".
45
Using the Handset Phonebook
Editing a Stored Item
Enter name.*1
OR
Press Centre.
Press the left
soft key.
Select the
desired item.
(if required)
Press Centre.
Press
Up or Down.
Press Centre.
Edit name.
(max. 16 characters)
Press Centre.
Select "Edit".
OR
Press Centre.
Press
Up or Down.
Edit phone number.
(max. 32 digits)
Press Centre.
Press Centre.
Select the desired
category number
(1-9) or "Off".
Press Centre
for "Save".
*1 This step can be omitted.
•
•
To enter characters, see page 55.
To search for an item in the Phonebook, see page 29.
•
The valid digits are "0" through "9", " ", "#", "P (
•
To change a character or digit, press the Navigator Key
or
to delete it, then enter the new character or digit.
To clear an entire line, press
for more than 1 second.
To move the cursor to the left or right, press the Navigator Key
•
•
46
)".
to highlight it, press
or
, respectively.
Using the Handset Phonebook
Storing an Item Using the Predialling
Enter phone number.
(max. 32 digits)
Enter name.
(max. 16 characters)
Press Centre.
OR
Press Centre.
Select the desired
category number
(1-9) or "Off".
Press
Up or Down.
Press Centre.
Edit phone
number.
(max. 32 digits)
(if required)
Press Centre.
Press Centre
for "Save".
47
Using the Handset Phonebook
Storing an Item Using the Outgoing Call Log
Press the
right soft key.
Select the
desired item.
Press Centre.
Select "Save
Phonebook".
Enter a name, phone number, and select
the category number (1-9) or "Off".*1
Press Centre.
*1
•
48
Press
Press Centre
for "Save".
to confirm each entry. (name: max. 16 characters/phone number: max. 32 digits)
When storing an outside phone number, the line access number will be stored
automatically. The line access number must be identical to the handset’s "Line
Access CD" setting. (See "Other Option" on page 71.)
Using the Handset Phonebook
Storing an Item Using the Incoming Call Log
Press the
right soft key.
Press the
right soft key.
OR
Select the
desired item.
Press Centre.
Press
Up or Down.
Enter a name, phone number, and
select the category number (1-9) or
"Off".*1
Select "Save
Phonebook".
Press Centre.
Press Centre
for "Save".
*1
•
Press
to confirm each entry. (name: max. 16 characters/phone number: max. 32 digits)
When storing an outside phone number, the line access number will be stored
automatically. The line access number must be identical to the handset’s "Line
Access CD" setting. (See "Other Option" on page 71.)
49
Using the Handset Phonebook
Storing an Item Using the PBX System Phonebook
Enter name.*1
Press the left
soft key.
Press the left
soft key.
OR
Press Centre.
Press
Up or Down.
Select the
desired item.
(if required)
Press Centre.
Enter a name, phone number, and
select the category number (1-9) or
"Off".*2
Select "Save
Phonebook".
Press Centre.
Press Centre
for "Save".
*1 This step can be omitted.
*2
Press
to confirm each entry. (name: max. 16 characters/phone number: max. 32 digits)
•
50
To search for an item in the Phonebook, see page 29.
Using the Handset Phonebook
Storing an Item Using the PBX Extension Phonebook
Enter name.*1
Press the left
soft key.
Press the left
soft key.
Press the left
soft key.
OR
Press Centre.
Press
Up or Down.
Select the
desired item.
(if required)
Press Centre.
Enter a name, phone number, and
select the category number (1-9) or
"Off".*2
Select "Save
Phonebook".
Press Centre.
Press Centre
for "Save".
*1 This step can be omitted.
*2
to confirm each entry. (name: max. 16 characters/phone number: max. 32 digits)
Press
•
To search for an item in the Phonebook, see page 29.
51
Using the Handset Phonebook
Editing Category Names
You can edit the names of the categories in the Handset Phonebook.
Press Centre.
Select "
Setting
Handset".
Press Centre.
Select "Display
Option".
Press Centre.
Select "Category
Name".
Press Centre.
Select the desired
category number
(1-9).
Enter name.
(max. 13 characters)
Press Centre.
52
Press Centre.
Using the Handset Phonebook
Assigning Hot Keys
You can assign a phone number stored in the Handset Phonebook to a key to be used as
a Hot Key.
Enter name.*1
Press the left
soft key.
Press
Up or Down.
Press Centre.
Press Centre.
Select "Regist.Hot
Key".
Select a blank hot
key number (0-9).
Press Centre.
Press Centre
for "Save".
Select the
desired item.
(if required)
Press Centre.
OR
Press Centre.
*1 This step can be omitted.
•
•
To search for an item in the Phonebook, see page 29.
A " " will be displayed next to hot key numbers that have a Phonebook item registered
to them.
53
Using the Handset Phonebook
Selecting the Type of Hot Key Dialling
You can select one of 2 types of Hot Key Dialling for each assigned Hot Key.
Press the dialling
key for more than
1 second.
Press Centre.
•
54
Select the
desired item.
Press Centre.
Select one of the
following:
- Manual
- Auto
Press Centre.
Select "Automatic
Call".
To select the number of seconds before the call is automatically made, see "Key
Option" on page 66.
Using the Handset Phonebook
Entering Characters
You can enter characters and digits using the dialling keys.
You can select one of 5 character modes by pressing the Right Soft
Key while entering a name. The function icon above the soft key displays
the current character mode.
For available characters, see "Character Mode Table" (page 56).
A, a
B, b
C, c
To change the character mode while editing a name in the Phonebook, press the right soft
key.
Alphabetic
Numeric
Extended 1
Greek
Extended 2
Example: To enter "Anne" in Alphabet Mode.
•
•
•
To switch between uppercase and lowercase, press
.
To enter a character located on the same dialling key as the previous character, move
the cursor by pressing the Navigator Key
, then enter the desired character.
If you enter a different character by mistake, press the Navigator Key
or
to
highlight the character, press
to delete it, then enter the correct character.
To clear an entire line, press
for more than 1 second.
•
To move the cursor, press the Navigator Key
•
,
,
or
.
55
Using the Handset Phonebook
Character Mode Table
Keys
ABC
(Alphabetic)
0-9
(Numeric)
(Greek)
(Extended 1)
(Extended 2)
1
2
3
4
5
6
7
8
9
0
•
•
56
Press
before or after entering a character to change between uppercase and
lowercase.
Pressing a key repeatedly will cycle through the characters associated with that key. For
example, to enter the letter "C" in Alphabet Mode, press
3 times.
Using the Handset Phonebook
Locking the Handset Phonebook
You can lock/unlock the Phonebook while the handset is in standby mode.
If no password has been set, you cannot lock the Phonebook. To set the password,
see "Setting the Password" on page 8.
Locking the Handset Phonebook
Press the left soft key
for more than 2 seconds.
Locked.
Unlocking the Handset Phonebook
Enter your
password.*1
You can view the Phonebook and
use it to make calls.
Press the left soft key
for more than 2 seconds.
Press CANCEL.
Unlocked.
Unlocking the Handset Phonebook Temporarily
Enter your
password.*1
You can view the Phonebook and
use it to make calls.
Press the left soft key
for less than 2 seconds.
Press CANCEL.
Still locked.
*1 To change the password, see page 71.
57
Deleting Stored Items
Deleting Stored Items
Deleting Stored Items in Handset Phonebook/Hot Key
Dial/Outgoing Call Log/Incoming Call Log
Handset Phonebook
Enter name.*1
Press the left
soft key.
OR
Press Centre.
Select the
desired item.
(if required)
Press Centre.
Press Centre.
Press Centre.
Select "Yes".
Press Centre.
*1 This step can be omitted.
*2 Select "Delete All" if you want to delete all items.
•
58
To search for an item in the Phonebook, see page 29.
Press
Up or Down.
Select "Delete".*2
Deleting Stored Items
Hot Key Dial
Press the dialling
key for more than
1 second.
Press Centre.
Select the
desired item.
Press Centre.
Select "Yes".
Press Centre.
Select "Delete".*1
*1 Select "Delete All" if you want to delete all items.
•
If you delete a Phonebook item that you also assigned to a Hot Key, the Hot Key Dial is
also deleted. (See page 53.)
59
Deleting Stored Items
Outgoing Call Log
Press the
right soft key.
Select the
desired item.
Press Centre.
Press Centre.
Select "Yes".
Press Centre.
Select "Delete".
Incoming Call Log
Press the
right soft key.
Select "Delete".
60
Press the
right soft key.
Press Centre.
Select the
desired item.
Press Centre.
Select "Yes".
Press Centre.
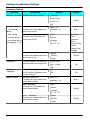
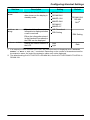
Configuring Handset Settings
Configuring Handset Settings
Changing the Initial Settings
You can customise the handset by editing the settings found under "Setting Handset"
in the menu list, as follows:
Press Centre.
Select "
Setting
Handset".
Press Centre.
Select the desired
main item.
Follow the setting.
Press Centre.
Select the desired
sub item.
Press Centre.
Press Centre.
•
To return to the previous menu item, press
.
•
•
To cancel, press
at any time.
The handset will beep to indicate that the new settings have been saved.
61
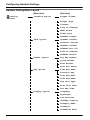
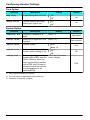
Configuring Handset Settings
Handset Setting Menu Layout
Setting
Handset
[Main Item]
Incoming Option
[Sub Item]
Ringer Volume
Ringer Type
Vibrate
Ring On Charger
Memo Alarm
Power Save
Headset Ringer
Talk Option
Speaker Volume
Receiver Volume
Headset Volume
Headset Mic Vol
Talk On Charger
Headset Button
Answer Option
Any Key Answer
Quick Answer
Auto Answer
Auto Ans Delay
Key Option
Flex Key Name
Function Key
Soft Key Edit
Soft Key Name
Key Lock Type
Auto Lock Time
Hot Key Time
Display Option
Language
Backlight
LCD Contrast
Standby Display
Category Name
Guidance
Date&Time Form
62
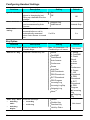
Configuring Handset Settings
Caller ID Disp
Colour Scheme
Tone Option
Key Tone
Range Alarm
System Option
Register H/S
Cancel Base
Select Base
System Lock
Change PIN
Other Option
Change Password
Line Access CD
Reset Handset
63
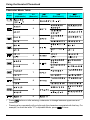
Configuring Handset Settings
Incoming Option
Sub Item
Ringer Volume
Description
Adjusts the ringer volume.
Setting
Default
Step Up
Step Down
Level 1-6
Level 3
Off
Ringer Type
– Intercom
Ring
– Ext Ring
– Group Ring
– Private Ring
(Category 1-9)
Vibrate
Ringer Pattern
Selects the ringer pattern for
each type of call.
Bell 1-10
LED Pattern
Selects the LED pattern for
each type of call.
Red
Melody 1-10
Green
Orange
R® G® O
Vib. Pattern
Selects the vibrate pattern for
each type of call.
Single
Selects whether the handset
vibrates while receiving a call.
Vib.& Ring
Double
Bell 1
Ext Ring:
Red
Intercom
Ring/
Private Ring:
Green
Group Ring:
Orange
Single
Triple
Vib.® Ring
Off
Off
Ring On
Charger
Selects the ringing mode (On
or Off) while a handset is set
on the charger.*1
On
Memo Alarm
Ringer Pattern
Selects the ringer pattern for
each Memo Alarm.
Bell 1-10
LED Pattern
Selects the LED pattern for
each Memo Alarm.
Red
Off
Melody 1-10
Green
Orange
On
Bell 1
Green
R® G® O
Vib. Pattern
Selects the vibrate pattern for
each Memo Alarm.
64
Single
Double
Triple
Single
Configuring Handset Settings
Sub Item
Power Save
Headset
Ringer
Description
Setting
Power Save Time
Selects the number of
seconds before automatically
0 s-60 s
turning off the Power Save
Items below when receiving a
call.
Default
30 s
Power Save Item
Selects the items to turn off.
Ringer&Vibrate
Selects whether a tone is
heard from the attached
headset while receiving a
call.
On
Backlight
Off
Not selected
Off
*1 When "Ring On Charger" is set to "On" but "Ringer Volume" is set to "Off", the handset rings
at level 1.
Talk Option
Sub Item
Description
Setting
Speaker
Volume
Adjusts the rear speaker
volume.
Level 1-6
Receiver
Volume
Adjusts the receiver volume.
Level 1-5
Headset
Volume
Adjusts the headset speaker
volume.
Level 1-5
Headset Mic
Vol
Adjusts the headset
microphone volume.
Level 1-5
Talk On
Charger
Selects whether or not to
continue the conversation
when the handset is put on
the charger during a
conversation.
On
Selects whether to mute or
disconnect a current call by
pressing the headset key
during a conversation.
Mute
Headset
Button*1
Off
Default
Level 3
Level 3
Level 2
Level 1
Off
Terminate
Mute
*1 For details regarding compatible headsets, consult your dealer.
Answer Option
Sub Item
Any Key
Answer
Description
Answers a call by pressing
any dialling key.
Setting
On
Off
Default
Off
65
Configuring Handset Settings
Sub Item
Quick Answer
Auto Answer
Auto Ans
Delay
Description
Setting
Answers a call while the
phone is charging by just
lifting up a handset from the
charger.
On
Selects the types of calls that
can be answered by Auto
Answer.
Internal Only
Selects the number of
seconds before a call is
automatically answered
when Auto Answer is turned
on.
Off
Default
Off
Int&External
0 s-20 s
Internal Only
6s
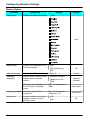
Key Option
Sub Item
Description
Flex Key Name
Edits the names of the
Flexible Keys.
Function Key
Edits the Function Key list.
Setting
Max. 12 characters x 12
Flexible Keys x 4 bases
Redial
Fwd/DND
Flash/Recall
Auto Answer
Conference
Pause
Auto Dial
H/S Phonebook
PBX Phonebook
EXT Phonebook
PBX Program
Incoming Log
Incoming LogGrp
Outgoing Log
None*1
Soft Key Edit
– Softkey
Left
– Softkey
Right
66
Edits the soft keys.
– Standby
– Talking
Default
Not stored
1: Redial
2: Fwd/DND
3: Flash/
Recall
4: Auto
Answer
5:
Conference
6: Pause
7: H/S
Phonebook
8: PBX
Phonebook
9: EXT
Phonebook
0: PBX
Program
: Incoming
Log
: Outgoing
Log
Default
Flexible Key
Function Key
Hot Key Dial*2
Not stored
Configuring Handset Settings
Sub Item
Description
Soft Key Name
– Softkey
Left
– Softkey
Right
Edits the names of the soft
keys.
– Standby
– Talking
Key Lock Type
Selects the type of key lock.
Setting
Max. 5 characters
Default
Not stored
Manual
Manual&Password*3*4
Auto
Manual
Auto&Password*3*4
Auto Lock
Time
Hot Key Time
Sets the number of seconds
before the handset key lock is
activated when "Auto" is
0 s-60 s
selected as the Key Lock
Type.
10 s
Selects the number of
seconds before a call is
automatically made when a
1 s-20 s
Hot Key assigned to "Auto" is
pressed and held.
2s
*1 Used to cancel the settings.
*2 Displayed only when "Standby" is selected.
*3 To avoid unauthorised access to this product:
– Set a password that is random and cannot be easily guessed.
– Change the password regularly.
*4 If no password has been set, you cannot select "Manual&Password" or "Auto&Password" for
Key lock type.
67
Configuring Handset Settings
Display Option
Sub Item
Language
Description
Selects the display language.
Setting
Default
Auto
Auto
Backlight
Turns on the backlight of the
LCD and keypad.
On
On & Receiving
On
Off
LCD Contrast
Adjusts the LCD contrast.
Standby
Display
Selects what is shown on the
display while in standby
mode.*1
Level 1-5
Handset Number
Base & H/S No.
Edit
Edits the name displayed on
the LCD while in standby
mode.
Max. 16 characters/4
digits
Category Name
Edits the names of the
categories.
Max. 13 characters x
Category (1-9)
Guidance
Selects whether the guidance
display is shown or not in
standby mode.
68
Level 3
Handset
Number
Not stored
Not stored
On
Off
On
Configuring Handset Settings
Sub Item
Date&Time
Form
Description
Selects the format for the
date shown on the display in
standby mode.
Setting
Default
DD-MM 12H
DD-MM 24H
MM-DD 12H
MM-DD 24H
DD-MM-YY
DD-MM 12H/
DD-MM
24H*2
MM-DD-YY
Caller ID
Disp
Colour Scheme
Selects which caller
information is displayed when
a call is received.
Either the information stored
in the Handset Phonebook or
the PBX can be displayed.
H/S Phonebook
Selects the colour scheme of
the LCD.
Dark
PBX Setting
PBX Setting
Light
Dark
*1 If an extension name is stored in the PBX, the extension name is displayed when "Handset
Number" or "Base & H/S No." is selected. Depending on the number of characters stored for
the extension name, the end of the extension name may not be displayed.
*2 The default setting for KX-TCA275CE is DD-MM 24H, and for KX-TCA275UK/KX-TCA275AL is
DD-MM 12H.
69
Configuring Handset Settings
Tone Option
Sub Item
Key Tone
Description
Turns the key tone on or off.
Setting
On
On
Off
Range Alarm
Selects whether the range
alarm tone rings or not.
Default
On
On
Off
System Option
Sub Item
Description
Setting
Register H/S
Registers a handset to a
base.
Base 1-4
Cancel Base*1
Cancels the registration of a
handset.
Base 1-4*2
Select Base*1
Selects a base.
Auto
Base 1-4
System Lock
Change PIN
Selects whether to lock the
System Option setting or not.
Off
Enter the PIN number.
Before registering your
handset with a PBX, enter the (max. 8 digits)
PBX’s PIN here. Once you
have registered the handset
with a PBX, this PIN can be
changed so that the handset
can be registered to an
additional PBX.
*1 Only registered bases are shown.
*2 You can select multiple bases simultaneously.
*3 Password is required. (4 digits)
70
On*3
Default
Not stored
Not selected
Auto
Off
1234
Configuring Handset Settings
Other Option
Sub Item
Change
Description
Setting
Changes the handset
password (4 digits) used for
unlocking the Handset
Phonebook, using the Reset
Handset option, and
unlocking the key lock.
Enter Old Password.*3
Line Access
CD
Enters the line access code
that matches the setting of
your PBX. Three access line
codes can be stored.
Select a number, then
enter the code. (max. 6
digits)
Reset Handset
Returns the handset settings
to its default settings.
Enter Password.
(4 digits)
Password*1*2
¯
Enter New Password.
¯
Default
Not
registered
Verify New Password.
¯
Select the desired item(s).
No.1: 0/9*4
No.2: 8XX*5
No.3: Not
Stored
Not selected
¯
Press "OK".
*1 To avoid unauthorised access to this product:
– Set a password that is random and cannot be easily guessed.
– Change the password regularly.
*2 Make a note of the password so that you will not forget it.
*3 If a password has not already been set, you can skip the first step.
*4 The default setting for KX-TCA275CE/KX-TCA275AL is 0, and for KX-TCA275UK is 9.
*5 XX is identical to the Outside line group number, and 8XX represents any 3-digit code starting
with "8".
71
Configuring Handset Settings
Memo Alarm Setting
An alarm will sound at the set time. A memo can also be displayed. Memo Alarm is available
only when the handset is within range of a CS.
To set
Press Centre.
Select "
Alarm".
Memo
Press Centre.
Select the alarm
number. (1-3)
Press Centre.
You can select the following settings:
– Alarm mode-Once/Daily
– Alarm mode-Weekly
– Alarm mode-Off
[Select the alarm mode-Once/Daily]
[Once]
Enter date and
time.*1
[Daily]
Enter the time.
Press Centre
for "Save".
72
Enter memo.
Press Centre.
Press Centre.
Configuring Handset Settings
[Select the alarm mode-Weekly]*2
Enter time.
Select the desired
day of the week.
Press the
right soft key.
Press Centre.
Enter memo.
Press Centre.
Press Centre.
Press Centre
for "Save".
[Select the alarm mode-Off]
Press Centre.
Press Centre
for "Save".
*1 You can select the format for the date and time. (See "Display Option" on page 68.)
*2 A " " will be displayed next to the day of the week that has been set.
•
•
You can select the ringer/LED/vibrate pattern for each Memo Alarm. (See "Incoming
Option" on page 64.)
If you are on a call at the time that the alarm is set to sound, it will sound after you have
ended the call.
73
Configuring Handset Settings
To delete the alarm mode setting
Press Centre.
Press the
right soft key.
Select "
Alarm".
Memo
Select "Yes".
To stop the alarm
•
74
Press any key other than soft keys.
Press Centre.
Press Centre.
Select the alarm
number. (1-3)
Troubleshooting and Error Messages
Troubleshooting and Error Messages
Troubleshooting
Problem
The handset does
not work.
Possible Cause
Solution
The battery is drained.
Charge the battery fully.
(See "Charging the Battery" on
page 6.)
The power is off.
•
•
Turn it on.
(See "Location of Controls" on
page 9.)
Re-insert the battery and try
again. (See "Battery
Installation" on page 5.)
The handset does
not ring.
Ringer volume is set to "Off".
Adjust the ringer volume level.
(See "Adjusting the Ringer
Volume" on page 15.)
You cannot make/
receive a call.
The handset is out of range, or
the CS is busy.
Move closer to the CS or try again
later.
The radio channel is busy, or a
radio communication error
occurred.
Try again later.
The number that you dialled is
restricted by the PBX.
Consult your dealer.
You cannot dial.
Key lock mode is on.
To cancel the mode, press
for about 2 seconds.
(See "Key Lock" on page 11.)
The radio channel is busy or a
radio communication error
occurred.
The handset stops
working during
operation.
Try again later.
•
•
You cannot use the
handset during a
power failure.
Turn the handset off, then turn
it back on.
(See "Location of Controls" on
page 9.)
Re-insert the battery and try
again.
(See "Battery Installation" on
page 5.)
The handset will not function
during a power failure because
the PBX stops emitting
radiowaves.
75
Troubleshooting and Error Messages
Problem
Possible Cause
Solution
The headset does
not work.
A headset tone cannot be heard •
when receiving an incoming
call when the headset is
attached.
•
The tone from the
headset cannot be
changed to a bell or
melody.
The headset tone is a specific
tone and is not related to the
Incoming Option settings
(Ringer Type).
Noise is frequently
heard.
•
•
Make sure the headset tone
setting is set to "On". (See
"Incoming Option" on page
64.)
Make sure the headset jack is
connected properly. (See
"Location of Controls" on
page 9.)
Place the handset and CS
away from other electrical
appliances.
Move closer to the CS.
Two short beeps are The radio signal is weak.
heard during a
conversation.
Move closer to the CS.
The charge indicator The charger is not connected
flashes red rapidly.
properly.
•
•
You charged the
The battery charge contacts
battery for 5.5 hours, may be dirty.
but the beep tones
sound, and
It is time to change the battery.
(needs to be
charged) flashes
after a few telephone
calls.
While operating the
handset, the AC
adaptor feels warm.
While charging the
battery, the handset
feels warm.
These are normal conditions.
"No Service" is
displayed, and beep
tones are heard.
The handset is out of range.
76
Make sure the battery is
inserted properly.
Set the handset in the charger
properly.
Clean the battery charge contacts
without damaging them and
charge once more.
Replace with a new one.
Move closer to the CS or try again
later.
The CS or PBX is out of service. Consult your dealer.
Troubleshooting and Error Messages
Error Messages
Error Message
Possible Cause
Solution
Register Unit
The handset has been
cancelled or the handset has
not been registered.
Consult your dealer.
No Service
The handset is out of range.
Move closer to the CS.
The CS is turned off.
Make sure the power cord is
connected.
PS Not Connected
The called handset is out of
range or is not turned on.
Try again later.
CS Busy
The CS is busy.
Try again later.
Please Wait...
The handset is connecting to
the CS or PBX.
Wait for a moment.
Charge Battery
The handset battery has little
charge remaining.
Charge the battery fully. (See
"Charging the Battery" on page
6.)
No Entries
When trying to view the
Phonebook: No items have
been stored. (See "Storing an
Item in the Handset
Phonebook" on page 45.)
When trying to view the
Incoming or Outgoing Call Log:
No logs have been stored.
Memory Full
The Phonebook is full and
cannot store the new item.
Remove unnecessary data in the
Phonebook and try again.
Incorrect Entry
The numbers you entered are
invalid.
Recheck your entry (max. 5 digits)
and try again.
Need Repair
Consult your dealer.
77
Important Information
Important Information
Battery Information
After your Panasonic battery is fully charged (at 25 °C):
•
•
•
•
•
Operation
Operating Time
While in use (Talk)
Up to about 15 h
While not in use (Standby)
Up to about 200 h
Operating time may be shorter than listed above depending on usage conditions and
ambient temperature.
The battery will drain slowly even while the handset is turned off.
The handset can receive calls while charging.
Battery consumption increases when the handset is used out of range. If " " flashes,
turn the handset off.
Clean the handset and the charger contacts with a soft, dry cloth once a month.
Clean more often if the unit is subject to grease, dust or high humidity. Otherwise
the battery may not charge properly.
Low Battery Warning
The battery needs to be charged in the following situations:
• "
" flashes, and the alarm sounds*1.
• "Charge Battery" is displayed. In this situation, the handset cannot be operated.
*1 If the low battery warning occurs during a conversation, the call will be automatically disconnected
one minute after the alarm sounds.
Replacing the Battery
If "
" flashes after using the phone for a short time, even when the battery has been fully
charged, the battery should be replaced.
Before replacing the battery, make sure the low battery warning is displayed, then turn off
the power to prevent memory loss. Replace the battery and charge the new battery for about
5.5 hours.
If you replace the battery before the low battery warnings appears, the battery strength icon
may display an incorrect reading. In this case, use the handset as normal with the new
battery installed. When the low battery warning is displayed, charge the battery for about
5.5 hours. The battery strength icon will then display the correct reading.
78
Important Information
1. Turn the power off to prevent memory loss.
A
2. Press the notch on the cover firmly and slide it
as indicated by the arrow (A).
3. Open the cover and replace the batteries.
• Insert a finger into the side gap to remove the
B
batteries easily (B).
4. Close the cover and charge the handset.
•
Please use a Panasonic battery with the service part number HHR-4EPT only.
79
Important Information
Important Safety Instructions
When using your telephone equipment, basic safety precautions, including those below,
should always be followed to reduce the risk of fire, electric shock and injury to persons.
• Do not use the product near water, for example, near a bathtub, wash bowl, kitchen sink,
or laundry tub, in a wet basement, or near a swimming pool.
• Do not use the telephone in the vicinity of a gas leak to report the leak.
• Do not mix old and new batteries.
SAVE THESE INSTRUCTIONS
For Your Safety
WARNING
• Do not install the product in any other way than described in relevant manuals.
• For safety reasons, do not physically modify the product or any optional equipment.
• The product may only be installed and serviced by qualified service personnel.
• To prevent possible fire or electric shock, do not expose this product to rain or moisture.
• Follow all warnings and instructions marked on this product.
• Do not place the product on an unstable surface, as a fall may cause serious internal
damage.
• The AC adaptor only be connected to the type of electric power supply specified on the
charger label. If you are not sure of the type of power supply to your home, consult your
dealer or local power company.
• Do not allow anything to rest on the power cord. Do not locate the charger where the
power cord may be stepped on or tripped on.
• To reduce the risk of electric shock, do not disassemble this product. Only qualified
personnel should service this product. Opening or removing covers may expose you to
dangerous voltages or other risks. Incorrect reassembly can cause electric shock.
• Unplug the charger from the AC outlet and have the product serviced by qualified service
personnel in the following cases:
A. When the power supply cord or plug is damaged or frayed.
B. If liquid has been spilled into this product.
C. If the product has been exposed to rain or water.
D. If the product does not operate according to this manual. Adjust only the controls
that are explained in this manual. Improper adjustment of other controls may result
in damage and may require service by a qualified technician to restore the product
to normal operation.
E. If the product has been dropped or damaged.
F. If product performance deteriorates.
• Do not insert objects of any kind into this product through openings, as they may touch
dangerous voltage points or short out parts that could result in a risk of fire or electric
shock. Never spill liquid of any kind on or in the product.
80
Important Information
•
•
•
•
•
•
•
The use of excessive sound volume through earphones, headphones, or headsets may
cause hearing loss.
Switch off the device when in the proximity of areas with potentially explosive
atmospheres such as fuel/chemical storage facilities or blasting operations.
Consult the manufacturer of any personal medical devices, such as pacemakers, to
determine if they are adequately shielded from external RF (radio frequency) energy.
(The product operates in the frequency range of 1880 MHz to 1900 MHz and the output
peak power level is less than 0.25 W.)
Do not use the product in health care facilities if any regulations posted in the area
instruct you not to do so. Hospitals or health care facilities may be using devices sensitive
to external RF (radio frequency) energy.
Unplug the charger from AC outlet if it emits smoke, an abnormal smell or makes unusual
noise. These conditions can cause fire or electric shock. Confirm that smoke has
stopped and contact an authorised service centre.
The batteries pose a choking hazard. Keep the batteries out of reach of children.
This handset earpiece is magnetised and may retain small ferrous objects.
CAUTION
• Unplug the charger from the AC outlet before cleaning. Wipe the product with a soft
cloth. Do not clean with abrasive powders or with chemical agents such as benzene or
thinner. Do not use liquid cleaners or aerosol cleaners.
• When you operate this product, the AC outlet should be near the product and easily
accessible.
• The product should never be placed near or over a radiator or other heat source.
• Use only the AC adaptor, battery and charger indicated in this manual.
• Do not dispose of the battery in a fire. They may explode. Check with local authorities
for special disposal instructions.
• Do not open or disassemble the battery. Released electrolyte is corrosive and may
cause burns or injury to the eyes or skin. The electrolyte is toxic if swallowed.
• Exercise care in handling batteries in order not to short the battery to conductive
materials such as rings, bracelets, and keys. The battery and/or conductor may overheat
and cause burns.
• Charge the battery provided with, or identified for use with, this product only in
accordance with the instructions and limitations specified in this manual.
• There is a danger of explosion if the battery is incorrectly replaced.
• Do not place metal items such as coins or rings on the charger. As they become hot,
you might get burnt if you touch them.
Note
This telephone communicates using digital signals that are difficult to intercept. However,
it is possible that the signals could be intercepted by a third party.
81
Important Information
Important Notice Concerning the Correct Use and Charging of Ni-MH
Batteries
Batteries, due to their construction, undergo some wear and tear. The lifetime of a battery
also depends on correct maintenance. Charging and discharging are the most important
factors. You should take notice of the following to maintain the life of the battery as long as
possible.
Ni-MH batteries have a kind of memory, the "memory effect". If fully charged batteries are
used several times only for 15 minutes in the handset and then recharged, the capacity of
the batteries will be reduced to 15 minutes due to the memory effect. Therefore you should
discharge the batteries completely, i.e. use them in the handset until "
" on the display
starts flashing. Then recharge them as described in the manual. After the memory effect
has occurred, it is possible to achieve almost complete capacity of the Ni-MH batteries by
charging and discharging several times one after another.
Ni-MH batteries can also self-discharge. This self-discharge depends on the ambient
temperature. At temperatures under 0 °C, the self-discharge will be the lowest. High
humidity and high temperatures support the self-discharge. Also long-term storage will lead
to self-discharge. A dead Ni-MH battery should not be disposed of normally. They contain
toxic heavy metal hydride and therefore should be recycled.
CAUTION
RISK OF EXPLOSION IF BATTERY IS REPLACED
BY AN INCORRECT TYPE.
DISPOSE OF USED BATTERIES ACCORDING
TO THE INSTRUCTIONS.
82
Important Information
For Best Performance
Operating Range
•
•
•
•
The range of operation depends on the topography of your office, weather, or usage
conditions, because signals are transmitted between the CS and the handset by radio
waves.
Normally, you get greater range outdoors than indoors. If there are obstacles such as
walls, noise may interfere with your telephone calls. In particular, high metal shelves or
reinforced concrete walls will restrict your operating range.
A handset may not work when it is too far from the CS depending on the structure of the
building.
We strongly suggest you hold the bottom half of the handset to ensure better call quality.
Because, the antenna is located in the upper half of the handset.
Noise
Occasional noise or interference may occur due to electromagnetic radiation from objects
such as refrigerators, microwave ovens, faxes, TVs, radios, or personal computers. If noise
disturbs your telephone calls, keep the handset away from these electrical appliances.
Environment
•
•
•
•
•
Keep the product away from heating appliances and devices that generate electrical
noise, such as fluorescent lamps and motors. These noise sources can interfere with
performance of the product.
Do not place the product in rooms where the temperature is less than 5 °C or greater
than 40 °C.
Allow 10 cm clearance around the product for proper ventilation.
Avoid environments with excessive smoke, dust, moisture, mechanical vibration, shock,
or direct sunlight.
The apparatus is designed to be installed and operated under controlled conditions of
ambient temperature and a relative humidity.
Routine Care
•
•
•
•
Wipe the product with a soft cloth.
Do not clean the product with abrasive powder or with chemical agents such as benzene
or thinner.
Clean the terminal of the charger periodically.
When you leave the product unused for a long period of time, unplug the AC adaptor
from the outlet.
Placement
•
•
•
Do not place heavy objects on top of the handset and charger.
Care should be taken so that objects do not fall onto, and liquids are not spilled into, the
product. Do not subject the product to excessive smoke, dust, mechanical vibration, or
shock.
Place the charger on a flat surface. If the charger is mounted on the wall, install it straight.
83
Important Information
Notice for product repair, disposal, transfer, or return
•
•
Keep a copy of all important data (such as your Phonebook) before sending the machine
for repair.
This product can store your private/confidential information. To protect your privacy/
confidentiality, we recommend that you erase the information such as Phonebook or call
log from the memory before you dispose, transfer or return the product.
IMPORTANT NOTICE
Under power failure conditions, this wireless telephone may not operate. Please ensure that
a separate telephone, not dependent on local power, is available for emergency use in
emergencies.
When a failure occurs which results in the internal parts becoming accessible, disconnect
the AC adaptor immediately and return this unit to the place of purchase or service centre.
•
•
•
This apparatus is designed to aid the visually handicapped to locate dial keys and
buttons.
999 and 112 can be dialled on the apparatus after accessing the outside line for the
purpose of making outgoing calls to the BT emergency (999) and (112) services.*1
This equipment shall not be set to make automatic calls to the Telecom ‘111’ Emergency
Service.*2
*1 The regulation applied in the United Kingdom only.
*2 The regulation applied in New Zealand only.
84
Important Information
RF Specification
Item
Description
Radio Access Method
MultiCarrier TDMA-TDD
Frequency Band
1880 MHz to 1900 MHz
Number of Carriers
10
Carrier Spacing
1728 kHz
Bit Rate
1152 kbps
Carrier Multiplex
TDMA, 24 (Tx12, Rx12) slots per frame
Frame Length
10 ms
Modulation Scheme
GFSK
Roll-off factor=0.5
50 % roll-off in the transmitter
Data Coding for Modulator Differential Coding
Voice CODEC
32 kbps ADPCM (CCITT G.721)
Transmission Output
Average 10 mW
Peak 250 mW
85
Important Information
System Requirements
This model supports the following CS models, PBX models, and PBX software versions:
CS
KX-TDA0141CE
KX-TDA0142CE
KX-TDA0158CE
KX-NCP0158CE
86
PBX
Model No.
Main Processing (MPR) Software Version
KX-TDA30
PSMPR Software File Version 5.0000 or later
KX-TDA100
KX-TDA200
PMPR Software File Version 5.0000 or later
KX-TDA600
PLMPR Software File Version 5.0000 or later
KX-TDE100
KX-TDE200
PMMPR Software File Version 1.0000 or later
KX-TDE600
PGMPR Software File Version 2.0000 or later
KX-NCP500
KX-NCP1000
PBMPR Software File Version 1.0000 or later
KX-TDA100
KX-TDA200
PMPR Software File Version 5.0000 or later
KX-TDA600
PLMPR Software File Version 5.0000 or later
KX-TDE100
KX-TDE200
PMMPR Software File Version 1.0000 or later
KX-TDE600
PGMPR Software File Version 2.0000 or later
KX-TDA30
PSMPR Software File Version 5.0000 or later
KX-TDA100
KX-TDA200
PMPR Software File Version 5.0000 or later
KX-TDA600
PLMPR Software File Version 5.0000 or later
KX-TDE100
KX-TDE200
PMMPR Software File Version 1.0000 or later
KX-TDE600
PGMPR Software File Version 2.0000 or later
KX-NCP500
KX-NCP1000
PBMPR Software File Version 1.0000 or later
KX-NCP500
KX-NCP1000
PBMPR Software File Version 2.0000 or later
Important Information
Additional Information
For Users in New Zealand only
PTC200 General Warning
1. The grant of a Telepermit for any item of terminal equipment indicates only that
Telecom has accepted that the item complies with minimum conditions for connection
to its network. It indicates no endorsement of the product by Telecom, nor does it
provide any sort of warranty. Above all, it provides no assurance that any item will
work correctly in all respects with another item of Telepermitted equipment of a
different make or model, nor does it imply that any product is compatible with all of
Telecom’s network services.
PTC200 4.12 (2) (b) Handset Instability
2. When attached to some longer lines this Panasonic KX-TCA275 DECT Cordless
Handset may display instability immediately after dialling if the handset is placed
facedown on a hard surface. This is a temporary condition that will revert to a normal
level after a short duration. Please do not report it to the Telecom Fault Service.
PTC200 6.11.1 (3) All Customer Equipment (fail safe requirements)
3. Under power failure conditions this appliance may not operate. Please ensure that a
separate telephone, not dependent on local power, is available for emergency use.
For Users in Singapore only
Complies with
IDA Standards
DB 01017
For users in Hong Kong only
87
Important Information
Information for Users on Collection and Disposal of Old Equipment and used
Batteries
These symbols on the products, packaging, and/or accompanying
documents mean that used electrical and electronic products and batteries
should not be mixed with general household waste.
For proper treatment, recovery and recycling of old products and used
batteries, please take them to applicable collection points, in accordance
with your national legislation and the Directives 2002/96/EC and 2006/66/
EC.
By disposing of these products and batteries correctly, you will help to save
valuable resources and prevent any potential negative effects on human
health and the environment which could otherwise arise from inappropriate
waste handling.
For more information about collection and recycling of old products and
batteries, please contact your local municipality, your waste disposal service
or the point of sale where you purchased the items.
Penalties may be applicable for incorrect disposal of this waste, in
accordance with national legislation.
For business users in the European Union
If you wish to discard electrical and electronic equipment, please contact
your dealer or supplier for further information.
Information on Disposal in other Countries outside the European Union
These symbols are only valid in the European Union. If you wish to discard
these items, please contact your local authorities or dealer and ask for the
correct method of disposal.
Note for the battery symbol (bottom two symbol examples):
This symbol might be used in combination with a chemical symbol. In this
case it complies with the requirement set by the Directive for the chemical
involved.
88
Important Information
The following declaration is applicable to KX-TCA275CE/KX-TCA275UK only
1321
This device is a DECT Portable station operating in the frequency band of 1880 MHz to
1900 MHz.
The usage of this device is generally allowed in all EU countries.
Panasonic Communications Company (U.K.) Ltd. declares that this equipment is in
compliance with the essential requirements and other relevant provisions of Radio &
Telecommunications Terminal Equipment (R&TTE) Directive 1999/5/EC. Declarations of
Conformity for the relevant Panasonic products described in this manual are available for
download by visiting:
http://www.doc.panasonic.de
Contact to Authorised Representative:
Panasonic Testing Centre
Panasonic Marketing Europe GmbH
Winsbergring 15, 22525 Hamburg, Germany
89
1-62, 4-chome, Minoshima, Hakata-ku, Fukuoka 812-8531, Japan
Copyright:
This material is copyrighted by Panasonic Communications Co., Ltd., and may be
reproduced for internal use only. All other reproduction, in whole or in part, is prohibited
without the written consent of Panasonic Communications Co., Ltd.
© Panasonic Communications Co., Ltd. 2009
PSQX4875WA KK0309YR2069 (CE/UK/AL)