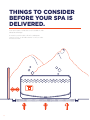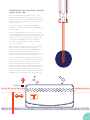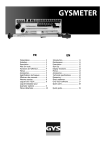
1
SPA WORLD
Pre- delivery
Guide
HELLO!
This document is designed to provide all the
information you need to ensure the smooth delivery
and installation of your spa or swim spa.
Please read it carefully and talk to your sales person
immediately if you require any further clarification.
Contact your salesperson for information.
01
CONTENTS
Before your spa is delivered
Recommended foundation or base
•Drainage
•Service access
•Positioning your spa
Sinking your spa into the ground
or adding decking around it
•Allowances for service access
Delivery of your spa
•Standard deliveries
•Depot pick ups
•Deliveries requiring a crane
Electrical installation
•10 and 15 amp spas
•32 amp or more spas
•Placement of electrical wires
Heat pump connection
instructions
•Parts supplied
•Tools and parts required
Delivery notification and spa
handover
•Taking delivery of your spa
•Balance of payment
•What’s next?
02
THINGS TO CONSIDER
BEFORE YOUR SPA IS
DELIVERED.
Your spa needs a solid, flat, level foundation, with
adequate drainage.
It must be positioned to allow for adequate
service access on all sides and of course, to take
in the best view.
03
Recommended foundation or base.
If the foundation is inadequate, it may shift or
settle after the spa is in place, causing stress to
the shell and cabinet, and voiding the warranty.
Your spa will weigh anything between 1200kg
and 2500kg (that’s between 1.2 and 2.5 tonnes,
about the same weight as an average family car
or 4x4). Swim spas can weigh up to 9 tonnes. We
therefore recommend the following surfaces:
1) 100mm thick reinforced concrete pad
2)A deck built to Australian building standards and certified by a qualified engineer that it can carry the full weight. Please consult your products spec sheet for weights which can be found at www.spaworld.com.au
Drainage.
Make sure that if the spa or swim spa is to be
positioned near a slope, dip, trough or below
ground level, there is adequate drainage for
any ground water to run off. In this instance we
recommend a land drain around the four sides
of the spa. Damage caused by flooding is not
covered under warranty.
Service access.
If you are building a deck around the tub, sinking
it slightly, or placing it against a wall, ensure easy
access is provided to the service panel. This is
almost always located on the same side of the spa
as the touch pad.
You must ensure that it is possible to drain the
spa and move it to gain access to the other three
sides if next to a wall or other object. (Access for
spa repair is the customers responsibility)
Positioning your spa.
Proper planning will enhance the enjoyment of
your spa experience and protect your privacy.
Do you need quick and easy access? If so, placing
spas close to the house or changing room is ideal.
Perhaps you want extra privacy by adding a gazebo?
Do you have a view to admire from the spa? If so,
consider how the spa can be best rotated so the
seating faces the view without obstructing the
service panel.
04
SINKING YOUR SPA
INTO THE GROUND OR
DECKING AROUND IT.
Decking can create a stunning visual effect, and by stepping down into your spa or swim spa, you
benefit from added privacy and easier access.
However, you need to allow for service access to your spa on all sides.
If
you are planning to do this, we strongly
advise that you read on.
If this is not done properly it can
be the equivalent of welding
your car bonnet shut!
05
Allowing for service access to your
spa or swim spa.
All spas and swim spas require access to the
service panel. If the spa cannot be moved freely
(i.e. it is sunk in a pit or surrounded by decking)
sufficient access is needed for our technicians to
service your spa.
We recommend you allow at least 600mm
clearance on all four sides for spas and 900mm
for swim spas.
If you are decking around the spa or swim spa,
we strongly advise that you do this after the item
has been delivered. Swim spas cannot be moved
without a crane, so it is important that they are
spaced at least 900mm from any buildings,
fences or retaining walls to ensure sufficient
access to all panels.
When decking around your new pool, we advise
that you place upright supports at regular
intervals around the spa, set back 600mm, then
cantilever the joists so that the deck is selfsupporting around the spa. This way our engineers
can access any service panels if required.
It is a recommendation of Spa Worlds that you
position your spa to sit 300mm above the deck
height, this allows for safe entry and exit into
the spa and most importantly allows for the
hardcover safety clips to be attached to the spas
cabinet. If your spa shell is level with the deck,
you will need install these clips onto the deck
and they become a toe and trip hazard, typically
ending with either a broken toe or broken clip.
300mm
O6
SPA
DELIVERY.
Standard deliveries.
Deliveries requiring a crane.
Any local delivery charges that have been
included in the sale are for Spa World’s standard
delivery with two people and a trolley. If the spa
can be put into place with that two people using
only a trolley then there will be no extra charges.
If access is difficult, a crane may be required.
Cranes are not as expensive as you might think
and provide an easy solution for getting spas
and swim spas into tight spots.
If the delivery team arrives, and the spa cannot
be put into place as described above, the
delivery team will discuss options with that may
incur extra charges.
To avoid disappointment at the time of delivery,
please read the following carefully:
Access requirements.
Your sales person should have discussed access
requirements with you when you purchased your
spa. In addition to the dimensions of the spa, you
need to allow 300mm for the height of a trolley.
For example, if your spa is 2350 x 2350 x
930mm and is to go on its side to the position,
you must allow 2650mm in height and at least
1 metre in width when measuring. If it needs to
turn corners they have to allow for the width and
also the length.
07
A swim spa will almost always require a crane. In
some situations, if the delivery truck has a hiab
crane, this can be used for a small additional
cost, preventing the need to hire a crane.
Request that your chosen crane company visit
your property to assess any potential access
problems and to ensure that the intended site is
within safe reach.
While spas can often be lifted without spreader
bars, this is at the discretion of the crane
company and we insist that they are used for
lifting swim spas.
It is the sole responsibility of the crane company
to ensure that the spa is moved without damage,
and it is your responsibility to ensure that they
are suitably insured for damage occurring to
either your spa or your property. We can not and
will not be held responsible for any damage to
persons or property while the product is in the
air, or while the crane is operating.
08
09
ELECTRICAL
INSTALLATION.
You must use a qualified electrician.
Wire placement.
In the comments section of your invoice, the
salesperson should have noted the amount of
amps that your spa requires to operate. If you
cannot see this note, please call your salesperson
as soon as possible. This information is what you
need to provide to your electrician for them to
quote correctly.
Electrical connections for your spa are typically
found under the touch pad of your spa.
10 and 15 amp systems.
Please only use a qualified electrician who will be
able to recommend the safest and most efficient
installation method.
To provide maximum flexibility, the spa cabinet is
not pre-drilled to allow the power cord to be run
out of the cabinet. Therefore, a 60mm hole should
be drilled in the appropriate position. A special
transition cap is provided to tidy the hole and this
will be found with the spa’s instruction manual.
10 and 15 amp spas.
Spas requiring 32 amps or more.
Spas that are listed as 10 or 15 amps will require
an outdoor waterproof power point with an
earth leakage protection device (unless there is
one already fitted to your switch board). There is
a power lead on these spas that is approximately
3 metres long and located under the touch pad.
This means for the cord to reach the power point
you need to position the touch pad side of the
spa to within 2m of the power point.
When hard wiring the spa, the electrician will
typically drill a hole in the cabinet and run
conduit to connect the spa electrics. Please
discuss where you would like this hole drilled
with your electrician.
(Please check with your electrician but in most
cases you cannot have the power point closer
than 1m to the spa for safety reasons).
Mark out where your spa will sit on the base with
the correct dimensions. Then measure in 300mm
from the corner where you want the power to
come from. You can have your electrician run
conduit before the base is prepared so that when
the spa is delivered the power will come from
underneath the spa and be concealed.
Spas requiring 32 amps or more.
If your spa is 32 amps or more, it will need to
be hard wired by your electrician. This typically
means that your electrician is required to make
two trips: the first to do initial connection work
and the second to connect the wires after
delivery and before handover.
We recommend that you arrange for an
electrician to come out after the spa delivery
date in case of delays with delivery.
Alternatively, if you are preparing a new base for
your spa or installing onto a deck and would like to
conceal the power, please follow these instructions:
When the delivery driver arrives you will need
to advise them of the power location and that
they will need to prepare a hole in the base to
accommodate the cable.
(As every spa is different we cannot guarantee that
every spa will accept this method of installation.)
10
HEAT PUMP
CONNECTION
INSTRUCTIONS.
1. Turn off spa and close shut off valves to the circulation pump and controller. (Marked 1 on
the diagram)
7. From the outlet of the heat pump, run 40mm pipe to the inlet of the SV controller using the supplied union to make new the connection.
2. Consult the Spa Net installation guide to connect power and control wire.
NOTE: You must use PVC hard pipe on the outside of the spa, flexible pipe may only be used internally.
3. Remove existing plumbing between circulation pump and SV controller. (Marked 2 on the diagram)
4. Fit the new 40mm circulation pump union supplied and point it in the direction where the heat pump will be located.
5.
8. Open the shut off valves. (Marked 1 on the diagram)
9. Undo the top outlet on the heat pump to bleed air out of the system.
10.Close it once water comes out and then switch on the spa.
Cut holes into the cabinet where the pipe will run into the heat pump, be sure cut the holes at a height that allows the pipes to remain even and supported on the cabinet.
6. Run 40mm pipe form the circulation pump to the inlet of the heat pump.
11. Make sure the circulation pump is flowing and is free of any air locks.
12. Depending on the installation, purezone filters may create a flow error, we suggest replacing this filter with a standard paper version.
(Depending on the installation of your heat pump, your pure zone filter may need to be replaced
with a paper filter, if you receive a flow error, shut down the spa and replace the pure zone with a
paper filter before re-starting, if problem persists please ring the service number)
Heat Pump
The heat pump must be installe
at least 1 metre from the spa po
The heat pump must be not
further than 2.5 metres from
the circulation pump.
11
talled
a pool.
Parts supplied:
•1x circulation pump barrel union.
•1x 40mm 90 Degree Street elbow.
•1x SV barrel union.
Tools and parts required:
•40mm or larger hole saw
•PVC Pipe Glue
•Hacksaw
•40mm hard pipe
(The amount of pipe or fittings required will
depend on your installation)
Spa Pool
2 Existing Plumbing
Circulation Pump
SV Control Box
1
Valve
1
t
m
Heater
NOTE: The heat pump must be installed at the same approximate level as the circulation pump.
12
DELIVERY
NOTIFICATION AND
SPA HANDOVER. (IF REQUIRED)
Please follow the instructions below to allow your spa delivery and handover to be as smooth as possible.
Taking delivery of your spa.
Depot pick ups.
When your spa arrives, our delivery team will be
notified and they will contact you to arrange a
suitable delivery date and time.
If you have chosen to collect your spa from our
nearest depot, please ensure that you thoroughly
check for damage before signing for the spa. If
damage is noticed after collection, we cannot
guarantee that the freight company will take
responsibility for this damage.
The delivery teams duty is to deliver the spa
as outlined previously in this guide, be sure to
give clear instructions of where the spa is to
be located. our delivery team will make one
drop off. If they are required to come back to
reposition the spa for any reason other than
through fault of their own, an additional delivery
fee will be charged.
Once the spa is in position, please sign to verify
that you have received your spa.
IMPORTANT: Before filling your spa, please
read the instructions carefully. Most importantly,
please ensure that all barrel unions on either side
of the pumps and heater are securely tightened.
Balance of payment must be made by direct
deposit before delivery can take place.
Once your electrician has hooked up the power
for your spa, you are ready to fill it. Fill the spa
to a level that referred to in your user manual. In
the unlikely event you notice any water coming
from the spa, please stop filling it and contact us
immediately.
If you are not ready for delivery, we will hold the
spa for up to one month upon notification of
arrival. After that, 80% of the Contract Price must
be paid and a storage fee of $10 per week will
apply.
For a complete set of operating instructions,
please refer to the information pack that will
arrive with the spa. An online copy of our
instructional video can be found at www.
spaworld.com.au/support.
Balance of payment.
ALL PAYMENTS MUST BE CLEARED BEFORE
THE SPA IS PLACED ONTO YOUR PROPERTY.
13
What’s next?
14
NOTES.
7/14