1
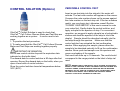
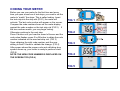
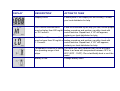
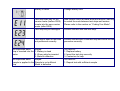
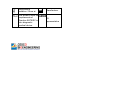
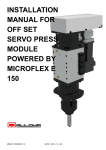
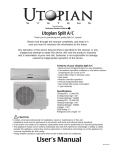
Important Information
GlucCellTM SYSTEM USER’S GUIDE
Ver 2.1
The GlucCellTM System is intended for in vitro analysis
use with cell culture medium. The system should not be
used for diagnosis of diabetes.
Intended Use
The GlucCellTM Glucose Monitoring System (The
GlucCellTM System) is designed to quantitatively measure
the concentration of glucose during cell culture. It is for
use by laboratory researchers or bioreactor professionals
to obtain a quantitative measurement of glucose in cell
culture.
About the System
The GlucCellTM System uses the latest technology in Cell
Culture Glucose monitoring to provide you with easy and
comfortable testing. The system requires only a 0.5µL of
medium sample to complete the testing in only 15
seconds.
The GlucCellTM System consists of 1) the GlucCellTM
Glucose Meter and 2) GlucCellTM Glucose Test Strips
. These products are intended to be used together to get
accurate Cell Culture Glucose test results. Do not use
other brand name test strips with your meter.
Caution
A sample with large amount of reducing substances such
as ascorbic acid and uric acid may cause result slightly
higher than the actual glucose level.
High altitudes above than 2,750 meter (8,800 feet) may
affect the test results.
Temperatures outside the range of 10°C to 40°C (50° F to
104°F) may affect the test results.
CELL CULTURE GLUCOSE METER
DISPLAY: The large, easy to read display shows test
results, messages, Cell Culture Glucose results stored
in memory, time and date.
S BUTTON: Press S button to enter time setting, and
to decrease values in the setting mode.
M BUTTON: Press M button to enter memory mode to
recall the information stored in meter’s memory and to
increase values in the setting mode.
STRIP SLOT : Holds a GlucCellTM Cell Culture
Glucose Test Strip in place when you
perform Cell Culture Glucose test or perform check
test.
DATA PORT : Allows you to transfer the information
stored in the meter’s memory to a computer to view,
analyze and print.
BATTERY COMPARTMENT : Holds ONE 3v Lithium
battery. The battery is not yet installed into meter when
new purchasing. By using the meter, please install the
battery first.
1. TEST RESULT
2. BATTERY SYMBOL : Appears when battery is
weak.
3. THERMOMETER SYMBOL : Appears when
ambient temperature is above or below the
acceptable range needed for testing.
4. DROP SYMBOL : Appears when the test strip is
inserted and meter is ready for testing.
5. STRIP SYMBOL
6. M188 : Memory capacity is 180 entries. The display
shows M188 to ensure that all digits are working
properly.
7. mg/dL mmol/L : The meter has two units of
measurement (mg/dL or mmol/L) to choose from.
8. DAY AVG : Appears when the meter is in the
memory mode while recalling 1/7/14/21/28 day test
averages.
9. DATE : Month/date.
10. TIME : The meter is programmed for a 12 hour
period format.
CELL CULTURE GLUCOSE TEST
STRIP
1: Aperture: On the tip of the test strip. For sample
loading.
2: Gray Electrode End: insert this end of test strip into
meter.
3: Test Confirmation Window: make sure the part is
filled up with test sample to ensure the correct result.
For example:
IMPORTANT TEST STRIP INFORMATION
GlucCellTM System measures the amount of glucose in
cell culture medium. Sample should be loaded from the
aperture on the tip of the test strip and is automatically
drawn to the test confirmation window where the reaction
takes place.
GlucCellTM Cell Culture Glucose Test Strips are intended
for in vitro analysis use with cell culture medium. Results
will not be accurate if used with samples containing no
electrolyte.
Do not use test strips beyond the expiration date indicated
on the strip vial label.
The discard date for test strips is 90 days after first
opening the vial. Record the discard date on the vial,
when you open a new vial of test strips.
GlucCellTM Cell Culture Glucose Test Strip can be
damaged by heat and light. Keep them sealed in the
original vial.
Store the vial in a cool, dry place below to 40℃/104℉ and
above 10℃/50℉. Do not refrigerate.
Do not use damaged test strips or abnormal test strips.
Use test strip immediately after removing it from the vial;
replace the vial cap and close it tightly.
Do not transfer test strips to a new vial. Always carry test
strips in their original vial.
Do not place in direct heat or sunlight.
Test strips are for single use only.
CONTROL SOLUTION (Options)
GlucCellTM Control Solution is used to check that
GlucCellTM Cell Culture Glucose Meter and Test Strip are
working together as a system. It can be used in two
ways:
1. To practice the test procedure
2. To make sure that the GlucCellTM Cell Culture Glucose
Meter and Test Strips are working together properly.
IMPORTANT INFORMATION
Do not use control solution beyond the expiration date
indicated on the bottle label.
The discard date for control solution is 90 days after first
opening. Record the discard date on the bottle, when you
open a new bottle of control solution.
Store the control solution closed at temperatures below
30ºC (86ºF).
PERFORM A CONTROL TEST
Insert a new test strip into the strip slot, the meter will
activate. The last code number will appear on the screen.
Compare the code number shown on the screen against
the code number on the test strip vial. If the two numbers
match, you may begin test, otherwise consult Section
“CODING YOUR METER” of this user’s manual to code
your meter first. Gently shake the control solution, and
apply a droplet to the aperture of strip. For convenient
operation, we suggest to apply a droplet on a hydrophobic
surface and draw the aperture of the strip to touch the
droplet. Sample should be absorbed naturally into the
test strip through the aperture. Make sure that the
control solution has saturated the test confirmation
window. When applying the sample, please allow the
sample to be absorbed naturally to fill up the confirmation
window. Never push test sample over the aperture and
cause overloading of the sample.
Test result will show up in 15 seconds. The result should
correspond to the range printed on the label of strip vial
used.
NOTE: REPEAT TEST IF THE RESULT FALLS OUTSIDE THE CONTROL
RANGE. IF YOU CONTINUE TO GET THE RESULT FALLING OUTSIDE THE
CONTROL RANGE, YOUR METER AND STRIP MAY NOT BE WORKING
PROPERLY. DO NOT USE THE SYSTEM TO TEST YOUR SAMPLE UNTIL
YOU GET A TEST RESULT FALLS WITHIN THE CONTROL RANGE.
CONSULT YOUR LOCAL DISTRIBUTOR FOR HELP.
SETTING METER PARAMETERS
SETTING TIME & DATE
When you first time install the battery into the meter or
every time when replace a battery, the meter will
automatically enter to the setting mode. Please set
correct time and date before you begin testing.
How to set Time and Date
Press S BUTTON for 3 seconds to turn on the meter. The
meter will enter to the setting mode automatically.
At the beep sound, the year will flash - for example for the
year of 2009, number ” 09 “will appear.
Press S or M button to obtain the desired year.
Wait the new setting flash 3 times to confirm and shifts to
the next setting.
Repeat to set the month, day, hour and minute. After
minute is set, the meter will display “OK” before turn off.
NOTE: WHILE SETTING THE TIME AND DATE, YOU
CAN EXIT THE SETTING MODE ANYTIME BY PRESS
M BUTTON FOR 3 SECONDS.
CODING YOUR METER
Before you use your meter for the first time and every
time you open a new box of test strips, you need to set the
meter to “match” the strips. This is called coding. Insert
the test strip into the strip slot (FIG1), the meter will
activate. The last code number will appear on the screen.
Compare the code number shown on the meter display
against the code number on the test strip vial (FIG 2). If
the two numbers match, you may begin testing.
Otherwise continue to the next step.
Press S button until you hear the sound of buzzer and the
code value flashes, press S or M button to obtain the code
number indicated on the new test strip vial. (FIG 3)
Upon obtaining the right code number, wait the new
setting to flash 3 times to validate the change. (FIG 4)
After screen shows the proper code and a blinking drop
symbol shows up, your meter is ready to perform a test.
(FIG 5)
NOTE: THE NEW CODE NUMBER IS DISPLAYED ON
THE SCREEN TOO.(FIG 4)
FIG 1
FIG 2
FIG 3
FIG 4
FIG 5
PERFORMING TEST
Remove new test strip from vial. Be sure to tightly replace
vial cap after removing test strips. Insert test strip
immediately into strip slot as illustrated (FIG 1). The meter
turns on automatically.
Check that the code number in the meter matches the
code on the vial (FIG 2). If the two numbers match you
may begin testing. Otherwise refer to above section to
code your meter first.
When the drop symbol flashes (FIG 3), you are ready to
perform a test. To perform the test, you need only 0.5
uL of test sample. Use a pipette tip to withdraw around
10 ~100 ul test sample (FIG 4).
FIG 1
FIG 2
FIG 3
FIG 4
Apply the sample and form a droplet on a hydrophobic
surface (FIG 5 ). Draw the tip of the test strip to touch the
droplet and allow the sample be absorbed naturally
thrugh the aperture of the test strip to fill up the
confirmation window. Make sure that the sample has
saturated the test confirmation window. Never push test
sample over the aperture and cause overloading of the
sample. When sample is applied to the strip, a dotted line
moves on the screen until measurement is completed
(FIG 6).
Test result will show up in 15 seconds (FIG 7 ).
After test complete, remove the strip from meter (FIG 8),
and discard the used strip safely.
The testing range of the meter is from 20 to 600
mg/dL(1.1 to 33.3 mmol/L). If HI is displayed, your Cell
Culture Glucose result may be higher than 33.3 mmol/L or
600 mg/dL. If LO is displayed, your Cell Culture Glucose
result may be lower than 1.1 mmol/L or 20 mg/dL (FIG 9).
FIG 8
FIG 9
FIG 5
FIG 6
FIG 7
MEMORY RECALL
The GlucCellTM Cell Culture Glucose Meter automatically
stores 180 test results, letting you review them in order
from the most recent to the oldest. If the memory is full
and a new result is added, the meter deletes the oldest
result.
The meter also calculates and displays the previous 1-, 7-,
14-, 21-, and 28-day averages.
To recall Results Stored in Memory
Turn meter on by press M button till you hear a beep
sound. The first result displayed on the screen is your
latest test result.
By pressing M button, you will see your test record from
the most recent to the oldest.
By pressing S button you will obtain the averages of the
last 1-, 7-, 14-, 21- and 28-days.
NOTE: ANYTIME IN MEMORY MODE, YOU CAN
PRESS M BUTTON UNTIL YOU HEAR THE BEEP TO
EXIT AND TURN OFF THE METER.
To Delete Memory
While in the memory mode, select the test result you wish
to delete and display it on the screen.
Press S button until you hear a beep sound. The blink
“dEL” symbol will appear on the meter.
Press M button until the “OK” symbol appears which
confirms that the selected test result has been deleted
successfully.
The meter will return to memory mode and display next
result after deleting.
SYSTEM SPECIFICATIONS
1
Assay Method
Electrochemical biosensor
2
Dimension
96 mm x 60 mm x 18.5 mm
3
Weight
60 g including battery
4
Test Sample
Animal cell culture medium or buffer solution
5
Test Result
Glucose concentration in mg/dL or mmol/L
6
Sample Size
Less than 0.5 µL
7
Measuring Time
Less than 15 seconds
8
Measuring Range
20 – 600 mg/dL (1.1 – 33.3 mmol/L)
9
Operating Temp. Range
10℃~40℃(50℉~104℉)
10
Operating Relative Humidity
20% - 80% RH
11
Memory Capacity
180 test results with time and date
12
Power Supply
One 3-volt Lithium Battery
13
Battery Life
Approximately 1000 tests
14
Automatic shut-off
In 3 minutes
TAKING CARE OF YOUR METER
REPLACING THE BATTERY
The GlucCellTM Cell Culture Glucose Meter comes with
a battery (not yet be installed when new purchasing).
Please install your battery before started.
Battery life will vary depending on usage, so always
keep a spare on hand.
The battery should last about 12 months when testing 3
times a day.
When the battery symbol appears on the meter display,
battery is getting low. You will still be able to test with low
battery, but you should replace it as soon as possible.
When battery symbol appears flashing on the display,
the meter will no longer give results and you must
replace the battery immediately.
TO REPLACE THE BATTERY
Make sure the meter is turned off.
Let the front of meter rest in the palm of your hand.
Slide battery compartment door open.
Remove the old battery and insert the new 3 volt Lithium
battery into the metallic hood of the battery holder with
the plus(+) side up.
Slide battery compartment door closed. Check to see
that your meter is working. If it fails to turn on, the battery
may have been inserted incorrectly. Remove the battery
and reinsert it as illustrated.
NOTE: EVERY TIME WHEN YOU REPLACE THE
BATTERY, THE METER WILL TURN ON
AUTOMATICALLY AND ENTER TO THE TIME/DATE
SETTING. PLEASE SET CORRECT TIME AND DATE
BEFORE TESTING.
CLEANING
Clean the outside of the meter with a soft cloth, slightly
dampened with water. Do not get moisture into the strip
slot and data port.
STORAGE AND HANDLING
Keep your meter free of dust. Protect it from extreme
temperature and humidity.
DISPLAY MESSAGES AND
PROBLEM-SOLVING GUIDE
When any of the following messages appear, there is a
problem with your GlucCellTM Cell Culture Glucose
Meter or the way in which you are performing a test.
These messages will help you to identify certain
problems. If error messages appear that are not listed
on the following pages, contact with your local distributor
for help.
DISPLAY
DESCRIPTION
ACTION TO TAKE
Display check
If some parts of the display are not working. Contact
your local distributor for help
Cell Culture Glucose result
If this not confirmed by the way you feel, review proper
may be higher than 600 mg/dL testing procedure and perform a quality check with
or 33.3 mmol/L.
control solution. Repeat test, if “HI” still appears,
contact your local distributor for help
Cell Culture Glucose result
If this not confirmed the way you feel, review proper
may be lower than 20 mg/dL or testing procedure and perform a quality check with
1.1 mmol/L.
control solution. Repeat test, if “LO” still appears,
contact your local distributor for help
Temperature is above or below The result you have obtained may not be accurate.
the operating range of test
Move to an area with temperature between 10ºC to
strips.
40ºC (50ºF - 104ºF). Do not artificially heat or cool the
meter.
Battery is low
Change battery soon.
Battery is dead.
Change battery now.
Test strip code key for old
version meter (before 2009)
inserts into the new version
meter (after 2009)
Test strip may be damaged.
New version GlucCell meter does not require Code Key
to match the code between test strips and meters.
Please refer to the section on “Coding Your Meter”.
Perform the test with new test strip.
Test strip is used or test was
not performed correctly.
Perform the test with a new test strip and follow the test
procedure correctly.
No responses when
Maybe:
strip is inserted into the 1. Battery is dead
meter
2. Wrong strip be inserted
3. Meter is defective
No responses when
Maybe:
sample is applied to the Sample is not sufficient
strip
Meter is defective
You have to:
1. Replace battery
2. Insert the test strip correctly
3. Contact us for help
You have to:
1. Repeat test with sufficient sample
NOTE : If there is any error message displayed but not listed here, or your meter shut down
for no reason, you can reset the meter by following two ways:
1. Replace the battery.
2. Open the battery door and use a needle to prick the “reset” hole (with a reset mark beside)
the battery component.
PERFORMANCE EVALUATIONS
Glucose Analyzer as reference. The results are shown in
the following table.
PRECISION
Tests were carried by trained technicians in the
laboratory setting. The sample from one subject was
adjusted to 3 different levels. Strips out of a single lot
were tested. The results are shown in the following
table.
No. of Mean
Within-Run
Level
tests
(mg/dL ) C.V. (%)
Low
20
43.3
4.7
Normal 20
96.2
3.4
High
20
381.0
2.4
ACCURACY
Tests were carried by trained technicians in the
laboratory setting. Samples from the subjects were
tested with both GlucCell Meter and YSI Model 2300
Slope
y-intercept
Correlation Coefficient (R)
Number of tests
Range tested
1.07
-5.9 mg/dL; -0.3 mmol/L
0.99
120
54-490 mg/dL
3.0–27.2 mmol/L
SYMBOL
Do not reuse
Lot number
Please consult
instructions for
use
Use by /Expiry date
Caution, consult
accompanying
document
Temperature
limitation / Store at
Manufacturer
This product fulfils the
requirements of
Directive 98/79/EC in
vitro diagnostic
medical device.
EU
representative