1
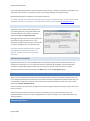
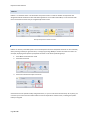
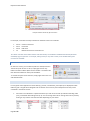
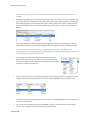
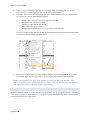
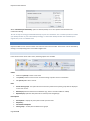
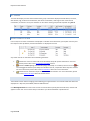
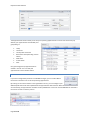
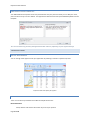
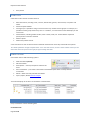
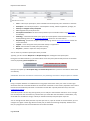
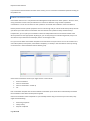
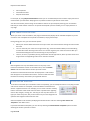
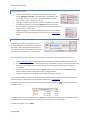
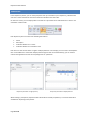
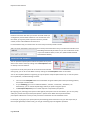
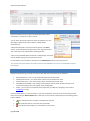
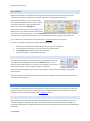
EzyPractice User Manual EzyPractice SOFTWARE FOR NATURAL THERAPISTS User Manual www.ezypractice.com Version 1.5 Page 1 of 29 EzyPractice User Manual TABLE OF CONTENTS Table of Contents ................................................................................................................................................... 2 Introduction ............................................................................................................................................................ 4 Installation .............................................................................................................................................................. 5 Installation On Apple OS X .................................................................................................................................. 5 Generating Testing Data ..................................................................................................................................... 6 Data Import ........................................................................................................................................................ 7 Importing Dispensary ......................................................................................................................................... 7 Licensing and Activation ......................................................................................................................................... 7 Application Basics ................................................................................................................................................... 7 Ribbon................................................................................................................................................................. 8 Data Tables ......................................................................................................................................................... 9 Database Backup .............................................................................................................................................. 11 Main Screen .......................................................................................................................................................... 12 Clients ............................................................................................................................................................... 12 Calendar ............................................................................................................................................................ 13 Appointments ................................................................................................................................................... 14 System Settings................................................................................................................................................. 15 Clients ................................................................................................................................................................... 16 Consultations ........................................................................................................................................................ 17 Dispensary ............................................................................................................................................................ 23 Health Funds ......................................................................................................................................................... 24 Prescription Browser ............................................................................................................................................ 24 External Documents ............................................................................................................................................. 25 Letters ................................................................................................................................................................... 25 Mail Merge ....................................................................................................................................................... 26 Letter Templates ............................................................................................................................................... 26 Integration with Google Apps ............................................................................................................................... 26 Calendar Replication ......................................................................................................................................... 26 Page 2 of 29 EzyPractice User Manual Contacts Repliation ........................................................................................................................................... 27 Data Replication ............................................................................................................................................... 27 SMS Messages ...................................................................................................................................................... 27 Database Security ................................................................................................................................................. 27 Release Notes ....................................................................................................................................................... 28 Version 1.1 (February 2013) ............................................................................................................................. 28 Version 1.2 (May 2013) .................................................................................................................................... 29 Version 1.4 (February 2014) ............................................................................................................................. 29 Version 1.5 (March 2014) ................................................................................................................................. 29 Page 3 of 29 EzyPractice User Manual INTRODUCTION Welcome to EzyPractice, software specifically designed to assist the natural therapists to run their practice. It contains a number of unique features, such as: Intuitive user interface MS Outlook style calendar to create and organise client appointments Ability to set reminders at a specific date and time Powerful text editor compatible with MS Word. Choose any font and colour you want, insert tables and images directly into your consultation for simple case taking Organise and analyse your prescriptions based on simple criteria Ability to split your consultation text into multiple sections for their easy retrieval Mail merge functionality to generate letters and consultation reports by a simple click of a mouse Ability to attach any kind of document to a client or consultation record Lock down your consultations after a specific period of time as might be required by your local legislation Integration with external case taking software (for homoeopathic consultations) If you have any questions, comments or suggestions, please do not hesitate to contact us on the e-mail address [email protected]. Page 4 of 29 EzyPractice User Manual INSTALLATION To install EzyPractice on your computer, first download the latest version from www.ezypractice.com. After downloading, the program will guide you through a number of simple instructions to complete the installation. Technical requirements: Windows Vista or 7, 32 or 64 bit version .NET Framework 3.5 SP1 or higher 2 GB RAM or more (4 GB RAM recommended) Internet connection for license activation The application must have a full access to the installation folder. If you are installing EzyPractice in a security restricted environment, consult with your system administrator first. When you run EzyPractice for the first time, it will detect that the database has not been created and displays following dialog: If you wish to create a new database, select Setup a new database and click Next. The program will create a new database in either default or custom location and EzyPractice is ready to be used. If you wish to place an existing database in a custom location, simply close EzyPractice and move the database file to folder you wish to use. When you start the program next time, it will detect the database was not found and will display the same dialog as above. Select Use existing database and locate database file you wish to use. INSTALLATION ON APPLE OS X Although EzyPractice is a native Microsoft Windows application, it can be also run in a virtualized environment such as Parallels Desktop for Mac, VMware or Oracle VM VirtualBox. You might need to consult your local IT specialist to assist you with the installation. We recommend that your Mac OS has at least 4 GB of physical memory available for this solution. To install EzyPractice using Parallels Desktop for Mac, follow these instructions: Create a new virtualized environment. Recommended parameters are 1GB RAM, 1 CPU and 15 GB disk space. More or less memory might be required, depending on the overall system performance and the version of Windows you decide to use. Page 5 of 29 EzyPractice User Manual Install Windows 7 in a virtualized environment. Please note that you might require a Windows license for this installation. Apply all automatic online updates in Windows, including installing .NET Framework 3.5 SP1. Make sure your virtualized environment has the integration tools installed (eg. MacLook in Paralells for Mac) to allow seamless work with your parent OS. Install EzyPractice system as under described above. On your Mac OS environment, create a folder for your application data and call it EzyPractice. Configure your virtualized environment so it has an access to this folder and map it as another network drive. Please refer to relevant documentation for assistance. Create Data folder in the EzyPractice folder on your host computer. Run EzyPractice and create a new database in the data folder you have just created (on you Mac computer). Run EzyPractice and go to Configuration, Client tab. Change Default Location of external documents and images so it points to the EzyPractice folder. If you use external analysis software (as with homoeopathy, point it either to the same location, or into location that is being used by your external application. Configure your backup location so it uses the same location. Please refer to Backup section for more information. Configure EzyPractice to run in a seamless mode. You can create an application shortcut in your Finder to run EzyPractice easily. By following these instructions, you will make sure you will have all your data (including database backups) placed in your host environment. Also, file operations (Save As and Open file dialogs) will use the specified location by default so data exchange between your Mac and the virtualized environment will be very simple. As all application updates are done automatically, you should never have to use the Windows environment directly. TIP: Make sure you configure your Mac to backup your EzyPractice folder (e.g. using Time Machine). GENERATING TESTING DATA In order to help you test EzyPractice properly, it contains a build-in function to generate random data for assessment and performance evaluation. The data generator can be found in menu File. Page 6 of 29 EzyPractice User Manual The random data generator will create requested number of clients, including consultations, prescriptions and documents. Each client has a special text in their note, allowing the data to be deleted in bulk. Random data generator is available only during the trial period. TIP: Please note that the random data generator does not create consultation sections, as this requires custom configuration based on your needs. For more information, please see the chapter Consultation Sections. DATA IMPORT A basic set of client data can be imported from your existing system by using a CSV data format. The import function can be found in the Main ribbon under File tab, Import From CSV. We suggest that you first save a CSV template into a file and then copy your data into it. If you attempt to modify number of columns, their order or name, the program will not import the data. Important: The date of birth has to be in format yyyy-MM-dd or the data will not import. For example, 17th May 1971 must be recorded as 1971-05-17. IMPORTING DISPENSARY EzyPractice allows you to create a predefined list of items (dispensary) that will be offered when you are making your prescriptions. You can import this list from an external file. By default, list of homoeopathic remedies is provided with EzyPractice but you can create your own list and import it into the system. Dispensary import function can be found in the Main ribbon menu in Prescriptions group. LICENSING AND ACTIVATION When you run EzyPractice for the first time, it automatically starts a 30 day trial period. During this time, you can use EzyPractice without any restrictions. If you wish to continue using EzyPractice when the trial ends, you must activate it using a serial number. You can find the license activation option on the main screen ribbon under menu System, Activate License. If for some reason you did not have enough time to test the program during the evaluation period, please feel free to contact us. Please note that you need an Internet connection to activate your copy. Once activated, you can use EzyPractice offline. If you wish to start using EzyPractice on another computer, you need to deactivate your existing copy first. APPLICATION BASICS Page 7 of 29 EzyPractice User Manual RIBBON Ribbon is an interface where a set of toolbars are placed on tabs in a tab bar. Ribbon in EzyPractice was designed to follow standards of other Windows applications such as Microsoft Office, so users familiar with this environment will find it easy to navigate EzyPractice as well. Example of EzyPractice ribbon interface KEYBOARD SHORTCUTS Ribbon can be fully controlled by both mouse and keyboard shortcuts. Keyboard shortcuts can be invoked by either pressing a hotkey for given function, or simply by pressing Alt key to invoke the ribbon shortcuts. For example, displaying Prescriptions by keyboard shortcuts can be done by following steps: 1. 2. Press Alt to invoke shortcut mode Press H to Home tab: 3. Press P to activate Prescriptions shortcut: Some functions have specific hotkeys assigned to them, so you can call the function directly. At any time, you can hover your mouse over the ribbon button to read an explanation of the function, including the specific hotkey if assigned: Page 8 of 29 EzyPractice User Manual Example of ribbon button fly-by information For example, some of the hot keys available on the Main screen are as follows: Ctrl+N Ctrl+F Ctrl+E F5 Create a new client Find client Edit client Refresh the client or transaction list TIP: Please note that some ribbon buttons and their hotkeys are enabled or disabled automatically based on availability of given function. For example, editing clients (or any other record) is not enabled when given record is not available. QUICK ACCESS TOOL BAR On the main screen, you can add any button to the Quick Access Tool bar for quick access. To do so, simply right click on any button and select “Add to Quick Access Tool Bar”. The button will then become available on the top of the Ribbon. To remove the quick access shortcut, simply right click on the icon and select Remove. DATA TABLES In many parts of the applications various data (e.g. clients, consultations, prescriptions) are displayed in data tables or grids. The grids were designed to be consistent across various parts of EzyPractice so they can be controlled in consistent manner: Sort criteria are indicated in a specified column by a small arrow. Arrow up indicates ascending order (A..Z), arrow down descending order (Z..A). You can change the order or sorting criteria at any time by clicking on any column and resort the data depending on your needs: Page 9 of 29 EzyPractice User Manual Please note that in some areas, where sort order needs to be explicitly set, this functionality is not available. Some grids allow grouping your data based on custom criteria. This way you can for example group all your clients with the same postcode, prescription with the same presenting complaint, etc. Data grid that supports grouping can be recognised by a group area on the top. For example, to group client’s previous consultations on the main screen by date, drop “Date” column into the panel above grid as follows: You can group data by multiple criteria by simply dragging column(s) to the grouping area. Groups and the data inside them can be sorted independently, by clicking on the column heading indicator. TIP: This way you can very quickly create custom previews on you data. For example, in the Prescription Browser you can group data by Pathology and sort them by Response flag to retrieve your most successful prescriptions in a given area. You can filter any column by clicking on the small lock icon that appears when you hover your mouse over the column heading. For example, you might want to display only certain types of prescriptions, clients from specific post codes, etc. When a grid is selected, you can find desired record by simply typing the data into the grid. The most suitable record will be selected and the search criteria will be highlighted in a transparent colour: Current sort order will be always used as search criteria. To search by a different column, modify your sort order and start again. You can also use a full-text search by pressing Ctrl+F. This time, all active columns will be used for search criteria, offering much more powerful search functionality. Page 10 of 29 EzyPractice User Manual Double clicking on the data grid will open corresponding record, where applicable. For example, double clicking on a client list grid will open edit form for a specific record. At any time, you can save your current data layout so it will be restored the next time EzyPractice is run. In particular, you can save following properties: o o o o o Change order of columns or remove any column completely Change data sort order for any column Change grouping of data by any column Apply custom filter to any column Visibility of some data elements, as the Find Panel or Auto Filter Row. To save current data layout, right-click on the column heading and select Grid Layout and Save Layout. To reset to the default setting, select Reset Layout. Data grids can be exported at any time by selecting the data grid and pressing Ctrl+P. This way you can print the data in any format you wish, or you can export them into PDF or Microsoft Excel. TIP: By combining custom sorting, grouping and filters you can very quickly create powerful custom reports and export them into external applications for further processing. Auditing your practice can be a very simple process done in just couple of clicks of your mouse. DATABASE BACKUP By default, database backup is run every time you close EzyPractice. You can change the settings so the backup is run either every time you close EzyPractice, or at specific intervals. Manual Backup indicates that the backup must be run from the main screen menu. Page 11 of 29 EzyPractice User Manual When “Run backup automatically” option is selected, backup is run at a specific interval without the confirmation dialog. TIP: Do not rely on leaving your database backups on your local hard drive. It is a common practice to include your backup location in your overall backup strategy, or chose other backup location that is backed up on regular basis, such as a network drive. MAIN SCREEN EzyPractice Main screen consists of two main sections: Clients and Calendar. Each section can be activated by clicking on corresponding menu on the left navigation bar. CLIENTS In the Clients section of the main screen, following options are available: Clients New Client (Ctrl+N) creates a new client Find (Ctrl+F) invokes a search screen to allow locating a specific client or consultation Edit (Ctrl+E) edits client’s record. Data Active clients groups. This option will ensure that only clients from specific groups will be displayed on the main screen. Refresh (F5) refreshes data from the database (e.g. after a client was added or edited) Replicate (F9) replicates data (Calendar or Contacts) with Google Apps Prescriptions Prescriptions - displays all prescriptions made up to the date. Dispensary Consultation templates Client groups – to add, edit and delete client groups Page 12 of 29 EzyPractice User Manual ALL CLIENTS This view will display all clients from selected client group. Information displayed includes Name, Surname, date of birth, age, number of consultations, date of last consultation, how long it’s been since the last consultation, and others. At any time the data can be custom sorted, grouped and exported using Ctrl+P. RECENT CONSULTATIONS In this view, list of recent consultations is displayed. It includes client information, prescription summary and the response note. By default, last 50 consultations are displayed in the list. Any of the records can hold either of the following indicators: Indicates the record is locked and cannot be edited, except for specific information. For more information please refer to the Consultation Lockdown section. Indicates a follow up flag. If the follow up flag is due today or is overdue, the icon turns red All records flagged for follow up will always be included in the list, irrespective when they were created. For more information please refer to the Consultations section for more information. Indicates that an external analysis was attached to a consultation. For more information, please refer to the External Analysis section of this document. CALENDAR The Calendar section allows managing and scheduling your appointments. The calendar allows the data to be displayed in in Day View, Work Week, Week and Month View. Click New Appointment to create a new record. You will be able to specify Start and End times, location and append a short note. You can even setup a reminder so you will be notified at a specified time. Page 13 of 29 EzyPractice User Manual APPOINTMENTS The Appointments section allows you to see your upcoming appointments in a clear and concise way. By default, your appointments are labelled (and grouped by) as Today Tomorrow The day after tomorrow Rest of this week (excluding records above) Next week In two weeks Later Only upcoming (future) appointments are viewed in this list. You can view past appointments in the Calendar section. SMS NOTIFICATIONS If you have configured Ezy Practice to send SMS messages, you can send a SMS to the client to remind him or her of the upcoming appointment. By clicking on the chevron button in the right bottom corner, you can configure your SMS template that will be then updated with the appointment date and time. When the SMS reminder was sent sucessfuly, the appointment reminder will be updated with a small icon and the SMS will be recorded in the Client’s record in the Diary section. Page 14 of 29 EzyPractice User Manual SMS NOTIFICATION TEMPLATE Your SMS notification template can be fully customized to suit your personal needs: you can add your name, phone number and your clinic’s address. The appointment date and time will replace #date# keyword from the template. TIP: You can choose any format of the appointment date and time, depending on your regional settings. SYSTEM SETTINGS VISUAL APPEARANCE You can change visual appearance of your application by selecting a new skin in System Tab, Skins. EzyPractice with Xmas (Blue) skin applied EZYPRACTICE CONFIGURATION There are a number of parameters that affect how EzyPractice works: Basic Information Name, address and contact information of you and your practice. Page 15 of 29 EzyPractice User Manual Clients Default Country – you can specify default country for a new client record. Location of External Analysis – please refer to the External Analysis section. Default location of external documents – you can specify a default location for your documents Consultation lockdown. Specifies after how many days a consultation will be locked. Please refer to the Consultation lockdown section for more information. Email If you wish to send your e-mails directly from EzyPractice, you need to configure your mail server for outgoing messages. Please refer to the Letters section for more information. Text Editor Spell Check – Indicates whether you wish to use spell check in your case taking notes. The default installation contains three spelling dictionaries – Australian, Canadian and US English. If you wish to use a different spelling dictionary (German, French, etc.) you can download them from Open Office website on http://extensions.services.openoffice.org/dictionary. Copy the dictionary files to C:\EzyPractice\TextEditorFiles\Dictionaries folder and select the dictionary you wish to use. Please note that both AFF and DIC files must be provided. Replace text as you type – If enabled, you can provide list of text shortcuts that will be used when typing your consultation notes. For example, you can configure to replace text ‘qqq’ for ‘Practitioner's note:’ to enable easier and more structured case taking. Custom dictionary – this list contains your additions to custom dictionary. GoogleApps Google Username and Password Synchronize with Google Calendar Synchronize with Google Contacts Please refer to the Google Apps section for more information. CLIENTS A new client record can be created by clicking on New Client button in the main screen menu. Alternatively, existing client can be edited by clicking Edit, or double-clicking on a record in the data grid. The client ribbon menu consists of following sections: Active view, that determines current view on client’s record Client data section Consultations section Page 16 of 29 EzyPractice User Manual Diary section CLIENT DATA Client Data screen consists of several sections: Main information, including name, surname, date of birth, gender, marital status, occupation and others. Home and postal address Client group. It is possible to assign a client record to any number of client groups. For example, it is possible to create groups called “City clinic” or “Children”, to control which clients will display on the main screen. Contact details, including mobile number, work number, email, etc. Contact details of patients primary doctor can be also entered. Patient’s photo. Note to the patients record. A new record has to have at least Surname and Gender entered to be saved. Any other fields are optional. TIP: Gender field does not offer a default value. For a new client record, to enter a value without mouse you can tab on the control and press arrow right (or left) to change the value. CONSULTATIONS Consultation section offers following options: New consultation (Ctrl+N) Edit consultation Prescriptions – view all prescriptions made to this client Print consultation – print client’s information and detailed report about currently selected consultation Delete – delete currently selected consultation Import, Export, Delete external analysis. This section displays list of client’s consultations created to date: CONSULTATIONS Every consultation contains following data: Consultation Tab Page 17 of 29 EzyPractice User Manual Consultation date Chief complaint Case taken – for example “In the office”, “Phone”, “Patient’s home”, etc. Consultation status – to mark the consultation as Created (default) or Closed Follow Up flag – can be used to mark the case for a follow up (with specific date) to make it appear in the “Previous Consultations” in the main screen. Consultations marked such will be never be removed from the Previous Consultations though they might be of older date. Created, Last Edited – indicate when the consultation was created and last edited Note This allows including any supplementary comments that might not be necessary relevant to the actual consultation. This field is editable even though he consultation is locked. Finances Consultation price – price of the consultation (automatically updated if a consultation template is selected) Prescription fee – summary of charges of all prescription items (e.g. medicine, postage, etc.) Payment status (paid, not paid) Attachments Here you can attach any documents relevant to the consultations (e.g. PDF scan of a blood test). Please note that images (e.g. photograph of a skin condition) can be inserted directly into the consultation text. DISPLAY PREVIOUS CONSULTATIONS At any time, you can review previous consultation notes by clicking Previous on the ribbon menu. You can select either the specific consultation you wish to see, or you can browse through the records by clicking buttons Next Consultation and Previous Consultation. The actual consultation text will appear in a new window on the bottom of the screen. PRESCRIPTIONS Making and managing prescriptions is a fundamental part of any consultation. In EzyPractice, you can manage your prescriptions directly in the consultation screen by expanding consultation tab on the bottom of the screen: When the consultation screen is expanded, it will allow filling consultation data, including prescription information: Page 18 of 29 EzyPractice User Manual Code – code of your prescription, either selected from the dispensary list or entered as a free text Description – the actual prescription – homoeopathic remedy, medical supplement, postage, etc. Potency or strengths of the prescription Fee charged for the prescription item Prescription instructions. This text can be printed on your consultation letter using Mail Merge functionality. Pathology – a free text that allows you to group your prescriptions. Please note that this is not an ICD10 pathology code. See the Prescription Browser section for more information. Response flag - practitioner’s flag for response groupings. See the Prescription Browser section for more information. Supplier – name of supplier of the prescribed remedy or supplement Batch – batch number to allow prescription tracking Response – patient’s response to the prescription You can enter any number of prescription items you need. Typically, you will not enter Response and Response Flag when making the initial prescription. During the consultation follow-up, you will be able to access last prescription directly from the consultation screen by expanding Last Prescription tab: Here you can update your Prescription Flag and Patient’s Response of the previous consultation. Other fields are read only. IMPORTANT: When the consultation is locked down, only Pathology and Patient’s Response fields are editable. CONSULTATION LOCKDOWN Using a computer database is no different from using paper based client notes: your notes are still a legal document that must not be altered when the consultation is finished. For this reason, EzyPractice has a built-in function that automatically locks down a consultation record after a specific period of time (as set in the configuration section). The default period is set to 5 days, during which you can edit your notes without restrictions. This is enough time to analyse the case and make any relevant notes you need. After the consultation is locked down, only some fields are available for change, as Note (on the left-hand side) and prescription response. You can change the lock down period to any value you wish or, if you do not wish to use this feature, you can change it to a higher number (eg. 365 for a whole year) to avoid record locking completely. However even then, the program will still record the date the record was last edited. Page 19 of 29 EzyPractice User Manual If you however need to edit the record for some reason, you can unlock the consultation by double-clicking on the padlock icon. CONSULTATION SECTIONS Consultation sections are a unique feature that distinguishes EzyPractice from other systems. Sooner or later, every practitioner comes to the point where he or she has to deal with a large number of patient’s consultations. It is not so uncommon to have a patient’s record with two hundred or more consultations. Did the patient mention specific symptoms some six months ago and you cannot locate them quickly? How do you extract your notes from all consultation that are relevant to the patient’s family medical history? In EzyPractice, you can split your consultation notes into independent sections and record relevant notes where you feel are most appropriate. By doing so, you not only keep your notes well organised, but you can also retrieve any of the sections and display them in chronological order. First, you have to define consultation template and create sections of your choice. You can do it either in the main ribbon (Home, Prescriptions, Consultation Templates), or directly in the consultation screen by clicking on the chevron in the Consultation Sections button group. Some of the consultation sections you might want to create include: Acute consultation Chronic consultation Chronic consultation – follow up etc. Each consultation template also contains a default consultation price which will be automatically inserted to the consultation notes when the template is applied. Choice of consultation sections depends on your modality and the way you structure your case notes; they might include following: Presenting complaint Family history Physical complaints Page 20 of 29 EzyPractice User Manual Skin complaints Constitutional notes Physical examination For example, by using Physical examination section you can record blood pressure and then simply retrieve all relevant when you need them. Keeping track on patient’s health has just become much easier. You do not necessarily have to assign all consultation sections to your template; if during your consultation find that you need another one that is not part of the template you have loaded, you can simply attach it at any stage. USING CONSULTATION SECTIONS When you create a new consultation, the program automatically displays list of available templates. If you do not wish to use a template for this specific consultation, simply press Escape. During taking your case, you have several options: Define your sections beforehand and record your notes into relevant sections during the sections with the client You can record all your notes into a single section (e.g. called Consultation Notes) to avoid breaking concentration when listening to the client. You can then organise your notes into sections after you have finished taking the case and are working on the prescription There is, of course, a possibility of using combination of both approaches, where you take notes into a single section and appending new ones on need-to-have basis. RETRIEVING CONSULTATION SECTION Retrieving data from any consultation section is very easy. In the Previous Consultations section in the ribbon menu, click on Preview Section and then select relevant section you wish to view. All data from selected section will then be displayed in a new window that will appear on the bottom of the form. You will be able to browse the data and read any information you might find relevant. SAVING SECTION TEMPLATES To be able to customize your consultation sections completely, you can modify the section in any way you wish and save the content as a template, so the text will be reused when the section is applied next time. For example, you can create a section “Dietary habits” and create a table inside it that contains a questionnaire regarding client’s diet, allergies, cravings, etc. This way you not only don’t have to retype your notes every time, but you also make sure you never forget all the questions that might be relevant for the case. Section template can be saved by modifying the selected section and then selecting Save Section as a Template on the ribbon menu. If you wish to delete the template, you can do it by selecting the Delete Section Template options and then selecting the section you wish to restore. Page 21 of 29 EzyPractice User Manual OTHER OPERATIONS Quick navigation between consultation sections can be done by selecting Navigate to Section in the ribbon menu. Alternatively, you can directly press Ctrl+1 (or Ctrl+2, etc) hotkey where the number key is number of your consultation section. If you wish to add a section that has not been included in the original consultation template, you can select Append to add it at any stage. Function Sort can change order of the consultation sections, if you wish to reorder them for some reason. Toggle highlighting of selected text ((Ctrl+Shift+H) or current paragraph (Ctrl+Shift+L). The background colour can be setup in the Configuration section. EXTERNAL ANALYSIS Some modalities such as homoeopathy rely on external applications to support case analysis and prescription. With homoeopathic prescriptions, a case is analysed using computerised repertory and such analysis can be saved into an external file. EzyPractice allows saving this data file and attaching it to consultation record by a very simple process: In the configuration section, locate the folder being used by your external application to save data. In your case taking application, save the analysis into external file. You do not have to worry about the filename, as the program will rename the file correctly according the patient name and date of consultation. After the consultation was saved, click on Import button. The program will show Open File dialog where it displays all files in the folder that was configured above. Select the analysis file and the program will import the data into database. To keep the data folder clean and concise, the file will be deleted from the folder after it’s been imported. If you wish to keep the file instead, you can change this behaviour in configuration. Consultation with analysis data will have the record marked with a special icon will look as follows: and your consultation list To load the analysis from the database, click on Export. The program will automatically save the data into the specified location, with correct file name consisting of the client name and analysis date. To delete the analysis, click on Delete. Page 22 of 29 EzyPractice User Manual DISPENSARY In the Dispensary section, you can easily keep track of all your remedies in your dispensary, indicate which ones are in stock and mark the ones that need to be included in the next order. On the main screen, you can display either all records or only those that are indicated to be in stock or are marked for a future order. Each dispensary item can contain the following information: Name Description Indication whether it’s in stock Indication whether it’s marked for order Each item can also contain either a single or multiple potencies. For example, you can create a homeopathic item “Arnica Montana” and record multiple potencies against this record. Alternatively, you can create a nutritional supplement and use various package sizes as “potencies”. Dispensary item with a single potency Dispensary item with multiple potencies When making a prescription, EzyPractice will indicate which remedy and potency is in stock and therefore available for dispensing to the patient. Page 23 of 29 EzyPractice User Manual HEALTH FUNDS Health Funds section will allow you to enter all health funds you are eligible to provide health rebates for. For the client to claim the rebate, you typically need to provide insurance provider number, which is often different for each Fund. For each Health Fund, you need to enter its name and your health provider number. After you assign the Health Fund to the client’s record (in the Client Edit screen), it will become available in the Mail Merge functionality for letters so you can include these codes in your Consultation Letters, emails, etc. (fields HealthFundCode and HealthFundName). PRESCRIPTION BROWSER You can preview all prescriptions made to the patient at any time either in the client’s screen by clicking on the Prescriptions button or directly in the Consultation. If you wish to see all prescriptions for all clients from the selected client group, you can do it in the Main screen by clicking on the Prescriptions button in the ribbon. You can be completely flexible in organising your prescriptions and prescription follow-ups. To use the system to its capabilities, consider following scenarios: You can use the Complaint field in the consultation for general description of the presenting problem, for example “Twisted ankle” As your Pathology, you can use “Musculoskeletal”, “Female”, “Emotional”, “Headache”, etc. Alternatively, you can use ICD-10 pathology codes if you prefer using this system. In Prescription Response you can record response as reported by the patient. By assigning your pathology and response codes against prescription and not consultation, you can very easily audit your practice to find your best prescriptions in specific areas. What were my best headache prescriptions? Where was I most (or least) successful in treatment of musculoskeletal issues? For example, if you group your prescriptions by the Pathology Code and choose only your best responses (in this example graded by number 0 to 8), you can get a following report for digestive problems: Page 24 of 29 EzyPractice User Manual EXTERNAL DOCUMENTS EzyPractice allows saving any type of a document either under a consultation, or directly in a client’s record. You can store documents relevant to client consultation such as XRay images, blood results, referral letters, liability release documents, etc. A document attached to a client record will appear in the Diary section; it will indicate the actual document size, original file name and a note that can be created when attaching the file. A file can be previewed (when the format is supported) or saved into a file by double-clicking on the relevant file record. In consultations, you can attach a document in the Attachments section in the same manner. TIP: Consider size of documents you decide to attach as the database size can grow considerably using this functionality. LETTERS EzyPractice allows storing any kind of communication with the client directly in the database: Received letter or e-mail – to be copied and pasted into the text editor Outbound phone call – your notes about a phone call you made to the client Inbound phone call – your notes about a phone call received from the client Sent SMS, Received SMS – text mesage communication with the client. Please note that in the moment the program does not support actual sending SMS. Emails – you can send e-mail directly from EzyPractice, provided your outgoing e-mail server is configured correctly. Please note that when an e-mail is saved, it is not sent immediately. You have to send it manually from the Diary menu clicking on Resend Email button. Status of an email record is displayed in the Diary data grid and looks as follows: icon indicates that an e-mail was created but was not sent icons indicates that an e-mail was sent successfully icon indicates that sending an e-mail failed for some reason Page 25 of 29 EzyPractice User Manual MAIL MERGE EzyPractice text editor has a powerful mail merge functionality that simplifies generating letters to the customers. Mail merge is available for any type of documents, including letters and e-mails. With this functionality, there are number of databound fields populated either from client’s records, or relevant consultation. The list of fields can be found in the ribbon menu, Mailings tab. Please note that you can use the mail merge in two different ways – by creating a new document (letter, e-mail, etc.) from the Client screen, or from Consultations. When the letter is selected from the Consultation tab, there will be additional data available, with consultation data as Chief complaint, prescriptions etc. You can define your custom letters and save them into a Template for reuse at a later time. To insert a prescription summary for our letter, follow existing steps: Press Ctrl+F9 in the document where you wish to insert this mail merge field Type {docvariable "prescription"} as name of the mail merge variable Click Refresh Data to update variable with actual data Save the document as a template for later reuse LETTER TEMPLATES Any document (including e-mails) can be saved as a template for later reuse. The template can be loaded by clicking on the Templates button on the document editor ribbon. Here you can create a new template, save document under existing record, rename template or delete it completely. Please note that the template does not store only document content, but also formatting including page format and size. EzyPractice database contains two sample templates (medical certificate and consultation report) which you can modify for your purposes. INTEGRATION WITH GOOGLE APPS It is possible to integrate EzyPractice into Google Apps and enjoy access to your data even if you do not have EzyPractice available. All you need is to sign in for a free Google account if you don’t already have one and configure your username and password in the Configuration section. CALENDAR REPLICATION When enabled, you can replicate your data with Google Calendar. This is a two-way replication, so you can create or modify your data (appointments) in either system and the records will replicate accordingly. If a record was modified both in Google and EzyPractice since the last replication, the record that was updated last will be kept. Page 26 of 29 EzyPractice User Manual Important: if you replicate your data and then change your Google account, you must reset the replication first, or all local data will be deleted (the program will presume the records were deleted on remote server). The Reset Replication function is available in the Configuration. CONTACTS REPLIATION This is a one-way replication that allows replicating your contact information (both client and contacts) to be available on the remote server. Only contact information such as phone number and e-mail address will be replicated. You can choose to replicate your contacts either into the system “My Contacts” group or into custom EzyPractice groups. Important: Please note that this is a one way replication and all records in the destination area will be deleted. If your Google account already contains existing records you wish to keep, choose to replicate into Contact Groups. DATA REPLICATION When the replication is enabled, you can replicate the data at any time from the main menu. Please note that depending on number of your records, the initial replication can take several minutes. Internet connection is required for successful replication; after that EzyPractice can be used offline. TIP: You can connect your mobile device (such as iPhone or iPad) to your Google Account to have your appointments and client contact data available at all times. SMS MESSAGES It is possible to send messages directly from Ezy Practice – either to contact the client quickly (as an alternative to making a phone call or sending an e-mail), or to remind of an upcoming appointment. To be able to send a SMS, you first need to create an account with a SMS gateway provider. Ezy Practice currently supports Red Oxygen (http://www.redoxygen.com) that allows reasonable pricing models in several different countries including Australia, United States and United Kingdom. To integrate your account into Ezy Practice, go to Configuration, SMS Notifications. Here you select ‘Red Oxygen’ as a provider. Once you enter your AccountID, email address and password, you can start sending SMS from Ezy Practice immediately. Important: to send an SMS message, your computer must have an active Internet connection. TIP: you can nominate any of your email addresses with your account. If your client responds to the SMS, you will receive the response in your mailbox. DATABASE SECURITY When enabled, EzyPractice will detect that the database was moved to another computer and requests that the computer is authorized before it can work with this database. This is important if you want Page 27 of 29 EzyPractice User Manual to make sure that your database is not stolen or transferred to another computer without authorization. To enable this feature, you can do so in Configuration, Database Security section. You will be prompted for a master password that will be required whenever Ezy Practice detects that your database was run on a computer that has not been authorized yet. RELEASE NOTES VERSION 1.1 (FEBRUARY 2013) Saving data grid layout Ability to save custom data grid layout so it will be used by default next time EzyPractice is started. Change order of columns or remove any column completely Change data sort order for any column Change grouping of data by any column Apply custom filter to any column Visibility of some data elements, as the Find Panel or Auto Filter Row. To save current data layout, right-click on the column heading and select Grid Layout and Save Layout. To reset to the default setting, select Reset Layout. Please refer to Data Tables section in this document. Editing Dispensary Items Ability to edit dispensary items, mark them as in stock or to be ordered. Ability to assign multiple potencies to each dispensary item. Ability to export items in stock or those marked for order through built-in functionality of the data grid. Please refer to Dispensary section in this document. Page 28 of 29 EzyPractice User Manual Creating a new database in custom location When creating a new database, there is now an option to create the database file in a custom location. VERSION 1.2 (MAY 2013) Ability to store Contact records – various contacts and reference addresses not directly related to patient records. Integration with Google Apps – please refer this section for more information. VERSION 1.4 (FEBRUARY 2014) In the consultation text section, added ability to toggle highlighting colour for either selected text (Ctrl+Shift+H) or current paragraph (Ctrl+Shift+H). Added Skype field in Client’s record Ability to edit consultation after it’s been locked – by double clicking on the padlock icon in the Edit Consultation form Ability to view current consultation notes in secondary view (right-click in the consultation text are for refresh) Integrated PDF viewer Custom client attributes – assign a custom attribute to a client record and then use it to in a search screen (Ctrl+F in Client View, Previous Consultations and Prescriptions) VERSION 1.5 (MARCH 2014) New functionality: Ability to secured database so it can be opened only on authorized computers (to prevent data theft). Please refer to this section for more information. Ability to configure Health Funds and for simplified health insurance rebates. For more information, please refer to this section. Ability to see upcoming appointments in a simple list. For more information, refer to this section. Ability to send SMS messages directly from Ezy Practice. The messages are sent through an online Internet gateway. For more information, refer to this section. Ability to send SMS reminders to clients to notify them of their upcoming appointments. For more information, refer to this section. Page 29 of 29