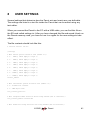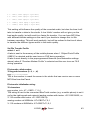
1
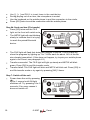
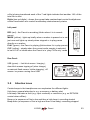
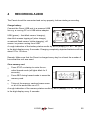
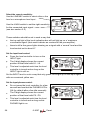
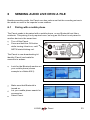
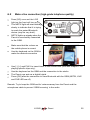
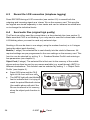
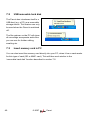
User Manual
You/Com Audiocommunicatie b.v.
Motorenweg 5-k
2623CR Delft (The Netherlands)
tel: +31 15 262 59 55
fax: +31 15 257 15 95
e-mail: [email protected]
URL : www.youcom.nl
Parrot
v1.09 published November 16, 2007
Copyright 2005
No part of this publication may be reproduced and/or made public by means of printing,
photocopying, microfilm or any other way without a prior written permission from
You/Com (www.youcom.nl).
Table of contents
1
2
Quick start....................................................... 7
Introduction ................................................... 11
2.1
2.2
2.3
2.4
2.5
2.6
2.7
3
Operation ...................................................... 19
3.1
3.2
3.3
3.4
3.5
4
5
6
Pushbuttons .......................................................................19
Input sensitivity switches .....................................................20
Level controller ...................................................................21
Visual feedback...................................................................22
Attention tones ...................................................................23
Recording audio.............................................. 25
Organising audio samples ................................ 29
Sending audio live or in a file ........................... 33
6.1
6.2
6.3
6.4
7
Front view ..........................................................................11
Rear view ...........................................................................12
Memory card ......................................................................13
Audio inputs .......................................................................13
Audio outputs .....................................................................14
Bluetooth ...........................................................................15
USB...................................................................................16
Pairing with a mobile phone ..................................................33
Make a live connection (high-grade telephone quality) ..............35
Record the LIVE connection (telephone logging).......................36
Send audio files (original high quality).....................................36
Connect to PC................................................ 39
7.1 USB audio ..........................................................................39
7.2 USB removable hard disk ......................................................40
7.3 Insert memory card in PC .....................................................40
8 User settings .................................................. 41
Annex 1: Analog overview..................................... 46
Annex 2: Software upgrade ................................... 48
Annex 3: Troubleshooting...................................... 50
Annex 4: Specifications......................................... 51
6
© 2007
Parrot
1
QUICK START
Step 1: Connect cables:
Connect the MIC/LINE cable to
the MIC/LINE-input and the
headphones cable to the
PHONES-connector on the rear.
Choose either the LINE or MIC
input with the LINE/MIC switch.
Select sensitivity with the H/M/L
switch (see below).
Step 2: Insert a memory card:
Insert a Secure Digital (SD) card
into the memory-slot on the left
hand side of the unit with the
card’s topside facing away from
the belt-clip.
Switch ON the unit by pressing
for 1 second until the ON light
lights up. Green means there is
power in the battery.
The MEM light should not light up. This means that there is enough memory left
for a first recording.
Step 3: Adjust input level:
Press the level-controller on the
front briefly to light up [INPUT].
Talk into the microphone with a
level you think you will use.
Turn the level-control (while
[INPUT] is still lit) until your voice
makes the level-meter run into
yellow occasionally.
© 2005
Parrot
7
The top light of the level-meter is
a red overload indication. This
can light up even when level
seems to be in the green or
yellow region.
! This overload indication must never
light up. If so, set the L, H or M
switch to a lower sensitivity or even
to LINE and then re-adjust the inputlevel on the front.
Step 4: Adjust headphones level:
Wait until the PHONES light is
on.
Talk into the microphone with a
level you think you will use.
Turn the level-control until you
have a comfortable level on your
headphones.
Step 5: Start Recording:
Press (and hold briefly) the [REC]
button on the side panel to start
recording.
The red REC light on both the
side panel and on the front will
switch on and you will get a
‘beep-up’ on your headphones.
(Place Markers):
During recording (or playback later on) markers can be set by pressing [MARK]
on the side panel. The MARK light will light up briefly indicating it has been set.
8
© 2007
Parrot
Stop recording:
Press (and hold briefly) the
[STOP] button on the side panel
for at least 1 second to stop
recording.
The red REC light on both the
side panel and on the front will
switch off and you will get a
‘beep-down’ on your
headphones.
Play last item:
Press [PLAY] right after recording to play-back this last item.
The green PLAY light on both the side panel and on the front will switch on.
Step 6a: Live contribution including playback of item
(First make sure your Parrot has been
paired once. See paragraph 6.1 for
pairing with a mobile phone)
Press [GO] once and the LIVE
light on the front will switch on.
The NETW light will start blinking
slowly to indicate that it is trying
to reach the paired Bluetooth
device (may be very brief).
NETW lights up steady when the Parrot is successfully connected to the mobile
phone (see paragraph 6.1 for pairing with a mobile phone).
Use the keyboard on the mobile phone to make the desired connection (make
sure level on mobile phone is set right)
Hold down the level-controller until RETURN lights up and adjust the mix
between the local signal (low side of the bar) and the return signal (high side of
the bar). RETURN will normally be somewhere in the middle.
© 2005
Parrot
9
Use [-], [+ ] and PLAY to insert items in the contribution.
During playing out of an item, the microphone is muted
Use the keyboard on the mobile phone to end the connection to the studio.
Press [GO] twice to end the connection with the mobile phone.
Step 6b: Send one item (File transfer)
Press [GO] twice and the FILE
light on the front will switch on.
The NETW light will start blinking
slowly to indicate that it is trying
to reach the paired Bluetooth
device.
The FILE light will flash fast during the transfer of the file. The LED-bar will
show the progress by lighting up 1 to 7 LEDs each for about 14% of the file
size already transmitted. (if this does not happen, try to pair your mobile phone
again to the Parrot; see paragraph 6.1)
Transfer successful: The FILE light will light up steady and NETW will blink
green. Press [GO] to end file transfer mode.
Transfer failed: The FILE light will blink and NETW will blink red. Press [GO] to
end file-transfer-mode or try again by pressing [GO] 3 times.
Step 7: Switch off the unit
Power down the unit by pressing
for 1 second until ON light
switches off. Try pressing it for 5
seconds, if for some reason it
does not switch off.
10
© 2007
Parrot
2
INTRODUCTION
The Parrot is designed to make quick and simple audio recordings using professional
microphones/line inputs and headphones. Once the recordings are made, you can
select the interesting audio samples and send them out to either a notebook for
further editing, as a file transfer directly into the studio, or live on the air using a
mobile network.
2.1
Front view
6
7
8
9
5
4
3
2
1
1 - Level controller for input level, phones volume and send/return mix
2 - Level indicator for input level, level of stored audio during playback
3 - Indication for the current function of the level-controller
4 - Progress and function indication for the [GO] button
5 - [GO] button to initiate a live audio connection or a file transfer
6 - [On/Off] button to sw itch the unit on (press button until ON LED is lit) or
switch it off (press button until ON LED is off), pushing this button for more
then 5 seconds is a failsafe OFF function in case the unit is stuck.
7 - Indication for the ON/OFF status and battery-power-left alerts
8 – 2-digit display shows takenr., battery/memory status and level settings
9 - Indications for PLAY/RECORD status and memory-left alerts
© 2005
Parrot
11
2.2
Rear view
1
2
5
3
4
6
7
1 - unbalanced line output
2 - headphones output
3 - input sensitivity switches
4 - balanced line/microphone input
5 - Bluetooth antenna
6 - battery charge indication
7 - USB connector (also used for battery charge power)
12
© 2007
Parrot
2.3
Memory card
Any Secure Digital memory card can be used for the Parrot to store the audio on.
We have tested Sandisk and Dane-Elec up to 512 MByte. The card can only be
inserted one way which is with the slanted side inwards and the bottom side
pointed towards the belt-clip of the Parrot.
2.4
Audio inputs
Microphone- or line-input
The Parrot has one input for balanced
microphone- or line-level audio on a
female XLR connector on the rear of
the unit.
LINE or MIC input is selected with a
slide switch on the rear.
The sensitivity of this input is set w ith a second slide sw itch: H/M/L for highmedium- or low-sensitivity (e.g. a weak incoming signal needs a high sensitivity, see
also Annex 4: Specifications). The level-indication on the LED-bar should show only
green or yellow lights on the audio you want to use, with the level-control set to
about 70% (L7, see section 3.3). Select a lower sensitivity or lower level-control
when the red LED lights up even briefly.
© 2005
Parrot
13
2.5
Audio outputs
Headphone output
The 6.3mm jack socket on the rear
connects to 8-32ohms headphones to
give highest power output. Higher
impedance headphones can also be
connected, but may result in a lower
signal level.
Line output
The rear panel also holds a cinch
socket (a.k.a. RCA or PHONO jack) to
connect to an unbalanced line input.
14
© 2007
Parrot
2.6
Bluetooth
Bluetooth is a wireless interface and there is therefore no physical connector. This
interface connects to another BT device like a mobile telephone. Depending on
whether LIVE or FILE is selected with the [GO] key, the Parrot can be either a
‘modem’ or a ‘headphone’ to this mobile phone.
Bluetooth used as a headset (LIVE)
Audio coming in from in this case the mobile phone can be heard in the headphones.
The mix of your own input signal and this return-audio is made with the RETURN
level adjust (see section 3.3). The signal from the MIC/LINE input or a played out
recording on the Parrot is sent towards the mobile phone. The level of this signal is
adjusted by the sensitivity switches described in section 3.2) and by the level
control (see section 3.3) on the Parrot. This function is also called “digital hybrid”.
Both the incoming and outgoing signal can be stored separately in a ‘stereo’
recording when RECORD is pressed during a LIVE connection. This function is also
called “telephone logging”.
Some mobile phones have an extra
volume control for the Bluetooth
headset. Make sure that this is set to a
comfortable level (see the manual of the
mobile phone).
See chapter 6 for pairing with another
Bluetooth device and making such a LIVE
connection.
© 2005
Parrot
15
Bluetooth used as a modem (FILE)
Most mobile phones that have Bluetooth, also have modem functionality (see the
manual of your mobile phone). This could for instance be used to read your email
with your laptop through this Bluetooth modem. The Parrot can use this function to
set up a data link to a server in the studio and store the audio-files there to be used
for further editing or broadcasting. The parameter “file_transfer_profile” in the usersettings-file (see chapter 8) should be set to “ 0 -> Zmodem Modem”. The file will
only be sent to the local mobile phone, in case this parameter is set to “1 -> Object
Push Profile (OBEX)” and can then be forwarded to the studio by email (e.g. through
a 3G network like UMTS). See chapter 6 for pairing with another Bluetooth device
and making such FILE connections.
2.7
USB
The Parrot introduces itself as both
an external audio-card and a file
storage device, when the mini-USB is
connected to a USB-host (e.g. a PC).
! The Parrot will activate the audio
function when the Parrot is switched
ON.
! The Parrot will activate the storage
function when the Parrot is switched
OFF.
16
© 2007
Parrot
USB audio
The Parrot’s headphones are an extra output and the MIC or LINE input is an extra
audio input for the PC (when the Parrot is switched ON). So while editing some
audio on a notebook, the result can be monitored on your own professional
headphones. The mix of your own input signal and this return-audio is made with
the RETURN level adjuster (see section 3.3). The extra professional input can be
used to make good quality recordings on the PC.
USB mass storage device
The memory card inside the Parrot will act like a removable hard disk on the PC
(when the Parrot is switched off). The audio files with their markers can now be
used directly by any program. This also enables you to edit the settings inside the
.ini file (see chapter 8). Taking out the SD card and putting it in the PC’s card reader
has the same effect.
USB battery charging
The internal batteries are charged when the Parrot is connected to another USB
device that is capable of giving out enough current on the USB-power (up to
500mA, like any standard PC or mains adapter with such a connector). The Parrot
will limit the power used for charging, to prevent damaging the other USB-device.
Therefore charging the batteries will go faster when no power is needed to feed the
Parrot itself and so it is better to switch off the Parrot for battery charging. The
green LED indicates the charging status: fast-blink means ‘charging’, slow-blink
means topping-of (slow charge), occasional flash means ‘trickle-charging’, off
means ‘no power coming from USB’
© 2005
Parrot
17
18
© 2007
Parrot
3
OPERATION
The user interface consists of a few pushbuttons on the front and side panel,
sensitivity select switches on the rear, visual feedback with lights on 3 sides and
attention tones on the headphones.
3.1
Pushbuttons
Each single pushbutton has one main function.
ON/OFF [
GO [
]:
Switch on or off.
Go through the steps LIVE, FILE or
offline (see chapter 6) .
]*:
REC*:
Start recording. A latency may be set on this key (see
section ???). In that case press this key until you hear the
beep-up and see the REC light turn on.
MARK*:
Set a marker during a recording or playback. It can also
remove an existing marker when in stop- or play-pausemode and positioned on that marker (MARK light is on).
STOP*:
Stop recording or playback.
PLAY:
Start playing or go to play-pause when already playing.
REV [-]:
(pull towards -) Step to the previous marker when pressed
shortly or play fast in reversed order when pressed longer.
FWD [+]: (pull towards +) Step to the next marker when pressed
shortly or play fast forward order when pressed longer.
CLIP*:
(press in the middle) Select or de-select a sample of audio
in between two markers. If this button is pressed longer it
will make the unit go in or out of CLIP-mode (see section
5).
*) Some buttons may have additional functions:
© 2005
Parrot
19
Press STOP on startup to enter the so-called hazard-mode (all lights blink for 2
seconds). Press REC during hazard-mode to erase the memory card. Press MARK
during hazard-mode to erase all user-set markers, unselect all clips and return to
only ‘ start of new recording’ markers.
Press and hold GO on startup to enter the BlueTooth pairing-mode. The red NETW
light blinks until unit is paired or switched off (see also section 6.1).
3.2
Input sensitivity switches
The analog input can be selected to take in either a line level or a microphone level
signal. The selected input can furthermore be set to three levels of sensitivity.
Select line- or microphone-level
Use the LINE/MIC switch to select a
line level or a microphone level input
(see also Annex 4: Specifications)
Select low-, medium- or highsensitivity
Use the LINE/MIC switch to select
the right sensitivity. These switches
should be set in such a way that
while the level-control is set to about
70% (L7, see section 3.3):
the top red light of the level-indication-bar will not light up on a ‘maximum
conceivable signal’ (that would indicate an overload of the pre-amplifier).
there is still a few green lights showing on a signal with a ‘normal’ level and the
level-control set to about 6 red lights.
20
© 2007
Parrot
3.3
Level controller
Three settings can be adjusted with the use of the level controller, the 2-digit
display and the INPUT/PHONES/RETURN lights:
fine tune the microphone or line input (set by the sensitivity switches)
set the headphones volume
set the mix between the local and remote signals (in case of a LIVE or a USB
connection) towards the headphones
PHONES will light up by default
to adjust the phones level. The
Parrot will always return to
PHONES after a short idle time.
Press the level controller briefly
to turn on the INPUT light and
adjust MIC/LINE input-level.
Press and hold the level controller until RETURN lights up to change the mix
between the local signal (low side of the bar) and the return signal (high side of
the bar). RETURN will normally be somewhere in the middle.
PHONES will turn on again when the level-controller is not used for about 5
seconds.
© 2005
Parrot
21
3.4
Visual feedback
The user can get the following visual feedback from the Parrot on its’ status or a
function that needs attention:
Front panel:
INPUT (yellow) - the level-controller can be
used to alter the input level
PHONES (yellow) - the level-controller can
be used to alter the headphones output level
RETURN (yellow) - the level-controller can
be used to alter the mix between the local
signal (microphone- or line-input) and the
remote signal coming in from either USB or
BlueTooth
PLAY (green) - the Parrot is playing (blinks when it is in play-pause)
REC (red) - the Parrot is recording (blinks when it is in record-pause)
MEM (red) - memory card is getting full (1 flash every 30 seconds at 20 minutes, 2
flashes every 20 seconds at 10 minutes and 1 flash every second at 1 minute
before the memory card is full)
NETW (green/red) - slow-blink red means ‘about to enter pairing mode’ or
‘ filetransfer failed’, fast-blink red means ‘now in pairing mode’, slow-blink green
means ‘filetransfer completed’, fast-blink green means ‘trying to connect’, steady
green means ‘connected’
LIVE (yellow) - Parrot now in LIVE mode i.e. sending and receiving audio to and
from BlueTooth
FILE (yellow) - fast-blink means ‘now transferring file’, steady means ‘transfer not
yet begun’ or ‘ transfer ended’ depending on NETW status
ON (green/red) - green means ‘unit is switched on’, red means battery almost
depleted (1 red flash every 3 seconds at 60 minutes before batteries are empty)
LED-bar (green/red/yellow) - when level-indication is active a sequence of 4 green, 2
yellow and 1 red light show the input-level (or recorded level during playback); when
22
© 2007
Parrot
a file is being transferred each of the 7 red lights indicate that another 14% of the
total file is sent.
Digits (two red digits) - shows the current take number/input control level/phones
control level/return mix control level/battery status/memory status
Left panel:
REC (red) - the Parrot is recording (blinks when it is in recordpause)
MARK (yellow) - lights up briefly when a marker is passed or is set
just now and lights up steady when stopped or in play-pause
directly on a marker
PLAY (green) - the Parrot is playing (blinks when it’s in play-pause)
CLIP (yellow) - steady when the current audio sample is selected
to be a CLIP or blinks when the Parrot is in ‘play CLIPs only’ mode
Rear Panel:
USB (green) – fast-blink means ‘ charging’ ,
slow-blink means topping-of (slow charge),
occasional flash means ‘trickle-charging’, off
means ‘no power coming from USB’
3.5
Attention tones
Certain beeps in the headphones can emphasise the different lights:
High-beep: general attention to e.g. a memory or battery alert
Low-beep: indicates a fault (e.g. input overload) or restriction (e.g. no RETURN
control when offline)
Beep-up (a sequence of first a low and then a high beep): recording started
Beep-down (a sequence of first a high and then a low beep): recording stopped
© 2005
Parrot
23
24
© 2007
Parrot
4
RECORDING AUDIO
The Parrot should be connected and set up properly, before starting a recording.
Charge battery:
Connect the Parrot USB port to a powered USB
line e.g. a running PC or a USB mains adapter.
USB (green) – fast-blink means ‘charging’,
slow-blink means topping-of (slow charge),
occasional flash means ‘trickle-charging’, off
means ‘no power coming from USB’
A rough indication of the battery status scrolls by as b0 (empty), b1, b2… b9 (full)
in the digit-display every 5 seconds. Charging completely depleted batteries will take
about 10 to 12 hours.
Remark: Make sure that the Parrot is charged every day for at least the number of
hours that the unit was used.
Clear memory card:
Press STOP on startup to enter the socalled hazard-mode (all lights blink for 2
seconds).
Press REC during hazard-mode to erase the
memory card.
or…
Take out the memory card and erase some
or all of the audio-files on a PC.
A rough indication of the memory status scrolls by as c0 (empty), c1, c2…c9 (full)
in the digit-display every 5 seconds.
© 2005
Parrot
25
Select the correct sensitivity:
Use the LINE/MIC switch to select either a line
level or a microphone level input .
Use the L/M/H switch to set the right sensitivity
for the connected input signal.
(see also section 3.2)
These switches should be set in such a way that:
the top red light of the level-indication-bar will not light up on a ‘maximum
conceivable signal’ (that would indicate an overload of the pre-amplifier).
there is still a few green lights showing on a signal with a ‘normal’ level and the
level-control set to about L7.
Set the input level-control:
Press the level controller to turn on the
INPUT light.
The 2-digit display shows the current
position of that level with L0…L9
This level is adjusted each time the level
controller is turned and as long as the
INPUT light is still on.
Set the INPUT-level in such a way that only green LEDs light up on the input signal
with an occasional yellow one.
Set the input phones-control:
Do not press the level controller for a few
seconds and see that the PHONES LED is
ON (by default after a few idle seconds).
The 2-digit display shows the current
position of that level with P0...P9.
This level is adjusted each time the level
controller is turned and as long as this
PHONES light is on.
26
© 2007
Parrot
Adjust the level-controller until the level on your headphones is right for the
circumstances.
Start recording:
Press (and hold briefly) REC to start
recording
Both the red REC light on the front panel as
the one on the left panel turn on and you
hear a beep-up in the headphones.
Press MARK to highlight a certain point in
the recording for later use
Press REC again to pause the recording.
This way the audio-file on the card is not
yet closed and the ‘resume-recording’
(press REC again) takes place immediately.
Press and hold STOP to end this recording which also closes the audio file that has
just been generated on the memory card (this may take a few seconds). An
automatic marker on the start, pause and end of the recording will help in browsing
through the various recordings on the card.
The take number (1..99) is shown in the digit-display.
© 2005
Parrot
27
28
© 2007
Parrot
5
ORGANISING AUDIO SAMPLES
The simplest way to get an item in the studio is to
A) make a recording and
B) press GO to play out the audio LIVE or send it as a FILE.
However, if the item is more complicated or too long to send out right away, it can
be chopped up in smaller pieces. Only specific parts of the audio can then be sent
out.
Browse through the audio
Locate the desired audio samples by browsing through the audio while listening with
the headphones:
Press PLAY to hear the latest recording.
Press [-] or [+] to skip to the next or previous marker.
Press and hold [-] or [+] to fast forward or fast rewind the audio.
Set a marker
Place a marker on the starting point (head) of the desired audio sample by pressing
MARK while playing or first press PLAY(-pause) and then press MARK. Do the same
for the end marker (tail).
Delete a marker
The best way to position the unit on an unwanted marker is to find the general
location first by ear and then press PLAY(-pause). Now use [-] or [+] to step
directly on this marker (MARK will light up). Press MARK to delete this marker
(MARK turns off).
Delete all markers
The Parrot goes to so-called ‘hazard-mode’ when it is turned on with the STOP
button pressed (all LEDs are flashing). All user-placed-markers (and clips) are
removed when you now press MARK!!
© 2005
Parrot
29
Select clips
Press CLIP briefly within a desired audio sample or at the starting-marker of that
sample when the various head- and tail-markers are set (or use the automatically
placed start-of-take markers). The CLIP light now turns on every time the unit is
inside such a selected clip. Selecting or deselecting clips can only be done when in
PLAY or PLAY-PAUSE mode.
The examples below have a line that
starts halfw ay take1, than all the w ay
through take2 and ends halfway take3.
They show two fixed ‘start’-markers ( )
and two user-placed-markers ( ).
Example 1:
Action: Clip-button (+/- slide button
pressed down in centre) is pressed
during PLAY in between the two userplaced markers
Result: A clip is selected from the
previous to the next user-placed-marker.
Example 2:
Action: PLAY-button is pressed during
PLAY to go to PLAY-PAUSE in between
the two user-placed markers and then
the CLIP-button is pressed
Result: A clip is selected from the
previous to the next user-placed-marker.
30
© 2007
Parrot
Example 3:
Action: PLAY is pressed during PLAY to
go to PLAY-PAUSE in between the two
user-placed markers. A third marker is
placed by pressing MARK and then CLIP
is pressed
Result: A clip is selected from this new
user-placed-marker to the next userplaced-marker.
If the placed marker in example 3 was intended to be a ‘tail-marker’, then the clip
should be selected as described in example 4.
Example 4:
Action: PLAY is pressed during PLAY to
go to PLAY-PAUSE in between the two
user-placed markers. A third marker is
placed by pressing MARK. The slide
switch is pressed towards ‘-‘ to go to the
previous marker and then CLIP is
pressed.
Result: A clip is selected from the
previous user-placed-marker to this new
user-placed-marker.
Deselect clips
You can deselect a clip the same way that you select one. Go to PLAY or PLAYPAUSE, step to the right position (within a clip or at the head-marker of that clip)
and press the CLIP-button briefly. The CLIP LED turns off during PLAY or PLAYPAUSE.
Play out selected CLIPs only
Press and hold the CLIP-button until the CLIP light starts blinking. Only the samples
that were selected to be a clip can now be played out with PLAY. They will also be
© 2005
Parrot
31
played out to the studio when LIVE is activated. The 2-digit display shows a number
for each clip as they are ordered on the memory card (e.g. a first clip selected from
take 1 is called 1 and the next 2 clips from take4 are called 2 and 3, etc.). The
blinking CLIP LED shows the difference between normal mode and clips-only mode.
Press and hold the CLIP-button to switch off CLIP-mode and return to normal
operation (CLIP light stops blinking).
Send selected CLIPs as files
Press and hold the CLIP-button until the CLIP light starts blinking. Only the samples
that were selected to be a clip will be sent as a file when FILE is selected. The 2digit display shows a number for each clip as they are ordered on the memory card
(e.g. a first clip selected from take 2 is called 1 and the next 2 clips from take4 are
called 2 and 3, etc.).
Go to the CLIP you wish to send with PLAY and/or [+]/[-] and press GO twice
to activate the FILE function.
The Parrot will connect to the phone that it was already paired with (see
section 6.1) and start sending the file.
A blinking green NETW LED together w ith a full red LED bar indicates a
successful transfer of the clip shown in the display. Press GO at this point to
acknowledge.
Proceed to the next CLIP you wish to send.
Press and hold the CLIP-button to switch off CLIP-mode and return to normal
operation (CLIP light stops blinking).
32
© 2007
Parrot
6
SENDING AUDIO LIVE OR IN A FILE
Besides recording audio, the Parrot can also make sure that the recording arrives in
the studio or even in the reporter’s own mailbox.
6.1
Pairing with a mobile phone
The Parrot needs to be paired with a mobile phone, or any Bluetooth host like a
notebook. This pairing is only required once, as long as the Parrot is not paired to
another device in the mean time.
Turn off the Parrot.
Press and hold the GO button
while turning it back on, until
NETW starts blinking red.
The Parrot is now broadcasting its’
identity (Parrot) and waits for
someone to answer.
Look for the Bluetooth section on
your mobile phone (shown
example is a Nokia 6021)
Make sure that Bluetooth is
turned on.
Let your mobile phone search for
accessories.
Select Parrot.
© 2005
Parrot
33
Enter 0000 when the Parrot asks
for a passcode
The mobile phone may ask for a
short name for future
presentation of this device (enter
any)
The NETW still blinks red until
the two devices are also actually
connected.
Some mobile phones (like this
Nokia 6021) will automatically
connect after pairing
Connect this accessory (the
Parrot) manually, when the
mobile phone does not do that
automatically. Press Go to end
pairing manually, when this
option does not exist in your
phone.
NETW will light up green
indicating a successful
connection. Press and hold GO to
bring the Parrot back to normal
mode and to switch off batterypower to the internal Bluetooth
module.
From now on these two devices are paired, even after shut-down or when your
mobile phone has been using e.g. your Bluetooth carkit in the mean time. Pairing is
only lost when the Parrot itself is used together with an other Bluetooth device.
34
© 2007
Parrot
6.2
Make a live connection (high-grade telephone quality)
Press [GO] once and the LIVE
light on the front will turn on.
The NETW light will start blinking
slowly to indicate that it is trying
to reach the paired Bluetooth
device (may be very brief).
NETW lights up steady when the
Parrot is successfully connected
to the GSM.
Make sure that the volume on
the mobile phone is correct
Use the keyboard on the GSM to
make the desired connection
Use [-], [+] and PLAY to insert items in the contribution (see also chapter 5 for
playing specific clips only).
Use the keyboard on the GSM end the connection to the studio.
The Parrot now acts as a digital hybrid.
Press [GO] after the connection to clear Bluetooth with the GSM (NETW, LIVE
and FILE LED are off).
Remark: Try to keep the GSM and its’ antenna away from the Parrot and the
microphone cable to prevent ‘GSM humming’ in the audio.
© 2005
Parrot
35
6.3
Record the LIVE connection (telephone logging)
Press RECORD during a LIVE connection (see section 6.2) to record both the
outgoing and incoming signal as a ‘stereo’ file on the memory card. This way the
two signals are stored separately in two tracks and can for instance be edited later
on to change the individual levels.
6.4
Send audio files (original high quality)
The Parrot can either send the current take or a few selected clips (see section 5).
Make sure that CLIP is not blinking if you only want to send the current take or that
it IS blinking when you want to send only selected clips.
Sending a file can be done in one stage (using the modem function) or in 2 stages
(using the object push function):
Modem (1 stage): the selected file is sent directly into the studio’s fileserver. All
required settings are pre-programmed in the user settings on the memory card. This
function can be selected by setting ‘ 0 -> Zmodem Modem Profile’ and entering a
few parameters (see chapter 8).
Object Push (2 stage): The selected file is first sent to the memory of the mobile
phone and can then be sent by any means available (e.g. email through UMTS) to
different destinations. This function can be selected by setting ‘1 -> Object Push
Profile’ (see chapter 8).
Press [GO] twice and the FILE
light on the front will turn on.
The NETW light will start blinking
fast to indicate that it is trying to
reach the paired Bluetooth device
(the mobile phone will ask if the
file can be stored in its’ memory,
when the object push function is
used)
36
© 2007
Parrot
The FILE light will then blink during the transfer of the file (to a pre-programmed
location). The LED-bar will show the progress by lighting up 1 to 7 LEDs each
for about 14% of the file size already transmitted.
Transfer successful: The FILE light will light up steady and NETW will blink
green slowly.
Transfer failed: The FILE light will blink and NETW will blink red slowly.
Press the GO button one more time to confirm that you have seen either this
green or red blinking LED.
Check your uploaded files on parrot.youcom.nl, when the modem function is used
with the test numbers that are listed in the chapter 8.
© 2005
Parrot
37
38
© 2007
Parrot
7
CONNECT TO PC
The mini-USB connector on the rear panel not only provides pow er to the internal
battery charger, but is indeed also a digital interface to a PC providing both an
external audio device (when Parrot is switched on) and a mass storage device
(when Parrot is switched off).
7.1
USB audio
The Parrot introduces itself to a USBhost (e.g. a PC) as an external audiocard and can be used as such when
the Parrot is switched on.
The PC can be seen as an audio input towards the headphones on the Parrot, with
this audio-card functionality. So while editing some audio on a notebook, the result
can be monitored on your own professional headphones. The mix of your own input
signal and that returned from the PC is made with the MIX level adjuster (see
section3.3).
The signals generated on the Parrot (i.e. mic/line input and playback) are sent
towards the PC so that it can for instance be used to insert into the item you
creating with an audio editing program.
© 2005
Parrot
39
7.2
USB removable hard disk
The Parrot also introduces itself to a
USB-host (e.g. a PC) as a removable
storage device. This feature can only
be used when the Parrot is switched
off.
The file explorer on the PC will show
all recordings as separate audio-files
you can use for further editing,
emailing etc.
7.3
Insert memory card in PC
You can also insert the memory card directly into your PC, when it has a card reader
for this type of card (SD or MMC card). This will then work similar to the
‘removable hard disk’ function described in section 7.2.
40
© 2007
Parrot
8
USER SETTINGS
Several settings that determine how the Parrot acts and reacts are user definable.
The settings are listed in a text file inside the Parrot that can be edited using any
text editor.
When you connect the Parrot to the PC with a USB cable, you can find this file on
the SD card called settings.ini. After you have changed this file and saved it back on
the Parrots memory card, you have to turn it on again for the new settings to take
effect.
The file contents should look like this:
# Software version: 295.003
[settings]
# What bitrate profile should be used (number 0-7):
# 0 =
48Kb/s, 24kHz (Mpeg 2.0 Layer 3)
# 1 =
48Kb/s, 48kHz (Mpeg 1.0 Layer 3)
# 2 =
64Kb/s, 44kHz (Mpeg 1.0 Layer 3)
# 3 =
64Kb/s, 48kHz (Mpeg 1.0 Layer 3)
# 4 =
96Kb/s, 44kHz (Mpeg 1.0 Layer 3)
# 5 =
96Kb/s, 48kHz (Mpeg 1.0 Layer 3)
# 6 = 128Kb/s, 44kHz (Mpeg 1.0 Layer 3)
# 7 = 128Kb/s, 48kHz (Mpeg 1.0 Layer 3)
bitrate_index=3
# What filetransfer profile should be used (number 0-1):
# 0 = Z-modem file transfer
# 1 = OBEX Object Push
file_transfer_profile=0
# What telephone-number should be dialed using Z-modem (max 32 characters):
file_transfer_number=+31152510414
# What modem init-string should be sent using Z-modem (max 64 characters):
© 2005
Parrot
41
modem_init=AT+CBST=71,0,1
# What prefix should be added to the filename, when a file is sent
# using filetransfer (max 32 characters, including a space at the end):
file_prefix=Test Parrot
# What description should be added to recordings (max 256 characters):
bwf_description=
# What is the name of the originator (max 32 characters):
bwf_originator=
# What is the reference of the originator (max 32 characters):
bwf_orig_reference=
# Time and date:
# Time is in 24h format HH:MM:SS
# Date is in DD-MM-YY format
# (remove these lines completely if you don't want to modify this setting!)
time=unchanged
date=unchanged
#----end of file----#
The following settings are user definable:
Recorder settings:
select 0..7
e.g. bitrate_index= 3
This number represents a set of parameters for the mp3 encoder to use for the
recordings:
# What bitrate profile should be used (number 0-7):
# 0 = 48Kb/s, 24kHz (Mpeg2.0 Layer3 Mono)
# 1 = 48Kb/s, 48kHz (Mpeg1.0 Layer3 Mono)
# 2 = 64Kb/s, 44kHz (Mpeg1.0 Layer3 Mono)
42
© 2007
Parrot
# 3 = 64Kb/s, 48kHz (Mpeg1.0 Layer3 Mono)
# 4 = 96Kb/s, 44kHz (Mpeg1.0 Layer3 Mono)
# 5 = 96Kb/s, 48kHz (Mpeg1.0 Layer3 Mono)
# 6 = 128Kb/s, 44kHz (Mpeg1.0 Layer3 Mono)
# 7 = 128Kb/s, 48kHz (Mpeg1.0 Layer3 Mono)
This setting will influence the quality of the recorded audio, but also the time it will
take to transfer a take to the studio. A low ‘kbit/s’ number will not give you the
best audio quality, but will result in a faster file transfer. You can have MP3 files
with different bitrate-settings on the card if you decide to change this .ini file
between recording. This will work perfectly, but will be noticed in the time it takes
to transfer the different types and/or in the audio quality.
Set File Transfer Profile:
select: 1 or 0
A take is sent to the memory of the mobile phones when 1 “Object Push Profile
(OBEX)” is selected and the user turns on FILE during operation.
A take is sent directly to the preprogrammed fileserver (see filetransfer settings
above) when 0 “Zmodem Modem Profile” is selected and the user turns on FILE
during operation.
File transfer called number:
32 keypad characters (0..9, + , #)
e.g. ftn=+31151234567
This is the number to reach the server in the studio that can receive one or more
MP3 files from the Parrot.
File transfer initialization string:
32 characters
e.g. modem_init= AT+ CBST= 71,0,1
This string is sent to the connected BlueTooth modem (e.g. a mobile phone) to set it
up for the right speed and network (analog modem with testnr +31152510005, or
V.110 modem with testnr +31152510414):
analog modem at 9600bit/s: AT+CBST=7,0,1
V.110 modem at 9600bit/s: AT+CBST=71,0,1
© 2005
Parrot
43
V.110 modem at 19200bit/s: AT+CBST=79,0,1+CHSN=3,0,0,4
V.110 modem at 28800bit/s: AT+CBST=80,0,1+CHSN=4,0,0,4
File transfer prefix:
32 characters
e.g. pre=Parrot take
This is a string of characters that will form the file-name on the server in the studio
together w ith the take name on the memory card. E.g. “ Parrot take” + “ 1.mp3” w ill
result in a filename “Parrot take1.mp3” after the file transfer.
BWF information fields:
BWF description: 256 characters
BWF originator: 32 characters
BWF originator reference: 32 characters
These fields allow you to send along extra information in the header of each audio
file (also entered in the recordings on the SD card).
Set Time and Date:
time: HH:MM:SS (24 hour clock)
date: DD-MM-YY
e.g. time=10:37:00
e.g. date=04-11-05
The Parrot evaluates these values. They will be ignored when these exact values
have already been set the last time, otherwise they will be set in the Real Time
Clock in the Parrot on the moment that the Parrot reboots with this .ini file on its’
memorycard. This way you will only need to set the time and date once and not
each time you edit the .ini file. The Parrots’ internal clock will continue until the
batteries are taken out for more then 2 minutes or that it is not charged for a long
period.
44
© 2007
Parrot
© 2005
Parrot
45
ANNEX 1: ANALOG OVERVIEW
The following drawing gives an indication of all audio paths, inputs, outputs and
controls:
46
© 2007
Parrot
© 2005
Parrot
47
ANNEX 2: SOFTWARE UPGRADE
To upgrade the Parrot with a newer software version, simply put the update.dat file
on the memory card and insert it in the Parrot.
When the Parrot recognizes the upgrade to be valid, it will show the upgradeprogress as 1 to 7 LEDs in the LED-bar. It will then reboot and the Parrot is ready
for use again.
48
© 2007
Parrot
© 2005
Parrot
49
ANNEX 3: TROUBLESHOOTING
Problem: Parrot no longer reacts to any pushbutton.
Possible solutions: Press and hold the ON button until the Parrot reboots/ Connect
Parrot to USB power/ Take out SD-card and reboot
Problem: The SD-card is available on the PC, but only for about 2 minutes.
Possible solutions: The Parrot has an old bootloader version which needs to be
upgraded by You/Com in Delft
Problem: Parrot does not pair Bluetooth with a mobile phone
Possible solutions: The Parrot may have already found a phone that it was paired
with once before; try switching off all phones, set Parrot in pairing mode (NETW
should start blinking slow and then fast) and then switch on the phone you wish to
pair.
50
© 2007
Parrot
ANNEX 4: SPECIFICATIONS
Input
Pin Description
1
Shielding
2
Analog signal +
3
Analog signal -
Format
Symmetrical
Connector
3-pin female XLR socket
Maximum input level:
MIC L/M/H
LINE L/M/H
(upto red LED, level-control at 100%)
-33.5 dBu/-44 dBu/-54 dBu
Input stage sensitivity adjustment
6 steps
Input impedance
2 kOhm (MIC) or 200 kOhm (LINE)
Signal-to-noise ratio
MIC: 70 dB, LINE: 75 dB
+9.0 dBu/-1.5 dBu/-11.2 dBu
Phones Output
Pin
Description
tip
Analog signal +
ring
Analog signal +
sleeve
Analog ground
e
ev
sleg
rin
tip
Phones connector
6.3 mm jack socket
Maximum phones output level
2x200 mW (at 2x 32 Ohms)
Phones output impedance
=
© 2005
16
Parrot
51
Line output
Pin
Description
tip
Analog signal +
sleeve
Analog ground
Connector type
Female RCA (Cinch) asymmetrical
Nominal level
2 Vtt (1 kOhm)
General
Batteries
4xAA 2700mAh NiMH battery pack
Battery life
10 hrs typical
Charging time (unit off)
10 hrs typical
Dimensions
110x85x35 mm
Weight
360 g (incl. batteries)
52
© 2007
Parrot
INDEX
3G network, 16
analog overview , 46
antenna, 12
attention feedback, 22
attention tones, 23
audio
input, 13
output, 14
paths, 46
balanced, 12; 13
battery
charge indication, 12
charging, 25
status, 25
beep-down, 9; 23
beep-up, 8; 23
belt-clip, 13
Bluetooth
headset, 15
LIVE, 15
modem, 16
BlueTooth, 12
cables, 7
charging battery, 25
clear memory card, 25
clip, 23; 30
button, 19
unselect all, 20
date, 44
erase all markers, 20
erase memory card, 20
fast
forward, 29
rewind, 29
FILE, 22; 37
file transfer, 10
called number, 43
initialization string, 43
prefix, 44
front panel, 22
front view, 11
fwd button, 19
GO, 35
go button, 11; 19
hazard-mode, 20; 25
headphones, 14
level, 8
output, 12
to mobile phone, 15
input, 12; 13
audio, 13
level, 7; 26
line, 13
microphone, 13
sensitivity switches, 12; 20
introduction, 11
LED-bar, 22
left panel, 23
level
controller, 7; 11; 21
indication, 11; 22
LEVEL, 22
line
input, 13
level, 20; 26
output, 12; 14
© 2005
Parrot
53
line/microphone input, 12
LIVE, 15; 22
recording, 15
live connection, 35
live contribution, 9
MARK, 23; 29
mark button, 19
marker, 8
erase all, 20
memory
card, 7; 13
clear card, 25
slot, 7
status, 25
microphone, 13
microphone level, 20; 26
MIX, 22
NETW, 22
next button, 19
normal level, 20
notebook, 17; 39
ON, 22
on/off button, 11; 19
operation, 19
organising audio, 29
output, 14
line, 14
overload, 8; 20; 26
pairing-mode, 20; 33
PC, 17; 39
PHONES, 22
phones level, 26
PLAY, 22; 23
play button, 19
play-pause, 22
54
prev button, 19
pushbuttons, 19
quick start, 7
rear, 12
REC, 23
rec button, 19
RECORD, 22
recorder settings, 42
recording, 8; 25
LIVE, 15
rev button, 19
SD-card, 7
Secure Digital card, 7; 13
select samples, 30; 31
send audio file, 36
sending audio, 33
sensitivity, 13; 26
sensitivity switches, 12
sequence of beeps, 23
settings.ini, 41
single-beep, 23
skip to
the next marker, 29
the previous marker, 29
software upgrade, 48
specifications, 51
start recording, 27
status feedback, 22
stop button, 19
table of contents, 5
telephone logging, 15
time, 44
transfer failed, 10
transfer successful, 10
UMTS, 16
© 2007
Parrot
unbalanced, 12; 14
unselect all clips, 20
USB connector, 12
USB-audio input, 16
user definable, 41; 42
user settings, 41
visual feedback, 22
XLR connector, 13
© 2005
Parrot
55