1
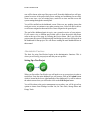
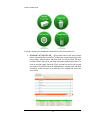
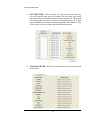
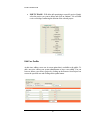
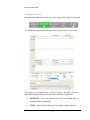
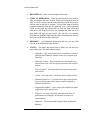
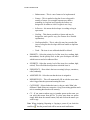
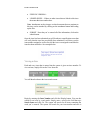
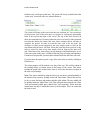
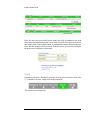
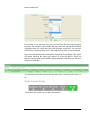
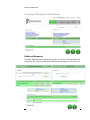
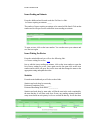
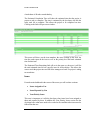
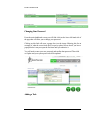
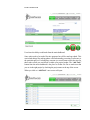
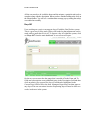
Volume 1 User Manual and Resource Guide GURUTRACKER User Manual and Resource Guide Game Gurus United States Telephone: (415) 800-3599 Brazil Telephone: 55 84-8723-2557 Email: [email protected] Table of Contents What is GuruTracker? ........................................................................... 1 Accessing GuruTracker ........................................................................ 1 The Guru Tracker Dashboard ............................................................... 2 Administrative Functions ...................................................................... 3 Setting Up a New Project ......................................................... 3 Creating a New Issue ............................................................................ 7 Viewing an Issue ................................................................................. 10 Search .................................................................................................. 12 Quality Assurance Testing .................................................................. 13 Navigating and Reading the Main Dashboard .................................... 14 Builds and Documents ............................................................ 14 Tracking Project Costs........................................................... 15 Fix Rate .................................................................................... 15 Issues Needing an Estimate.................................................... 16 Issues Waiting For Review .................................................... 16 Statistics ................................................................................... 16 Changing Your Password ...................................................... 18 Adding a Task ......................................................................... 18 Days Off ................................................................................... 20 G U R U T R A C K E R Chapter 1 What is GuruTracker? What is GuruTracker used for? G uruTracker is the premier tracking and production tool for software development studios. It can be used to track issues, bugs, time and resources during the development phase of any software development project. It has been used when developing things like gaming software, websites, application development and more. GuruTracker allows you to track your entire project through every step of the development process from start to finish. Accessing GuruTracker In order to login to GuruTracker you will need to go the login page. This is located at: http://www.gamegurus.com/tracker/login.php 1 G U R U T R A C K E R The Guru Tracker Dashboard Once you are logged in you will be taken to the main dashboard. The dashboard is your visual overview of the project(s) that you are working on. We will discuss each aspect of the dashboard in more detail in other sections of this manual but for now here is a general overview of what you will see on the dashboard. From the main dashboard page you can access your specific projects which will be listed in the Project Name tab at the top of the screen. In addition the name of the 2 G U R U T R A C K E R user will be shown at the top of the page as well. From this dashboard you will get a general overview of the project that you are working on. In addition you can easily create a new issue, view an existing issue, search for an issue and also access the system settings through the control panel. You will be notified on the dashboard screen if there are any pending issues that need your review, an estimate or any other pressing issue. Users will also be able to see all issues assigned to them and well as issues assigned to the general pool. The goal of the dashboard again is to give you a general overview of your projects. If you want to view a different project then select it from the project drop down menu at the top of the page by selecting the Project Name. Once you select the project name the system will automatically load that project and you will again be at the dashboard for that project. We will discuss reading the main dashboard later in this manual. Administrative Functions The basis for using GuruTracker begins in the administrative functions. This is where you will set up your projects and edit your user profiles. Setting Up a New Project When you first utilize GuruTracker you will need to set up your projects in order to track them. From the main dashboard you will want to click on the Admin button which is located in the lower, right-hand side of the dashboard. You will be taken to the admin screen where you will need to click on the Edit Project button. You will be taken to the project management screen where you will be given four options to choose from: Manage Account List, Set Time Zone, Storage Meter and Empty Trash. 3 G U R U T R A C K E R From the main project dashboard is broken down into four main areas: MANAGE ACCOUNT LIST – All accounts listed in the Project Name tab are listed under the account list. To add a new account simply type in the project name without spaces and then clock on Add Account. The new account will now show up in your drop down menu under Project Name. To close an account simply check the Close Account box next to the account you want to close then click on the Update button. A history trail will show all activity on the accounts as to when they were opened and when they were closed. 4 G U R U T R A C K E R SET TIME ZONE – Since accounts can come from all across the blog, you can set specific time zones for accounts. This will allow you to track time easily since you will know the time zone the account is in. This is great for example when you need to call an account and they have an 11 hour time zone difference. It makes coordinating schedules easier than ever. This will also allow you to see when a bug was added to the system. STORAGE METER – Will show you how many issues have been stored in the system. 5 G U R U T R A C K E R EMPTY TRASH – Will delete info pertaining to a specific project. Simply select the project you want to delete and click on continue. You will then receive a message confirming the deletion of the selected project. Edit User Profiles At this time, adding a new user is not an option that is available to the public. To add a new user contact your system administrator to have a user added. You can however delete a user from a project by clicking on the Remove from Project box next to the specified user and clicking on the update button. 6 G U R U T R A C K E R Creating a New Issue From the main dashboard, to create a new issue, simply click on the New Issue tab. You will then be taken to the main screen where you can create your new issue. The system is very simple to use. You can see that it’s basically a fill in the blank form. Begin by filling out the areas of the form that are applicable: ESTIMATE – Enter the estimated time this issue should take by entering the hours and minutes. TITLE – Enter the title of the issue. For example, LogIn Form Error. 7 G U R U T R A C K E R DESCRIPTION – Enter a brief description of the issue. STEPS TO REPRODUCE – Enter the steps that need to be taken in order to reproduce the issue. In order for the user assigned the issue to fully see what’s involved and how the problem occurred they need to take the steps in this box to get there. You will then want to enter the pertinent information that may be applicable such as what operating system is being used, the browser that was used, the flash version and what device was being used. These are important and while not all of these fields will apply to your specific issue, the key is to complete fields that are applicable. Remember the more information the user has; the easier it is for them to address the issue. REMARKS – Add additional information that the user may find relevant or are important for them to know. STATUS – The status drop down menu is where you will select the status of the issue. The status options include: o Open Bug – This is any kind of issue or bug that is a known problem in the database. Initially each issue is opened as an open bug. o Ready for Testing – This is when the user has found a bug and fixed the issue. Now the quality assurance team can test the bug. o Tester Verified – This means the issue/bug has been tested and verified. o Closed – Once the issue is verified it can be closed if fixed. o Submitted for Review – If items such as art work needed to be reviewed for approval the status would be changed to Submitted for Review. o Suggestion/Feedback – Users can provide feedback or make suggestions for the project/issue. o Deferred – An issue is deferred when the team know its problem but are delaying it for the latest version to be presented first. o Duplicate – This means another bug has been found in the database. 8 G U R U T R A C K E R o Enhancement – This is a new feature to be implemented. o Feature – This is marked as bug but it's not a bug and is actually a feature. For example someone may think a something is a bug but in all actually the feature was designed to do whatever it did. It again is not a bug. o In Process – his means the developer is working on bug in open status. o Not Bug – This almost resembles a feature and may be designed to work specific way. (See Feature for a detailed explanation). o Not Reproducible – This is when QA may have marked the issue as a bug but the developer has been unable to duplicate the bug. o Trash – The issue is not valid and should be deleted. PRIORITY – Select the priority level of the issue (low, medium, high, intermediate). Set the priority level so that your developers will know which issues to need to be addressed first. SEVERITY –Select the severity level of the issue (low, medium, high, critical). This will tell the developer how critical the issue is. FREQUENCY – How often is the issue occurring? (always, sometimes, often, randomly). ASSIGNED TO – Select the user that the issue is assigned to. REPORTED BY – This will automatically fill in with the users name who is logged into the system and creating the issue. CATEGORY – Select whether the issue is a bug or a task. What’s the difference? Both of these are categories. A bug is an existing problem and a task is something that doesn't exist currently. CC – If you want to carbon copy (cc) another person on the team, you can select their name from the list. To select more than one person simply hold down the control button (Ctrl) and click on the names you wish to copy. Note: When Assigning, Reporting or Copying a person if you check the email box then the person listed will be sent an email notification. 9 G U R U T R A C K E R FIXED IN VERSION# - LINKED ISSUES – If there are other issues that are linked to this issue then enter that issue number here. Note: Attachments such as images or other documents that are pertinent to this issue can be attached by clicking on the attachment button and loading up the files. SUBMIT - Now that you’ve entered all of the information, click on the submit button. Once the issue has been submitted you will be taken to a notification screen that will verify that the issue has successfully been submitted. It will show you the issue number assigned as well as list who the issue was assigned to and who the issue has been emailed to. See example below: Viewing an Issue Each and every issue that is entered into the system is given an issue number. To view an issue, simply click on the View Issue tab: You will then be taken to the issue search screen: Begin by entering the Issue Number and click the Display button. You can also search for an issue by word search. Simply enter a word in the field that says Search Issues and click Go. The system will search for all issues containing the word you’ve entered. The system will search for your issue number and once it 10 G U R U T R A C K E R finds the issue it will open up the issue. The screen will closely resemble that of the “create issue” screen but with a few minor differences: The system will bring up the issue ticket that you searched for. You can also go to the previous issue or the next issue on a project by clicking the appropriate links at the top left and right of the screen. The top of the issue screen will show the estimated time (if entered when the ticket was issued) of the estimated time that the admin who created the issue ticket estimates that it will take to complete the project. In order to track the time used to fix the issue, the developer or other person assigned to the issue simply needs to click on the start button and the timer will start. When the ticket has been resolved or the ticket is closed for later review then simply click on Stop and the timer will end. Utilization of the timer allows project managers and administrators to see if the time spent on the issue is falling within the projects budget and timelines. If estimate is not provided, you must enter estimate first before the timer will work. Users also have the option to print a copy of the issue ticket as well by clicking on Print Preview. The tickets progress will be tracked every step of the way. This will be evident in the tracking history as broken down at the bottom of the screen. This makes tracking the people who worked on the issue as well as the time that was spent on the issue easy to manage. Note: Time can be tracked by using the timer or it can also be entered manually at the bottom of the screen by clicking on the Add Time button. Then all the user has to do is to enter the hours and minutes and then click submit. The time added will be included under the Added Time Trail. This will break down tracked time (Time Trail) and manually added time (Added Time Trail) separately. Please note that manual time can only be added three times by the developer. This is to ensure that the timer is used. 11 G U R U T R A C K E R Once the issue has been worked on the status can easily be updated in the drop down menu and additional remarks can be made. Once the issue has been resolved; then simply click on the Update button. A confirmation screen will then let the user know that the changes have been saved. From this screen you can also search for the next issue or a perform a word search. Search Sometimes you may be looking for a specific issue but you are not sure of the issue #. To search for an issue, simply click on the Search tab: The search screen will open up: 12 G U R U T R A C K E R If you know a few keywords, then you can search for the issue based on those keywords. For example, you remember the issue had to do with the Build a Block Application then you could enter this in the keyword issues field. You can also search by the category, priority level, a date range as well as the severity and status. Once the search information is entered then click on the Search button. The system will search based on the criteria you entered. So if the title Build a Block was entered in the keyword section and the system found the results then you will get a results screen like this: You can easily access the issue by clicking on the Issue #. In this case the Issue # is 16. Quality Assurance Testing <Need more info on this area to add to the manual> 13 G U R U T R A C K E R Navigating and Reading the Main Dashboard Builds and Documents From the dashboard screen when you sign in you will see a link for Builds and documents. By clicking on the Builds and Documents link you will be taken to 14 G U R U T R A C K E R a new screen. The latest version of a build can be uploaded quickly and easily. Simply attach the new build and click on submit. In addition, links to documentation can also be added by adding the documentation URL and clicking on Submit. A URL can also be added to take users to where the developer loaded the application. Tracking Project Costs From the main dashboard you will see that the system tracks project costs allowing you to manage your budget and stay on track. By clicking on the appropriate link: Project Cost to Date – This will show all the project costs up to the current date. Project cost for this month – This will show all the project costs for the current month. Project cost for last month – This will show all the project costs for the prior month. The user will be taken to a page that lists the project costs to date, for the month or for the previous month. When you click on one of the links a new page will open with a breakdown of the issues and the project costs. See the example below: To look closer at the issue ticket, simply click on the issue number to open the ticket. Fix Rate From the main dashboard you will see your Fix Rate percentage. This calculation shows how efficient the user is when it comes to closing bugs. A high percentage shows a great rate of success in closing bugs while a low percentage shows that the user is less effective in closing bugs. In this example the user has a fix rate of 100% which means this user has a great success rate in closing bugs. 15 G U R U T R A C K E R Issues Needing an Estimate From the dashboard and located under the Fix Rate is a link: # of issues requiring an estimate: _____ The number of issues requiring an estimate to be entered will be listed. Click on that number and it will open a screen with all the issues needing an estimate. To open an issue, click on the issue number. You can then enter your estimate and save the issue again. Issues Waiting For Review From the main dashboard you will see the following link: # of issues waiting for review: ____ Just as with the issues needing an estimate, click on the issue number to open the list of issues waiting for review. Once again once the list opens click on the issue number and its ticket will open. Review the issue and then change the status to the appropriate setting and update the ticket. Statistics From the main dashboard you will also see three links: Statistics and work done by team today Estimated Completion Time: ________ Estimated Remaining Work Hours: ___________ Statistics and work done by team today will list the stats in the work completed by the team that day. It will show each users fix rate, any pending estimates and how many issues based on each priority level were worked on that day. It will also show 16 G U R U T R A C K E R a breakdown of all tasks created that day. The Estimated Completion Time will show the estimated time that the project is project to take to complete. The time is estimated by the developer who has the most work left to complete. This allows the project to be completed on time. Clicking on the link will open a new window: This screen will show you the issue numbers, the users working on the issue, the time the under spent on the issue as well as the priority level and total estimated time for that issue. The Estimated Time Remaining link will act in the same way however it will list the total estimated time left on a specific issue for all developers. This allows the users to track the project time and will allow managers to know if a project is taking too much time. Issues From the main dashboard in the center of the screen you will see three sections: Issues Assigned to You Issues Reported by You Your Priority Issues This area is important as it tells the developer what issues have been assigned to them and reported by them. In addition the Your Priority Issues section lets the developer know what issues need to be worked on first and then what issues need to follow after that one. 17 G U R U T R A C K E R Changing Your Password From the main dashboard screen you will find a link on the lower left hand side of the page that will allow you to change your password. Clicking on this link will cause a popup box (see the image following this for an example of what the screen looks like) to open so please beware that if you have a popup blocker it may not open the first time until you authorize it. You will need to enter your new password and confirm that password. Then click on Update and your system password will be updated. Adding a Task 18 G U R U T R A C K E R Users have the ability to add tasks from the main dashboard. Some tasks need to be tracked for time purposes but will be non-bug related. This can include things like making phone calls and attending a meeting in reference to the particular project. For budgetary concerns you would want to track the time for these tasks so that you can include it within your project budget. The “Add Task” button from the main dashboard is the place to do that. Be sure to make sure that you are in the right project by checking the project name at the top of the screen. When you click on “Add Task” a new screen will open: 19 G U R U T R A C K E R All the user needs to do is add the hours and the minutes a particular task took to complete along with the description. When you have finished adding tasks click on the submit button. You will see a conformation message pop up stating the task(s) were added successfully. Days Off Users working on a project can request days off with the GuruTracker system. This is a great way to keep track off days off needed so that adjustments can be made while a particular tech is off. To request a day off within the system, click on “Days Off” from the main dashboard. A new screen will open: On the new screen enter the date range that is needed off in the From and To fields and a description or any additional notes in the Description field and then click on submit. Any requests for days off will then be highlighted in the Current Days Off box below the form. Managers/Supervisors can then approve any days off in one convenient location. Requesting days off must be done two weeks in advance in the system. 20