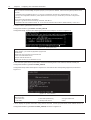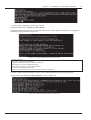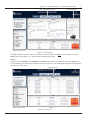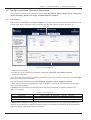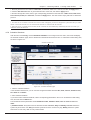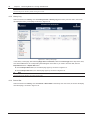
1
RDU-SIC Card
User Manual
Version
Revision date
BOM
V1.3
November 16, 2011
31011798
Emerson Network Power provides customers with technical support. Users may contact
the nearest Emerson local sales office or service center.
Copyright © 2010 by Emerson Network Power Co., Ltd.
All rights reserved. The contents in this document are subject to change without notice.
Emerson Network Power Co., Ltd.
Address: No.1 Kefa Rd., Science & Industry Park, Nanshan District 518057, Shenzhen
China
Homepage: www.emersonnetworkpower.com.cn
E-mail: [email protected]
Application Scope
This manual is the user directions of the RDU-SIC card (SIC card for short) V1.00. It will guide you through the
installation, configuration, operation and troubleshooting of the SIC card.
The operation of the SIC card involves the operation and use of monitored intelligent equipment, Web browser,
network management system (NMS) and Nform. This manual only deals with the SIC card-related operations.
As for the use of other operation systems, please refer to relevant manuals.
Reading Guide
This manual briefly introduces the SIC card and provides use directions, including installation, configuration and
operation, ending with an appendix.
The manual contains nine chapters and an appendix. The content of each chapter keeps as independent as
possible in the aspect of compiling. Except for the first chapter, you may choose to read all chapters according to
you needs. However, if it is the first time you use the SIC card, we suggest that you read through the manual to
get an overall understanding. The following is the reading guide of each chapter.
Chapter
Chapter 1 SIC Card Description
Chapter 2 Installing SIC Card
Chapter 3 Configuring SIC Card
Basic Parameters
Chapter 4 Monitoring Method 1:
Through Web Browser
Chapter 5 Monitoring Method 2:
Through NMS
Chapter 6 Monitoring Method 3:
Through RDU-Manager
Chapter 7 Monitoring Method 4:
Through Nform
Chapter 8 Guarding Computer With
Network Shutdown
Chapter 9 Q’s & A’s
Reading guide
Provides a brief introduction to the SIC card, including its functions, technical
specifications, models and appearance. This chapter will greatly help you to
understand the following chapters
Introduces the system requirement (including software environment and hardware
environment) and installation of the SIC card. If you need to install the SIC card in
the intelligent equipment, please read this chapter and Chapter 3 carefully. If you
have already installed the SIC card and just want to use Web browser, NMS or
Nform to monitor the intelligent equipment through the SIC card, you may skip this
chapter and Chapter 3
Tells you how to configure the basic parameters (such as IP address) of the SIC
card through Hyper Terminal and Telnet. After installing the SIC card for the first
time, you must configure its basic parameters before you can use it to monitor the
intelligent equipment and the environment
Tells you how to use Web browser to monitor your intelligent equipment and the
environment through the SIC card. If you need to use Web browser to monitor the
intelligent equipment and the environment, please read this chapter carefully
Tells you how to use the NMS to monitor your intelligent equipment and the
environment through the SIC card. If you need to use the NMS to monitor the
intelligent equipment and the environment, please read this chapter carefully
Tells you how to use the RDU-Manager software to monitor your intelligent
equipment and the environment through the SIC card. If you need to use the
RDU-Manager software to monitor the intelligent equipment and the environment,
please read this chapter carefully
Tells you how to use the Nform to monitor your intelligent equipment and the
environment through the SIC card. If you need to use the Nform to monitor the
intelligent equipment and the environment, please read this chapter carefully
Tells you how to use the SIC card and Network Shutdown computer safe
shutdown program to protect the computer system in case of a mains or UPS
failure
Lists fast Q’s & A’s in SIC card operation. If you encounter any questions during
operation, to save your precious time, we suggest you quickly look through this
chapter for solutions before seeking technical assistance from the local customer
service center of Emerson Network Power Co., Ltd.
Target
z User
z Technical support personnel, operation and maintenance personnel
Glossary
UPS: uninterruptible power supply
NMS: network management system. For example, HP OpenView, IBM NetView or Novell Network NMS
SNMP: simple network management protocol
MIB: management information base
HTTP: hypertext transfer protocol
Web browser: such as Internet Explorer
RDU-Manager: a management software for equipment room developed by Emerson Network Power Co., Ltd.
Nform: a centralized management software developed by Emerson Network Power Co., Ltd.
Network Shutdown: a computer safe shutdown program developed by Emerson Network Power Co., Ltd.
Trap: SNMP trap, non-request information sent by SIC card to NMS
NTP: network time protocol
TFTP: trivial file transfer protocol
1-Wire: 1 wire communication module
Modem: a module capable of receiving and sending SMS wirelessly
Contents
Chapter 1 SIC Card Description .......................................................................................................................................... 1
1.1 Functions .............................................................................................................................................................. 1
1.2 Technical Specifications ....................................................................................................................................... 1
1.3 Model & Appearance ............................................................................................................................................ 2
Chapter 2 Installing SIC Card .............................................................................................................................................. 3
2.1 System Requirement ............................................................................................................................................ 3
2.2 Unpacking Inspection............................................................................................................................................ 4
2.3 Installation Preparation ......................................................................................................................................... 4
2.4 Installing SIC Card ................................................................................................................................................ 4
Chapter 3 Configuring SIC Card Basic Parameters ............................................................................................................ 6
3.1 Login & Logout ...................................................................................................................................................... 6
3.1.1 Using TTY Or Telnet To Login SIC Card ................................................................................................... 6
3.1.2 Logout........................................................................................................................................................ 7
3.2 Using TTY Or Telnet To Configure SIC Card Basic Parameters........................................................................... 7
3.2.1 Basic Commands ...................................................................................................................................... 7
3.2.2 Configuring Basic Parameters ................................................................................................................... 8
Chapter 4 Monitoring Method 1: Through Web Browser ................................................................................................... 14
4.1 Checking Web Browser Settings......................................................................................................................... 14
4.2 Using Web Browser To Login SIC Card .............................................................................................................. 15
4.3 Homepage Description ....................................................................................................................................... 15
4.4 Monitor Interface Operation Description ............................................................................................................. 16
4.4.1 Device...................................................................................................................................................... 16
4.4.2 Temperature Sensor ................................................................................................................................ 21
4.4.3 Humidity Sensor ...................................................................................................................................... 21
4.4.4 Input Contacts ......................................................................................................................................... 22
4.5 Configure Interface Operation Description .......................................................................................................... 23
4.5.1 User Manage ........................................................................................................................................... 23
4.5.2 Device Manage ........................................................................................................................................ 24
4.5.3 Sensor Config .......................................................................................................................................... 26
4.5.4 Alarm Config ............................................................................................................................................ 27
4.5.5 Net Manage ............................................................................................................................................. 28
4.5.6 Host IP ..................................................................................................................................................... 31
4.5.7 Time Config ............................................................................................................................................. 32
4.5.8 Schedule Shutdown ................................................................................................................................. 33
4.5.9 Reboot ..................................................................................................................................................... 34
4.6 History Interface Operation Description .............................................................................................................. 35
4.6.1 History Data ............................................................................................................................................. 35
4.6.2 History Alarm ........................................................................................................................................... 37
4.6.3 History Log .............................................................................................................................................. 38
4.6.4 Record Set............................................................................................................................................... 38
4.7 Help Interface Operation Description .................................................................................................................. 40
Chapter 5 Monitoring Method 2: Through NMS ................................................................................................................. 41
5.1 Protocol And NMS Supported By SIC Card ........................................................................................................ 41
5.2 Installing Equipment MIB .................................................................................................................................... 41
5.3 Applying For Management Authority ................................................................................................................... 41
5.4 Notes .................................................................................................................................................................. 41
Chapter 6 Monitoring Method 3: Through RDU-Manager.................................................................................................. 42
Chapter 7 Monitoring Method 4: Through Nform ............................................................................................................... 43
Chapter 8 Guarding Computer With Network Shutdown ................................................................................................... 44
Chapter 9 Q’s & A’s ........................................................................................................................................................... 45
9.1 Q’s & A’s In Installation ....................................................................................................................................... 45
9.2 Q’s & A’s In Running ........................................................................................................................................... 46
9.3 Q’s & A’s In Web Monitoring ............................................................................................................................... 46
9.4 Q’s & A’s In NMS Monitoring............................................................................................................................... 47
9.5 Q’s & A’s In RDU-Manager Monitoring ............................................................................................................... 48
9.6 Q’s & A’s In Nform Monitoring ............................................................................................................................. 48
9.7 Q’s & A’s In Using Network Shutdown ................................................................................................................ 48
Chapter 1
SIC Card Description
Chapter 1 SIC Card Description
This chapter gives a brief introduction to the SIC card, including its functions, technical specifications, model and
appearance.
1.1 Functions
The SIC card is a network management card. It can make the intelligent equipment (such as UPS, PDU and so on)
developed by Emerson has the capacity of network communication. The SIC card can also connect to the
environment monitoring equipment, including IRM series or 1-Wire series temperature sensor, temperature &
humidity sensor or dry contact signal input & detecting sensors. In case of an intelligent equipment alarm, it notifies
the user by multiple ways: recording, sending a Trap message, sending an E-Mail or sending an SMS.
The SIC card provides four approaches to monitor the intelligent equipment and equipment room environment:
z Web browser. Monitor your intelligent equipment and equipment room environment through the Web server
function provided by the SIC card
z Network management system (NMS). Monitor your intelligent equipment and equipment room environment
through the SNMP agent function provided by the SIC card
z RDU-Manager. RDU-Manager is a piece of management software for equipment room. You can use
RDU-Manager to monitor your intelligent equipment and equipment room environment through the TCP/IP
interface provided by the SIC card
z Centralized management software (Nform). Monitor your intelligent equipment through the Velocity Server
service function provided by the SIC card
The SIC card can also work with the Network Shutdown computer safe shutdown program developed by Emerson
Network Power Co., Ltd. to provide automatic safe shutdown function for your computer installed with Network
Shutdown, so as to prevent data loss.
1.2 Technical Specifications
z Network type: automatically adapt to 10/100MB/s Ethernet
z Concurrent Web browsers’ number: 5
z Concurrent NMS number: 10
z Protocol : SNMP v2c and SNMP v1
z Concurrent RDU-Manager and Network Shutdown number: 200
z Concurrent Nform number: 8
z Total alarm records: 10000 pieces
z Total data records: 10000 pieces
RDU-SIC Card
User Manual
1
2
Chapter 1
SIC Card Description
1.3 Model & Appearance
The SIC card is a built-in card with the model of RDU-SIC. Its appearance is shown in Figure 1-1. Its hardware
functions are described in Table 1-1.
Note
During installation, the SIC card should be inserted into the intellislot intelligent slot of the Emerson intelligent equipment.
LAN indicator
COM interface
RUN indicator
1-Wire interface
Front panel
Front panel
RJ45 interface
SIC card interface
USB interface
Figure 1-1 SIC card appearance
Table 1-1 SIC card hardware description
Component
LAN indicator (green)
RUN indicator (yellow)
RJ45 interface
SIC card interface
USB interface
1-Wire interface
COM interface
Function
Off: The network cable is not connected
On: The network cable is connected
Off: The SIC card has no alarms
Blink once every second: The SIC card has observation alarms
Blink once every 0.2 seconds: The SIC card has major alarms
On: The SIC card has critical alarms
Connect to the network
To be inserted into the intellislot intelligent slot of intelligent equipment
Connect to computer or SMS Modem by means of the accessory USB communication cable.
Used for configuring parameters of the SIC card when connecting to the computer; used for sending
SMS when connecting to the SMS Modem
Connect to 1-Wire series sensor
Connect to IRM series sensor or intelligent equipment
RDU-SIC Card
User Manual
Chapter 2
Installing SIC Card
Chapter 2 Installing SIC Card
This chapter expounds the SIC card installation, including the system requirement, unpacking inspection, installation
preparation and procedures of the SIC card.
Warning
1. Some electronic components on the SIC card are sensitive to static electricity. Do not touch the electronic components or
circuit with hands or through electrified objects, otherwise the SIC card might be damaged.
2. Hold the side edges when moving or installing the SIC card.
2.1 System Requirement
Hardware requirement
z Emerson intelligent equipment with intellislot intelligent slot matching the SIC card size
z SMS Modem with a USB interface (option)
z IRM series sensors or 1-Wire series sensors (option), see Table 2-1
Table 2-1 Sensors that can be connected to the SIC card
Sensor series
IRM series sensors
1-Wire series sensors
Sensor name
IRM-S01T intelligent temperature sensor
IRM-S02TH intelligent temperature & humidity sensor
IRM-S04DI intelligent digital input sensor with Phoenix ports
IRM-S04DIF intelligent digital input sensor with RJ45 ports
SN-Z01 integrated single temperature sensor
SN-Z02 integrated three temperature sensor
SN-Z03 integrated three temperature & single humidity sensor
SN-T modular single temperature sensor
SN-TH modular single temperature & single humidity sensor
SN-2D modular two door signal inputs & detecting sensor
SN-3C modular three dry contact inputs & detecting sensor
Note:
1. The sensors connect to the SIC card through the straight network cable in cascade mode: the IRM series sensors connect to
the COM interface (see Figure 1-1) of the SIC card; the 1-Wire series sensors connect to the 1-Wire interface (see Figure 1-1) of
the SIC card;
2. The IRM series sensors and the 1-Wire series sensors cannot be used at the same time;
3. The IRM series sensors and the 1-Wire series sensors are all hot-pluggable, after they connect to the SIC card, the software
interface can display them directly;
4. Before the IRM series sensors connect to the SIC card, please set the DIP switches according to their user manuals
Software requirement
1. Local area network (LAN), metropolitan area network (MAN), or wide area network (WAN), 10MB/s or 100MB/s
Ethernet, supporting TCP/IP protocol and HTTP protocol.
2. Computer with one of the following installed:
z Web browser: Internet Explorer 6.0 or above
z NMS compatible with SNMPv1 and SNMP v2c protocols: HP OpenView, IBM NetView, Novell ManageWise or
SunNet Manager, and so on
z Emerson-developed RDU-Manager, a management software for equipment room
z Emerson-developed Nform, a centralized management software
RDU-SIC Card
User Manual
3
4
Chapter 2
Installing SIC Card
2.2 Unpacking Inspection
Open the package of the SIC card, take out the delivery list, and check the goods against the delivery list. Report any
discrepancy to your dealer.
2.3 Installation Preparation
Before installing the SIC card, please finish the preparation work first according to the following procedures:
1. Make sure that the jumpers are set to maintenance mode, that is, J1 short-connected, Pin 2 & Pin 3 of J26
short-connected, and Pin 1 & Pin 2 of J27 short-connected. See Figure 2-1 for the jumper positions, and see
Table 2-2 for the jumper descriptions.
J1 J27
J26
Front panel
Figure 2-1 Jumper positions
Table 2-2 Jumper descriptions of the SIC card
Working mode
Jumper setting
Normal mode
J1
, J26
, J27
Maintanence mode
J1
, J26
, J27
Reset mode
J1
, J27
Description
The USB interface is used to connect to the SMS module
The USB interface is used to login the SIC card through Hyper
Terminal (TTY) or Remote Login (Telnet)
When you forget the password of ‘rduadmin’, password of Web
system administrator ‘admin’ and IP address, set the jumpers
according to this mode, reboot the SIC card, and wait more than 20s
to recover the above three parameters to be default values
2. Use the delivery accessory USB communication cable to connect the USB interface of the computer to that (see
Figure 1-1) of the SIC card.
For the first time the SIC card is installed, please install the USB driver from the CD delivered with the SIC card, and
note down the used serial port number of the computer according to the answer to question 2 in 9.1 Q’s & A’s In
Installation.
3. Start Hyper Terminal, and correctly configure the serial port property of the Hyper Terminal according to the
instructions provided in Using TTY to login SIC card in 3.1.1 Using TTY Or Telnet To Login SIC Card. Note that the
serial port number set in Hyper Terminal must be the one connected to the SIC card.
4. Prepare a category 5 twisted pair cable for connecting the SIC card to the Ethernet, and connect one end to the
network.
Note
For 100MB/s Ethernet, please use super category 5 twisted pair cable meeting EIA/TIA 568 standard. Otherwise the network
cable length must be limited within 100m, and the conducted emission will increase slightly.
2.4 Installing SIC Card
Note
The SIC card is hot-pluggable, and you can install it without turning off the intelligent equipment.
Use the following procedures to install the SIC card:
RDU-SIC Card
User Manual
Chapter 2
Installing SIC Card
5
1. Remove the cover of the intellislot intelligent slot of the intelligent equipment.
Note
1. Retain the screws and cover for use in the future.
2. For the location of the intellislot intelligent slot, refer to the user manual of the intelligent equipment.
2. Insert the SIC card into position along the guide grooves on both sides of the intellislot intelligent slot, and tighten
the screws.
3. Connect the network cable to the RJ45 interface (see Figure 1-1) of the SIC card.
At this point, if the LAN indicator (green) of the SIC card turns on, it indicates that the SIC card is starting up. Observe
the Hyper Terminal screen on the computer, and you will see the SIC card login information, as shown in Figure 2-2.
Figure 2-2 SIC card login information
After the SIC card starts up, if the RUN indicator (yellow) is off, it indicates that the SIC card has no alarms; if the
RUN indicator (yellow) blinks once every second, it indicates that the SIC card has observation alarms, if the RUN
indicator (yellow) blinks once every 0.2 second, it indicates that the SIC card has major alarms; if the RUN indicator
(yellow) is on, it indicates that the SIC card has critical alarms.
4. If you need to monitor more PDUs or connect the SIC card to the IRM series sensors, connect the RJ45 interface
of the PDU or the RJ45 interface of the IRM series sensors to the COM interface (see Figure 1-1) of the SIC card
through a straight network cable. The SIC card can cascade-connect up to four PDUs and four IRM series sensors.
5. If you need to connect the SIC card to the 1-Wire series sensors, please connect the RJ45 interface of the 1-Wire
series sensors to the 1-Wire interface (see Figure 1-1) of the SIC card through a straight network cable. The SIC card
can cascade-connect up to four 1-Wire series sensors.
6. If you need to connect the SIC card to the SMS Modem, please set the jumpers according to ‘Normal mode’ in
Table 2-2 (Pin 1 & Pin 2 of J26 short-connected), and then insert the USB plug of the SMS Modem into the USB
interface (see Figure 1-1) of the SIC card. If the SMS Modem is placed far from the SIC card, use the USB extended
cable delivered with the SIC card to connect the SMS Modem to the SIC card.
Note
In normal mode, the USB interface is used to connect the SMS Modem; in maintenance mode, the USB interface is used to login
the SIC card through Hyper Terminal (TTY) or Remote Login (Telnet). The two kinds of usage cannot be used at the same time,
and can be configured through jumper J26, see Table 2-2 for the configuring method.
RDU-SIC Card
User Manual
6
Chapter 3
Configuring SIC Card Basic Parameters
Chapter 3 Configuring SIC Card Basic Parameters
This chapter tells how to configure the basic parameters of the SIC card through TTY and Telnet.
You may configure the basic parameters of the SIC card through Hyper Terminal (TTY) or Remote Login (Telnet),
including the IP address and communication baud rate of the SIC card. If the SIC card is installed for the first time or
you do not know the IP address of the SIC card, you must use TTY to configure the basic parameters of the SIC card.
If you know the IP address of the SIC card, you can configure the basic parameters of the SIC card through Telnet.
Note
The two configuration modes (TTY and Telnet) of the SIC card basic parameters have the same interfaces.
3.1 Login & Logout
3.1.1 Using TTY Or Telnet To Login SIC Card
Using TTY to login SIC card
TTY is a system tool of Windows. For the specific creation and start procedures of TTY, please refer to relevant
computer OS manual.
When creating TTY, note that the serial port No. is the one that connects to the SIC card. Refer to Question 2 in
9.1 Q’s & A’s In Installation to obtain the serial port No.. Refer to Table 3-1 for serial port configuration.
Table 3-1 TTY serial port configuration
Parameter
Baud rate
Data bit
Parity check
Stop bit
Flow control
Setting
115200bps
8
None
1
None
After the SIC card starts up, press the Enter key, and the system will prompt the login information.
Using Telnet to login SIC card
Type ‘telnet SIC card IP address’ in the command line, for example, ‘telnet 10.76.12.228’, and the system will prompt
login information.
Login information
Figure 2-2 shows the login information. Enter the user name and password. The password will not be displayed, as
shown in Figure 3-1.
Figure 3-1 Enter user name and password
RDU-SIC Card
User Manual
Chapter 3
Configuring SIC Card Basic Parameters
7
If you login successfully, the system will display the login interface and the command prompt RDU_admin#, as
shown in Figure 3-2.
Figure 3-2 Successful login
If your user name or password is incorrect, the system will not allow you in and will prompt you to enter them again.
Note
1. Only the super user is allowed to login the SIC card through TTY or Telnet. The user name of the super user is ‘rduadmin’ and
the default password is ‘emerson’. The password is case sensitive.
2. For Telnet mode, only one user can login at a time.
3.1.2 Logout
Manual Logout
After configuring the basic parameters of the SIC card, you may type the exit or logout command to logout.
Automatic Logout
If you have not done any key operation within five minutes, the system will log you out automatically to ensure system
safety.
Re-login after logout
If you adopt TTY mode, you may simply re-enter your user name and password to re-login; but in Telnet mode, you
have to rebuild Telnet connection.
3.2 Using TTY Or Telnet To Configure SIC Card Basic Parameters
3.2.1 Basic Commands
TTY and Telnet support the commands shown in Table 3-2.
Table 3-2
Command
help
logout
password
reboot
download
setip
settime
test
show
stoprdu
version
Command supported by TTY and Telnet and its description
Description
View the commands supported by SIC card
Manually logout
Modify the password of super user rduadmin
Reboot the SIC card
Download files to the SIC card working directory, delete the files of SIC card working directory or format the
SIC card working directory
Set the IP address, subnet mask, gateway address of the SIC card
Set the system time of the SIC card
View the system start-up information, and test the working status of the network, Flash and serial port
Display the system information: using state of the Flash, console port parameters, MAC address and so on
Stop the application program of the SIC card
View the version information of the SIC card, including hardware version and software version
RDU-SIC Card
User Manual
8
Chapter 3
Configuring SIC Card Basic Parameters
After you login the SIC card through TTY or Telnet, type the command ‘help’ or ‘?’ after RDU_admin#, and press the
Enter key, the system will prompt all the commands and their descriptions, as shown in Figure 3-3
Figure 3-3
Command supported by TTY and Telnet
3.2.2 Configuring Basic Parameters
Type a command behind RDU_admin#. If the command is incorrect, the system will displayRDU_admin# again,
waiting for reentering the command. If you have typed a command corresponding to a parameter, the system will
prompt you to configure the parameter.
Note
When typing a command, you may just type the first several letters of it, and the SIC card can identify them, for example, pa for
password.
1. Password: change the password of the super user rduadmin.
Warning
Keep in mind the password of rduadmin. If you forget it, you cannot configure the basic parameters of the SIC card through TTY
or Telnet, or even access the card. If you lose it, please refer to ‘Reset mode’ in Table 2-2 to recover the default password. This
operation recovers the password of TTY rduadmin, password of Web system administrator admin and IP address at the same
time.
Because rduadmin has the highest authority, to ensure the safety of the connected equipment and sensors, we
suggest that you change the password of rduadmin immediately after installing the SIC card.
Configuration method: type password after RDU_admin#.
Configuration steps: see Figure 3-4.
Figure 3-4 Modify login password
RDU-SIC Card
User Manual
Chapter 3
Configuring SIC Card Basic Parameters
9
Interface description:
Input the new password (five characters at least, and eight at most) üüthe password will not be displayed.
Please use a combination of upper and lower case letters and numbers.
Confirm the new password.
If the password is not strong enough, the following warning will be displayed:
Bad password: too short.
Warning: weak password (continuing).
2. download: download files to the SIC card working directory, delete the files of SIC card working directory or format
the SIC card working directory.
The download command is used to delete former files of the SIC card working directory and download new files to the
SIC card working directory during updating the application program.
Configuration method: type download after RDU_admin#.
Configuration steps: see Figure 3-5 ~ Figure 3-14.
Figure 3-5
Download command
Interface description:
RDU download function: please make sure that the file size is under 3M!
Before operation, you should stop application program first!
0> Print this menu
1> Download *.tar.gz files and decompress to RDU directory
2> Delete all the files in RDU directory
3> Format RDU directory
4> Exit
Select command 2 or 3: delete all the files in the SIC card working directory or format the SIC card working directory,
as shown in Figure 3-6.
Figure 3-6
Delete files
Select command 1, there are two cases, which are respectively shown in the following:
1) If the dialog box shown in Figure 3-7 pops up, select the *.tar.gz file which needs to be downloaded in the dialog
box. The operation is shown in Figure 3-7 ~ Figure 3-9.
RDU-SIC Card
User Manual
10
Chapter 3
Configuring SIC Card Basic Parameters
Figure 3-7 Select the file
The file downloading progress bar appears (downloading file needs three minutes or so, please wait patiently), as
shown in Figure 3-8.
Figure 3-8
Download the file
After the downloading is done, wait three minutes or so and the interface shown in Figure 3-9 appears, indicating that
the downloading is successful.
Figure 3-9
Downloading is successful
After the successful downloading, select command 4 to exit the command mode, and reboot the system manually.
2) If the information shown in Figure 3-10 appears, the operation is shown in Figure 3-10 ~ Figure 3-14.
Figure 3-10 Wait to receive the file
Select Send File… in Transfer option of HyperTerminal, as shown in Figure 3-11.
Figure 3-11
HyperTerminal option
After selecting Send File…, the dialog box shown in Figure 3-12 pops up, click Browse… button to select the *.tar.gz
file which needs to be downloaded, select Zmodem in the drop-down box of Protocol: and click Send button.
RDU-SIC Card
User Manual
Chapter 3
Configuring SIC Card Basic Parameters
11
Figure 3-12 Select the file and protocol
The file downloading progress bar appears (downloading file needs three minutes or so, please wait patiently), as
shown in Figure 3-13.
Figure 3-13
Download the file
After the downloading is done, wait three minutes or so and the interface shown in Figure 3-14 appears, indicating
that the downloading is successful.
Figure 3-14
Downloading is successful
After the successful downloading, select command 4 to exit the command mode, and reboot the system manually.
3. setip: set the IP address, subnet mask, and gateway address of the SIC card.
If the SIC card is installed for the first time or moved from one LAN to another, you must set the network parameters
of the SIC card such as the IP address through TTY.
Configuration method: type setip after RDU_admin#
Configuration steps: input the IP address, subnet mask, and gateway address in sequence, and ensure them, as
shown in Figure 3-15.
Figure 3-15 Set the network parameters
RDU-SIC Card
User Manual
12
Chapter 3
Configuring SIC Card Basic Parameters
Interface description:
After you enter the command setip, the system prompts you to input the IP address, subnet mask and gateway address of the
SIC card.
IP information will be modified as below: IP: 10.163.162.158, Netmask: 255.255.255.0, Default Gateway: 10.163.162.1
If you log in the configuration interface by Telnet, please use the new IP to log in Telnet after you ensure to change the IP
information!
Are you sure to save the new IP information?
Entering Y or y means to ensure the settings, otherwise, enter N or n.
IP information has been modified as below: IP: 10.163.162.158, Netmask: 255.255.255.0, Default Gateway: 10.163.162.1
4. settime: set the system time of the SIC card.
Configuration method: type settime after RDU_admin#
Configuration steps: input the time following the format of the example, as shown in Figure 3-16.
Figure 3-16 Set the system time
Interface description:
Before operation, you should stop application program first!
Set RDU time:
Please input year-month-day hour:minute:second
Format: YYYY-MM-DD hh:mm:ss
Example: 2008-05-06 08:06:18
Please input new time (YYYY-MM-DD hh:mm:ss):
5. test: view the system start-up information, and test the working status of the network, Flash and serial port.
Configuration method: type test after RDU_admin#
Configuration steps: select each option in sequence to view and test the corresponding equipment, as shown in
Figure 3-17.
Figure 3-17 Test command
Interface description:
RDU test function:
0> Print this menu
3> Test Flash
1> View start-up self-test log
4> Serial port test service
2> Ping-to-network test
5> Exit
6. show: display the system information: using state of the Flash, console port parameters, MAC address and so on.
Configuration method: type show after RDU_admin#, as shown in Figure 3-18.
RDU-SIC Card
User Manual
Chapter 3
Configuring SIC Card Basic Parameters
Figure 3-18 View the system information
7. stoprdu: stop the application program of the SIC card.
Configuration method: type stoprdu after RDU_admin#
Configuration steps: after typing the command and ensuring it, the system displays counting down for stopping the
application program, as shown in Figure 3-19.
Figure 3-19 Stop the application program of the SIC card
Interface description:
Are you sure to stop the RDU application?
Entering Y or y means to ensure it, otherwise, enter N or n.
RDU application will not be restarted automatically.
Please reboot the system to start the RDU application!
The system is being stopped, please wait…
Notice: you must reboot the system manually to make the RDU-SIC start again
8. version: view the version information of the SIC card, including hardware version and software version
Viewing method: type version after RDU_admin#, as shown in Figure 3-20.
Figure 3-20 View the version information of the SIC card
RDU-SIC Card
User Manual
13
14
Chapter 4
Monitoring Method 1: Through Web Browser
Chapter 4 Monitoring Method 1: Through Web Browser
This chapter tells how to use Web browser to monitor the intelligent equipment and environment in real time,
including checking Web browser settings, using Web browser to login SIC card, homepage description and operation
descriptions of Monitor interface, Configure interface, History interface and Help interface.
4.1 Checking Web Browser Settings
Before using Web browser to monitor the intelligent equipment and environment through the SIC card, please verify
that the Web browser meets the requirement listed in this section.
Browser type and version
The SIC card supports the following browsers:
z Internet Explorer 6.0 or above
z Other browser types compatible with HTTP1.1, HTML4.0 and JavaScript1.0, the SIC card might support them
but this is not for sure
The SIC card supports Chinese and English. If you select Chinese, the browser must support simplified Chinese
(GB2312) character set but not necessarily be Chinese version. If the browser cannot display Chinese, please upload
or install corresponding software components. Future version SIC card will support more languages.
JAVA Virtual Machine and version
The computer must be installed with JAVA Virtual Machine 1.6.0_17-b04 or above.
Enabling graphic and animation display
The browser must be able to display graphic and animation.
Enabling JavaScript
The browser must allow JavaScript. The setting method is as follows:
For Internet Explorer: Tools -> Internet Options -> Security -> Custom Level, scroll down to Scripting -> Active
Scripting, select Enable and click OK.
Web page cookie setting
The browser must allow automatic cookie handling. The setting method is as follows:
For Internet Explorer: Tools -> Internet Options -> Privacy -> Advanced..., and remove the tick before Override
automatic cookie handling in the pop-up dialog box.
Web page Cache setting
Browsers use Cache (called temporary file in IE) to increase web page display speed. When you visit web pages in
the Cache, the browser will check whether there is any new version of them in Web server according to the
configuration below:
z Check every time visiting pages
z Check every time starting the browser
z Automatic
z No check
When visiting the SIC card, the configuration must be Automatic. Otherwise, the monitoring web pages cannot be
displayed normally. For example, the newly opened web page is still the web page before you exit the browser last
time. The configuration steps for common Web browsers are as follows:
For Internet Explorer: View -> Internet Options -> General -> Internet Temporary Internet files -> Settings ->
Check for newer version of stored pages -> Every visit to the page.
Definition and browser font setting
We recommend you to set the monitor definition to 1024 × 768 or above.
RDU-SIC Card
User Manual
Chapter 4
Monitoring Method 1: Through Web Browser
15
4.2 Using Web Browser To Login SIC Card
Login
Start the Web browser, type the IP address of the SIC card in the IP address bar, and the login interface will appear.
The SIC card can detect the OS language of the computer automatically. If the OS language is English, the English
login interface will appear, and if the OS language is Chinese, the Chinese login interface will appear, as shown in
Figure 4-1.
Figure 4-1
Login SIC card
Select English or ѝ᮷ in the drop-down menu of Language to switch to the corresponding display language, as
shown in Figure 4-2.
Figure 4-2 Select the language
Enter the user name and password, and click the Login button. If the user name and password pass the verification,
you can have access to the homepage of the SIC card, as shown in Figure 4-3.
Note
1. For the first time you access the new SIC cad through Web browser, you must login with super user’s name ‘admin’ and its
password (‘123456’ or ‘emerson’ by default). The user name and password are case sensitive.
2. If you have the control authority or you are a super user, you must close the browser before leaving, or it might cause serious
consequences if others use the browser to send equipment control commands at will.
4.3 Homepage Description
As shown in Figure 4-3, the homepage includes four parts: system information area, main menu area, Monitor tree
view menu and display area.
RDU-SIC Card
User Manual
16
Chapter 4
Monitoring Method 1: Through Web Browser
System information area
Main menu area
Display area
Monitor tree view menu
Figure 4-3
Homepage
1. System information area
The system information area displays: User, User level, SIC System Time and SIC System Address. Clicking
Logout link exits to the login page.
2. Main menu area
The main menu area displays the main function options of Web monitoring, including Monitor, Configure, History
and Help. Clicking any button displays the monitoring page of corresponding main menu.
3. Monitor tree view menu
The Monitor tree view menu displays all devices of Web monitoring, including Device, Temperature Sensor,
Humidity Sensor and Input Contacts. Clicking the device name displays the monitoring page of corresponding
device.
4. Display area
The display area displays the page information of selected main menu corresponding to the device in the Monitor tree
view menu.
4.4 Monitor Interface Operation Description
The Monitor tree view menu of Monitor interface includes Device, Temperature Sensor, Humidity Sensor and
Input Contacts.
4.4.1 Device
The Device Interface includes four function options: Overview, Collect, Control and Set.
Overview
Click the main menu Monitor, and click Adapt5K under Device in the Monitor tree view menu, the screen will display
the overview page of Adapt5K, as shown in Figure 4-4. The Overview page displays the main operating data graphs,
basic information and events of the device.
RDU-SIC Card
User Manual
Chapter 4
Monitoring Method 1: Through Web Browser
Main operating data graphs
17
Basic information
Events
Monitor tree view menu
Figure 4-4
Overview page
The page displays at most four events. If you need to view more events, click [More…] in the events to enter the
History main menu. Refer to 4.6 History Interface Operation Description.
Collect
Click the main menu Monitor, click Adapt5K under Device in the Monitor tree view menu, and select Collect, the
screen will display the collect page of Adapt5K, as shown in Figure 4-5. The Collect page displays the operating data
list and events of the device.
Operating data list
Events
Monitor tree view menu
Figure 4-5
RDU-SIC Card
Collect page
User Manual
18
Chapter 4
Monitoring Method 1: Through Web Browser
Control
Click the main menu Monitor, click Adapt5K under Device in the Monitor tree view menu, and select Control, the
screen will display the control page of Adapt5K, as shown in Figure 4-6. The Control page displays the control
parameter list and events.
Control parameter list
Events
Monitor tree view menu
Figure 4-6
Control page of Adapt5K
In the control parameter list, you can select the Control Value of Signal Name, and click the Apply button, the
confirm dialog box pops up, as shown in Figure 4-7. Click OK to send the command to the SIC card.
Figure 4-7
Confirm dialog box
If the SIC card sends the control command successfully, a dialog box will prompt ‘Operation success’; if the SIC card
fails in sending the control command, a dialog box will prompt ‘Operation failed’.
The control page of UPS-GXT3G is different from that of Adapt5K, as shown in Figure 4-8.
RDU-SIC Card
User Manual
Chapter 4
Figure 4-8
Monitoring Method 1: Through Web Browser
19
Control page of UPS-GXT3G
Note
For GXT 3G UPS, before setting the Control Value of Turns Output On and Turns Output Off in the Control page, you are
required to first check the Setting Value of Any Mode Shutdown Pin Actions and Any Mode Shutdown Pin Logic in the Set
page (see Figure 4-10) to ensure normal on/off of the UPS output.
Set
Click the main menu Monitor, click Adapt5K under Device in the Monitor tree view menu, and select Set, the screen
will display the set page of Adapt5K, as shown in Figure 4-9. The Set page displays the set parameter list and events.
Set parameter list
Monitor tree view menu
Events
Figure 4-9 Set page of Adapt5K
RDU-SIC Card
User Manual
20
Chapter 4
Monitoring Method 1: Through Web Browser
In the set parameter list, you can select the Setting Value of one or more Signal Name, and the font color of Setting
Value turns carmine. After selecting all command which need to be set, click the Apply button, and the confirm dialog
box pops up, as shown in Figure 4-7. Click OK to send the command to the SIC card.
If the parameter is successfully saved, a dialog box will prompt ‘Operation success’, at the same time, the font color
of Setting Value recovers black; if the parameter is not saved, a dialog box will prompt ‘Operation failed’, at the same
time, the font color of Setting Value which is not saved remains carmine.
Note
For Adapt UPS, after setting Device Address in the Set page, you are required to modify Parameter and Address in the Device
configuration page (see Figure 4-18) synchronously, or it will cause a communication failure between the RDU-SIC card and
UPS.
The set page of UPS-GXT3G is different from that of Adapt5K, as shown in Figure 4-10.
Figure 4-10 Set page of UPS-GXT3G
RDU-SIC Card
User Manual
Chapter 4
Monitoring Method 1: Through Web Browser
21
4.4.2 Temperature Sensor
Click the main menu Monitor, and click Temp0 under Temperature Sensor in the Monitor tree view menu, the
screen will display the information page of Temp0, as shown in Figure 4-11. The temperature sensor page displays
the parameters of all temperature sensors and events.
Figure 4-11 Temperature sensor page
The setting procedures of the temperature sensor parameters are as follows:
1. In the temperature sensor page, double-click one temperature sensor histogram to enter the setting mode, as
shown in Figure 4-12.
Figure 4-12 Setting mode of temperature sensor
2. Drag the mouse to set the high and low thresholds and click the temperature sensor name (such as temp0) to
change its name. The temperature sensor name can also be modified in the Sensor config under the main menu
Configure, please refer to 4.5.3 Sensor Config.
The red, yellow and green areas on the histogram respectively indicate alarm, warning and normal range.
3. After the setting, click Apply button to confirm the setting. Click Cancel button to cancel the preceding setting.
If the temperature setting exceeds the normal range, the histogram will turn yellow or red; if it is within the normal
range, the histogram will turn green, as shown in Figure 4-13.
Warning status
Normal status
Figure 4-13 Status figure after setting
4.4.3 Humidity Sensor
Click the main menu Monitor, and click Sensor2 under Humidity Sensor in the Monitor tree view menu, the screen
will display the information page of Sensor2, as shown in Figure 4-14. The humidity sensor page displays the
parameters of all humidity sensors and events.
RDU-SIC Card
User Manual
22
Chapter 4
Monitoring Method 1: Through Web Browser
Figure 4-14
Humidity sensor page
The setting method of humidity sensor parameters is the same as that of temperature sensor parameters, please
refer to 4.4.2 Temperature Sensor.
4.4.4 Input Contacts
Click the main menu Monitor, and click 3C0_DI1 under Input Contacts in the Monitor tree view menu, the screen
will display the information page of 3C0_DI1, as shown in Figure 4-15. The input contacts page displays the status of
all input contacts and events.
Figure 4-15 Input contacts page
In the page, you can view the working status of each connected digital sensors. For example, the status of 3C0_DI3
is Normal, it means that the sensor has no alarm currently; the status of 3C0_DI1 and 3C0_DI2 is Alarm, it means
that the sensors have alarms currently.
RDU-SIC Card
User Manual
Chapter 4
Monitoring Method 1: Through Web Browser
23
4.5 Configure Interface Operation Description
The configure tree view menu of Configure interface includes User manage, Device manage, Sensor config, Alarm
config, Net manage, Host IP, Time config, Schedule shutdown and Reboot.
4.5.1 User Manage
Click the main menu Config, and click User manage in the configure tree view menu, the screen will display the user
manage page, which is divided into user list and user information manage area, as shown in Figure 4-16.
User list
Configure tree view menu
User information manage area
Figure 4-16
User manage page
1. View the user information
In the user list, you can view the user information, including No, User name, Level, Email and Phone.
2. Add the user information
If you need to add a user, type the corresponding parameters in the user information manage area, and click the Add
button. At most ten users can be added.
The user information parameters include User, Authority, Password, confirm, Cellphone and Email.
1) User: the user name can be English letters, digits and underline, other special characters are invalid; the length
cannot exceed ten characters.
2) Authority: the system authority is divided into three user levels: Administrator, Engineer and Browser, see
Table 4-1 for details.
Table 4-1 User authority list
User
Administrator
; User manage
Authority
; Configuration
; Control
; Viewing
Engineer
ƶ User manage
; Configuration
; Control
; Viewing
ƶ Configuration
ƶ Control
Browser
ƶ User manage
; Viewing
3) Password and confirm: the password by which you access the SIC card. You must type the same password for
two times, and the length of the password cannot be less than six characters. The password can be English letters,
digits and underline, other special characters are invalid.
RDU-SIC Card
User Manual
24
Chapter 4
Monitoring Method 1: Through Web Browser
Note
1. Administrator can change the passwords of Administrator, Engineer and Brower.
2. The default passwords of Administrator are ‘123456’ or ‘emerson’. To ensure system security, after installing the SIC card,
please use the authority of Administrator to login the SIC card and change the passwords. Meanwhile, it is recommended to
change the passwords regularly.
4) Cellphone: user’s cellphone number which can receive the SMS or call from the SIC card. You can test it through
the SMS Test or Dial Test button.
5) Email: user’s Email address which can receive the Email from the SIC card, for instance,
[email protected]. You can test it through the Email Test button.
3. Modify the user information
Select the user information which needs to be modified in the user list, and the user information manage area will
display the corresponding parameters automatically, type the new parameters and click the Modify button.
Note
In the user information manage area, User cannot be modified.
4. Delete the user information
If you need to delete a user, select the user information which needs to be deleted in the user list, and click the
Delete button.
4.5.2 Device Manage
The device manage is divided into device drivers and device configuration.
Device drivers
Click the main menu Config, click Device manage in the configure tree view menu, and select Load drivers, the
screen will display the device drivers page, which is divided into device drivers list and load drivers area, as shown in
Figure 4-17.
Device drivers list
Load drivers area
Configure tree view menu
Figure 4-17
Device drivers page
1. View the device drivers
In the device drivers list, you can view the No. and name of the loaded device drivers.
RDU-SIC Card
User Manual
Chapter 4
Monitoring Method 1: Through Web Browser
25
2. Unload the device drivers
In the device drivers list, click the Unload button to unload the corresponding device driver.
Note
ENP_ENV_SIC[SENSOR] and ENP_ENV_OW[SENSOR] have been installed before delivery. They are respectively the device
drivers of IRM series sensors and 1-Wire series sensors. It is recommended not to unload them.
3. Load the device drivers
In the load drivers area, click the Browse…button, and the dialog box of selecting files pops up. Select the
corresponding driver file, and click the Load button.
Note
1. In the load drivers area, you cannot type the installation path manually, you can only select it through the Browse… button.
2. Internet Explorer 7.0 and Internet Explorer 8.0 enhance the security system of IE explorer, which makes the installation path of
the driver file cannot be normally displayed in the load drivers area, but does not affect the normal installation of the driver file.
Device configuration
Click the main menu Config, click Device manage in the configure tree view menu, and select Device config, the
screen will display the device configuration page, which is divided into device manage list and device configuration
area, as shown in Figure 4-18.
Device manage list
Configure tree view menu
Device configuration area
Figure 4-18
Device configuration page
Note
Before the device configuration, please first check whether the SIC card has been installed with the corresponding driver of the
device.
1. View the device
In the device manage list, you can view the installed device, including No, Device type, Name, Device ID, Address,
Port and Parameter.
2. Add the device
If you need to add a device, type the corresponding parameters in the device configuration area, click the Add button
and then click the Apply button to make the settings effective.
RDU-SIC Card
User Manual
26
Chapter 4
Monitoring Method 1: Through Web Browser
The device parameters include Device type, Name, Port type, Address and Parameter.
1) Device type: corresponding to the device driver, you should load the device driver of the device type first, and then
select the corresponding device driver in the drop-down box of Device type.
2) Name: user-defined device name.
3) Port type: corresponding to the device type. After confirming the device type, select the corresponding port type in
the drop-down box of Port type, such as RS-232.
4) Address: the device addresses under the same device type cannot be the same.
5) Parameter: the format is baud rate, parity, bit, stop bit, for instance, 9600,n,8,1.
3. Modify the device
Select the device type which needs to be modified in the device manage list, and the device configuration manage
area will display the corresponding parameters automatically, type the new parameters, click the Modify button and
then click the Apply button to make the settings effective.
4. Delete the device
If you need to delete a device, select the device type which needs to be deleted in the device manage list, click the
Delete button and then click the Apply button to make the settings effective.
Note
Clicking the Apply button can save all the operations at a time.
4.5.3 Sensor Config
Click the main menu Config, and click Sensor config in the configure tree view menu, the screen will display the
sensor configuration page, which displays the sensors connected to the SIC card, including sensor information list
and modifying area, as shown in Figure 4-19.
Sensor information list
Configure tree view menu
Modifying area
Figure 4-19 Sensor configuration page
1. View the sensor information
In the sensor information list, you can view the sensor No, Sensor name, Channel name, DI alarm condition and
Sensor address.
2. Modify the sensor information
RDU-SIC Card
User Manual
Chapter 4
Monitoring Method 1: Through Web Browser
27
Select the sensor information which needs to be modified in the sensor information list, and the modifying area will
display the corresponding parameters automatically, type the new parameters, and click the Modify button.
The sensor information parameters include Sensor name, Channel name, and DI alarm condition.
1) Sensor name: user-defined sensor name.
2) Channel name: only applicable to input contacts, used to configure the name of the device connected to each port
of the input contact.
3) DI alarm condition: only applicable to input contacts, used to configure the alarm condition of the device
connected to each port of the input contact.
Note
For temperature sensor and temperature & humidity sensor, only the Sensor name can be modified, while other parameters
cannot be modified.
4.5.4 Alarm Config
The alarm configuration page includes two function options: Alarm manage and Mail server.
Alarm manage
Click the main menu Config, click Alarm config in the configure tree view menu, and select Alarm manage, the
screen will display the alarm manage page, including Alarm style and Alarm device type, as shown in Figure 4-20.
Figure 4-20 Alarm manage page
1. Alarm style
You can select the user name, alarm language and the alarm style. The alarm language includes English and
Chinese; the alarm style includes Email, SMS and Dial.
Note
Before selecting the alarm style, first make sure that the user has been configured with Email address or cellphone number, refer
to 4.5.1 User Manage.
2. Alarm device type
You can select to send different type alarms from different devices. The devices include all configured devices; the
alarm types include Critical alarm, Major alarm and Observation.
Note
Before selecting the alarm device type, first make sure that the user has been configured with alarm style.
RDU-SIC Card
User Manual
28
Chapter 4
Monitoring Method 1: Through Web Browser
Mail server
Click the main menu Config, click Alarm config in the configure tree view menu, and select Mail server, the screen
will display the mail server page, including Email server and SMS modem, as shown in Figure 4-21.
Figure 4-21 Mail server page
1. Email server
Administrator can configure the mail server address, name and password.
2. SMS modem
You can view the parameters of currently-used SMS modem, including Modem type and Modem parameter.
4.5.5 Net Manage
The net manage page includes three function options: RDU Manager, NMS and Shutdown.
RDU Manager
Click the main menu Config, click Net manage in the configure tree view menu, and select RDU Manager, the
screen will display the RDU Manager page, including the verification control area, RDU Manager IP list and set IP
area, as shown in Figure 4-22.
RDU-SIC Card
User Manual
Chapter 4
Monitoring Method 1: Through Web Browser
Verification control area
Configure tree view menu
RDU-manager IP list
Figure 4-22
Set IP area
RDU Manager page
1. Verification control
In the verification control area, you can select the verification style according to your need.
2. View the RDU manager IP
In the RDU manager IP list, you can view the RDU Manager IP No, IP address and Connection status.
3. Add a RDU manager IP
If you need to add an IP, type the new IP address in the set IP area, and then click the Add button.
4. Delete a RDU manager IP
If you need to delete an IP, select the IP which needs to be deleted in the RDU manager IP list, and then click the
Delete button.
NMS
Click the main menu Config, click Net manage in the configure tree view menu, and select NMS, the screen will
display the NMS page, including the NMS IP list and NMS IP setting area, as shown in Figure 4-23.
RDU-SIC Card
User Manual
29
30
Chapter 4
Monitoring Method 1: Through Web Browser
NMS IP list
NMS IP setting area
Configure tree view menu
Figure 4-23
NMS page
1. View the NMS IP
In the NMS IP list, you can view the NMS IP No, Ip address, Trap, Public and Private.
2. Add an NMS IP
If you need to add an IP, type the new NMS IP parameters in the NMS IP setting area, and then click the Add button.
The NMS IP parameters include IP address, Trap, Public and Private.
1) IP address: the IP address of the NMS computer which is allowed to access the SIC card, for example,
‘10.163.162.141’.
2) Trap: when the intelligent equipment and sensors generate alarms, whether the SIC card is allowed to send Trap
messages (alarms) to NMS.
z Enable: the SIC card sends all the alarms to NMS
z Disable: the SIC card does not send any alarm to NMS
3) Read: community string for getting SIC card variables, the default is ‘public’.
4) Write: community string for setting SIC card variables, the default is ‘private’.
Note
The community strings are the passwords for the NMS to access the SIC card. The passwords are case sensitive.
3. Modify the NMS IP
Select the IP which needs to be modified in the NMS IP list, the NMS IP setting area will display the corresponding
parameters automatically, type the new parameters and then click the Modify button.
Note
The IP address in the NMS IP setting area cannot be modified.
4. Delete an NMS IP
If you need to delete an IP, select the IP which needs to be deleted in the NMS IP list, and then click the Delete
button.
RDU-SIC Card
User Manual
Chapter 4
Monitoring Method 1: Through Web Browser
31
5. Trap test
Select the IP which needs to be tested in the NMS IP list, and click the Trap test button. If the test is successful, the
prompt Operation success will appear.
Shutdown
Click the main menu Config, click Net manage in the configure tree view menu, and select Shutdown, the screen
will display the Shutdown page, including the Shutdown IP list and set IP area, as shown in Figure 4-24.
Shutdown IP list
Configure tree view menu
Set IP area
Figure 4-24 Shutdown page
1. View the Shutdown IP
In the Shutdown IP list, you can view the Shutdown IP No., IP address and Connection status.
2. Add a Shutdown IP
If you need to add an IP, type the new IP address in the set IP area, and then click the Add button.
3. Delete a Shutdown IP
If you need to delete an IP, select the IP which needs to be deleted in the Shutdown IP list, and then click the Delete
button.
4.5.6 Host IP
Click the main menu Config, and click Host IP in the configure tree view menu, the screen will display the host IP
page, as shown in Figure 4-25.
RDU-SIC Card
User Manual
32
Chapter 4
Monitoring Method 1: Through Web Browser
Figure 4-25
Host IP page
In the host IP page, you can view the current IP address, Subnet mask and Gateway; if you need to change them,
type the new parameters and click the Apply button, the SIC card will reboot automatically. After that, you can use
the new IP address to access the SIC card.
Note
The IP address in the host IP page cannot be set the same as that of other equipment.
4.5.7 Time Config
Click the main menu Config, and click Time config in the configure tree view menu, the screen will display the time
config page, as shown in Figure 4-26.
Figure 4-26
Time config page
In the time config page, you can calibrate the system time of the SIC card by the following three methods:
RDU-SIC Card
User Manual
Chapter 4
Monitoring Method 1: Through Web Browser
33
1. Manually select time in the textbox of Date Time, for instance, 2009-12-01 15:20:54, and click the Apply button.
2. Click the Get host time button to get the date and time of the host, and click the Apply button.
3. Get time through NTP server, that is, type corresponding parameters in the textboxes of Main server, Bak server,
Time interval (minute) and Time zone, and click the Apply button. The time servers comply with NTP or SNTP time
protocol.
Note
1. If no time server is available or the time server has not been configured, you must reconfigure the system time after you install
the SIC card for the first time so as to ensure that the card time is consistent with the real time.
2. If the time server is available and accessible, the SIC card time will be automatically calibrated by the time server after you
install the card for the first time.
4.5.8 Schedule Shutdown
Click the main menu Config, and click Schedule Shutdown in the configure tree view menu, the screen will display
the schedule shutdown page, which is divided into schedule shutdown list and turn on & shutdown model setting area,
as shown in Figure 4-27.
Schedule shutdown list
Configure tree view menu
Turn on & shutdown model setting area
Figure 4-27 Schedule shutdown page
1. View the schedule shutdown
In the schedule shutdown list, you can view the configured schedule shutdown No, Name, Interval, Shutdown time,
Turn back on and Status.
2. Add a schedule shutdown
If you need to add a schedule shutdown, select corresponding parameters in the turn on & shutdown model setting
area, and then click the Add button.
The schedule shutdown parameters include Shutdown model, Shutdown detail, Turn on model and Turn on
detail.
1) Shutdown model: the system has three shutdown models: One-time, Daily and Weekly. One-time means the
system only shuts down once; Daily means the system shuts down on time every day; Weekly means the system
shuts down on time every week or every several weeks.
RDU-SIC Card
User Manual
34
Chapter 4
Monitoring Method 1: Through Web Browser
2) Shutdown detail: including Name, Status and shutdown time. Name is the user-defined name; Status includes
Enable and Disable; the shutdown time is linked with the shutdown model, you can select it in the drop-down box.
3) Turn on model: the system has three turn on models: Never, Immediately and Configure. Never means the
system does not turn on; Immediately means the system turns on immediately; Configure means the system turns
on according to the information you have configured manually.
4) Turn on detail: including the date and time of turning on. Only when Configure is selected for Turn on model can
it be configured. Turn on detail is linked with Turn on model. You can select it in the drop-down box.
Note
1. After a schedule shutdown is triggered, the system will turn off the UPS in ten minutes, so that users can perform data backup.
2. When setting several shutdown tasks, it is recommended that the interval between two tasks is above 10min.
3. Modify the schedule shutdown
Select the schedule shutdown which needs to be modified in the schedule shutdown list, the turn on & shutdown
model setting area will display the corresponding parameters automatically. Modify the parameters and click the
Modify button.
4. Delete a schedule shutdown
If you need to delete a schedule shutdown, select the schedule shutdown which needs to be deleted in the schedule
shutdown list and click the Delete button.
4.5.9 Reboot
Click the main menu Config, and click Reboot in the configure tree view menu, the screen will display the reboot
page, and the confirming dialog box pops up, as shown in Figure 4-28.
Figure 4-28
Reboot page
Click OK, and the system will reboot.
RDU-SIC Card
User Manual
Chapter 4
Monitoring Method 1: Through Web Browser
35
4.6 History Interface Operation Description
The history tree view menu of History interface includes History Data, History Alarm, History Log and Record Set.
4.6.1 History Data
The history data is displayed in two modes: Chart and Table.
Chart
Select the main menu History, and click Chart of History Data in the history tree view menu, the screen will display
the chart page of history data, as shown in Figure 4-29.
Figure 4-29
Chart page of history data
In the chart page of history data, after selecting Begin time and End time, select the device which needs to get data
in the drop-down menu, and click the Get button, all corresponding parameters of the device will appear below the
device, select the parameter you need to view, and the corresponding data will appear in the chart.
Data Points Per Page means how many data points each page displays, if you select 20, each page will display
twenty data points. Clicking
or
enters the previous page or the next page.
Note
At most 200 pieces of history data can be got at a time.
Table
Select the main menu History, and click Table of History Data in the history tree view menu, the screen will display
the table page of history data, as shown in Figure 4-30.
RDU-SIC Card
User Manual
36
Chapter 4
Monitoring Method 1: Through Web Browser
Figure 4-30 Table page of history data
In the table page of history data, after selecting Begin time and End time, select the device which needs to get data
in the drop-down menu of Equip Name, and click the Get button, Equip Signal will turn from gray to black, select the
parameter you need to view in the drop-down box of Equip Signal, and the corresponding data will appear in the
table. If you need to save the data, click the Export Excel button or Export Xml button:
z Click the Export Excel button, the Excel file page pops up, as shown in Figure 4-31.
Figure 4-31 Excel file page
z Click the Export Xml button, the Xml file page pops up, as shown in Figure 4-32.
RDU-SIC Card
User Manual
Chapter 4
Monitoring Method 1: Through Web Browser
37
Figure 4-32 Xml file page
Note
At most 200 pieces of history data can be got at a time.
4.6.2 History Alarm
Select the main menu History, and click Table of History Alarm in the history tree view menu, the screen will display
the table page of history alarm, as shown in Figure 4-33.
Figure 4-33 Table page of history alarm
In the table page of history alarm, after selecting Begin time and End time, select the device which needs to get data
in the drop-down menu of Equip Name, and click the Get button, the corresponding data will appear in the table. If
you need to save the data, click the Export Excel button or Export Xml button:
z Click the Export Excel button, the Excel file page pops up, as shown in Figure 4-31.
z Click the Export Xml button, the Xml file page pops up, as shown in Figure 4-32.
RDU-SIC Card
User Manual
38
Chapter 4
Monitoring Method 1: Through Web Browser
Note
At most 200 pieces of history alarm can be got at a time.
4.6.3 History Log
Select the main menu History, and click History Control of History Log in the history tree view menu, the screen
will display the history control page, as shown in Figure 4-34.
Figure 4-34
History control page
In the history control page, after selecting Begin time and End time, select the Control type in the drop-down menu,
and click the Get button, the corresponding data will appear in the table. If you need to save the data, click the
Export Excel button or Export Xml button:
z Click the Export Excel button, the Excel file page pops up, as shown in Figure 4-31.
z Click the Export Xml button, the Xml file page pops up, as shown in Figure 4-32.
Note
At most 200 pieces of history log can be got at a time.
4.6.4 Record Set
Select the main menu History, and click Interval of Record Set in the history tree view menu, the screen will display
the interval page, as shown in Figure 4-35.
RDU-SIC Card
User Manual
Chapter 4
Monitoring Method 1: Through Web Browser
39
Figure 4-35 Interval page
The interval page is used to set the interval for recording data. Type the interval value behind Log data Interval time
(mins) and click the Apply button, the confirming dialog box pops up, as shown in Figure 4-36.
Figure 4-36
Confirming dialog box
Click OK, and the interval page displays operation success, indicating that the operation is successful.
Note
The interval value must be from 10 to 1440, or the operation cannot be successful.
RDU-SIC Card
User Manual
40
Chapter 4
Monitoring Method 1: Through Web Browser
4.7 Help Interface Operation Description
The Help interface displays System info, including System name, Hardware Ver, Software Ver and service
number, as shown in Figure 4-37.
Figure 4-37
RDU-SIC Card
Help interface
User Manual
Chapter 5
Monitoring Method 2: Through NMS
41
Chapter 5 Monitoring Method 2: Through NMS
Through the SNMP agent function of the SIC card, you may use an NMS to view the parameters and alarm
information of the intelligent equipment and environment in real time, configure the operating parameters and control
the equipment. In case of an equipment or environment alarm, the SIC card will send trap information to the NMS.
This chapter tells how to use an NMS to monitor the intelligent equipment and environment. 5.1 Protocol And NMS Supported By SIC Card
The SIC card currently supports SNMP v2c and SNMP v1. NMSs supporting SNMP v1 and SNMP v2c can access
the SIC card, such as HP OpenView, IBM NetView, Novell ManageWise, SunNet Manager and so on.
5.2 Installing Equipment MIB
If you need to use an NMS to access the SIC card to monitor the intelligent equipment and environment, you need to
use the MIC import function of the NMS to load the MIB of the intelligent equipment. For the loading method, refer to
the user directions of the NMS.
You may get the equipment MIB from:
z the CD delivered with the SIC card
z the local customer service center of Emerson
z our website: www.emersonnetworkpower.com.cn
5.3 Applying For Management Authority
To enable the NMS to manage the intelligent equipment and environment through the SNMP agent function provided
by the SIC card, first of all, you must apply to the system administrator of the SIC card for management authority, ask
the system administrator to add the NMS into the NMS access control list of the SIC card. Refer to the NMS part in
4.5.5 Network Manage for procedures.
5.4 Notes
For the details on how to use the NMS to monitor the intelligent equipment and environment, refer to the NMS user
directions. In operation, please note the following points:
1. The community string used in getting data must be the same as the read community string set in the SIC card.
2. The community string used in configuring parameters and controlling equipment must be the same as the write
community string set in the SIC card.
3. If you are granted the read-only authority, you will not be able to use the NMS to perform control or configuration
operations, but can only view the operating parameters and alarm data.
4. If you want to modify a table, you must configure all the writable properties of it and submit them to the SIC card.
Only in this way can your modifications be accepted.
5. In case of a control failure due to lack of authorization or community string error, the NMS will receive an
AUTH_FAILURE trap.
RDU-SIC Card
User Manual
42
Chapter 6
Monitoring Method 3: Through RDU-Manager
Chapter 6 Monitoring Method 3: Through RDU-Manager
RDU-Manager is an SIC card centralized management software developed by Emerson Network Power Co., Ltd..
Through TCP/IP protocol, you can use RDU-Manager to obtain the real-time data and alarm data of the intelligent
equipment and environment from the SIC card, control the equipment and configure operating parameters.
RDU-Manager can manage up to ten thousand pieces of intelligent equipment.
To use RDU-Manager to manage intelligent equipment and environment through the SIC card, you need to open the
IE browser on the computer installed with RDU-Manager, and configure the IP address of the SIC card into
RDU-Manager.
For details on how to use RDU-Manager to monitor the intelligent equipment and environment, refer to RDU-Manager
Monitoring Software User Manual.
RDU-SIC Card
User Manual
Chapter 7
Monitoring Method 4: Through Nform
Chapter 7 Monitoring Method 4: Through Nform
Nform is an SIC card centralized management software developed by Emerson Network Power Co., Ltd.. Through
Velocity protocol, you can use Nform to obtain the real-time data and alarm data of the UPS from the SIC card,
control the UPS and configure operating parameters.
To use Nform to manage the UPS through the SIC card, you need to open the Nform on the computer installed with
Nform, and configure the IP address of the SIC card into Nform.
For details on how to use Nform to monitor the UPS, refer to Nform Monitoring Software User Manual.
RDU-SIC Card
User Manual
43
44
Chapter 8
Guarding Computer With Network Shutdown
Chapter 8 Guarding Computer With Network Shutdown
The computer safe shutdown program Network Shutdown is developed by Emerson Network Power Co., Ltd.. In case
of a UPS alarm, the SIC card will send alarm information to the preset computer installed with Network Shutdown.
Network Shutdown receives and processes the alarm information and takes the following protective measures to
protect the computer according to the user configurations:
z Notify the administrator
z Execute the command file
z Save the application files automatically and shutdown the computer
For the installation and operation of Network Shutdown, refer to Network Shutdown Software UNIX & Novell Netware
User Manual and Network Shutdown Software (Windows Version) User Manual.
RDU-SIC Card
User Manual
Chapter 9
Q’s & A’s
45
Chapter 9 Q’s & A’s
This chapter introduces the Q’s & A’s in the daily use of the SIC card. In case you encounter any problems, you are
recommended to seek solution in this chapter first. If the problem cannot be solved, seek technical assistance from
the local customer service center of Emerson.
9.1 Q’s & A’s In Installation
Question 1: The RUN indicator (yellow) of the SIC card remains off after installation, why?
Answer: The intelligent equipment is shut down or has not been connected to the utility. Turn on the intelligent
equipment. If the intelligent equipment cannot be turned on, check the connection between the intelligent equipment
and the utility and connect the network cable, then observe if the RUN indicator (yellow) turns on.
Question 2: When using the USB interface of the SIC card for the first time, how to use TTY to make
connection?
Answer: Before inserting the SIC card, you must first check that the jumper settings are correct. Refer to Table 2-2 for
corresponding settings. After finishing the settings, you must start the TTY and use the accessory USB cable to
connect the intelligent equipment with the computer. Because it takes only about five seconds to start the SIC card,
you cannot see the start process if you do not run TTY before inserting the card. If you do have started TTY before
inserting the card but cannot see the process, refer to the answer to Question 2 in 9.2 Q’s & A’s In Running.
Besides, please install the USB driver in the CD delivered with the SIC card, and find the serial port of CP2101 USB
to UART on the menu COM & PT in Device Manager, and remember it. You need to use this serial port to make
connection.
Question 3: Can I finish the installation without computer at hand to run Hyper Terminal?
Answer: No, if you don't know the IP address. If you know the IP address, or if it is a new card (default address:
192.168.1.1), you may use the following steps to configure your card through Telnet mode.
1. Connect the SIC card to the network.
2. Modify the network parameters of a computer located in the same LAN (better in the same HUB or switch) with the
SIC card to get them in the same network section. Suppose the SIC card’s IP address is: 192.168.1.1, subnet mask
is: 255.255.255.0, and gateway is: 0.0.0.0, then the computer IP address can be: 192.168.1.2, subnet mask can be:
255.255.255.0, and gateway can be: 0.0.0.0.
3. Reboot the computer, connect to the SIC card in Telnet mode, login with user name rduadmin and rduadmin’s
password. For a new SIC card, the default password is ‘emerson’.
4. After login, set the SIC card’s IP address and other network parameters. The SIC card will be rebooted
automatically, and later you may access the card using the new IP address.
5. Restore the network parameters of the computer.
Question 4: Why is the new password invalid after modifying the password of rduadmin, password of Web
system administrator admin or IP address of the SIC card and rebooting the system?
Answer: Please refer to Table 2-2 to check whether the jumper settings are correct.
Question 5: Why does the Web interface not display the sensor information after the IRM series sensors are
connected?
Answer: If it is confirmed that the IRM series sensors have data display in the display panel, please check the
following:
1. The DIP switches of the IRM series sensors are correctly set.
2. The addresses of all the IRM series sensors series-connected to the same SIC card cannot be the same.
3. The drivers of the IRM series sensors have been properly installed.
RDU-SIC Card
User Manual
46
Chapter 9
Q’s & A’s
9.2 Q’s & A’s In Running
Question 1: The LAN indicator (green) of the SIC card does not illuminate, why?
Answer: The SIC card is not connected to the network. Please connect it to the network.
Question 2: The SIC card is running, but when I start TTY and intend to configure the SIC parameters, why
does no login information appear on the screen?
Answer: Press the Enter key, and the login information should appear. If not, please verify that the SIC card is
running and check that:
1. The Pin 2 & Pin 3 of jumper J26 have been short-connected. Please refer to ‘Maintenance mode’ in Table 2-2 for
jumper settings.
2. The intelligent equipment is connected to the computer with the USB cable.
3. The USB driver has been properly installed, and the serial port CP2101 USB to UART is on the menu COM&PT in
Device Manager.
4. The serial port set in TTY is the same as the one connected to the intelligent equipment.
5. The serial port set in TTY is correct. Refer to the part Using TTY to login SIC card in 3.1.1
Login SIC Card.
Using TTY Or Telnet To
6. TTY and serial port can communicate well.
Question 3:
What shall I do if I lose my password?
Answer: If you forget the password of rduadmin, password of Web system administrator admin or IP address, please
refer to ‘Reset mode’ in Table 2-2 for restoring the SIC card parameters to default values, and the password of Web
system administrator admin is restored to ‘123456’ or ‘emerson’. If you forget the read-only user’s password, ask the
system administrator of the SIC card for it.
Question 4:Why can some computers visit the card while some others cannot, but these computers can visit
one another?
Answer: Incorrect SIC card gateway setting. If the default gateway is 0.0.0.0, the SIC card can be accessed only by
the computers in the same network segment. Please reset the SIC card gateway according to the gateway of the
computer.
Even though the gateway is set correctly, if firewall is installed in your network, you will also meet with this problem. If
so, contact the network administrator.
Question 5:I cannot send alarm data through SMS or call after I connect the SMS Modem, Why?
Answer: Check the following:
1. The power indicator of the SMS Modem is on.
2. Refer to ‘Normal mode’ in Table 2-2 and check whether the jumper settings are correct.
3. The SMS or call alarm has been set, and the telephone number set for sending alarms is correct.
4. The SIM card is properly installed in the SMS Modem and its charges are not owed.
9.3 Q’s & A’s In Web Monitoring
Question 1: When I type in the Web browser the IP address of the computer connected to the equipment
installed with the SIC card, the system prompts ‘cannot find server’, why?
Answer: Suppose the IP address is correct, there are two reasons:
1. The SIC card is not running.
If this is because the intelligent equipment is off, please turn on the intelligent equipment and try again.
2. Network connection has not been built.
Use the ping command to check whether the computer can connect to the card. Refer to the OS manual for the
usage of the ping command. If you cannot ping successfully, check whether the IP address of the SIC card is wrong.
RDU-SIC Card
User Manual
Chapter 9
Q’s & A’s
47
Question 2: Why does the system prompt connection timeout while visiting the SIC card through the
browser?
Answer: Too many network users (including Web users and NMSs). The SIC card can respond only five Web users
and five inquiring NMS concurrently. Please close or stop some Web browsers or NMSs and try again.
Question 3: Why are the intelligent equipment status and SIC card configuration displayed on Web browser
inconsistent with the actual situation?
Answer: It might be caused by:
1. Incorrect computer time.
2. Incorrect time of the SIC card.
3. Incorrect cache setting of the Web browser.
4. Web page time error on the computer.
Please set the time of the SIC card, computer time and browser cache correctly, and delete all temporary web pages
on your computer.
Question 4: The browser sometimes prompts web page error and cannot continue while sometimes not,
why?
Answer: This problem usually occurs when you have just started to browse the SIC card and the browser is
downloading the monitoring homepage from the SIC card, while at this point, you click other link on the homepage,
and the download process is thus interrupted. Please wait till correct status data appear on the homepage before you
carry out other operations.
Question 5: I have typed correct user name and password and there is no error message, but the homepage
does not come next, why?
Answer: Because the SIC card homepage is programmed by JavaScript, this problem may be caused by the
following two reasons:
1. You have installed anti-virus firewall. The software cannot identify normal web pages or web pages that contain
virus, so the homepage cannot be displayed. Please configure or close the firewall software.
2. JavaScript is disabled in the Web browser. To visit the SIC card web page, you must enable JavaScript. Refer to
the part Enabling JavaScript in 4.1 Checking Web Browser Settings.
9.4 Q’s & A’s In NMS Monitoring
Question 1: Why timeout error often occurs when NMS is visiting the SIC card?
Answer: This may be caused by the following three reasons:
1. The NMS is not in the Access Control list of the SIC card. Ask the system administrator to add it in the Access
Control list. Refer to the NMS part in 4.5.5 Network Manage.
2. Community string error. In this case, the NMS will receive an AUTH-FAILURE trap. The community string used in
sending request must be the same as that set in the access control parameters of the SIC card. Refer to the NMS
part in 4.5.5 Network Manage.
3. Network error. Check the network connection.
Question 2: When NMS attempts to configure SIC card parameters, genErr is replied, why?
Answer: genErr occurs in the following two cases:
1. The NMS is lack of control authority.
2. The SIC card fails in sending the configuration request of the NMS to the intelligent equipment. Please check
whether the parameters sent by the NMS are correct, and whether a communication failure trap is received.
Question 3: I just cannot use an NMS to add a new one in Access Control list of the SIC card, why?
Answer: Only the system administrator can add, delete, or modify NMS. Besides, you must submit all writable
properties of the NMS when you do this.
RDU-SIC Card
User Manual
48
Chapter 9
Q’s & A’s
9.5 Q’s & A’s In RDU-Manager Monitoring
Question: How can RDU-Manager manage the intelligent equipment through the SIC card in the network?
Answer: Use the configuration function of RDU-Manager to add the IP address of the SIC card to the configuration
file of RDU-Manager, and start RDU-Manager, then you can use it to manage the intelligent equipment.
9.6 Q’s & A’s In Nform Monitoring
Question: How can Nform manage the UPS through the SIC card in the network?
Answer: Use the configuration function of Nform to add the IP address of the SIC card to the configuration file of
Nform, and start Nform, then you can use it to manage the UPS.
9.7 Q’s & A’s In Using Network Shutdown
Question: How can Network Shutdown get information from the SIC card in case of a UPS alarmϋ
ϋ
Answer: Run Network Shutdown and enter the IP address of the SIC card to build up connection between the card
and the computer.
RDU-SIC Card
User Manual