1
User Manual
Version 1.6.x
WD SmartWare Software User Manual, Version 1.6.x
Backup Software
WD SmartWare™ Software
WD Service and Support
Should you encounter any problem, please give us an opportunity to address it before returning
this product. Most technical support questions can be answered through our knowledge base
or e-mail support service at http://support.wdc.com. If the answer is not available or if you
prefer, please contact WD® at the best telephone number shown below.
Your product includes 30 days of free telephone support during the warranty period. This 30day period starts on the date of your first telephone contact with WD Technical Support. E-mail
support is free for the entire warranty period and our extensive knowledge base is available 24/
7. To help us keep you informed of new features and services, remember to register your
product online at http://register.wdc.com.
Accessing Online Support
Visit our product support website at http://support.wdc.com and choose from these topics:
• Downloads—Download drivers, software, and updates for your WD product.
• Registration—Register your WD product to get the latest updates and special offers.
• Warranty & RMA Services—Get warranty, product replacement (RMA), RMA status, and
data recovery information.
• Knowledge Base—Search by keyword, phrase, or answer ID.
• Installation—Get online installation help for your WD product or software.
• WD Community—Share your thoughts and connect with other WD users.
Contacting WD Technical Support
When contacting WD for support, have your WD product serial number, system hardware, and
system software versions available.
North America
English
Spanish
800.ASK.4WDC
(800.275.4932)
800.832.4778
Europe (toll free)*
00800 ASK4 WDEU
(00800 27549338)
Europe
Middle East
Africa
+31 880062100
+31 880062100
+31 880062100
Asia Pacific
Australia
China
Hong Kong
India
Indonesia
Japan
Korea
Malaysia
Philippines
Singapore
Taiwan
1 800 42 9861
800 820 6682/+65 62430496
+800 6008 6008
1 800 11 9393 (MNTL)/1 800 200 5789 (Reliance)
011 26384700 (Pilot Line)
+803 852 9439
0120 994 120/00531 65 0442
02 703 6550
+800 6008 6008/1 800 88 1908/+65 62430496
1 800 1441 0159
+800 6008 6008/+800 608 6008/+65 62430496
+800 6008 6008/+65 62430496
* Toll free number is available in the following countries: Austria, Belgium, Denmark, France, Germany, Ireland, Italy,
Netherlands, Norway, Spain, Sweden, Switzerland, United Kingdom.
ii
WD SMARTWARE SOFTWARE
USER MANUAL
Table of Contents
WD Service and Support . . . . . . . . . . . . . . . . . . . . . . . . . . . . . . . . . . . . . . . . . . . . . . . . . . . ii
Accessing Online Support . . . . . . . . . . . . . . . . . . . . . . . . . . . . . . . . . . . . . . . . . . . . . . . . . . . . . ii
Contacting WD Technical Support. . . . . . . . . . . . . . . . . . . . . . . . . . . . . . . . . . . . . . . . . . . . . . . ii
1
About the WD SmartWare Software . . . . . . . . . . . . . . . . . . . . . . . . . . . . 1
Operating System Compatibility . . . . . . . . . . . . . . . . . . . . . . . . . . . . . . . . . . . . . . . . . . . . . 1
Hard Drive Support. . . . . . . . . . . . . . . . . . . . . . . . . . . . . . . . . . . . . . . . . . . . . . . . . . . . . . . . 1
Functional Overview . . . . . . . . . . . . . . . . . . . . . . . . . . . . . . . . . . . . . . . . . . . . . . . . . . . . . . . 2
Home Tab Display . . . . . . . . . . . . . . . . . . . . . . . . . . . . . . . . . . . . . . . . . . . . . . . . . . . . . . . . . . . 3
Backup Tab Displays . . . . . . . . . . . . . . . . . . . . . . . . . . . . . . . . . . . . . . . . . . . . . . . . . . . . . . . . . 8
Retrieve Tab Displays. . . . . . . . . . . . . . . . . . . . . . . . . . . . . . . . . . . . . . . . . . . . . . . . . . . . . . . . 11
Settings Tab Displays. . . . . . . . . . . . . . . . . . . . . . . . . . . . . . . . . . . . . . . . . . . . . . . . . . . . . . . . 14
Help Tab Display . . . . . . . . . . . . . . . . . . . . . . . . . . . . . . . . . . . . . . . . . . . . . . . . . . . . . . . . . . . 17
2
Installing the Software and Getting Started . . . . . . . . . . . . . . . . . . . . 19
3
Securing the Drive . . . . . . . . . . . . . . . . . . . . . . . . . . . . . . . . . . . . . . . . . 22
Password Protecting the Drive . . . . . . . . . . . . . . . . . . . . . . . . . . . . . . . . . . . . . . . . . . . . . . 22
Unlocking the Drive . . . . . . . . . . . . . . . . . . . . . . . . . . . . . . . . . . . . . . . . . . . . . . . . . . . . . . 23
Unlocking the Drive with the WD SmartWare Software . . . . . . . . . . . . . . . . . . . . . . . . . . . . . . 24
Unlocking the Drive Without the WD SmartWare Software . . . . . . . . . . . . . . . . . . . . . . . . . . . 25
Changing Your Password . . . . . . . . . . . . . . . . . . . . . . . . . . . . . . . . . . . . . . . . . . . . . . . . . . 26
Turning Off the Drive Lock Feature. . . . . . . . . . . . . . . . . . . . . . . . . . . . . . . . . . . . . . . . . . . 27
4
Backing Up Your Computer Files . . . . . . . . . . . . . . . . . . . . . . . . . . . . . 28
How the Backup Function Works . . . . . . . . . . . . . . . . . . . . . . . . . . . . . . . . . . . . . . . . . . . . 28
Backing Up Files. . . . . . . . . . . . . . . . . . . . . . . . . . . . . . . . . . . . . . . . . . . . . . . . . . . . . . . . . 28
5
Retrieving Backed Up Files . . . . . . . . . . . . . . . . . . . . . . . . . . . . . . . . . . 33
How the Retrieve Function Works . . . . . . . . . . . . . . . . . . . . . . . . . . . . . . . . . . . . . . . . . . . 33
Retrieving Files . . . . . . . . . . . . . . . . . . . . . . . . . . . . . . . . . . . . . . . . . . . . . . . . . . . . . . . . . . 33
6
Managing and Customizing the Drive . . . . . . . . . . . . . . . . . . . . . . . . . 37
Using the WD Quick View Icon. . . . . . . . . . . . . . . . . . . . . . . . . . . . . . . . . . . . . . . . . . . . . . 37
Opening the WD SmartWare Software. . . . . . . . . . . . . . . . . . . . . . . . . . . . . . . . . . . . . . . . . . .
Checking Drive Status . . . . . . . . . . . . . . . . . . . . . . . . . . . . . . . . . . . . . . . . . . . . . . . . . . . . . . .
Safely Disconnecting the Drive. . . . . . . . . . . . . . . . . . . . . . . . . . . . . . . . . . . . . . . . . . . . . . . . .
Monitoring Icon Alerts . . . . . . . . . . . . . . . . . . . . . . . . . . . . . . . . . . . . . . . . . . . . . . . . . . . . . . .
37
38
38
38
Naming the Drive . . . . . . . . . . . . . . . . . . . . . . . . . . . . . . . . . . . . . . . . . . . . . . . . . . . . . . . .
Setting the Drive Sleep Timer . . . . . . . . . . . . . . . . . . . . . . . . . . . . . . . . . . . . . . . . . . . . . . .
Registering the Drive . . . . . . . . . . . . . . . . . . . . . . . . . . . . . . . . . . . . . . . . . . . . . . . . . . . . .
Checking Drive Health . . . . . . . . . . . . . . . . . . . . . . . . . . . . . . . . . . . . . . . . . . . . . . . . . . . .
Erasing the Drive. . . . . . . . . . . . . . . . . . . . . . . . . . . . . . . . . . . . . . . . . . . . . . . . . . . . . . . . .
39
39
40
41
43
Using the Drive Settings Drive Erase Function. . . . . . . . . . . . . . . . . . . . . . . . . . . . . . . . . . . . . 43
Using the Drive Unlock Utility. . . . . . . . . . . . . . . . . . . . . . . . . . . . . . . . . . . . . . . . . . . . . . . . . . 44
Restoring the WD SmartWare Software and Disk Image . . . . . . . . . . . . . . . . . . . . . . . . . . 45
TABLE OF CONTENTS – iii
WD SMARTWARE SOFTWARE
USER MANUAL
7
Managing and Customizing the Software . . . . . . . . . . . . . . . . . . . . . . 46
Specifying the Number of Backup Versions . . . . . . . . . . . . . . . . . . . . . . . . . . . . . . . . . . . .
Specifying a Different Retrieve Folder . . . . . . . . . . . . . . . . . . . . . . . . . . . . . . . . . . . . . . . .
Checking for Software Updates . . . . . . . . . . . . . . . . . . . . . . . . . . . . . . . . . . . . . . . . . . . . .
Uninstalling the WD SmartWare Software . . . . . . . . . . . . . . . . . . . . . . . . . . . . . . . . . . . . .
A
46
46
47
48
Warranty Information . . . . . . . . . . . . . . . . . . . . . . . . . . . . . . . . . . . . . . . 49
GNU General Public License (“GPL”) . . . . . . . . . . . . . . . . . . . . . . . . . . . . . . . . . . . . . . . . . 49
Index . . . . . . . . . . . . . . . . . . . . . . . . . . . . . . . . . . . . . . . . . . . . . . . . . . . . . . 50
TABLE OF CONTENTS – iv
WD SMARTWARE SOFTWARE
USER MANUAL
1
1
About the WD SmartWare Software
WD SmartWare™ software is an easy-to-use backup application that gives you the
power to:
•
Protect your data automatically—Relax! Your data is safe. Automatic, continuous
backup instantly makes a second copy whenever you add or change a file.
•
See your backup as it happens—Visual backup organizes and displays your files
in categories and shows the progress of your backup.
•
Bring back lost files effortlessly—Retrieve your valuable data to its original
location whether you have lost everything, deleted a file, or just overwritten an
important file.
•
Take control—Customize your backup, set drive security, run diagnostics,
manage the power settings, and more from the WD SmartWare control center.
•
Secure your drive—Gain peace of mind knowing that your data is protected from
unauthorized access or theft with password protection and 256-bit hardwarebased encryption.
Operating System Compatibility
The WD SmartWare software is compatible with the following Windows® operating
systems:
•
Windows XP
•
Windows Vista®
•
Windows 7
Compatibility can vary, depending on hardware configuration and operating system.
For highest performance and reliability, always install the latest updates and service
pack (SP). Go to the Start menu and select Windows Update.
Hard Drive Support
The WD SmartWare software supports the following WD external devices:
•
Direct-attached My Book® Drives
- My Book Essential™
- My Book Elite™
- My Book for Mac® (reformatted for Windows operating systems)
- My Book Studio™ (reformatted for Windows operating systems)
•
Direct-attached My Passport® Drives
- My Passport Essential™
- My Passport Essential SE
-
My Passport for Mac® (reformatted for Windows operating systems)
My Passport SE for Mac (reformatted for Windows operating systems)
My Passport Elite™
My Passport Studio™ (reformatted for Windows operating systems)
ABOUT THE WD SMARTWARE SOFTWARE – 1
WD SMARTWARE SOFTWARE
USER MANUAL
•
Network-attached Devices
- My Book Live™
- My Book Live Duo
Note: You must reformat Mac drives for compatibility with Windows operating
systems to use them with this version of the WD SmartWare software. For
information about reformatting your My Book or My Passport drive, see
answer ID 3865 in the WD Knowledge Base at http://support.wdc.com.
The WD SmartWare software does not support other manufacturers’ hard drives, or WD
hard drives that were not originally configured for the WD SmartWare software.
Functional Overview
All operational features and capabilities of the WD SmartWare software are presented in
five tab-selected screen displays where:
The . . . tab display
Provides . . .
Home
Five tabs and content gauges showing the total capacity and
category structure of your computer’s internal hard drive and each
supported external device connected to it.
If your computer has more than one internal hard drive or multiple
hard drive partitions, or if a connected external device has
multiple partitions or network shares, then the WD SmartWare
software displays a selector box that you can use to specify the
one you want to work with.
See “Home Tab Display” on page 3.
Backup
One of two backup dialogs, depending on the backup mode that
you select:
•
The by-category dialog provides content gauges showing the
total capacity and category structure of your computer’s
internal hard drive, and the external device that you are
working with.
•
The by-file dialog provides a folder view of your computer’s
internal hard drive for selecting the files and folders that you
want to back up.
Each backup dialog also provides a:
•
File/category backup toggle button for switching between the
two backup modes
•
Start/stop backup toggle button for controlling the backup
See “Backup Tab Displays” on page 8.
(Continued)
ABOUT THE WD SMARTWARE SOFTWARE – 2
WD SMARTWARE SOFTWARE
USER MANUAL
The . . . tab display
Provides . . .
Retrieve
Three full-screen dialogs for selecting the:
•
Backup volume that you want to retrieve files from
•
Destination on your computer where you want to copy the
retrieved files
•
Files that you want to retrieve
See “Retrieve Tab Displays” on page 11.
Settings
One of two dialogs, depending on the type and model of your
connected device.
For all My Book drives and most My Passport drives, the Settings
tab display provides buttons for displaying Software Settings and
Drive Settings screens.
For three models of My Passport drives, the Settings tab display
provides only the Software Settings screen.
See “Settings Tab Displays” on page 14.
Help
Instant access to:
•
Detailed information about backing up and retrieving files and
making your software and drive setup selections
•
WD Customer Support and software update services
See “Help Tab Display” on page 17.
In each display, the WD SmartWare software changes the names and graphic images to match
the hardware configuration of the connected device.
Note: In addition to the detailed Help tab information, each WD SmartWare
display provides easy access to abbreviated online help to quickly guide
you through your backup, retrieve, and settings tasks. Whenever you are
uncertain about what to do, just click the info/online help icon in the
upper-right corner of the display:
To close the info/online help screen after reading the online help, click the
X icon in the upper-right corner of the help screen.
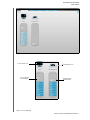
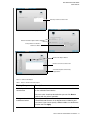
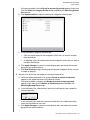
Home Tab Display
Use the Home tab display to view hard drive content gauges and select:
•
The internal hard drive or hard drive partition that you want to back up files from
or copy retrieved files to when your computer has more than one
•
The external device that you want to back up files to, retrieve files from, or
customize when you have more than one connected to your computer
See Figure 1 on page 4 and Table 1 on page 5 for a brief functional description of the
Home tab display.
ABOUT THE WD SMARTWARE SOFTWARE – 3
WD SMARTWARE SOFTWARE
USER MANUAL
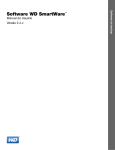
Your Computer Icon
External Device Icon
Your Computer’s
Content Gauge
External Device
Content Gauge
Figure 1. Home Tab Display
ABOUT THE WD SMARTWARE SOFTWARE – 4
WD SMARTWARE SOFTWARE
USER MANUAL
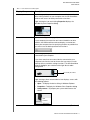
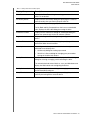
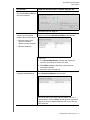
Table 1. Home Tab Functional Description
Display Component
Description
Your computer icon
Provides a graphic representation and name of the internal hard
drive or drive partition on your computer that the WD SmartWare
software will access for backup and retrieve functions.
Right-clicking the icon and clicking Properties displays the
Windows System Properties dialog:
Internal drive selector box
(Not shown in Figure 1 on page 4.)
If your computer has more than one internal hard drive or drive
partition, the WD SmartWare software displays a selector box
below your computer icon for specifying the drive or partition that
you want to use for backup and retrieve functions:
External device icon
Provides a graphic representation and name of the external device
connected to your computer.
If you have more than one external device connected to your
computer, left-click the icon for the one that you want to use for
backup, retrieve, and drive settings functions. The WD SmartWare
software highlights your selection with a light-blue shadow
background:
Selected My Book Drive
Right-clicking a direct-attached device icon displays a menu with
the following options:
•
Open—To display the device listing in Windows Explorer
•
Properties—To display the Windows Drive Properties dialog
•
Safely remove—To prepare your system to disconnect the
device
(Continued)
ABOUT THE WD SMARTWARE SOFTWARE – 5
WD SMARTWARE SOFTWARE
USER MANUAL
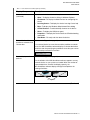
Table 1. Home Tab Functional Description (Continued)
Display Component
Description
External device icon
(continued)
For a network-attached device, the options are:
•
Open—To display the device listing in Windows Explorer
•
Dashboard—To display the Web interface for configuring the
device
•
Learning Center—To display the device Learning Center help
•
Map—To display the Windows Map Network Drive dialog
•
Create Shortcut—To add a desktop shortcut to the device
•
Alerts—To display the WD Alerts report
•
Properties—To display the Device Details and Troubleshooting
information
•
Shut Down—To ready and shut down the device
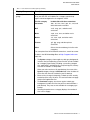
External device drive
partition or network share
selector box
(Not shown in Figure 1 on page 4.)
Device display scroll
pointers
(Not shown in Figure 1 on page 4.)
If an external device has more than one drive partition or network
share, the WD SmartWare software displays a selector box below
the device icon for specifying the partition or share that you want to
use for backup and retrieve functions:
One installation of the WD SmartWare software supports as many
external devices as you system can handle. When the number of
connected devices exceeds the display capacity, the
WD SmartWare software displays left/right scroll pointers for
viewing all of them:
Scroll Pointers
(Continued)
ABOUT THE WD SMARTWARE SOFTWARE – 6
WD SMARTWARE SOFTWARE
USER MANUAL
Table 1. Home Tab Functional Description (Continued)
Display Component
Description
Your computer’s content
gauge
The content gauge for your computer’s internal hard drive shows
all of your files that are available for a category-type backup
against a blue background in six categories where:
This file category
Includes files with these extensions
Documents
.doc, .txt, .htm, .html, .ppt, .xls, .xml, and
other document extensions
Mail
.mail, .msg, .pst., and other mail
extensions
Music
.mp3, .wav, .wma, and other music
extensions
Movies
.avi, .mov, .mp4, and other movie
extensions
Pictures
.gif, .jpg, .png, and other picture
extensions
Other
Others that do not belong in the five main
categories
For a complete list of all included file extensions, search for answer
ID 3644 in the WD Knowledge Base at http://support.wdc.com.
Note that:
•
The System category, shown against a dark gray background,
includes all of your operating system files that are not available
for a category-type backup, including: system files, program
files, applications, working files like .tmp and .log files, and any
files that are stored in a Temp folder.
When you select and run a file-type backup, the name of the
System category changes to Excluded and it then includes all
of the files that were not included in your file backup.
•
Because they change so frequently, Outlook .pst files are only
backed up once every 24 hours. This exclusion does not apply
to other mail application files.
•
The Retrieved category, also shown against a dark gray
background, includes the files that you have retrieved from a
prior backup. They, too, are not available for a category-type
backup.
•
Hovering the pointer over a category displays the number of
files in the category.
(Continued)
ABOUT THE WD SMARTWARE SOFTWARE – 7
WD SMARTWARE SOFTWARE
USER MANUAL
Table 1. Home Tab Functional Description (Continued)
Display Component
Description
External device content
gauge
After installing the WD SmartWare software—before running your
first backup or copying any files to the device—the external device
content gauge shows only a small number of files in the Additional
Files category. These are the system files and hidden files that your
computer’s operating system put there when you installed the
device.
After running a backup or copying files to the external device, the
external device content gauge shows:
•
All of the files that have been backed up in the same categories
as the content gauge for your computer’s internal hard drive
(see “Your computer’s content gauge” on page 7)
•
Any other files that you have copied or saved to the external
device in the Additional Files category
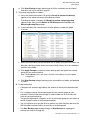
Backup Tab Displays
The WD SmartWare software provides two different Backup tab displays, depending on
how you want to select files to back up:
•
By category—As shown in the content gauges
•
By file—As shown in the folder structure of your computer’s internal hard drive
See “How the Backup Function Works” on page 28 for a description of category- and
file-type backups.
Use the Backup tab displays to select the files or categories of files that you want to
back up and control the backup operation.
See Figure 2 and Table 2 on page 9 for a brief functional description of the Backup tab
displays.
ABOUT THE WD SMARTWARE SOFTWARE – 8
WD SMARTWARE SOFTWARE
USER MANUAL
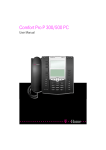
Backup by Category Display
Backup by Files Display
Your Computer’s
Content Gauge
External Device
Content Gauge
Category/File Backup
Toggle Button
Advanced Backup Area
Start/Stop Backup
Toggle Button
Figure 2. Backup Tab Displays
Table 2. Backup Tab Functional Description
Display Component
Description
Your computer’s content
gauge
Same as the content gauge for your computer’s hard drive on the
Home tab display. (See “Your computer’s content gauge” on
page 7.)
External device content
gauge
Same as the content gauge for your external device on the Home
tab display. (See “External device content gauge” on page 8.)
(Continued)
ABOUT THE WD SMARTWARE SOFTWARE – 9
WD SMARTWARE SOFTWARE
USER MANUAL
Table 2. Backup Tab Functional Description (Continued)
Display Component
Description
Advanced backup area
In category mode, the initial/default configuration of the
WD SmartWare software is to back up all categories of your files. In
this configuration, the advanced backup area is blank.
Clicking Advanced View displays a backup files selection box that
you can use to specify the categories of files that you want to back
up:
Clicking Apply Changes in the backup files selection box updates
the content gauge for your computer and your external device.
Clicking Switch to File Backup displays a folder structure view
that you can use to specify individual files or folders that you want
to back up:
Note: The folder structure displaces the content gauge for
your computer on the Backup tab display.
In file mode, the initial/default configuration of the WD SmartWare
software is with none of the files/folders selected for backup. After
selecting the files or folders that you want to back up, clicking:
•
Apply Changes updates the content gauge for your external
device.
•
Revert clears your recent selections and redisplays the prior
applied configuration.
(Continued)
ABOUT THE WD SMARTWARE SOFTWARE – 10
WD SMARTWARE SOFTWARE
USER MANUAL
Table 2. Backup Tab Functional Description (Continued)
Display Component
Description
Start/stop backup toggle
button
Controls backup operations by starting and stopping the backup.
Category/file backup
toggle button
Switches the backup mode between categories and individual
files:
•
Category mode—Backs up files according to their categories,
as shown in the content gauges for your computer and your
external device.
The button name is Switch to File Backup when the backup
mode is category.
•
File mode—Backs up files according to their folder structure on
your computer.
The button name is Switch to Category Backup when the
backup mode is file.
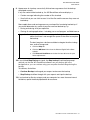
Retrieve Tab Displays
Three Retrieve tab displays guide you through finding backup files and copying them to
your computer’s internal hard drive:
•
Selecting the backup volume to retrieve from
•
Selecting the destination for retrieved files
•
Selecting the files to retrieve from your external device
See Figure 3 and Table 3 on page 12 for a brief functional description of the Retrieve tab
displays.
ABOUT THE WD SMARTWARE SOFTWARE – 11
WD SMARTWARE SOFTWARE
USER MANUAL
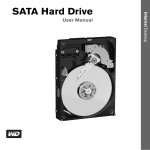
Backed Up Volumes Selection Box
Select a Volume to Retrieve From Display
Retrieve Destination Option Buttons
Change Retrieve Folder Box
and Browse Button
Select a Destination for Retrieved Files Display
Retrieve Files Option Buttons
Retrieve Some Files Selection Box
Start Retrieving/Cancel Retrieving
Toggle Button
Select Content to Retrieve Display
Figure 3. Retrieve Tab Displays
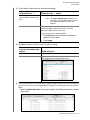
Table 3. Retrieve Tab Functional Description
Display Component
Description
Backed up volumes
selection box
Lists the backed up volumes that are available to retrieve files from
on the selected external device.
You must select a backup volume before you can click Next to
continue with the retrieve operation.
Change retrieve folder box
and browse button
By default, the WD SmartWare software creates and uses a folder
named Retrieved Contents in the My Documents folder for your
user name. If you want to specify a different folder, use the Browse
function and click Apply.
(Continued)
ABOUT THE WD SMARTWARE SOFTWARE – 12
WD SMARTWARE SOFTWARE
USER MANUAL
Table 3. Retrieve Tab Functional Description (Continued)
Display Component
Description
Retrieve destination
option buttons
Specify the location on your computer’s internal hard drive where
you want to copy the files retrieved from the selected external
device:
Retrieve files option
buttons
•
To the Original Places copies the retrieved files to the same
location that they were backed up from.
•
To a Retrieved Content Folder copies all of the retrieved files
to a single folder.
By default, the Retrieve Some Files option is selected and the
WD SmartWare software displays the Retrieve Some Files
selection box that you can use to find and retrieve only selected
files or folders.
Selecting the Retrieve All Files option closes the Retrieve Some
Files selection box and the WD SmartWare software retrieves all of
the files from the selected backup volume on the selected external
device.
Retrieve some files
selection box
Displays all of the files from the selected backup volume on the
selected external device in a folder structure with check boxes for
selecting individual files or folders:
Start/cancel retrieving
toggle button
Controls retrieve operations by starting and canceling the retrieve.
ABOUT THE WD SMARTWARE SOFTWARE – 13
WD SMARTWARE SOFTWARE
USER MANUAL
Settings Tab Displays
The configuration of the Settings tab display depends on the type and model of the
selected external device:
•
For all My Book drives and most My Passport drives, the Settings tab display
provides buttons that open the:
- Software Settings screen
- Drive Settings screen
•
For three models of My Passport drives—the ones that support the
WD Security™ and WD Drive Utilities™ software—the WD SmartWare software
displays only the Software Settings screen.
To determine the model of an external device, hover the cursor over the device
icon on the Home screen to see the About your drive ToolTip display:
You can also use Windows Explorer by right-clicking the device, selecting
Properties, and clicking the Hardware tab:
In these examples the model of the selected device is identified by the Product ID
of 0748. The three My Passport drive models that display only the Software
Setting screen are:
- 071D, My Passport Studio (reformatted for Windows operating systems)
- 0746, My Passport for Mac (reformatted for Windows operating systems)
- 0748, My Passport
For these drives, you must use the WD Security and WD Drive Utilities software
to access the drive settings functions.
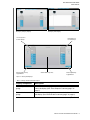
See Figure 4 on page 15 and Table 4 on page 16 for a brief functional description of the
Settings tab displays.
ABOUT THE WD SMARTWARE SOFTWARE – 14
WD SMARTWARE SOFTWARE
USER MANUAL
Settings Tab Display
Software Settings Screen
Drive Settings Screen
Figure 4. Settings Tab Displays
ABOUT THE WD SMARTWARE SOFTWARE – 15
WD SMARTWARE SOFTWARE
USER MANUAL
Table 4. Settings Tab Functional Description
Display Component
Description
Drive Erase button
Displays the Drive Erase dialog for erasing your external device
when it is not locked.
File History button
Displays the Set File History dialog for specifying the number of
backup versions that you want to keep for each file.
Label button
(Not shown in Figure 4 on page 15)
For My Book and My Passport drives that have a customizable
label, displays the Set Label dialog for naming the drive.
Preferences button
Displays the Set Preferences dialog for enabling/disabling the
option that automatically checks for software updates.
Registration button
Displays the Register Drive dialog for registering your external
device.
Retrieve Folder button
Displays the Set Retrieve Folder dialog for specifying a different
destination folder for retrieved files.
Security button
Depending on whether your external device is already password
protected or not, displays the:
Set Up Drive button
•
Set Security dialog for creating a password
•
Your Drive is Secure dialog for changing your password or
turning off the drive lock feature
For direct-attached external devices, displays the Drive Settings
dialog for securing, managing, and customizing the drive.
For network-attached external devices, uses your Web browser to
display the Web interface for configuring the device.
Set Up Software button
Displays the Set Up Software dialog for managing and customizing
the WD SmartWare software.
Sleep Timer button
Displays the Set Sleep Timer dialog for specifying the period of
inactivity for turning off the external device.
ABOUT THE WD SMARTWARE SOFTWARE – 16
WD SMARTWARE SOFTWARE
USER MANUAL
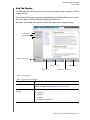
Help Tab Display
The Help tab display provides quick access to Learning Center topics and links to online
support services.
The Learning Center topics provide more detail than the info/online help for each screen,
but not as much as the WD SmartWare Software User Manual.
See Figure 5 and Table 5 for a brief functional description of the Help tab display.
Learning Center
Topic Buttons
Update Software Button
Contact Us Link
Support Link
WD Store Link
Online User Manuals Link
Figure 5. Help Tab Display
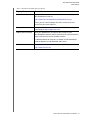
Table 5. Help Tab Functional Description
Display Component
Description
Contact Us link
Uses your Web browser to connect to the WD Service & Support
Contact Us page at http://support.wdc.com/contact.
Learning Center topic
buttons
Provide links to display the main Learning Center help topics:
•
Overview
•
Backup
•
Retrieve
•
Manage & Customize
(Continued)
ABOUT THE WD SMARTWARE SOFTWARE – 17
WD SMARTWARE SOFTWARE
USER MANUAL
Table 5. Help Tab Functional Description (Continued)
Display Component
Description
Online User Manuals link
Uses your Web browser to connect to the user manual page for
WD SmartWare manuals at:
http://www.wdc.com/wdproducts/wdsmartware/um.asp.
There, you can select and open the online version of the user
manual for your external device.
Support link
Uses your Web browser to connect to the WD Service & Support
Home page at http://support.wdc.com.
Update Software button
Uses your Web browser to compare the versions of your
WD SmartWare software and the firmware of the selected external
device with the most-recent available versions.
If updated software or firmware is available, the WD SmartWare
software prompts you do download and install it.
WD Store link
Uses your Web browser to connect to the WD online store at:
http://www.wdstore.com
ABOUT THE WD SMARTWARE SOFTWARE – 18
WD SMARTWARE SOFTWARE
USER MANUAL
2
1
Installing the Software and Getting Started
This chapter provides instructions for installing and getting started with the
WD SmartWare software.
The WD SmartWare setup file can be:
• On the drive for direct-attached external devices
• Either on the drive or on the setup CD for network-attached devices
• In the My Documents\Downloads folder on your computer for updated software
When the setup file is on the drive, disregard this procedure and follow the software
installation procedure in the drive user manual.
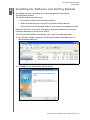
To install the WD SmartWare software from your setup CD or download folder:
1. Use Windows Explorer to open the WD SmartWare folder and double-click the
WD SmartWare Setup file:
2. Click Next on the WD SmartWare Setup Wizard:
INSTALLING THE SOFTWARE AND GETTING STARTED – 19
WD SMARTWARE SOFTWARE
USER MANUAL
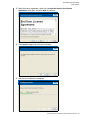
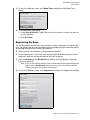
3. Read the license agreement, select the I accept the terms in the License
Agreement check box, and click Next to continue:
4. Click Install to begin the software installation:
5. Wait for the installation to complete:
INSTALLING THE SOFTWARE AND GETTING STARTED – 20
WD SMARTWARE SOFTWARE
USER MANUAL
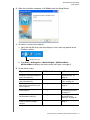
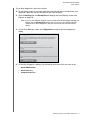
6. When the installation completes, click Finish to exit the Setup Wizard:
7. To confirm a successful installation:
a. Verify that the WD Quick View icon displays in the system tray portion of the
Windows taskbar:
WD Quick View Icon
b. Click Start > All Programs > Western Digital > WD SmartWare >
WD SmartWare to display the Home screen (see Figure 1 on page 4).
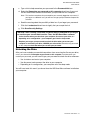
8. On the Home screen:
IF you want to . . .
THEN click the . . . tab
AND see . . .
Back up the files on your
computer’s internal hard drive to
your external device,
Backup
“Backing Up Your
Computer Files” on
page 28.
Retrieve backed up files from
your external device,
Retrieve
“Retrieving Backed Up
Files” on page 33.
Create a password to keep others
from accessing the files on your
external device,
Settings
“Securing the Drive” on
page 22.
Customize the settings of your
external device,
Settings
“Managing and
Customizing the Drive”
on page 37
Customize the settings of the
WD SmartWare software,
Settings
“Managing and
Customizing the
Software” on page 46.
View Learning Center help topics
and links to online support
services,
Help
“Help Tab Display” on
page 17
INSTALLING THE SOFTWARE AND GETTING STARTED – 21
WD SMARTWARE SOFTWARE
USER MANUAL
3
1
Securing the Drive
This chapter includes the following topics:
Password Protecting the Drive
Unlocking the Drive
Changing Your Password
Turning Off the Drive Lock Feature
Password Protecting the Drive
You should password protect your drive if you are worried that someone else will gain
access to your drive and you do not want them to see your files on the drive.
CAUTION! The WD SmartWare software uses your password to electronically
lock and unlock your drive. If you forget your password, you will not be able to
access the data that is on your drive or write new data to it. You will have to erase
the drive before you can use it again.
To create a password and keep others from accessing the files on your drive:
1. On the Home screen, if you have more than one external device connected to your
computer, select the icon for the one that you want to create a password for.
2. Click the Settings tab and Set Up Drive to display the Drive Settings screen (see
Figure 4 on page 15).
Note: If you see the Software Settings screen instead of the WD SmartWare Settings tab
display with the Set Up Drive button, then you must use the WD Security software
to create a password for the selected external device.
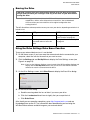
3. On the Drive Settings screen, click Security to display the Set Security dialog:
4. On the Set Security dialog:
a. Type your password in the Choose a password box, using up to 25 characters.
b. Retype your password in the Verify password box.
SECURING THE DRIVE – 22
WD SMARTWARE SOFTWARE
USER MANUAL
c. Type a hint to help remember your password in the Password hint box.
d. Select the Remember my password on this computer check box if you want
the WD SmartWare software to remember your password on this computer.
Note: This function remembers the password for your currently logged on user name. If
you log on as a different user, you will have to type your password and repeat this
selection.
e. Read the warning about the possibility of data loss if you forget your password.
f.
Click the I understand check box to signify that you accept the risk.
g. Click Save Security Settings.
CAUTION! After creating a password, the drive remains unlocked for as long as
you continue your current work session. Then, the WD SmartWare software:
•
Locks the drive when you shut down your computer, disconnect your drive, or—
depending on its configuration—your computer goes into the sleep mode
•
Requires you to type your password to unlock the drive when you restart your
computer or reconnect your drive, UNLESS you selected the Remember my password
on this computer check box when you created your password
Unlocking the Drive
After you have created a password to keep others from accessing the files on your drive,
unless you selected the Remember my password on this computer check box when you
created your password, you will have to type your password to unlock the drive whenever:
• You shut down and restart your computer
• You disconnect and reconnect the drive to your computer
• Depending on its configuration, your computer exits the sleep mode
You will have to do this even if you do not have the WD SmartWare software installed on
your computer.
SECURING THE DRIVE – 23
WD SMARTWARE SOFTWARE
USER MANUAL
Unlocking the Drive with the WD SmartWare Software
Whenever you shut down and restart your computer, or disconnect and reconnect a
locked device to your computer, unless you selected the Remember my password on this
computer check box when you created your password, the WD SmartWare software adds a
lock symbol to the icon and displays a Drive is locked message in place of the content
gauge for the device:
To unlock the drive with WD SmartWare software:
1. If the Unlock your drive dialog does not appear automatically, click the drive image
above the Drive is locked message to display it:
2. Type your password in the Password box.
3. If you want to avoid this dialog in the future, select the Remember my password on
this computer check box.
4. Click Unlock.
SECURING THE DRIVE – 24
WD SMARTWARE SOFTWARE
USER MANUAL
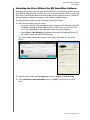
Unlocking the Drive Without the WD SmartWare Software
Whenever you connect your password-protected drive to a computer that does not have
the WD SmartWare software installed, you can use the Drive Unlock utility to unlock the
drive there. The WD SmartWare software provides the Drive Unlock utility on a virtual CD
drive that appears under My Computer in the Windows Explorer display.
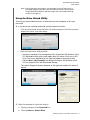
To unlock the drive without the WD SmartWare software installed:
1. Start the Drive Unlock utility by either:
• Using your computer’s file management utility to open the WD Unlocker virtual CD
and double-clicking the unlock application file—either Unlock.exe or WD Drive
Unlock.exe, depending on the type and model of the external device
• Clicking Start > My Computer and double-clicking the WD Unlocker virtual CD
icon under Devices with Removable Storage
The unlock dialog that displays depends on the type and model of the external
device:
2. Type your password in the Password box and click Unlock or Unlock Drive.
3. At the Your drive is now unlocked prompt, click Exit to close the Drive Unlock
utility.
SECURING THE DRIVE – 25
WD SMARTWARE SOFTWARE
USER MANUAL
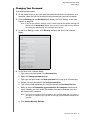
Changing Your Password
To change your password:
1. On the Home screen, if you have more than one external device connected to your
computer, select the icon for the one with the password that you want to change.
2. Click the Settings tab and Set Up Drive to display the Drive Settings screen (see
Figure 4 on page 15).
Note: If you see the Software Settings screen instead of the WD SmartWare Settings tab
display with the Set Up Drive button, then you must use the WD Security software
to change your password for the selected external device.
3. On the Drive Settings screen, click Security to display the Your Drive is Secure
dialog:
4. On the Your Drive is Secure dialog:
a. Type your current password in the Password box.
b. Select the Change password option.
c. Type your new password in the New password box, using up to 25 characters.
d. Retype your new password in the Verify password box.
e. Type a hint to help remember your new password in the Password hint box.
f.
Select or clear the Remember my password on this computer check box to
signify whether you want the WD SmartWare software to remember your new
password on this computer.
Note: This function remembers the password for your currently logged on user name. If
you log on as a different user, you will have to type your password and repeat this
selection.
g. Click Update Security Settings.
SECURING THE DRIVE – 26
WD SMARTWARE SOFTWARE
USER MANUAL
Turning Off the Drive Lock Feature
To remove password protection from your drive:
1. On the Home screen, if you have more than one external device connected to your
computer, select the icon for the one that you want to remove password protection
from.
2. Click the Settings tab and Set Up Drive to display the Drive Settings screen (see
Figure 4 on page 15).
Note: If you see the Software Settings screen instead of the WD SmartWare Settings tab
display with the Set Up Drive button, then you must use the WD Security software
to remove password protection from the selected external device.
3. On the Drive Settings screen, click Security to display the Your Drive is Secure
dialog:
4. On the Your Drive is Secure dialog:
a. Type your password in the Password box.
b. Select the Remove security option.
c. Click Update Security Settings.
SECURING THE DRIVE – 27
WD SMARTWARE SOFTWARE
USER MANUAL
4
1
Backing Up Your Computer Files
This chapter includes the following topics:
How the Backup Function Works
Backing Up Files
How the Backup Function Works
The WD SmartWare software automatically and continuously backs up all of your
important data files to the external device—music, movies, photos, documents, e-mail,
and other files.
After the WD SmartWare software categorizes the different types of files on your
computer’s internal hard drive, clicking the Start Backup button backs all of them up. Or
you can select specific files, folders, or categories of files to back up.
After performing a backup, the WD SmartWare software protects your files by backing
up any:
• New file that is created on or copied to your internal hard drive
• Existing file that is changed in any way
This protection is automatic—the WD SmartWare software does it for you without any
action on your part—just make sure to leave your external device connected to your
computer.
Note: Automatic backup protection is continuous for as long as your external device is
connected to your computer. Then, whenever you disconnect and reconnect the
device to your computer, the WD SmartWare software rescans your computer for
new or changed files and resumes automatic, continuous backup as before.
Backing Up Files
To back up your files:
1. On the Home screen:
a. If you are going to back up files by category AND your computer has more than
one internal hard drive or drive partition, use the internal drive selector box under
your computer’s icon to select the one that you want to back up first:
b. If you have more than one external device connected to your computer, select
the one that you want to back up files to:
c. Verify that a light-blue background shadow appears around the selected device.
BACKING UP YOUR COMPUTER FILES – 28
WD SMARTWARE SOFTWARE
USER MANUAL
d. If the selected device has more than one drive partition or network share, use the
selector box under the device icon to select the one that you want to use:
2. Click the Backup tab to display the Backup screen (see Figure 2 on page 9).
3. On the Backup screen:
IF you want to back up . . .
on the internal hard drive,
THEN . . .
All of the categories of files
Proceed to step 4.
Selected categories of files
Skip to step 5.
All of the files and folders
Skip to step 6 on page 30.
Selected files or folders
Skip to step 7 on page 31.
4. To back up all of the categories of files and on the internal hard drive:
a. Verify that the backup mode is category and that Ready to perform category
backup appears at the upper-left corner of the Backup screen.
If the backup mode is file and Ready to perform file backup appears there, then
click the Switch to Category Backup button and OK at the Switching Backup
Plan prompt.
b. Click Advanced View to open the backup by categories selection box and verify
that the check boxes for all six categories are selected:
As required, select any cleared check boxes and then click Apply Changes to
create a custom backup plan and refresh the content gauge for your external
device.
c. Click Start Backup to begin backing up all categories of files on the internal hard
drive and skip to step 8 on page 31.
5. To backup selected categories of files:
a. Verify that the backup mode is category and that Ready to perform category
backup appears at the upper-left corner of the Backup screen.
BACKING UP YOUR COMPUTER FILES – 29
WD SMARTWARE SOFTWARE
USER MANUAL
If the backup mode is file and Ready to perform file backup appears there, then
click the Switch to Category Backup button and OK at the Switching Backup
Plan prompt.
b. Click Advanced View to open the backup by categories selection box:
c. In the backup by categories selection box:
•
Clear the check boxes for the categories of files that you want to exclude
from the backup.
•
As required, select the check boxes for the categories of files that you want to
include in the backup.
d. Click Apply Changes to create a custom backup plan and refresh the content
gauge for your external device.
e. Click Start Backup to begin backing up the selected categories of files and skip
to step 8 on page 31.
6. To back up all of the files and folders on the internal hard drive:
a. Verify that the backup mode is file and that Ready to perform file backup
appears at the upper-left corner of the Backup screen.
If the backup mode is category and Ready to perform category backup
appears there, then click the Switch to File Backup button and OK at the
Switching Backup Plan prompt.
b. In the backup by files selection box, select the check box for your computer’s
internal hard drive:
If your computer has more than one internal hard drive or hard drive partition,
select the check box for each one.
c. Click Apply Changes to create a custom backup plan and refresh the content
gauge for your external device.
BACKING UP YOUR COMPUTER FILES – 30
WD SMARTWARE SOFTWARE
USER MANUAL
d. Click Start Backup to begin backing up all of files and folders on the internal
hard drive and skip to step 8 on page 31.
7. To backup selected files or folders:
a. Verify that the backup mode is file and that Ready to perform file backup
appears at the upper-left corner of the Backup screen.
If the backup mode is category and Ready to perform category backup
appears there, then click the Switch to File Backup button and OK at the
Switching Backup Plan prompt.
b. In the backup by files selection box, click the pointers to open the folder
structure:
c. Select the check boxes for the individual files or folders that you want to back up.
Note that selecting a folder check box automatically selects all of the subfolders
and files in the folder.
d. Click Apply Changes to create a custom backup plan and update the content
gauge for your external device.
Note: Clicking Revert clears your recent selections and redisplays the prior applied
configuration.
e. Click Start Backup to begin backing up the selected files or folders and proceed
to step 8.
8. During the backup:
• A progress bar and message indicate the amount of data that has been backed
up.
• For a category backup, the blue background in the content gauge for your
computer’s internal hard drive changes to yellow/amber for all of the files that
have not yet been backed up.
• The gray background for categories or files in the content gauge for your external
device changes to blue as the backup completes.
• You can continue to set up your drive or perform any other functions because the
WD SmartWare software backs up your files in the background.
• The Start Backup toggle button changes to Stop Backup for stopping the
backup (see step 10 on page 32).
BACKING UP YOUR COMPUTER FILES – 31
WD SMARTWARE SOFTWARE
USER MANUAL
9. Appearance of a backup successfully finished message means that the backup
completed normally.
If any files could not be backed up, the WD SmartWare software displays a:
• Caution message indicating the number of files involved
• View link that you can click to see a list of the files and the reasons they were not
backed up
Some applications and running processes can keep files from being backed up. If
you cannot determine why some of your files were not backed up, try:
• Saving and closing all of your open files
• Closing all running applications—including your e-mail program and Web browser
Important:
Appearance of a Caution message indicating that your drive is full
means that there is not enough free space on the drive to complete
the backup.
The best long-term solution would be to relegate the drive to longterm archive storage and:
a. Click the Help tab.
b. Click the WD Store link to view the Western Digital Online Store
website.
c. Click External Hard Drives and select the best drive to suit your
future requirements.
10. If you clicked Stop Backup at step 8, the Stop backup? confirmation prompt
reminds you that the WD SmartWare software runs your backup job in the
background so you can continue using your computer for other things during the
backup.
To continue, click either:
• Continue Backup to disregard your request and resume the backup
• Stop Backup to follow through with your request and stop the backup
11. If you backed up files by category and your computer has more than one internal
hard drive, repeat the backup procedure for each one.
BACKING UP YOUR COMPUTER FILES – 32
WD SMARTWARE SOFTWARE
USER MANUAL
5
1
Retrieving Backed Up Files
This chapter includes the following topics:
How the Retrieve Function Works
Retrieving Files
How the Retrieve Function Works
The WD SmartWare software makes it easy for you to retrieve backed up files from your
external device and copy them to either:
• Their original locations on your computer
• A special retrieve folder
Retrieve is generally a five-step process:
1. On the Home screen, select the external device to retrieve files from.
2. Select the backup volume that you want to retrieve files from.
3. Specify the destination where you want to copy the retrieved files—either a special
retrieve folder or their original locations.
4. Specify what you want to retrieve—either individual files, folders, or everything.
5. Retrieve the files.
Retrieving Files
To retrieve files:
1. On the Home screen:
a. If your computer has more than one internal hard drive or drive partition, use the
internal drive selector box under your computer’s icon to select the one that you
want to copy retrieved files to:
b. If you have more than one external device connected to your computer, select
the one that has the files you want to retrieve:
2. Click the Retrieve tab to display either the:
•
Select a destination for retrieved files dialog
•
Select a volume to retrieve from dialog
(See Figure 3 on page 12.)
RETRIEVING BACKED UP FILES – 33
WD SMARTWARE SOFTWARE
USER MANUAL
IF you have . . .
THEN the WD SmartWare software displays the . . .
Created a single backup on
the selected external device
from your computer,
Select a destination for retrieved files dialog:
Proceed to step 3 on page 35.
Created multiple backup
volumes on the selected
external device from either:
Select a volume to retrieve from dialog with the available
volumes listed in the Backed Up Volumes selection box:
• Different internal hard
drives or hard drive
portions on your computer
• Different computers
In this case:
a. In the Backed Up Volumes selection box, select the
volume that you want to retrieve files from.
b. Click Next to display the Select a destination for
retrieved files dialog.
c. Proceed to step 3 on page 35.
Not run a backup on the
selected external device,
The Select a volume to retrieve from dialog with nothing listed
in the Backed Up Volumes selection box:
You cannot retrieve files from a drive that does not have a
backup volume. Click the Home tab and return to step 1-b on
page 33 to select the external device that has the files you
want to retrieve.
RETRIEVING BACKED UP FILES – 34
WD SMARTWARE SOFTWARE
USER MANUAL
3. On the Select a destination for retrieved files dialog:
IF you want to copy your
retrieved files to . . .
THEN select the . . . option.
Their original locations on
your computer’s internal hard
drive,
To the Original Places
A retrieved content folder,
To a Retrieved Content Folder
Note: The To the Original Places option is not
available if you selected a backup volume
from another computer at step 2 on
page 33.
The default folder is Retrieved Contents in the My
Documents folder for your user name.
If you want to specify a different folder:
a.
Click Browse and use the browse function to
identify the new folder.
b.
Click Apply.
4. Click Next to display the Select content to retrieve... dialog.
IF you want to retrieve . . .
from the selected backup
volume
THEN select the . . .
All of the files
Retrieve All Files option and skip to step 6 on page 36.
Selected files or folders
Retrieve Some Files option to open the Retrieve Some
Files selection box and proceed to step 5.
5. In the Retrieve Some Files selection box, navigate through the folder structure to find the files
you want. You can also use the search box by typing the name (or partial name) of the file or
folder:
• Select the Show older files check box to display the different backed up versions
of your files:
RETRIEVING BACKED UP FILES – 35
WD SMARTWARE SOFTWARE
USER MANUAL
• Select the Show deleted files check box to display backed up files that have
been deleted:
•
Select the View icon to list individual files.
•
To find a file, type all or part of the file name in the search box and press the
Enter key to initiate the search.
To eliminate the search filter, delete all of the text in the search box and press
Enter.
•
Select the check boxes for the files or folders that you want to retrieve.
6. Click Start Retrieving.
7. During the retrieve:
•
The Retrieve screen displays a progress bar and a message indicating the
amount of data that has been copied to the specified retrieve location.
•
A Cancel Retrieving button is available for stopping the retrieve.
8. A Retrieval accomplished message signifies completion of the retrieve.
A Partial retrieve accomplished message means that all of the files you selected for
the retrieve were not copied to the specified retrieve location. In this case, either a:
•
Files Not Retrieved message provides the number of files that were not
retrieved and a link to a failed-to-retrieve information screen. Click the View files
link to see the list of files and the reasons they were not retrieved.
•
Destination is full message means that your computer does not have sufficient
disk space to complete the retrieve.
RETRIEVING BACKED UP FILES – 36
WD SMARTWARE SOFTWARE
USER MANUAL
6
1
Managing and Customizing the Drive
This chapter includes the following topics:
Using the WD Quick View Icon
Opening the WD SmartWare Software
Checking Drive Status
Safely Disconnecting the Drive
Monitoring Icon Alerts
Naming the Drive
Setting the Drive Sleep Timer
Registering the Drive
Checking Drive Health
Erasing the Drive
Restoring the WD SmartWare Software and Disk Image
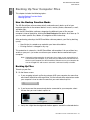
Using the WD Quick View Icon
After you have installed the WD SmartWare software, the WD Quick View icon displays in
the system tray portion of the Windows taskbar:
WD Quick View Icon
You can use the icon to:
• Open the WD SmartWare software
• Check the drive status
• Safely disconnect the drive
• Monitor icon alerts
The following sections describe how to use the icon and other ways to do these things.
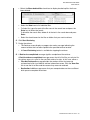
Opening the WD SmartWare Software
If the WD SmartWare software does not start automatically, you can start it by:
• Left- or right-clicking the WD Quick View icon in the taskbar and selecting
WD SmartWare:
• Clicking:
Start > (All) Programs > Western Digital > WD SmartWare > WD SmartWare
MANAGING AND CUSTOMIZING THE DRIVE – 37
WD SMARTWARE SOFTWARE
USER MANUAL
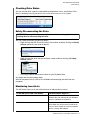
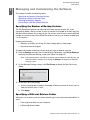
Checking Drive Status
You can see the drive capacity used and drive temperature status, and find out if the
drive is locked by hovering the pointer over the WD Quick View icon in the taskbar:
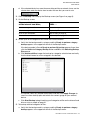
Safely Disconnecting the Drive
CAUTION! To prevent data loss, close all active windows and applications before
shutting down or disconnecting the drive.
You can safely disconnect the drive by either:
• Right-clicking the WD Quick View icon in the taskbar, and then clicking the Safely
remove option for your external device:
• Right-clicking the drive icon on the Home screen and then clicking the Safely
remove option:
• Pressing the power button on the back of your My Book drive
You might hear the drive power down.
Wait for the power/activity LED to turn off before disconnecting the drive from the
computer.
Monitoring Icon Alerts
The WD Quick View icon in the taskbar flashes to indicate device status:
IF the WD Quick View icon flashes . . .
THEN the device might be . . .
Green and white,
Locked or in a format that the WD SmartWare
software does not understand (non-Windows
format in a Windows environment).
Red and white,
Overheated.
Power down the device and let it cool for 60
minutes. Power it back up, and if the problem
persists, contact WD Support.
MANAGING AND CUSTOMIZING THE DRIVE – 38
WD SMARTWARE SOFTWARE
USER MANUAL
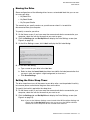
Naming the Drive
Some configurations of the following drives have a customizable label that you can use
to name your drive:
• My Book Elite
• My Book Studio
• My Passport Studio
The name that you specify remains on your drive even when it is turned off or
disconnected from your computer.
To specify a name for your drive:
1. On the Home screen, if you have more than one external device connected to your
computer, select the icon for the one that you want to name.
2. Click the Settings tab and Set Up Drive to display the Drive Settings screen (see
Figure 4 on page 15).
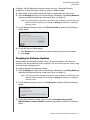
3. On the Drive Settings screen, click Label to display the Set Label dialog:
4. On the Set Label dialog:
a. Type a name for your drive in the label box.
b. Select or clear the Invert label check box to establish the label presentation that
you want—dark text against a light background, or vice versa.
c. Click Save Settings.
Setting the Drive Sleep Timer
The drive sleep timer turns off the power to your drive after a certain period of inactivity
to conserve power and minimize long-term wear on the drive.
To specify the inactivity period for the sleep timer:
1. On the Home screen, if you have more than one external device connected to your
computer, select the icon for the one that you want to set.
2. Click the Settings tab and Set Up Drive to display the Drive Settings screen (see
Figure 4 on page 15).
Note: If you see the Software Settings screen instead of the WD SmartWare Settings tab
display with the Set Up Drive button, then you must use the WD Drive Utilities
software to set the sleep timer for the selected external device.
MANAGING AND CUSTOMIZING THE DRIVE – 39
WD SMARTWARE SOFTWARE
USER MANUAL
3. On the Drive Settings screen, click Sleep Timer to display the Set Sleep Timer
dialog:
4. On the Set Sleep Timer dialog:
a. In the Turn off Drive box, select the inactivity time interval at which you want to
turn off the drive.
b. Click Set Timer.
Registering the Drive
The WD SmartWare software uses your computer’s Internet connection to register your
drive. To register your drive to receive free technical support during the warranty period
and be kept up-to-date on the latest WD products:
1. Make sure that your computer is connected to the Internet.
2. On the Home screen, if you have more than one external device connected to your
computer, select the icon for the one that you want to register.
3. Click the Settings tab and Set Up Drive to display the Drive Settings screen (see
Figure 4 on page 15).
Note: If you see the Software Settings screen instead of the WD SmartWare Settings tab
display with the Set Up Drive button, then you must use the WD Drive Utilities
software to register the selected external device.
4. On the Drive Settings screen, click Registration to display the Register Drive dialog:
MANAGING AND CUSTOMIZING THE DRIVE – 40
WD SMARTWARE SOFTWARE
USER MANUAL
5. On the Register Drive dialog:
a. Type your first name in the First name box.
b. Type your last name in the Last name box.
c. Type your e-mail address in the E-mail address box.
d. Select your language in the Preferred language box.
e. Select or clear the Yes, I want to receive communication... check box to
specify whether or not you want to receive e-mail notifications about software
updates, product enhancements, and price discount opportunities.
f.
Click Register Drive.
Checking Drive Health
The WD SmartWare software has several built-in diagnostic tools to help make sure that
your drive is performing well. Run the following tests if you are concerned that your drive
is not operating properly:
• Quick SMART Status
SMART is a failure-prediction function that continuously monitors key internal
performance attributes of the drive. A detected increase in drive temperature,
noise, or read/write errors, for example, can provide an indication that the drive is
approaching a serious failure condition. With advanced warning, you could take
precautionary measures, like moving your data to another drive, before a failure
occurs.
The result of a quick SMART status check is a pass or fail evaluation of the drive's
condition.
The SMART status check completes within a second or two.
• Quick Drive Test
Your external device has a built-in Data Lifeguard diagnostic utility that tests the
drive for error conditions. The quick drive test checks the drive for major
performance problems.
The result of a quick drive test is a pass or fail evaluation of the drive's condition.
The quick drive test can take several minutes to complete.
• Complete Drive Test
The most comprehensive drive diagnostic is the complete drive test. It
methodically tests every sector for error conditions and inserts bad-sector
markers as required.
The complete drive test can take several hours to complete, depending on the
size and data configuration of your drive.
The best time to run the drive diagnostics and status checks is on a regular basis, before
you encounter any problems with your drive. And, because they are so fast, running the
quick SMART status check and the quick drive test provides a high level of assurance
with minimal inconvenience. Then, run all three whenever you encounter disk error
conditions when backing up or retrieving files.
MANAGING AND CUSTOMIZING THE DRIVE – 41
WD SMARTWARE SOFTWARE
USER MANUAL
To run drive diagnostics and status checks:
1. On the Home screen, if you have more than one external device connected to your
computer, select the icon for the one that you want to check.
2. Click the Settings tab and Set Up Drive to display the Drive Settings screen (see
Figure 4 on page 15).
Note: If you see the Software Settings screen instead of the WD SmartWare Settings tab
display with the Set Up Drive button, then you must use the WD Drive Utilities
software to run drive diagnostics and status checks for the selected external
device.
3. On the Drive Settings screen, click Diagnostics to display the Run Diagnostics
dialog:
4. On the Run Diagnostics dialog, click the button for the test that you want to run:
•
Quick SMART Status
•
Quick Drive Test
•
Complete Drive Test
MANAGING AND CUSTOMIZING THE DRIVE – 42
WD SMARTWARE SOFTWARE
USER MANUAL
Erasing the Drive
CAUTION! Erasing your drive permanently deletes all of the data on the drive.
Always make sure that you no longer need any of the data on your drive before
erasing the drive.
Note: Erasing your drive also deletes the WD SmartWare software and all of the
support files, utilities, online help and user manual files. You can download
these to restore your external device to its original configuration after
erasing the drive.
The WD SmartWare software provides two ways to erase your device, depending on whether it is
locked or not:
IF your drive is . . .
AND you . . .
THEN see . . .
Not locked,
Want to erase the drive,
“Using the Drive Settings Drive
Erase Function” on page 43.
Locked,
Have forgotten or lost your
password and must erase the
drive,
“Using the Drive Unlock Utility”
on page 44.
Using the Drive Settings Drive Erase Function
To erase your external device when it is not locked:
1. On the Home screen, if you have more than one external device connected to your
computer, select the icon for the one that you want to erase.
2. Click the Settings tab and Set Up Drive to display the Drive Settings screen (see
Figure 4 on page 15).
Note: If you see the Software Settings screen instead of the WD SmartWare Settings tab
display with the Set Up Drive button, then you must use the WD Drive Utilities
software to erase the selected external device.
3. On the Drive Settings screen, click Drive Erase to display the Erase Drive dialog:
4. On the Erase Drive dialog:
a. Read the warning about the loss of data if you erase your drive.
b. Click the I understand check box to signify that you accept the risk.
c. Click Drive Erase.
After the drive erase operation completes, go to http://support.wdc.com and see
Knowledge Base answer ID 7 for information about downloading and restoring the
WD SmartWare software and disk image on your external device.
MANAGING AND CUSTOMIZING THE DRIVE – 43
WD SMARTWARE SOFTWARE
USER MANUAL
Note: Erasing your drive also removes your password. If you still want to use a
password to protect your drive, you will need to re-create it after restoring
the WD SmartWare software and disk image. (See “Password Protecting
the Drive” on page 22.)
Using the Drive Unlock Utility
To erase your external device when it is locked and you have forgotten or lost your
password:
1. If you do not see a prompt to provide your password, then either:
•
Click the drive image above the Drive is locked message on the Home screen to
display the Unlock your drive dialog:
• Start the Drive Unlock utility by either:
- Using your computer’s file management utility to open the WD Unlocker virtual
CD and double-clicking the unlock application file—either Unlock.exe or WD
Drive Unlock.exe, depending on the type and model of the external drive
- Clicking Start > My Computer and double-clicking the WD Unlocker virtual
CD icon under Devices with Removable Storage
The unlock dialog that displays depends on the type and model of the external
device:
2. Make five attempts to unlock the drive by:
a. Typing a password in the Password box.
b. Clicking Unlock or Unlock Drive.
MANAGING AND CUSTOMIZING THE DRIVE – 44
WD SMARTWARE SOFTWARE
USER MANUAL
3. The fifth invalid password attempt displays a too many password attempts dialog:
4. If you see the dialog with a warning about the loss of data if you erase your drive,
read it and select the I understand check box to signify that you accept the risk.
5. Click either Drive Erase or Erase Drive.
After the drive erase operation completes, go to http://support.wdc.com and see
Knowledge Base answer ID 7 for information about downloading and restoring the
WD SmartWare software and disk image on your drive.
Note: Erasing your drive also removes your password. If you still want to use a
password to protect your drive, you will need to re-create it after restoring
the WD SmartWare software and disk image. (See “Password Protecting
the Drive” on page 22.)
Restoring the WD SmartWare Software and Disk Image
In addition to deleting all of the data on your external device, erasing or reformatting the
drive also removes the WD SmartWare software and all of the support files, utilities,
online help and user manual files.
If you ever need to remove and reinstall the WD SmartWare software on your computer,
or move the drive to another computer and install the software there, you will need to
restore the WD SmartWare software and disk image on your external device. To do this,
after you have erased or reformatted the drive, go to http://support.wdc.com and see
Knowledge Base answer ID 7.
MANAGING AND CUSTOMIZING THE DRIVE – 45
WD SMARTWARE SOFTWARE
USER MANUAL
7
1
Managing and Customizing the Software
This chapter includes the following topics:
Specifying the Number of Backup Versions
Specifying a Different Retrieve Folder
Checking for Software Updates
Uninstalling the WD SmartWare Software
Specifying the Number of Backup Versions
The WD SmartWare software can keep up to 25 older versions of each file. If you
overwrite or delete a file by mistake, or want to see the file a couple of versions ago, the
WD SmartWare software has a copy for you. You always have the most-recent specified
number of versions of each file available for retrieves, and you can choose to keep from
1 to 25 versions.
Keeping more versions:
• Improves your ability to retrieve files from a longer back-in-time period
• Consumes more disk space
To specify the number of backup versions that you want to keep for each file:
1. Click the Settings tab and if you see the Settings Tab display, click Set Up Software
to display the Software Settings screen (see Figure 4 on page 15).
Note: If the external device selected on the Home screen supports the WD Security and
WD Drive Utilities software, then clicking the Settings tab displays the Software
Settings screen.
2. On the Software Settings screen, click File History to display the Set File History
dialog:
3. On the Set File History dialog:
a. Use the selection box to specify the number of backup versions that you want to
keep for each file, from 1 to 25.
b. Click Apply.
Specifying a Different Retrieve Folder
When you start a retrieve, you can choose whether you want to store the retrieved files in
either:
• Their original locations on your computer
• A Retrieved Content folder
MANAGING AND CUSTOMIZING THE SOFTWARE – 46
WD SMARTWARE SOFTWARE
USER MANUAL
By default, the WD SmartWare software creates and uses a Retrieved Contents
subfolder in your My Documents folder. To specify a different folder:
1. Either create a new folder or determine which existing folder you want to use.
2. Click the Settings tab and if you see the Settings Tab display, click Set Up Software
to display the Software Settings screen (see Figure 4 on page 15).
Note: If the external device selected on the Home screen supports the WD Security and
WD Drive Utilities software, then clicking the Settings tab displays the Software
Settings screen.
3. On the Software Settings screen, click Retrieve Folder to display the Set Retrieve
Folder dialog:
4. On the Set Retrieve Folder dialog:
a. Click Browse and use the browse function to identify the new retrieve folder.
b. Click Apply.
Checking for Software Updates
When enabled, the Preferences option checks for software updates each time you
reconnect your external device to your computer. This ensures that you are always using
the most-recent software version.
To enable or disable the Preferences option:
1. Click the Settings tab and if you see the Settings Tab display, click Set Up Software
to display the Software Settings screen (see Figure 4 on page 15).
Note: If the external device selected on the Home screen supports the WD Security and
WD Drive Utilities software, then clicking the Settings tab displays the Software
Settings screen.
2. On the Software Settings screen, click Preferences to display the Set Preferences
dialog:
3. On the Set Preferences dialog, select or clear the Automatically check for
WD SmartWare software updates check box to enable or disable the Preferences
option.
MANAGING AND CUSTOMIZING THE SOFTWARE – 47
WD SMARTWARE SOFTWARE
USER MANUAL
Uninstalling the WD SmartWare Software
Important: Uninstalling the WD SmartWare software deletes all existing backup job
configurations. You must restart the backup job manually after reinstalling the software.
(See “Backing Up Your Computer Files” on page 28.)
Use the operating system’s Add or Remove Programs function to uninstall the
WD SmartWare software.
On Windows XP computers:
1. Click Start > Control Panel.
2. Double-click Add or Remove Programs.
3. Select WD SmartWare and click Remove.
4. Click Yes at the Are you sure... prompt.
On Windows Vista or Windows 7 computers:
1. Click Start > Control Panel.
2. Double-click Programs and Features.
3. Click WD SmartWare or the WD SmartWare icon and click Uninstall/Change at the
top of the screen.
4. Click Yes at the Do you wish to proceed... prompt.
MANAGING AND CUSTOMIZING THE SOFTWARE – 48
WD SMARTWARE SOFTWARE
USER MANUAL
A
1
Warranty Information
GNU General Public License (“GPL”)
This software may include third party copyrighted software licensed under the GPL or
Lesser General Public License ("LGPL") (collectively, “GPL Software”) and not Western
Digital’s End User License Agreement. In accordance with the GPL, if applicable: 1) the
source code for the GPL Software may be downloaded at no charge from http://
support.wdc.com/download/gpl or obtained on CD for a nominal charge from http://
support.wdc.com/download/gpl or by calling Customer Support within three years of the
date of purchase; 2) you may re-use, re-distribute, and modify the GPL Software; 3) with
respect solely to the GPL Software, no warranty is provided, to the extent permitted by
applicable law; and 4) a copy of the GPL is included herewith, may be obtained at http://
www.gnu.org, and may also be found at http://support.wdc.com/download/gpl.
Modification of or tampering with the Software, including but not limited to any Open
Source Software, is solely at your own risk. Western Digital is not responsible for any
such modification or tampering. Western Digital will not support any product in which
you have or have attempted to modify the Software supplied by Western Digital.
WARRANTY INFORMATION – 49
WD SMARTWARE SOFTWARE
USER MANUAL
Index
A
Advanced backup area, Backup tab displays 10
Alerts, flashing icon 38
B
Backed Up Volumes selection box 12
Backup
about backing up files 28
files content box 29, 30, 31
procedure 28
Backup tab displays
advanced backup area 10
description 8
drive content gauge 9
functional overview 2
Start/Stop Backup toggle button 11
Switch to Category/File Backup toggle
button 11
your computer’s content gauge 9
Browse button, Retrieve tab displays 12
C
CAUTION
about erasing the drive 43
about lost passwords 22
about preventing data loss when disconnecting 38
about your unlocked drive 23
Change retrieve folder box, Retrieve tab
displays 12
Changing your password 26
Compatibility with operating systems 1
Contact Us link 17
Content gauge
Backup tab displays 9
drive 8
your computer’s 7
your computer’s, Backup tab displays
9
Creating a password 22
D
Disconnecting the drive 38
Disk image, downloading and restoring 45
Drive
content gauge, Backup tab displays 9
content gauge, home tab displays 8
diagnostics and status checks 41
disconnecting from a PC 38
icon, Home tab display 5, 6
sleep timer 39
status check 38
Drive Erase button, Settings tab displays
16
Drive Settings
drive erase 43
registration 40
security 22
sleep timer 39
E
Erase Drive dialog 43
Erasing the drive 43
F
File History button 16
File history dialog 46
Flashing icon alerts 38
Front and back views 2, 3
Full Media Scan 41
G
GNU general public license 49
GPL software 49
H
Help tab display
Contact Us link 17
description 17
functional overview 3
Learning Center topic buttons 17
Online User Manuals link 18
Support link 18
Update Software button 18
WD Store link 18
Home tab display
description 3
drive content gauge 8
drive icon 5, 6
functional overview 2
Internal drive selector box 5
your computer icon 5
your computer’s content gauge 7
I
Internal drive selector box, Home tab display 5
L
Label button 16
Launching WD SmartWare software 37
Learning Center topic buttons 17
INDEX – 50
WD SMARTWARE SOFTWARE
USER MANUAL
N
NTFS format 1
O
Online support, accessing ii
Online User Manuals link 18
Operating system requirements 1
P
Password protecting your drive 22
CAUTION about lost passwords 22
Password, changing 26
Password, removing 27
Physical description 2, 3
Preferences
button 16
option, setting 47
Q
Quick Diagnostic Self-test 41
R
Register Drive dialog 40
Registering your drive 40
Registration button 16
Removing password protection 27
Requirements, operating systems 1
Restoring the software disk image 45
Retrieve
about retrieving files 33
folder, specifying 46
procedure 33
Retrieve destination option buttons 13
Retrieve files option button 13
Retrieve Folder button 16
Retrieve some files selection box 13
Retrieve tab displays
Backed Up Volumes selection box 12
Browse button 12
Change retrieve folder box 12
description 11
functional overview 3
Retrieve destination option buttons 13
Retrieve files option buttons 13
Retrieve some files selection box 13
Start/Cancel Retrieving toggle button
13
Run Diagnostics screen 42
S
Security button 16
Service and Support, WD ii
Set
file history dialog 46
preferences dialog 47
retrieve folder dialog 47
sleep timer dialog 39, 40
Set Up Drive button 16
Set Up Software button 16
Settings tab displays 16
description 14
Drive Erase button 16
File History button 16
functional overview 3
Preferences button 16
Registration button 16
Retrieve Folder button 16
Security button 16
Set Up Drive button 16
Set Up Software button 16
Sleep Timer button 16
Sleep Timer button 16
SMART Status Check 41
Software Settings
file history 46
preferences 47
retrieve folder 46
Software, GPL 49
Space available 38
Start/Cancel Retrieving toggle button 13
Start/Stop Backup toggle button 11
Settings
See Drive Settings
Status check 38
Support link 18
Switch to Category/File Backup toggle
button 11
System compatibility 1
System file category, defined 7
T
Technical support, contacting ii
Temperature check 38
U
Unlocking the drive
from the virtual CD 25, 38
with WD SmartWare 24
Update Software button 18
W
Warranty information 49
WD Quick View icon 37
WD Service and Support ii
WD Store link 18
WD technical support, contacting ii
INDEX – 51
WD SMARTWARE SOFTWARE
USER MANUAL
Y
Your computer
content gauge, Backup tab displays 9
content gauge, Home tab display 7
icon, Home tab display 5
INDEX – 52
Information furnished by WD is believed to be accurate and reliable; however, no responsibility is assumed by WD for its use
nor for any infringement of patents or other rights of third parties which may result from its use. No license is granted by
implication or otherwise under any patent or patent rights of WD. WD reserves the right to change specifications at any time
without notice.
Western Digital, WD, the WD logo, My Book, and My Passport are registered trademarks and My Passport Essential,
WD SmartWare, and Data Lifeguard are trademarks of Western Digital Technologies, Inc. Other marks may be mentioned
herein that belong to other companies.
© 2012 Western Digital Technologies, Inc. All rights reserved.
Western Digital
3355 Michelson Drive, Suite 100
Irvine, California 92612 U.S.A.
4779-705057-A01 Apr 2012