1
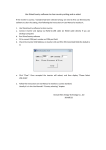
Identify & Report Professional
Identify & Report Professional User Manual
Rev.B
Chapter 5
Creating a New Inspection US
To Index Page
Manual:I&R US Rev. B
Identify & Report Professional
Creating a New Inspection
A professional inspection is as easy as one click.
The Identify & Report Professional inspection program is designed to create professional inspections each and
every time. The program uses a Default Report inspection as a standard template for the creating inspections.
This Default Report inspection may be modified to meet the user’s requirements by selecting the Default
Report at the
Find Inspection screen and entering/editing data as desired.
The Default Report is essential to the operation of the program and should never be deleted.
Starting an Inspection
(Non-Template)
1.Click on the “New Inspection” button at the Main Menu.
Chapter 5; page 2 of 6
2.
First Enter a New Report ID Number:
The best ID Report Number Format
Example:
Use the first three letters of last name then Clients name: Bill Jones
the date of the scheduled inspection.
Scheduled inspection date: May 5, 2012
Recommended ID Number
Jon051112
If you are inspecting
Mutable units just
Add u1, u2.etc…
Jon051112u2
3.Select continue
Very important:
Only use Letters and Numbers for Report ID Numbers.
The program does not recognize punctuation mark, spaces and special Characters.
Chapter 5; page 3 of 6
4.Enter required information on the order form.
5.All drop down’s Boxes have the ability be edited.
Chapter 5; page 4 of 6
6. The edit window will open, you can remove, add or modify any statement as you would like.
Then reselect the field to auto enter the information.
7. When you are finished filling in the Order Form click on “TO CURRENT Inspection” icon.
Chapter 5; page 5 of 6
8. On right side of screen, you will see a column of buttons listing the main inspection categories each
categories has sub categories, select as needed.
9. At any time you
can select the “To
Summary” button
to view summary.
Chapter 5; page 6 of 6