1
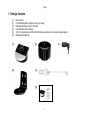
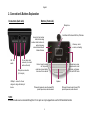
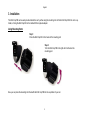
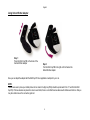
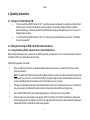
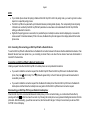
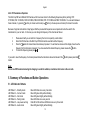
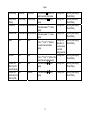
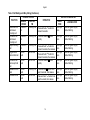
USER MANUAL
Bluetooth Car-Kit EGO Cup FM
CONTENTS
FCC Statement.......................................................................................................................................................................................... 2
1. Package Contents ................................................................................................................................................................................. 3
2. Connection & Buttons Explanation ........................................................................................................................................................ 4
3. Installation ............................................................................................................................................................................................. 5
4. Operating Instructions ........................................................................................................................................................................... 7
4.1. Turning On / Off the EGO Cup FM.............................................................................................................................................. 7
4.2. Pairing & Connecting the EGO Cup FM with a Bluetooth Device ................................................................................................ 7
4.2.1. Pairing the EGO Cup FM with a Bluetooth Device / Bluetooth Mobile Phone ................................................................... 7
4.2.2. Connecting / Disconnecting your EGO Cup FM with a Bluetooth Device.......................................................................... 8
4.2.3. Erasing Pairing Information............................................................................................................................................... 9
4.3. Call Functions ............................................................................................................................................................................. 9
4.3.1. Basic Call Operation ......................................................................................................................................................... 9
4.3.2. Call Mute / Un-mute.......................................................................................................................................................... 9
4.3.3. Transferring Call to/from Your Mobile Phone..................................................................................................................... 9
4.3.4. Advanced Call Functions .................................................................................................................................................. 9
4.4. A2DP Function.......................................................................................................................................................................... 10
4.4.1. Using Mobile Phone’s A2DP Function............................................................................................................................. 10
4.4.2. AVRCP Operations (Remote-Control)............................................................................................................................. 11
4.5. Volume Adjustment................................................................................................................................................................... 11
4.6. FM Transmission Function........................................................................................................................................................ 11
4.6.1. Using FM Transmission .................................................................................................................................................. 11
4.6.2. FM Transmission Operation............................................................................................................................................ 12
5. Summary of Functions and Button Operations .................................................................................................................................... 12
5.1. LED Indicator Patterns .............................................................................................................................................................. 12
5.2. Key Duration ............................................................................................................................................................................. 13
5.3. Functions and Button Operations.............................................................................................................................................. 13
6. Technical Data .................................................................................................................................................................................... 19
English
FCC Statement
This device complies with part 15 of the FCC Rules. Operation is subject to the following two conditions:
(1) This device may not cause harmful interference, and
(2) This device must accept any interference received, including interference that may cause undesired operation.
Note: The manufacturer is not responsible for ANY interference, for example RADIO or TV interference, caused by unauthorized
modifications to this equipment. Such modifications could void the user’s authority to operate the equipment.
Federal Communication Commission Interference Statement
This equipment has been tested and found to comply with the limits for a Class B digital device, pursuant to Part 15 of the FCC Rules.
These limits are designed to provide reasonable protection against harmful interference in a residential installation. This equipment
generates, uses and can radiate radio frequency energy and, if not installed and used in accordance with the instructions, may cause
harmful interference to radio communications. However, there is no guarantee that interference will not occur in a particular installation.
If this equipment does cause harmful interference to radio or television reception, which can be determined by turning the equipment off
and on, the user is encouraged to try to correct the interference by one of the following measures:
1. Reorient or relocate the receiving antenna.
2. Increase the separation between the equipment and receiver.
3. Connect the equipment into an outlet on a circuit different from that to which the receiver is connected. Consult the dealer or an
experienced radio/TV technician for help.
FCC Caution: Any changes or modifications not expressly approved by the party responsible for compliance could void the user‘s
authority to operate this equipment.
RF Exposure Warning:
This equipment must be installed and operated in accordance with provided instructions and the antenna(s) used for this transmitter
must be installed to provide a separation distance of at least 20 cm from all persons and must not be co-located or operating in
conjunction with any other antenna or transmitter. End-users and installers must be provide with antenna installation instructions and
transmitter operating conditions for satisfying RF exposure compliance.
2
English
1. Package Contents
[1]
[2]
[3]
[4]
[5]
[6]
EGO Cup FM
Car-Kit Mounting Rotor (adapter for using cup holder)
Rotateable Microphone with 2.5 mm Jack
Herbert-Richter System Adapter
12V Car Charger Head with 5-Pin Mini USB Cable (connection kit to the vehicle cigarette lighter)
Multilingual User Manual
[1]
[2]
[4]
[5]
[3]
[6]
3
English
2. Connection & Buttons Explanation
Connectors (back side)
Buttons (front side)
Microphone
Red / Blue LED: indicate EGO Cup FM status
Accept call, last number
redial, last incoming
number redial, transfer call,
audio play/pause,
connect/disconnect with
Bluetooth device
ON / OFF
switch
3.5 mm stereo mini
connector (to connect
audio out device)*
Microphone connection
(2.5 mm jack)
USB-port – connect to the car
charger to charge the battery of
device
Volume up, mute /
un-mute, call waiting
End call, reject incoming
call, stop audio,
enter/cancel voice dialling,
disconnect from a device
Volume down, erase
paired records, mute /
un-mute, conference
call, exit A2DP mode
Speaker
FM-search backward, select backward FM
preset frequencies, audio-backward
FM-search forward, select forward FM
preset frequencies, audio-forward
*NOTE:
An external audio source connected through the 3.5 mm jack can only be played back over the FM transmitter function
4
English
3. Installation
The EGO Cup FM can be easily mounted inside the car by either using the mounting rotor to fix the EGO Cup FM in the car’s cupholder, or fixing the EGO Cup FM on the Herbert-Richter system adapter.
Using Mounting Rotor
Step 1:
Press the EGO Cup FM on the hooks of the mounting part
Step 2:
Turn the EGO Cup FM to the right until it is fixed on the
mounting part.
Now you can press the mounting rotor fixed with the EGO Cup FM into the cup-holder of your car.
5
English
Using Herbert Richter Adapter
Step 1:
Press the EGO Cup FM on the hooks of the
Herbert-Richter adapter
Step 2:
Turn the EGO Cup FM to the right until it is fixed on the
Herbert-Richter adapter
Now you can adjust the adapter with the EGO Cup FM to an applicable counterpart in your car.
NOTE:
Please make sure to place your mobile phone not too close to the Ego Cup FM (it should be put at least 30 cm / 1 feet from the EGO
Cup FM). If the two devices are placed too close to each other, there is a risk that these two devices will interfere each other so that you
may here static noise or the connection gets lost.
6
English
4. Operating Instructions
4.1. Turning On / Off the EGO Cup FM
•
To turn on: switch the ON/OFF switcher to “ON”. You will hear one low tone followed by one high tone and blue LED will
blink once every 3 seconds. This indicates the car-kit is powered on. If you haven’t paired your EGO Cup FM with
Bluetooth devices (e.g.: mobile phone) the EGO Cup FM will enter the pairing mode right after you turn it on (see 4.2. for
detailed pairing procedure).
•
To turn off: switch the ON/OFF switcher to “OFF”. You will hear two high tones followed by one low tone. This indicates
the car-kit is powered off.
4.2. Pairing & Connecting the EGO Cup FM with a Bluetooth Device
4.2.1. Pairing the EGO Cup FM with a Bluetooth Device / Bluetooth Mobile Phone
Before making and answering calls, you must pair your EGO Cup FM with your mobile phone. This is a one-time procedure to authorize
the EGO Cup FM and your mobile phone with each other.
Detailed pairing procedure is as follows:
1.
Place your EGO Cup FM close to your Bluetooth enabled mobile phone and ensure your EGO Cup FM and your mobile
phone are powered on.
Note: If your EGO Cup FM hasn’t been paired with any Bluetooth devices / mobile phone before, it will enter the pairing mode
automatically once you turn it on. You will hear the Pairing Tone (high-low-high-low tones), the blue LED will blink once every
second, and the Bluetooth symbol will appear on the LCD and blink once every 2 seconds.
2.
Following your mobile phone user guide to activate Bluetooth device search on the mobile phone side. On your mobile phone
screen you will see a list of Bluetooth devices found by the mobile phone at the end of the searching process.
3.
Select “EGO CUP FM” from the list and initiate pairing following your mobile phone’s on-screen prompts.
4.
Continue to follow on-screen prompts to enter passkey “0000” and confirm to pair the EGO Cup FM with your mobile phone.
Once the pairing procedure is completed, you will hear one high tone and the mobile phone / device name will be displayed. It
indicates that the EGO Cup FM and the mobile phone are paired.
7
English
NOTE:
• If your mobile phone shows that paring is failed and the EGO Cup FM is still in the paring mode, you need to go back to above
steps 2-4 to repeat the paring process.
• The EGO Cup FM can be paired with up to 8 Bluetooth devices (including mobile phones). The corresponding 8 sets of pairing
information are recorded by the EGO Cup FM. Each paired device can wireless communicated with the EGO Cup FM after
setting up a Bluetooth connection.
• Right after the pairing process is successful, it is possible that your mobile phone name cannot be displayed (i.e. because the
name exceeds 12 characters allowed). If this is the case, the Bluetooth symbol will appear on the display instead of the mobile
phone name.
4.2.2. Connecting / Disconnecting your EGO Cup FM with a Bluetooth Device
To use the EGO Cup FM with a Bluetooth device the Bluetooth connection between both devices shall be established in advance. If two
Bluetooth devices have been paired once, you can simply reconnect them, even when the two devices have been disconnected or
turned off in the mean time.
Connecting your EGO Cup FM with a Bluetooth mobile phone
Initiating a request from either the EGO Cup FM or the mobile phone can set up Bluetooth connection.
• If you want to initiate the connection request from the EGO Cup FM: Place the EGO Cup FM close to the Bluetooth mobile
phone, then press button briefly. The
successfully connected.
symbol will appear shortly on the LCD and one high tone will be heard when it’s
• If you want to initiate the connection request from the Bluetooth mobile phone: Place the EGO Cup FM close to the Bluetooth
mobile phone and then follow the mobile phone’s user guide to find the EGO Cup FM and send connection request.
Disconnecting your EGO Cup FM from your Bluetooth mobile phone:
When the EGO Cup FM is connected with Bluetooth mobile phone (or in the connected mode), you can disconnect them either by
pressing and holding
button for at least 3 seconds or by following the mobile phone’s user guide and initiating disconnection from the
phone side. After disconnecting, you will hear one low tone, then the blue LED will give 1 blink per 3 seconds and you will see “EGO
CUP FM” on the LCD-display.
8
English
4.2.3. Erasing Pairing Information
This EGO Cup FM can be paired with up to 8 Bluetooth devices. To erase all pairing information stored in the EGO Cup FM, first you
button for at least 3 seconds until the Bluetooth
have to disconnect the EGO Cup FM from all connected mobile phones by pressing
button for at least 6 seconds. The
symbol appears on the LCD-display, then press and hold
which indicates that all pairing information have been erased.
icon will appear on the screen,
4.3. Call Functions
Before operating call functions make sure both EGO Cup FM and your mobile phone are powered on and have been connected.
4.3.1. Basic Call Operation
•
•
Answer Call or Redial:
Reject or End Call:
Press button
Press button
briefly
briefly
4.3.2. Call Mute / Un-mute
You can mute an ongoing call by simultaneously quickly pressing the button
and button
.
When the ongoing call is muted, two tones will be heard every 3 seconds. You can un-mute the ongoing call by simultaneously quickly
pressing again button
and button
again.
4.3.3. Transferring Call to/from Your Mobile Phone
•
Transferring calls to your mobile phone: Press button
•
Transferring calls from your mobile phone: Press button
briefly
briefly
4.3.4. Advanced Call Functions
Mobile Phone - Voice Dialing
If the connected mobile phone supports voice dialing, you can press and hold button
The blue LED glows brightly without blinking.
When voice dialing is in progress, you can quick press button
to cancel voice dialing.
9
for at least 6 seconds to activate voice dialing.
English
Note:
Before using voice dialing, you must record voice tags in your mobile phone. Please refer to your mobile phone manual for detailed
descriptions on how to set up voice dialing and recording voice tags.
Call Waiting / Conference
If your mobile phone has call waiting/conference functions, your EGO Cup FM can support the function by following operations:
•
When a new call comes in while you are in talk:
•
for at least 3 seconds to hold active call and accept incoming call, OR
- Press and hold button
to end active call and answer incoming call.
- Press button
When two calls are in progress, one is active and the other is on hold:
for at least 3 seconds to toggle hold call and active call.
- Press and hold button
to end active call and accept hold call.
- Press button
for at least 3 seconds to make conference (NOTE: this function is available only if your
- Press and hold button
mobile phone supports the conference call feature!)
4.4. A2DP Function
This EGO Cup FM supports the Bluetooth A2DP Profile to play music in high quality. When connecting with a Bluetooth-enabled
multimedia/music player or a mobile phone with A2DP compatibility, the product allows users to enjoy and remotely play stereo music
from the player.
4.4.1. Using Mobile Phone’s A2DP Function
If your mobile phones support Bluetooth A2DP profile, you can establish an audio connection between the mobile phone and the EGO
Cup FM to enjoy music played by the phone. Most mobile telephones will establish the audio connection automatically when you start
playing music. If your mobile phone does support Bluetooth A2DP profiles but you fail to get an audio connection when you start playing
music, you must follow your phone user guide to establish an Audio connection before playing music.
10
English
4.4.2. AVRCP Operations (Remote-Control)
The following operations can be used for remotely control your Bluetooth capable mobile phone or multimedia/music player to play
music:
quickly
Play/Pause: Press and release button
quickly
Stop:
Press and release button
Press and release button
quickly
Backward : Press and release button
quickly
Forward:
4.5. Volume Adjustment
You can adjust sound volume up or down by pressing button
or
, respectively, while the EGO Cup FM is in the connected,
talk, or play mode. You can repeat the above operation until the speaker volume reaches at a desirable level. This volume adjustment
does not work when the EGO Cup FM’s performing FM transmission function. In this case the volume will be controlled from the car
radio.
Note:
Mostly the Bluetooth volume control of the EGO Cup FM will synchronize with the phone. That is, the sound volume of your EGO Cup
FM can be controlled by your phone and vice versa. However, this may not be always true due to variations on implementations chosen
by different mobile phone manufactures.
4.6. FM Transmission Function
This EGO Cup FM supports FM transmission to transfer the call and play music over the car speaker. Therefore you have to set your
EGO Cup FM to a same frequency like your car radio. Then you can enjoy high quality sound both over your EGO Cup FM speaker or
the car speaker.
4.6.1. Using FM Transmission
You can enable FM transmission by simultaneously quick pressing button
You can disable FM transmission by simultaneously quick pressing button
11
and button
and button
.
again.
English
4.6.2. FM Transmission Operation
The EGO Cup FM has 6 different FM Channels, which have been stored to the following frequencies (factory setting): FM1:
87.50 MHz, FM2: 91.00 MHz, FM3: 94.50 MHz, FM4: 98.00 MHz, FM5: 101.50 MHz and FM6: 105.00 MHz. You can switch between
these channels, by pressing button (to choose next channel) or button (to choose previous channel) for at least 3 seconds.
Because of regional radio stations it may happen that the pre-selected frequencies are occupied and cannot be used for the
transmission to your car radio. In this case you can change the frequency of the channels as follows:
1.
2.
3.
4.
Please search with you car radio for a frequency that is not occupied by a radio station
Select the FM channel on the EGO Cup FM that should be used with another frequency.
Press the button for at least 6 seconds and keep it pressed. You will hear two tones and the display shows how the
frequency for this channel is increased. If you have reached the desired frequency please release the button.
To store this frequency please press .
If you want to lower the frequency of a channel please follow the instructions above but instead of the
button.
button please press the
Note:
Do not use FM Transmission during the charging, to avoid the radiation, crosstalk or static noise in the car radio.
5. Summary of Functions and Button Operations
5.1. LED Indicator Patterns
LED Pattern 1 – Standby mode:
LED Pattern 2 – Connect mode:
LED Pattern 3 – Call mode:
LED Pattern 4 – Pairing mode:
LED Pattern 5 – Low power warning:
LED Pattern 6 – Audio mode:
Blue LED blinks once every 3 seconds
Blue LED glows dimly without blinking
Blue LED glows brightly without blinking
Blue LED blinks once every second
Red LED is ON and blue LED blinks once every 20 seconds
Blue LED glows brightly without blinking
12
English
5.2. Key Duration
Key Press
Short
Long
Very Long
Hold
Description
Press and release a button quickly
Press and hold a button for at least 3 seconds, then release
Press and hold a button for at least 6 seconds, then release
Hold button down
5.3. Functions and Button Operations
You can follow the instructions listed on Table 1 – 7 below to operate your EGO Cup FM.
Note:
Your EGO Cup FM can only talk to paired Bluetooth devices. For devices supporting only the Hands-free Profile (HFP), you also need
to establish Bluetooth connection between your EGO Cup FM and your mobile phone before making and answering calls.
Table 1: Power on/off
Turn On
CURRENT STATUS
MOBILE
EGO CUP FM
PHONE
Power On
Power Off
Turn Off
Power On
FUNCTION
Standby
OPERATION
Move the “OFF/ON”
switch to “ON”
Move the “OFF/ON”
switch to “OFF”
13
EGO CUP FM INDICATOR
AUDIO TONE
One low tone followed
by one high tone
Two high tones
followed by one low
tone
LED INDICATOR
Blue LED blinks once
every 3 seconds
Blue LED is OFF
English
Table 2: Pairing/Connections
FUNCTION
Pair EGO Cup
FM with
mobile phone
Erase all
paired profiles
Connect EGO
Cup FM with
mobile phone
Disconnect
CURRENT STATUS
MOBILE
EGO CUP FM
PHONE
Power on
Pairing mode
Automatic, no operation needed
One high tone
Blue LED glows brightly
without blinking
Disconnected
to all devices
Disconnected
to all devices
Press button for at least 3
seconds, then release, and then
One high tone
Blue LED blinks once
every 3 seconds
Standby
Standby
(disconnected) (disconnected)
button for at
press and hold
least 6 seconds, then release
Press and release
button
quickly
One high tone
Blue LED glows dimly
without blinking
Standby
(connected)
Press and hold
button for at
least 3 seconds, then release
One high tone
Blue LED blinks once
every 3 seconds
Standby
(connected)
OPERATION
EGO CUP FM INDICATOR
AUDIO TONE
LED INDICATOR
Table 3: Basic Call Functions
FUNCTION
Answer Call
Reject/End
Call
Outgoing
number redial
Incoming call
redial
CURRENT STATUS
MOBILE
EGO CUP FM
PHONE
Incoming call
Incoming call
Connected
Connected
Connected
Connected
Connected
Connected
OPERATION
Press and release button
quickly
button
Press and release
quickly
Press and release button
quickly
Press and hold button for at
least 3 seconds, then release
14
EGO CUP FM INDICATOR
AUDIO TONE
One high tone
One high tone
One high tone
One high tone
LED INDICATOR
Blue LED glows brightly
without blinking
Blue LED glows dimly
without blinking
Blue LED glows brightly
without blinking
Blue LED glows brightly
without blinking
English
Voice Dialing
Connected
Connected
Cancel Voice
Dialing
Volume Up
Voice Dialing
Voice Dialing
Connected/Call Connected/Call
Volume Down
Connected/Call Connected/Call
Mute
Call
Call
Un-mute
Call
Call
Transfer Call
Call
(EGO Cup FM
to mobile phone)
Transfer Call
Call
(mobile phone to
EGO Cup FM)
Call
Standby
Press and hold button for at
least 6 seconds, then release
Press and release
button
quickly
Press and release
quickly
button
Press and release
quickly
button
One high tone
One high tone
One high tone
One high tone
Blue LED glows brightly
without blinking
Blue LED glows dimly
without blinking
Blue LED glows brightly
without blinking
Blue LED glows brightly
without blinking
One high tone Blue LED glows brightly
without blinking
followed by 2
low tones every
3 seconds
during mute-call
One high tone Blue LED glows brightly
and
button at the
Press
without blinking
same time and release quickly
Press and release button
One high tone Blue LED glows brightly
quickly
without blinking
and
button at
Press
the same time and release
quickly
Press and release
quickly
15
button
One high tone
Blue LED glows brightly
without blinking
English
Table 4: Call Waiting and 3-Way Calling (Conference)
FUNCTION
Hold active call
and answer
incoming call
End active call
and answer
incoming call
Reject incoming
call
CURRENT STATUS
MOBILE
EGO CUP
PHONE
FM
Connect/C Incoming Call
all
Connect/C
all
Incoming Call
Connect/C
all
Incoming Call
Toggle active
call and hold call
Call on
hold
Call on hold
End active call
and accept hold
call
Release all held
calls
Conference call
Call on
hold
Call on hold
Call on
hold
Call on
hold
Incoming Call
Call on hold
OPERATION
button for
Press and hold
at least 3 seconds
Press and release
quickly
button
button for
Press and hold
at least 3 seconds, then release
button for
Press and hold
at least 3 seconds, then release
Press and release button
quickly
Press and hold button for at
least 3 seconds, then release
button for at
Press and hold
least 3 seconds, then release
16
EGO CUP FM INDICATOR
AUDIO
LED INDICATOR
TONE
One high
Blue LED glows brightly
tone
without blinking
One high
tone
Blue LED glows brightly
without blinking
One high
tone
Blue LED glows brightly
without blinking
One high
tone
Blue LED glows brightly
without blinking
One high
tone
Blue LED glows brightly
without blinking
One high
tone
One high
tone
Blue LED glows brightly
without blinking
Blue LED glows brightly
without blinking
English
Table 5: Audio Operations (A2DP)
FUNCTION
Play
CURRENT STATUS
MOBILE
EGO CUP FM
PHONE
A2DP Mode
Pause
A2DP Mode
Stop
A2DP Mode
Volume Up
A2DP Mode
Volume Down
A2DP Mode
Forward
A2DP Mode
Backward
A2DP Mode
EGO CUP FM INDICATOR
OPERATION
Press and release
quickly
Press and release
quickly
Press and release
quickly
AUDIO TONE
button
One high tone
button
One high tone
button
One high tone
Press and release
quickly
button
Press and release
quickly
Press and release
quickly
Press and release
quickly
button
17
One high tone
One high tone
button
One high tone
button
One high tone
LCD INDICATOR
English
Table 6: FM-Transmission
FUNCTION
Enable / disable
FM transmission
FM searching
forward / set a
frequency
FM searching
backward / set a
frequency
Select FM PreSet channels
forward (1-6)
Select FM PreSet channels
backward (6-1)
CURRENT STATUS
MOBILE
PHONE /
EGO CUP FM
PLAYER
All except
Search-FM
Connect
Connect
Connect
Connect
Connect
Connect
Connect
Connect
EGO CUP FM INDICATOR
OPERATION
button at the
Press and
same time and release quickly
Hold button down then
press and release button
quickly
Hold button down then
press and release button
quickly
Press and hold button for
at least 3 seconds, then
release
Press and hold button for
at least 3 seconds, then
release
AUDIO TONE
LED INDICATOR
One high tone
Blue LED blinks once
every 3 seconds
One high tone
One high tone
One high tone
One high tone
Table 7: Others
FUNCTION
Enable/disable
auto connect
feature
CURRENT STATUS
MOBILE
EGO CUP FM
PHONE
Standby
OPERATION
button for
Press and hold
at least 6 seconds, then
release
18
EGO CUP FM INDICATOR
AUDIO
LED / LCD
TONE
INDICATOR
One high
tone
English
Mute EGO Cup
FM speaker
Call
Un-mute EGO
Cup FM speaker
Call
Low Power
Warning
Unchanged
and
Press and hold
button for at least 3 seconds
-
Mute Remind
Unchanged
-
Incoming call
Press and hold button for at
least 3 seconds, then release
-
See incoming
Incoming
call number
call
Volume maximum or
minimum is reached
Unchanged
and
Press and hold
button for at least 3 seconds
6. Technical Data
Dimension:
Weight:
Length of cable-adapter:
Operating voltage:
Operating temperature:
76 mm x 71 mm x 50 mm / 3.0 x 2.8 x 1.9 Inches
96 gram / 3.4 oz
0.6 m / 23 Inches
12V
-20°C to +70°C / - 4° to 158°F
Supported Bluetooth Profiles: Handsfree, A2DP, and AVRCP
Bluetooth Specification:
Bluetooth 2.0
19
One high
tone
Blue LED glows brightly
without blinking
One high
tone every
60 seconds
Two high
tones every
3 seconds
-
Red LED is ON and
blue LED blinks once
every 20 seconds
Red LED is ON and
blue LED blinks once
every 20 seconds
Incoming call number
appears on the LCD
Blue LED glows brightly
without blinking
High – low
tones