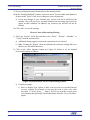
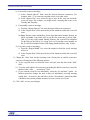
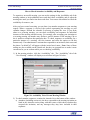
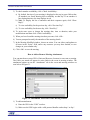
1
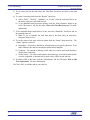
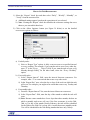
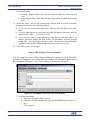
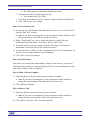
NCMAIL – ENTEPRISE SOLUTIONS A DIVISION OF ITS
Web Interface Calendar Manual
NCMail Calendar Instructional Manual
Revision 2005.08
Table of Contents
Table of Contents
WELCOME TO NCMAIL CALENDAR
3
ACCESSING NCMAIL
4
LOGGING IN TO NCMAIL
LOGGING OUT OF WEBMAIL
4
5
ACCESSING CALENDAR
6
ELEMENTS OF THE CALENDAR SCREEN
7
ELEMENTS OF THE CALENDAR TOOLBAR PANE
NCMAIL SYSTEM TOOLBAR ELEMENTS
CALENDAR TOOLBAR ELEMENTS
ELEMENTS OF THE CALENDAR NAVIGATION PANE
ELEMENTS OF THE CALENDAR CREATION/SELECTION PANE
ELEMENTS OF THE CALENDAR TASK LIST PANE
ELEMENTS OF THE CALENDAR VIEW PANE
CALENDAR HELP SYSTEM
8
8
9
9
10
10
11
12
CALENDAR PREFERENCES
15
ACCESSING NCMAIL ACCOUNT PREFERENCES
NCMAIL CALENDAR PREFERENCES
CALENDAR SETTINGS
TASK SETTINGS
15
16
17
18
OVERVIEW OF CALENDAR TASKS
19
CALENDARS
20
CALENDAR GROUPS
HOW TO CREATE A CALENDAR GROUP
HOW TO EDIT (RENAME) A CALENDAR GROUP
HOW TO DELETE A CALENDAR GROUP
21
21
21
21
Page
1 1 of 45
Table of Contents
NCMail Calendar Instructional Manual
Revision 2005.08
ADDITIONAL CALENDARS
HOW TO ADD A NEW CALENDAR
HOW TO SHARE YOUR CALENDARS WITH OTHER USERS
HOW TO REMOVE USERS SHARING PRIVILEGES
HOW TO ADD ANOTHER USERS SHARED CALENDAR
HOW TO DELETE A CALENDAR
22
22
23
24
24
25
EVENTS AND MEETINGS
26
EVENTS
ADDING AN EVENT
How to Create a Recurring Event
How to Add or Remove Event Attachments
HOW TO EDIT AN EVENT
HOW TO DELETE AN EVENT
MEETINGS
HOW TO ADD A MEETING
How to Create a Reoccurring Meeting
How to Check Attendees Availability and Responses
How to Add or Remove Meeting Attachments
HOW TO EDIT A MEETING
HOW TO DELETE A MEETING
26
26
28
28
29
30
31
31
34
36
37
38
40
TASKS OVERVIEW
41
TASKS
HOW TO ADD A TASK
How to Set Task Reoccurrence
How to Add or Remove Task Attachments
HOW TO VIEW OR EDIT A TASK
HOW TO SET TASK STATUS
HOW TO MARK A TASK AS COMPLETE
HOW TO DELETE A TASK
41
41
43
44
45
45
45
45
Page 2 of
2 45
NCMail Instructional Manual
Revision 2005.05.17
Welcome
Welcome to NCMAIL Calendar
We hope the enclosed information assists you in increasing your knowledge of the
NCMail Calendar application. The screen shots and instructions that are included will
guide you through all common calendar tasks with ease.
Everyone who has an NCMail account can, for an additional fee, opt to have access to
Calendar. The Calendar application enables you to view and edit your scheduled and the
schedules of other NCMail Calendar users from any computer in the world that has an
Internet connection.
If you have any questions please direct them to your local Customer Service Center,
Helpdesk or Local NCMail administrator
You may enter your local contact information below for quick reference:
Local Contact Name:
Local Contact Number:
Local Contact Email:
_________________________________
_________________________________
_________________________________
If your questions cannot be answered by your local contact, your local contact will open a
ticket with the ITS Customer Service Center by telephone at 919.754.6000 or 1-800-7223946 or email at [email protected].
Our staff will be happy to answer any of your questions
Page
3 3 of 45
NCMail Calendar Instructional Manual
Revision 2005.08
Accessing Calendar
Accessing NCMail
The Calendar application is part of the NCMail system. To access the Calendar you must
have an NCMail account. The first step in using the NCMail Calendar is accessing the
NCMail web interface and logging in. To accomplish this you will need to navigate to
the NCMail portal on the web by following these steps:
Logging In to NCMail
1. Open your Internet browser (Internet Explorer, Netscape, Mozilla, etc.)
2. Type the following address into the address bar:
www.ncmail.net
3. Hit the <Enter> key on your keyboard
4. At this point you will be presented with the following screen:
Figure 1: NCMail Web Site
Page 4 of
4 45
NCMail Calendar Instructional Manual
Revision 2005.08
Accessing Calendar
5. If you look at the series of links along the left side of this page you will find the web
interface login links as seen in the following figure:
Figure 2: E-Calendar Login Button
6. Click on your domain account login link to access the user authentication screen seen
in Figure 3 below:
Figure 3: WebMail Login Screen
7. Enter the Username and Password provided to you by your email administrator.
8. Click on the
button or the “Enter” key to complete the login process
Logging Out of WebMail
To log out of the WebMail system you need to click on the <Log Out> button located at
the top of the window in the NCMail System Toolbar (see Figure 7 on Page 8). The Web
Interface will log you off automatically after thirty (30) minutes of inactivity.
Page
5 5 of 45
NCMail Calendar Instructional Manual
Revision 2005.08
Accessing Calendar
Accessing Calendar
After logging into the WebMail system you will need to locate the WebMail system
toolbar (noted in Figure 4 below) and find the <Calendar> button (see Figure 5).
WebMail System Toolbar
Figure 4: WebMail Main Screen
Figure 5: NCMail System Toolbar with Calendar Button Highlighted
There is a more detailed description of this toolbar and what each button performs on
page 8.
Page 6 of
6 45
NCMail Calendar Instructional Manual
Revision 2005.08
Calendar Elements
Elements of the Calendar Screen
After logging into the WebMail system and accessing the Calendar application you will
need to familiarize yourself with the elements that make up the application. The
following figure is a representation of the Calendar application. The Calendar main
screen is broken into 5 main sections (or panes). Each of the five panes is noted in the
figure. We will discuss in detail each of these panes on the following pages.
Calendar
Navigation
Calendar
Selection
Calendar
Task List
Calendar
Toolbars
Calendar
View
Figure 6: Calendar Main Screen
Page
7 7 of 45
NCMail Calendar Instructional Manual
Revision 2005.08
Calendar Elements
NCMail Calendar Instructional
Elements of the Calendar Toolbar Pane
NCMail System Toolbar Elements
Figure 5 shows the NCMail System Toolbar followed by a description of what functions
each button performs. In this manual we are interested primarily in the <Calendar>
button although we will also reference the <Preferences> button to access the Calendar
Preferences and the <Log Out> button to end our Calendar session.
Figure 7: NCMail System Toolbar
Mail Button: Clicking this button will return you to the WebMail main screen
from other areas of the Web Interface such as Calendar or your Address Book
Calendar: Clicking this button will take you to the Web Calendar application
Address Book: Clicking this button will take you to your Personal Address
Book
Sync Service: Clicking this button will take you to settings that will allow you
to setup sync service for your handheld device(s) (Palm OS, Windows Pocket
PC based device, etc.)
Preferences: Clicking this button will take you to the preference settings for
your email account
Log Out: Clicking this button will log you out of the Web Interface system
Page 8 of
8 45
NCMail Calendar Instructional Manual
Revision 2005.08
Calendar Elements
Calendar Toolbar Elements
Figure 8 shows the Calendar Toolbar followed by a description of the function each
button performs.
Figure 8: Calendar Toolbar
New Event:
The “New Event” button will allow you to schedule a new event.
Events help you keep track of milestones and long-term activities.
New Meeting:
The “New Meeting” button will allow you to schedule a new meeting.
A meeting is an event that allows the meeting owner to search for the
availability of other users, invite them to attend, and notify them if
there are any changes. Unlike other events, meetings can only be
added to your main calendar.
Find Calendars: The “Find Calendars” button will allow you to search for the calendar
of other NCMail users. You can search for users, and any calendars
belonging to users who match your search criteria are displayed in a
search results list. Unless a user has given you read or write access to a
calendar, however, you will not be able to view it or add it to your
calendar list.
Delete:
The “Delete” button will allow you to delete events or meetings from
your calendar. Deleting an event, permanently removes it from your
calendar.
Elements of the Calendar Navigation Pane
The calendar navigation pane (as seen below in Figure 9) allows you to navigate to the
different months or years of the calendar you are currently viewing.
Figure 9: Calendar Navigation Pane
Page
9 9 of 45
NCMail Calendar Instructional Manual
Revision 2005.08
Calendar Elements
NCMail Calendar Instructional
Elements of the Calendar Creation/Selection Pane
In the Calendar Creation/Selection pane (as seen below in Figure 10) you will find your
main calendar and any additional calendars you have created. Your main calendar is
your permanent calendar, which you use to add meetings and to accept meeting
invitations from other users. You can create additional calendars, however, on which you
can add events that are not meetings. For example, you could use your main calendar for
business and create a separate calendar for personal events.
Figure 10: Calendar Selection Pane
Elements of the Calendar Task List Pane
The Calendar Task List pane (as seen below in Figure 11) is used to view tasks you have
added to your calendar. You can add and edit tasks, mark tasks as complete, and delete
tasks. You can sort your task list by priority, task name, details, due date, and current
status. If you want, you can also limit the list to show only those tasks with a particular
status or due date.
Figure 11: Calendar Task List Pane
Page 1010
of 45
NCMail Calendar Instructional Manual
Revision 2005.08
Calendar Elements
Elements of the Calendar View Pane
The Calendar View pane (as shown in Figure 12 below) displays an enlarged view of the
calendar you have chosen to display. It will show an overview of any meetings or events
that have been scheduled on you calendar. It also includes a “View” drop down list to
allow you to view your calendar in a variety of different formats.
Figure 12: Calendar View Pane
Page
1111 of 45
NCMail Calendar Instructional Manual
Revision 2005.08
Calendar Elements
NCMail Calendar Instructional
Calendar Help System
The NCMail Calendar application provides context sensitive help for the area of the
system you are working. No matter what tasks you are performing in the Calendar
application you will always find the “Help” link in the upper right hand corner of the
screen (as highlighted in Figure 13 below).
Figure 13: Highlighted Help Link
Page 1212
of 45
NCMail Calendar Instructional Manual
Revision 2005.08
Calendar Elements
The Help link will take you into the Calendar help system and display help on the task
you are currently performing (see Figure 14 below).
Figure 14: Help Window
If what the Help window displays is not the topic you are interested in, you can access a
related topic in the “Related Topics” list. If these topics still do not provide the
information you are interested in, you can use the “Contents” or “Index” buttons as
described below.
Contents Button: The Contents Button will take you to the Table of Contents for
the Help system.
Previous Button: The Previous Button will take you to the help topic prior to the
topic you are currently viewing.
Next Button: The Next Button will take you to the next help topic.
Index Button: The Index Button will take you to the Index for the Help System.
Here you can scan through a list of key words to find the help topic in which you
are interested.
Page
1313 of 45
Calendar Elements
NCMail Calendar Instructional
NCMail Calendar Instructional Manual
Revision 2005.08
Now that we are familiar with the basic elements that make up the Calendar application
window, we need to look at the preferences that are available for our calendar.
Page 1414
of 45
NCMail Calendar Instructional Manual
Revision 2005.08
Calendar Preferences
Calendar Preferences
NCMail Account Preferences allow you to access settings that will determine how your
NCMail account works (including the Calendar application). They are broken down into
four categories: General, Mail, Calendar, and Contacts. In this section we will discuss
how to access the preferences for your account and discuss how preference settings will
effect your account. Because this manual is intended for the Calendar application we will
only discuss the Calendar Preferences in detail. The other preference elements are
discussed in the NCMail Webmail Manual within the WebMail preferences section.
Accessing NCMail Account Preferences
You will remember from earlier in this manual that we pointed out the WebMail System
Toolbar. In addition to containing the <Calendar> button we will also find the
<Preferences> button located here (highlighted in Figure 15 below).
Figure 15: WebMail System Toolbar
Once you have clicked on the <Preferences> button, you will be presented with the
screen shown in Figure 16 below.
Figure 16: NCMail Preferences Window
Page
1515 of 45
NCMail Calendar Instructional Manual
Revision 2005.08
Calendar Preferences
You will notice on the left side of this window there is a listing of the four categories of
preferences that are available. To access the preference category, click on the category
name in the left pane. By default, the General Preference Category is selected when you
enter the NCMail Preferences window. When you open any of the Preference Categories
(General, Mail, Calendar, Contacts) you can use the scroll bar on the right side of the
window to see the additional settings for that category. On the following pages we will
discuss the Calendar preferences.
NCMail Calendar Preferences
As noted above you will need to click the “Calendar” category on the left side of the
preferences window to access the Calendar Preferences (as seen below in Figure 17).
There are two Calendar Preference settings: Calendar Settings, and Task Settings. We
will discuss each of these in detail on the following pages.
Figure 17: Calendar Preferences
Page 1616
of 45
NCMail Calendar Instructional Manual
Revision 2005.08
Calendar Preferences
Calendar Settings
The “Calendar Settings” preferences (as seen in Figure 18 below) determine how the
Calendar View will display when you access the Calendar application. These settings
consist of “Default View” and “Default Event Duration”.
Figure 18: Calendar Settings Preferences
Default View:
When you access the Calendar application the “Default View”
preference determines how your calendar displays. Options
available from the drop-down list include: month, week, day,
and various list views.
Default Event Duration: When you create a new event in the calendar application the
“Default Event Duration” preference determines what length of
time will be automatically selected for the event. When
creating the event you will be able to select a different
duration, but if most of your events will last for one hour it will
be beneficial to select one hour as the default.
Note: Once you have set these preferences you must click the <Save Changes> button to
activate the changes. You can return the Calendar Settings to their default values by
clicking the <Reset> button.
Page
1717 of 45
Calendar Preferences
NCMail Calendar Instructional Manual
Revision 2005.08
Task Settings
The “Task Settings” preferences (as seen below in Figure 19) will allow you to determine
how tasks you have scheduled on your calendar will display when you access the
Calendar application. These settings consist of “Show Completed Tasks”, “Default
Sort”, and “Default View”.
Figure 19: Task Settings Preferences
Show Completed Tasks: This yes/no option button can be set to determine whether your
task list displays tasks that have marked as completed or not.
Default Sort:
This drop-down list will determine how your tasks will be
sorted. It includes the following sort options: Priority, Task,
Due Date, and Status.
Note: Once you have set these preferences you must click the <Save Changes> button to
activate the changes. You can return the Task Settings to their default values by clicking
the <Reset> button.
We should now be familiar with the basic elements of the Calendar application as well as
the preferences that will effect our default display. Next we will discuss how to perform
common calendar tasks such as scheduling a new event or meeting,
creating/editing/completing tasks, viewing other NCMail user’s calendars, etc.
Page 1818
of 45
NCMail Calendar Instructional Manual
Revision 2005.08
Calendars
Overview of Calendar Tasks
You have a single calendar by default, but you can create additional calendars to record
different types of events. Your main calendar is permanent, but any additional calendars
you create can be deleted. Each calendar you create is added to your calendar list, and
you can select any calendar in the list to view. In fact, you can select multiple calendars,
and all events on the selected calendars appear simultaneously in a single, layered
calendar view. You can create calendar display groups, which appear in your calendar
list, and assign any calendar in your list to a group. When you select a group, the events
on all calendars in the group are displayed in your calendar view. You can also control
the layout of your calendar view to display events in month, week, day, or list views.
You can add events to any of your calendars. On your main calendar, you can also add
meetings. If you have identified another user as your administrative assistant, they can
manage meetings on your behalf.
You can share your calendars with other users and add other user’s calendars to your
calendar list. Depending on the level of access granted by the calendar owner, you can
view or modify events on a shared calendar.
On the following pages we will discuss in detail how to perform all of these tasks.
Page
1919 of 45
NCMail Calendar Instructional Manual
Revision 2005.08
Calendars
Calendars
Your calendar(s) will display in your “Calendar Creation/Selection Pane” as shown in
Figure 20 below. In this area you can select one or more calendars to view as well as
adding additional calendars, editing calendars, and deleting calendars. You can also
create calendar display groups to allow for the display of multiple calendars in a unified
view. Follow the detailed instructions that follow to setup and use your calendar(s).
Figure 20: Calendar Creation/Selection Pane
Page 2020
of 45
NCMail Calendar Instructional Manual
Revision 2005.08
Calendars
Calendar Groups
Being able to create multiple calendars introduces a possible need to view these calendars
at the same time. Calendar groups are a convenient way to display all calendars in a
group. When you select a group in your calendar list, all events on the calendars in the
group appear in the calendar view. You can add or delete a group, and edit a group name.
If you have your business schedule on your main calendar and create a separate calendar
for your personal schedule you may wish to add them to a group so you can view your
business and personal schedules in one unified calendar.
How to Create a Calendar Group
1) In “Calendar Creation/Selection” pane list, click the <Add Group> button. The “Add
Group” window will display (as seen in Figure 21 below).
Figure 21: Add Calendar Group Window
2) In the “Add Group” window, enter a name for the group in the “Group Name” text
box and click the <OK> button.
3) The new group will appear in your calendar list.
How to Edit (Rename) a Calendar Group
1) In the “Calendar Creation/Selection” pane, select the group you wish to rename.
2) Click the <Edit> button.
3) Edit the group name.
4) Click the <OK> button.
How to Delete a Calendar Group
When you delete a group, all calendars you own move to the top of your calendar list.
Any calendars owned by other users are removed from the list entirely. To remove a
shared calendar from a group before you delete the group, see the section “Removing a
Calendar from a Group”.
1) Click the name of the group in your calendar list to select it.
2) Click <Delete>.
Page
2121 of 45
NCMail Calendar Instructional Manual
Revision 2005.08
Calendars
Additional Calendars
Your main calendar is your permanent calendar, which you use to add meetings and to
accept meeting invitations from other users. You can create additional calendars,
however, on which you can add events that are not meetings. For example, you could use
your main calendar for business and create a separate calendar for personal events.
How to Add a New Calendar
1) In your calendar list, click the <New Calendar> button. This will display the “New
Calendar” window as seen in Figure 22 below.
Figure 22: New Calendar Window
2) In the New Calendar window, enter a name for the calendar in the “Display Name”
text box.
3) Enter a description of the calendar in the “Description” text box.
4) To disable double booking of events, clear the “Allow double booking of events”
check box. Double booking is enabled by default, which enables you to have events
whose duration overlaps. If this option is not enabled, you cannot create an event that
conflicts with the time span of an existing event.
5) To add the calendar to a group, select the group from the “Calendar Group” dropdown list.
6) By default, all users of your calendar service have Free/Busy access to the calendar
only. Users can determine whether you are available at a particular time, but they
cannot view or modify events on the calendar. We will discuss setting calendar access
later in this section.
Page 2222
of 45
NCMail Calendar Instructional Manual
Revision 2005.08
Calendars
7) Click the <OK> button to save your changes and close the window.
8) You will now see the new calendar in your calendar list.
How to Share Your Calendars with Other Users
You can set access levels when you add or edit a calendar. By default, a calendar cannot
be accessed by other users. The default access setting, which applies to all calendar users,
is Free/Busy. This means that other users can check your availability when organizing a
meeting but cannot view your calendar or its events. You can change the user access
settings if you want other users to view or edit events on your calendar or if you want to
further limit or expand user access. You can select from the following access levels:
Access Level Description
None
No access allowed. The user or users cannot view this calendar or check
your availability (Free/Busy status) for meetings.
Allows a user or users to check your availability when organizing
Free/Busy
meetings. (Free/Busy access is applicable to your main calendar only.)
(default)
Read
Allows a user or users to view details about events and meetings on this
calendar. Includes the access privileges for Free/Busy.
Write
Allows a user or users to add, modify, and delete events and meetings on
this calendar. Includes the access privileges for Read and Free/Busy.
Note: If you set a separate access level for an individual user, that setting takes
precedence over the setting for All Registered Users.
1) Open the New Calendar or Edit Calendar window.
2) The “Calendar Access” section of the window provides the access settings.
3) To change the access level for all calendar users, select a new level from the “All
Registered Users” drop-down list. Note: This setting applies to all users of the
calendar service in any domain, not just to users in your domain.
4) To add one or more users to the calendar access list:
a) Click the <Add User> button. The “Add Calendar User” window will display as
seen in Figure 23 below.
Figure 23: Add Calendar User Window
Page
2323 of 45
NCMail Calendar Instructional Manual
Revision 2005.08
Calendars
b) In the “Add Calendar User” window, enter the search criteria for the user you
want to add.
i) To find a user in your domain, search by name or by email address.
ii) To find a user in any domain, select the “Search across all available domains”
check box and search by user ID.
c) Click <Search>.
d) If you search by name and multiple matches are found, five at a time will appear
in the search results. If necessary, select a new range of results to view from the
“Show” list.
e) In the search results list, select the check box for the user and click the <Add >
button. Note: You can repeat the search as necessary to add other users.
f) Click the <OK> button.
g) The search window closes and all selected users appear in the User Access
section.
h) Select an access level from the “Access” list for the user or users you just added.
“Read” access is selected by default.
How To Remove Users Sharing Privileges
1) Select the check boxes of the users you want to remove.
2) Click the <Remove> button.
3) Click <OK> to save your changes and close the window.
How to Add Another Users Shared Calendar
You can add another user's calendar to your calendar list if the calendar owner has given
you read or write access to it. When you add a shared calendar to your list, it remains
there until you delete it, and you can view it whenever you choose.
The calendar owner may delete the calendar (assuming it is not the user's main calendar)
or revoke your access to it at any time. The calendar will remain in your calendar list, but
you will no longer be able to view or modify it. In this case, you can confirm with the
owner that the calendar is no longer available and then delete it.
1) Use the <Find Calendars> button to search for the calendar you wish to add
(searching for calendars is discussed in a separate section of this manual).
2) In the search results, select the calendars you want to add. Note: If a calendar in the
search results list cannot be selected, it means that the owner has not granted you
access to it.
3) Click the <Add to My Calendars> button.
4) The “Select Calendar Group” window appears.
Page 2424
of 45
NCMail Calendar Instructional Manual
Revision 2005.08
Calendars
5) To add the calendars to a group, select a group from the “Calendar Group” dropdown list. None is selected by default, which means that the calendars will not be
added to any group. Unless you have created one or more groups, it will be the only
selection available.
6) Click the <OK> button to add the calendars to your list.
7) The search results pane is replaced by your calendar view.
How to Delete a Calendar
You can delete any calendar you own except your main calendar. When you delete a
calendar, all events on the calendar are deleted. This action cannot be undone. Note:
When you delete a shared calendar owned by another user, the calendar is removed from
your calendar list, but it is not actually deleted. Only the owner of a calendar can delete it.
1) In your calendar list, select the check box of the calendar or calendars you want to
remove.
2) Click the <Delete> button.
3) All selected calendars that you own are deleted, unless they are in a group. Any
calendars you own that are in a group are moved out of the group. All selected
calendars owned by other users are removed from your calendar list, whether they are
in a group or not.
4) To delete a calendar that has been moved out of a group, select the calendar and click
the <Delete> button again.
Page
2525 of 45
NCMail Calendar Instructional Manual
Revision 2005.08
Events and Meetings
Events and Meetings
Events are activities that you add to your calendars. You can design events with many
options, such as the span of time for the event, recurrence, reminders, and much more.
Meetings are events, too, with the additional option of inviting attendees and notifying
attendees of changes. You can even book resources, such as conference rooms or
projection equipment for meetings if your administrator has enabled this option for your
calendar service.
Events
Adding an Event
Events help you keep track of milestones and long-term activities. Follow the following
steps to create a new event.
1) Click the <New Event> button in the Calendar Toolbar. The “New Event” window
will display as shown in Figure 24 below.
Figure 24: New Event Window
a) Note: You can also click the number representing a date on the calendar to open a
New Event window. This pre-populates the date fields with that date.
2) Enter a title for the event in the “Title” field. The title you enter is used to label the
event in the calendar view.
Page 2626
of 45
NCMail Calendar Instructional Manual
Revision 2005.08
Events and Meetings
3) If needed, enter the location of the event in the “Location” field.
4) If needed, enter a description of the event in the “Details” field.
5) If necessary, make the event private by clicking the “Private Event” check box. The
private event option will not appear unless your calendar service includes this feature.
The “Public Event” option is selected for new events by default. Unless you give
other users access to the calendar, however, they cannot see events on it.
6) Select the calendar to which the event will be added from the “Calendar“ drop-down
list. The calendar currently displayed in the calendar view is selected by default. If
more than one calendar is displayed, your main calendar will be selected. Once you
have added the event to a particular calendar, you cannot move it to a different
calendar. If other users have write access to any of the calendars in your list, you can
click the Refresh icon to update the calendars. This is useful when the calendar owner
has changed your access to a shared calendar or when another user has added an
event that would conflict with the one you are adding.
7) Set the date, time, and duration of the event:
8) Select the start date and time for the event. The end time is set automatically based on
the default duration period.
9) If necessary, reset either the end date or time or the duration for the event. For an
event that lasts all day, select the “All day event” check box. If you change the
duration, the end time is recalculated. Likewise, if you change the end time, the
duration is recalculated. If you change the end time to be earlier than the start time,
the start time is recalculated based on the duration. If you select the all-day option,
the start and end times and the duration update accordingly. Note: The maximum
duration of an event is 365 days.
10) To set a reoccurrence for your event, follow the steps outlined in the following
section “How to a Create Reoccurring Event”.
11) To set your availability, select “Free” or “Busy” from the “Availability”drop-down
list. If double booking is disabled for the calendar, this setting is used to determine
whether there are any conflicts with other events. If you select “Free”, this event can
overlap with another event. If this is your main calendar and other users have
Free/Busy access to it, this setting is also used to determine your availability for
meetings those users are organizing.
12) To attach a URL to this event, click the “Attachments” tab.
13) Click <OK> to add the event to your calendar. Note: If the event does not appear, you
may have added it to a calendar that is not currently selected in the “My Calendars”
list. You must select a calendar to display the events and meetings it contains.
Page
2727 of 45
NCMail Calendar Instructional Manual
Revision 2005.08
Events and Meetings
How to Create a Recurring Event
1) From the “Create Event” window check the “Repeat” check box.
2) Select “Daily”, “Weekly”, “Monthly”, or “Yearly” from the associated list to set the
event to repeat at a specified interval. If you chose one of these options, the event
recurs based on the day and time you specified in the “Start Time” area.
3) For more recurrence options, click the <More Options> button. This will take you to
the “Reoccurrence” tab as shown in Figure 25 below.
Figure 25: Reoccurring Tab of Create Event Window
4) After entering all necessary information for the reoccurrence of the event click on the
“Event Details” tab to finish setting up your event or click <OK> to save the event.
How to Add or Remove Event Attachments
You can attach one or more URLs (Universal Resource Locators) to an event or meeting.
The URLs you attach will appear as active links in the event or meeting window. The
attachment options are on the “Attachment” tab in the event and meeting windows.
1) To add an attachment:
a) Enter the URL in the URL field.
b) Make sure the URL begins with a valid protocol handler such as http:// or ftp://.
c) Click <Attach>.
d) The URL appears as a link in the Attachments section.
2) To attach more URLs, repeat the previous step.
3) You can attach up to five URLs.
4) To remove an attachment, click the <Remove> button associated with the link.
5) Click <OK> to save your changes.
Page 2828
of 45
NCMail Calendar Instructional Manual
Revision 2005.08
Events and Meetings
How to Edit an Event
When you open an existing event, you can view details about the event and modify it.
When the event you are opening is a recurring event, you can choose whether to edit the
entire series or only that specific instance. When you edit a single instance, you create an
exception to a recurring event. For example, you can change the start time of a weekly
event for one particular week only, without changing the regular start time for the other
occurrences. The exceptional event is still part of the recurring series, and any subsequent
changes you make to all instances will reset the exceptional instance. For example, if you
change the start time or date when editing all instances, all occurrences will be reset,
including any exceptions. If you decide that you want to invite other users, you can
change an event to a meeting, as long as the event is on your main calendar, by selecting
Change to Meeting from the list at the top of the window.
1) On the calendar, click the event that you want to edit. The Edit Event window opens
as shown in Figure 26 below. Note: If you select a recurring event, before the
window opens you are prompted to choose whether to edit the current instance of the
event only or the entire series.
Figure 26: Edit Event Window
2) On the “Event Details” tab, modify the details as needed. For more information about
each option, see the topic “Adding an Event”.
3) To modify specific recurrence options, click the “Recurrence” tab. For more
information, see the topic “How to Create a Reoccurring Event”.
Page
2929 of 45
Events and Meetings
NCMail Calendar Instructional Manual
Revision 2005.08
4) To attach or remove a URL, click the “Attachments” tab. For more information, see
the topic “How to Add or Remove Event Attachments”.
5) Click OK to save your changes.
How to Delete an Event
1) Select the check box next to the event that you want to delete from your calendar.
a) If you want, you can select multiple events to delete at the same time.
b) Note: If you select a recurring event, you are prompted to choose whether to
select only the current instance of the event or the entire series.
2) Click the <Delete> button in the Calendar Toolbar and then click <OK> to confirm
the deletion.
Page 3030
of 45
NCMail Calendar Instructional Manual
Revision 2005.08
Events and Meetings
Meetings
A meeting is an event that allows the meeting owner to search for the availability of other
users, invite them to attend, and notify them if there are any changes. Unlike other events,
meetings can only be added to your main calendar.
How to Add a Meeting
1) Click the <New Meeting> button in the Calendar System Toolbar. The “New
Meeting” window will appear (as seen in Figure 27 below).
a) You can also click the number representing a date on the calendar to schedule a
meeting on that date. The New Event window will open by default, but you can
change the event to a meeting by selecting “Create Meeting” from the list at the
top of the window.
Figure 27: New Meeting Window
2) To invite others to the meeting, do either or both of the following:
a) Enter the email addresses of the people you want to invite in the “Invite” text box,
separating each entry with a comma.
Page
3131 of 45
Events and Meetings
NCMail Calendar Instructional Manual
Revision 2005.08
b) Click the <Invite> button to select contacts from your address books. The
“Contacts and Groups” window will open as displayed in Figure 28 below.
Figure 28: Select Contacts and Groups Window
i) Select the names of the individuals or groups you would like to invite to your
meeting and click the <Add> button.
ii) Choose <OK> to add all selected to the meeting.
3) Enter a title for the meeting in the “Title” text box.
a) The title is used as the subject line of email invitations sent to attendees, as well
as to label the meeting in the calendar view.
4) Enter the location of the meeting in the “Location” text box.
5) To book resources for the meeting:
a) Click the <Resources> button and then select one or more resources from the list.
If necessary, expand a category in the list to access the resources in that category.
b) Resources can include conference rooms, overhead projectors, or portable
presentations systems. Resources are often categorized by location, type, or other
criteria and listed in outline style under each category. If no resources appear in
the list, it means that your administrator has not added them.
c) To view a resource calendar in a separate window, click the name of the resource.
d) Click the <Add> button to add the selected resources and then click <Close>.
e) Note: By default, double booking of a resource is not allowed. You are informed
in case of any resource conflicts.
Page 3232
of 45
NCMail Calendar Instructional Manual
Revision 2005.08
Events and Meetings
6) Enter a description of the meeting in the “Details” check box. If necessary, make the
meeting private by selecting the “Private Meeting” option.
a) The “Public Meeting” option is selected for new meetings by default. Unless you
give other users access to the calendar, however, they cannot see meetings on it.
b) Note: The private meeting option will not appear unless your calendar service
includes this feature.
7) Set the date, time, and duration of the meeting:
8) Select the start date and time.
9) The end time is reset automatically based on the default duration period.
10) If necessary, reset either the end date and time or the duration. For a meeting that lasts
all day, select the “All day event” check box.
a) If you change the duration, the end time is recalculated. Likewise, if you change
the end time, the duration is recalculated. If you change the end time to be earlier
than the start time, the start time is recalculated based on the duration. If you
select the all-day option, the start and end times and the duration update
accordingly.
b) Note: The maximum duration of a meeting is 365 days.
11) To create a recurring meeting select the “Repeat” check box.
a) Select “Daily”, “Weekly”, “Monthly”, or “Yearly” from the associated list to set
the meeting to repeat at a specified interval.
b) If you choose one of these options, the meeting recurs based on the day and time
you specified in the “Start Time” area. For more recurrence options, click the
<More Options> button. See the topic “How to Create a Reoccurring Meeting”
for more information.
12) To be reminded about the meeting before it starts, select the “Reminder” check box
and set the reminder interval.
a) Note: You must have integrated alerts service to set reminders.
13) To set your availability, select “Free” or “Busy” from the “Availability” drop-down
list.
a) This option enables other users to see whether you are free or busy during this
meeting, to determine your availability for meetings they are organizing.
b) Note: If this meeting is being added to a calendar that does not grant Free/Busy
access to other users, they will not be able to determine your availability.
14) To check for the availability of the users you entered in the “Invite” field, click the
“Availability” tab. See the topic “How to Check Attendees Availability and
Responses” for detailed instructions on how to perform this check.
15) If you want to attach a URL to this meeting, click the “Attachments” tab. See the
topic “How to Add or Remove Meeting Attachments” for detailed instructions on
how to perform this action.
16) Click <OK> to add the meeting to your calendar.
Page
3333 of 45
NCMail Calendar Instructional Manual
Revision 2005.08
Events and Meetings
17) You are prompted to notify the attendees of the meeting details.
18) In the “Meeting Modified” window, choose an action. You can either send updates to
all users in the “Invite” field, or save changes to your calendar only.
a) If you save changes to your calendar only, invitees will not be notified of the
meeting. They will not receive an email invitation and a meeting request will not
appear on their calendars. In addition, any resources you selected will not be
booked.
19) Click <OK> to save the meeting.
How to Create a Reoccurring Meeting
1) Select the “Repeat” check box and then select “Daily”, “Weekly”, “Monthly”, or
“Yearly” from the associated list.
a) Additional settings appear, based on the repeat interval you selected.
b) Note: Clearing the “Repeat” check box disables the recurrence settings but saves
them so you can enable them later.
2) Click on the <More Options> button (see Figure 29 below) to set the detailed
reoccurrence options as follows.
Figure 29: Reoccurrence Tab of Create Meeting Window
a) For daily meetings...
i) Select a “Repeat Type” option. A daily event can recur at a specified interval
or every weekday. For example, if you want the event to recur every other
day, enter “2” in the “Every ___ Day(s)” field. If you want the event to recur
every Monday through Friday, on the other hand, select the “Every Weekday”
option.
Page 3434
of 45
NCMail Calendar Instructional Manual
Revision 2005.08
Events and Meetings
b) For weekly events or meetings...
i) In the “Repeat Interval” field, enter the interval between recurrences. For
example, enter “2” to create an event that recurs every other week.
ii) In the “Repeat Day” area, select the day or days of the week on which the
event will recur. For example, you might create a meeting that recurs every
Tuesday and Thursday.
c) For monthly events or meetings...
i) From the “Repeat Interval” list, enter the interval between recurrences.
ii) In the “Repeat Date” field, enter the day of the month on which the event will
recur.
iii) Note: Because some months have fewer days than other months, the date on
which a monthly event recurs will vary if the first occurrence is on the 29th,
30th, or 31st day of the month. During February, the event will be scheduled
for the 28th (or the 29th if it is a leap year). An event that recurs monthly on
the 31st will be scheduled for the 30th during months that have only 30 days.
d) For yearly events or meetings...
i) From the “Repeat Month” list, select the month in which the yearly meeting
will recur.
ii) In the “Repeat Date” field, enter the day of the month on which the event will
recur.
3) Change the “Start” date for the recurring event. Choose how to end the recurrence
series by selecting one of the following options:
a) To set a specific date on which the series will end, enter the date in the “End”
field.
b) To set the total number of occurrences (including the initial occurrence), enter the
number in the “After ___ occurrences” field.
c) If you want the event to recur indefinitely, select the “No end time” option. As
business processes change, the need to have an indefinitely recurring meeting
usually does. As such it is not advised to use the “No end time” option but rather
a definitive time period, perhaps measured in years, such as two 2 years.
4) Click <OK> to save your changes.
Page
3535 of 45
Events and Meetings
NCMail Calendar Instructional Manual
Revision 2005.08
How to Check Attendees Availability and Responses
To organize a successful meeting, you can use the settings in the Availability tab of the
meeting window to invite additional users and check their availability and to adjust the
meeting time until you find a time that works best. You can use this method to check the
availability of resources, too.
After you have created a meeting, you can later view attendee responses to your meeting
request. When a response is received, the symbol representing the meeting on your
calendar changes. Refresh the calendar if necessary to update the view. If you invite
others to a recurring meeting, you can check availability and responses for individual
instances of the meeting when necessary. For example, after accepting your invitation to
a recurring meeting, an attendee may decline a specific instance of the meeting if he or
she is unable to attend on that particular date. To check responses or availability for a
particular instance of a meeting, click the instance and select the option to edit this
instance only. If an administrative assistant has responded to an invitation, their name and
the phrase "on behalf of" will appear with the invited user's name. Note: Some of these
settings are also available on the Details tab, but they are grouped here to make it more
convenient for you to set them while you are checking availability.
1) In the meeting window, click the “Availability” tab. The “Availability” tab of the
“New Meeting” window will display as seen below in Figure 30 below.
Figure 30: Availability Tab of Create Meeting Window
2) To check attendee responses, examine the Attendee list at the bottom of the window.
a) Attendees (including resources) who have responded to the meeting invitation are
listed in the Attendee section along with their status, which shows whether they
accepted the invitation, and any messages they may have included in their
responses.
Page 3636
of 45
NCMail Calendar Instructional Manual
Revision 2005.08
Events and Meetings
3) To check attendee availability, click <Check Availability>.
a) By default, the time of your meeting is displayed at the top in green. Below that,
all attendees are listed showing their availability on that day. If an attendee is
busy during that time, the time displays in red.
b) Note: To display the list of attendees and their responses again, click “Show
Reply”.
c) To view availability for the previous day, click “Previous Day”.
d) To view availability for the next day, click “Next Day”.
4) To invite more users or change the meeting date, time or duration, make your
modifications and then click <Check Availability>.
5) When you have found the meeting time that you want, click <OK>.
6) You are prompted to notify the attendees of the meeting details.
7) In the Meeting Modified window, choose an action. You can either send updates to
all users in the “Invite” field, and to any resources you may have booked, or save
changes to your calendar only.
8) Click <OK> to save the meeting.
How to Add or Remove Meeting Attachments
You can attach one or more URLs (Universal Resource Locators) to an event or meeting.
The URLs you attach will appear as active links in the event or meeting window. The
attachment options are on the “Attachment” tab in the event and meeting windows as
seen below in Figure 31.
Figure 31: Attachments Tab of the Create Meeting Window
1) To add an attachment:
a) Enter the URL in the “URL” text box.
b) Make sure the URL begins with a valid protocol handler such as http:// or ftp://.
Page
3737 of 45
Events and Meetings
NCMail Calendar Instructional Manual
Revision 2005.08
c) Click <Attach>.
d) The URL appears as a link in the Attachments section.
2) To attach more URLs, repeat the previous step.
a) You can attach up to five URLs.
3) To remove an attachment, click the <Remove> button associated with the link.
4) Click <OK> to save your changes.
How to Edit a Meeting
When you open an existing meeting, you can view details about the meeting and modify
it. Any changes made by an administrative assistant are identified in associated
notifications and on the Availability tab with the phrase "on behalf of".
When the meeting you are opening is a recurring meeting, you can choose whether to edit
the entire series or only that specific instance. When you edit a single instance, you create
an exception to a recurring meeting. For example, you can change the start time of a
weekly meeting for one particular week only, without changing the regular start time for
the other occurrences. The exceptional meeting is still part of the recurring series, and
any subsequent changes you make to all instances will reset the exceptional instance. For
example, if you change the start time or date when editing all instances, all occurrences
will be reset, including any exceptions. Note: You can also open a specific instance of a
meeting to check attendee responses and availability for that particular instance. As you
modify the meeting details, if you decide that you no longer want to invite other users,
you can change a meeting to an event by selecting Change to Event from the list at the
top of the window. Once you change a meeting to an event, you lose the invitation list
and any resources you may have booked.
Page 3838
of 45
NCMail Calendar Instructional Manual
Revision 2005.08
Events and Meetings
1) On the calendar, click the meeting that you want to edit. The “Edit Meeting” window
opens as shown in Figure 32 below.
Figure 32: Edit Meeting Window
2) If you select a recurring meeting, before the window opens you are prompted to
choose whether to edit the current instance of the meeting only or the entire series.
3) On the “Meeting Details” tab, modify the details as needed.
4) To check for the availability of new users you added in the “Invite” field, click the
“Availability” tab.
5) To view the responses of attendees, click the “Availability” tab.
6) To modify specific recurrence options, click the “Recurrence” tab
7) To attach or remove a URL, click the “Attachments” tab.
8) Click <OK> to save your changes.
9) You will be prompted to notify the attendees of the meeting details.
a) In the Meeting Modified window, choose an action. You can either send updates
to all users in the “Invite” field, and to any resources you may have booked, or
save changes to your calendar only.
10) Click <OK> to save the meeting.
Page
3939 of 45
Events and Meetings
NCMail Calendar Instructional Manual
Revision 2005.08
How to Delete a Meeting
You can delete events and meetings from any of your calendars. Deleting an event
permanently removes it from your calendar.
1) Select the check box next to the event that you want to delete from your calendar.
a) If you want, you can select multiple events to delete at the same time.
b) Note: If you select a recurring event, you are prompted to choose whether to
select only the current instance of the event or the entire series.
2) Click <Delete> and then click <OK> to confirm deletion.
Page 4040
of 45
NCMail Calendar Instructional Manual
Revision 2005.08
Tasks
Tasks Overview
Your task list displays the tasks you create. You can add and edit tasks, mark tasks as
complete, and delete tasks. You can also sort your task list by priority, task name, details,
due date, and current status. If you want, you can also limit the list to show only those
tasks with a particular status or due date.
Tasks are an efficient way to keep track of your day-to-day activities and track the
progress of long-term projects. Adding tasks to your task list helps you manage busy
schedules and deadlines.
Tasks
How to Add a Task
1) In your “Calendar Task List”, click the “New Task” button. The “New Task”
window opens as seen below in Figure 33.
Figure 33: New Task Window
2) On the “Task Details” tab, enter a name for the task in the “Task” text box.
a) The name you enter appears in the Task column of the Task list.
3) From the “Priority” drop-down list, select a priority for the task: Priority options
include: “Normal” (the default priority), “High”, or “Low”.
a) Tasks with high priority are indicated in the task list by a red exclamation mark.
b) Tasks with low priority are indicated by downward pointing blue arrow.
4) Enter a description of the task in the “Details” text box.
Page
4141 of 45
Events and Meetings
NCMail Calendar Instructional Manual
Revision 2005.08
5) To set a due date for the task select the “Due Date check box and enter a date and
time.
6) To create a recurring task select the “Repeat” check box.
a) Select “Daily”, “Weekly”, “Monthly”, or “Yearly” from the associated list to set
the task to repeat at a specified interval.
b) To set additional task recurrence options, click the <More Options> button to go
to the “Recurrence” tab. See the topic “How to Set Task Reoccurrence” for more
information.
7) To be reminded about a task before it is due, select the “Reminder” check box and set
the reminder interval.
a) Note: To set a reminder, the task must have a due date and you must have
integrated alerts service.
8) To set the status of the task, select an option from the “Status” drop-down list. The
“Status” options consist of:
a) Incomplete - Selected by default for all tasks unless you specify otherwise. Even
tasks without a due date are incomplete until marked complete.
b) Complete - Use instead of deleting a task when you want to track tasks that have
already been completed.
c) Needs Action - Use when a task requires that some type of action be taken before
it can be completed, so that the task is more easily visible in your task list.
9) To attach a URL to this task, click the “Attachments” tab. See The topic “How to Add
Task Attachments” for more information.
10) Click <OK> to add the task to your task list.
Page 4242
of 45
NCMail Calendar Instructional Manual
Revision 2005.08
Tasks
How to Set Task Reoccurrence
1) Select the “Repeat” check box and then select “Daily”, “Weekly”, “Monthly”, or
“Yearly” from the associated list.
a) Additional settings appear, based on the repeat interval you selected.
b) Note: Clearing the “Repeat” check box disables the recurrence settings but saves
them so you can enable them later.
2) Click on the <More Options> button (see Figure 34 below) to set the detailed
reoccurrence options as follows.
Figure 34: Reoccurrence Tab of Add Task Window
a) For daily tasks...
i) Select a “Repeat Type” option. A daily event can recur at a specified interval
or every weekday. For example, if you want the task to recur every other day,
enter “2” in the “Every ___ Day(s)” field. If you want the task to recur every
Monday through Friday, on the other hand, select the “Every Weekday”
option.
b) For weekly tasks...
i) In the “Repeat Interval” field, enter the interval between recurrences. For
example, enter “2” to create an task that recurs every other week.
ii) In the “Repeat Day” area, select the day or days of the week on which the task
will recur. For example, you might create a task that recurs every Tuesday and
Thursday.
c) For monthly tasks...
i) From the “Repeat Interval” list, enter the interval between recurrences.
ii) In the “Repeat Date” field, enter the day of the month on which the task will
recur.
iii) Note: Because some months have fewer days than other months, the date on
which a monthly task recurs will vary if the first occurrence is on the 29th,
30th, or 31st day of the month. During February, the task will be scheduled
for the 28th (or the 29th if it is a leap year). An task that recurs monthly on the
31st will be scheduled for the 30th during months that have only 30 days.
Page
4343 of 45
NCMail Calendar Instructional Manual
Revision 2005.08
Events and Meetings
d) For yearly tasks...
i) From the “Repeat Month” list, select the month in which the yearly task will
recur.
ii) In the “Repeat Date” field, enter the day of the month on which the task will
recur.
3) Change the “Start” date for the recurring task. Choose how to end the recurrence
series by selecting one of the following options:
a) To set a specific date on which the series will end, enter the date in the “End”
field.
b) To set the total number of occurrences (including the initial occurrence), enter the
number in the “After ___ occurrences” field.
c) If you want the event to recur indefinitely, select the “No end time” option. As
business processes change, the need to have an indefinitely recurring meeting
usually does. As such it is not advised to use the “No end time” option but rather
a definitive time period, perhaps measured in years, such as two 2 years.
4) Click <OK> to save your changes.
How to Add or Remove Task Attachments
You can attach one or more URLs (Universal Resource Locators) to a task. The URLs
you attach will appear as active links in the task window. The attachment options are on
the “Attachment” tab in the “Create Task” windows as seen below in Figure 35.
Figure 35: Attachments Tab of the Add Task Window
1. To add an attachment:
a. Enter the URL in the “URL” text box.
b. Make sure the URL begins with a valid protocol handler such as http:// or
ftp://.
c. Click <Attach>
Page 4444
of 45
NCMail Calendar Instructional Manual
Revision 2005.08
Tasks
d. The URL appears as a link in the Attachments section.
2. To attach more URLs, repeat the previous step.
a. You can attach up to five URLs.
3. To remove an attachment, click the <Remove> button associated with the link.
4. Click <OK> to save your changes.
How to View or Edit a Task
1) In your task list, click the name of the task that you want to view or edit. This will
open the “Edit Task” window.
a) Note: If you select a recurring task, you are prompted to choose whether to edit
the current instance of the task only or the entire series.
2) On the “Task Details” tab, view or modify the details as needed. For more
information about each option, see the topic “How to Add a Task”.
3) To modify specific recurrence options, click the “Recurrence” tab. For more
information, see the topic How to Set Task Reoccurrence”.
4) To attach or remove a URL, click the “Attachments” tab. For more information, see
the topic “How to Add or Remove Task Attachments”.
5) Click <OK> to save your changes.
How to Set Task Status
Most often, you set task status while adding or editing a task, however, you can also
change the status of tasks to Complete from the task list. For more information, see the
topic “How to Mark a Task as Complete”.
How to Mark a Task as Complete
1) Select the check box for each task you want to mark as complete.
a) Note: If you select a recurring task, you are prompted to choose whether to
change the current instance of the task only or the entire series.
2) Click <Mark as Complete>.
How to Delete a Task
1) Select the check box next to each task you want to delete.
a) Note: If you select a recurring task, you are prompted to choose whether to
change only the current instance of the task or the entire series.
2) Click <Delete> and click <OK> to confirm deletion.
Page
4545 of 45