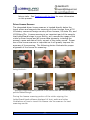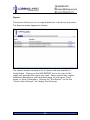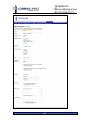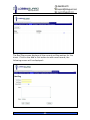
1
User Guide Version 3.4 What’s New ................................................................................. 4 Getting Started.............................................................................. 4 The LobbyGuard Hardware............................................................... 5 Integrated Camera with Tilt Control................................................... 5 Speakers for Audio Prompts of the Visitor Inputs................................... 6 Touchscreen for Use by Visitor to Sign In / Out..................................... 6 Badge Printer for Printing Visitor Badges ............................................ 6 Bar Code Scanner for Fast and Accurate Sign In / Out............................ 6 Driver License Scanner................................................................. 7 Integrated PC Architecture ............................................................. 8 Loading Visitor Badges ................................................................. 8 Cleaning the Touchscreen and Bar Code Scanner Window ...................... 9 Accessing other System Components................................................ 9 Dimensions ............................................................................... 9 The LobbyGuard Kiosk Stand ....................................................... 10 The LobbyGuard Kiosk Software.................................................... 11 Kiosk Mode .......................................................................... 11 Event Mode .......................................................................... 25 The Kiosk Control Panel ........................................................... 28 The LobbyGuard Administrative Utility ............................................. 29 What is it? .............................................................................. 29 Accessing the Administrative Utility from your desktop .......................... 29 Accessing the Administrative Utility from the Kiosk .............................. 31 Using the Administrative Utility ...................................................... 32 Visitor Log............................................................................ 32 Reports ............................................................................... 39 Registered Visitors ................................................................. 40 Scheduled Visitors .................................................................. 45 Time and Attendance .............................................................. 52 Administration ....................................................................... 55 Appendices................................................................................ 71 Appendix A: Supplies ................................................................ 72 Visitor Badges, Frequent Visitor Passes and Other Items .................... 72 Ordering instructions and resources ............................................. 72 Appendix B: Recommended Policies .............................................. 73 Data Backup ......................................................................... 73 Kiosk Power ......................................................................... 73 Antivirus, Firewall and Windows Update Policies .............................. 73 Appendix C: Troubleshooting & Contacting Tech Support ..................... 74 Solutions to common problems ................................................... 74 -2- Contacting technical support ...................................................... 74 Appendix D: Keeping Current with the Latest Versions ......................... 76 Appendix E: On-Site Installation, Support and Training......................... 77 Appendix F: Contacting LobbyGuard Solutions, LLC............................ 78 Appendix G: What’s New ............................................................ 79 Appendix H: Multi-Kiosk Networking ............................................... 81 Appendix I: Legal Notice............................................................. 82 -3- What’s New If you are already familiar with LobbyGuard and would like to review the areas of this guide that apply to new features in this version, please refer to Appendix G: What’s New for links to those sections. Getting Started Thank you for making the LobbyGuard kiosk as your visitor management system of choice. This User Guide will provide you with detailed information on the LobbyGuard kiosk hardware and the LobbyGuard software. In conjunction with the installation and training offered by Authorized LobbyGuard Distributors and the dedicated support staff at LobbyGuard Solutions, you will have all you need to gain a full understanding of the proper use of LobbyGuard at your facility. If you have received your kiosk and have not already scheduled your installation and training with your Authorized LobbyGuard Distributor, you should do so at this time. If you need assistance at any time or if you are unable to reach your distributor, please contact LobbyGuard Technical Support using the information provided at the top of this page. In order to make the most of your installation and training, it is recommended that you read this manual and have some level of familiarity with LobbyGuard prior to your scheduled training session. IMPORTANT You MUST receive on-site installation and training in the proper use of LobbyGuard by an authorized distributor prior to using the LobbyGuard product. RECOMMENDED Review the Appendices at the end of this guide for important information and recommendations. -4- The LobbyGuard Hardware The LobbyGuard kiosk contains a number of hardware features for your visitors to use during the sign-in process. These features are illustrated below: The kiosk is the hardware that runs the LobbyGuard software. It provides an aesthetically pleasing appearance and the strong visual impression of a serious security measure on the part of your building or facility. The kiosk is an all-in-one unit that includes the following hardware components: Integrated Camera with Tilt Control The LobbyGuard camera takes high-resolution 1.3 megapixel photos of your walk-in traffic. The camera is housed in a swivel mount, allowing for users of all heights to easily adjust the camera angle. -5- Speakers for Audio Prompts of the Visitor Inputs All LobbyGuard screens contain visual and audio cues to walk the user through the sign-in and sign-out process. The built-in speakers are positioned to provide clear, easy-to-hear audio prompts for your visitor. Touchscreen for Use by Visitor to Sign In / Out The centerpiece of user interaction with LobbyGuard kiosk is the integrated touchscreen monitor. This allows users to interact with the kiosk via touch only, eliminating the need for a mouse or keyboard. Badge Printer for Printing Visitor Badges The LobbyGuard kiosk can print visitor badges as needed via the included visitor badge printer. The printer is thermal, eliminating the need for printer ribbons or ink cartridges. The badge printer is capable of printing photos and text at 300 X 300 DPI. The printer ships preloaded with a roll of 250 visitor badges. Instructions for loading new visitor badges into the printer are detailed in the section labeled Loading Visitor Badges. Bar Code Scanner for Fast and Accurate Sign In / Out The integrated bar code scanner broadcasts a red grid of light onto the lower right portion of the kiosk. Using the bar code scanner, your users can do the following: Sign IN – using the LobbyGuard Frequent Visitor keytags, registered users can sign themselves in by waving their key tag in front of the bar code scanner. For more information on the LobbyGuard Frequent Visitor Keytag and user registration, see the section labeled Registering with the Kiosk. Sign OUT – users who are issued visitor badges are able to sign themselves out quickly and easily by waving the bar coded section of the visitor badge in front of the bar code scanner. LobbyGuard will inform the user that he/she is now signed out. Registered users with a LobbyGuard Frequent Keytag will be able to sign out by scanning their key tag before leaving the facility. Register with the kiosk – During the sign in process, your users will be given the opportunity to register themselves with the kiosk by scanning a permanent LobbyGuard Frequent Visitor Keytag, allowing that user to quickly sign in and out during -6- future visits. See Registering with the Kiosk for more information on this process. Driver License Scanner The integrated driver license scanner is located directly below the touch screen and supports the scanning of driver licenses from all 50 US states, numerous foreign country driver licenses, US state IDs, and US Military IDs. License scanning is an important part of the security that LobbyGuard brings to your facility, as it records the image of the visitor’s driver license and all license data elements, including the person’s name and date of birth, as part of the visitor record. Proper use of the license scanner is important as it will greatly improve the accuracy of the scanning. The following photos illustrate the proper alignment of the license for scanning: Feed the license into the scanner upside down, with the front of the license facing the kiosk… …and apply slight downward pressure on the license until the scanner begins to pull the license through. During the license scanning portion of the visitor signing, the LobbyGuard kiosk software displays full text, audio and video illustrations of how to insert the license into the scanner for best scanning results. -7- Integrated PC Architecture The LobbyGuard kiosk runs on an integrated Intel 3.2Ghz Pentium processor with 2GB RAM, 80GB SATA hard drive and multi-fan cooling system. The unit employs 4 internal and 4 external USB ports, as well as an external Ethernet outlet for connection to internet/intranet ports. The kiosk is pre-installed with Microsoft Windows XP Professional. The kiosk ships with a USB mouse and keyboard for use by administrators when needed. The kiosk is designed to be maintenance free and easy to use. The only area of the kiosk that will require regular maintenance is the loading of visitor badges into the printer. Loading Visitor Badges Follow these instructions to load a new roll of badges in the printer: Pull the side door open by the printer. It is held in place with a magnetic enclosure; pulling the door from the top will open it and expose the printer(see image below). Remove the printer from the kiosk and lift open the top of the printer to expose the spool that holds the roll of visitor badges. Detailed instructions for replacing the roll of badges are located inside the printer. Refer to these instructions for information on replacing the roll of badges. Place the printer back into the kiosk. Make certain the two cables that connect the printer to the kiosk are still connected to the bottom of the printer. Video instructions for this process are available at the LobbyGuard support site at www.lobbyguard.com/support. If you are in need of -8- additional visitor badges, please contact your Authorized Distributor or visit http://www.lobbyguard.com/supplies Cleaning the Touchscreen and Bar Code Scanner Window Clean the touchscreen with a dry tissue or other lint-free soft cloth. Turn the kiosk off before cleaning the screen. Do not use glass cleaner or other cleaning solution on the screen. The plastic window in front of the bar code scanner should also be kept clear of fingerprints and other debris. It should be cleaned in the same manner as the touch screen. Accessing other System Components The LobbyGuard kiosk incorporates a locked door that houses the internal workings of the unit. If you have lost your key, please contact LobbyGuard Solutions for a replacement. Power down the unit and unplug any cables from the back of the kiosk before opening the rear access door. This includes the power cable and any USB devices (i.e. mouse, keyboard, etc) that may be connected to the rear of the kiosk. Opening the door will reveal the motherboard, cooling system, hard drive enclosure and other internal system parts for LobbyGuard. MODIFYING ANY PORTION OF THIS HARDWARE MAY VOID YOUR WARRANTY. CONTACT LOBBYGUARD TECHNICAL SUPPORT BEFORE MAKING ANY CHANGES TO THE LOBBYGUARD HARDWARE. Dimensions The kiosk weighs 62 lbs. and is 21.5”W (front of kiosk) X 15”L (side of kiosk). When placing the kiosk on a table or countertop, allow at least 2” of clearance on all sides of the kiosk in order to maintain maximum stability for the hardware. -9- IMPORTANT The LobbyGuard kiosk must be plugged in to a surge suppressor that protects both the power cable and the Ethernet cable. Failure to provide surge suppression and power spike protection for either of these connections is a violation of product warranty. An example of an acceptable surge suppressor is available at www.lobbyguard.com/supplies or contact your local distributor. The LobbyGuard Kiosk Stand A stand is available for your kiosk that is both functional and attractive. The stand mounts directly to your kiosk, transforming the LobbyGuard kiosk from a desktop unit to a free-standing unit that utilizes less space and brings more attention to the kiosk for added security. The stand is made from the same materials as the kiosk and blends in to create a professional appearance. The kiosk stand is available only through your Authorized LobbyGuard Distributor. If you need assistance locating your distributor please contact [email protected] and you will be provided the necessary information. - 10 - The LobbyGuard Software The LobbyGuard visitor management system is composed of two distinct software applications. Both of these applications are installed on the kiosk prior to shipping: The LobbyGuard Kiosk Software – The software that your visitors use during sign-in and sign-out. It displays the visitor input requests, prints visitor badges, performs background checks and records all visitor activity. The LobbyGuard kiosk software can only be accessed from the kiosk itself. The LobbyGuard Administrative Utility – This software provides web-based access to a large variety of administrative functions, including visitor logs, reports, and changing various settings on the kiosk. The LobbyGuard Administrate Utility can be accessed via a web browser from any PC on the network. Microsoft Internet Explorer is recommended for optimal use of the LobbyGuard Administrative Utility. In addition to the above software, LobbyGuard stores all visitor data and photographs in a Microsoft SQL database. This database is hosted on the kiosk hard drive or can be hosted to an external SQL Server. This database is encrypted and password protected to prevent unauthorized access to sensitive visitor information. The LobbyGuard Kiosk Software The LobbyGuard kiosk software is the interface to your visitor traffic. It contains all the user input requests, including audio and visual cues, as well as support for license scanning, bar code scanning, photographing and badge printing. The kiosk software is capable of running in two modes – kiosk mode and event mode. Each mode serves a unique purpose and each mode displays a unique interface to the visitor. See the section labeled “kiosks” for further information on setting the appropriate mode. Kiosk Mode The LobbyGuard kiosk runs by default in kiosk mode. This mode is useful for individual visitors signing in and out of your facility. Kiosk mode places greater emphasis on security and visitor information and less emphasis on the amount of time to sign in. See the section - 11 - labeled “kiosks” for further information on setting your kiosk to this mode. Signing In The key feature of LobbyGuard is the visitor sign-in process. This process has been designed to be as simple and efficient as possible, while providing your facility with effective security and record keeping. LobbyGuard allows the sign-in process to be customized to the needs of your facility and to the type of visitor signing in. Modifications to the sign-in process can be made via the LobbyGuard Administrative Utility. There are two forms of sign-in with the LobbyGuard kiosk: manual sign-in and registered visitor sign-in. Manual sign-in is the process through which most of your visitors will sign in using the touchscreen prompts and other inputs, such as the license scanner, to sign themselves in to your facility. Registered visitor sign-in takes place when a registered visitor signs in via the scanning of a LobbyGuard Frequent Visitor Keytags in front of the bar code scanner. LobbyGuard Frequent Visitor Keytag Manual Sign-In Most of your visitors will use manual sign-in, meaning they are not registered with the LobbyGuard kiosk and do not carry a LobbyGuard Frequent Visitor Keytag. During manual sign-in, the visitor will enter his or her name, scan his or her driver license and choose the reason for entry into the building. The exact inputs that are requested from the visitor are customizable in the LobbyGuard Administrator Utility. The following is an overview of some common screens that your visitors will see during the LobbyGuard manual sign-in process: - 12 - Welcome Page The first page your visitors will see on the kiosk is the Welcome Page. The buttons that appear on this screen depend on language support options that can be set for the kiosk via the LobbyGuard Administrative Utility. If support for Spanish and English is selected, the buttons will appear as per the figure below, allowing the user to select from English or Spanish prompts. If support for only one language is selected, the buttons will be labeled “Sign In” and “Sign Out” in the supported language. The home page can also play a custom multimedia presentation or welcome message for your facility. Follow these instructions to change the welcome page: Build your presentation in Adobe Flash format (.swf file extension). The presentation must be 700 pixels wide by 768 pixels high. Using a white background is preferable. Save your presentation to the following location on the kiosk: - 13 - C:\program files\lobbyguard\flash\welcome.swf Creating a custom presentation or welcome message is the perfect way to blend the LobbyGuard kiosk into your environment and welcome your visitors. If you are in need of assistance in developing your custom welcome message, please visit www.lobbyguard.com/supplies and you will be provided with additional resources. - 14 - Visitor Type The next screen your visitors will see when signing in is the “visitor type” screen. This screen asks the visitor to choose from two or more types of visitors. You can create as many visitors types as needed using the LobbyGuard Administrative Utility. The workflow can be configured to ask different questions of different visitor types. The answer the visitor gives on this screen will determine what questions, or ‘workflow’, presented during the remainder of the sign-in process. In addition, LobbyGuard can generate reports based on visitor type. In this example, the visitor types are “Visitor”, “Vendor”, and “Employee”. LobbyGuard can be easily configured to display any number of custom visitor types to suit the visitors signing in and out of your facility. - 15 - Take Photo This screen provides the visitor with a view of the integrated camera. The visitor is asked to press the TAKE PHOTO button to capture the photograph that will become part of the visitor record. The camera on the LobbyGuard kiosk is mounted to swivel up and down to accommodate the various heights of your visitors. - 16 - Scan Driver License This screen provides instructions on the proper way to insert the driver license into the driver license scanner. For additional instructions on how to insert the license into the scanner please refer to the section labeled Driver License Scanner. Note the button on the right side of the screen. If the user does not have a driver license on hand, this button can be pressed to bypass the license scan. The user will then be asked to enter his or her name manually, using an on-screen keyboard. This feature is optional and can be disabled for security purposes, requiring each visitor to sign in using a license scan. - 17 - Confirm Name and Confirm Date of Birth If background checking is enabled, the visitor will be required to verify the name and date of birth that are derived from the driver license scan. In both cases, the visitor is presented with the information taken from the license and asked if it is accurate. If the visitor answers “no” to either question, he or she will be presented with a screen to enter the information manually, as shown below. Confirm name and enter manually if needed. Confirm date of birth and enter manually if needed. - 18 - Enter your Company Name LobbyGuard can be configured to ask the visitor for the name of his or her employer. If this option is enabled, the visitor will be asked to enter the company name, as shown below: - 19 - Choose Reason for Visit The next step the visitor will take is to choose the reason he or she is visiting your facility. This screen consists of buttons that can be customized to your needs via the LobbyGuard Administrative Utility. These buttons may consist of the names of your employees, areas of your building, departments in your organization, or anything else you would like to provide to your visitors as a choice. In addition, LobbyGuard supports multi-tiered choices, allowing your visitors to drill down to a specific reason. For example, your top layer of choices might consist of the departments in your organization. If the visitor chooses “Human Resources”, he or she would then be presented with a new screen that contains the names of all the employees in Human Resources, from which the final choice would be made. These reasons can have unlimited tiers. This approach allows for the presentation of a large number of choices without overwhelming the visitor. - 20 - Enter the name of the person you are visiting In addition to the Reason for Visit screen above, the visitor may also be prompted to enter the name of the person he or she is visiting using an on-screen keyboard: - 21 - Printing the Visitor Badge LobbyGuard can also be configured to print a visitor badge upon completion of the sign-in process. The badge contains the visitor’s name, visitor type, reason for visit, date and time of visit, photograph and a bar code. LobbyGuard includes multiple badge formats and layouts; in addition, custom layouts and badge designs are available at www.lobbyguard.com/supplies. The badge serves as a visual identifier to your employees, as well as an indicator that this visitor signed in with LobbyGuard upon entering your building. The LobbyGuard visitor badge measures 4” W X 2.25” H The badge has a self-adhesive backing or may be inserted into a lanyard or clipon badge holder. The presence of the visitor badge sends a signal to facility employees that the visitor has signed in using LobbyGuard and has followed procedure. In addition it provides your employees with information regarding the reason this visitor is in the building and thus preventing the visitor from accessing unauthorized areas. The color logo in the bottom right corner of the badge also provides an additional security measure. The visitor badge printer only prints in black & white; the logo is pre-printed on the badge. The presence of this color logo indicates this badge was printed at a LobbyGuard kiosk and not from a home computer or other source. - 22 - Signing Out As the visitor prepares the leave the building, he or she should sign out at the LobbyGuard kiosk. The process for signing out is quick and efficient. If the visitor has a visitor badge or a LobbyGuard Frequent Visitor Keytag, the bar code located on the badge or keytag is used for signing out of the facility. The visitor simply scans this bar code under the bar code scanner on the LobbyGuard kiosk and is quickly and easily signed out. If the visitor does not have a visitor badge, sign-out can be accomplished by entering his or her name into the kiosk. The visitor should choose the “SIGN OUT” option from the kiosk workflow, after which the visitor will be provided with instructions for signing out without a visitor badge. In addition to the above options, the LobbyGuard Administrative Utility provides features for signing out visitors via the desktop. Information on these features is outlined in the section labeled “The LobbyGuard Administrative Utility”. - 23 - Registering with the Kiosk One of the most powerful features of LobbyGuard is the ability for your visitors to ‘register’ themselves with the kiosk. This involves providing the visitor with a permanent plastic keytag, known as a LobbyGuard Frequent Visitor Keytag, which the visitor can use in future visits to quickly and easily sign in and out of the kiosk. In addition, a visitor can use the same keytag to register with other LobbyGuard kiosks; for example, a person who signs in to a LobbyGuard kiosk at his workplace can register with that kiosk and can use this same keytag to register with the LobbyGuard kiosk at his child’s school, making sign-in and sign-out much easier in both locations. When a visitor has completed their initial “manual” sign-in, LobbyGuard will provide the visitor with an opportunity to register with this kiosk. The visitor will then scan a LobbyGuard Frequent Visitor Keytag in front of the kiosk’s bar code scanner. Once this has been done, the visitor will receive confirmation that registration is complete. The visitor can either scan a keytag he or she already has (from having registered at another LobbyGuard kiosk) or you will need to supply the visitor with a keytag. Additional keytags are available as needed at www.lobbyguard.com/supplies. There is no limit to the number of visitors who can register with your kiosk. The visitor is provided an opportunity to register; confirmation of successful registration follows. - 24 - Registered Sign-In Once a visitor has registered with the kiosk, signing in to LobbyGuard during future visits is much faster and easier. The visitor needs only to scan the bar code contained on the LobbyGuard Frequent Visitor keytag to sign in. Following a successful scan, LobbyGuard will only ask the visitor for a photo and to choose a reason for the visit that day. All other information – including the visitor’s name, date of birth, license scan and other information, are contained in the visitor’s original record and are copied to create a record for this visit. Registered Sign-Out Registered visitors who have a LobbyGuard Frequent Visitor Keytag can scan their plastic visitor pass in front of the bar code scanner or the bar code on the printed visitor badge. The visitor will receive a confirmation screen that the sign-out was successful. Event Mode The LobbyGuard kiosk also contains a special mode for handling large events (i.e. Open House, Conferences, Meetings, etc) called Event mode. This mode places less emphasis on security and visitor information and greater emphasis on sign-in time in order to process large numbers of individuals in a short period of time. See the section labeled “Events” for information on setting up an event and setting your kiosk to this mode. Event Mode Sign-In When set to Event Mode, the Welcome screen of the kiosk will appear as follows: - 25 - When a letter is selected, the names of all attendees whose last name begins with that letter will be displayed, as illustrated below: - 26 - The visitor will then choose his or her name, and will be issued a visitor badge. The kiosk will return to the Event mode welcome screen for the next visitor. The entire process for signing in takes on only a couple of seconds, allowing for quick entry of visitors into the facility. It is important to keep in mind that the Event mode of the kiosk does not perform any background checks, or take photos or license scans of the visitors entering the building. Event mode also does not support scanning LobbyGuard Frequent Visitor Keytags. The Event mode was designed to move a know list of individuals into the building very quickly for specific events where security is less of an issue. Event Mode Sign-Out Visitors can sign themselves out of the building by scanning the barcoded section of the visitor badge under the LobbyGuard bar code scanner. Visitors may also be signed out from the LobbyGuard Administrative Utility; see the section labeled “Visitor Log” for more information. - 27 - The Kiosk Control Panel LobbyGuard’s kiosk software includes a built-in control panel that allows you to take actions such as reboot, power down and request remote support. To access the control panel, press the top right corner of the Welcome screen, either from Kiosk mode or Event mode. This will expose the administrator password screen with a numeric keypad. The default password is 12345. This password can be changed via the LobbyGuard Administrative Utility. You will then see the Kiosk Control Panel, which contains the following options: Request Remote Assistance – this feature allows LobbyGuard Support Technicians to take control of the kiosk and address any questions or issues. You should call LobbyGuard Support prior to using this feature so that a support technician is available and expecting your connection. Your support technician will provide you with additional instructions for using this powerful feature. Power Down – this feature will safely power down the kiosk. This is the recommended method of powering down the kiosk. Use the power switch located on the rear of the kiosk to power on the kiosk. - 28 - Access the Windows Desktop – this will shut down the LobbyGuard software and will take you to the Windows desktop. The LobbyGuard Administrative Utility What is it? The LobbyGuard Administrative Utility is web-based software that can be accessed either from the kiosk or from any PC desktop on your network. Since it is web-based, it does not require any installation to run – it is accessed via a web browser, just like any other web page. The PC from which you wish to access the Administrative Utility need only be running Microsoft Internet Explorer, which is included as part of the Windows operating system. The Administrative Utility provides the following features: Visitor Log – View complete details of visitors to your building, including those who have been flagged by the LobbyGuard Background Check. Reports – Run reports on visitor traffic Registered Visitors – Assign LobbyGuard Frequent Visitor Keytags to visitors who frequent your facility for even faster sign in/out. Use the Registered Visitors section to manage this information. Scheduled Visitors – Schedule upcoming appointments directly with LobbyGuard, and send notifications to your scheduled visitors via email. Create “events” to handle large numbers of visitors in a very short period of time. Time and Attendance – Modify the time a registered visitor has signed in/out of the kiosk, in order to generate an accurate time and attendance report. Administration – Change workflow settings for various visitor types and other settings for your LobbyGuard kiosk. Accessing the Administrative Utility from your desktop - 29 - The LobbyGuard Administrative Utility is web-based, meaning it runs from within a web browser, such as Microsoft Internet Explorer or Mozilla Firefox. LobbyGuard runs on Microsoft Internet Explorer 5.0 or better, and Mozilla Firefox v2.0 or better. With the kiosk running and connected to your network, you should be able to access the LobbyGuard Administrative Utility by typing the following URL into the web browser of any PC on your network: http://(ip address of kiosk)/lobbyguard For example, if the IP address of the kiosk is 10.10.1.20, you would type 10.10.1.20/lobbyguard into the address bar of the browser. If your LobbyGuard kiosk is not installed on your LAN or Intranet, or if you are unable to grant the kiosk a static IP address, you can still access the functionality of the Administrative Utility from the kiosk itself; refer to the section below labeled Accessing the Administrative Utility from the Kiosk. Please note that LobbyGuard Administrative Utility is fully functional in the absence of a network or internet connection. IMPORTANT The LobbyGuard background checking features will be disabled if your kiosk does not have an internet connection. - 30 - The software should appear in your web browser as follows: The default email address for logging in is [email protected]. The default password is 12345. For more information on creating additional user accounts see the section titled “User Manager”. IMPORTANT It is recommended that you remove the default user account and create your own unique user accounts as soon as possible. Accessing the Administrative Utility from the Kiosk You can access the Administrative Utility at any time from the kiosk, regardless of your network configuration. For ease of use, plug the included mouse and keyboard into the USB ports on the rear of the kiosk unit. Access the LobbyGuard Kiosk Control Panel (see the section labeled “The Kiosk Control Panel”) and choose “Access the Windows Desktop”. This will take you to the Windows desktop. You can then double-click on the icon labeled “LobbyGuard Admin” or you can open the Microsoft Internet Explorer web browser and enter the following URL: - 31 - http://localhost/lobbyguard This will launch the LobbyGuard Administrative Utility. When you are finished, close the browser and double-click the icon labeled “LobbyGuard Kiosk” on the desktop to restart the kiosk software. Regardless of where you access the LobbyGuard Administrative Utility – from the kiosk or from another PC elsewhere on the network – the software is exactly the same and the changes you make will have the same effect. Using the Administrative Utility Visitor Log The main feature of the Administrative Utility is the visitor log. This screen will give you an immediate view of visitors who are currently in the building as well as an archive of visitors who have signed out at any point in the past. When a visitor signs in to the LobbyGuard kiosk, the visitor log will resemble the following: - 32 - If you have several kiosks networked together, you can choose to view data from a specific kiosk by selecting that kiosk from the the “Kiosk” drop-down menu. In addition you can choose the date range of data you’d like to view using the From: and To: calendar menus, and then click the Filter button to activate your date range selection. Clicking on any of the headers (Time In, Kiosk, etc) will sort the data accordingly; clicking on the same header again will reverse the sort order. Clicking the “Sign Out All Visitors” button will move all visitors from the Signed In section to the Signed Out section. The Visitor Log is broken into three sections: Signed In, Signed Out, and Failed Background. Signed In The Signed In section of the visitor log shows all visitors who are currently signed in. This visitor log has a button labeled “Sign Out All Visitors” button. This button will sign out all the visitors and move them to the “Signed Out” log. From the Signed In log, you can immediately view the Time In (the date and time the visitor signed in), the visitor’s name, the type of visitor (see the section labeled “Visitor Type” above for an explanation of this feature) and the Visiting column, which contains the visitor’s reason for visiting your facility. To the far right of each entry is a hyperlink labeled “view”. Clicking on this hyperlink for any given visitor will display full details on the visitor in the Visitor Detail screen: - 33 - This screen contains all the details on the visitor. The photo image and the license image can be enlarged by clicking on the image. The visitor can be manually signed out by clicking on the “Sign Out” button located in the lower left corner of the screen. This will move this visitor from the “Signed In” section of the visitor log to the “Signed Out” section of the Visitor logs. Signed Out The Signed Out section of the visitor log contains the information on all visitors who have been signed out of the building at any point in the past, creating an archive of visitor information that you can access at any time. The Signed Out section appears as follows: This screen is very similar to the Signed In log, with the addition of two columns: the Time Out column displays the day and time the visitor signed out of the building. The Duration column displays how long this visitor was in your building, in terms of hours:minutes:seconds. Clicking the View link will provide detail on the visitor record. - 34 - Failed Background Section & How Background Checking Works The Failed Background section of the visitor log contains the names of any visitors who failed the LobbyGuard background check. If background checking is enabled, the visitor’s name and date of birth are run against a database of 500,000+ registered sex offenders from around the country and/or your Red Flag List; see the section labeled “Administration” for more info on the Red Flag List feature; see the section labeled “Background Checking” for more information on selecting the sources of background checking for your facility. If the visitor is matched to a record in either location, the visitor will not be issued a regular visitor badge, but will instead be issued a special visitor badge with the word VOID printed across the top. This badge also instructs the visitor to turn the badge over to a facility employee. Once this is done, it is the responsibility of the employee to further verify this match. The badge also contains reference to the web URL www.lobbyguard.com/assist that provides complete instructions for the steps to take in the event a VOID badge is printed. IMPORTANT THE PRINTING OF A VOID BADGE DOES NOT IMPLY THAT THIS VISITOR IS A REGISTERED SEX OFFENDER OR ON THE RED FLAG LIST. A VOID badge means the information this visitor supplied during signin was a close enough match to a known offender’s record to warrant - 35 - further investigation before allowing this person entry. LobbyGuard compares first name, last name, and year of birth to known offender records; as a result of such a broad approach, it is possible for someone to receive the “VOID” badge even when he or she is not an offender. IT IS VERY IMPORTANT THAT NO ACTION BE TAKEN AGAINST THIS VISITOR UNTIL THE INSTRUCTIONS BELOW ARE FOLLOWED. Once the visitor has turned over the VOID badge to a building employee, the employee should access the Failed Background section of the visitor log to verify this visitor against the record that he or she matches. The Failed Background log appears as follows: This screen closely resembles the “Signed In” portion of the visitor log. All entries in this screen are of visitors who failed the LobbyGuard background check. The column labeled Match Type displays the source of the record that LobbyGuard used to establish the match; “NSOPR” indicates a failure against a record in the national sex offender public registry, and “Local Red Flag” indicates a failure against the list of individuals created in the local red flag list. To the far right of the visitor record is a “VIEW” link. Clicking on this link will display the the following screen: - 36 - This screen is very similar to the visitor detail screen from the Signed In and Signed Out logs. The difference is in the bottom of the screen, where the records that match the visitor are displayed. This section contains the photo, name, state, ZIP code and date of birth of the actual offender(s) whom this visitor matched. This screen is used to verify the visitor against the actual offender record; most verifications are as simple as comparing the photograph of the visitor, at the top of the page, to the photograph of the offender, located on the bottom left of the page. If further information is needed on the offender, the “View Details” link will display the web page for this offender that is hosted by the offender’s state of - 37 - residence. This web page will provide additional detail on the offender, including physical traits such as tattoos and scars, and last known address, etc. Note that this is a link directly to an outside web site, run by the state where the offender is registered. Some states allow for direct links to offender detail, while other states will only allow links to the outside search engine for the state offender web site. For the latter, you will need to enter the offender’s name into a search form in order to bring up this offender’s detailed information page. If the visitor is not the offender in question, click the link labeled “remove match”. This will ensure that this visitor will not be failed against this particular record in the future. The visitor should then be directed to sign in once again and should receive a regular visitor badge. If the visitor is the offender in question, it is important that your facility have procedures in place for handling this type of scenario. These procedures should include who is to be notified and what proper steps should be taken. Notification LobbyGuard can send notification to appropriate personnel of your choice, such as local police, administrative staff or security personnel, in the event of a failed background. This notification is automatically sent as soon as LobbyGuard fails a background check on a visitor, and it can be sent in the form of an email or a text message to any cell phone. The following is an example of the message that would be sent in the event of a background failure: Subject: LobbyGuard Alert! Name: CRAIG ABBINGDON DOB: 05/07/1970 failed a background check at kiosk 'ABC Elementary School’ This message provides those alerted with the name and date of birth of the offender, as well as the location of the kiosk where the failure occurred. For more information on setting up notification, please see the section titled “kiosks”. - 38 - Reports This section allows you to run reports based on criteria that you select. The Reports screen appears as follows: The reports section contains a list of reports that are available in LobbyGuard. Clicking on the RUN REPORT link to the right of the report will generate the report you need. Some reports may require additional parameters, such as a date range for the report, kiosk name, or other information. Clicking the “Run Report” link for the “Visitor Archive Report” will display the following: - 39 - In this example, a number of criteria can be set for the report, including the date range, the visitor type and the name of a specific registered user, if needed. The “Select Kiosk” option allows the selection of an individual kiosk; the report will only reflect data gathered from that kiosk. Each report can be viewed online, printed, or saved in a number of formats. Registered Visitors The Registered Visitors section allows for management of individuals who are registered with your kiosk. Registered users are users who possess a LobbyGuard Frequent Visitor Keytag, or who have a LobbyGuard Bar Code Sticker on an existing ID (see www.lobbyguard.com/supplies for these items). These keytags are very useful for frequents users of the kiosk as they allow the user to bypass much of the workflow and to quickly sign in and out of the kiosk by simply scanning the bar-coded section of the keytag or sticker under the kiosk bar code scanner. For more information on this process, see the section titled “Registering with the Kiosk” - 40 - The Registered Visitors section appears as illustrated below: The names of the registered visitors are displayed with the following columns: • • • • Name – the name of the registered visitor Visitor Type – the visitor type is the type of visitor this person represents, based on the Visitor Types set up in the workflow. For more information on Visitor Types see the section titled “Workflow”. Each registered user is registered as a visitor type for the purposes of reporting. ID – this is the number located below the barcode on the LobbyGuard Frequent Visitor keytag. Expiration Date displays the date that the visitor’s keytag will expire. The LobbyGuard kiosk will not recognize the keytag after this date. - 41 - Clicking on any of these column headings will sort the list of registered visitors via that column’s data. Clicking the same column again will reverse the sort order (ascending / descending). You can search for a particular registered visitor by entering the last name of the visitor in the “Last Name” field at the top of the page and clicking the button labeled “Search”. You can also search for a particular keytag by entering the number on the keytag in the “LobbyGuard ID” field. The “Number of Results” menu will limit the number of returned names for a given search. There are two ways to create a new registered visitor in LobbyGuard: • • A non-registered visitor can sign in through the kiosk as normal; if the visitor signs in using a visitor type that has “Prompt the Visitor to Register” enabled in the workflow (for more information see the section titled “Workflow”), the visitor will be presented with a screen at the end of the sign in process with instructions to scan a LobbyGuard keytag. If the visitor scans a keytag at that time, he or she will the be registered with this kiosk, and the record of this visitor will appear in the Registered Visitors tab on the Administrative Utility. This is the most efficient way of creating new Registered Visitors as it allows the visitor to create the record by simply signing in to the kiosk. In addition it removes the possibility of error because the ID tag is taken directly from the scan of the keytag at the time of registration. A visitor can also be registered without the use of the kiosk. This is done by clicking the “Add New” link on the right side of the Registered Visitors tab on the Administrative Utility. Clicking the “Add New” link will display the following screen: - 42 - Enter the requested information into the fields to create the new registered visitor. The LobbyGuard ID number should be entered exactly as it appears on a LobbyGuard Frequent Visitor keytag. The Registration Expiration Date can be used to set a date for the keytag to no longer be recognized by the kiosk. This can be useful for contractors who are scheduled for short-term work in the building, for parents whose keytag should expire at the end of the school year, etc. Click the “Add” button when all the information has been entered. The visitor can be provided the keytag and will be able to use it immediately. A quicker and more effective way to register a visitor is to have the visitor register themselves via the kiosk. When a non-registered visitor signs in to the kiosk and chooses a visitor type with the workflow option “Prompt the Visitor to Register” enabled (see the section labeled “Workflow” for more information), the visitor will be given an opportunity to scan an unregistered keytag at the end of the - 43 - sign-in sequence. This will create the registered visitor record automatically, and will include any images (ie license scan and/or photo) acquired during sign-in. The detail for a registered visitor who has registered via the kiosk will appear as follows: You may change any of the information on this screen and click “Update” to save the changes. If you wish to completed remove this person from the list of registered visitors, click the “Unregister” button at the bottom of the screen. - 44 - Scheduled Visitors The LobbyGuard Scheduled Visitors tab provides methods for scheduling upcoming appointments and events. The Scheduled Visitors section provides an area to scheduled a visitor or group of visitors and email the information regarding the scheduled visit to the visitors, and the Events section provides features to schedule large groups of individuals who need to enter the facility in the fastest possible time. Scheduled Visitors The Scheduled Visitors feature lets you schedule a visitor or group of visitors in advance of his or her visit, then send an email notification to the visitor that outlines the visit location, time, and other information. The email also contains a bar code that the visitor can print out, bring along and use to instantly sign in to the kiosk. The Scheduled Visitors screen appears as follows: Scheduled Visitors are organized as “groups” that represent parties of people who will be visiting together. A group may consist of one person or any number of people. In the illustration above, a group - 45 - named “Board of Directors” consisting of 2 people is scheduled to arrive at 12:00 PM on October 24th. The “Status” column indicates this group was created, meaning no notification has been sent at this time. Click the “Add New Group” link at the top right of the screen to create a new group. The following screen will appear: Enter the information in the fields provided and click the “Save Group” button to save the group. This will return you to the previous screen with your new group listed, similar to the previous illustration. Click the “visitors” link located on the same row as the group you just created. This will provide an interface for adding the visitors to the group, as shown below: - 46 - Enter the information for each visitor. If you include the email address you will be able to send an email notification to the visitor. When you have filled in all the information, click “Add Visitor” and the visitor information will appear in the list at the bottom of the form. Click on the Scheduled Visitors tab when all visitors have been added. The group now appears, with the number of visitors listed in the “# in Group” column. Click on the “generate notification” link, and the following screen will appear: - 47 - This screen provides an overview of the email that will be delivered to the visitors in the group. Click the EMAIL NOTIFICATION link to send the notification via email to the visitors in the group. Click the PRINT NOTIFICATION link to print the email for these visitors to use if they show up without the printed email. IMPORTANT If your facility is using a proxy server, you will need to contact LobbyGuard Support for assistance with sending Scheduled Visitor emails When the members of the group arrive, whether together or separately, they each need only scan the bar code located in the email to sign in. This process can greatly speed up the signing in of large groups during especially busy times or special events. - 48 - Events The Events section is used for scheduling events at your facility where large groups of visitors will need to enter in a very short period of time. The Events feature works best for events where attendee names are known in advance, and when a high level of security is not needed. Clicking on the Events section reveals the following screen: Use this screen to create the event by entering the name of the event, any description you wish to give the event, and the visitor badge format you wish to print for visitors as they sign in to this event. Click the “Add Event” button to add the event to the list on the bottom half of the page. The next step is to add the names of the event attendees. Click on the “attendees” link located on the right side of the event listing. The following screen will appear: - 49 - Enter the names of the attendees by typing the first name and last name and optionally the attendee company name and email address. Attendee lists can also be imported directly from a Microsoft Excel spreadsheet. Click the “Browse” button the right side of the screen to browse to the spreadsheet and click the “Import” button to import the names from the spreadsheet into the attendees list. To view the data format needed for proper import, click on the “Click here for an example” link, located under the “Import” button. Once you have added all the attendee’s names to the list, you will need to change the mode of the kiosk to reflect the event. Click on the Administration tab and then click on the section labeled “kiosks”. You will see a setting labeled “Mode”. Set the mode to “Event” and choose the event you created from the drop-down menu. Scroll to the bottom of the screen and click the button labeled “Update General Settings”. The kiosk will change to reflect the Event mode interface, as illustrated below: - 50 - When a letter is selected, the names of all attendees whose last name begins with that letter will be displayed, as illustrated below: The visitor will then choose his or her name, and will be issued a visitor badge. The kiosk will return to the Event mode screen for the next visitor. The entire process for signing in takes on only a couple of seconds, allowing for quick entry of visitors into the facility. Visitors can sign themselves out of the building by scanning the bar-coded section of the visitor badge under the LobbyGuard bar code scanner. - 51 - It is important to keep in mind that the Event mode of the kiosk does not perform any background checks, or take photos or license scans of the visitors entering the building. Event mode will not recognize and does not make use of LobbyGuard Frequent Visitor keytags. The Event mode was designed to move people into the building very quickly for specific events where security is less of an issue. When the event is completed, change the kiosk mode to “Kiosk” and the LobbyGuard kiosk will resume its normal interface. The Kiosk Control Panel can be accessed at any time while in Event mode by pressing the top right corner of the screen and entering the Kiosk Control Panel Password. Time and Attendance In addition to managing visitors and recording visitor activity in your facility, LobbyGuard also serves as an excellent method for tracking time and attendance and hours worked by employees and contractors in your facility. These individuals can sign in to the kiosk when entering the building and sign out when leaving. Using this data you can run a Time and Attendance report to show the hours that an employee was in the building for a given date range, including a total of the hours for the entire range; see the section labeled “Reports” for more information on this report. In order to obtain accurate hours reporting, it is important that the employee sign in and out accurately when entering and leaving the building. In the event that this is not done correctly (for example, someone arrives at 8:00 but does not sign in until 9:00), the Time and Attendance tab provides an interface for modifying the time of sign-in and sign-out, or for the creation of a new sign-in/sign-out record. Clicking on the Time and Attendance interface displays the following: - 52 - The top left section of the page provides an area for selecting the individual whose time and attendance records you wish to view or edit. Only the records of those individuals who are registered and use a LobbyGuard Frequent Visitor Keytag when signing in and signing out can be modified through this interface; see the section labeled “Registered Visitors” for more information on how to register with the kiosk. Select the visitor type of the individual whose records you wish to review, then select the individual’s name from the “Name” dropdown menu. The last step is to select the date range of records you wish to review. Click the “Show Activity” button and you will be presented with a list of sign in/sign out records for this individual during the selected date range. The list has the following column headers: • • • Time In – displays the time and date of sign in. Time Out – displays the time and date of sign out. Kiosk – displays the name of the kiosk used for sign in. - 53 - • Duration – displays how long the individual was in the building. This is the difference between the Time In and the Time Out. To modify a record click the “edit” link located on the right side of the record. Doing so will display the drop-down edit box, as show below: Change the Time-In date/time and/or the Time-Out date/time as needed. You may also change the kiosk from which the visitor signed in. Press OK to submit the changes. A new Duration will appear in the record to indicate the change in time spent in the facility, and a new Total Time will appear at the bottom of the list of records, to indicate the change in total time in the facility during the entire date range. If you wish to delete an entire record, you may do so by clicking the “delete” link located on the far right side of the record. Click the “Add New” link to add a new record. The new record will appear at the bottom of the records list, with the date/time of sign in set by default to 8:00AM on today’s date, and the date/time of sign - 54 - out set by default to 5:00PM on today’s date. Edit the record to reflect the appropriate dates/times as needed. Administration The Administration tab provides you with the tools you need to customize the workflow of the kiosk for your visitors. The Administration section appears as follows: The Administration tab contains the following sections: Workflow The Workflow section contains the two most important kiosk customization features: visitor types and workflow settings. Visitor Types are the foundation for the sign-in process with LobbyGuard. During the sign-in process, users of your LobbyGuard kiosk will initially identify themselves as a particular visitor type, and then answer - 55 - questions during sign-in that are specific to that visitor type, ie the workflow. For example, you might create a visitor type called “Guest” that requires the visitor to scan a driver license and run a background check, whereas you might create another visitor type called “employee” that simply takes a photograph of the employee and nothing more. Using visitor types also makes for more accurate reporting: you can run a report displaying the number of “Guests” who entered your building in a given time frame, etc. The visitor types are displayed on the left side of the screen. Some common visitor types are visitor, employee, contractor, vendor, parent, student, etc. You can create as many visitor types as you like and give them any description you wish. To add a new visitor type, simply enter the description of the visitor type in the text box located just above the list of current visitor types and click “add new”. The new visitor type will appear in the list on the left side of the screen. The next step is to create a workflow for anyone who signs in as this new visitor type. Click on the link labeled “edit” located to the right of the new visitor type. The visitor type will appear on the right side of the screen, above the workflow checkboxes. Each checkbox corresponds to a question or action that takes place during sign in and sign out. Check the boxes that correspond to the questions you’d like to ask of this visitor type as they sign in. The following is a description of each workflow option; screenshots for these steps as they appear on the screen are available at The LobbyGuard Kiosk Software section: Request Visitor’s Photo – This option will take a photograph of the visitor. This photo will be stored as part of the visitor record. Request Visitor’s Company – The visitor will be presented with an on-screen keyboard and asked to enter his or her company name. Request Visitor’s Driver License – If this option is checked, the visitor will be prompted to scan his or her driver license. LobbyGuard will store an image of the driver license as a part of the visitor record. In addition, the visitor’s name and date of birth will be extracted from the license, saving the visitor the time of entering this information by hand. Save Driver License Info – If this option is checked, LobbyGuard will save an image of the visitor’s driver license as well as other - 56 - information from the license as part of the visitor record. If it is not checked, the driver license image and other information from the license will not be stored as part of the visitor record or captured in any way to the LobbyGuard database. This can be used in information-sensitive environments to limit the amount of information being stored about each visitor. IMPORTANT Refer to your local laws and regulations before storing images of personal IDs in your LobbyGuard database. Below this checkbox are two radio buttons, labeled “Require license scan in order to proceed” and “Allow the visitor to bypass the license scan”. Choosing the latter will display a button on the kiosk screen during the driver license scanning step that is labeled “Press here if you do not have a driver license.” This gives visitors who do not wish or do not have a license the opportunity to enter their name by hand using an on-screen keyboard. Choosing to require the license scan will hide this button, and the visitor will have to scan a driver license in order to proceed with the sign in process. Perform Background Check – This option will run the visitor’s name and date of birth against the LobbyGuard background data services and/or the Red Flag List. For information on how background checking works in LobbyGuard, see the section labeled “Failed Background & How Background Checking works in LobbyGuard”. Request Visitor’s Reason for Visiting – If this option is checked, the visitor will be presented with a selection of choices regarding why they are in the building. For example, a reason for visit choice might be “Picking Up a Student” or “Attending a Meeting”. These choices are defined in the section labeled “Reason for Visit”. Request the Name of the Person to be Visited – This option is similar to the above “reason for visiting” option, except the visitor is presented with an on-screen keyboard and allowed to perform freeform entry of text instead of choosing from a pre-defined list. Print a Visitor Badge – When this option is selected, the LobbyGuard kiosk will print a visitor badge for the visitor. The drop- - 57 - down menu located to the right of this option allows you to select different formats for the badge. If you are in need of a custom badge format please contact LobbyGuard sales at [email protected]. Prompt the Visitor to Register – If this option is checked, the visitor will be presented with instructions to register with this kiosk. This involves taking a LobbyGuard Frequent Visitor Keytag and waving it under the bar code reader until the reader “beeps”. Once the user has done this, the screen will inform the user that he or she may use that keytag in future visits to sign in and sign out. Language Translations – Enter the Spanish translation for this visitor type in the text box and click the “save” link. The translation will appear for users who sign in to the kiosk with the Spanish option. If you do not know or do not enter the translation, the English translation will appear by default. Reason for Visit This section allows you to set up the choices provided to a visitor regarding their reason for visiting your building. The screen appears as follows: - 58 - This screen is used to create the menu of choices from which the user chooses to indicate why he or she is visiting the building. These choices are made available if the user signs in with a visitor type that has the option “Request Visitor’s Reason for Visiting” selected in the workflow (see the section labeled “Workflow” for more information). The first step in creating these reasons is to select a visitor type from the drop-down menu, located to the right of the “Reasons for Visit” label. This menu consists of all the visitor types that have “Request Visitor’s Reason for Visiting” selected. Each visitor type will have it’s own unique set of choices; for example, the reasons you may want to provide to a visitor type called “Contractor” may be different from the reasons you would provide for a visitor type called “Parent”. To create a reason, enter the description for the reason in the text box located at the bottom of the screen and click the button labeled “Add Reason for Visit”. You can create as many reasons as you wish in this fashion. Once you have created a reason, click the link labeled “edit” located to the far right of the reason. This will provide a feature to enter the Spanish translation for this reason; any translation entered will appear for users who sign in to the kiosk using the Spanish option. If no translation is entered, the English translation will appear by default. You can also set the sort order by entering a number that represents the order in which you wish the reason to be displayed, relative to other reasons that you have created. For example a reason with a sort order of 2 will appear on the kiosk below a reason with a sort order of 1. Click the link labeled “save” to save these changes. Another feature in the Reasons for Visit screen is to organize the reasons you are creating and “drill down” the exact reason the user is entering the building. To do this you will create a list of detailed reasons under a reason. Create a new reason called “Attending a Meeting” and click “Add Reason for Visit”. Now click on the “Meeting” text that appears in blue. You will see a blank “reason for visit” screen like the one shown below: - 59 - Note the path outlined with the text “Top Level>>Attending a Meeting”. This means we are now creating reasons that will appear to the user when they press “Attending a Meeting” on the kiosk. On the screen, enter “Accounting” and press the “Add Reason for Visit” screen. Now click on the “Accounting” text that appears in blue, and you will once again see a blank Reasons for Visit screen, with a path that reads “Top Level>>Attending a Meeting>>Accounting”. Now enter “John Smith” in the text box and click “Add Reason for Visit”. Now click on “Top Level” in the path. Following this example, the next time a visitor signs in and chooses “Attending a Meeting” as their reason for visit, they will see a new set of buttons on the kiosk screen with one labeled “Accounting”. If the visitor chooses “Accounting” a new set of buttons will appear with one labeled “John Smith”. Using this method of creating tiered reasons, you can create a large number of reasons for your visitors to choose from without creating an overwhelming number of choices on the screen. Note also that a “reason for visit” can be anything you wish, such as a room, a department, an event, an employee’s name, etc. Kiosks Click on the kiosk section and you will see the following screen: - 60 - - 61 - The Kiosks section provides the following administrative functions for your LobbyGuard kiosk. The items marked with an “*” are settings that require a restart of the kiosk in order for any changes to take effect: • • • • • • • • • • Kiosk Properties provides a listing of all the kiosks available; in a multiple kiosk installation, each kiosk would be listed. Select the kiosk you wish to administer from this menu before proceeding. Properties for Kiosk ID shows the unique ID given to this kiosk. This ID is not editable but may be required for LobbyGuard support reasons. Name is the name of this kiosk, for the purpose of the visitor records in the visitor logs. Each visitor has the name of the kiosk from which they signed in and out as part of his or her record in the lobbyguard database. Location is a description of the physical location of the kiosk. This is useful if you are administering a large number of kiosks. Background Color* should be set to the background color of the message being played on the Welcome screen of the kiosk. Installed Devices* allows you to enable and disable certain hardware components in the kiosk. This is used in the event of a hardware repair and for future use as optional hardware components become available. Languages* allows for the support of English, Spanish, or both languages for your users during sign in and sign out. Kiosk Visitor Types displays each visitor type create in the Workflow section. Those visitor types that are checked are displayed for your visitors to choose from during sign in, and those that are not checked are hidden from view. Mode sets the kiosk to “kiosk” mode, for regular visitor sign in/out, or “event” mode, to handle a scheduled event. See the section labeled “The LobbyGuard Kiosk Software” for more information on modes. Control Panel Password* is the numeric password used during the process of accessing the Kiosk Control Panel. The default password is 12345. For more information see the section labeled “The Kiosk Control Panel”. - 62 - • • • • • • Auto Signout sets a time to automatically sign out everyone in the “Signed In” visitor log and moves these records to the “Signed Out” visitor log. This is useful for keeping the visitor log clear of records for the beginning of the day. Auto Shutdown sets a time to automatically power down the kiosk each day. This is helpful in preserving the hardware life of the kiosk. Proxy Info provides an interface for entering any proxy server credentials that may be needed by the kiosk to send messages from the kiosk or access the internet. The address format for the proxy server should be http://xx.xx.xx.xx:port/. The kiosk must be restarted if the proxy settings on the network are changed from those stored in LobbyGuard. Messaging* sets the SMTP (mail) server from which background failure notification emails and cell phone text messages are delivered. Using the LobbyGuard messaging service will route the message through the mail servers that are made available for this purpose. You may choose a different server by selecting “Use a specified SMTP Server” and entering the IP address or friendly name of the smtp server. Admin Email is the address from which background failure notifications are sent; by default this is set to [email protected] but can be changed to any email address you wish. Security Email is the email address or addresses that are notified in the event of a background failure (see “Failed Background Section & How Background Checking Works”). Enter any email address into this field and an email will be delivered to that address when someone fails the background checking at the kiosk. Multiple email addresses can be entered, separated by a semicolon. For example: [email protected];[email protected] would send the notification to both addresses. Do NOT use commas or any trailing characters in your email list or the email notification will not properly function. To send notification to a cell phone via text message, enter the email address of the phone and the message will be delivered - 63 - to the cell phone. The format for a cell phone email address is as follows: 10-digit phone number@carrier messaging domain name.com Example: If your cell phone number is (919) 555-1234 and your carrier is Verizon Wireless, you would enter [email protected] In the case of Verizon Wireless, “vtext.com” is the messaging domain for sending text messages. Each carrier has its own domain name and you should consult your carrier to obtain the correct one for your phone. After making any changes to this page you must click the button labeled “Update General Settings” for your settings to take effect. Red Flag This section provides the ability to add records against which your visitors will be checked during sign-in, provided the visitor type has “Perform Background Check” enabled in the workflow. If a visitor matches a record in your Red Flag list, that visitor will be issued a VOID badge and will be required to turn this badge over to a building employee for further verification (see the section labeled “Failed Background” above for more information). This is useful if there are individuals that you do not wish to allow entry into your building, including ex-employees, custody disputes, etc. - 64 - The Red Flag screen displays all the current red flag entries for this kiosk. Click on the Add to List button to add a new record; the following screen will be displayed: - 65 - Enter as much information as possible to the record to make matching as accurate as possible during visitor sign-in. First and Last Name are required field. The “Active” check box will enable or disable this person’s record from the background check. When you have completed the entry, click the ADD button to add this new record to your Red Flag list. - 66 - User Manager The User Manager is used to add / edit / delete user accounts for those users who need to gain access to the Administrative Utility. The default account [email protected] is listed on the right. To create a new account, enter the information in the fields on the left. The Account Rights section contains check boxes, each of which corresponds to a tab on the Administrative Utility interface. This provides user-level rights with regards to accessing various areas of the software; if you are creating a user account for a user who does not need access to the Administration tab, leave that box unchecked. When that user signs in, the Administration tab will not be visible. The Kiosk Rights section contains a list of all the kiosks in the network. You can turn off access to an entire kiosk for a given user account by leaving the box next to that kiosk unchecked. Each user account should have at least one kiosk checked; else that account will have no access to any data. User accounts are listed on the right side of the screen. Click the “edit” link to edit an existing account, or click the “delete” link to delete an account. - 67 - Background Checking This section provides features to customize what background sources will be used when performing instant background checks on visitors. See the section labeled “Workflow” for further information on turning background checking on / off for your visitors. Clicking on the Background Checking tab will display the following: Under the heading “Data Source” are listings for the two sources that are available for background checking of visitors: the database of - 68 - registered sex offenders in the United States and the Red Flag list. The sex offender database consists of 500,000+ registered offenders in all 50 US states and Washington, DC. The Red Flag list consists of any individuals added to your list; see the section labeled “Red Flag” for more information. You can enable either source by checking or the box located to the left of each source. When the “U.S. Sex Offenders” source is selected, additional options are made available at the bottom of the screen. These choices represent the 5 states that do not make available sex offender date of birth information. By selecting these states, you may see an increase in “false positive” VOID badges printed, since the only information LobbyGuard will be able to use for background checking against these state records is first and last name. Database Management This section of the Administration tab provides features to purge data records from your LobbyGuard database. Clicking on this section will display the following: The top of the screen displays the “Number of Unregistered Visitors”. This number is the total of all visitors currently in your visitor logs, including visitors in the Signed In, Signed Out, and Failed Background - 69 - logs. This number does not include any registered visitors in your database. Select a date from the “Purge visits before” to indicate the date threshold from this purge; select a kiosk from the “Purge from kiosk” to indicate which kiosk’s records should be purged. Click on the “Purge Records” button to initiate the purge; all visitor log records dated on or before your selected date and were signed in from the selected kiosk will be deleted. The purge feature is an effective way to manage database size and visitor log growth. It is important to note the following before using this feature: • Purged records are permanently deleted and cannot be retrieved. Be certain you will no longer need these records before running a purge. • Database size is not a concern for most environments, especially stand-alone / single kiosk installations. The typical LobbyGuard database will take many years to exceed the hard disk capacity on the LobbyGuard kiosk. The purge feature is most useful for multi-kiosk installations that are sharing a common database and are adding hundreds or thousands of records each day. See the section labeled “Multi-Kiosk Networking” for more information. - 70 - Appendices - 71 - Appendix A: Supplies Visitor Badges, Frequent Visitor Passes and Other Items LobbyGuard Solutions, LLC is proud to offer additional rolls of blank visitor badges as well as LobbyGuard Frequent Visitor Pass key tags and other LobbyGuard supplies. The LobbyGuard visitor badges are pre-printed with the LobbyGuard logo in color on each badge and are available in seven different colors. This color logo serves as an extra measure of security, ensuring that the visitor badge was not created elsewhere for the purposes of gaining entry to your facility. Changing your badges to a new color each day means visitors won’t be able to wear the yesterday’s badge to gain entry to your facility. Ordering instructions and resources To view the latest supplies available for LobbyGuard and to access online ordering instructions, please visit: http://www.lobbyguard.com/supplies Or call toll-free at (866) 905-6229 option 3 - 72 - Appendix B: Recommended Policies Data Backup It is recommended that you include the LobbyGuard kiosk as part of your regularly scheduled data backup routine in your facility. If this is not possible, please contact LobbyGuard technical support at [email protected] for optional methods of backing up your data to prevent any unexpected data loss due to power surge, hard drive failure, etc. Kiosk Power Your kiosk hardware is designed to safely run 24/7 if needed. It is a good idea to power down the kiosk from time to time, although this does not need to be done every night. To shut down LobbyGuard, please refer to the section above labeled “Kiosk Control Panel” and power down the kiosk using the method described. In addition, your kiosk has an Auto Shutdown feature that will automatically power down your kiosk at a time of your choice. For more information on this please see the section above labeled “kiosks”. Antivirus, Firewall and Windows Update Policies Your LobbyGuard kiosk does not have any antivirus installed. It is your responsibility to install the antivirus package used within your organization and to follow the normal procedures for firewall protection, etc that is afforded to any new PC added to your internal network. In addition you should apply the normal Windows update settings to comply with your network policy. Please consult your IT staff or your Authorized LobbyGuard Distributor regarding these issues. - 73 - Appendix C: Troubleshooting & Contacting Tech Support Solutions to common problems For answers to frequently asked questions, please view our FAQ at: http://www.lobbyguard.com/faq.htm To access LobbyGuard technical support resource, visit: http://www.lobbyguard.com/support It is recommended you read through this information before contacting technical support. If you are still unable to resolve your issue, use the information below to contact technical support. Contacting technical support LobbyGuard is proud to provide outstanding support for all its hardware and software systems. Software support is provided via LobbyGuard Remote Assistance, allowing LobbyGuard tech support staff to take control of your kiosk at your request. Hardware support is handled by our extensive team of hardware and kiosk experts. In order to make use of the LobbyGuard Remote Support feature, you MUST have an internet connection to your kiosk. If you do not have an internet connection to your LobbyGuard kiosk, it may be necessary for you to ship your kiosk or components of your kiosk back to the LobbyGuard offices for support. The LobbyGuard Support & Update Contract does NOT cover on-site visits to your location or reimbursement of shipping charges. Follow these steps to contact LobbyGuard technical support: Internet: For fastest response, fill out the form located at www.lobbyguard.com/support and your support request will be handled in the order in which it was received. Phone: If you are unable to contact us through our web site, you can call LobbyGuard support at (866) 905-6229 8am – 5pm M-F Eastern time. Your call will be handled in the order it was received. - 74 - For more information regarding LobbyGuard technical support policies and warranties please refer to the documentation included in your Welcome packet that accompanied your kiosk shipment. You may contact LobbyGuard support to obtain additional copies of this information. - 75 - Appendix D: Keeping Current with the Latest Versions It is important to keep your LobbyGuard kiosk up-to-date with the latest version of the LobbyGuard software. New versions and updates to the LobbyGuard software are released regularly by LobbyGuard Solutions. In order to maintain your software and keep it as up-todate as possible, you will need a current LobbyGuard Support and Update Contract. These contracts provide you with 12 months of ongoing updates, technical support and access to LobbyGuard Background Checking Services. If you need information on the status of your Support and Update Contract or would like to renew immediately, send your request to [email protected] and you will receive the requested information. You will be notified by email of any new releases to the LobbyGuard software, or you can visit www.lobbyguard.com/support to view any new updates that are available for download. Follow the instructions on the download page to complete the update. - 76 - Appendix E: On-Site Installation, Support and Training Your Authorized LobbyGuard Distributor will provide initial training and support of the LobbyGuard kiosk at your location. If you need additional training you should contact your Authorized LobbyGuard Distributor. If your distributor is unable to assist, please contact LobbyGuard at [email protected] or call toll-free (866) 9056229. On-Site Support Contract LobbyGuard offers an optional on-site support contract, providing you with access to technicians in your area who are fully trained on the operation of the kiosk and the repair of any hardware issues. If you are interested in learning more about this optional support contract, contact [email protected]. - 77 - Appendix F: Contacting LobbyGuard Solutions, LLC LobbyGuard Solutions, LLC is the Raleigh, NC-based manufacturer of the LobbyGuard hardware and software. LobbyGuard Solutions also handles all support requests for the product and provides ongoing updates and maintenance to the LobbyGuard kiosk. Web Site: The LobbyGuard web site contains answers to common questions, information on updates and other useful information on the LobbyGuard product. Please visit our site at the following URL: http://www.lobbyguard.com Sales: Including general and technical pre-sales questions, and purchase inquiries [email protected] (866) 905-6229 (919) 785-3398 fax Support: Questions from users of LobbyGuard. [email protected] or via the form on the web site at www.lobbyguard.com/support toll-free M-F EST (US East Coast) (866) 905-6229 option 2 Mailing Address: LobbyGuard Solutions, LLC 4700 Six Forks Road Ste 300 Raleigh NC 27609 - 78 - Appendix G: What’s New LobbyGuard v3.4 Release Notes The following new features were added to LobbyGuard: • • • • • • • • Support for International Date Format – Within the kiosk and the LobbyGuard Administrative Utility, the international date format of “dd/mm/yyyy” is fully supported for international users. Applies to various sections through this guide. The default date format for the LobbyGuard kiosk is US English “mm/dd/yyyy”. If you would like to make use of the international date format, please contact LobbyGuard Support via email at [email protected] and request assistance. Workflow option to store driver’s license – providing the option of storing or not storing the driver’s license image. See the section labeled “Workflow” for more information. Kiosk shutdown desktop icon – Kiosk is configured to automatically turn off by double-clicking the icon. Powering down the kiosk when not in use (nights/weekends/holidays) can greatly increase the lifespan of the kiosk hardware. This icon is accessible from the Windows desktop; see the section labeled “Kiosk Control Panel” for information on accessing the Windows desktop from your kiosk. Kiosk shutdown option on Kiosk Control Panel – same functionality as above but on the Kiosk Control Panel. This option replaces the restart option on the Kiosk Control Panel. See the section labeled “The Kiosk Control Panel” for more information. Hidden Button available in Event Mode – Customer can now disable Event Mode by accessing the hidden button on the Kiosk and accessing the Administrative Utility. See the section labeled “Events” for more information. Database Management – Customer can purge visitor records for a Kiosk based on a specific date. See the section labeled “Database Management” for more information. Reports specific to Kiosk – Customer now has the ability to run reports for an individual Kiosk or all Kiosks in a multi-Kiosk environment. See the section labeled “Reports” for more information Additional ID support – Driver license library updated to most recent versions of all US state and national IDs, including green cards, armed forces ID cards, and Ivy League university ID cards. Feature is built-in to - 79 - • • • license scanning support; see the section labeled “Workflow” for more information. Proxy Server Support – Customer can now define their network’s proxy server on the Admin Utility’s Kiosk tab. The format for the address is http://xx.xx.xx.xx:port/. See the section labeled “Kiosks” for more information. VOID badge design – New badge contains information for employees to follow in order to assist a visitor who receives a VOID badge. See the section labeled “Failed Background Section & How Background Checking Works” for more information. Kiosk Name badge format – New badge format contains the name of the kiosk from which the visitor signed in, printed on the badge below the visitor’s name. See the section labeled “Workflow” for information on setting the visitor badge format. - 80 - Appendix H: Multi-Kiosk Networking One of the most useful features of the LobbyGuard kiosk is the ability to network multiple machines together, storing all your data in one location and providing you with the ability to retrieve data from multiple kiosks using any web browser. By default, all LobbyGuard kiosks ship as “stand-alone” units; all data is stored on the local hard drive, and the kiosk is not connected to other kiosks on your network. Any LobbyGuard kiosk can be modified and networked with other kiosks, via a shared database server. ADVANTAGES There are several advantages to networking your kiosks together: • • • • • Visitors can sign in at one kiosk and use the bar coded visitor badge to sign out from another. All visitor logs, administration, and reports can be accessed from one web interface. Single database provides for ease of data backup Individuals added to the “Red Flag List” will automatically be populated across all kiosks Individuals who “register” with one kiosk will be able to use their LobbyGuard keytag with any kiosk on the network. If you are interested in networking your kiosks please contact LobbyGuard Support for further information. Do not attempt to perform this operation without assistance from a LobbyGuard Support Technician. - 81 - Appendix I: Legal Notice All contents of this manual are © 2008 LobbyGuard Solutions, LLC. The LobbyGuard name, logo, likeness, software and hardware are registered trademarks of LobbyGuard Solutions, LLC. in the U.S. and/or other countries. All rights reserved - 82 -