1
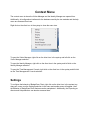
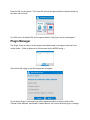
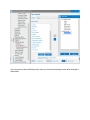
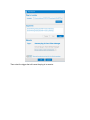
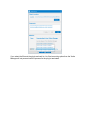
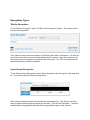
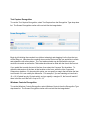
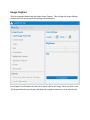
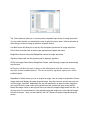
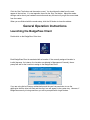
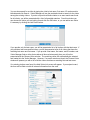
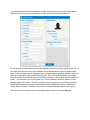
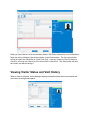
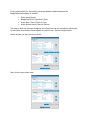
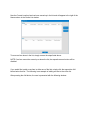
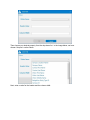
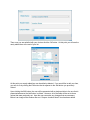
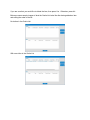
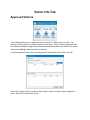
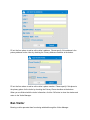
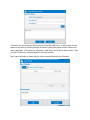
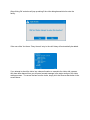
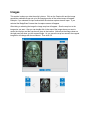
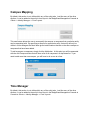
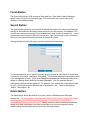
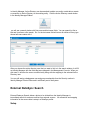
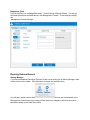
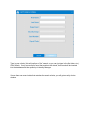
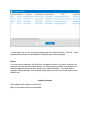
Visitor Manager Identity Manager Client User Manual www.badgepass.com Time Manager Table of Contents 1. Context Menu a. Settings i. Help Options 1. About 2. Manual 3. Get Latest Settings from BadgePass Server ii. Startup Options iii. Reporting iv. Plugin Manager v. Screen Push Setup 1. Special Functions a. Capitalize First Letter b. Lower-case All c. Remove d. Replace e. Tab Character Count or Less f. Truncate Left g. Truncate Right h. Sub-string i. Upper-case All 2. Modifiers 3. Recognition Types a. Title Bar b. Screen Scrape c. Internet Explorer d. Text Capture e. Windows Controls vi. Client Behavior Setup 1. Populate Screen 2. Set Default Entity vii. Client Settings b. Printing i. VM Badge Printing 1. Auto Print Badge 2. Preferences a. Form b. Printer ii. Clear Print Queue c. Imaging 2. 3. 4. 5. 6. 7. i. Image Capture ii. OCR d. Readers i. Auto Check-Out Reader ii. Smart Card Reader iii. Card Reader 1. IDG 250 – Barcode Setup General Operating Instructions a. Launching BadgePass Client b. Starting BadgePass Visitor Manager c. Searching and Adding a Visitor d. Defining a Visit e. Comments and Finishing the Visit f. Viewing Visitor Status and Visit History Visitor Tasks on Home Tab a. Printing a Badge b. Onsite List c. Reports Options Tab a. Custom Card Setup b. Interfaces Visitor Info Tab a. Approved Visitors b. Visitor Information c. Ban Visitor Identity Manager First Run a. Entity Screens b. Badge Preview c. Entity Information d. Card Information e. Security f. Images g. Qualifications h. Campus Mapping Ribbon Buttons a. New b. Save c. Search d. Clear e. Card Actions f. Entity Navigation 8. Time Manager a. Time Agent b. Time Management Console 9. Active Directory Search and Integration 10. Common Features 11. Appendices a. Appendix A - Setting up NSOPR plugin for Visitor Manager b. Appendix B – New Features Context Menu The context menu is where the Visitor Manager and the Identity Manager are opened from. Additionally, all configuration interfaces for the hardware used by the two modules and the help menu are accessed from here. Right click on the client icon in the systray to show the menu tree. To open the Visitor Manager, right click on the client icon in the systray and left click on the Visitor Manager selection. To open the Identity Manager, right click on the client icon in the systray and left click on the Identity Manager selection. To open the Time Management Console, right click on the client icon in the systray and left click on the Time Management Console selection. Settings To configure the behavior of BadgePass Client, right click on the client icon in the system tray, drag your cursor over the Settings selection in the menu and another menu will appear. Here the behavior of BadgePass Client features can be manipulated. Additionally, the Reporting redirector and Help selections can also be accessed here. Help Options Click the Settings submenu, the Help submenu, and finally the About item to launch an information window for BadgePass Client. This window shows the name of company you bought BadgePass from, their phone number, website address, the serial number, and the version of BadgePass Client that you are currently running. Click the OK button to close the window. Click on Manual to launch the manual for BadgePass Client. Click on Advanced to see other advanced options, including Get Latest Settings from BadgePass Server. Get Latest Settings from BadgePass Server This will get the latest changes made to the BadgePass Server in the BadgePass Management Console. When you make changes, those changes are automatically sent out to all the BadgePass Clients. However, if you do not see the changes that you made in the Management Console reflected at the client, then it is advised, that you use this feature to assure that your client has the latest configuration and will function as expected. This function is NOT performed when the client starts up. So, simply restarting the client will not perform this action. Startup Options The Startup Options is where either the Visitor Manager, Identity Manager, or Time Manager modules can be configured to launch automatically whenever the BadgePass Client is ran. Select the Settings submenu, then the Startup Options item. Once the window opens select Auto Startup Selected Module and then select either the Visitor Manager or Identity Manager module. Reporting BadgePass Client allows you to view reports of visit and visitor data. By clicking on the Settings submenu, then the Reporting item in the context menu, the user is able to set the address for the reports. This is useful if the report server is not a default install or exists on a machine other than the BadgePass Server does. Enter the URL for the reports. This is the URL that will be opened when the Reports button on the Home tab is clicked. If no URL is set, the default URL will be opened which is “http://[your server name]/reports.” Plugin Manager The Plugin Center is used to run third party executables based on a trigger or stimulus from a custom button. (Refer to Appendix A of this manual for the NSOPR setup.) Click Add to add a plug-in, the following screen will appear. On the Select Plug-in Type window you will be presented with four options: National Sex Offender Public Website, aptiQmobile, Predator Barrier, and Custom build the plug-in’s settings. If you select National Sex Offender Public Website OR Predator Barrier and click Next you will see the following screen. Here you can specify the Execution Setup for the plugin to either Execute plug-in from Visitor Manager or Execute plug-in from Identity Manager. If you choose to execute from Visitor Manager the drop down list will populate with a few choices of when the event is executed. See the image below for the entire list. If you select Execute plug-in from Identity Manager then the values in the first drop down list will change and a second drop down list will appear. The second drop downlist is used to specify which entity in Identity Manager this particular event will be executed for. See the two images below for the values in each list. If you choose aptiQmobile, you will have the two options above, then the next window will be the Staging or Production. Choose staging during the setup process. Come back after everything is ready to go live and change it to Production. The next window is the aptiQmobile User Pin number window. aptiQmobile requires a user’s pin number to finish the process of loading the person’s card onto the person’s mobile device. You can choose to have to provide a pin number everytime the plugin is triggered. This will give each person an opportunity to create their own personal pin number. Or you can choose to set a global pin number. The next window is the aptiQmobile Card Format window. This window indicates the type of cards your system uses so aptiQmobile can provided your mobile device the correct card format. Among the data contained on a smart card is a facility code. The next window asks if you want to set the facility code. aptiQmobile’s service requires an account. The next window asks if you would like to provide the username and password now. If you don’t provide a username and password, then the plugin will ask for the username and password each time the plugin is triggered. NOTE: The username aptiQmobile sets up for your account is an email address. In the next window you will specify which card type the plugin will use to get the card data. NOTE: There is a corresponding aptiQmobile Form Layout item that can be added to Identity Manager via the Management Console. If you choose to custom build the plugin, then you will see the following screen after clicking the Next button. Browse to the location of the executable. If you have arguments you need to pass along to the plug-in you can add them to the Arguments box. Click Add. There will be a list of available fields in the left window, or you can manually type a value in the right pane. The example shown above is adding the first name to the plug-in as an argument. Next, specify which module the plug-in will be executed from. Then select the trigger that will cause the plug-in to execute. If you select the Execute the plugin and wait for it to finish executing option then the Visitor Manager will not proceed until the process for the plug in terminates. Screen Push Setup The Screen Push feature is designed to read data from any supported Driver’s License, Passport, Military ID, standard Credit Card or Custom Card into BadgePass Client and automatically populate your third party application. Once setup properly, the system will populate multiple screens with little to no user interaction. To add a new profile, click the New button. The following window will appear. Enter the desired name for the profile and select the OK button. Your profile will now appear in the Profiles list at the top of the form. Next, choose the Card Type that you wish to associate the new profile with. As the card type changes so does the data in the Available Fields column. Then, choose the fields which you would like to be outputted, and please choose them in the order that form fields appear. To move a field from the Available Fields column to the Output Fields column, select the field that you wish to move and select the arrow button or double click on the selected field. Once the field is in the Output Fields column, you can add Special Functions and Modifiers by right-clicking on the field. Next, choose the Recognition Type that you wish to use to recognize your form. The five methods are Title Bar, Screen Scrape, Internet Explorer Scraper, Text Capture and Windows Controls. Click here to see further explanations of each recognition type. The Screen Push gives you the ability to add extra functionality to the output fields of a profile in the form of the Functions found on the ScreenPush Configuration Manager. See the sample image below: The Keys button is used to add extra key strokes. See the sample image below: The Space button is used to add a space keystroke to the output list. The Delay button is used to add a time delay (seconds) to the output list. Click the button and enter the delay time in seconds. The Execute button is used to run an external executable during the output of a profile. See the sample image below: Click the Browse button to navigate to the location of an external application you want to run. If the application can accept command arguments, then type those into the Cmd Args text box. Next choose either to Execute or Execute and Wait. The Execute option will cause the external application to run while continually processing a profile. In contrast Execute and Wait will cause the external application to launch but will not continue to process the profile until the external executable is closed. The Enter button will add an ENTER keystroke to the output list. The Tab button will add a TAB keystroke to the output list. The Auto Enter checkbox will cause an ENTER to automatically be placed after every field you insert into the output list. The Auto Tab checkbox will cause a TAB to automatically be placed after every field you insert into the output list. The the button is used to add a selected field to the output fields list. In a similar fashion, button is used to remove a field from the output fields list. Within the Functions region there is a smaller section labeled Output Format. Here you can choose to output ALL fields within the current profile Normal, in an Upper case format, or a Lower case format. Special Functions The Special Functions option gives the ability to apply a series of string manipulation functions on a field’s data. To apply a special function to an output field, simply right click on the desired field in the Output Fields list and select Special Functions. At this point you should see the dialog below: To add a new function, click the New button. Upon doing so you should see the dialog below: Special Functions: Capitalize First Letter This function takes the first letter of the field value and capitalizes it. See the example below: Field: Field Value: Result: Last Name manningham Manningham Lower-case All This function causes all characters to output in lower case. See the example below: Field: Field Value: Result: Last Name McDaniel mcdaniel Remove This function removes each instance of the function parameter from the field value. See the example below: Parameter 1: Field Value: Result: a banana bnn Replace This function takes every instance of the first parameter and replaces it with second parameter. See the example below: Field: Field Value: Parameter 1: Parameter 2: Result: State Mississippi i a Massassappa Tab Character Count or Less This function outputs a TAB keystroke if the field value length is less than the first parameter value. See the example below: Field: Field Value: Parameter 1: Result: Last Name Bond 3 No TAB outputted Truncate Left This function removes the first P1 (Parameter 1) characters of the field value. See the example below: Parameter 1: Field Value: Result: 2 apple ple Truncate Right This function removes the last P1 (Parameter 1) characters of the field value. See the example below: Parameter 1: Field Value: Result: 2 apples appl Sub-String This function returns a smaller portion of a particular string. This is based upon the Start Index (parameter 1) and the Length (parameter 2). See the example below: Field: Field Value: Parameter 1: Parameter 2: Result: First Name Jonathan 2 3 nat Upper-case All This function causes all characters to output in upper case. See the example below: Field: Field Value: Result: State Massachusetts MASSACHUSETTS Modifiers The Modifiers function is mainly for use with single characters. To apply a modifier to an output field, simply right click on the desired field in the Output Fields list and select Modifiers. See the image below: Select Modifiers and the following dialog box will appear: You can add keyboard modifiers, such as Ctrl and Alt, to the field. This allows for you to simulate shortcuts, such as Ctrl + Alt + F12. To add a keystroke or combination of keystrokes, simply press the key(s) you desire to use. Recognition Types Title Bar Recognition To use Title Bar Recognition, select Title Bar in the Recognition Type list. The section should look like the image below: Then, place the cursor over the crosshair in the bottom right corner of the section. Left click the mouse and your normal cursor should be replaced with a crosshair. Move the crosshair to the form that you wish to recognize, and release the mouse button. The Title Text textbox should then be filled with the title bar information. Screen Scrape Recognition To use Screen Scrape Recognition, select Screen Scrape from the Recognition Type drop down list. The section should look like the image below: Next, select the desired session from the Session List dropdown list. The Session List is the range of session ids that might be used by the emulator. Click the Get Data button. The black area should then be populated with data from the presentation space of the emulator. Next, highlight a word that is unique in its placement in the presentation space. Then, right-click the highlighted area and click Add Rule. You should then see the rule in the table below the black area. Repeat this process until you feel that this profile is completely unique from any other profiles that you have or might have. Internet Explorer Recognition To use the Internet Explorer Recognition, select the Internet Explorer Scraper option as your recognition type. The section should then look like the image below: Begin by typing the words or HTML that you want to match in the textbox titled HTML Text Contains. For example: “Online Registration” or you could use HTML tags such as: <a href="somepage.php" target="body"> Here is an example of HTML for a website: <body> <img src="picture.jpg" width="50%"/> <br> <center> <br> <div id ="attention">Online Registration Screen</div> <br> <a href="somepage.php" target="body"> Info Page</a> <br> Thank you for visiting our Web site. <br> <a href="contact.html" target="body">Contact Us</a> </center> </body> In the event all of the screens have the same title of Online Registration Screen, you can specify HTML code from the page. In order to look at the HTML for a particular page, in most cases simply right click on the browser window and choose View Source. This will vary from browser to browser. Text Capture Recognition To use the Text Capture Recognition, select Text Capture from the Recognition Type drop down list. The Screen Recognition section will now look like the image below: Begin by left-clicking the crosshair icon (without releasing) and dragging it to the form that you will be filling out. Now place the crosshair icon over the form’s text that you would like to match and release the left mouse button. The Text textbox should now be filled with the text you would like to match as well as the Title textbox should now be filled with the form’s title bar text. If you would like to match the text of the item, then select the Compare Text checkbox. To match the dimensions of the item at that location on the form, select the Use Component Dimensions checkbox. By choosing this option you can specify a margin that will allow the item to still match if it is not exactly the same size. For example, if you are matching an item that is 10 x 10 (10 pixels long by 10 pixels wide), and you specify a margin of 2, the form will match if there is an item on it that is 8 x 8 up to 12 x 12. Windows Controls Recognition To use the Windows Controls Recognition, select Windows Controls from the Recognition Type drop down list. The Screen Recognition section will now look like the image below: Begin by left-clicking the crosshair icon (without releasing) and dragging it to the form that you will be filling out. Now release the left mouse button. The title of the form will now be displayed in the drop down list beneath the Use Sub-Window as Parent checkbox. Next, make the window you are trying match the active window and press the assigned Hot Key. This will cause all of the available controls to be listed in the Available Fields area. The Use Sub-Window as Parent is used when a form has a child window within itself. You can choose which child window you would like to count the items on. This gives you the ability to match the form in case the parent form was to ever change. Once the screen recognition is set, you must save the profile. You do this by selecting the Save or Save As buttons. Now, your profile is complete. Client Behavior Setup The Client Behavior Setup tells the BadgePass Client how to behave when a card is read in a reader. To access this configuration click the Settings submenu, then Client Behavior Setup. All the default cards and custom cards will show up under the Card tab section. The Screen to Populate option refers to which window will be populated when a card is read. If Visitor Manager is selected then the Visitor Manager screen will be populated and if Identity Manager is selected then the Identity Manager screen will be populated when a card is read. However, if Current Window is selected then whatever window has focus when the card is read will be populated. The Set Default Entity option applies to the Identity Manager and onloy appears when Idenetity Manager is selected. It determines which entity to populate if the client is minimized. The Entity tab refers to how the data is treated in the Identity Manager screens. If the Save Data checkbox is checked then the data in the Identity Manager screens will be saved to the BadgePass entity tables. However, if it is un-checked the data will not be saved. Also the Identity Manager screen will not show the navigation buttons or the Print All button and the Save button will change to a Finish button. If you are using a SmartCard reader you will also specify here what card technology type will be used when reading cards for this entity type. Client Settings Click on the Client Settings item in the Settings submenu and you will see the following screen: The Open Default Client Hotkey will be the key you press to open the Visitor Manager screen when it is running minimized. The Screen Push Hotkey is the key or key sequence you will press to output the data for the Screen Push. The Silent Entity Tracking desired behavior feature of the client can be set to behave as a Check-In / Check-Out or as a Check Point Only. This feature can be set by changing the selection in the combo box under Silent Entity Tracking. By default, Check-In / Check-Out is selected. The Move To feature allows you to set the starting location for an entity when using entity tracking. The Launch As: setting allows you to use your license as either Identity Manager or Identity Manager Web. Printing BadgePass Visitor Manager has the ability to print badges (forms) for visitors. While global badge printing preferences can be set in the BadgePass Management Console, those global settings can be overridden locally. Web Printing Statuses Web print is a part of BadgePass where you can print to a printer in the cloud which resides at BadgePass. You save the cost of buying a printing system by printing over the web to our printer and we mail it to you. The window allows you to see the badges you have printed and their statuses. VM Badge Printing This is the section where the global badge printing preferences on the local BadgePass Visitor Manager are overridden. NOTE: With the exception of Auto Print Badge features, all badge printing preferences are set to use the global settings by default. Auto Print Badge The Auto Print Badge features allow BadgePass Visitor Manager to automatically print a badge for each time a visitor is checked-in or checked-point only. By checking the Auto-print visitor badge on check-in check box, BadgePass Visitor Manager will automatically print a badge for each visitor upon check in. By checking the Auto-print visitor badge on check-point only check box, BadgePass Visitor Manager will automatically print a badge for each visitor upon check-point only. Regardless of whether or not the Auto Print Badge options are checked, the user can always choose to manually print a badge for a visitor. Preferences This section allows you to set correlate badges and printers based on a Visit Purpose or Visitor Type. NOTE: Visit purpose takes precedence over the visitor type. There are two tabs in this section: Visit Purpose and Visitor Type. Each tab contains a list of Form / Printer settings for each of its respective properties. The Form (badge) drop down menu contains three built in options as well as an item for each badge imported into the BadgePass Suite. Auto Disabled: This option will override the Auto Print Badge setting and cause the badge to NOT be printed automatically. The user can still manually print a badge. Allow User Selection: This option will cause a drop down menu to appear allowing the user to select which badge to print. Use Server Settings: This option will cause the global settings to be used. This is the default setting. (All Other Options): In the above display, the last two options are Parent and Visitor. These are the names of the badges that have been imported into the BadgePass Server. Choosing an imported badge will cause that badge to be printed. The Printer drop down menu contains three built in options as well as an item for each printer found on the local computer. Use Default Printer: This option will cause the badge to be printed to the local computer’s default printer. Allow User Selection: This option will cause a drop down menu to appear allowing the user to select which printer to use. Use Server Settings: This option will cause the global settings to be used. This is the default setting. Clear Print Queue Just as its name implies, this option clears the printer queue. Currently, however, this feature works ONLY with the DIS printer. Imaging BadgePass Client gives users the ability to capture images in both Visitor Manager and Identity Manager through several different methods. Image Capture Click the Imaging submenu and then select Image Capture. This will open the Image Settings window where the image device and settings can be selected. Load Image From File allows the end user to select a file for the image. When you click on the Test Acquisition button you will get a Windows file navigation window for you to select the file. The Twain option will allow you to use any twain compatible input device for image acquisition. You can select whether you would like the user to select the device from a list that will show up when they go to take an image or default to a specific device. Use WIA Device will allow you to use any WIA compliant input device for image acquisition. Direct Show is another form of device input geared more towards web cams. BadgePass Camera will use the BadgePass camera for image acquisition. Signature Capture will use the signature pad to capture a signature. ID PIX will support Direct Show, BadgePass Camera, and Videology images and automatically crop the face. Ink Canvas will allow the user to draw on the allotted area with the mouse or using touch(on a touch enabled device). This can be used for signature capture on a touch enabled device. Regardless of which means you use to acquire an image, once an image is acquired the Format Image window will display the newly acquired image. Here the user can use the crop control to crop the image, if desired. Additionally the user can double click in the area of the image that you would like for the crop control to be centered and the crop box will jump to that section. Notice that image viewer on the right will show you what the cropped image would look like. As the crop control is moved around on the captured image the image box on the right will change with the movement. Once you are satisfied, click OK. Below is a sample image showing this screen. OCR OCR (Optical Character Recognition) scanning is a way to extract the information from a valid driver’s license or passport. It can be used for check in as well as adding an image of the person. Under the Imaging submenu select OCR. Once the OCR Device Preferences window opens, select the Enable OCR check box to enable OCR scanning. The device you wish to use can be selected from the Select Device drop down list. There are four supported devices at the time of this print: the ScanShell 800 (driver licenses), the ScanShell 1000/A (driver licenses and passports), the SnapShell Camera (driver licenses, including 2-D barcodes), and the SnapShell Passport (driver licenses and passports). The Use Method box determines if the scanner will be able to get information out of a 2-D barcode like a regular 2-D barcode reader. It should be noted that by choosing 2-D Barcode or 2-D Barcode & Front of Card, that the parameters for the device are automatically set and cannot be changed in the interface until the use method is changed back to Front of Card. The installation processes for the SnapShell Camera and SnapShell Passport are much different than the other devices and the instructions are found in the installation manual for BadgePass Client. It should also be noted that OCR is a less reliable way than reading barcodes or magstripes using the IDG 250 reader to gather data. Always check the data before accepting. Set the Resolution under the device parameters. The recommended resolution is 300. Set the Image Type to either Gray Color or True Color depending on your needs. Typically True Color works better than Gray Color. Set the Image Size. Auto Detect will determine what type of document is being fed into the scanner and will then set the width and height variables accordingly. Use Default is simpler. It will set the width and height depending on the scanner type only. You can manually set the image size by choosing Use the following and typing the height and width of the image. You should always calibrate the scanner before using to ensure you get the best possible scan. If the reader begins to produce inaccurate information you should try cleaning the scanner. NOTE: The SnapShell Camera and SnapShell Passport do not require calibrating. To calibrate the scanner you will need the calibration paper that comes with the scanner. Simply click on Calibrate Scanner button under the test section of the OCR Device Preferences screen and follow the directions on the screen. To clean the scanner you will need the cleaning paper that comes with the scanner. Simply click on Clean Scanner under the test section of the OCR Device Preferences screen and follow the directions on the screen. To use the OCR scanning option just insert the card or passport into the reader when you are ready to search for a visitor. The following screen will appear: NOTE: Double check the accuracy of the information gathered to make sure it is correct!! You can also swipe your license in the IDG 250 reader and when the input screen appears you can run the card through the OCR scanner to add the picture. NOTE: If you are using the SnapShell Camera or SnapShell Passport as your OCR device, it is important to know that when BadgePass Client is closed that it takes approximately 5 seconds for the device to be fully released by the application. Once it has been released, the green LED on the device will turn off and the device is ready to be used again. NOTE: It is important to remember that the OCR devices are port specific devices. This means that if you unplug the device from its current USB port and plug it into another, it will not function properly. To resolve this issue, you must reinstall the device. Please see the BadgePass Client Install manual for instructions on how to reinstall the SnapShell Camera or SnapShell Passport. The ScanShell 800 scanner is for scanning ID Cards only. The ScanShell 1000/A scanner is for scanning ID Cards and Passports. The SnapShell Camera is for scanning the front of ID Cards and 2-D Barcodes, often found on the back of ID Cards. The SnapShell Passport is for scanning ID Cards and Passports. NOTE: When using the ScanShell 1000/A scanner and the SnapShell Passport devices the top most button (with the ScanShell 1000/A the buttons on the right side of the scanner) is for scanning ID Cards, the middle button is for scanning passports and the bottom button doesn’t do anything. NOTE: When using the SnapShell Camera or the SnapShell Passport you must push the button in order to initiate scanning. Readers BadgePass Client gives users the ability to use various types of reader devices to perform various tasks. The settings for these readers can be accessed from the Readers submenu. Auto Check-Out Reader To configure the Auto Checkout reader click on the Readers submenu, then click the Auto Checkout Reader item. To use the badge reader, check the option Use Badge Reader. This will enable the other options. When you scan a badge, you can specify that the computer play an alert sound. Check the option for Play Alert Sound to enable this. This will only function if the computer system has a built in speaker or external speakers. The Badge Reader Settings section allows you to specify the port that the reader is on as well as the Baud Rate, Parity, Data Bits, and Stop Bits. When you have finished with the reader settings, you can test the reader by clicking on the Start Test button. Scan the badge. You should see the data from the barcode in the text box. If no data is displayed, or the data is incorrect, then click Stop Test, adjust the reader settings, and repeat the test. The Features section allows you to specify what Visitor Manager does when the badge is scanned. The Auto Visitor Search option will search for the visitor and pull up their record in the Visitor Manager Window. The Auto Visitor Check-Out will automatically check out the visitor without displaying the visitor’s record. When you have finished setting the Badge Reader Settings, click the OK button to close the Badge Reader Setup window and return to the Visitor Manager. Smart Card Reader Under the Reader submenu, click the Smart Card Reader item. A Smart Card reader can be used to read card numbers to assign to an entity in Identity Manager, or it can be used by Time Manager users to clock in and out. In the Smart Card Reader Choice window select the Prox/MOCA reader that will be used for reading card information into the card area in Identity Manager and in Time Agent. The same reader can be used for both functions or you can assign 2 different readers. Card Reader BadgePass Client uses a serial reader to collect data from a visitor’s driver’s license or other valid standard or custom cards. The first checkbox labeled Use Card Reader allows you to specify whether the BadgePass Client will use a card reader or not. If this is un-checked then all other settings are disabled. To use the reader, check this option. Once checked, the Auto-Detect checkbox becomes enabled. BadgePass Client is able to scan the computer’s serial ports and to find the correct port automatically, provided that you are using an IDG 250 reader. If you choose Auto-Detect you will not be able to change any other settings. If you do not want to use the Auto-Detect feature then uncheck it and you will have the option to choose the Reader Model that you are using and specify what serial port it is on. After you are finished setting your reader options, you can test the settings to make sure that the reader is functioning properly. IDG 250 Reader - Barcode Setup Click the check box next to the barcode type that you will be reading in the input reader. There will be approximately a seven second delay and you will hear a beeping from the IDG 250 reader. After an additional five seconds you will see the check mark appear in the check box. This will occur for all types. Click the Start Test button and then swipe a card. You should see the data from the card appear in the text box. If no text appears, then click the Stop Test button. Adjust the reader settings and/or check your hardware connection and retry the test until you get the correct data from the reader. When you are finished with the reader setup, click the OK button to close the window. General Operation Instructions Launching the BadgePass Client Double click on the BadgePass Client icon. Each BadgePass Client is associated with a Location. If the currently assigned Location is invalid (because, for instance, the Location was deleted in Management Console), then a prompt will ask for the Location to assign to the BadgePass Client. If you are using Active Directory authentication and the user has permission to use the application then the client will start and the client icon will appear in the system tray. However, if BadgePass security is being used then you will be prompted with a login window. The default login is: Username: admin Password: admin Starting BadgePass Visitor Manager Start BadgePass Visitor Manager by right clicking the client icon in the system tray and selecting Visitor Manager from the menu list. Searching for and Adding a Visitor You can search for a visitor by swiping a valid driver’s license, military ID, credit card, or custom card that was previously set up from within the BadgePass Management Console ( see BadgePass Management Console User Manual section Card Management -> Card Types ) or from the Configuration tab of the Visitor Manager (see Custom Card Setup). Additionally, you can open the Visitor Manager and type in the name and/or ID number of the visitor you would like to search for. To search using a card, simply swipe the visitor’s card. If the visitor has already been added to the system, you will see the BadgePass Visitor Manager with the information already filled in: You can also search for a visitor by typing the visitor’s last name, first name, ID number and/or birthdate and click Search. Visitor Manager will use the provided criteria to search for the visitor among the existing visitors. If you do not provide all three criteria or no exact match was found for all criteria, you will be presented with a list of all possible matches. From this window you can choose the visitor you are looking for and click the OK button, or you can add a new visitor if necessary by clicking the Add Visitor button. If you provide only the last name, you will be presented a list of all visitors with that last name. If you provide a last name and first name, you will be presented a list of all visitors that have the matching last name and first name. If you provide a last name, first name, and ID number, and Visitor Manager finds a visitor that matches all three criteria exactly then you will not be presented with the Choose Visitor window. The matching visitor will automatically be selected and loaded into the Visitor Manager. However, if no exact match was found, the Choose Visitor window will present you with a list of all the visitors that have a matching first and last name. If no existing visitors were found, the Add Visitor Info screen will appear. If you swiped a card, the form will be filled out with all relevant information from the card. If you searched from the Visitor Manager, and the visitor does not exist in the system already the form will only have the name and/or ID number that you searched with filled out. Fill out all required information and any other relevant information for the visitor and click OK. If you have more than one visitor type available you will be required to select the proper visitor type. If only one visitor type is configured then it will automatically populate the field. Required fields are indicated by having a yellow background. If the OK button is disabled, this implies that some of the fields that are required have been left blank or that a value that was entered is invalid. This commonly occurs if any part of the Primary Address section is filled out, but an address type is not chosen. This also commonly occurs if you have a custom data field (see BadgePass Management Console User Manual section BadgePass System -> Database -> Setup) that is set up as a “Number,” but you have entered a character that is not a number. After clicking OK, the visitor that you just created will be active in the Visitor Manager. Defining a Visit Now that you have created or found the visitor, you will define the visit by filling out the fields under the Define Visit section of the Visitor Manager. tt This section will have different fields available based on what kind of visit purpose you choose. This is determined by the mappings that were created in the Visit Purposes section of the BadgePass Management Console (see BadgePass Management Console User Manual section Visitor Manager ->Visit Purposes). For example, you have mapped the Visit Purpose, Sales Meeting, to the Visit Actions, Check-In and Check-Out. When you select the Visit Purpose Sales Meeting, the Visit Action field is hidden. This is because it can only be Check-In or Check-Out, and since the visitor is currently checked-out the value for Visit Action must be Check-In. Next a value must be entered for the Visiting field. This is the person or place that the visitor is visiting or having contact with. This will need to be a contact of the same type that is chosen in the Visit Contact Type field, or the type that is mapped to the selected Visit Purpose if the Visit Contact Type field is hidden. There are several ways to search for a contact for the Visiting field. If you know the name of the person then you can type it in the Visiting field, and when you click on the arrow to open the drop down list, it will automatically be listed. Alternatively you can type the name of the person and hit the right arrow key to open the list of contacts. If you are searching for the name of a person, you must enter the name in the form of “Last Name, First Name.” You can also type any portion of the name as long as it is in the above format. For example, you can search for John Doe by typing “Doe, John” or “Doe” or “Doe, J” or “D”. Please note that typing only a portion of the name will return all contacts that match those criteria. So if you type “Doe” instead of “Doe, John” you will get all contacts that have the last name of “Doe.” Another way to search for the contact in the Visiting Field is to use the Visit Contact Search form. You can access this form by clicking the button next to the <Entity> Field drop down list. The <Entity> value will change depending on the visit contact type chosen in the prior step. If it is a person then you will see the Visit Contact Search form: From this form, you can choose the Contact Type that you are looking for and then click Search to search for all contacts of that type. Alternatively, you can type in the person’s name and click Search to find only the one you are looking for. Once you find the contact, click the OK button. This will put the contact you chose in the Visiting field in the Visitor Manager, and it will also choose the corresponding type value in the Visit Contact Type field. If it is a location then you will see the following form: Navigate through the location list with the keyboard and press the Enter key once you have selected the desired location, or simply click on the desired location. At this point you will return to the main form. If you have enabled Campus Filtering in the Management Console ( see the manual for the Management Console ), then the only contacts that will be available will be the ones associated with the campus that the Client is installed to. For example, if your client is installed to Main Campus-> Office, then when you attempt to visit an employee, only the employees that have Main Campus added to their Campus Mapping ( this is done in Identity Manager ) will show up in the search. Comments and Finishing the Visit Under the Comments section you can enter any text relevant to this visit. This field is optional. An example might be “Checking Out student early for Doctor Appointment.” When you have filled out all of the necessary fields in the Define Visit section, you will be able to finish the visit by clicking on the left-most button in the Finish section. The text on this button will say Accept if the Visit Action is Check Point Only. It will say Check-In if the Visit Action is Check-In, and it will say Check-Out if the Visit Action is Check-Out. The Clear button will clear the current visit without saving it. Viewing Visitor Status and Visit History When a visitor is selected, Visitor Manager displays information about their current status and visit history in the right-hand panel. The top half of the panel will list relevant details about the visitor. If a picture has been taken for the visitor, their picture will be shown. However, if no picture is available, a default placeholder will be displayed. The Status section will indicate the current status of the employee whether they are Checked-In or Checked-Out. The bottom half of the panel will list the Visit History for the visitor. All previous visits can be viewed by clicking on the arrows. The right arrow will show older visits and the left arrow will show newer visits. The buttons with the vertical lines move to the most recent or oldest visit. The right hand button will display the oldest visit and the left hand button will display the newest visit. Visitor Tasks on the Home Tab Printing a Badge The Visitor Manager system will print badges for visitors. Depending on what options you choose during setup (see Badge Printing Setup), Visitor Manager will automatically print a badge when the visitor is checked in, or you can manually print a badge by clicking on the Print Badge button on the Home Tab. In order to print a badge, you must have searched for and selected a visitor, and you must have filled out all the fields in the Define Visit section. Onsite List The Onsite List displays all visitors that are Checked-In on the current campus. It will not show visitors that are Checked-In on other campuses. From the Onsite List you can check out and print badges for a single visitor or multiple visitors at once. To select multiple visitors, hold down the Control key and click on the visitors that you would like to select. If you want to select a range of visitors, click on the first visitor you would like to select and hold down the Shift key and click on the last visitor in the range. To check out a visitor or visitors, click the Check-Out button. The current time is used as the Check-Out time. To print a badge for a visitor or visitors, click the Print Badge button. After you have finished, click the Close button to close the window and return to the Visitor Manager. Reports The Visitor Manager system will allow you to setup and run different reports of the visit and visitor data. You can access these reports by clicking on the Reports button on the Home tab. This will launch a new window that will allow you to browse, run, and view the available reports. The first screen will have a link to view BadgePass Reports. The next screen will show a list of all available reports. Click on the report you want to run and view. The following is an example of the Visits By Date Range report. Depending on what version of SQL Reports Server you are running you can export the reports in various formats including Excel and PDF. Close the report window to return to Visitor Manager. Options Custom Card Setup BadgePass allows you to set up Custom Cards to use with the system. To create a custom card, click on the Custom Card button on the Options tab. In the Define Card Type form, type in a name for the custom card type and the swipe a card. In order to be able to set up fields, we must first parse the card data into Blocks and Rows. Block Splits: Delimiter values used to separate Blocks. Block Delimiter: A way to group data into logical sections (Blocks) base on a delimiter value. Block Delimiters and Row Delimiters can be entered as ASCII values or as Hexadecimal values. (Ex. [0x1D]) Now that the data is in a more manageable form, you can start mapping fields. To map a field, highlight the area in the row that you want to become a field, right click and choose Map Field. Enter the name of the field. (Making sure not to use spaces or other special characters) Column: The starting point in the row to start extracting data. Length: The amount of characters; starting at the column value defined prior to extract from the row. All: Checking this box will cause the whole row to be extracted, regardless of the number of characters in the row. You can also separate blocks into more rows by using a Row Delimiter. Go To Button: This will take you to the Block\Row of the highlighted field under Mapped Fields. If you click on a mapped field, you will see a balloon that will show you the Block, Row, Column location and the field Length. Delete: This will delete the highlighted field under Mapped Fields. Now you MUST set up a rule so the program will be able to distinguish this card from any other card. To create a rule: Highlight a section of data that will ALWAYS be the same and unique for this particular card. Right click and choose Map Rule. Verify that the information is correct and click OK. To see your changes you can restart the client or right click in the context menu, then go to Settings -> Help -> Advanced and select Get Latest Settings from BadgePass Server. Interfaces The Interfaces feature of BadgePass Visitor Manager allows the user to specify the layout of various user interfaces found within the application. Currently, the Onsite List is the only interface that can be customized this way. By clicking the Interfaces button, the user is presented with the following window: This window is comprised of tabs that specify the specific windows that can be customized by the user. Here we see the tab Onsite List. The contents of this tab look very similar to the actual contents of the Onsite List - such that it is split into two list views with the top being used for Visitors and the bottom for Other Entities. Within the Onsite List tab, the user is able to control the columns that will appear in the Onsite List window as well as control the name and width of each column. Each list view is comprised of three columns: Item, Header Value, and Width. Item The Item column indicates the property whose value will be displayed in the Onsite List. Header Value The Header Value column specifies the name given to the column being added/edited/deleted. Width The Width column specifies how wide (in pixels) the column will be in the Onsite List window. For the visitors list, the following values get added by default whenever the BadgePass Client software is installed: Visitor Full Name [First Middle Last] (Name) Action Date / Time (Check-In Time) BadgePass Entity Type Value (Contact Type) Contact Full Name (Contact Name) QuickPass Number (QP #) For the other entities list, the following values get added by default whenever the BadgePassClient software is installed: Entity Name (Name) BadgePass Entity Type Name (Type) Action Date / Time (Check-In Time) Action Source Name (Check-In Source) The order in which the columns will appear in the Onsite List can be controlled by utilizing the Up and Down arrow buttons found adjacent to each list view. See the example below: Select the item you want to move in the list. Next, click the up or down arrow. Now the Current Location item has been moved up in the list and will appear to the right of the Name column in the Onsite List window. To move an item down in the list, simply reverse the steps listed above. NOTE: If an item cannot be moved up or down the list, the respective arrow button will be disabled. If you would like to add a new item to either one of the lists, simply click the respective Add button below that list. The following is an example of adding an item to the visitor list. After pressing the Add button, the user is presented with the following window: Then choose your desired property from the drop down list. In the image below, we have chosen Campus Location Name. Next, enter a value for the header and the column width. Then once you are satisfied with your choices click the OK button. At this point you will see the newly added item at the end of your list. At this point your newly added item can be edited or deleted. If you would like to edit your item, you can do so by clicking the Edit button that is adjacent to the Add button you previously clicked. Upon clicking the Edit button, the user will be presented with a window similar to the one that is presented whenever the Add button is clicked. However, all of the fields will be set to those values that were previously set. Here the user can make any changes that are necessary. Below is an image of the window after our “Campus Location Name” item has been edited: Then once you are satisfied with the changes you have made, click the OK button. At this point you will see newly edited item in your list. If you would like to delete your item, you may do so by clicking the Delete button that is adjacent to the Edit button you clicked. See the image below: At this point, the user will be prompted to confirm the deletion of this item. If you are sure that you would like to delete the item, then press Yes. Otherwise, press No. Below are some sample images of what the Onsite List looks like after having added an item and editing the order of the list. No visitors in the Onsite List With one visitor in the Onsite List Visitor Info Tab Approved Visitors Visitor Manager allows you to approve certain visitors for a contact person or place. For example, you can approve a student’s parents to visit them. When a visitor is approved, then the contacts that they are approved for will automatically be entered in the Define Visit section of the Visitor Manager when that visitor is selected. To add an approved visitor, click on the Approved Visitors button on the Visitor Info tab. In the Visit Contacts section, search for the contact to which you want to add an approved visitor. Select that contact from the list. At this point you will see any approved visitors that already exist for the contact in the Approved Visitor section at the bottom of the window. If the visitor that you want to set as approved is not in the list, click the Add button. In this window you will search for the visitor that you want to add. When you have selected the correct visitor, click the OK button to return to the Approved Visitor window. You will now see that visitor is in the Approved Visitor list at the bottom of the window.If you want to remove an approved visitor, click the Remove button. When you are finished adding approved visitors, click the red X in the top right of the window to close the window and return to Visitor Manager. Visitor Information Visitor Manager allows you to view and edit a visitor’s information including addresses and phone numbers. You can also add visitors from the Visitor Manager. Click on the Visitor Information button on the Visitor Info tab. If no visitor is selected in the Visitor Manager, the window will be blank. However, if there is a visitor selected in the Visitor Manager, that visitor’s information will be loaded in the Visit Information window. In the Visitor section at the top of the window, you can add a new visitor by clicking on the Add button. Fill out the Add Visitor form and click OK to add the visitor. When you return to the Visit Information window, the newly added visitor will be selected. To edit an existing visitor, click the Edit button. This will display the same window as above, but the visitor’s information will be loaded and you will be able to edit any details necessary. You can also delete a visitor from the Visit Information window by clicking the Delete button. The bottom section of the Visit Information window lists the Addresses and Phone Numbers for the selected visitor. You can follow the same process listed above to add, edit, or delete the visitor’s addresses and phone numbers. Fill out the form above to add or edit a visitor’s address. Please specify if this address is the primary address for the visitor by checking the Primary Address checkbox at the bottom. Fill out the form above to add or edit a visitor’s phone number. Please specify if this phone is the primary phone for the visitor by checking the Primary Phone checkbox at the bottom. When you are finished with the visitor information, click the OK button to close the window and return to the Visitor Manager. Ban Visitor Banning a visitor prevents them from being admitted through the Visitor Manager. To ban a visitor, search for and select the visitor. Go to the Visitor Info tab and click on the Ban Visitor button. The following window will appear: If you want the visitor to be banned from all locations and entities then leave the Ban from All Entities check box checked. However, you can ban a visitor from specific locations or people by unchecking the Ban from All Entities check box. Once you uncheck the Ban from All Entities box and click the Add button, the window below will appear: From here you can choose the entity you wish to ban the visitor from. In this window you can search for an entity by choosing the type as well as entering the partial or exact values in the entity name fields. If the name you entered is a valid entity, the OK button will be active. After you click OK the entity value will appear in the lower window. Next, type a comment or reason why the visitor is banned and click the OK button. After clicking OK a window will pop up asking if the visitor being banned tried to enter the facility. If the user clicks Yes then a “Deny Access” entry in the visit history will automatically be added. If you attempt to check the visitor into a banned location or associate the visitor with a person they have been banned from you will see a banned message in the status section of the visitor manager screen. To remove the ban from the visitor, simply click the Remove Ban button in the screen above. Identity Manager Entity Screens Depending on what your permissions are set to in the BadgePass Management Console, you will see a tab for each entity that you have been given permissions to View. Below is what you will see if you have been given permissions to all entities Note: P1, P2, and Contractor in the bellow image are the names given to the three custom entities for this example. You will probably have different names for your custom entities. If there are no Form Layout items for an entity, then that entity will not show up. Badge Preview In this section on the Identity Manager screen the user will get a live preview of what a printed badge and or card would look like for any particular entity. These badge previews will vary depending on how the printing rules have been designated with the Printing Rules area found within the BadgePass Management Console. Entity Information The Identity Manager screen contains the fields that were selected in the BadgePass Management Console -> Clients -> Identity Manager -> Forms Layouts. (Refer to the BadgePass Management Console User Manual for details on selecting fields for the Identity Manager.) *The Active checkbox determines if the entity is set to Active in the BadgePass system. If you set the entity to not active, then the entity will be disabled as well as the entity’s card(if one exists). Example: The form layout in the management console looks like the image below for the screen shot above that shows the Employee tab as selected. Auto Type Assignment BadgePass associates an entity type (such as Employee) and a sub type (such as Full Time) to every entity. Each entity’s sub types are managed in the Management Console -> System Settings -> Database -> List Values. Since this is a requirement of BadgePass, if Type is included in Identity Manager, that field is required. If an entity only has one sub type, and Type is removed from Identity Manager’s Form Layouts for that entity type, then when adding or editing an entity of that type, the one and only sub type will automatically be assinged to that entity. For example, if Employee only has Full Time as a sub type, and Type is removed from Identity Manager, then creating a new Employee will automatially assign Full Time to that new Employee. Card Information NOTE: Both the Card Information and Security sections MUST be filled in before a card will work in the Access Control system. They can be filled in by different users with different security level at different times but the card will not work until both sections are filled out. This area allows for the creation of one or more cards associated with the selected entity. Each entity may have one active card of each card type. You can scroll between the card types by clicking the arrows. The card data types that are available are the ones that have been set to be associated with the selected entity type in the BadgePass Management Console->Access Control->Card Options (ex. Prox, Magnetic Stripe, MOCA). The Badge Number field contains the actual data on the card that is used to authenticate and authorize the associated entity in Access Control. The Pin Number field contains a pin code that can be used in substitution or addition to the entity card. Obviously, the pin number can only be used if you have an input device that supports pin codes. The Expiration Date denotes the day that the card will be set to inactive if that is a policy required by the customer. The Activation Date denotes when a card will become active in case a situation arises in which the card must be issued before the entity is to be allowed to use it. The Activate / Deactivate button (Deactiveate is shown in the image bellow) determines whether the selected card is active in the system. The New Card button creates a brand new card for the associated entity. If you set the Activation date to be in the future or the expiration date to be in the past, then when you save the entity, that card will be set to inactive. It will then be set to Active by the BadgePass Agent ( if that functionality is turned on from the Management Console ). If there is an activation or expiration date and the card is manually set to inactive by clicking the Deactivate button, then the activation and expiration dates will be cleared. Security This section allows for the creation of the associated entity’s username and password, as well as the assignment of group membership. Group membership determines the permissions for the associated entity’s card and username. Permissions for the group are assigned in the BadgePass Management Console. The Username is based on the contingencies set up in the Management Console -> Clients -> Identity Manager -> Username Generation. To generate a username, click on the Generate button. If you have not enabled automatic username generation, then the Generate button will not be visible and you will be required to enter one manually. Images This section is where you take the entity’s picture. Click on the Capture link and the image acquisition method that was set up in the Imaging section of the context menu will appear. Example: If you selected file input method then the windows explorer tree will open. If you selected the BadgePass Camera then its capture screen will appear. After taking or selecting the image the image crop box will appear. Size the crop box to the image size you want. Also you can double click in the area of the image where you want to center the crop box and the crop box will jump to that section. Notice that the image viewer on the right pane will show you the cropped image. As you move the crop box around, the cropped image box will change with the movement. Then click OK. Qualifications By default, this section is not visible within any of the entity tabs. Just like many of the other sections, it can be added to the entity’s form layout in the BadgePass Management Console at Clients -> Identity Manager -> Form Layouts. The list on the left will display all of the currently available qualifications, while the list on the left will display all of the currently selected qualifications for a specific entity. Below is a screenshot showing an example of this. It should be noted that as you add specific qualifications for an entity, they will be removed from the list of available qualifications. Likewise, when you remove qualifications for an entity, they will be added to the list of available qualifications. Also, if at any time the list of Epic Qualifications is re-imported into the BadgePass Management Console, the available qualifications will change. In the event that this happens, and you have an entity who has a qualification that is no longer in the system, when removing that qualification from the entity, it will not be added back to the list of available qualifications. Campus Mapping By default, this section is not visible within any of the entity tabs. Just like many of the other sections, it can be added to the entity’s form layout in the BadgePass Management Console at Clients -> Identity Manager -> Form Layouts. This new feature allows the user to now specify the campus or campuses that a particular entity can be associated with. By specifying a campus for a particular entity, that entity will only be visible in Visitor Mangers that have been given install locations that are on the same campus or campuses that have been added. To add a campus or campuses, simply click the Add button. At this point you will be presented with the Add Campus window that will have a list of all campuses in a drop down list. If you need to add more than one campus, you will have to do so one at a time. Time Manager By default, this section is not visible within any of the entity tabs. Just like many of the other sections, it can be added to the entity’s form layout in the BadgePass Management Console at Console at Clients -> Identity Manager -> Form Layouts. To designate this entity as a Manager, Time Editor, or Payroll Administrator click the corresponding check box. To set a manager for the entity, click the search button next to the manager text box. On the Entity Search window, type in a last and or first name and hit search or enter. This will search for all entity types ( employee, person1, etc…) and perform a like search. So a search with “J” in the lastname field will return all entities of any type whose lastname starts with J. If you need to remove the manager for an entity, then hit the clear button. All of these settings will not take effect until the Save button is clicked for the entity in the Identity Manager Ribbon menu. Payroll By default, this section is not visible within any of the entity tabs. Just like many of the other sections, it can be added to the entity’s form layout in the BadgePass Management Console at Console at Clients -> Identity Manager -> Form Layouts. This allows you to assign a payroll code to an entity. Ribbon Buttons All the ribbon buttons will act the same for all the entity tabs in the Identity Manager. Entity Data Buttons New Button The New button clears all of the fields on the currently selected tab and allows for a new entity to be created. Save Button The Save button saves the information for the currently selected entity. If the entity is a new entity that was initialized by clicking on the New button, then save will create the entity with the specified information. If the entity already existed and was obtained through a search, then the save will replace the entity’s old information with the current information. Finish Button The Save button will say Finish instead of Save when the “Save Data in Identity Manager” option is set to Off for the current entity type. This is done from the context menu under Settings->Client Behavior setup. Search Button The Search button allows for you to search for entities of the type of the currently selected tab. Leaving all the fields blank and hitting search will return ALL the records in the database. This could be very resource consuming if your database has a large number of records in it. It could potentionally cause timeouts if there is too much data. This is more common but not limited to when you have upper thousands and tens of thousands of records. Clicking the Search button will bring up the search screen as shown below. This screen allows for you to search by a single piece of criteria(ex. Last name) or combination of criteria(ex. First Name, Last Name, ID Number). The fields that show up here are determined in the management console. (Refer to the BadgePass Management Console User Manual for details on selecting search fields for the Identity Manager). Also, the searches that are performed are always wildcard searches. For example, if you search with a Last Name criteria of “Ard”, it will return all results that start with a Last Name of “Ard.” Such results might be “Ardent”, “Ardountillas”, etc. Delete Button The Delete Button allows the deletion of an entity, which is dependent upon the proper permissions. One must be aware of the fact that there are ramifications involved to any feature that depends on the individual record being deleted. It should only be done with that understanding foremost in the user’s mind. Making the entity inactive preserves the data and allows for an easy reactivation if the entity should need it for a re-hire or another, similar, situation that would require the entity to be used in the system again. Clear Button The Clear button clears all current search results and all current fields. Card Actions Buttons **A save is done automatically when you press the Print or Print All buttons. The Print Button sends the associated card to the printer. The card design that will print is determined in the Management Console -> Client -> Identity Manager -> Printing Rules section. (Refer to the BadgePass Management Console Users Manual for more details about Printing Rules). The Print All button sends all the presently queried records to the printer. The Read Card button will get prox or smart card card information from a stand alone reader. (Only works with MOCA cards in version 3.1) Entity Navigation Buttons The navigation buttons include First, Previous, Next and Last buttons. The navigation buttons only apply if there are multiple results from a search. The First button will go to the first record in the queried record set. The Previous Button will navigate to the record immediately before the current record. The Next Button will navigate to the record immediately after the current entity record. The Last button will go to the last record in the queried record set. Time Manager This is a new module like Visitor Manager and Identity Manager that can be installed along with the BadgePass Client. This is a time tracking module. It will allow an entity of any type to Clock-In and Clock-Out with BadgePass. Reports and Exports can then be generated to view the time card data. You can also designate managers who have certain permissions to edit and approve the time cards of certain individuals. This will be configured from within Identity Manger. Each entity can now be assigned a payroll code, a department, and a manager. Each entity can also be designated as a Manager, a Time Editor, or a Payroll Administrator. A Manager can edit and approve time for anyone they manage. A Time Editor can edit and approve time for anyone in their own department. A Payroll Administrator can edit and approve time for anyone in the system. Time Agent The Agent runs in the systray whenever BadgePass Client is running. Clock ins and outs require the entity to have a valid smart card assigned to them. To clock in or out, an entity will read their card at a BadgePass Client that has a smartcard reader configured. It will display the current time and a button for Clock In and a button for Clock Out. Click the correct button according to whether you want to clock in or out. This will cause the event system Clock-In or Clock-Out to be fired. Time Management Console Open the Time Management Console by clicking on the Time Management Console menu item in the BadgePass Client system tray menu. In order for the Time Management Console to be available, you must check the option for it in the installer ( BadgePass Server or Client ). In addition, you must have assigned permission to the logged on user’s group from within the Management Console. To search for time data, set a start date and an end date for the range of time to search for. After you set the second value, it will perform a search and list all of the people who clocked in or out during that data range. To add a person who does not already have a clock in / out to the list for the indicated date range, click the Plus button located along with the Start and End date range menu bar. This will open a window prompting for the entity to add. Start typing the Last, First Middle Name and the list of entities with matching properties will be displayed. You can filter the list by changing All to a particular entity type (such as Employee). Select the entity and click OK. The window closes and the entity is added to the list with a default clock in / out. Select an entity in the left to display the data on the right. The data on the right in the time card is divided into dates. Each date then has items that are paired clock in and outs. If there is missing information it will be highlighted in red. This would most likely occur if someone forgot to check out at the end of their shift, then checked in again at the beginning of the next shift ( missing check out ). The system adds the missing check out for you, however you will have to assign it a location and set the time before you can approve the time card. It is possible for a clock in / out time to span multiple days. In this case, there will exist a Clock in / out for each day, the first day’s clock in will be editable, and the last day’s clock out will be editable. All the days inbetween will be displayed, but not editable. If you need to add time to a day that is not listed on the time card, click the add button at the bottom. If you need to add a clock in/out pair to a day that is already listed, click the Add Time hyper link beside the day. You can delete clock in/out pairs by clicking the X button next to them. You can delete a whole day by checking the checkbox at the top right of the day and then clicking the delete button at the bottom. Any clock ins or outs that are added manually will not cause the Clock-In or Clock-Out event system event to fire. Approval of a timecard is done by someone designated as a Manager/Time Editor/Payroll Administrator ( see above ). Once a time card is set to approved, you cannot un-approve it. However if you add a new clock in/out pair or time to a new day, it should set itself to unapproved. The Approve button approves only the currently selected time card. The Approve All button approves all of the timecards for every entity listed in the left side on the window. These buttons will only be enabled if the timecard for the selected entity ( for Approve ) and for all of the searched entities ( for Approve All ) are valid and have no missing information. The Export button will export the timecards for the currently searched for entities. It will display a save as dialog so you can specify the file location and name. It will format the data according to what fields you specified per entity type in the Management Console (see above). If you have an entity searched for, but you have not set up the export configuration for that entity type in the Management Console, the export will succeed, but the information for that entity will be missing from the file. There is a Reports button that will open reporting. An event in the Event System has been added for each entity type for Clock In and Clock Out ( Employee Clock In, Person 1 Clock In, etc ). These will be fired when an entity performs a clock in or out by clicking the corresponding button from the Time Agent. The specific roles ( Manager/Time Editor/Payroll Administrator ) are user based. The current user is obtained when BadgePass Client starts and the user logs in with BadgePass Security or with Active Directory security the client gets the currently logged in active directory user. That user is then referenced in the database to get the corresponding entity ( employee, person1, etc ) that owns that user. This entity record hold the flags for determining if they are a Manager/Time Editor/Payroll Administrator. This means that now when using Active Directory security, you will have to create a connection between the logged on AD user and a BadgePass entity. When you perform a search on a date range in the Time Management Console if the logged on user’s associated entity is a Manager, they will get back all of the people that they directly have been set to be a manager of in the Identity Manager. If they are a Time Editor, they will get back all of the people that are in their department. If they are a Payroll Administrator, they will get back all of the people that clocked in or out during that time range regardless of department or manager. Active Directory Search and Integration Active Directory integration is now built into the BadgePass core system. You no longer need the active directory snap in or the Directory Sync application. However, you can still use these if you like in addition to the built in functionality. In Identity Manager, Active Directory can be searched to add a new entity or add data or create a connection to Active Directory for an existing entity. Click the Active Directory search button in the Identity Manager Ribbon: you will see a search window with first name and last name fields. You can search by first or last and it performs a like search. So J in the last name field will return all entities of every type whose last name starts with J. After you choose the active directory user that you want to link to in the search window, it will fill out Identity Manager with the fields that were mapped in the Management Console. When you click save, it will save the new or modified entity along with the mapping to the selected Active Directory user. You can still assign a badgepass user and group membership from the Security section in Identity Manager if that will be used in a different part of the system. External DataSync Search External Datasync Search allows a button to be clicked from the Identity Manager to immediately search for and save entities from external sources. All connection and mapping information to the source data is setup in a DataSync profile. Setup External search can be setup both from the Management Console and from the Client. Settings in the Management Console will be applied globally to all clients. Settings done from a client, will override any settings done in the Management Console and will only be applied to that one client. Data Sync Configuration Utility Only profiles that are saved to the BadgePass Server can be used in the Datasync search. In the Data Sync Configuration Utility, click the settings button Server option under Save all Settings on: . Click the BadgePass Management Console Under Client->Identity Manager->External Search, you will be able to enable or disable the datasync search functionality for each entity. You can also specify the text that will appear on the button in Identity Manager and which datasync profile should be used to obtain the connection and mapping information. BadgePass Client Click the SysTray icon for BadgePass Client. Under Settings->External Search. You will get the same options that are listed above in the Management Console. These settings override the Management Console Settings. Running External Search Identity Manager If you have enabled the Data Sync Connect for the current entity type in Identity Manager, there will be a button in the ribbon. Click the button to search the external source. You will see a search window with all of the fields that have both been set to searchable in the Management Console form layout setup and that have been mapped to a field in the source data when setting up the Data Sync profile. Type in your criteria ( this will perform a “like” search, so you can just type in the first letter, etc ). Click Search. If only one record is found that matches the criteria, that record will be inserted into the database and then pulled up in Identity Manager. If more than one record exists that matches the search criteria, you will get an entity choice window. You can select one or more records by holding down the control or shift key. Click OK. Those records will be inserted into the database, then pulled up in Identity Manager. Events If you have events enabled in the Data Sync configuration utility for the profile, then when you search for an entity with the external search, you will get an entity inserted, card enabled, etc event that happens before the entity is pulled up in Identity Manager. If you then make a change in Identity Manager, such as capturing an image, and save, you will get another entity edited event. Common Features All the ribbons now collapse to a menu bar. Many of the windows are now maximizable.