1
SmartCAM
Installation Guide
for
All SmartCAM 2015
Applications
© 2004-2015, SmartCAMcnc
1144 Gateway Loop Ste 220
Springfield, OR 97477-7750 USA
All Rights Reserved.
The information and the software discussed in this document are subject to change without notice and should not be
considered commitments by SmartCAMcnc.
No part of this work may be reproduced or transmitted in any form or by any means, electronic or mechanical, for any
purpose without the express written permission of SmartCAMcnc.
The software discussed in this document is furnished under a license and may be used or copied only in accordance with the
terms of this license. All warranties give by SmartCAMcnc as to the software and documentation are set forth in the
SmartCAMcnc Software License Agreement, and nothing stated in, or implied by, this document or its contents shall be
considered or deemed a modification or amendment of such warranties.
Software License Notice
Your license agreement with SmartCAMcnc, which is included in the SmartCAM Installation Guide, specifies the permitted
and prohibited uses of the product. Any unauthorized duplication or use of SmartCAM in whole or in part or in any other
storage and retrieval system is prohibited.
Export
User agrees that this document will not be exported (or re-exported from a country of installation), directly or indirectly,
separately or as part of a system, without user or user’s employer, at its own cost, first obtaining all licenses from the United
States Department of Commerce and any other appropriate agency of the United States Government as may be required by
law.
License and Trademarks
SmartCAM and CAM Connection are registered trademarks, and SmartCAM Production Milling, SmartCAM Advanced
Milling, SmartCAM FreeForm Machining, SmartCAM Production Turning, SmartCAM Advanced Turning, SmartCAM
Advanced Fabrication, SmartCAM Advanced Wire EDM, SmartCAM Visual Customization Toolkit, and SmartCAM CAMCAD
Standard are trademarks of SmartCAMcnc, which holds the exclusive rights to their use.
All other trademarks or registered trademarks belong to their respective holders.
Published: Apr 2014
SmartCAM Installation Guide
II
SmartCAM Software License Agreement (SLA)
Use of SmartCAM® software programs (Software) are subject to the terms and conditions of the Software License
Agreement (SLA).
By downloading and installing the software, or otherwise using the Software, you agree to be bound by the terms of the SLA.
Grant of License
SmartCAMcnc, LLC ("SmartCAMcnc"), grants the original purchaser ("Licensee") the limited rights to possess and use the
SmartCAMcnc, LLC Software and User Manual ("Software"), on the terms and conditions specifically set out in this License.
Purchases of Software License
When purchased the customer has purchased a License to use the SmartCAM Software. The Software is owned and
remains the property of SmartCAMcnc, LLC., is protected by international copyrights, and is transferred to the original
purchaser and any subsequent owner of the Software media for their use only on the License terms set forth below. Opening
the packaging, downloading and/or using SmartCAM indicates your acceptance of these terms. If you do not agree to all of
the terms and conditions, or if after use you are dissatisfied with the SmartCAM Software, remove all SmartCAM related
software from your systems, and return the Software, manuals and any partial or whole copies within sixty days of purchase
to the party from whom you received it for a refund, subject to our restocking fee.
Temporary Trial Usage Software
When granted, permission is given to use the SmartCAMcnc Software for a time limited to the length of the temporary
license key provided by SmartCAMcnc. The Software is owned and remains the property of SmartCAMcnc, LLC., is
protected by international copyrights, and is offered for temporary use only on the License terms set forth below. Opening
the packaging, downloading and/or using SmartCAM indicates your acceptance of these terms. If you do not agree to all of
the terms and conditions, or if after use you are dissatisfied with the SmartCAM Software, return any hard copy software,
manuals or other materials immediately to SmartCAMcnc, and/or remove all SmartCAM related software from your systems.
License
This License permits you to use one copy of each version of SmartCAM Software for each license acquired. The Software
may be placed on a network server under the condition that Licensee agrees to provide technical or procedural methods to
prevent use of the Software by more than one user per license authorized. Installation of the Software onto a network server
for the sole purpose of distribution to other computers is not 'use'.
If the Software is an UPGRADE you may use or transfer the Software only in conjunction with the prior version(s) of the
Software.
One machine-readable copy of the Software may be made for BACK-UP PURPOSES ONLY, and the copy shall display all
intellectual property notices, and be labeled externally to show that the back-up copy is the property of SmartCAMcnc, and
that its use is subject to this License. One copy only of the Software Documentation in whole or part may be copied.
Use of the Software by any department, agency or other entity of the U.S. Federal Government is limited by the terms of the
attached "U.S. Rider for Governmental Entity Users", which is incorporated by reference into this License.
In some circumstances, SmartCAMcnc may AT ITS DISCRETION transfer the License rights to another party PROVIDED
that the party to whom such rights are transferred agrees to the terms and conditions of this License; a license transfer fee
may apply. Contact SmartCAMcnc for information regarding software transfers.
Except as expressly provided in this License, Licensee may not use, copy, disseminate, modify, reverse engineer, distribute,
sub-license, sell, rent, lease, lend, give or in any other way transfer, by any means or in any medium, including
telecommunications, the Software. Licensee will use its best efforts and take all reasonable steps to protect the Software
from unauthorized use, copying or dissemination, and will maintain all intellectual property notices intact.
Terms
This License is effective as of the time Licensee receives the Software, and shall continue in effect until Licensee ceases all
use of the Software and returns or destroys all copies thereof, or until automatically terminated upon the failure of Licensee
to comply with any of the terms of this License.
SmartCAM Installation Guide
III
LIMITED WARRANTY
SmartCAMcnc warrants the Software media to be free of defects in workmanship for a period of ninety days from purchase.
During this period SmartCAMcnc will replace at no cost any such media returned to SmartCAMcnc, postage prepaid. This
service is SmartCAMcnc's sole liability under this warranty.
DISCLAIMER
LICENSE FEES FOR THE SOFTWARE DO NOT INCLUDE ANY CONSIDERATION FOR ASSUMPTION OF RISK BY
SmartCAMcnc, AND SmartCAMcnc DISCLAIMS ANY AND ALL LIABILITY FOR INCIDENTAL OR CONSEQUENTIAL
DAMAGES ARISING OUT OF THE USE OR OPERATION OR INABILITY TO USE THE SOFTWARE, OR ARISING FROM
THE NEGLIGENCE OF SmartCAMcnc, OR ITS EMPLOYEES, OFFICERS, DIRECTORS, CONSULTANTS OR DEALERS,
EVEN IF ANY OF THESE PARTIES HAVE BEEN ADVISED OF THE POSSIBILITY OF SUCH DAMAGES.
FURTHERMORE, LICENSEE INDEMNIFIES AND AGREES TO HOLD SmartCAMcnc HARMLESS FROM SUCH CLAIMS.
THE ENTIRE RISK AS TO THE RESULTS AND PERFORMANCE OF THE SOFTWARE IS ASSUMED BY THE LICENSEE.
THE WARRANTIES EXPRESSED IN THIS LICENSE ARE THE ONLY WARRANTIES MADE BY SmartCAMcnc, AND ARE
IN LIEU OF ALL OTHER WARRANTIES, EXPRESSED OR IMPLIED, INCLUDING BUT NOT LIMITED TO IMPLIED
WARRANTIES OF MERCHANTABILITY AND OF FITNESS FOR A PARTICULAR PURPOSE.
THIS WARRANTY GIVES YOU SPECIFIED LEGAL RIGHTS, AND YOU MAY ALSO HAVE OTHER RIGHTS WHICH VARY
FROM JURISDICTION TO JURISDICTION. SOME JURISDICTIONS DO NOT ALLOW THE EXCLUSION OR LIMITATION
OF WARRANTIES, SO THE ABOVE LIMITATION OR EXCLUSIONS MAY NOT APPLY TO YOU.
General
This license is the complete and exclusive statement of the parties' agreement. Should any provision of this License be held
to be invalid by any court of competent jurisdiction, that provision will be enforced to the maximum extent permissible, and
the remainder of the License shall nonetheless remain in full force and effect. This License shall be controlled by the laws of
the state of Oregon, and the United States of America.
SmartCAMcnc
1144 Gateway Loop Ste 220
Springfield, OR 97477-7750 USA
Tel: 541-344-4563
Fax: 541-683-4795
http://www.SmartCAMcnc.com
SmartCAM Installation Guide
IV
Table of Contents
Introduction............................................................................................................................ 1
Typographic Conventions .................................................................................................................................... 1
Technical Support ................................................................................................................................................ 1
Before Installing Your SmartCAM Applications.................................................................. 2
System Requirements ......................................................................................................................................... 2
‘Administrator’ Installations .................................................................................................................................. 3
Windows Permissions.......................................................................................................................................... 3
User Access Control (UAC) ................................................................................................................................. 4
Adobe Acrobat Reader ........................................................................................................................................ 4
Installing your SmartCAM Applications .............................................................................. 5
Installation Overview............................................................................................................................................ 5
Attention Existing SmartCAM Users – SmartCAM Paths .................................................................................... 5
Internet Access .................................................................................................................................................... 6
Standard Installation Buttons ............................................................................................................................... 6
Installing the Applications .................................................................................................................................... 6
Download the Installation from the SmartCAMcnc Web Page ............................................................................ 6
Run the Installation Executable ........................................................................................................................... 7
Follow the Instructions Provided by the Installation Windows ............................................................................. 8
Starting Your Trial Software................................................................................................................................. 9
Request your Long-term License Key ............................................................................................................... 10
License your Application .................................................................................................................................... 12
Run the Application............................................................................................................................................ 13
Post Installation Activities .................................................................................................................................. 13
Troubleshooting SmartCAM Installations ......................................................................... 14
SmartCAM Installation Guide
V
Introduction
This guide contains installation instructions for SmartCAM products.
Typographic Conventions
The following typographic conventions are used throughout this guide and other SmartCAM
manuals.
Convention
Used for
Bold
Menu and command names; also buttons. For example, Select
File—Run and choose the File Select button.
Courier
Filenames and directories. For example, Open the
SmartCAMcnc.ini file.
Courier bold
Anything that you must type exactly as it appears. For example,
Type a:\setup.
Courier italic
Placeholders for information you must provide. For example,
application.ini signifies that you must substitute the name of
the application you are installing (pmill.ini).
Technical Support
If you need technical assistance with your SmartCAM product, you can contact SmartCAMcnc
Technical Support using the following website link:
http://www.SmartCAMcnc.com/Technical_Support/support_email.php
Long-term license keys are requested using a specific page on the SmartCAMcnc website. Use
the following URL and follow the prompts to request your long-term keys.
http://www.smartcamcnc.com/KeyPurch/keyrequest_sma_msg.php
Additional information is available on the SmartCAMcnc Web page:
http://www.SmartCAMcnc.com/KeyPurch/keypurch_home.php
SmartCAM Installation Guide
1
Before Installing Your SmartCAM Applications
System Requirements
Verify that your computer meets the following minimum system hardware and operating system
requirements before proceeding with your installation. SmartCAM applications may function on
systems that do not meet the minimum requirements, but these configurations are not supported.
For optimum performance, your system should satisfy the recommended configuration.
Operating System
SmartCAM is supported on the following 32- or 64-bit operating systems:
•
•
•
Microsoft® Windows 8® Professional (Note: runs as a desktop application, not as a
Windows 8 Metro application)
Microsoft® Windows 7® Professional
Microsoft® Windows Vista® Business
The SmartCAM applications may function properly on older Windows Operating Systems,
such as Windows XP, Windows 95/98/ME, Windows NT 4.x, but SmartCAMcnc will not
be able to support systems running in these configurations.
Processor
Recommended: Intel Core I7, Intel Core I5, Intel Pentium® IV or AMD Athlon® XP, Intel
Dual Core or Higher
Minimum: Intel Core I3, Pentium® IV, or Athlon® XP
Physical RAM Memory
Recommended: 2 Gb or greater
Minimum: 128 Mb
Best performance comes from meeting or exceeding the memory requirements for the
operating system.
Available Hard Disk Space
Minimum: 90 Mb for installation for each SmartCAM NC application. Combined data
translators take 180 MB.
Note: Data files created in SmartCAM require approximately 0.5 to 5 Mb storage space
per part.
Predator CNC Editor for SmartCAM: 90 Mb
SmartCAM Installation Guide
2
Video Display
Recommended: 1280x1024 display resolution with True Color, 256 Mb of display RAM;
Hardware-accelerated OpenGL v1.2 (or higher)
Minimum: 1024x768 display resolution with True Color, 32 Mb of display RAM;
Hardware-accelerated OpenGL v1.2 (or higher)
Note: Problems have been reported running SmartCAM using some motherboard
embedded video chipsets. A separate video adapter is recommended.
Network Card
A Network Interface Card (a.k.a. Ethernet or NIC card) or motherboard embedded with
NIC is required. The network card does not need to be attached to a network, but it must
be enabled and active.
Devices
Minimum: Windows Mouse and Keyboard
3DConnexion SpaceNavigator/SpaceBall series of 3D mice supported. Not required.
Note: Digitizers must be configured as a mouse.
‘Administrator’ Installations
We do not recommend installing SmartCAM while logged into Windows using the ‘Administrator’
account. Instead, install using the log in account of the person that will be running the application.
It is sometimes very helpful for the account being used to install the product to temporarily include
administrative privileges. The installation may need to install some support run-time DLL files,
which are installed in Windows Side-by-Side installation directory. This directory often requires
administrative privileges to modify.
The reason not to use the “Administrator” account to install the products is that after the
installation is complete, the files are owned by the administrator and regular user accounts may
not be able to access them.
If you are required to install applications as Administrator or do so accidentally, please reference
the following SmartCAM Technical Bulletin which explains what is required to resolve any related
issues.
www.SmartCAMcnc.com/Technical_Support/Tech_Bulletins/techbulletin.php?tbnum=207
Windows Permissions
The SmartCAM installation will install the application using ALLUSERS administrative
permissions. This allows the SmartCAM installation to place the Start menu shortcuts in the All
Users group, making them visible to all users on the given computer.
The SmartCAM installation requires that the person running the installation have adequate
permissions or the installation will display an error and stop. Check with your system
administrator to verify adequate permissions before running the installation.
SmartCAM Installation Guide
3
To perform a standard SmartCAM installation, the user running the installation must have
permissions to perform the following actions:
•
•
•
•
•
Create and remove subdirectories; in local folders as well as Windows maintained Program
Files and ProgramData or User folders.
Copy, replace, delete, and edit files into user-created directories.
Copy, replace, delete, and edit files in the Windows root and System directories.
Create, update, and delete Start Menu shortcut group folders.
Create, update, and delete Windows Registry keys.
User Access Control (UAC)
Windows includes a security feature called User Access Control (UAC). With the UAC enabled,
you may be prompted whether or not you really meant to run the SmartCAM setup installer.
Answer Yes to this prompt.
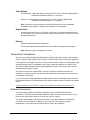
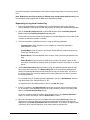
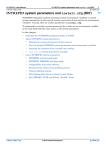
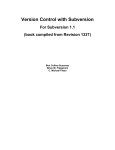
Occasionally, there is a conflict between the SmartCAM installer and the Windows UAC. When
this conflict happens, you will see an error message similar to the following:
If you receive an error similar to this, you temporarily need to disable the UAC. This is a simple
process.
1. Open Windows Control Panel
2. Select User Accounts from the Control Panel tasks
3. From the User Accounts, ‘Make changes to your user account’ page, select ‘Turn User
Control on or off.’
4. From the ‘Turn on User Account Control (UAC) to make your computer more secure’ page,
deselect the check box for ‘Use User Account Control (UAC).
This change will require a reboot.
Once the reboot is complete, you can install your SmartCAM applications.
When you are finished installing the applications, repeat the steps to re-enable UAC.
Adobe Acrobat Reader
SmartCAM uses the Adobe® Acrobat Reader to display and print the SmartCAM online manuals.
If you do not have Adobe Acrobat Reader installed, trying to view the SmartCAM online manuals
will display an error that ‘Windows cannot open this file.’
You can download the latest free Adobe Acrobat Reader from the Adobe Systems Incorporated
Web site. http://www.adobe.com
SmartCAM Installation Guide
4
Installing your SmartCAM Applications
Please read the installation instructions carefully before proceeding with the application
installation. By reviewing and understanding the installation process you keep the installation as
smooth and trouble free as possible.
Before you can run your SmartCAM applications, you must enter a valid license key.
Installation Overview
The installation process is very straightforward. The installation process consists of the following
high-level steps.
•
•
•
•
•
•
Download the installation from the SmartCAMcnc website.
Run the installation executable.
Follow the instructions provided by the installation windows.
Request your long-term license keys.
License your application using the supplied License Manager utility.
Run the application.
Attention Existing SmartCAM Users – SmartCAM Paths
When running the SmartCAM installation it is highly recommended that you accept the default
paths for the SmartCAM, configuration files, and temporary directories.
Do not mix current and previous SmartCAM major release versions in the same directory
structure, as this may cause applications to fail. It is permissible, and recommended, that minor
releases of the application, where the major version number does not change, be installed in the
same directory as other releases with the same major version number.
The default paths are:
SmartCAM directory tree
SmartCAM Common files
directory
SmartCAM User Configuration
files directory
SmartCAM Unversioned files
Directory
SmartCAM Temporary files
directory
C:\Program Files\SmartCAM\SmartCAMv2015\
C:\ProgramData\SmartCAM\SmartCAMv2015\
C:\ProgramData\SmartCAM\SmartCAMv2015\SCUSER\
C:\ProgramData\SmartCAM\Common\
C:\ProgramData\SmartCAM\SmartCAMv2015\TEMP\
Note: The Common files directory is used as the starting path for the User Configuration and
Temporary files directories. The Unversioned files directory is a location for shared SmartCAM
files that are often customized, the folder is outside of the Versioned (meaning,
…\SmartCAM\SmartCAMv###\) folder, as they are often shared between releases of the
product.
On 64-bit versions of Windows, the \Program Files folder is named \Program Files
(x86).
SmartCAM Installation Guide
5
Internet Access
Internet access and email are required to download the SmartCAM application installation
packages, obtain long-term license keys, and for primary technical support for the applications.
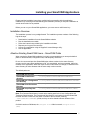
Standard Installation Buttons
The installation windows and messages that are displayed during the product installation may
vary depending upon the Installation Type selected and the product being installed. However, all
of the installations will operate in a similar fashion. There are some common controls that will
appear on all the installations.
These common buttons are:
•
•
•
•
< Back moves backwards one step in the installation.
Next > moves forward one step in the installation.
Cancel stops the installation, removes the files installed to that point, and exits.
Finish after the installation is complete, this button exits the install.
After the installation is complete, you will need to request and enter a long-term or temporary
license key before you can run your application.
Installing the Applications
Once launched the installation process is automated. After starting the installation you will be
guided by a series of SmartCAM Installation Wizard pages and, possibly, pop-up dialog boxes
and messages. These pages display current status for the installation, important information you
need to be aware of, and prompt for information required by the installation.
Before you begin the installation process, be sure to read Before Installing Your SmartCAM
Applications.
Close any running SmartCAM applications before running a SmartCAM installation.
Download the Installation from the SmartCAMcnc Web Page
Each SmartCAM application is contained in an executable file. To install an application, first
download the installation package from the SmartCAMcnc web site. If you do not delete the
application installation package, you do not need to complete this step again for subsequent
reinstallation or installing the application on multiple machines (if you have acquired the correct
number of seats for the machines you are installing it on).
View the SmartCAMcnc Web Page
Launch your Web browser of choice. When the browser has opened, display the SmartCAMcnc
website. The address for the website is:
http://www.SmartCAMcnc.com/
Display the Downloads Page
From the Web page menu, select the Technical Support, then Download SmartCAM. This
displays a Web page containing links to the currently available SmartCAM downloads. The
Downloads page is only accessible by those SmartCAMcnc customers with active Software
Maintenance Agreements (SMA) or that have recently purchased new software.
SmartCAM Installation Guide
6
http://www.SmartCAMcnc.com/Release/download.php
Before the Downloads page will be displayed, you will be prompted to enter your Customer ID
and Passcode. SmartCAMcnc, using your preferred contact method, provided your Customer ID
and Passcode. This notification may also include a temporary license key to allow you to run your
application while waiting for your long-term license key. Temporary license keys only work for a
limited duration, once they expire, your SmartCAM application will not function until you enter
your long-term license key.
Once this information is provided and verified, the Downloads page will be displayed.
Download and save the Installation Package
Find the application that you wish to install from the list of available downloadable installation
packages. Click on the entry for the product you wish to download. It will expand and show a
table of download links. Click on the appropriate application hyperlink to start the download
process.
You may be prompted to either Open the current file or Save it to disk. Select the option to save
the file to your computer. Make note of the location where you are saving the file and the file’s
name. The exact wording of these prompts varies depending upon the Web browser being used.
If prompted whether to save the installation file or run it, always pick “save.” Do not run the
installations directly from the web page.
Note: While it is may be possible to download and run any of the application installation
packages on this web page, you will need to provide application license keys before the
application will run. Therefore, it does not make any sense to download application installations
for products that you have not purchased, as you cannot run them.
Once the download is complete, you can move to the next step.
Run the Installation Executable
To start the actual installation process, simply run the application installation package or
packages that you just downloaded.
If you have purchased and downloaded multiple applications, do not run more than one
installation at a time.
To reduce the possibility of file sharing conflicts, it is suggested that you close all other running
Windows applications before starting the installation.
After the SmartCAM installation package is launched, it will briefly extract the files needed for the
install and then bring up the first SmartCAM Installation Wizard page. When the installation
Welcome page is displayed, move to the next step.
Note: The Predator Editor for SmartCAM installation is different from the other SmartCAM
product installations. The installation and uninstallation instructions for the Predator Editor vary
from version to version. There are special instructions for installing and uninstalling the editor. To
see these instructions, use your web browser and view the SmartCAMcnc download page. The
same web page used to download the editor installation.
After expanding the Predator CNC Editor for SmartCAM section of the web page, click on the link
that is labeled “Read these installation instructions …” The page that is displayed includes
information on how to handle the Predator Editor.
SmartCAM Installation Guide
7
Follow the Instructions Provided by the Installation Windows
The SmartCAM Installation Wizard pages and prompts may vary depending upon the application
being installed. Each page should contain enough information to make it clear what is needed.
In general, the installation will display the following pages:
Welcome
Displays what application is being installed.
License Agreement
Displays the SmartCAMcnc Software License Agreement. You must accept the terms of this
agreement before the installation can continue.
Customer Information
Contains prompts for general Customer information, enter the information requested.
Prerequisites
Depending upon how your Windows computer is configured, SmartCAM may need to install some
prerequisite files. These are support files required by the tools that SmartCAM uses to build and
run the applications. The installation will list the prerequisite installations that it needs; you will
need to let the installation install these files to continue. If the installation prompts to you reboot,
do so at the time it requests it; otherwise the installation will not continue. After rebooting the
installation will automatically continue again – check your Start menu (or equivalent) for a flashing
icon if you do not see the prompt to continue the installation. Windows sometimes minimizes the
request to continue the installation waiting for human input.
You may need to reboot multiple times, depending upon the files that need to be installed.
Setup Type
Select the type of setup to install.
•
Complete
This option installs the application with a minimum of user interaction. It will install all program
options and use defaults for all path information. This is the recommended option.
•
Custom
Allows you to select which options to install (if there are any). Also allows you to choose
destination paths and Start menu program group folder. This setup type is recommended for
advanced users only.
SmartCAM Directory
Accept or change the path for the main SmartCAM application directory. Displays the default
path, but allows you to change it. This page is only displayed if using a Custom setup type.
SmartCAM Common Files Directory
Accept or change the path for the SmartCAM common files directory. Displays the default path,
but allows you to change it. This page is only displayed if using a Custom setup type. This path is
used as the starting point for building the default User Configuration and Temporary files paths.
SmartCAM Installation Guide
8
SmartCAM Unversioned Shared Files Directory
Accept or change the path for the SmartCAM unversioned files directory. Displays the default
path, but allows you to change it. This page is only displayed if using a Custom setup type. This
path is used as the starting point for storing shared SmartCAM files that are not often updated.
The files may be edited by users, or more commonly used as templates for building your own
versions for extensive changes. Having the files outside of the normal, by version, SmartCAM
folders, means the files do not need to be manually copied after installing a new major release of
the product.
SmartCAM User Configuration Files Directory
Accept or change the path for the SmartCAM configuration or user files. Displays the default path,
but allows you to change it. This page is only displayed if using a Custom setup type.
Temporary Files Directory
Accept or change the path for the subdirectory used for temporary storage. Not all applications
will need this path. Displays the default path, but allows you to change it. This page is only
displayed if using a Custom setup type.
Program Folder
Accept or change the Windows Start menu Program Group folder. This is the folder name used
when opening the Windows Start menu and selecting All Programs. Displays the default folder
name, but allows you to change it. This page is only displayed if using a Custom setup type.
Select Features
Select which features to install. For example, may have options to install the Program files (the
executables), the Documentation files (the help and online documentation), and Sample files
(sample data). Can turn these options on or off individually. Only those items that have been
selected will be installed.
Not all SmartCAM application installations will include this Wizard page. This page is only
displayed if using a Custom setup type; the Complete setup type installs all features.
Ready to Install the Program
This is the last SmartCAM Installation Wizard page before your application files are actually
installed. Gives you the opportunity to use the Back button to move back through the installation
options and make changes.
Installation Complete
After the installation is complete, this SmartCAM Installation Wizard page is displayed. It signals
that the installation has successfully ended. Depending upon what is being installed, you may be
required to reboot your computer. If so, this page will include options to allow you to reboot
immediately or reboot later.
You will need long-term or temporary license keys to run the applications. Once the Installation is
complete move to the next step to start licensing your applications.
Starting Your Trial Software
If you are running a trial version of SmartCAM, you do not initially need to complete the remaining
steps for requesting a license key and installing it. When you started your trial, you were sent an
email containing an Access Code string or a trial license key file. These can be used to quickly
get your SmartCAM application running.
SmartCAM Installation Guide
9
•
Install your Application
Use the previous steps to download your SmartCAM application and run the installer.
•
Run the Application
After the installation is complete, run your application. After a few seconds, you will get a
warning that the application is not licensed. Close this warning message.
After closing the warning message, another window will open. The ‘Install License’ window
contains a text input field and two buttons. Depending upon whether you are using the
Access Code or already have a trial license key file, for this application and version, use one
of the two following steps:
•
Access Code
To use the Access Code method, you will need your access code; which was previously
emailed to you, and your computer will need Internet access.
Type your Access Code into the Code: input field. Then click on the Use Internet Access
Code button. SmartCAM will use the provided code and download and install your license
key. When the process is complete, you will be informed the license has been installed and
you can now start your SmartCAM trial.
•
License Key File
If you were sent a license key file for the trial, save the license key file to a location where the
computer being used for the SmartCAM trial can find it. Click on the Install New License File
button. This opens a standard Windows File Open dialog; browse to and select the license
key file you were provided. Open the file.
SmartCAM will import this license key file. When the installation is complete, a message will
be displayed that your key file has been installed. You can now start your SmartCAM trial.
Request your Long-term License Key
Each SmartCAM application requires a valid license key to operate. To activate your SmartCAM
license you must perform these tasks:
•
Install your Temporary Key
A temporary license key has been provided for your SmartCAM application. This temporary
key is included in the email from SmartCAMcnc that verifies your purchase or informs you of
a product update. This temporary key allows you to run the application for a short time while
your permanent key is being requested and provided.
•
Request a Long-term License Key
Use SmartCAMcnc Web-site ‘License Keys’ menu item to request your long-term license
keys; select the SMA Key Request menu item. You must request the keys before your
temporary license expires or your SmartCAM applications will cease to function – until you
can provide the long-term keys. Wait until your new purchase or SMA payment has been
received by SmartCAMcnc before requesting your long-term keys.
•
Install your Long-term License Key
Enable your long-term license key, when you receive it, by replacing the temporary license
key with the long-term key.
SmartCAM Installation Guide
10
Use the SmartCAM License Manager to enter license keys and generate a License Key request
form.
Note: NLM Server and Client licensing is different from standard SmartCAM licensing. See
the installation guide supplied with the NLM server installation package.
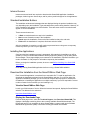
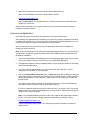
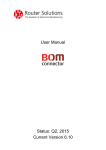
Requesting a Long-term License Key
1. Launch the SmartCAM License Manager from the SmartCAM program group. Run the
License Manager on the same machine that you plan on running your SmartCAM application.
2. Click on Create Key Request Form, or select File and then select Create Key Request
Form to open the Create Key Request Form dialog box.
The first line of text on the Create Key Request Form window displays the server code for the
computer on which the software is running.
3. Fill in the information requested on the form, using the following guidelines:
o
Company Name: Enter the name of your company as it should be displayed in
SmartCAMcnc’s records.
o
Contact Name: Enter the name of the primary SmartCAM user to whom the long-term
license key should be sent.
o
Email Address: The email address of the Contact. Used to send the generated license
keys.
o
Phone Number: Enter the phone number for the Contact. The phone number is only
used when SmartCAMcnc needs to reach the Contact for further information or to resolve
issues.
4. The Do Not Request Keys For list contains a list of all installed SmartCAM products that
have a long-term license key. The Request Keys For list is automatically populated with
entries for installed products that do not already have long-term license keys. The items in
the “Request Keys For” list will be added to the Licensing Request Form and have license
key strings generated.
To re-request a key for an existing licensed application, use the “< Add Selected” button to
copy the product to the “Request Keys For” list.
To request keys for all installed products, use the “<< Add All” button.
5. If there is a product in the Request Keys For list that you do not want to request a license
for; for example, a trial application that you have not purchased, remove it from the list and
add it to the Do Not Request Keys For list.
To remove a product select the product name and then click on the “Remove Selected >”
button. To remove all products, use the “Remove All >>” button.
6. When the information on the form is complete and correct select Save Form to save the
request form. A Save As dialog will open with the default path and filename the same as
displayed on the Create Key Request Form Filename status. If you wish to change the path
or filename, do so from this dialog box. Click Save to save the request form.
SmartCAM Installation Guide
11
7. Request your long-term license keys from the SmartCAMcnc Web site.
Open your Web browser and enter the SmartCAMcnc website:
http://www.SmartCAMcnc.com
Select “License Keys” from the Web site menu. Follow the instructions on the Web site to
request your license key.
After you have requested your long-term license key, you can continue with the next step to
enable your temporary license.
License your Application
Use these instructions to enter both your temporary and long-term license keys.
After installing your applications and submitting your license key request, complete the following
to enable your temporary key. This temporary key will allow the SmartCAM application to run, for
a short period, while your long-term key request is being processed.
After you receive your long-term license key, use these same instructions to update your
licensing to use the new keys.
Note: These instructions are to be used when licensing stand-alone products. If you are trying to
add licenses to a NLM License Server, please refer to the installation guide provided with your
NLM server installation.
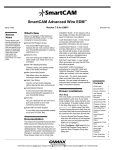
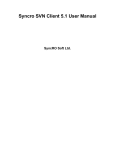
1. Launch the SmartCAM License Manager from the SmartCAM program group. Run the utility
on the same machine that you plan using to run your SmartCAM application.
2. The application displays currently installed products, version numbers, number of user seats,
and license expiration dates.
3. Your license key file was emailed to you. Save the key file (it should have a .LIC file
extension) to a local folder on your computer.
4. Click on the Install New License File button. A Open dialog box will be displayed. Using this
Open dialog, browse to and select the license key file you saved in Step 3. Select the license
key file (should have a .LIC file extension). And then click on the Open button to import the
license key file.
Your license key file will be imported. The Installed Products grid, in the License Manager,
will update to show the results of importing the license key file.
If you try to install the same license key file more than once, you will see a “607: License file
already exists” error. Click on the Cancel button to close the error. Cancel will not attempt to
install the same license file again.
Note: If your Installed Products grid does not show any changes after importing the license
key file or if you get any error messages, contact SmartCAMcnc by sending email to:
[email protected]
Include a description of the problem, your company and contact information, and the key
being entered.
SmartCAM Installation Guide
12
For further information about licensing SmartCAM applications, please refer to the following FAQ:
http://www.SmartCAMcnc.com/Technical_Support/Tech_Bulletins/techbulletin.php?tbnum=50
After you have imported your license key file, you can move to the next step and run the
application.
Run the Application
After you enter your temporary license key, you can run your SmartCAM application until the
license key expires. The temporary key is provided to allow you to run the application while you
wait for your long-term key. After you enter your long-term license key, the application license will
not expire.
To run an installed SmartCAM application, open the Windows Start menu. Select the All
Programs pull-right menu. This menu will contain a SmartCAM program group (unless you ran a
Custom installation type and changed the name).
Open the SmartCAM program group and select the SmartCAM application to run.
Post Installation Activities
At this point, you may delete the SmartCAM application installation package. This is the
executable that you downloaded from the SmartCAMcnc Downloads page.
If you think that you might want to rerun this installation again, perhaps using to fix any
inadvertent changes to application files, do not delete the installation file.
If you want to delete the installation package and later find that you need to reinstall, simply
download the file again.
SmartCAM Installation Guide
13
Troubleshooting SmartCAM Installations
If you are having problems installing your SmartCAM applications, the following general
guidelines may be of assistance.
Download The Installation Setup File Again
If you are getting errors during the installation, one cause maybe that the setup installer
executable is incomplete or corrupted (a data transmission error). Try downloading the setup
program from the SmartCAMcnc website again.
Reboot Your PC
Rebooting a Windows PC often resolves a number of issues. Especially, if you have recently
been installing or uninstalling other applications. Many times Windows cannot make a required
system change, while Windows is running. Rebooting the PC gives Windows a chance to process
these queued tasks.
Disable Anti-Virus/Malware
Many installation issues are caused by the computer’s anti-virus/anti-malware software interfering
with or locking files. Temporarily disable any resident anti-virus and anti-malware software
running on the system, then run the installation.
Quick Summary of Resolution Steps
The following steps are recommended for resolving problems where the SmartCAM installation
does not run to completion.
1. Reboot the PC
During installations, Windows may not be able to update or replace all files, requiring a reboot
at the end of the installation. If the installation does not run to completion, these changes may
still be pending and may have an affect on subsequent installation attempts. Rebooting
allows Windows to processes these pending changes.
2. Uninstall Previous Installation Attempt
If the failed installation ran long enough, InstallShield (the industry standard Installation
language used by SmartCAM) may leave behind information that will affect future installation
attempts. It may appear that the product is already installed, forcing subsequent installations
to run in maintenance mode. So, before reinstalling, check to see if the previous attempt is
stored in the Programs/Features or Add/Remove Programs control panel list. If so, uninstall it
before continuing.
3. Download Installer Again
Occasionally, the downloaded setup installer may be incomplete or have data-transmission
errors. Downloading the installer again usually resolves these issues.
4. Disable any Anti-Virus/Anti-Malware Software
Anti-Virus/Malware software may be interfering with the installations. Temporarily disable
these utilities. Do not forget to restart them after the installation is complete
5. Retry the Installation
Run the installation again.
SmartCAM Installation Guide
14