1
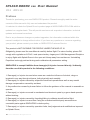
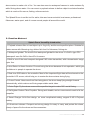
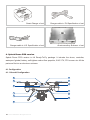
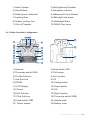
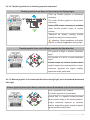
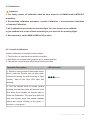
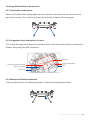
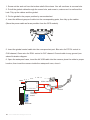
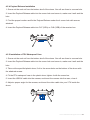
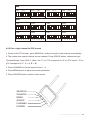
PRO
SPLASH DRONE PRO VERSION
User Manual V2.3
www.swellpro.com
SPLASH DRONE
PRO
User Manual
V2.3 2015.10
Preface
Thanks for purchasing your new SWELLPRO product. Please thoroughly read the entire
contents of this manual to fully use and understand the product.
It is advised to check the Splash Drone’s product page at WWW.SWELLPRO.COM which is
updated on a regular basis. This will provide services such as product information, technical
updates and manual corrections.
Due to any unforeseen changes or product upgrades, the information contained within this
manual is subject to change without notice. If you have any questions or concerns regarding
your product, please contact your dealer or SWELLPRO Customer Service.
This product is NOT SUITABLE FOR PEOPLE UNDER THE AGE OF 18
Obligatorily, please read the user Manual carefully before flight. For sake of safety, please DO
comply with regulations of ICAO, Local space territory Legacy and UAV Management Discipline
to enjoy flights with Splash Drone in the open air & keep away from residences. Uninstalling
Propellers is strongly advised during radio calibrations & parameters setting.
SWELLPRO is exempt liabilities from damage(s) & injuries incurred directly / indirectly
from the use of this product in the following conditions:
1. Damage(s) or Injuries incurred when users are under the influence of alcohol, drugs or
impaired in any way through sickness, both physically and mentally;
2. Damage(s) or injuries caused by subjective intentional operations as well as any mental
damage compensation caused by accident;
3. Any malfunction caused by human failure to follow the guidance of the manual to assemble or
operate;
4. Damage(s) or injuries occurred in mechanical and electronic parts by a green hand operator
without training;
5. Damage(s) or injuries caused by forgetting/failing to calibrate aircraft before flight;
6. Damage(s) or injuries incurred from using the unauthorized third party accessories or
counterfeit parts against SWELLPRO’s relative policy;
7. Damage(s) or injuries caused by operation faults, bad judgments and modifications imposed
on Splash Drone;
02 ©2015 SWELLPRO All Rights Reserved
8. Damage(s) or injuries caused by using malfunction & aging parts;
9. Damage(s) or injuries occurred by persistent flight after the low-battery warning;
10. Damage(s) or injuries occurred by salty corrosion without (thoroughly) washing & drying the
parts that engaged in sea water;
11. Damage(s) or injuries caused by losing control on aircraft due to change the location of flight
controller;
12. Damage(s) or injuries caused by using other third party appliances, such as
Transmitter/Receiver/Remote control device;
13. Damage(s) or injuries occurred in circumstances with possible interference, including the
magnetic filed, radio signal and other subjective operation troubles caused by bad judgments,
obscure vision & poor-eyesight;
14. Damage(s) or injuries occurred when the aircraft is in the following situations: collision, fire,
explosion, floods, tsunamis, ice, snow, avalanche, flooding, landslide, earthquake, etc. ;
15. Damage(s) or injuries caused by abusing & modifying the protective circuit inside of Battery;
16. Any legal liability incurred by illegal activities. Please use products within limits permitted by
local laws and regulations;
SWELLPRO reserves all the rights for final interpretation. Forbidden (Important)
Symbols Highlighting
Forbidden (Important)
Caution (Important)
Fundamental Awareness
Please QUIT using the aircraft if any exceptional abnormality occurs.
Please DO make sure the Throttle joystick is staying at neutral position before switching on
radio controller. Damage(s) or injuries may occur in tuning Splash Drone, so please DO ensure
all engines are turned off before any calibrations.
Index
1. Product Introduction
04
2. Function Abstract
05
3. What’s in the Box?
06
4. Splash Drone PRO version
08
4.1 Configuration
08
4.1.1 Aircraft Configuration
08
4.1.2 Radio Controller Configuration
09
©2015 SWELLPRO All Rights Reserved 03
4.2 Flight Guidance
10
4.2.1 Radio Controller Operation Guidance
10
4.2.2 Flight Mode
12
4.2.3 OSD data on Radio Controller
14
4.2.4 Self-tightening Propeller
14
4.2.5 Battery
17
4.3 Calibrations
19
4.3.1 Joystick Calibration
19
4.3.2 Accelerometer Calibration
20
4.3.3 Compass Calibration
21
4.4 Flight Instruction
23
4.4.1 Announce Before Flight
23
4.4.2 Start flying the Splash Drone
24
4.4.3 Landing
25
4.4.4 Auto Return-To-Home (RTH)
26
4.4.5 Navigation Indication
27
4.4.6 Indication LED for Flight Control
27
4.4.7 Low Battery Warning
28
4.5 Using different kind of Accessories
29
5. Specifications of Splash Drone
34
6. FAQ
35
1. Product Introduction
Developed by SwellPRO, Splash Drone is the world’s 1st amphibious & waterproof drone. 71% of
the earth covered by water, 60% of the people live by ocean or lake. There isn’t a drone that can
survive from landing on water. The Splash Drone fills this gap on the drone market.
Similar to regular drone on the market, Splash Drone come with video transmission for live-video
streaming, gimbal for aerial filming, auto return home for safety. The special thing is that Splash
Drone is a multifunctional drone. You can start your aerial filming from water and land the whole
drone on water without fearing of lost the drone. You can take off the gimbal to make extreme fly
04 ©2015 SWELLPRO All Rights Reserved
above water to make a lot of fun. You can also mount a waterproof camera to make extreme fly
while filming above water. You can mount a payload release to deliver object to selected location
which is used on life rescue, fishing, enforcement etc.
The Splash Drone is an idle tool for sailor, lake and ocean scientist, boat owner, professional
fisherman, water sport, and of course normal people all around the world.
2. Function Abstract
Splash Drone Versatility Introduction
1. Payload release: Able to load object up to 1kg to fly and throw at specified place. Suitable for
water rescue with lifesaving ring; deliver fish food for fisherman; fishing etc.
2. Waterproof gimbal: The world’s first waterproof gimbal for the drone. It’s GoPro type FPV
waterproof case fits GoPro Hero3/3+/4 camera.
3. Built-in one of the most compact designed 5.8G video transmitter, with a transmission range
upto 1km.
4. Auto Return to Home function: Prevent losing the drone because of mis-operation, which give
confidence to people to operate the drone.
5. Real time OSD data on the controller: Most of the important flight data will be showed on the
controller LCD screen, which help you to master the drone status during flying.
6. Cruise Control: Idea come from fixed wing plane, the drone keep flying straight forward
automatically, which make sure filming super stable aerial video.
7. Circle Flight: Fly the drone surround the specified target to make 360° aerial filming.
8. Self-tighten Carbon Fiber Propeller: Strong and durable, and no more wrench need to fix the
propeller.
9. Smart Charger: All-In-One design, no more complicated setting, support 2-4S Li-Polymer
battery.
10. Aluminum suitcase: Compact and strong design for easy to carry and protect the drone,
plenty of space fits the drone and its accessories.
©2015 SWELLPRO All Rights Reserved 05
3. What’s in the Box?
Attention: please check & confirm the parts inside the package comply with
the part list as below:
Splash Dronex1 set
Self-tightening Propeller x2 pairs
Lipo Battery x1pc
Quick-release Landing gear x1 set
2.4G Radio controller x1 set
Short terminal of Receiver x1pc
Mini 5.8G video transmitter x1pc
Waterproof 2-Axis Gimbal x1 set
06 ©2015 SWELLPRO All Rights Reserved
Gimbal controller Board x1 set
Quick-release mounting plate for Dive Case
M3 Screws x5pcs
Waterproof Pay-load releaser
x1 set
7 Inch diversity LCD FPV Monitor x1 set
Receiver Antenna of FPV Monitor x1 set
AV Out cable of FPV Monitor x1 set
Charger cable of FPV Monitor x1 set
Smart Charger of FPV Monitor x1
Mounting bracket of FPV Monitor x1 set
©2015 SWELLPRO All Rights Reserved 07
Smart Charger x1 set
Charger cable in EU Specification x1 set
Charger cable in U.S. Specification x1 set
Aluminum-alloy Suitcase x1 set
4. Splash Drone PRO version
Splash Drone PRO version is full Ready-To-Fly package. It includes the drone, controller,
waterproof gimbal, battery, self-tighten carbon fiber propeller, 5.8G VTX, FPV screen etc. All the
parts are fits into an aluminum suitcase.
4.1 Configuration
4.1.1 Aircraft Configuration
01
12
02
11
03
10
09
04
08
05
07
06
08 ©2015 SWELLPRO All Rights Reserved
1) Hatch Screws
2) Self-tightening Propeller
3) Aircraft Nose
4) Navigation Indicator
5) Shake-proof rubber ball
6) Waterproof 2-Axis Gimbal
7) Landing Gear
8) Watertight seal screw
9) Rubber cushion foot
10) Watertight Motor
11) Nut of Propeller
12) NANO Vent cover
4.1.2 Radio Controller Configuration
02 01 19
20
03
18
04
05
17
06
16
07
15
08
14
09
10
11
21
22
13
12
1) Antenna
2) Knob switch VRA
3) Three-way switch SWA
4) Tie Hanger
5) Throttle Sub-trim
6) Left Joystick
7) Yaw Sub-trim
8) UP
9) DOWN
10) Coding button
11) LCD Display
12) Power switch
13) Cancel
14) OK
15) Roll Sub-trim
16) Right Joystick
17) Pitch Sub-trim
18) Three-way switch SWB
19) Knob switch VRB
20) Handle shaft
21) Trainer access
22) Battery cover
©2015 SWELLPRO All Rights Reserved 09
4.2 Flight Guidance
4.2.1 Radio Controller Operation Guidance
4.2.1.1 Flight Mode Introduction
Attention: left-hand throttle is the default setting for the Radio controller, right-hand
throttle is possible based on request
SWA is Flight Mode switch (SWA1, SWA2, SWA3)
SWA1
SWA2
SWA3
SWA1
GPS Mode
SWA2
ATTI Mode
SWA3
Cruise Control
4.2.1.2 Intelligence Flight Control
SWB is Intelligence Flight Control switch (SWB1, SWB2, SWB3)
SWB1
SWB2
SWB3
SWB1
Normal
SWB2
Circle Flight
SWB3
Return-To-Home
4.2.1.3 Gimbal controll
VRA, VRB are knob switch to adjust the PAN/TILT of the gimbal. Which will help you to choose
the best angle for filming.
VRA
10 ©2015 SWELLPRO All Rights Reserved
VRB
4.2.1.4 Throttle joystick is for elevating upward/ downward
Throttle joystick (from Down to Up) controls the flying height
Push up Throttle joystick to accelerate
elevating
Pull down Throttle joystick to bring down
the drone
Under GPS mode, hovering is available
when throttle joystick stays at neutral
position.
Taking-off by slightly pushing throttle
joystick excess the neutral position.
Attention: Slight operations on throttle
joystick is always suggestible during flight.
Throttle joystick (from Left to Right) controls the Yaw direction
Pull joystick to Right to execute clockwise
flight.
Pull joystick to Left for counter-clockwise
flight.
Aircraft keeps its current location when
joystick stays in the neutral position. Larger
variances imposed, the higher rotating
speed would be performed.
4.2.1.5 Aileron joystick is for horizontal direction during flight, such as forward/ backward/
left/ right.
Aileron joystick (from Up to Down) controls forward & backward in the horizontal plane
Push up joystick to fly forward.
Pull down joystick to fly backward.
Aircraft flies in a specific horizontal plane
when joystick stays in the neutral position.
Larger variances imposed at up/down
motion, larger tilting angle as well as higher
speed would be performed.
©2015 SWELLPRO All Rights Reserved 11
Aileron joystick (from Left to Right) controls left & right flight in the horizontal plane
Aircraft flies to right when pulling joystick to
Right
Aircraft flies to left when pulling joystick to
left
Aircraft flies in a specific horizontal plane
when joystick stays in the neutral position.
Larger variances imposed on left/right
motion, the larger tilting angle as well as
higher speed would be performed.
4.2.2 Flight Mode
4.2.2.1 Introduction spreadsheet
ATTI Mode
GPS Mode
Linear Control
Radio Input
Keep the drone horizontal and staying in Keep the drone horizontal and staying in
same height when both joysticks stay at same height when both joysticks stay at
Operation
neutral positon, the Max tilting flight neutral positon, the Max tilting flight
angle is 25degree.
angle is 25degree.
Locating
Not support
Support
Max rise
4m/s
4m/s
AUTO RTH
Support
Support
Flight speed
Unlimited
Unlimited
speed
Flight Mode
Flight Mode
GPS mode: The most commonly used mode. In this mode, the compass and
GPS will be activated to make the drone recognize the current location precisely,
that make sure you can fly the drone in good gesture and hover anytime easy.
GPS Mode
Different from the ATTI mode that suitable for senior pilot. GPS mode is suitable
for new pilot and aerial filming. The week point is that the GPS & compass
module is the quite sensitive with magnetic interference. Make sure you fly in a
place without strong magnetic interference place and good GPS signal.
12 ©2015 SWELLPRO All Rights Reserved
ATTI mode: In ATTI mode, the compass and GPS module will not work. The
drone can maintain the height, but not able to lock the position automatically.
This mode is good for senior pilot and necessory for every drone. Because of the
ATTI Mode
senstive of the compass and week GPS signal will make the drone not good at
flying on the indoor, crowd and strong megnetic environment.
(Important note: when your drone is out of control suddently in GPS mode, the
best way to get it back is switching to ATTI mode, bring it back manually).
Curise Control: Curise control mode idea comes from fixed-wing plane, it is a
perfect for aerial filming. Switch SWA gear to SWA3 (Curise Control) position to
Cruise
Control
activate the cruise control mode. The drone will fly forward at current height and
speed (1.5meter/second is the minimum cruise speed) automatically. In this
mode, the function of the aileron joystick will be changed into direction control.
Keep pushing the aileron joystick forward, the drone will speed up; keep pulling
down the aileron joystick, the drone will slow down; Keep pushing the aileron
joystick left, the drone will keep flying left; Keep pushing the aileron joystick right,
the drone will keep flying right. Control the flying height by the throttle stick, but
the yaw function is blocked.
Circle Flight: Circle flight mode is designed for shooting 360degree video of a
specified object. Fly the drone to the top of a specified object, switch SWB to
center position to activate the Circle Flight mode. The drone will automatically fly
away from the object at a radius of 10meters with the nose pointing to the object,
hovering. In this mode, the function of aileron joystick is changed. Up & down for
Circle Flight
radius control, left & right for anti-clockwise and clockwise control. Keep pulling
the aileron joystick right, the drone will start flying anti clockwise faster and faster
(max speed is 8m/ second); Keep pulling the aileron joystick left, the drone will
slow down till become flying clockwise. Keep pushing the aileron joystick up, the
drone will keep enlarge the radius, and down to reduce the radius. Control the
flying height by the throttle stick, but the yaw function is blocked.
RTH mode: Switch SWB to lowest SWB3 position to activate the
Return-To-Home mode. The drone will return to the original take-off location
RTH Mode
(Note: the drone will recognize the location that it start getting good GPS signal
to be home). For detail introduction of RTH mode, please refer to
4.4.4 Return To Home.
©2015 SWELLPRO All Rights Reserved 13
Fail Safe Return: The Fail Safe mode is an extension mode of RTH. When the
Fail
drone is fly our of range by accident or lost control signal, the Fail Safe function
Safe
will be activated. The drone will start flying back until it regain the remote control
Return
signal. If the remote control signal keep lost, the drone will return to home point
and land.
4.2.2.2 Graphic Illustration
a. Cruise Control
SWA3
b. Circle Flight
SWB2
4.2.3 OSD data on Radio Controller
The Splash Drone PRO intergrated with telemetry system. All flight data will be send back and
display on the remote controller screen in time. They are height, distance, speed, GPS
coordinate, battery voltage etc.
14 ©2015 SWELLPRO All Rights Reserved
OSD data on Radio Controller
Press "Up" or "Down" to enter into OSD screen.
All the flight data will be display on the screen.
Attention:
Home location can only be
recordedwhen the satellite quantity is up to 6.
So pleasedo check the satellite quantity is up to
6 before flying.
Altitud
0.0m
Distanc
0.0m
VSpeed
0.0
Picth
0.0
Voltage
0.0m
Speed
0.0m
Yaw
0.0
Roll
0.0
Satelli
0
HDOP
0
Lon
0
Course
0
HCourse
0
Lat
0
Menu
Introduction
Altitud
The relative height between current point and the take-off point
Voltage
The current voltage of the drone battery
Distanc
The ground distance from current point to the take-off point
Speed
Flying Speed( m/s )
Satelli
GPS signal level
Course
The relative direction of the drone and its take-off location, “0” means North
HDOP
The horizontal Dilution of Precision on GPS
HCourse
The moving direction of the drone
VSpeed
Ascending(+) /Descending(-) speed ( m/s),
Yaw
Flight (Rotating) angle of aircraft Nose
Pitch
Flying angle of moving forward(+)/ Backward(-)
Roll
Flying angle of moving to Right(+)/ Left(-)
Lon
Longitude
Lat
Latitude
Remarks: With the GPS coordinate, you can locate your drone in case it is lost.
©2015 SWELLPRO All Rights Reserved 15
4.2.4 Self-tightening Propeller
4.2.4.1 Install propeller
Take out the 4pcs original 12inch self-tighten carbon fiber propellers. Install the 2pcs propellers
with silver spinner onto CCW motors; Install the 2pcs propeller with black spinner onto CW
motors. Tighten them.
Propeller
Propeller with silver spinner
Propeller with black spinner
Graphic
Assembly Location
Motor with silkprinting ‘CCW’
Motor with silkprinting ‘CW’
Propeller
Assembly
Indication
4.2.4.2 Uninstall Propeller
NEVER try to uninstall the propellers before the drone is not locked properly and motor
stop spinning.
Notice :
Props are self-tighten design without extra spinner & screw to fix.
The special propeller design make it not able to install the wrong propeller.
Please check to ensure every Props are in good shape before every flight. Aging & destroyed
Props are FORBIDDEN to use on Splash Drone.
DON’T touch the rotating propellers.
Please ALWAYS use the original 12inch propellers to guarantee good fly experience.
16 ©2015 SWELLPRO All Rights Reserved
4.2.5 Battery
4.2.5.1 Usage & Cautions
The battery is specially designed for Splash Drone, with 4S 4500mAh capacity, 14.8V
voltage and charge-discharge management functionality.
Forbid putting the battery into water, fire or heat place; please keep the battery away from
source of water and fire;
Battery should store in a cool and dry environment.
Battery temperature is high temporarily after use. Don’t start charging until the battery cools
down to room temperature;
Do not leave the battery charged unattended. If abnormal charging situation occurs, please
stop charging the battery at once; if you cannot attend the battery, remove the battery from
the charger in case of unpredictable danger;
Forbid imposing external force on the battery; do not drop the battery from high places and
disassemble or modify the battery;
Please replace the battery with new one if it bulges;
If a child accidentally swallows the battery you should immediately seek medical assistance.
Battery should be charged with proper standard charger.
Forbid connecting the battery reversed in positive and negative terminals in the charger or
equipment.
Forbid letting the battery terminals (+and-) touch together to cause short-circuit.
Forbid transport or store the battery together with metal objects.
Forbid driving a nail in, hit with a hammer, or stomp on the battery.
Do not disassemble or alter the battery.
Do not use the battery in strong electrostatic areas; otherwise the electronic protection may
be damaged which may cause a hazard.
If you get the battery electrolyte leakage into your eyes, don't rub, first wash your eyes with
clean water then seek medical assistance immediately. If not handled in a timely manner,
eyes could be damaged.
Do not use the battery when it emits an odor, high temperature, deformation, change in color
or other abnormal phenomena; if the battery is in use or charging, you should stop charging
or using immediately.
If the battery terminal gets dirty, please clean it with a dry cloth before using. Otherwise it will
cause a poor contact, thus causing energy loss or inability to charge.
Discarded battery could lead to a fire; you should completely discharge the battery and wrap
the output terminal with insulating tape before discarding.
©2015 SWELLPRO All Rights Reserved 17
DO NOT drain the battery of Splash Drone or leave the battery plugged into the Splash
Drone when unused. When there is low voltage alert please landing timely to avoid damages
to the battery or others.
Unplug the battery if not occupying with aircraft.
4.2.5.2 Charging Battery
Charging Process
1. Insert the AC power cord into charger (Image I)
2. Insert the AC power cord into 100-240V AC socket, all LED will light for 1 second, then your
charger is ready for using ( Caution: Always power ON the charger before connecting a battery,
or damage to the hanger and the battery can result.
3. Connecting the battery pack to the charger with the XH balance plug (Image I)
4. When it start charging, the 4 indication LEDs will show you the charging status: one LED blink
means 25%, two LED blink means 50%, three LED blink means 75%, and four LED blink means
the battery is fully charged.
5. During the charging process, if all 4LEDs keep blinking, that’s mean ERROR occur. Check
your connection or battery status.
Image I
4.2.5.3 Install Battery
Fit the battery into the specified location as picture below. Put the battery power cord as
far away as possible from the GPS module. Make sure no cable is placed under the
battery!!!!
18 ©2015 SWELLPRO All Rights Reserved
4.3 Calibrations
Attention:
1. For safety reason, all calibration shall be done based on LOCKING status WITHOUT
propellers;
2. Recommend calibration procedure: Joystick Calibration -> Accelerometer Calibration
->Compass Calibration;
3. All 3 calibrations are needed for the first flight. You can choose not to calibrate
or just calibrate one or two of them according to your need for the normally flight;
4. Recommend to switch SWA & SWB to UP position.
4.3.1 Joystick Calibration
Joystick calibration is required in below cases:
1. The first time to use the drone and the controller;
2. Side flight occurs when both joysticks are in neutral position;
3. The remote controller drop off to the ground by accident.
Operation Description
LED Indication
1. Switch on remote control, then power on the
drone, push the Throttle stick up Max within
10seconds (during the self-checking of flight
control). Wait till the blue LED start fast
blinking.
2. Pull the throttle stick to lowest neutral
position, the fast blue blink will become slow
blue blink, then release the throttle stick to
finish the Calibration. The slow blue blink will
stop and system enter into normal standby
status with regular blinking of two green ->
one blue -> two green…
©2015 SWELLPRO All Rights Reserved 19
Operation Diagram
Pull the throttle stick to lowest neutral position,
the fast blue blink will become slow blue blink,
Switch on remote control, then power on the
drone, push the throttle stick to up max.
then release the throttle stick to finish the
Calibration. The slow blue blink will stop and
system enter into normal standby status with
regular blinking of two green -> one blue ->
two green…
4.3.2 Accelerometer Calibration
Calibrate Accelerometer in below cases:
1. The first time to use the drone and the controller;
2. Side flight occurs when both joysticks are in neutral position;
3. The drone occurs crash;
4. The indication LED of the drone become slow red blink;
5. The hovering is not stable when the throttle joystick is in neutral position.
Operation Description
1. Place the drone on flat horizontal surface.
2. Switch on the remote control and drone.
Wait until the self-checking is finished. (during
the self checking, the motor will have Di…
Di… sound, after a long Di… the sound will be
gone, means the self checking is finished)
3. Pull the throttle joystick to lowest neutral
position, fast move aileron joystick from max
left to max right, until the green light start fast
blinking. Release the joystick to finish the
Calibration. Then the drone into normal
standby status with red and green light blink
alternately.
20 ©2015 SWELLPRO All Rights Reserved
LED Indication
Operation diagram
Pull the throttle joystick to lowest neutral
position, fast move aileron joystick from max
left to max right, until the green light start fast
blinking. Release the joystick to finish the
Calibration. Then the drone into normal
standby status with red and green light blink
alternately.
4.3.3 Compass Calibration
The GPS module combines magnetic field sensor, we call it Compass. If we didn’t do a proper
compass calibration, the flight will be not good, even not able to unlock the drone.
Note:
1. Recommend to place SWA and SWB switch to UP position before calibrating.
2. Be careful when you trying to do Compass calibration indoor. Some rooms might
has too much magnetic interference indoor. Recommend to do Compass calibration
outdoor.
Compass calibration is required in below cases:
1. The first time to use the drone and the controller;
2. Move to new fly location up to 100km away from the last location;
3. The drone occurs crash;
4. Heavy shake during transportation.
Calibration step
LED Indication
1. Switch on the remote control and drone.
Wait until the self-checking is finished. (during
the self checking, the motor will have Di…
Di… sound, after a long Di… the sound will be
gone, means the self checking is finished)
©2015 SWELLPRO All Rights Reserved 21
2. Flip SWA quickly from SWA1 to SWA3 to
SWA1…, until the indication LED start fast
flashing GREEN. (The last position of the
SWA switch should be SWA1)
3. Horizontally pick up the drone, rotate two
circles (720°), indication LED become slow
GREEN blinking. (During this, if you see the
LED become permanent RED, means the
drone is not in horizontal status, please hold
it horizontal and try to rotate again)
4. Hold the drone with nose point to the
ground vertically, make two clock-wise circles.
The indication LED become RED, GREEN
blink alternately. Then place the drone
stationary and power OFF to finished the
calibration. (During this, if you see the LED
become permanent RED, means the drone is
not in horizontal status, please adjust and
continue)
Operation diagram
Image 1
Image 2
Image 3
Flip SWA quickly from SWA1 Horizontally pick up the drone, Hold the drone with nose point
to SWA3 to SWA1…, until the rotate
indication
LED
start
two
circles
(720°), to the ground vertically, make
fast indication LED become slow two clock-wise circles. The
flashing GREEN. (The last GREEN blinking.
indication LED become RED,
position of the SWA switch
GREEN blink alternately.
should be SWA1)
22 ©2015 SWELLPRO All Rights Reserved
4.4 Flight Instruction
Suggestion: “Practice makes perfect” is always correct to fly any aircraft. Therefore, please
practice flight with empty-loading when fly the Splash Drone for the first time. After getting familiar
with the whole flying process, just help yourself to attached any accessories to enjoy great and
professional flight with your Splash Drone.
4.4.1 Announce Before Flight
DO NOT operate in following situations:
1. Please comply with local policy to eradicate any flights in the No-Fly Zone;
2. Flight nearby strong interference on radio signal is prohibited;
3. Flight among/ near to the crowed/ residences is prohibited;
4. Operations in heavy rain & storm pouring & poor flight vision are prohibited;
5. Operations nearby High-Voltage transmission line & Broadcast signal interference
is prohibited;
6. In case of losing control, please DO NOT operate near to strong magnetic filed;
7. DO NOT operate when you are tired, not feeling well or under the influence of
alcohol or drugs.
8. DO NOT operate aircraft when the radio controller is malfunction.
Check and ensure every parts are completely in good shape before every flight.
Check Motors & Propellers to make sure correct installation with high reliability before flight.
Please DO NOT be near to the running motors & propellers to avoid unexpected
Injuries(Damages).
Please keep the Compass module away from magnetic filed, otherwise it will ruin the
compass module and leads to malfunction on aircraft.
Please keep flight distance above 3M away from pilot & the crowed & power supplying
cables.
DO NOT overloading any objects that is heavier than 1KG;
Please make sure the main battery and radio are fully changed before flight;
Avoid operating radio controller and other wireless appliances simultaneously. Vehicle
equipment & power resource may influence the 2.4G telemetry system.
©2015 SWELLPRO All Rights Reserved 23
Firstly switch-on radio, then power-on aircraft before Taking-off, Firstly power-off aircraft and
then switch-off radio after Landing-on.
Please ALWAYS use the original 12 Inch self-tighten carbon-fiber Propeller.
Please place aircraft away from the speaker devices in vehicle.
Please turn off WIFI function before loading sport camera onto aircraft, any obedience will
influence the transmitter and leads to malfunction in aircraft.
Please operate in the open air under GPS & ATTI Mode. Notice: Please pay attention to the
GPS Indicator during flight, aircraft will enter into ATTI mode automatically in 3s after losing
GPS signal (Indicator blinks RED 2 or 3 times).
Please land off aircraft ASAP when the low-battery warning is alarming. Switching flight
mode into ATTI is advisable to get all under control.
Failsafe Return-To-Home: It will be activated once aircraft loses signal control from radio
transmitter under stable GPS circumstances, aircraft will return to take-off location
automatically.
Please note: 4 Navigation LEDs are blinking RED is indicating low battery balance.
Please check & ensure the 4pcs navigation indicators that enclosed inside of each axis are
working well before flight.
4.4.2 Start flying the Splash Drone
Note: Recommend to check the OSD data on the controller screen. When Pitch and Roll
show close to “0”, and VSpeed show “0” after unlock, means the drone is in good status.
If those data are too much. Please redo the calibration.
Important Notice before flight
1. Put the drone 3meter away minimum from your or people around.
2. Put SWA to GPS or ATTI, SWB to OFF position.
3. Make sure the drone have good status, propellers are good and well tighten.
4. When you power on the drone, it will enter self-checking. To make sure all sensor has
good start, please don’t move the drone during this time.
24 ©2015 SWELLPRO All Rights Reserved
Pull both joysticks to their corner to unlock the
motors. As picture on the right side and below:
Aircraft is ready for flight when the LED indicator woks normally(refer to details for LED
indications)
Unlock Motors
unlock motors 1
unlock motors 2
unlock motors 3
unlock motors 4
4.4.3 Landing
Slowly pull throttle joystick down, to reduce the height of the drone. When it is almost touch the
ground, pull the throttle joystick to lowest neutral position, the drone will land firmly. Hold the
throttle joystick up to 5second, the motors will be locked. Then power off the drone, and switch
off the remote controller.
Operation diagram
©2015 SWELLPRO All Rights Reserved 25
4.4.4 Auto Return-To-Home (RTH)
Automatic Return-To-Home
Switch SWB to lowest position (SWB3), the RTH
function is activated, and the drone will start flying back
SWB3
to Home point. (Make sure the drone has good GPS
signal)
Principles in Automatic Return-To-Home
When the flying height >
20meter, and ground distance
from Home location > 25meter,
the drone will keep the original
height to fly back and land
slowly.
When the flying height <
20meter, and ground distance
from Home location > 25meter,
the drone will climb up to
20meter first, then fly back with
this height and land slowly.
When the flying height <
10meter, and ground distance
from Home location < 25meter,
the drone will keep the original
height, fly back to top of home
point first, then land slowly.
Notice: During proceeding RTH, If you want to change the landing location, please
switch SWB to SWB1 to close the RTH first, then choose the location you like, then land
it manually.
26 ©2015 SWELLPRO All Rights Reserved
4.4.5 Navigation Indication
There are 4 strong LED on the four ARMs of the drone. Two RED led on the Nose side (Front
direction), Two GREEN led on the rear side (Back direction).
Front
Back
Notice: The Navigation Lights are also low-battery warning lights. When the battery
voltage is lower than 14.4V, all the 4 Navigation LED will start blinking at the same time.
Seeing this, please try to land.
4.4.6 Indication LED for Flight Control
GREEN light for working mode;
BLUE light for Joystick status;
RED light for strength of GPS signal and low battery warning.
Indication LED for Flight Control
LED Indication
Working Status
Blinking once
ATTI Mode
Blinking twice
GPS Mode
Blinking thrice
Circle Flight
Flashing
Return-To-Home
Blinking slowly
Vertical Compass Calibrating
Flashing
Horizontal Compass Calibrating
System Status
Blinking once
Joystick isn’t at neutral position
©2015 SWELLPRO All Rights Reserved 27
GPS signal & lower-battery warning
None blinking
Good GPS signal
Blinking once
No GPS signal
Thrice slowly
1st low-batter warning
Flashing
2nd low-battery warning
Blinking slowly
Please do horizontal calibration
4.4.7 Low Battery Warning
Low-battery warning
LED Indication
There are two low battery level setting in the
First Level
Assistant Software. When the first level
warning start, please prepare to land.
When the second level low battery warning is
activated, the drone will execute auto landing
Second Level
at the current point. If the current landing
location is not good, you can switch to ATTI
mode
to
change
the
landing
location
manually. (This might make the battery overdischarge, be careful to use it)
28 ©2015 SWELLPRO All Rights Reserved
4.5 Using different kind of Accessories
4.5.1 Detachable Landing Gear
Take out the carbon fiber landing gears from the suitcase, insert them into the aluminum joint
part under the arms. Try to slide the rubber joint a little bit to tighten the landing gear.
4.5.2 Suggestion Parts Installation Location
Try to install the parts according to the proved locations. But some senior pilots can change the
location, like putting the GPS outside etc.
Battery
Gimbal controller board
Flight controller
Receiver
Video transmitter
GPS
4.5.3 Waterproof Gimbal Installation
There are two parts for the waterproof gimbal: controller box and gimbal bracket
©2015 SWELLPRO All Rights Reserved 29
1. Screw out the seal nut from the bottom shell of the drone. You will see there is a screw hole.
2. Put all the gimbal cables through the screw hole, and screw in, make sure it is well seal the
hole. Tidy up the cables and the gimbal.
3. Fix the gimbal in the proper position by screw attached.
4. Insert the different groups of cable into the corresponding ports, then tidy up the cables.
(Move the power cable as far as possible from the GPS module)
5. Insert the gimbal control cable into the correspondent port: Blue wire for PITCH control to
CH8 channel, Green wire for ROLL control to CH7 channel. Ground cable to any ground (see
above illustration diagram.
6. Open the waterproof case, insert the AV USB cable into the camera, place the cable to proper
A1
A0
5V
GND
USB IMU
M2 M1
12V
location, then insert the camera inside the waterproof case, close it.
Gimbal
controller
board
Receiver
30 ©2015 SWELLPRO All Rights Reserved
Video transmitter 12V
Gimbal
4.5.4 Payload Release Installation
1. Screw out the seal nut from the bottom shell of the drone. You will see there is a screw hole.
2. Insert the Payload Release cable into the screw hole and screw in, make sure it well seal the
hole.
3. Find the proper location and fix the Payload Release under the 4 screw hole with screws
attached.
4. Insert the Payload Release cable into CH7 (VRA) or CH8 (VRB) of the receiver box.
4.5.5 Installation of FPV Waterproof Case
1. Screw out the seal nut from the bottom shell of the drone. You will see there is a screw hole.
2. Insert the Payload Release cable into the screw hole and screw in, make sure it well seal the
hole.
3. Take out the specified plastic shoe, fix it to the screw holes on the bottom of the drone with
the attached screws.
4. Fit the FPV waterproof case in the plastic shoe, tighten it with the screw bar.
5. Insert the USB AV cable into the camera, and insert the camera into the case, close it.
6. Adjust a proper angle for the camera, and insert the video cable into your VTX inside the
drone.
©2015 SWELLPRO All Rights Reserved 31
4.2.6 Mounting FPV screen
Find out the mounting bracket bag from the suitcase, assemble the mount and fix the FPV
screen to the controller handle bar according to below chart.
1
2
4
3
4.5.7 Select channel for your VTX (video transmitter)
1. Plug the VTX power cord into a 12V Out socket inside the drone.
2. Power on the drone and switch on the FPV screen.
3. Choose a channel by flipping switches on VTX, there are totally 32channel available for the
VTX.
4. See below channel selection sketch map, “4, 5” represent Frequency Range, “1,2,3”
represent
32 ©2015 SWELLPRO All Rights Reserved
FR
FR1
(A)
1 2 3 4 5 6
FR1
(B)
FR1
(C)
FR1
(D)
1 2 3 4 5 6
1 2 3 4 5 6
1 2 3 4 5 6
CH2
CH3
CH4
CH
CH1
1 2 3 4 5 6
1 2 3 4 5 6
1 2 3 4 5 6
1 2 3 4 5 6
CH5
CH6
CH7
CH8
1 2 3 4 5 6
1 2 3 4 5 6
1 2 3 4 5 6
1 2 3 4 5 6
4.5.8 Pair a right channel for FPV screen
1. Power on the FPV screen, press SEARCH/+ button to search a best channel automatically.
2. The screen also support manual choose channel. Press GROUP button, choose the right
“Channel Range” from A,B,E, F. (Note: the “C” on VTX correspond to “E” on FPV screen, “D” on
VTX correspond to “F”, A -> A, B -> B).
3. Press CHANNEL to choose channel from 1 - 8.
4. Press MENU button to adjust the screen parameter.
5. Press SOURCE button to select video source.
SEARCH/+
SOURCE/MENU
GROUP
CHANNEL
POWER
©2015 SWELLPRO All Rights Reserved 33
Important Notice:
1. For waterproof design reason, the antenna of VTX was placed inside the drone.
According to our test, the default effective range for the VTX is around 600meter to
1000meters.
2. Can upgrade the antennas of FPV screen to reach better quality and distance if
necessary.
3. Can do modification to put the VTX antenna outside under the drone to reach longer
range.
5. Specifications of Splash Drone
Aircraft & Battery & Radio Controller
Fullset Weight
Hovering precision
Splash Drone
Battery
2.4GHz Radio
controller
2300g
0.2 m
Max Yaw Angular Velocity
20°
Max pitch Tilting Angle
20°
Max Ascending/descending Velocity
4 m/s
Max flying speed
10m/s
Axis Diameter
450mm
Flight Time(without payload)
18 mins ( 4500 mAh)
Flight Time(Full Set)
12 mins ( 4500 mAh)
Max Take-off Weight
2.8Kg
Working Temperature
-10C°~ 40C°
Type and Capacity
4S 14.8V 4500mAh Lipo battery
Charging Temperature
-10C°~ 40C°
Net Weight
390g
Operation Frequency
2405 ~ 2475HMZ
Radio Range
1.0 KM
Receiver sensitivity (1%PER)
-105dbm
Working current
120 mA
Battery
1.5V AA*4
Channel
8 channels
34 ©2015 SWELLPRO All Rights Reserved
6. FAQ
6.1 How about the Radio range performance with Splash Drone customized remoter?
A: Practical test indicates the Max controlling range is up to 1.2KM, the effective distance of
signal transmission is depending on actual flight environment.
6.2 Is there any way to handle when Splash Drone is out of visible area?
A: Yes, the One-key Return-To-Home function is available to bring your Splash Drone back to
take-off location automatically. (Please ensure no obstacles & haunts during returning, regain
control on the aircraft once coming into visible sight.)
6.3 Is it truly full waterproof Drone with the naked motors?
A: A deep trust is here with us! The motors are specially treated with watertight structure design,
particularly for its wiring enrollment and perfect waterproof shell. Whatever, how amazing when
flying your Splash Drone on the sea to photograph the whale &
sailing(salty waters), please DO remember to wash Splash
dolphins! After enjoying
Motors with freshwater to avoid
corrosion/damages by the salts/sands.
6.4 You wanna a longer flight with the Splash Drone?
A: Usually, the flight time depends on different loading & flying circumstances,
Splash Drone is available for a long flight up to 19mins with empty loading and fully-charged
4500mAH Battery.
6.5 What if prefer to get the Right Throttle mode?
A: Pls don’t worry, although the radio controller is defaulted as Left Throttle when ex-factory,
customized modification of Right Throttle is also available based on special request. Splash
Drone is here to satisfy your different operation habits.
©2015 SWELLPRO All Rights Reserved35
6.6 How can i have the Follow-me function with Splash Drone?
A: Splash Drone is born to be a smart waterproof drone to accommodate with diversity needs for
different people, so it’s divided into 3 package versions: RTF, PRO and AUTO. Only the AUTO
version supports the Follow-me mode, however the RTF & PRO is also very hot for those drone
enthusiasts, professional Aerial photography and extreme sports surfing, skating, etc.
6.7 Is it normal when pulling throttle down to the lowest position, but the motors don’t
stop immediately after landing off?
A: Taking the unexpected damages into consideration, the motor will stop and lock automatically
in 5s after landing off. This protective method Not only decreases the spoilage possibility on the
motor, but also ensure a evenly landing off to avoid other in-necessity damages to shell,
Propellers, landing gear, etc.
6.8 Is it possible to switch WIFI while aerial photography with Splash Drone?
A: No, it’s advised to keep the WIFI off to avoid signal interference.
6.9 What’s happening when push Throttle joystick but without any response?
A: In case of extra danger occurs before flight, the radio controller need to be unlocked manually
to have control access, then motors can be activated by pushing up throttle.
6.10 Any counteractions to deal with difficulties in taking-off & tilting troubles?
A: 1. Improper installation with Propeller, please check whether the rotating direction of Propeller
is in accordance with motors;
2. Gyro variance error leads malfunction with Splash Drone. Please connect with software
assistant to calibrate the Gyro.
3. Please do the Horizontal calibration once again before flight.
36 ©2015 SWELLPRO All Rights Reserved
6.11 What’s wrong with wandering/red LED blinking slowly during flight?
A: Compass variance error, need to do Compass calibration at the flat ground, and try to get rid
of power cable, magnetic filed interference.
6.12 Why the drone is out of control by accident during flight?
A: The compass magnetization issue or forget calibration before taking-off, pls re-calibrate the
Compass or replace a new compass module.
6.13 What need to be done if the drone is dropping height suddenly and flashing red?
A: The low-battery warning is activated, please descend and land off aircraft properly and
quickly to have another battery replacement.
6.14 What’s the specified channel assigned for the waterproof Pay-load releaser?
A: The defaulted channel for pay-load releasing mechanism is CH7/CH8 in Receiver, this utility
can be realized by knob switch VRA/VRB to carry & release lifesaver, swim ring, mini radio
appliances to support emergency or even a bottle of water.
6.15 How to adjust the Waterproof Gimbal when it’s not in horizontal location?
A: Need to calibrate the Gimbal, detailed procedure please refer to <Operational
Instruction
of Waterproof Gimbal>
6.16 Why the drone is trembling or not hovering under GPS mode?
A: Aircraft keeps trembling, the system reminds to do the compass calibration;
Throttle range calibration is needed when aircraft isn’t hovering in GPS mode.
6.17 What should be done after getting a new Splash Controller replacement?
A: Yes, there is a binding procedure to code the new Controller with Receiver:
1. Insert the Short-circuit terminal into the ‘B/VCC’ channel in the Receiver;
2. Power on the drone, then Indicator in the receiver is flashing quickly;
©2015 SWELLPRO All Rights Reserved
37
3. Long press the black coding button on the left-lower corner of controller, at the same time
switch on the controller, then there will be a solid Red indicator in the Receiver to witness the
successful binding;
4. Power off the drone, and plug out the Short-circuit terminal to unlock the radio.
1
2
3
6.18 Any emergency methods to avoid burnt & damage when drone was hunted by the
tree, thread or crash unexpectedly?
A: Please immediately lock the Radio controller, then the motor stops working,that can protect
the motor/ESC/Props from burnt damage.
6.19 How to regain control once losing contact in the air under GPS mode?
A: Please immediately turn off the Radio controller, and flip all the switches back to original
status: 'SWA' stays at 'SWA1', 'SWB' stays at 'OFF', don't touch joysticks. Turn on the Radio
controller once again, then the controll signal can be taken over once again. After that, please
manually get the drone clam & control it to return safely.
38 ©2015 SWELLPRO All Rights Reserved
©2015 SWELLPRO All Rights Reserved39
40 ©2015 SWELLPRO All Rights Reserved