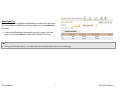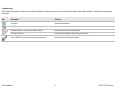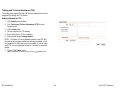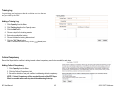
1
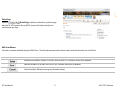
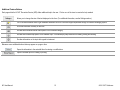
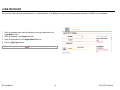
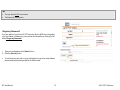
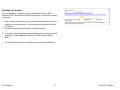
New York Coalition
Getting Started Guide
VERSION 1.0
July 2011
KIT Solutions®, LLC [email protected]
5700 Corporate Drive 1-888-600-4777
Suite 530
Pittsburgh, PA 15237
TABLE OF CONTENTS
Tips for Using The Service Effectively ...................................................................................................................................................................................................................... 5 Recommended Computer Settings ...................................................................................................................................................................................................................... 5 Application Navigating.......................................................................................................................................................................................................................................... 6 Menu Information............................................................................................................................................................................................................................................. 6 Listing Pages ................................................................................................................................................................................................................................................... 8 Data Fields & Buttons ........................................................................................................................................................................................................................................ 10 Edit Form Buttons .......................................................................................................................................................................................................................................... 11 Additional Feature Buttons............................................................................................................................................................................................................................. 12 Login Procedure ..................................................................................................................................................................................................................................................... 14 I forgot my Password! ........................................................................................................................................................................................................................................ 15 Service Announcement ...................................................................................................................................................................................................................................... 16 Temporary Account............................................................................................................................................................................................................................................ 16 Activating Your Account ..................................................................................................................................................................................................................................... 17 Administration......................................................................................................................................................................................................................................................... 18 Describe Coalition .............................................................................................................................................................................................................................................. 18 Editing Organization Information.................................................................................................................................................................................................................... 18 Funding Profile ................................................................................................................................................................................................................................................... 19 Adding a Funding Source .............................................................................................................................................................................................................................. 19 Catchment Area ................................................................................................................................................................................................................................................. 20 Adding a Catchment Area.............................................................................................................................................................................................................................. 20 Staff.................................................................................................................................................................................................................................................................... 22 Adding a Staff Member .................................................................................................................................................................................................................................. 22 Editing a Staff Member .................................................................................................................................................................................................................................. 24 Deleting a Staff Member ................................................................................................................................................................................................................................ 24 Change Password.............................................................................................................................................................................................................................................. 25 Assessment............................................................................................................................................................................................................................................................ 26 Needs Assessment Methods.............................................................................................................................................................................................................................. 26 Adding a Needs Assessment Method............................................................................................................................................................................................................ 26 Baseline NOMs Data Collection ......................................................................................................................................................................................................................... 27 Adding Baseline NOMs Data ......................................................................................................................................................................................................................... 27 Community Readiness ....................................................................................................................................................................................................................................... 27 Adding a Community Readiness Method....................................................................................................................................................................................................... 27 Needs Assessment Results ............................................................................................................................................................................................................................... 28 NY User Manual
2
© 2011 KIT Solutions®
Adding a Needs Assessment Results............................................................................................................................................................................................................ 28 Cultural Competency.......................................................................................................................................................................................................................................... 28 Adding Cultural Competency ......................................................................................................................................................................................................................... 28 Planning ................................................................................................................................................................................................................................................................. 29 LOGIC MODEL - Substance Related Consequences ........................................................................................................................................................................................ 29 Adding a Substance Related Consequence .................................................................................................................................................................................................. 29 Editing a Substance Related Consequence................................................................................................................................................................................................... 30 Deleting a Substance Related Consequence ................................................................................................................................................................................................ 30 LOGIC MODEL - Consumption Behavior........................................................................................................................................................................................................... 31 Adding a Consumption Behavior ................................................................................................................................................................................................................... 31 Editing a Consumption Behavior.................................................................................................................................................................................................................... 32 Deleting a Consumption Behavior ................................................................................................................................................................................................................. 32 LOGIC MODEL - Intervening Variables and Local Contributing Factors ............................................................................................................................................................ 33 Adding a Local Contributing Factors.............................................................................................................................................................................................................. 33 Strategic Plan..................................................................................................................................................................................................................................................... 34 Adding a Strategy and Activity ....................................................................................................................................................................................................................... 34 Action Steps................................................................................................................................................................................................................................................... 35 Adding Outcomes .......................................................................................................................................................................................................................................... 36 Coalition Capacity Building Activities ................................................................................................................................................................................................................. 37 Adding a Coalition Capacity Building Activity................................................................................................................................................................................................. 37 Cultural Competency.......................................................................................................................................................................................................................................... 38 Adding Cultural Competency ......................................................................................................................................................................................................................... 38 CAPACITY ............................................................................................................................................................................................................................................................. 39 Internal Resources ............................................................................................................................................................................................................................................. 39 Adding an Internal Resource ......................................................................................................................................................................................................................... 39 External Resources............................................................................................................................................................................................................................................ 40 Adding External Resources ........................................................................................................................................................................................................................... 40 Coalition Partners............................................................................................................................................................................................................................................... 41 Adding a Coalition Partners ........................................................................................................................................................................................................................... 41 Coalition Member ............................................................................................................................................................................................................................................... 42 Adding a Coalition Member............................................................................................................................................................................................................................ 42 Coalition Group .................................................................................................................................................................................................................................................. 42 Adding a Coalition Group............................................................................................................................................................................................................................... 42 Coalition Meeting ............................................................................................................................................................................................................................................... 43 Adding a Coalition Meeting ............................................................................................................................................................................................................................ 43 Training and Technical Assistance (TTA)........................................................................................................................................................................................................... 44 NY User Manual
3
© 2011 KIT Solutions®
Adding a Request for TTA ............................................................................................................................................................................................................................. 44 Training Log ....................................................................................................................................................................................................................................................... 45 Adding a Training Log.................................................................................................................................................................................................................................... 45 Cultural Competency.......................................................................................................................................................................................................................................... 45 Adding Cultural Competency ......................................................................................................................................................................................................................... 45 NY User Manual
4
© 2011 KIT Solutions®
TIPS FOR USING THE SERVICE EFFECTIVELY
Recommended Computer Settings
Screen Resolution
You will get the best screen layout if you set your PC monitor settings to 1024 X 768 pixels or larger. If your screen resolution is smaller (i.e., 800 X 600 pixels), everything on
the screen will appear larger. But, if you use 800 X 600 pixels you will have to scroll more both up & down and left & right to access all the data fields.
To change your PC monitor settings, right click on the Desktop background and select Properties. Next, click on the Settings tab and move the Screen Resolution scroll
bar to the right (towards “more”) to select 1024 X 768 (or larger) resolution. Click the OK button at the bottom of the window to make the change effective.
*Note: The above steps apply to a PC and may not work if you are using a MAC.
Web Browser
The web browser supported by NY KIT Prevention Service (KPS) is Microsoft Internet Explorer (IE). Mozilla Firefox, Netscape, Safari and other browsers may not be supported
by NY KIT Prevention Service (KPS). They may function but not to design specifications. We recommended users have the latest version of IE installed on their computer
along with the updates provided by Microsoft (which are released periodically).
Pop-Up Blockers
Modern computer security technology and usability features development have lead to pop-up blocking. Although these new features of internet browsers, toolbars, and other
3rd party managing software blocks hazardous and annoying pop-ups, sites like NY KIT Prevention Service (KPS) require pop-ups to be able to function. If your pop-up
blocker is enabled, there is a possibility that NY KIT Prevention Service (KPS) may not function or appear properly. You should either disable the pop-up blocker while using
NY KIT Prevention Service (KPS) (while remembering to enable it, if desired, when not in NY KIT Prevention Service (KPS)) or create exceptions for the pop-up blocker. This
is cumbersome, but may be easier than making exceptions to the pop-up blocker.
To create exceptions for the pop-up blocker, open your Internet Explorer browser window. Once the browser is open, click the top toolbar option “Tools” and then go to
“Internet Options”. After the “Internet Options” window is available, you will want to click on the “Privacy” tab at the top of the window. You will notice while on the “Privacy”
tab, at the bottom will be a section on Pop-Up Blockers. If your “Block Pop-Ups” checkbox is checked then click on the “Settings” button. You can now add the NY KIT
Prevention Service (KPS) link to the “Allowed Sites” list which the pop-up blocker will ignore when trying to block pop-ups from NY KIT Prevention Service (KPS).
*Note: These are instructions for Internet Explorer 6.0 and may be different for other Internet Explorer version.
NY User Manual
5
© 2011 KIT Solutions®
Application Navigating
The NY KIT Prevention Service (KPS) is set up in such a fashion that moving from Left to Right on the menu is the best approach to using the application. Start at the Logic
Model module, filling in all the information for that area, before moving on to the Planning module. Continuing in this manner will ensure that all of the sections of the
application have enough information to function correctly. If all of the different portions are not completed, some modules will not work correctly.
Menu Information
The Menu for the service is located across the top of the screen. Some Menu categories may be broken down into submenu categories to choose from. The Menu categories
list the main modules that are within the application. When a Menu category is selected a list of Submenu categories will be displayed on the Landing Page as links to access
the modules. (For more information on Landing Pages, see the Landing Pages section.)
1. Menu
Constant (unchanging). Available at all times.
2. Landing Page
Varies depending on which Menu category is selected. Displays the Submenu Categories.
3. Submenu Category
Varies depending on which Menu category is selected.
4. Listing Page
Varies depending on which Submenu Category is selected.
1. Main Menu
4. Listing Page
3. Submenu Category list
2. Landing Page
(This is a screenshot displaying the Main Menu (1), a Landing Page (2) and a
Submenu Category list (3))
NY User Manual
(This is a sample screenshot displaying a Listing Page (4))
6
© 2011 KIT Solutions®
Bread Crumb Trail
A “Bread Crumb Trail” is provided to indicate where you currently are in the system.
The links provided in the Bread Crumb Trail also allows you to move backwards in
the system.
•
Bread Crumb Trail
If at any time while working in the application you wish to return to the Home
page, you can click the Home link located within the Bread Crumb Trail.
Tips
•
Clicking the KIT Prevention Service – NY Coalition banner above the Menu will also return you to the Home page.
NY User Manual
7
© 2011 KIT Solutions®
Listing Pages
After selecting a category from the Landing Page you will see the “Listing Page”. When going into an area where a Listing Page is available, the service allows you to select
previously entered data to edit or view its content. No data is entered on the Listing Page.
•
When viewing a Listing Page, all of the data is available for review.
There are three types of Listing Pages:
1. Grid View
2. Hierarchy View
3. Single Form View
Grid View:
The Grid View displays the data in tables. Specific pieces of data will be displayed
within the Grid based on the fields within the entry/edit form.
•
•
When first viewing a Listing Page, all of the data is available for review. Click the
underlined Name of the data (
) you would like to edit/view.
You will be taken to the entry/edit screen. This page will be in edit mode (all data
fields will be open for data entry). Make any changes needed to the form. Click
the
(Save) button to save the changes.
Underlined
datascreenshot
link
(This
is a sample
displaying a “Grid View” Listing Page.)
Tips
•
•
If this is the first time data is being entered the Listing Page will be empty.
Clicking on the field name in a Category field (e.g.,
) will allow you to sort through your files by ascending or descending order.
NY User Manual
8
© 2011 KIT Solutions®
Computer Keys
While entering information into a form, several keys are helpful for moving the cursor from one information box (called a data field) to another. The table below summarizes
those keys:
Key
Description
Function
The Cursor
Points to desired location
The TAB key
Moves the cursor to the next data field
Hold down the SHIFT key and then press the TAB key
Moves the cursor to the previous data field
The Control (Ctrl) key
Enables blocked material to open (due to pop-up blocker)
Use the MOUSE by pointing and clicking to move the cursor
Moves the cursor by pointing and clicking
NY User Manual
9
© 2011 KIT Solutions®
Data Fields & Buttons
In NY KIT Prevention Service (KPS) there are several fields, boxes, and buttons that are used to collect, store, print, organize and delete data. Here are some examples:
Type
Preview/Description
Text Field
(aka ‘Text Box’)
Dropdown List
(aka ‘Pull Down Menu’)
List Box Buttons
Multiple Selector Box
Radio Buttons
checked
unchecked
Check Boxes
checked
unchecked
Plus/Minus buttons
(click to open)
Expand/Collapse buttons
(expand)
(click to close)
(collapse)
Required field
Default Page
(For additional information, see the Default Page section)
Tips
•
•
•
If a required field does not have data entered into it and you try to save the form, you will receive a message that informs you of the field vacant of data and you will not be able to save
that form until that field has data. Some or all of the fields may be required in order to save the form. Those fields that are required are bold and with an asterisk next to the field name.
To select multiple data at one time from a Multiple Selector Box or List Box, hold the control (Ctrl) key on the keyboard and left click the mouse on any of the data options that you’d like to
include in your entry.
Type an identifying letter of an item in a dropdown list to appear in the box.
NY User Manual
10
© 2011 KIT Solutions®
Default Page
(Default Page) checkbox is selected for a particular page
When the
within the NY KIT Prevention Service (KPS), the user will be taken directly to the
selected page upon login.
Edit Form Buttons
Information is entered and edited through the Edit Forms. The table below summarizes the buttons used to enter/edit information into an Edit Form.
Removes the information currently on an Edit Form from the NY KIT Prevention Service (KPS) database
Adds the information on an Edit Form to the NY KIT Prevention Service (KPS) database
Cancels the Add or Edit without saving any information entered
NY User Manual
11
© 2011 KIT Solutions®
Additional Feature Buttons
Each page within the NY KIT Prevention Service (KPS) offers additional help to the user. Click on one of the icons to receive the help needed.
Allows you to change the size of the text displayed on the form. (For additional information, see the Settings section.)
The Chat feature enables users to get immediate assistance from the Customer Support department through an instance messaging system.
Prints the information currently on the form.
Provides the multimedia tutorial video specific to the Submenu category.
Provides user manual help specific to the submenu topic. Includes step by step instructions for adding, editing and deleting.
Provides information on the topic with regards to treatment.
Below are some additional buttons that may appear on a page or form.
Opens the information in the enter/edit form for viewing or modifications.
Opens a selected report for viewing or printing.
NY User Manual
12
© 2011 KIT Solutions®
Settings
You can alter the size of the text on a form by using the
(Settings) option. Clicking on one of the
(Radio) button changes the text size from smallest to largest.
Provides the smallest text size
Provides a medium (default) text size
Provides the largest text size
1. Click the
(Settings) button.
2. Select the Text Size by selecting the appropriate radio button.
3. Click the
(Set) button.
*Note: Click the
(Cancel) button to cancel the resizer.
Chat Feature
The Chat feature enables users to get immediate assistance from the Customer
Support department.
•
Run button
(Chat) button has been selected, a new window opens prompting
When the
you to run the LogMeInRescue applet (application).
(This is a screenshot of the download message to use the Chat feature.)
Tips
•
•
You will need to install the LogMeIn applet in order to connect with Support. This is a free download.
The installation may take a few minutes.
NY User Manual
13
© 2011 KIT Solutions®
LOGIN PROCEDURE
Connect to the internet using an internet browser (i.e., Internet Explorer). In the Address field, type in the following website address and click Enter on your keyboard:
1. Enter the username (login name) provided by your acting administrator in the
Login Name text box.
2. Enter the password in the Password text box.
3. Enter the organization ID in the Organization ID text box.
4. Click the
(Login) button.
To log out of the application, click the
NY User Manual
(Logout) link in the upper right hand corner.
14
Login button
© 2011 KIT Solutions®
Tips
•
•
The Login Name IS NOT case sensitive.
The Password IS case sensitive.
I forgot my Password!
If you are unable to log into the NY KIT Prevention Service (KPS) due to forgetting
your Login Name or Password you can retrieve this information by clicking the link
entitle I forgot my Password!.
I forgot my Password! link
1. Type your email address in the Email text box.
2. Click the (Send It!) button.
•
You will receive a reply with our login information as long as the email address
entered matches the email provided in the Staff module.
NY User Manual
15
Send It! button
© 2011 KIT Solutions®
Service Announcements
Service Announcement
The Service Announcement section that is located on the Login page is there to notify
users that KPS is receiving any necessary server updates or other important
messages regarding the application.
If you see Service Maintenance it means that KPS may be down for a short period of
time and you will not be able to log into the application at that time. Server
maintenance typically occurs once a month.
Temporary Account
When first accessing the NY KIT Prevention Service (KPS), a temporary account is provided. The temporary account is a one (1) time account used for logging into the NY
KIT Prevention Service (KPS) and creating a system administrator (this person will register staff members into the NY KIT Prevention Service (KPS)).
1.
2.
3.
4.
5.
Enter the “temporary account” user name in the Login Name text box.
Enter the “temporary account” password in the Password text box.
Enter the organization id in the Organization ID text box.
Click the
(Login) button.
Upon login, you will be required to register a staff member. This will replace the “temporary account”. (For more information on registering staff, see the Staff section for
instructions.)
6. Once the new staff account is created, an email notification will be sent to the email address entered on the Staff form. Follow the instructions within the email to activate
the new account. (For additional information on activating an account, see the Activating Your Account section.) Upon activating the new account, the “temporary
account” will become deactivated; therefore you can no longer login with the “temporary account”.
Tips
•
When logging in using the “temporary account” you MUST create a new account. Click the (Cancel) button will log you out of the application.
NY User Manual
16
© 2011 KIT Solutions®
Activating Your Account
Your login information is created for you by your System Administrator. Before
accessing NY KIT Prevention Service (KPS) for the first time, you will need to activate
your account.
Activation link
1. Once you have been informed by your System Administrator that an account was
created for you, check your email. You should receive an email with instructions
for activation.
2. Click the activation link within the email to activate your account.
3. You should receive a confirmation message indicating your account was activated
successfully. Click the Login link to log into the NY KIT Prevention Service
(KPS).
•
Your login information should be provided to you by your System Administrator.
NY User Manual
17
© 2011 KIT Solutions®
ADMINISTRATION
The Administration module is used to complete administrative tasks within the KIT Prevention Service, such as updating organization information, staff registration, and
changing a password.
Describe Coalition
The Coalition module has fields that can be filled in with various pieces of information specific to your organization. The Primary Contact information will be useful to the State if
there are any questions on the data that has been entered into the KIT Prevention Service.
Editing Organization Information
1.
2.
3.
4.
Click Administration from the Menu.
Click Describe Coalition from the Administration Landing Page.
Click the
(Edit This Record) button.
The organization information will display in edit mode.
5. The Provider Name field will be pre-populated for you. You may modify this field
if needed.
6. The Status is defaulted to Active.
a. Active: your organization is currently providing services
b. Inactive: your organization is no longer providing services
NY User Manual
18
© 2011 KIT Solutions®
7. The list of registered staff members are displayed on the Organization form.
When in view mode, a link entitled Add New Staff will be displayed. If you need
to enter additional staff to the Staff list, select the Add New Staff link. You will be
taken to the Staff module.
8. Click the
(Save) button.
*Note: To exit the screen without saving any changes, click the
(Cancel) button.
Save button
Funding Profile
The Funding Profile is used to provide a complete picture of the funding that the coalition is receiving from any source.
Adding a Funding Source
1. Click Administration from the Menu.
2. Click Describe Coalition from the Administration Landing Page.
3. Click “Funding Profile” button at the bottom of the page
NY User Manual
Funding Profile button
19
© 2011 KIT Solutions®
4. Click the “Add” button to enter a funding source
5. Fill in the required fields and save the record
Catchment Area
The Catchment Area is used for the coalition to specify the geographical location that they will be serving
Adding a Catchment Area
1.
2.
Click Describe Coalition from the Menu.
Click “Catchment Area” button at the bottom of the page
NY User Manual
Catchment Area button
20
© 2011 KIT Solutions®
3. The County will be defaulted to the location of the coalition.
4. Choose the other data on the page to save your area.
NY User Manual
21
© 2011 KIT Solutions®
Staff
The Staff module is used to register any staff members that should have access to the data entered within the application or performing services within the community.
Adding a Staff Member
1. Click Administration from the Menu.
2. Click Staff from the Administration Landing Page.
3. Click the
(Create New Staff Member) button.
4. Enter the details for the staff account that you are creating.
5. Enter a username for the staff member in the Login Name text box.
6. Enter a temporary password for the staff member in the Password text box.
The Password can be any combination of alpha or numeric characters. This
Password will be used in combination with the Login Name to log into the NY
KIT Prevention Service (KPS). Once a user logs in, the password can be
changed to one of their liking using the Change Password module.
7. Select the staff member’s permission level from the Role dropdown list.
NY User Manual
22
© 2011 KIT Solutions®
Tips
•
•
Passwords can be any combination of letters, numbers and/or characters.
Passwords are case sensitive.
8. Click the
(Save) button.
*Note: To exit the screen without saving, click the
(Cancel) button.
Save button
NY User Manual
23
© 2011 KIT Solutions®
Editing a Staff Member
1. Click Administration from the Menu.
2. Click Staff from the Administration Landing Page.
3. From the Staff Listing Page, click the staff member First Name link of the staff
member you wish to edit.
4. Make any changes needed to the form.
5. Click the
(Save) button.
*Note: To exit the screen without saving any changes, click the
(Cancel) button.
Deleting a Staff Member
1. Click Administration from the Menu.
2. Click Staff from the Administration Landing Page.
3. From the Staff Listing Page, click the staff member First Name link of the staff
member you wish to delete.
4. Click the
(Delete) button at the bottom of the form.
*Note: To exit the screen without deleting, click the
(Cancel) button.
5. You will receive a message asking if you are sure you want to continue with the
deletion. Click the
(OK) button to continue with the deletion.
*Note: Click the
(Cancel) button to cancel the deletion.
6. You will receive a confirmation message indicating the staff member has been
deleted successfully. Notice that the staff member is no longer in the list.
Tips
•
•
When a staff member leaves your organization you will not be able to delete the staff member. In these instances, change the Status to Inactive to prevent the staff member from logging
into the application.
Setting the Status to Inactive is used to keep the staff member in the database for history purposes but removed from all of the staff lists on the Edit Forms.
NY User Manual
24
© 2011 KIT Solutions®
Change Password
The Change Password module allows a user to change the password on the account they are currently logged in with.
1.
2.
3.
4.
5.
6.
Click Administration from the Menu.
Click Change Password from the Administration Landing Page.
Enter the current password into the Current Password text box.
Enter a password you would like to use in the New Password text box.
Retype the password in the Confirm New Password text box.
Click the
(Save) button.
*Note: To exit the screen without saving, click the
(Cancel) button
Tips
•
•
•
It is important to remember that passwords are case sensitive.
Passwords can be any combination of letters, numbers, and/or characters.
Passwords do not expire.
NY User Manual
25
© 2011 KIT Solutions®
ASSESSMENT
The Assessment area is used to enter the results of the needs assessment that has been conducted by the coalition.
Needs Assessment Methods
Adding a Needs Assessment Method
1. Click Assessment from the Menu.
2. Click the Needs Assessment Method Link
3. Click the “Add Assessment Method” button
Save button
4. Use the drop downs to complete the page. The Notes section is optional to
provide any additional details.
NOTE: All of the Methods that are entered in this area will be used when
building your Logic Model during the Planning step.
NY User Manual
26
© 2011 KIT Solutions®
Baseline NOMs Data Collection
Adding Baseline NOMs Data
1.
2.
3.
4.
Click Assessment from the Menu.
Click the Baseline NOMs Data Collection Link.
Click “Add”
Use the drop downs to complete the details of the page
Community Readiness
Adding a Community Readiness Method
1.
2.
3.
4.
Click Assessment from the Menu.
Click the Community Readiness Link
Click the “Add” button
Complete the required fields for your methods.
NY User Manual
27
© 2011 KIT Solutions®
Needs Assessment Results
Adding a Needs Assessment Results
1. Click Assessment from the Menu.
2. Click the Needs Assessment Results Link
3. Choose whether each of the items have been identified.
NOTE: You will not be able to complete your Planning if this screen has not
been completed.
Cultural Competency
Record the Steps that the coalition is taking towards cultural competency need to be recorded for each step.
Adding Cultural Competency
1. Click Assessment from the Menu.
2. Click the Cultural Competency Link.
3. Record the details on how your coalition is addressing cultural competency
NOTE: Cultural Competency will be recorded for each of the SPF Steps.
What is recorded under each step should be addressing that step.
NY User Manual
28
© 2011 KIT Solutions®
PLANNING
The Planning Step contains the Logic Model module which is used for describing relationships among multiple factors and components in a community, and identifies the
strategies that can impact those relationships to achieve a desired outcome. This area is also used to develop your strategic plan and coalition capacity building activities.
LOGIC MODEL - Substance Related Consequences
Adding a Substance Related Consequence
4. Click Planning from the menu
5. Click Logic Model from the Planning Menu.
6. Click the
Begin Your Logic Model
button
(Begin Logic Model) button.
7. Identifying the priority problem from the Priority Problem dropdown list.
8. Select the primary substance related consequence from the Primary
Consequence dropdown list.
9. Using the Additional Consequences checkboxes, select any other substance
related consequences you wish to identify.
*Note: Depending on the Primary Consequence selected, the Additional Consequences options
may change.
10. Enter your problem statement
11. Choose the data source/sources that determined that support your selections.
These Data Sources are pre-populated from what was entered in the Needs
Assessment Methods in the Assessment step.
12. Choose the demographics that reflect the target population for this consequence
13. The Status is defaulted to Active.
1. Active: the substance related consequence is
currently in use.
2. Inactive: the substance related consequence is no
longer in use.
14. Click the
(Save) button.
*Note: To exit the screen without saving, click the
NY User Manual
Save button
(Cancel) button.
29
© 2011 KIT Solutions®
Editing a Substance Related Consequence
1. Click Planning from the Menu
2. Click Logic Model from the Planning Menu.
3. From the Logic Model Listing Page, click the Substance Related Consequence
Name link of the consequence you wish to edit.
4. Make any changes needed to the form.
5. Click the
(Save) button.
*Note: To exit the screen without saving any changes, click the
Substance Related
Consequence Name link
(Cancel) button.
Deleting a Substance Related Consequence
1. Click Planning from the Menu
2. Click Logic Model from the Planning Menu.
3. From the Logic Model Listing Page, click the Substance Related Consequence
Name link of the consequence you wish to delete.
4. Click the
(Delete) button at the bottom of the form.
*Note: To exit the screen without deleting, click the
(Cancel) button.
5. You will receive a message asking if you are sure you want to continue with the
deletion. Click the
(OK) button to continue with the deletion.
*Note: Click the
NY User Manual
(Cancel) button to cancel the deletion.
30
Delete button
© 2011 KIT Solutions®
LOGIC MODEL - Consumption Behavior
Adding a Consumption Behavior
1. Click Planning from the Menu
2. Click Logic Model from the Planning Menu.
3. Click the Add Consumption Behavior button.
Add Consumption
Behavior button
4. The Priority Problem and Consequences are prepopulated for you.
5. Select the substance abuse behavior from the Behavior dropdown list.
6. Enter any additional notes regarding the substance abuse behavior in the
Substance Abuse text box, if desired.
7. Choose the data sources that determined that support your selections. These
Data Sources are pre-populated from what was entered in the Needs Assessment
Methods in the Assessment step.
8. Select the demographic profile that is associated with this behavior
9. The Status is defaulted to Active.
a. Active: substance abuse behavior is currently in use.
b. Inactive: substance abuse behavior is no longer is use.
10. Using the Intervening Variables checkboxes, select the intervening variables
which are contributing to the priority problem.
a. If Other is selected, you will be asked to specify what that intervening
variable is using the text box
(Save) button.
11. Click the
*Note: To exit the screen without saving, click the
NY User Manual
(Cancel) button.
31
© 2011 KIT Solutions®
Editing a Consumption Behavior
1. Click Planning from the Menu
2. Click Logic Model from the Planning Menu.
3. From the Logic Model Listing Page, click the Substance Use Behavior Name link
of the behavior you wish to edit.
4. Make any changes needed to the form.
5. Click the
(Save) button.
*Note: To exit the screen without saving any changes, click the
Substance Use Behavior
Name link
(Cancel) button.
Deleting a Consumption Behavior
1. Click Logic Model from the Menu.
2. From the Logic Model Listing Page, click the Substance Use Behavior Name link
of the behavior you wish to delete.
3. Click the
(Delete) button at the bottom of the form.
*Note: To exit the screen without deleting, click the
Delete button
(Cancel) button.
4. You will receive a message asking if you are sure you want to continue with the
deletion. Click the
(OK) button to continue with the deletion.
*Note: Click the
NY User Manual
(Cancel) button to cancel the deletion.
32
© 2011 KIT Solutions®
LOGIC MODEL - Intervening Variables and Local Contributing Factors
The Intervening Variables are populated based on the items that are selected for each behavior. Each Intervening Variable will be color coded to match with the Local
Contributing Factors that are selected.
Intervening Variable Name
Adding a Local Contributing Factors
1. Click Planning from the Menu
2. Click Logic Model from the Planning Menu.
3. Click the Intervening Variable that you would like to add Local Contributing
Factors to.
4. Choose the data sources that determined that support your selections. These
Data Sources are pre-populated from what was entered in the Needs Assessment
Methods in the Assessment step.
5. Choose the Contributing Factors that are associated with the selected Intervening
Variable.
6. You may choose to enter a User Defined contributing factor. You will type in
your contributing factor and click the “Add” button. To add another User
Defined contributing factor, type in the factor and click Add again.
7. Click the
(Save) button.
*Note: To exit the screen without saving, click the
NY User Manual
(Cancel) button.
33
© 2011 KIT Solutions®
Strategic Plan
Adding a Strategy and Activity
1. Click Planning from the Menu.
2. Click the Strategic Plan link
3. Click the blue bar that is labeled Strategies to add a new strategy.
4. Choose an appropriate Intervening Variable and Contributing Factor combination
that this Strategy will be targeting
NOTE: Only those Intervening Variables and Contributing Factors that were
added in the Logic Model will be available for selection.
5. Enter the details of the Strategy that will be implemented
6. Enter the Expected Total Cost
7. Choose the Strategy Type – Community Prevention is the only option at this time.
8. Choose the Strategy Type II – Media, Policy, or Enforcement
9. Depending on the Strategy Type II – you may need to choose a Strategy Type III
to further narrow down the category of implementation
10. Choose the Activity Type that will be implemented
NY User Manual
34
Blue Bar to Add a new
Strategy
© 2011 KIT Solutions®
Action Steps
1. Click the Add button to begin to add Action Steps
2. Enter the details of your Action Step
3.
4.
5.
6.
7.
8.
Add Button for Action Steps
Choose a Start and End Date
Enter the person/persons responsible for completing the action step
Enter the process indicators to show that progress is being made
Enter the final desired Outputs of the action step
Click OK to add the Action Step
This will add the Action Step to the “Action Steps Grid.” Repeat Steps 1
through 7 to add additional steps.
NY User Manual
OK button
35
© 2011 KIT Solutions®
Adding Outcomes
Action Step Grid
9. Enter the Consumption Outcome that is being targeted with the strategy and
Activity
10. Enter the Consequence Outcome that is being targeted with the strategy and
Activity
Save Button
11. Click the
(Save) button.
*Note: To exit the screen without saving, click the
(Cancel) button.
Upon Clicking Save, you will be returned to the main landing page for the Strategic
Plan, It will be populated with the Strategy and Action Steps that were added.
NY User Manual
36
© 2011 KIT Solutions®
Coalition Capacity Building Activities
This module allows you to enter activities that will be conducted to help build your coalition capacity. These are not directly related to a strategy.
Adding a Coalition Capacity Building Activity
1.
2.
3.
4.
5.
6.
7.
8.
9.
Add Button
Click Planning from the Menu.
Click the Coalition Capacity Building Activities link
Click the Add button
Choose any of the Capacity Building Statements that may be impacted by
this activity
Choose an Activity Name
Enter a Description of the activity
Choose the locality in which the activity will take place
Enter a Projected Start/End Date
(Save) button.
Click the
*Note: To exit the screen without saving, click the
NY User Manual
(Cancel) button.
37
© 2011 KIT Solutions®
Cultural Competency
Record the Steps that the coalition is taking towards cultural competency need to be recorded for each step.
Adding Cultural Competency
1. Click Planning from the Menu.
2. Click the Cultural Competency Link.
3. Record the details on how your coalition is addressing cultural competency
NOTE: Cultural Competency will be recorded for each of the SPF Steps.
What is recorded under each step should be addressing that step.
NOTE: This is an example screenshot from the Assessment area.
NY User Manual
38
© 2011 KIT Solutions®
CAPACITY
The Capacity module is used to record the current capacity of the coalition as well as the ongoing activities of the coalition.
Internal Resources
Adding an Internal Resource
1.
2.
3.
Click Capacity from the menu
Click Internal Resources from the Capacity Menu
Select the appropriate internal resources that are currently a part of the
coalition
4. Click the
(Save) button.
*Note: To exit the screen without saving, click the
NY User Manual
(Cancel) button.
39
© 2011 KIT Solutions®
External Resources
Identify programs, policies and strategies existing in your community which address the Intervening Variables identified in your Needs Assessment.
Adding External Resources
1.
2.
3.
4.
Click Capacity from the menu\
Click External Resources from the Capacity Menu
Click Add to Inventory to start to build the external resource inventory
Choose an appropriate Intervening Variable that this External Resource will
be addressing
NOTE: Only those Intervening Variables that were added in the Logic Model will
be available for selection.
5. Choose a Resource Type and Name and provide a description of the
implementation
6. Enter any details concerning any gaps that may exist with this resource.
7. Enter an estimate of how many are served or impacted by this resource
8. Choose the type of organization that is implementing the resource and the
name of that organization
9. Select the demographics that are targeted by the resource
10. Choose any documentation that provides information on the effectiveness of
the resource
11. Enter any training or expertise that is required to continue this resource
12. Enter any funding information that is known concerning the resource
13. Click the
(Save) button.
*Note: To exit the screen without saving, click the
NY User Manual
(Cancel) button.
40
© 2011 KIT Solutions®
Coalition Partners
Register information about the organizations that the coalition is working with in the 12 sectors
Adding a Coalition Partners
1.
2.
3.
4.
5.
Click Capacity from the Menu.
Click Coalition Partners from the Capacity menu
Click Create New Coalition Organization button
Populate all required fields for the partnering organization
If it is a Funded OASAS provider – you will be prompted to choose an official
OASAS name.
6. Click the
(Save) button.
*Note: To exit the screen without saving, click the
NY User Manual
(Cancel) button.
41
© 2011 KIT Solutions®
Coalition Member
Add members of your coalition
Adding a Coalition Member
1.
2.
3.
4.
5.
Click Capacity from the Menu.
Click Coalition Members from the Capacity menu
Click Create New Coalition Member button
Populate all required fields for the coalition member
(Save) button.
Click the
*Note: To exit the screen without saving, click the
(Cancel) button.
Coalition Group
Coalition task force, subcommittee, and group registration
Adding a Coalition Group
1.
2.
3.
4.
Click Capacity from the Menu.
Click Coalition Group from the Capacity menu
Click Create New Coalition Group button
Populate the required fields for the group name and members
of the group
(Save) button.
5. Click the
*Note: To exit the screen without saving, click the
NY User Manual
(Cancel) button.
42
© 2011 KIT Solutions®
Coalition Meeting
Tracking of coalition meetings including who attended the meetings as
well as the option to upload agenda and minutes
Adding a Coalition Meeting
1.
2.
3.
4.
5.
Click Capacity from the Menu.
Click Coalition Meeting from the Capacity menu
Click Create New Coalition Meeting button
Select a meeting type and choose the meeting date
You can utilize the Upload Meeting Files to upload any files
(meetings, agenda, etc.) that you would like to associate with
this meeting.
6. Click the
(Save) button.
*Note: To exit the screen without saving, click the
NY User Manual
(Cancel) button.
43
© 2011 KIT Solutions®
Training and Technical Assistance (TTA)
The coalition may request Training and Technical assistance from their
assigned PRC through the TTA module.
Adding a Request for TTA
1. Click Capacity from the Menu.
2. Click Training and Technical Assistance (TTA) from the
Capacity menu
3. Click the Add button
4. Choose a topic for the TTA session
5. Enter a date that this TTA is needed by
6. Status should remain Training Needed
NOTE: The Status of Training Needed indicates to the PRC that
this training has not been received and is being requested. It will
be changed by the PRC after training is provided. If you no longer
need TTA, you can update the request to “Canceled” to reflect this
change.
7. Click the
(Save) button.
*Note: To exit the screen without saving, click the
NY User Manual
(Cancel) button.
44
© 2011 KIT Solutions®
Training Log
Log trainings and assistance that the coalition receives that are
not provided by the PRC.
Adding a Training Log
1.
2.
3.
4.
5.
6.
7.
Click Capacity from the Menu.
Click Training Log from the Capacity menu
Click the Add button
Choose a topic for the training session
Enter who provided the training
Choose the date the training was received
Click the
(Save) button.
*Note: To exit the screen without saving, click the
(Cancel) button.
Cultural Competency
Record the Steps that the coalition is taking towards cultural competency need to be recorded for each step.
Adding Cultural Competency
1. Click Capacity from the Menu.
2. Click the Cultural Competency Link.
3. Record the details on how your coalition is addressing cultural competency
NOTE: Cultural Competency will be recorded for each of the SPF Steps.
What is recorded under each step should be addressing that step.
NY User Manual
45
© 2011 KIT Solutions®