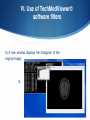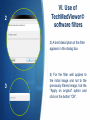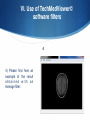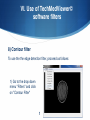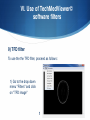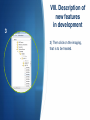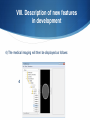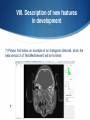
1
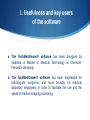
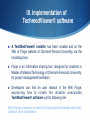
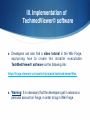
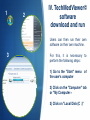
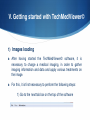
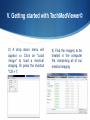
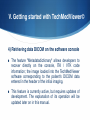
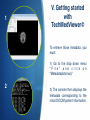
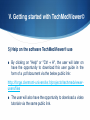
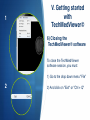
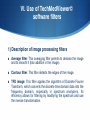
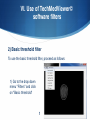
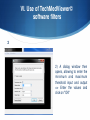
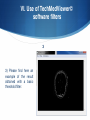
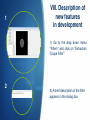
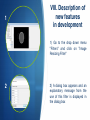
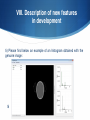
TECHMEDVIEWER © SOFTWARE S SUMMARY! ! I. Usefulness and key users of the software! ! II. Software Environment! ! III. Implementation of TechmedViewer software ! ! IV. TechMedViewer software download and run ! ! V. Getting started with TechMedViewer! ! !1) Images loading! !2) Saving an image on TechMedViewer! !3) Retrieving data DICOM (Digital Imaging and Communications in ! Medicine) of the patient! !4) Retrieving DICOM data on the software console! !5) Help on the software TechMedViewer use! !6) Closing the TechMedViewer software! ! SUMMARY! ! ! VI. Use of TechMedViewer software filters ! !1) Description of image processing filters! !2) Basic threshold filter! !3) Basic negative filter! !4) Low Pass filter! !5) High Pass filter! !6) Histogram filter! !7) Average filter! !8) Contour filter! !9) TFD filter! ! VII. Retrieving information about images! ! VIII. Description of new features in development! !1) Images preview! !2) Display of DICOM metadata! !3) Cutting extraction filter! !4) Image resizing filter! !5) Watershed line segmentation filter! !6) Viewing of pictures information! Credits! I. Usefulness and key users of the software S The TechMedViewer© software has been designed by students in Master of Medical Technology at ClermontFerrand’s University. ! S The TechMedViewer© software has been engineered for radiologists, surgeons, and more broadly, for medical laboratory employees, in order to facilitate the use and the speed of medical imaging processing.! II. Software environment S The TechMedViewer© software is an executable software to download and install on your own computer! S The TechMedViewer© software is currently used on the Windows operating system and all related operating versions (Vista family version, etc ...).! S Caution: The TechMedViewer© software does not work on other operating systems (e.g.: Linux, Mac). The use on other operating systems is planned for a later version of TechMedViewer© software.! III. Implementation of TechmedViewer© software ! S A TechMedViewer© installer has been created and on the Wiki of Forge website of Clermont-Ferrand University, via the InnoSetup tool.! S Forge is an information sharing tool, designed for students in Master of Medical Technology of Clermont-Ferrand’s University, for project management facilitation. S Developers can find an user manual in the Wiki Forge, explaining how to create the installer executable TechMedViewer© software via the following link:! http://forge.clermont-universite.fr/projects/techmedviewer/wiki/ Création_d'un_installateur! III. Implementation of TechmedViewer© software ! S Developers can also find a video tutorial in the Wiki Forge, explaining how to create the installer executable TechMedViewer© software via the following link:! https://forge.clermont-universite.fr/projects/techmedviewer/files! ! S Warning: It is necessary that the developers get in advance a personal account on Forge, in order to log in Wiki Forge.! IV. TechMedViewer© software download and run ! S Final users can download the TechMedViewer© software on their personal machine an executable software, by clicking on the following private link:! https://forge.clermont-universite.fr/projects/techmedviewer/files Warning: It is necessary that the users get in advance a personal account on Forge, in order to log in. ! S Later on, the final users will be able to get the executable software, by clicking on the following public link:! https://forge.clermont-universite.fr/projects/techmedviewerusers/files 1! 3! 2! IV. TechMedViewer© software download and run Users can then run their own software on their own machine.! ! For this, it is necessary to ! perform the following steps:! ! 1) Go to the "Start" menu of the user's computer ! ! 2) Click on the "Computer" tab or "My Computer »! ! 3) Click on "Local Disk (C :)"! ! ! 4! 6! 5! IV. TechMedViewer© software download and run ! 4) Access the "Program Files (x86)" folder on the hard disk and ! click on it! ! 5) Access the folder! "TechMedViewer" and ! click on it! ! 6) Double-click on the application "techmed_viewer"! ! ! IV. TechMedViewer© software download and run ! 7) The application of! TechMedViewer© software will now launch on your computer ! ! And 2 windows will open in the screen: ! ! !- an .exe console ! !- and the software tool.! ! ! V. Getting started with TechMedViewer©! 1) Images loading ! S After having started the TechMedViewer© software, it is necessary to charge a medical imaging, in order to gather imaging information and data and apply various treatments on the image.! S For this, it is first necessary to perform the following steps:! !1) Go to the next tab bar on the top of the software! ! ! V. Getting started with TechMedViewer© 2) A drop appear => image" to imaging. Or "Ctrl + I".! down menu will Click on "Load load a medical press the shortcut 3) Find the imagery to be treated in the computer file, comprising all of our medical imaging! V. Getting started with TechMedViewer© 4) Select the image you want to capture, click on the image file, and on the "Open" button! V. Getting started with TechMedViewer© ! 5) The initial imaging directly appears in the TechMedViewer© software pop-up, as well as the details of the size of the area pointed to the image by the mouse, in a second window: the console.! ! ! ! V. Getting started with TechMedViewer©! 2) Saving an image on TechMedViewer©! !! image processing work When the is finalized, it may be interesting ! ! to keep !the processed images. ! !! !For this, you must:! ! 1) Go to the drop down ! menu "File" and click on !"Save Image". ! ! Or press the shortcut !"Ctrl + S"! 1! ! 2! 3! V. Getting started with TechMedViewer© ! 2) Name the new image and ! click the "Save" button! ! ! ! ! ! 3) And click on the save button! ! ! ! V. Getting started with TechMedViewer©! 3) Retrieving data DICOM (Digital Imaging and Communications in Medicine) of the patient! S The !!feature "Info dicom" retrieves DICOM data ! in the ! header ! of the!! entered original imagery.! S This functionality is currently under development. The explanation of its operation will be updated later on in this manual.! V. Getting started with TechMedViewer©! 4) Retrieving data DICOM on the software console! S The !!feature "Metadatadictionary" allows developers to recover directly on the console, ITK / VTK code ! ! the image ! !! information; loaded into the TechMedViewer software corresponding to the patient's DICOM data entered in the header of the initial imaging.! S This feature is currently active, but requires updates of development. The explanation of its operation will be updated later on in this manual.! ! 1! 2! V. Getting started with TechMedViewer© To retrieve those metadata, you must: ! !! 1) Go to the drop down menu "File" and click on "Metadatadictionary"! ! ! 2) The console then displays the metadata corresponding to the initial DICOM patient information.! ! ! ! V. Getting started with TechMedViewer©! 5) Help on the software TechMedViewer© use! ! ! ! !! S The "Help" feature allows users to get help, as for the usual operations of the software.! S This feature is currently active, but requires significant updates. ! 1! 2! V. Getting started with TechMedViewer© To access to the “Help” feature, you must:! !! 1) Go to the drop down menu "File" and click on ”Help” or "Ctrl + H” ! ! ! 2) A quick explanatory message about the purpose of the software currently appears! ! ! ! V. Getting started with TechMedViewer©! 5) Help on the software TechMedViewer© use! ! ! ! !! S By clicking on "Help" or "Ctrl + H", the user will later on have the opportunity to download this user guide in the form of a .pdf document via the below public link:! http://forge.clermont-universite.fr/projects/techmedviewerusers/files! S The user will also have the opportunity to download a video tutorials via the same public link.! 1! V. Getting started with TechMedViewer© 6) Closing the! TechMedViewer© software ! 2! ! ! ! To close the TechMedViewer software session, you must:! ! 1) Go to the drop down menu "File” ! ! 2) And click on "Exit" or "Ctrl + Q"! ! ! ! ! VI. Use of TechMedViewer© software filters ! 1) Description of image processing filters! S The ! TechMedViewer ! ! software !! currently offers various image processing filters, detailed below:! S Basic threshold filter: This filter allows a double thresholding, which keeps a selected region and separate it from the bottom of the object. The number of classes being equal to 2, the filter is thus a binarization.! S Basic negative filter: This filter inverts the intensity of the image (white in the image becomes black and vice versa).! ! VI. Use of TechMedViewer© software filters ! 1) Description of image processing filters! ! ! ! !! S Low Pass filter: This filter allows low frequencies and attenuates high frequencies, ie frequencies above the cutoff frequency.! S High Pass filter: This filter passes high frequencies and attenuates low frequencies, ie frequencies below the cutoff frequency.! VI. Use of TechMedViewer© software filters ! 1) Description of image processing filters! ! ! ! filter applies !! S Histogram filter: This an histogram, that represents the distribution of the image intensities. ! The histogram is defined as a discrete function, that maps each value of intensity, the number of pixels taking this value. The determination of the histogram is carried out by counting the number of pixels for each image intensity. ! Sometimes performs a quantization, which features some intensity values into a single class, which can help to better visualize the distribution of image intensities.! VI. Use of TechMedViewer© software filters ! 1) Description of image processing filters! S ! Average filter: This averaging filter permits to denoise the image and to smooth it (blur addition in the image).! S Contour filter: This filter detects the edges of the image. ! S TFD image: This filter applies the algorithm of Discrete Fourier Transform, which converts the discrete time domain data into the frequency domain, especially in spectrum analyzers. Its efficiency allows for filtering by modifying the spectrum and use the inverse transformation.! VI. Use of TechMedViewer© software filters ! 2) Basic threshold filter! To use the basic threshold filter, proceed as follows:! ! ! 1) Go to the drop down menu "Filters" and click ! threshold"! ! ! on "Basic !! 1 VI. Use of TechMedViewer© software filters ! 2 2) A dialog window then opens, allowing to enter the minimum and maximum threshold input and output => Enter the values and click on "OK"! VI. Use of TechMedViewer© software filters ! 3 3) Please find here an example of the result obtained with a basic threshold filter:! VI. Use of TechMedViewer© software filters ! 3) Basic negative filter! To use the basic negative filter, proceed as follows:! ! ! 1) Go to the drop down menu "Filters" and click ! Negative"! ! ! on "Basic !! 1 2! 3! VI. Use of TechMedViewer© software filters 2) An explanatory message from the use of this filter is displayed in the dialog box.! ! ! ! ! ! 3) For the filter well applies to the initial image and not to the previously filtered image, tick the "Apply on original" option and click on the "OK" button! ! ! VI. Use of TechMedViewer© software filters ! 4 4) Please find here an example of the result obtained with a basic negative filter:! VI. Use of TechMedViewer© software filters ! 4) Low Pass filter! To use the Low Pass filter, proceed as follows:! ! ! 1) Go to the drop down menu "Filters" and click ! Pass !Filter"! ! on ”Low !! 1 2! 3! VI. Use of TechMedViewer© software filters 2) A brief description of the filter appears in the dialog box! ! ! ! ! ! 3) For the filter well applies to the initial image and not to the previously filtered image, tick the "Apply on original" option and click on the "OK" button! ! ! VI. Use of TechMedViewer© software filters ! 4 4) Please find here an example of the result obtained with a Low Pass filter:! VI. Use of TechMedViewer© software filters ! 5) High Pass filter! To use the High Pass filter, proceed as follows:! ! ! 1) Go to the drop down menu "Filters" and click ! Pass! Filter"! ! on ”High !! 1 2! VI. Use of TechMedViewer© software filters ! ! ! ! 2) For the filter well applies to the initial image and not to the previously filtered image, tick the "Apply on original" option and click on the "OK" button! ! ! VI. Use of TechMedViewer© software filters ! 3 3) Please find here an example of the result obtained with an High Pass filter:! VI. Use of TechMedViewer© software filters ! 6) Histogram filter! To use the Histogram filter, proceed as follows:! ! ! 1) Go to the drop down menu "Filters" and click ! ! Filter"! ! on ”Histogram !! 1 2! 3! VI. Use of TechMedViewer© software filters 2) A brief description of the filter appears in the dialog box! ! ! ! ! ! 3) For the filter well applies to the initial image and not to the previously filtered image, tick the "Apply on original" option! ! 4! VI. Use of TechMedViewer© software filters ! ! ! ! 4) Set the number of bins (details) of the image you would like to get and click on the "OK" button.! ! ! VI. Use of TechMedViewer© software filters ! 5) A new window displays the histogram of the original image:! 5 VI. Use of TechMedViewer© software filters ! 7) Average filter! To use the Average filter, proceed as follows:! ! ! 1) Go to the drop down menu "Filters" and click ! ! ! on ”Average Filter"! !! 1 2! 3! VI. Use of TechMedViewer© software filters 2) A brief description of the filter appears in the dialog box! ! ! ! ! ! 3) For the filter well applies to the initial image and not to the previously filtered image, tick the "Apply on original" option and click on the button “OK”.! ! VI. Use of TechMedViewer© software filters ! 4 4) Please find here an example of the result obtained with an Average filter:! VI. Use of TechMedViewer© software filters ! 8) Contour filter! To use the the edge detection filter, proceed as follows:! ! ! 1) Go to the drop down menu "Filters" and click ! ! ! on ”Contour Filter"! !! 1 2! 3! VI. Use of TechMedViewer© software filters 2) A brief description of the filter appears in the dialog box! ! ! ! ! ! 3) For the filter well applies to the initial image and not to the previously filtered image, tick the "Apply on original" option and click on the button “OK”.! ! VI. Use of TechMedViewer© software filters ! 4 4) Please find here an example of the result obtained with a Contour filter:! VI. Use of TechMedViewer© software filters ! 9) TFD filter! To use the the TFD filter, proceed as follows:! ! ! 1) Go to the drop down menu "Filters" and click ! image"! ! ! on ”TFD !! 1 2! 3! VI. Use of TechMedViewer© software filters 2) A brief description of the filter appears in the dialog box! ! ! ! ! ! 3) For the filter well applies to the initial image and not to the previously filtered image, tick the "Apply on original" option and click on the button “OK”.! ! VI. Use of TechMedViewer© software filters ! 4 4) Please find here an example of the result obtained with a TFD filter:! VII. Retrieving information about images! S The feature "Information" will retrieve information about images: provide information visualization extracted from the image, such as the histogram, the maximum and minimum values, etc.! ! To use the "Information", proceed as follows:! 1) Get the drop down menu of "Informations" and click on "Histogram”:! ! 1 VII. Retrieving information about images! S This functionality “Informations” is currently under development.! S The explanation of its operation will be updated later on in this manual.! ! VIII. Description of new features in development ! 1) Images preview! ! S This new feature will allow you to preview images when selecting a directory or a file in the DICOM tree.! S Please find further on an early grip of this new development functionality:! ! 1! 2! VIII. Description of new features in development 1) Loading the TechMedViewer© software, the interface will look like this.! ! ! ! ! 2) To choose a DICOM imaging in tree, find the location of imaging in the corresponding files, for example, by clicking on the hard drive "C:" and then "Program Files"! ! 3! VIII. Description of new features in development 3) Then click on the imaging, that is to be treated.! ! ! ! ! ! VIII. Description of new features in development ! 4) The medical imaging will then be displayed as follows:! 4 VIII. Description of new features in development ! 5) It is of course possible to resize with the mouse the size of the window, to better visualize the picture, and we can then begin to work!! ! 5 VIII. Description of new features in development ! 2) Display of DICOM metadata! ! S This new feature will fuel the existing functionality "Info DICOM" by feeding the DICOM metadata included in the header of the genuine imaging. ! ! ! ! VIII. Description of new features in development ! 3) Cutting extraction filter! S This new feature will apply a filter, giving the opportunity to carve out a cut in the initial image, according to values, predefined by the user.! S Please find further on an early grip of this new development functionality:! ! ! 1! 2! VIII. Description of new features in development 1) Go to the drop down menu "Filters" and click on "Extraction Coupe Filter"! ! ! ! ! ! ! ! 2) A brief description of the filter appears in the dialog box! ! 3! 4! VIII. Description of new features in development 3) Choose the number of cuts that we want to achieve in the selection "Number of section”.! ! ! ! ! ! ! 4) For the filter well applies to the initial image and not to the previously filtered image, tick the "Apply on original" option and on the "OK" button! ! VIII. Description of new features in development ! 5) Please find below an example of the result obtained with a “Extraction Coupe filter”:! 5 VIII. Description of new features in development ! 4) Image resizing filter! S This new feature will apply a filter, giving the ability to resize the image, according to values predefined by the user.! S Please find further on an early grip of this new feature currently in development:! ! ! 1! 2! VIII. Description of new features in development 1) Go to the drop down menu "Filters" and click on ”Image Resizing Filter"! ! ! ! ! ! ! 2) A dialog box appears and an explanatory message from the use of this filter is displayed in the dialog box! ! 3! 4! VIII. Description of new features in development 3) Choose the resize coordinates "X", "Y" and "Z" that we want to achieve, Z being the number of ! image slices! ! ! ! 4) For the filter well applies to the initial image and not the previously filtered image, tick the "Apply on original" option and on the "OK" button! ! VIII. Description of new features in development ! 5) Please find below an example of the result obtained with a “Image Resizing filter”:! 5 VIII. Description of new features in development ! 5) Watershed line segmentation filter! S This new feature will apply a filter image segmentation by watershed line. The segmentation aims to gather pixels, them according to pre-defined criteria. Pixels are grouped into regions and which constitute a paving or a partition of the image. This may be for example of separate objects on the bottom. ! VIII. Description of new features in development ! Please find below an example of the result that will obtained with a “Watershed filter”:! VIII. Description of new features in development ! 6) Viewing of pictures information! S This new feature will allow to propose information visualization extracted from the image, such as the histogram, the maximum and minimum values, etc.! S A new window will be created to view this information, with the establishment of a design pattern "factory" "decorator" for implementation.! S Please find further on an early grip of this new feature currently in development:! 1! 2! VIII. Description of new features in development 1) Go to the drop down menu ”Informations" and click on ”Histogram"! ! ! ! ! ! ! 2) A dialog box appears and an explanatory message from the use of this filter is displayed in the dialog box! ! 3! 4! VIII. Description of new features in development 3) Choose the number of classes (details) of the histogram in "Set bin number"! ! ! ! ! ! ! 4) For the filter well applies to the initial image and not the previously filtered image, tick the "Apply on original" option and on the "OK" button! ! VIII. Description of new features in development ! 5) Please find below an example of an histogram obtained with the genuine image:! 5 VIII. Description of new features in development ! 6) Please find below an example of an histogram obtained with a treated image:! 6 VIII. Description of new features in development ! 7) Please find below an example of an histogram obtained, when the beta version 2 of TechMedViewer© will be finished:! 7 Credits:! ! User Guide realization: ! Virginie ROUGIER! ! TechMedViewer© development (Version 2):! Alexis LAFONT! Ahmed MESBAH! Hawa MOHAMED ALI! Bibi OMULBANIN MOUSSAVI! ! THANK YOU FOR YOUR ATTENTION !! ! And have a great time on TechMedViewer© software …!