1
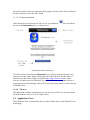
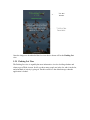
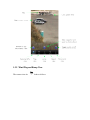
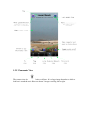
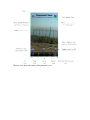
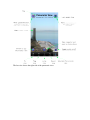
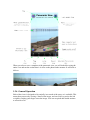
ThirdAveView User Manual
Version 2.3, September 2013
1 ThirdAveView Application Tutorial............................................................................. 1 1.1 General Information and Setup .............................................................................. 2 1.1.1 View Layout.................................................................................................... 2 1.2 Application Views ................................................................................................. 5 1.2.1 Parking Lot View ............................................................................................ 6 1.2.2 Wind Flag and Ramp View............................................................................. 7 1.2.3 Jump Area View ............................................................................................. 8 1.2.4 Lower Beach View ......................................................................................... 9 1.2.5 Panoramic View ............................................................................................ 10 1.2.6 General Operation ......................................................................................... 13 2 Troubleshooting .......................................................................................................... 14 1
ThirdAveView Application Tutorial
Welcome to the ThirdAveView tutorial! If you are here then there is a good chance you
have purchased ThirdAveView and either want to review the features or are confused and
are looking for answers. First, thank your for your interest/patronage! Second, if you are
confused then we apologize. We hope to improve the application but hope that this
tutorial will help you better understand the app and how to use it to your best advantage.
When done with this tutorial, if you have ThirdAveView installed on your device, you
can return to it using the following link: ThirdAveView.
ThirdAveView is an iOS application that is dedicated to monitoring the Third Avenue
kiteboarding and sailboarding network ptz camera mounted inside of the Electronics for
Imaging (soon to be Gilead Sciences) building in Foster City, CA. If you wish to return to
the application, please select the following link: ThirdAveView (only from an iOS device
that has it installed of course).
It is important that you know that ThirdAveView is a monitoring application for a
specific location. We provide you with up-to-date views of the 3rd Ave kiteboarding and
sailboarding site and its environs. You use this information in whatever way you want,
though most people use it to guide their decision about the conditions at this popular site.
ThirdAveView, and its cousins ThirdAveWind and ThirdAveSuite were developed for
kiters and sailboarders needing up-to-the-minute observational data. Why is this so?
Well, 3rd Ave gets its great winds largely through north-south convection caused by the
temperature differences between San Francisco and San Jose. On any given day it takes
time for this convective flow to get started (and to shut down). In the fall, as the number
of hours of daylight diminish, the time it takes for a convective flow to begin gets closer
and closer to dusk, so someone wanting to go out needs to be on site and prepped
sometimes before the conditions are good enough to go out. ThirdAveView provides the
kind of information that helps its users get out when other apps, which don’t provide data
as frequently, cannot.
Being a monitoring application, ThirdAveView might not provide images. If the webcam
or its server are down, or if there is an interruption in network connectivity,
ThirdAveView will be useless and you will need to use an alternate source until the
situation is resolved.
1.1 General Information and Setup
The application supports five (5) different photographic views of the Third Avenue
kiteboarding and sailboarding site acquired from our Sony PTZ network camera:
•
Parking Lot (
) shows a view of the main parking lot
•
Carpeted Area and Flag (
the sailboard ramp
•
Jump (
) shows the main kiteboarding jumping area at the corner of the
path, to the right of the sailboarding ramp
•
Beach (
•
Panoramic (
) shows a panoramic view created by stitching together 33
images together (3 rows of 11 images)
) shows the main setup area and the flag by
) shows the lower/south beach setup area
The following sections describe each of these view types in detail. The screen shots
shown in this document are the iPhone versions. The iPad versions are functionally.
1.1.1 View Layout
Each camera view has 4 areas:
•
•
•
•
Title area
View area
Button area
Tab area
1.1.1.1 Title area
The title area provides a title for the particular view as well as a timestamp for when this
view was last collected. Both the title and timestamp will change from black lettering to
white lettering at night.
1.1.1.1.1 ThirdAveWind Information
If ThirdAveView was launched from ThirdAveWind then some weather information is
transferred to it and is displayed in two button/images on the left and right sides of the
title area. One represents wind speed and direction, while the other represents tide
information.
The left image represents a compass rosette with a number inside. The rosette will have a
dial hand pointing in the current wind direction and the number will be the current wind
speed.
The right image looks like wave shape, and is used to depict tidal information. The image
is divided into a blue/left side and a green/right side. The blue/left side represents a
flooding tide, while the green/right side represents an ebbing tide.
You can tell which is in effect because there will be an overlay on whichever side is
active in a darker color (darker blue on the left, darker green on the right). In the center of
the image will be a number representing the current tide value.
1.1.1.2 View area
The primary function of ThirdAveView is to provide imagery of the Third Ave site. The
view area of any particular view shows a portion of the view associated with the location.
You can scroll the entire area using finger drag operations. You can also use double
finger pinch operations to zoom out or in. You can of course scroll a zoomed area.
1.1.1.3 Button area
There are 3 buttons at the bottom of each view, located just above the tab area. They are:
•
Information: Takes you to the ThirdAveView Information view.
•
•
Snapshot: Takes a snapshot of the current view.
Audio: Toggles audio on/off.
1.1.1.3.1 Audio Button
At the bottom right of each top-level (tab) view is an icon/button
that controls the
background audio. This is a toggle button, so it is used to turn audio on and to turn it off
again. The background audio changes with wind speed using the following logic:
•
•
•
•
0-11 mph: Gentle lapping of water against rocks
12-16 mph: Pumping sounds
17-26 mph: Discussion and deflation sounds
27+ mph: Wind oversaturating the microphone
When you select the audio button the sound may take a few seconds to begin. Also, when
you toggle it off it may take a few seconds to stop.
1.1.1.3.2 Snapshot Button
Version 2.3 introduced a new icon/button
to the center of each image view that,
when selected, will take a picture of the current view and save it to your photo album.
When the button is selected you may see an alert that looks like the one below:
If you don’t really want to save the image then simply select the ‘Don’t Allow’ button in
the alert. Otherwise select the ‘OK’ button.
1.1.1.3.3 Information Button
At the bottom left of each top-level (tab) view is an icon/button
the user to the Information view, as shown below:
that will redirect
Two items of note exist about the Information view. First, to return to the main view
area just select the ‘Done’ button on the right side of the Title area. Second, there is a
button close to the bottom of the view labeled http://arbor-studios.com that, when
selected, will take you to the ThirdAveView website. When you are on that website, if
you navigate to the Tutorial page, there will be a link that, when selected, will return you
to ThirdAveView.
1.1.1.4 Tab area
The application is tabbed, meaning that you can select any of the views by selecting the
tab at the bottom of any view. Its as simple as that.
1.2 Application Views
When ThirdAveView is launched the first view that will be shown is the ThirdAveView
splash page.
Once the images are downloaded the first view that is shown will be the Parking Lot
view.
1.2.1 Parking Lot View
The Parking Lot view is arguably the most informative view for deciding whether and
when to go to Third Avenue. It tells you how many people are in the lot, who is in the lot,
and what kind of activity is going on. For this reason it is the default image when the
application is loaded.
1.2.2 Wind Flag and Ramp View
The camera view for
looks as follows
1.2.3 Jump Area View
The camera view for
looks as follows
1.2.4 Lower Beach View
The camera view for
looks as follows
1.2.5 Panoramic View
The camera view for
looks as follows. It is a large image that takes a while to
load but is worth the wait. Here are shown 3 images scrolling left to right.
The next view shows the center of the panoramic view:
The last view shows the right side of the panoramic view:
When you select to save a snapshot of the panoramic view you will indeed be saving the
entire view and not the section that is in view on the phone at the moment. It will look as
follows:
1.2.6 General Operation
Each of the views is designed to fit vertically in as much of the space as is available. This
means that you are only viewing a 'band' of the image, and can scroll (or pan) to the left
or right by swiping your finger across the image. You can use pinch and stretch motions
to zoom out or in.
Clearly the most dramatic of all the views is the panoramic
view.
Unfortunately, it is a very large image (almost 1 MB) so it takes a long time to load.
When it does, it will be worth the wait, because it has been stitched together from 33
separate images and allows you to scroll from almost the north end on the left all the way
to Inktomi on the right. It may not load on older (3G and before) iPhones. In fact, it may
crash the application. If the panoramic view opens in zoomed mode it will probably do so
for the entire day, and will not respond to zoom out touch events. This is not a problem
with the application but with the software controlling the camera.
2
Troubleshooting
Symptom
The app doesn’t launch.
Solution
•
•
If you have wifi turned on and there
is no wireless in your current area,
the app may open so slowly that it
times out. Try turning off wifi.
Contact us at [email protected]
Weather information is not shown.
•
You didn’t launch ThirdAveView
from ThirdAveWind. The weather
buttons shown in this tutorial only
appear when ThirdAveView is
launched from ThirdAveWind.
Webcam images are unavailable.
•
There may be a network connectivity
issue. Check your network access.
The webcam may be offline.
•
Webcam views appear in grayscale
•
Occasionally the camera gets
confused and the images will be in
grayscale for the whole day. It is
annoying, but it always fixes itself
by the next reboot (reboots occur
around midnight daily).
If there is any other type of problem with the application, please send mail to:
[email protected] and please mention ThirdAveView in the subject line. We will
try to understand and resolve your problem.