1
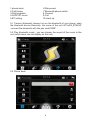
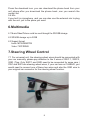
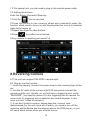
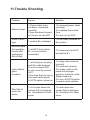
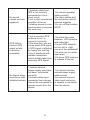
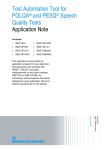
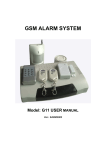
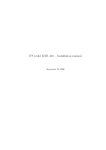
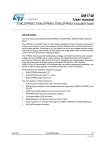
2
Content
Safety Precaoution------------------------------------------------2
Power Cable Harness----------------------------------------------3
Main Menu------------------------------------------------------------4
Radio Function-------------------------------------------------------5
DVD Function----------------------------------------------------------6
Navi Function---------------------------------------------------------6
Bluetooth Function--------------------------------------------------7
Multimedia--------------------------------------------------------------8
Steering Wheel Control--------------------------------------------9
Reversing Camera--------------------------------------------------10
External TV Function (Optional)--------------------------------11
Factory Setting------------------------------------------------------11
Trouble Shooting----------------------------------------------------12
1
Safety Precaoution
You are recommended to read all the instructions carefully before
installation and have it installed by a professional dealer of audio
devices.
This machine is applicable to vehicle power system of
12V-14V (connected with earth wire). Do not install the
machine in truck or bus with 24V power system, which
may cause damage to this machine.
Please use genuine 12cm discs rather than non-standard
or poor-quality discs, or it may cause machine failure or
shorten DVD driver's service life.
Do not replace the power fuse or use inappropriate fuse
without the guidance of professional. Or it may cause
damage to this machine or trigger fire alarm.
For fear of violating traffic regulation, Drivers are
forbidden to watch the program and operate this
machine.
For fear of short circuit, please remember to turn off the
engine and disconnect ACC from B+ before installation.
Do not install or unplug wires with power connected, it
may cause safety danger.
The reversing camera function is for parking assistance
only, please watch out surroundings of the car while
reversing car instead of replying on the camera.
Avoid water or other liquids coming into this machine.
Protect from water and moisture, and prevent fire or
other hazards, otherwise this machine may be damaged.
Do not use this machine in the temperature lower than
-15 ℃ or higher than 60 ℃ , which are non-working
Temperature.
2
Power Cable Harness
1, Black(bold): GND wire, connect to the negative pole of the car battery
power.
2, Green: RL+, connect to positive wire of the car rear left speaker
3, White: FL+, connect to positive wire of the car front left speaker
4, Grey: FR+, connect to positive wire of the car front right speaker
5, Purple: RR+, connect to positive wire of the car rear right speaker
6, Blue wire: Amp-con/Ant-con wire, connect to original car external
amplifier control wire/radio antenna control wire for power supply to the
amplifier/radio antenna.
7, Green: Reverse detective wire, connect to car reverse lamp positive
pole or reverse detective wire from the rear camera if it has the wire.
8, Red: ACC wire,connect to the original car ACC wire or ignition wire, so
when you turn on the car, it will get power to turn on the radio.
9, Yellow: BAT+ wire, connect to the positive pole of the car battery
power, to supply power to the radio.
10, Green: RL-, connect to negative wire of the car rear left speaker
11, White: FL-, connect to negative wire of the car front left speaker
12, Grey: FR-, connect to negative wire of the car front right speaker
13, Purple: RR-, connect to negative wire of the car rear right speaker
14, Pink: Brake-In wire, connect to GND wire, or you can connect to the
metal body of the radio. It is for the safety warning when driving car.
15, Orange wire: Illumination wire, connect to red ACC wire or your
original car Illumination control wire to get power for the radio button light
Black(thin): GND wire, for other wires that need to be grounded, such as
the wire NO. 11
16, White: Tel-mute, NOT USE
3
For special unit ,it use the original harness ,which you can plug with
original cables .
A: The 3rd switch is ACC, if your car has CANBUS system,please pull
down it The 4th switch usually is Reversing switch ,turn it on or off when
reversing camera installed or not.
(please check the diagram above the unit )
B:the original plug(the image is only for reference ),plug it with the power
cable ,if your car use different plug with the unit you purchase ,you will
need to use adapter ,please contact us in this situation .
1.Main Menu
4
1.Disc:DVD function
2.Bluetooth
3.Radio:FM/AM ,RDS radio
4.TV: external TV (only for our special TV box with touch control function)
5.AUX: aux AV input
6.Dim function ,press to change the brightness
7.night version switch ,press to turn off the screen,background still play.
8.Mute
9.Standby function ,press to standby the unit ,background stop playing
10.Date,time
2.Radio Function
1.Present frequency station
2.stored frequency station
3.Pre frequency
4.Next frequency
5.Band switch (FM1,FM2,FM3,AM1,AM2)
6.Scan :automatically search and store the stations
7.Stereo/mono switch
8.Save present station
9.Local and distant mode switch
10.PTY: program type(RDS radio)
11.AF:Alternative frequencies.(RDS radio)
12.TA: traffic announcement(RDS radio)
2.1 RDS: you can turn on/off from the setting-general-RDS on
2.2 Radio area:choose your area from the setting-general-radio set-radio
area
5
3.DVD Function
3.1 Please remove these two screws before installation ,otherwise the
disc can not be inserted.
3.2 Disc type
It is region free ,support most DVD in the market.
3.3 Play the disc
Insert the CD/DVD disc to the DVD slot ,the disc will be sucked into the
unit ,load and play automatically.
If you want to take out the disc ,press the eject icon on the DVD menu or
press the eject button on the panel of the unit(Note:after the disc come
out ,please remove the disc within 8 seconds ,otherwise the disc will be
sucked into the unit again,but will not play automatically).
When you play DVD video ,you can hear sound ,but can not see the
image, you will see”Note:handbrake is on,video forbided” ,at this
moment ,you need to go the Setup->General->Brake set ,change it
to off.
4.Navi Function
4.1 This unit use wince 6.0 system ,please make sure your GPS software
is compatible with the unit .Insert the GPS card to the GPS slot ,enter
the Setup-General-Navi path ,it will show the navi software ,press the
software to choose .
6
4.2 locate the GPS antenna
Please put the GPS antenna to the place with good reception
5.Bluetooth Function
7
1.phone book
2.Call history
3.Dial keyboard
4.A2DP BT music
5.BT setting
6.Disconnect
7.Bluetooth/phone switch
8.Connect
9.Call
10.Hand up
5.1 Connect bluetooth: please turn on the bluetooth of your phone ,scan
the bluetooth device.Generally ,the name of the unit is”CarKIt_BT6622”
.connect the bluetooth with the pair code”0000”.
5.2 Play bluetooth music : you can stream the sound of the music to the
unit (artist,name can not display on the unit)
5.3 Phone book
8
Press the download icon ,you can download the phone book from your
cell phone.after you download the phone book ,can you search the
contact list.
5.4 Mic
It use built in microphone ,and you can also use the external mic to plug
with the unit ,put to the place you want.
6.Multimedia
6.1 Music/Video/Picture could be used through the SD/USB storage.
6.2 SD/USB storage: up to 32GB
6.3 Support format:
Audio: MP3/WMA/PCM
Video: 720P RMVB
7.Steering Wheel Control
7.1 For universal unit, the steering wheel wires should be connected with
your car manually, please pay attention to the 3 wires of SWC 1, SWC2,
GND. (Tips: Only SWC1 and GND need to be connected for some cars.)
SW1 and SW2 are steering wheel wires, if your car has no CANBUS, you
would need to connect one of these two wires and also the GND wire to
your original car connector for the steering wheel function.
9
7.2 For special unit, you just need to plug to the original power cable.
7.3 Setting the buttons:
Enter the Setup->General->Steer key
1.Click the“
”icon to set clear
2.Press the button on the steering wheel,and meanwhile press the
function which need to be set on the display,when the icon is in selected
state,that’s means ok
3.Repeat the steps for other buttons
4.Press“
” to confirm once finished
5.Any mistake or resetting,just repeat 1-4
8.Reversing Camera
8.1This unit can support PAL/NTSC camera input.
8.2 How to use this function:
1. Install the camera: connect the power wires to the reversing light of the
car.
2. Use the AV cable of the camera with RCA connectors,connect the
camera and the unit. Usually, our unit will have a triggering wire, name
“REVERSE”, you need to connect it to the triggering wire of camera. for
some units, its triggering wire is added to the canbus decoder, in this
case, you don’ t need to connect it.
3. If you don’t install a camera, please keep the “reverse” wire
disconnected (for the unit come with Canbus, you need to turn off the
reversing switch,please see the diagram above the DVD player), or you
will see a black screen when you reverse the car.
10
9.External TV Function (Optional)
This unit support external TV box input ,which has special plug with the
unit .You can touch and control the tv box on the unit .you can buy the
special DVB-T or ATSC TV box from us . (If you buy the external TV box
from other sellers ,you can only watch the TV via AUX ,use the remote to
control the TV box ,can not control on the screen.)
10.Factory Setting
Enter Setup-General-Factory set ,with the password “3368”.
11
11.Trouble Shooting
Problem
Cause
Solution
1.Power cable have
not been connected
correctly
2.fuse has been burned
not to turn on car ACC
1.to connect power cable
correctly)
2.to replace the burned
fuse
3.to turn on car ACC
Stuck in boot
logo
1.system file collapsed
1.to re-install firmware of
the system
failure to save
the operation
record after
unplugging
the car key
1.red ACC and yellow
B + is not correctly
connected
1.to reconnect red ACC
and yellow B +
radio without
good
reception
1.not to plug or not plug
well the radio antenna
2.not to connect ANT
or not correctly connect
ANT
3.the area that you are in
has weak radio signal
4.AF/TA option turned on
1.to plug radio antenna
correctly
2.to connect correctly
3.to make radio in the
place with stronger
signal or to add an extra
Signal enhancer
4.to turn off AF/TA option
to search radio stations
Disc fails to
enter into
stereo
1.not to tear down two
screws that is designed
for shockproof on radio
cover
1.to tear down two
screws that is designed
for shockproof on radio
cover
failure to boot
12
No sound
comes out from
speakers
1.speaker cable from
ISO is not correctly
connected or it is in
short circuit
2.not to start up external
amplifier of the car
3.making stereo in mute
function when you press
the mute key
1.to connect speaker
cable correctly
2.to check stereo and
the connection wire of
external amplifier
3.to turn off the function
MUTE
GPS fails to
receive GPS
signal or fails
to position
accurately
1.not to connect GPS
antenna or not to
connect it correctly
2.the area that you are
in has weak GPS signal
3.GPS signal is affected
by heavy rain and fog
4.car is plastered with
metallic membrane
which shields radio from
receiving GPS signal
1.to make the screw
between GPS antenna
and radio tight
2.to put GPS antenna
on the left or right
corner of the windshield
3.to drive car to a wideopen area
3.to move GPS antenna
to outside of the car
No Signal when
reverse car with
installed camera
1.reverse camera
power supply wire have
not been connected
correctly
2.camera video input
connector from camera
has not be connected to
camera in port from the
device
1.to connect reverse
camera power supply
cable correct
2.to connect camera
video input connector
to camera in connector
from the device
13
Warranty Card
User Name: _________________________________
User Email:__________________________________
User Phone:_________________________________
User Address:________________________________
Manufacturer:______
Product Model:_______________________________
Date of purchase: ____________________________
Limitations:
Our returns and exchange service is limited to all purchases made
from Pumpkin. If you purchased through a different retailer, please
contact them directly.
(Unauthorized reselling of Pumpkin products is prohibited.)
When you have any problems, please do not hesitate to contact us.
Our customer service representatives are always ready to help!
14
15