1
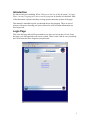
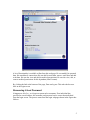
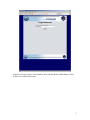
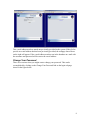
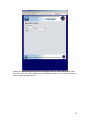
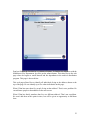
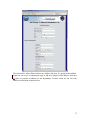
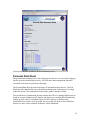
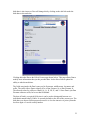
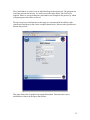
First Responder & Essential Personnel
Medical Distribution Pre-registration System
User Manual
January 2008
Table of Contents
Introduction......................................................................................................................... 3
Login Page .......................................................................................................................... 3
Logging In....................................................................................................................... 4
Recovering A Lost Password.......................................................................................... 5
Change Your Password................................................................................................... 8
Creating an Account ..................................................................................................... 11
Required Information................................................................................................ 11
Initial Enrollment ...................................................................................................... 12
Personal Data Sheet .......................................................................................................... 30
Modifying Personal Data .............................................................................................. 31
Adding Contact Data..................................................................................................... 35
Adding Secondary Contact Data................................................................................... 39
Editing Contact Data..................................................................................................... 41
Delete Contact Data ...................................................................................................... 45
Editing Work Data ........................................................................................................ 47
Adding Work Data........................................................................................................ 51
Deleting Work Data ...................................................................................................... 61
Adding a Dependant ..................................................................................................... 63
Viewing Dependant Data.............................................................................................. 67
Adding Dependant Contact Data .............................................................................. 69
Editing Personal Data and Medical Data Details of a Dependant ............................ 73
Editing a Dependant...................................................................................................... 77
Deleting a Dependant.................................................................................................... 82
Frequently Asked Questions ............................................................................................. 84
What if I don’t want to participate? .............................................................................. 84
What benefits do I gain by participating? ..................................................................... 84
What personal data do I have to provide?..................................................................... 84
What if I don’t want to give personal data?.................................................................. 85
How is the data that I provide used?............................................................................. 85
Where is this data stored? ............................................................................................. 85
What if I don’t have an e-mail address? ....................................................................... 85
What constitutes a dependant?...................................................................................... 85
Can I include pets?........................................................................................................ 86
Should my spouse and I both enroll if we both work for participating organizations? 86
Should I identify all participating organizations with which I am affiliated? .............. 86
What is a cookie? .......................................................................................................... 86
How do I enable cookies? ............................................................................................. 86
2
Introduction
We know what you’re thinking. Whoa! Did you see the size of this document? It’s huge!
There’s no way I’m going to be able to use this program! It actually isn’t that bad. Most
of this document is pictures and they are large pictures that take up most of the page.
This manual is intended to guide you through the use this program. There are lots of
pictures with arrows showing you where you need to click and what information you
need to provide.
Login Page
This is the first page that will be presented to you when you access the web site. From
this page, you can login and create a new account. There is also a link in case you already
have an account, but have forgotten your password.
3
Logging In
In order to log into the system, you need to have a user name and a password. This will
either have been assigned to you or you will have created one yourself by creating a new
account. You must also have cookies enabled for your browser (refer to page 80 for more
information about cookies).
In the figure below, Dan is going to log in using his password. You will notice that the
password field does not show the actual password, but little asterisks for each letter.
Upon successful login, Dan is presented with his personal data summary sheet. This is the
key page by which Dan can manage all of the information about himself and his
dependants. As can be seen in the figure below, his personal data summary sheet shows
his personal data, contact data, work data, and medicine distribution data.
4
A lot of functionality is available to Dan from this web page. He can modify his personal
data. He can add new contact data. He can edit his work data, remove work data, and add
work data. He can also view and edit his medical permissions. He can also view, edit, or
remove medical permissions for his dependant (Jane Fireman).
By clicking the link at the bottom of the page, Dan can log out. This takes the browser
back to the login screen.
Recovering A Lost Password
It happens to all of us – we forget our password or username. If an individual has
provided an e-mail address, the username and password can be sent to that individual
from the login screen. The process starts from the login webpage shown in the figure that
follows.
5
Clicking on the Forgot Your Password link opens up a page (as shown in the figure that
follows) in which the user can provide their e-mail address.
What if you didn’t provide an e-mail address? Well, you will have to ask the individual in
charge of the Medication Distribution Program for your organization to reset your
password.
6
After the user types in their e-mail address, they can then hit the submit button. There
will be two results to this action.
7
This e-mail address needs to match one previously provided to the system. If they fail to
provide an e-mail address that has been previously provided, the webpage shown above
on the right will appear. If the e-mail address matches one in the database an e-mail with
the username and password will be sent to the e-mail address.
Change Your Password
There are occasions when you might want to change your password. This can be
accomplished by clicking on the Change Your Password link on the login webpage
shown in the figure below.
8
Clicking on the Change Your Password link opens up a new page which is shown in the
figure that follows.
9
In order to change the password, the user must provide their username and current
password. They must also type their new password twice. The reason for requiring the
new password to be entered twice is so that a typographical error does not prevent the
user from being able to access their account. Once the user has provided all of the
required information, they can change their password by hitting the login button at the
bottom of the page.
The result will be one of the two web pages shown below. The webpage on the left will
be displayed if the username and password are incorrect or if the two new passwords
don’t agree. The webpage on the right will be shown if the attempt to change the
password was successful.
10
Once you have successfully changed the password, the system asks you to login using the
new password.
Creating an Account
This website allows individuals to self-register for participating in the Monmouth County
Medication Distribution Plan. Prior to creating an account the user needs to gather some
basic information.
At first glance, creating an account may seem like a daunting task. It isn’t. The user is
guided through a sequence of web pages that ask for a small amount of information at a
time. Errors can be corrected so that even if mistakes are made, the user won’t have a
problem fixing them.
In this example that follows, Dan Fireman is creating an account for himself. He works
for the Middletown Fire Department at the Navisink Firehouse. He has some dependents
that live with him and one dependent that does not live in his home.
Required Information
Very little personal information is actually required. For the individual creating the
account, the following information is required:
Name
Date of Birth
Participating Organizations
Ability to take Ciprofloxacin and Doxycycline
It is advised that individuals check with their physicians to make sure that they can take
Ciprofloxacin and Doxycycline. The distributing organization is not responsible if you
provide incorrect data.
11
For each individual that the user wants to protect under this program, the following
information is required:
Name
Date of Birth
Ability to take Ciprofloxacin and Doxycycline
Individuals should check with their physicians to make sure that they can take
Ciprofloxacin and Doxycycline. The distributing organization is not responsible if you
provide incorrect data.
Additional information can be provided for the user and those who they wish to protect
under this program. This includes contact information such as:
e-mail address
telephone number
street address
Remember, the above information does not have to be provided. The e-mail address can
be used to recover your password in the event that you can’t remember it.
Initial Enrollment
The initial enrollment process begins by selecting the Create New Account link on the
initial webpage shown in the figure below.
12
Clicking the Create a new account link opens the terms and conditions page shown in the
figure below. The user must accept the terms and conditions in order to continue with the
registration process.
13
Accepting the terms and conditions requires that the user click on the yes bubble and then
clicking on the submit button. Clicking on the submit button opens the Create New
Account Page that is shown in the figure below.
This page requests the user to provide three distinct pieces of information. The first set of
information is used to actually create an account in the software. This is comprised of a
user name and password. You get to choose your own user name and password. This is
required information.
The second set of information that is requested is your name, date of birth, and gender.
Use your full name. Warning: do not include any apostrophes – O’Neal should be
entered as ONeal. The suffix field is used to allow the specification of Sr., Jr., II, III, IV,
and V if appropriate.
The third set of information that is requested is contact information. This information will
allow management of distributing organizations to contact you with reminders to update
your information or in case there is a need to distribute medication to first responders and
their families.
14
The e-mail address that you provide will allow you to recover your password in the event
that you have forgotten it. Without an e-mail address, the procedure to recover your
password is much more difficult.
Dan Fireman, III is creating an account and has provided the information shown in the
figure below.
15
Once Dan has provided his information, he clicks on the submit button. He will be taken
to one of the screens shown below.
He will be taken to the screen on the right if there is a problem with the data that he
provided. Fields with red asterisks are required fields or a field has a value that is
problematic – such as the user name already in use or no password was given. All Dan
has to do at this point is correct the problem and resubmit the page.
Dan will be taken to the screen on the right once he has provided all of the information
necessary. This screen allows Dan to identify the participating organization with which
he is affiliated.
16
Once Dan has added himself as a user, he is now presented with the webpage shown on
the right in the figure above. This webpage acquires information in a controlled manner
rather than listing all of the organizations that participate in the program.
The drop down menu presents the type of organization that is participating in the program
as shown in the figure that follows.
17
Since Dan is a member of the fire department in Middletown, he would select
municipality. This reveals another menu that identifies the municipalities defined within
the system as shown in the figure that follows.
What if Dan mistakenly selected the wrong kind of organization? All he would have to
do is go to the top menu and select the right one. The second menu will be refreshed with
the proper contents.
18
Dan would select Middletown since that is the municipality in which he works. This will
reveal a third menu with the participating organizations in Middletown as shown in the
figure that follows.
What if Dan selected the incorrect municipality by accident? All he has to do is select the
proper one in the second drop down menu. The third menu will be repopulated with the
proper data.
19
Since Dan works for the Middletown Township Fire Department, he would select that as
the organization. Once he is sure that he has all of the correct information provided, he
would hit the submit button at the bottom of the page.
20
Hitting the submit button takes Dan to the webpage where he selects the location where
he works. In the case of the Middletown Fire Department, there are eleven fire stations as
shown in the figure that follows.
21
Dan selects Station #1 in Navisink as the fire station in which he works. He does this by
clicking on the select link next to that entry. This leads to the webpage where he defines
his position as shown below.
22
Dan has filled in the fact that he’s a volunteer fireman. To finalize his affiliation with the
Middletown Fire Department, he clicks on the submit button. This takes Dan to the web
page where he begins to enroll himself and his dependants in the medical distribution
program. This page is shown below.
This web page allows Dan to identify all individuals living at the address shown at the
top of the page. He can identify up to five other individuals on this page.
What if Dan has more than five people living at that address? That’s not a problem. He
can add more people to that address on the next screen.
What if Dan has family members that live at a different address? That’s not a problem.
He won’t add them at this point in time, but will be given an opportunity to add them
later.
23
At this point, Dan fills out the form by identifying his ability to take the two medicines
and adding the family members that live at his residence. After adding five of the
members of his household, he is at the bottom of the webpage as shown in the figure that
follows.
24
At this point, Dan has three options. He can declare that he is finished adding dependants,
he can declare that he wants to add more dependants at that household, or he can add
another household. At this point, he selects to add more at that household. This presents a
continuation webpage shown below.
25
Dan can add five more people to this household and access the continuation page just as
done previously. Dan adds another family member to his household and elects to define
another household as shown in the figure that follows.
26
The screen above allows Dan to enter a new address and up to five people at that address.
Again, he can access a continuation page to add more people at that address. Dan does
not have to provide an address for his dependants. In other words, he can leave the
address section blank as shown below.
27
Dan has finished adding individuals to his distribution list. He goes to the bottom of the
page and selects the option that he has completed adding people as shown below.
28
Dan summits this page by hitting the submit button. This takes him to his Personal Data
Summary Sheet shown in the figure below.
29
At this point, Dan has finished with the enrollment process.
Personal Data Sheet
The personal data summary sheet is the main page for the user. It is accessed by logging
into the system as described previously. All of the basic data management functions
accessible to the user are provided on this page.
The Personal Data Sheet presents four blocks of information about the user. The first
block basically identifies the user with sufficient information for that user to be unique
within the system. This information is their name, gender, and date of birth.
The second block of information presents contact data. This is a mailing address such as
found in a typical telephone book. Anyone who knows you can find this information by
looking up your name in a telephone book. For those who are so inclined, this
information does not have to be provided. However, that will make it more difficult to
inform you when, where, and how medicines will be distributed.
30
The third block of information presents work data. This identifies the participating
organization that will be distributing medicine to you in case of an outbreak of a
contagious disease. If you are a volunteer, this program is not interested in the place
where you are employed.
The fourth block of information identifies the individuals to whom you will be
distributing medicines. This allows you to keep track of who can take which medicines.
At present, two kinds of medicines will be distributed: ciprofloxacin and doxycycline.
Some people are allergic to one or the other. Identifying which medicines each individual
can take enables the distributing organization to give you the proper medicines for your
family members.
Modifying Personal Data
There is a little problem with the personal data presented on Dan’s personal data
summary sheet. In particular, his first name and last name are both in lower case. His
31
birth date is also incorrect. Dan will change this by clicking on the edit link under the
birth date as shown below.
Clicking this takes Dan to the Edit A Person page shown below. This page allows Dan to
modify more information than just his personal data. It also allows him to update his
ability to take the medicines.
The fields associated with Dan’s name are his first name, middle name, last name, and
suffix. The suffix allows Dan to identify if he is Dan Fireman, Sr. or Dan Fireman, Jr.
The allowed values for suffix are: Blank, Sr., Jr., II, III, IV, and V. Since Dan is just Dan
Fireman without a suffix, he leaves that field blank.
The date of birth is a required field since it can be used to distinguish between two
individuals named John Q. Public. It currently defaults to the first of the current year. The
birth date was chosen for this purpose because it is a lot less intrusive of privacy than the
last four digits of a social security number.
32
The e-mail address is used in case an individual forgets their password. The program can
e-mail the password to the user. As can be seen in the figure below, this field is not
required. However, not providing an e-mail address can complicate the process by which
a forgotten password can be recovered.
The last two pieces of information on this page are concerned with the ability to take
ciprofloxacin and doxycycline. In the example shown below, Dan can take ciprofloxacin,
but not doxycycline.
This page allows Dan to update his personal information. Dan enters the correct
information as shown in the figure that follows.
33
Once Dan has finished making changes to all of the desired fields, he clicks on the submit
button. The result of submitting this page is shown in the figure below.
34
As can be seen, Dan’s name is now correct as is his birthday.
Adding Contact Data
Dan has not provided any contact information. Dan can add contact information by
selecting the add link below the Contact Data header.
35
When Dan clicks on the add contact data button, he is taken to the Add New Address
Page shown below. The information that Dan can provide allows up to three lines for a
street address, the city, the state, and the zip code.
Although the address is intended to be a home address, he can provide a business address
in case he wants to receive communications at his work location. It is not necessary to
provide a home or business address. Some individuals find that they would prefer not to
provide a home address and can use the business address of the organization that will
distribute the medicines as an alternative. Others would prefer not to provide any address
at all.
36
Dan provides his address in this page. In entering an address, the following fields are
mandatory: Street Address Line 1, City, State, Zip Code, and Type. Street Address Line 2
and Street Address Line 3 are optional.
If Dan decided not to provide a new address, he could hit the browser’s back button and
return to his Personal Data Summary Sheet.
37
Now that Dan has entered the address data, he can submit it to the system by clicking on
the submit button. The result of submitting this page is shown below.
38
Adding Secondary Contact Data
Dan has a second address in California. He can add that address to his personal Data
Summary Sheet by clicking the Add link as done to add the first address. This brings up
the Add New Address Page again. The process of filling out this page is identical to the
process described in the preceding section.
39
Submitting this page adds the address to the Data Summary Sheet as shown below. As
can be seen, Dan now has two addresses by which he can be contacted.
40
Editing Contact Data
Dan has left out some information in his contact data. He can add that information by
selecting the edit link under the address that he wishes to update.
41
Clicking on the edit link for his Middletown, NJ address opens the Edit Address Page.
All of the fields are filled in with the values that he had provided previously. He can then
add the appropriate information.
42
Dan can make additions to his address location, such as an apartment number, if
necessary. This is shown in the figure below.
43
Now that his address has been corrected, Dan can submit this page by clicking on the
submit button. Submitting this page returns Dan to the Personal Summary Page with all
of the correct information shown.
In the event that Dan had decided that the information was initially correct, he can hit the
back button of the browser. This will return him to the Personal Data Summary Sheet
without updating any of the fields.
44
Delete Contact Data
Dan decides that the fact that he has a home in Los Angeles is not important for
delivering medicine to him and his family. He can delete that information by selecting the
delete link under the Los Angeles address as shown in the next figure.
45
This deletes the address from his Personal Data Summary Sheet. Other people who may
live at that address will not be affected. The address itself is not deleted only the fact that
Dan lives there. If Dan had deleted this address by mistake, he can just go back and add it
again.
46
Editing Work Data
Dan has made an error in his work data information. He has listed himself as a volunteer
when he is a part time employee. He can change this by clicking on the edit link below
the word Volunteer as shown in the figure that follows.
47
Clicking the edit link brings up the edit work data. Here he can add his position and
modify the type of working relationship he has with the Howell First Aid Squad.
48
Dan is just a member of the first aid squad. Rather than come up with some fancy
sounding title for his position, he just types Member. The changes he made are shown in
the figure below.
49
To update his record, he submits the page by clicking on the submit button. This returns
Dan to the Personal Data Summary Page as shown below.
50
Adding Work Data
Dan decides to join the Middletown Office of Emergency Management as a full time
employee. He can do this by clicking on the add link within the Work Data block of
information as shown in the figure that follows.
51
The result of clicking on the Add link brings up a Select Where You Work page. This is
shown in the figure below. This form is a little tricky since it provides information in
little chunks rather than all at once. Rather than presenting all of the participating
organizations in a huge list, the information is identified in little increments.
52
The drop down menu shown in the above figure allows Dan to specify the level of the
government organization (federal, state, county, municipality, or other). Middletown is a
municipality so Dan selects that option.
53
When Dan selects municipality, a new dropdown menu appears on the page. This menu
lists the municipalities defined within the system.
54
Dan picks Middletown as the municipality of choice. This brings up a new drop down
menu as illustrated below. This drop down identifies the organizations within that
municipality that are participating the medicine distribution program. Dan selects the
Office Of Emergency Management since that is the organization he has joined.
Suppose Dan had made a mistake and selected other instead of municipality. That’s not a
problem. He just goes back to the first drop down menu and selects municipality. The
entries in the second menu will change so that it presents the correct data.
55
On selecting the organization, Dan is in a position to submit where he works as shown in
the figure that follows.
What if the organization for which Dan works is not shown? This means that the
organization is not participating in the medicine distribution program. A user can not add
an organization to the medical distribution program. He can hit the back button and
return to his Personal Data Summary Page.
56
Submitting the form brings up the page where Dan identifies the location where he will
be working. In some cases, agencies have more than one location although in this
example there is only one.
Why bother with the specific work location? Some organizations may elect to distribute
medicines from a single point of distribution or they may elect to distribute medicines to
individual work locations. By providing the specific work location, the data is available
to distribute the medicines in the best possible manner.
What if Dan worked at more than one location? Dan can decide which location is best for
him. In the event that medicines are distributed by locations, he would choose the one
where he is most likely to work.
57
Although there is only one location presented, Dan still needs to select the Municipal
Building location. This provides a basic confirmation that he works at that organization
and location.
Clicking on the select link takes him to the page where he identifies his position and
employment role within the organization. This is shown in the figure below.
58
Dan has accepted a full time position as clerk. He provides that information in the form
as shown below.
59
Submitting this page by clicking on the submit button takes Dan back to his Personal
Data Summary Sheet. The new information is displayed on that sheet as shown below.
60
Dan is now listed as working for the Howell First Aid and the Middletown Township
Office of Emergency Management. In the event that medicine is being distributed in
Howell, Dan will get his medicines from Howell. In the event that medicine is being
distributed in Middletown, he will get his medicines from Middletown. In the event that
medicines are being distributed in both Howell and Middletown, Dan can pick up his
medicines at either location. Unclaimed
Deleting Work Data
Dan has to work long hours on his regular job and decides to quit the Howell First Aid
Squad. He can do this by clicking on the delete link that appears below the Howell First
Aid entry.
61
Clicking on the delete link will immediately remove Dan from the Howell First Aid
Squad. The result of deleting Howell First Aid is shown below.
What if Dan hit the delete link in error? That is not a problem. Dan can add himself back
to the Howell First Aid following the procedure for Adding Work Data outlined above.
62
Adding a Dependant
Dan’s brother Sonny Fireman comes to live with him. Dan wants to add his brother to the
list of people on his medicine distribution list. This is done by clicking on the add link
under this block of information as illustrated in the figure below.
63
Clicking on the Add link brings up the Add a Dependant Page. This page is shown in the
figure below.
64
The fields associated with Sonny’s name are his first name, middle name, last name, and
suffix. The suffix allows Dan to identify if he is Sonny Fireman, Sr. or Sonny Fireman,
Jr. The allowed values for suffix are: Blank, Sr., Jr., II, III, IV, and V. Since Sonny is just
Sonny Fireman without a suffix, he leaves that field blank.
The date of birth is a required field since it can be used to distinguish between two
individuals named John Q. Public. It currently defaults to the first of the current year. The
birth date was chosen for this purpose because it is a lot less intrusive of privacy than the
last four digits of a social security number.
The e-mail address and telephone number are not used by this program, but are
incorporated to allow Dan a means to keep track of how he can contact Sonny in case of
an emergency.
The last two pieces of information on this page are concerned with the ability to take
ciprofloxacin and doxycycline. Dan would select the appropriate answers.
65
What if Dan doesn’t have all of the information necessary to complete the form? Suppose
that he doesn’t know Sonny’s birthday and whether he can take ciprofloxacin or
doxycycline. He can still fill out the information that he does know as shown in the figure
that follows.
Dan can submit this data even though it is incomplete and Sonny’s birthday is defaulted
to January 1, 2008. The result of submitting this data is shown in the figure below.
In the event that Dan decides not to add Sonny at this time, he can use the browser’s back
button to return to his Personal Data Summary Sheet.
66
Dan notices that there is a red flag by the entry for Sonny Fireman. This red flag is used
to warn Dan that Sonny will not be given either ciprofloxacin or doxycycline in the event
that medicine is distributed. It also serves as a reminder to ask Sonny if he can take
ciprofloxacin and doxycycline.
Dan can log off from this page by clicking on the logoff link at the bottom of the page.
Viewing Dependant Data
Dan decides that he would like to view the data that he has entered about Jane Fireman.
He clicks on the view link beside her name as shown in the figure that follows.
67
Clicking on the view link opens a Personal Data Summary Sheet for Jane.
68
One will notice some important details here. Even though Jane is a dependant of Dan, she
is also a full time employee of the Middletown Office of Emergency Management. She
can claim Dan as a dependant as well. Because Jane is a dependant, Dan can edit her
personal data, her contact data, and medicine data details. He can not add or modify her
work data.
Dan can return to his Personal Data Summary Sheet by clicking on the link ‘Return to
Personal Page.’ He can also log off by clicking on the link at the bottom of the page.
Adding Dependant Contact Data
Dan is viewing the Personal Data Summary Sheet for Jane who is a dependant. He
notices that she does not have contact information provided for her. Dan can add contact
information by clicking on the Add link in the contact information block as shown in the
figure that follows.
69
Clicking on the add link brings up the Add New Address Page as shown below.
70
Dan fills in the address data. Since Jane lives with Dan, he provides her with the same
address that he entered into the system as his address. (Care should be taken to make sure
that the spellings of addresses are identical. This allows Dan to move the whole family by
editing the address. If there are misspellings then some people may get left behind
because the program does not recognize them as the same address.)
71
When Dan hits the submit button, Jane will be registered as living at that address as
shown in the figure that follows. It is important to note that when Jane logs in at a later
time, that address will show up on her Personal Data Summary Sheet.
72
Dan can return to his Personal Data Summary Sheet by clicking on the link ‘Return to
Personal Page.’ He can also log off by clicking on the link at the bottom of the page.
Editing Personal Data and Medical Data Details of a Dependant
It is possible to edit personal data and medical data details of a dependant from the Data
Summary Sheet for the dependant. This can be accomplished by clicking on the edit links
appearing under personal data or by the medical data details for the person. If the page
does not look like the figure below, then do not follow this procedure. Use the procedure
defined in Edit Dependant Data.
73
Clicking on the edit links in the Personal Data block or the Medical Data Details block
will lead to the Edit A Person Page shown in the following figure. All fields are filled in
with default values reflecting the information known about that person.
74
Jane’s birthday is entered incorrectly. She was actually born on November 18,1928. Dan
can modify that field by selecting the correct values in the date of birth field as shown in
the figure that follows.
75
Once the corrected data has been entered, Dan can submit that data by clicking on the
submit changes button. This updates the information about Jane and takes Dan to the
Personal Data Summary Page for Jane as shown below.
76
Dan can return to his Personal Data Summary Sheet by clicking on the link at the bottom
of the page. He can log off by clicking on the logoff link that is at the very bottom of the
page.
Editing a Dependant
Dan notices that he still has a red flag next to Sonny’s entry in the Medical Details block.
Dan can edit information about Sonny from his Personal Data Summary Sheet. He does
this by selecting the edit link next to the dependant’s name in the Medical Data Details
block. This is shown in the figure below.
77
Clicking on the edit link next to Sonny Fireman’s entry brings up the Edit A Person page
with defaults corresponding to the information known about Sonny Fireman. This page
allows Dan to correct any information that might be incorrect about Sonny.
78
Dan had asked Sonny if he could take ciprofloxacin and doxycycline. Sonny answered
that he could take both antibiotics. Dan updates the data on the page by selecting yes for
both doxycycline and ciprofloxacin. This is shown in the figure below.
79
Dan can now submit the updated information by clicking on the submit changes button.
This takes Dan to the Personal Data Summary Sheet for Sonny Fireman as shown in the
figure that follows. Notice that the entries for ciprofloxacin and doxycycline have both
been changed to yes.
80
Dan can return to his Personal Data Summary Sheet by clicking on the link at the bottom
of the page. If he does this, he will see his Personal Data Summary sheet as shown in the
figure that follows. One will observe that the red flag that had once been by Sonny’s
name has disappeared now that drug data has been provided.
81
Deleting a Dependant
To Dan’s joy, Sonny Fireman has gotten a job in Timbuktu. Dan can remove Sonny as a
dependant by clicking on the delete link next to Sonny’s name in the Medicine
Distribution List block as shown in the figure that follows.
82
Sonny is immediately deleted from Dan’s Personal Data Summary Sheet.
83
Frequently Asked Questions
The following are frequently asked questions along with answers to them.
What if I don’t want to participate?
This program is a voluntary program. If you do not want to participate, you are not
required to participate. However, if you choose not to participate you will not receive the
medications when they are distributed in the event of an emergency.
What benefits do I gain by participating?
This medicine distribution program is in place to protect first responders and their
families in the event of a public health emergency. By using this program, you are preregistering you and your family for immediate distribution of medicine. What personal
data do I have to provide?
84
This program operates with minimum personal information. The amount of data required
is limited to the following: your name, your date of birth, the participating organization,
and your ability to take the medicines. You will provide the same information for each
dependant that you register.
What if I don’t want to give personal data?
No personal data is being asked of you that is not already available from other publicly
available sources. The amount of data absolutely necessary is limited to the following:
your name, your date of birth, your address, the participating organization, and your
ability to take the medicines.
How is the data that I provide used?
It might surprise you to learn that the primary user of the data that you provide will be
you. You will be the only one who has access to all of the provided data. No one else will
see who you have listed as dependants. Those names are for your use in keeping track of
who you have elected to protect.
Managers in the distributing organization who are responsible for distributing
medications will only see the raw numbers of doses that you have requested and your
contact information. They will not see the names of the people you have identified. They
will be provided with only the information necessary to get you the number of doses of
medicine that you have requested.
Periodically, a report identifying how many medications are to be delivered to each
organization is generated for use by the organization, municipality, county, and state.
This report does not include any names of the individuals participating in the program.
All that is presented is how many people can take both doxycycline and ciprofloxacin;
only doxycycline; only ciprofloxacin; and can take neither.
Where is this data stored?
This data is stored on a secure server at the Monmouth County Health Department. It is
stored on a separate machine from the Web Server and is not accessible from the without
going through the appropriate security measures.
What if I don’t have an e-mail address?
While an e-mail address is not absolutely necessary to use the program, it is a good idea
to have one since it will be used in the event that you forget your password. If you don’t
have an e-mail address, you can always get one by going to yahoo.com, google.com, or
any other free provider of e-mail accounts.
What constitutes a dependant?
Rather than rely upon a legal definition of who is a dependant, this program allows you to
identify individuals as dependents.
85
Can I include pets?
No. The medications that are being distributed are intended for people, not animals.
Rather than saving your pet, you may be harming them by providing them with
medicines and doses that are not appropriate.
Should my spouse and I both enroll if we both work for
participating organizations?
Yes. In some cases, the rollout of medicines may only encompass some organizations. Be
sure to include each other as dependants. You can both identify the same set of
dependants. This gives you optimal protection in case of an emergency. It also allows one
of you to leave or move to other organizations without having to update all of the data.
Should I identify all participating organizations with which I am
affiliated?
Yes. In some cases, the rollout of medicines may only encompass some organizations. By
identifying all of the participating organizations you assure that you’ll get the
medications at the earliest possible time. What is a cookie?
A cookie is a packet of text sent back and forth between a web server and a web browser.
In this web application, it is a simple number that is exchanged that serves as a check that
the requests are actually coming from a logged in user. The number is generated upon
login and is retired upon logout.
How do I enable cookies?
That depends upon which browser you are using. Commonly used browsers include
Internet Explorer, Netscape, Safari, Opera, and Firefox. Instructions on how to enable
cookies for your browser is available under the help feature of the browser.
86