1
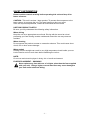
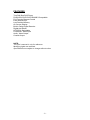
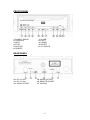
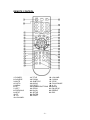
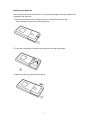
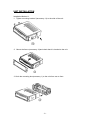
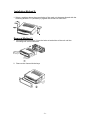
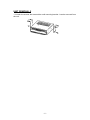
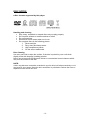
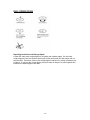
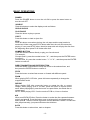
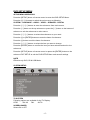
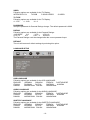
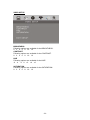
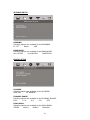
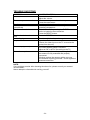
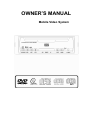
OWNER’S MANUAL
Mobile Video System
SAFETY INFORMATION
Please read the manual carefully before operating this unit and keep it for
future reference.
CAUTION: This unit is a class 1 laser product. To prevent direct exposure to the
laser system, do not open the unit. The laser beam may hurt your eyes.
If the unit requires adjustments, contact an authorized service centre.
USE THIS PRODUCT SAFELY
Be sure you fully understand the following safety information:
When driving
Keep the unit at an appropriate sound level. Driving with the sound at a level
preventing you from hearing sounds outside and around the car may cause an
accident.
When cleaning
Do not expose the product to water or excessive moisture. This could cause short
circuit, fire or other severe damage.
When parked
Parking in direct sunlight can result in very high temperature levels inside your car.
Let the interior and unit cool down before switching the unit on.
NOTE:
Do not use and store the player in dusty, hot or humid environment.
FUSE REPLACEMENT – WARNING!
Never replace any fuse with one of a higher value than the fuse supplied
with your unit. Using a higher current rated fuse may cause damage to
your unit and/or electrical wiring.
-1-
FEATURES
True DIN Size DVD Player
DVD/VCD/CD/CD-R/CD-RW/MP3 Compatible
Full Function Remote Control
Extra Remote Eye
Last Position Memory
On Screen Display
Built-in Dolby Digital Decoder
Digital Anti-Shock
NTSC/PAL Switchable
FrontAudio, Video Input
Audio, Video Output
Coaxial Output
NOTE:
This user's manual is only for reference.
Modifying rights are reserved.
Specifications are subject to change without notice.
-2-
ACCESSORIES
-3-
TABLE OF CONTENTS
Safety information ............................................................………………..1
Features ...........................................................................………………..2
Accessories ......................................................................………………..3
Table of Contents..............................................................………………..4
Front Panel Description ...................................................………………..5
Rear panel Description
..................................................………………..5
Remote Control Description ...........................................………………..6
Installation and Removal ..................................................………………..8
Wire Connection
.......................................................... …………………11
Disc Notes ......................................................................…………………12
Disc Operation ................................................................…………………13
Basic Playback Operations ............................................…………………14
DVD Setup Menu .............................................................…………………17
Specifications ..................................................................…………………22
Requirements .................................................................…………………23
Trouble Shooting.............................................................…………………24
-4-
FRONT PANEL
1. POWER / PAUSE
2. PREVIOUS
3. NEXT
4. STOP
5. DVD LED
6. REMOTE
7. AV LED
8. EJECT
9. POWER
10. RESET
11. A/V INPUTE
REAR PANEL
12. DC 12V IN 1
13. DC 12V IN2
14. VIDOU OUTPUT
15. AUDEO OUTPUT
16. REMOTE SOCKET
17. COAXIAL
-5-
REMOTE CONTROL
1. POWER
2. SOURCE
3. MUTE
4. GOTO
5. MENU
6. UP
7. LEFT
8. PREVIOUS
9. NEXT
10. FF
11. FR
12. VOLUME+
13. TITLE
14. ZOOM
15. SUBTITLE
16. AUDIO
17. EJECT
18. NUMBER BUTTONS
19. PROG
20. SLOW
21. SETUP
22. ENTER
23. RIGHT
-6-
25. VOLUME26. DOWN
27. STOP
28. PLAY/PAUSE
29. A - B
30.ANGLE
31. PAL/NTSC
32. REPEAT
33. PBC
Replacing the Batteries
If the remote control has no function or if the operating range is reduced, replace the
old battery with new one.
1. Remove the battery cover. Follow the arrow (1) slide the tab to the right
while pulling the cover away at the same time.
2. Place the new battery in the tray and slide the cover back into place.
3. Make sure the cover is locked into place.
-7-
UNIT INSTALLATION
Installation Method 1:
1. Tighten mounting bracket 2(accessory 11) to the side of the unit:
2. Mount the frame (accessory 12)and check that it is hooked to the unit.
3. Hitch the mounting box(accessory 1) to the unit from rear to front.
-8-
Installation Method 2:
1. Select a position where the screw holes of the main unit become aligned with the
mounting bracket 1 's (accessory 3) tighten the screws on each side.
Removal Method 1:
1. Insert the keys(accessory 7) into the holes at both sides of the unit until the
mounting box can be removed.
2. Remove the frame with the keys
-9-
UNIT REMOVAL 1
1. Insert the keys(accessory 7) into the holes at both sides of the unit until the
mounting box can be removed.
2. Remove the frame with the keys.
3. Remove mounting bracket 2 with screwdriver.
- 10 -
UNIT REMOVAL 2
1. Loosen the screws with screwdriver until mounting bracket 1 can be removed from
the unit.
- 11 -
WIRE CONNECTION
NOTE:
1. If you want to extend the operational range of remote control, you can
insert the remote control receiver in the rear panel
- 12 -
DISC NOTES
■ Disc formats supported by this player
Handling and cleaning
• Dirty, dusty, scratched or warped discs may not play properly.
• Do not place stickers or make scratches on discs
• Do not warp discs.
• Store discs in their cases when not in use.
• Do not place discs in the following places:
1. Direct sunlight.
2. Dirty, dusty and damp areas.
3. High temperature places.
4. On the sets or dashboard.
Disc Cleaning
Use a dry soft cloth to wipe the surface. If the disc is quite dirty, use a soft cloth
slightly moist with isopropyl (rubbing) alcohol.
Never use solvent such as benzene, thinner or conventional record cleaners which
may mar the surface of the disc.
NOTE:
A disc may become somewhat scratched to a point which will skip excessively or not
play at all in your player. Have the disc resurfaced or polished to reduce the issue or
replace the disc with a new one.
- 13 -
DISC OPERATIONS
Repairing New Discs with Rough Spots
A new disc may have rough edges on its inside and outside edges. If a disc with
rough edges is used, the proper setting will not be performed and the player will not
play the disc. Therefore, remove the rough edges in advance by using a ballpoint pen
or pencil. To remove the rough edges, press the side of the pen or pencil against the
inside and outside edges of the disc.
- 14 -
BASIC OPERATIONS
POWER
Press the POWER button to turn the unit ON or press the same button to
turn the unit OFF.
SOURCE
Press this button to select the display mode as follows:
DVD-AV IN-DVD
PLAY/PAUSE
Press the button to play or pause.
EJECT
Press this button to load or eject disc.
STOP
Press this button once when playing, the unit stops and the stop location is
memorized. When user press PLAY button after that, the unit will resume the
playing. If user press STOP twice, then disc stops and unit will play the disc from
the beginning when press PLAY button after that.
NUMBER BUTTON
Push the number buttons directly to play your favorite track.
For example:
Choose track 8, press the number button " 8 " ; and then press the ENTER button
to onfirm it.
Choose track 18, press the number button " 1 " & " 8 " ; and then press the ENTER
button to confirm it.
DIRECTION BUTTON AND ENTER BUTTON
Press the DIRECTION button to move the cursor to the selected item, and
then press the ENTER button to confirm it.
FF/FR
Press the button to select fast reverse or forward with different speed.
ZOOM
When playing DVD, VCD disc, press this button repeatedly to change the
magnification levels.
REPEAT
When playing DVD disc, press the button to repeat the title or current
chapter. When playing VCD or CD disc, press the button to repeat current
track. When playing Mp3, press the button to repeat folder, the whole disc or
current song.
NOTE: When playing VCD. If on the mode of PCB on, it has no function
A/B
When read DVDA/CD disc, Press the button to make the disc repeated between
point A and point B. Press the button once to select point A and press again to
select point B. Then the unit will repeat the content between A and B. To make the
disc played normally, just press A/B button the third time.
GOTO
Press this button to select time, track or chapter.
- 15 -
AUDIO
When playing a DVD disc, press the button to select audio language. When playing
other kinds of disc, press the button to select audio channel.
PAL/NTSC
Press the button to select video output model(NTSC/PAL/PAL60/AUTO).
DISPLAY
Press this button to display the current playback information on the screen.
VOL+/VOLPress the button to adjust sound volume.
MUTE
Press this button to mute.
SETUP/A.MEMO
When there is a disc in the unit Press this button to enter setup menu.
PREVIOUS/NEXT
Press this button to go to the PREVIOUS/NEXT chapter, track or song.
TITLE
For DVD discs, press this button to enter the title menu, press the DIRECTION
buttons and PLAY button to select and play.(only if supported by the discs.)
PBC
Press this button to return boot menu during playing VCD disc.
MENU/ADD DEL
When read DVD disc Press this button once to return to the boot menu. If user
selected none of the chapters in the menu, and press MENU/ADD DEL again, ast
position memory function will turn on and the disc will be played from where user last
press the MENU/ADD DEL button.
SUBTITLE
For DVD disc, press this button to select subtitle language.
RESET
Press this button to restore the default settings. User need to press POWER button
to restart the unit after reset.
ANGLE
Press this button to select different visual angles if stored on the DVD disc.
Slow
When read DVD disc or VCD disc Press the SLOW button to activate slow motion
playback.
Program
When playing VCD disc or CD disc or Mp3 disc, press Program button enter
program status,press the number buttons to enter the track number you want to
playback, If you want to exit, press the PROGRAM button again.
NOTE: You must press stop at first the press PROG to turn on programma function
- 16 -
DVD SETUP MENU
SETUP MENU OPERATION
Press the [SETUP] button of remote control to enter the DVD SETUP Menu.
Press the [<] / [>] buttons to switch the main menus as following:
SYSTEM – LANGUAGE – AUDIO – VIDEO – SPEAKER – DIGITAL
Press the [∧] / [∨] buttons to enter the submenus from main menus.
Press the [∧] button on the top submenu or press the [∨] button on the bottom of
submenu to exit the submenus to main menus.
Press the [∧] / [∨] buttons to select the submenus as your need.
Press the [>] or [ENTER] buttons to enter the items of submenus.
Press the [<] button to exit the items of submenus.
Press the [∨] / [∧] buttons to select the item you want to change.
Press the [ENTER] button to confirm the item you have selected and exit to the
submenus.
Press the [SETUP] button of remote control or press the [ENTER] button on the
submenu EXIT SETUP to exit the DVD SETUP Menu and save all settings.
NOTE
Effective only DVD, SD & USB Mode.
SYSTEM SETUP
TV SYSTEM
Following options are available for the TV Display:
NTSC
PAL 60
PAL
AUTO
SCREEN SAVER
Select ON or OFF.
- 17 -
VIDEO
Following options are available for the TV Display:
INTERLACE-YUV
TV-RGB
P-SCAN YPBPR
S-VIDEO
TV TYPE
Following options are available for the TV Display:
4 : 3 PS
4 : 3 LB
16 : 9
PASSWORD
Setup the password for Parental Ratings change. The default password is 0000.
RATING
Following options are available for the Parental Ratings:
1 KID SAFE
2G
3 PG
4 PG 13
5 PG - R
6R
7 NC - 17
8 ADULT
The Parental Ratings could be changed after the correct password input.
DEFAULT
The unit will restore all default settings by selecting this option.
LANGUAGE SETUP
OSD LANGUAGE
Following options are available for the OSD LANGUAGE:
ENGLISH
GERMAN
SPANISH
FRENCH
PORTUGUESE
ITALIAN
RUSSIAN
DUTCH
SWEDISH
KOREAN
DANISH
NORWEGIAN POLISH
HUNGARIAN
AUDIO LANGUAGE
Following options are available for the AUDIO LANGUAGE:
ENGLISH
GERMAN
SPANISH
FRENCH
PORTUGUESE
ITALIAN
RUSSIAN
DUTCH
SWEDISH
KOREAN
DANISH
NORWEGIAN POLISH
HUNGARIAN
SUBTITLE LANGUAGE
Following options are available for the SUBTITLE LANGUAGE:
ENGLISH
GERMAN
SPANISH
FRENCH
PORTUGUESE
ITALIAN
RUSSIAN
DUTCH
SWEDISH
KOREAN
DANISH
NORWEGIAN POLISH
HUNGARIAN
- 18 -
MENU LANGUAGE
Following options are available for the MENU LANGUAGE:
ENGLISH
GERMAN
SPANISH
FRENCH
PORTUGUESE
ITALIAN
RUSSIAN
DUTCH
SWEDISH
KOREAN
DANISH
NORWEGIAN POLISH
HUNGARIAN
DIVX LANGUAGE
Following options are available for the DIVX LANGUAGE:
CENTRAL
EU
WESTERN
EU
KOREAN
AUDIO SETUP
AUDIO OUT
Following options are available for the AUDIO OUT:
SPDIF / OFF
SPDIF / RAW
SPDIF / PCM
KEY
Following options are available for the KEY:
b -4 -2 0 +2 +4 #
- 19 -
VIDEO SETUP
BRIGHTNESS
Following options are available for the BRIGHTNESS:
0 2 4 6 8 10 12
CONTRAST
Following options are available for the CONTRAST:
0 2 4 6 8 10 12
HUE
Following options are available for the HUE:
-6 -4 -2 0 +2 +4 +6
SATURATION
Following options are available for the SATURATION:
0 2 4 6 8 10 12
- 20 -
SPEAKER SETUP
DOWNMIX
Following options are available for the DOWNMIX:
LT / RT
Stereo
VSS
BASS MODE
Following options are available for the BASS MODE:
ALL LG SPK
ALL SM SPK
MIXED SPK
DIGITAL SETUP
OP MODE
Following options are available for the OP MODE:
LINE OUT
RF REMOD
DYNAMIC RANGE
Following options are available for the DYNAMIC RANGE:
FULL
6/8
4/ 8
2 /8
OFF
DUAL MONO
Following options are available for the DUAL MONO:
STEREO
MONO L
MONO R
MIX MONO
- 21 -
SPECIFICATIONS
Supply voltage
Current consumption
Signal system
Disc compatible
Audio output level
Audio signal output
Characteristics
: 12V DC (10.8V-16V), negative ground
: Less than 900mA
: Composite video 1.0Vp-p 75 Q
: 1)
DVD-VIDEO Disc
5" (12cm) single-sided, single-layer 5"
(12cm) :single-sided, double-layer
Compact disc (CD-DA)
5" (12cm) disc
: 10kQ(2ch 1.8Vms)
:
1.Frequency response 20Hz-20KHz
2.S/N ratio
80dB (JIS)
3.Wow and flutter below measurable limits
4.Weight (approx)
1.4kg
5.Dimension (approx) 162x187x56(mm)
(W/D/H)
6.Mounting (approx) 160x178x50(mm)
(W/D/H)
NOTE:
Specifications and design are subject to change without notice.
- 22 -
REQUIREMENTS
1) Do not use and store the loader in dusty, high temperature and high Humidity
environments.
2) Do ground all equipments and works in order to avoid causing damage to The
loader by electrostatic discharges.
3) The user who handles this product should take all necessary precautions To avoid
ESD (Electro-Static Discharge) failures.
4) Do not touch assembled PCB with hand directly, avoid fingerprints or stains
Remains on the PCB and handle the loader in a clean environment
5) Do not shock loader during handing and manufacturing
6) Do not use loader immediately when you bring it from cold to warm place. Great
change of temperature may cause moisture condensing on the Pickup lens which
influences the readability for certain time. Please make the loader stable at least 2
hours before operating under such a condition.
7) Do not disassemble the loader to avoid ESD failures and to prevent from
Contamination.
REPLACE THE FUSE
Make sure the amperage match the specified when replacing the fuses. If the fuse is
broken, check the power connection and replace a new one. If the same problem
occurs, it would be subjected to the malfunction in-house. In such cases, please
consult the nearest service dealer.
! A Warning
Never use the fuse with the rated amperage more than that supplied to your unit,
otherwise it will damage the unit
- 23 -
TROUBLE SHOOTING
SYMPTOM
No sound
The memory contents are lost
The disc does not play
The disc comes out
automatically
The disc can not be inserted
The function buttons do not
work
Audio skipping
No picture
Picture stops (pauses)
Poor radio reception
CAUSE / SOLUTION
Cancel the mute function.
Adjust the volume.
Disconnect the power wire or battery.
Press the reset button.
The disc might be dirty or damaged.
The temperature is outside the range of the
operating temperature.
Push the disc while pressing the EJECT button.
A disc is loaded in the mechanism.
Press the RESET button.
Press the RESET button.
The disc might be dirty or damaged.
Open the monitor.
Choose the video input on the TV to receive the
picture from the unit.
The disc might be dirty or damaged.
The colour system setup is incorrect.
Adjust to PAL or NTSC according to the TV.
Antenna may not have the proper length. Be sure
the antenna is fully extended and properly
connected.
If broken replace the antenna with a new one.
The antenna is poorly grounded. Check again the
antenna connection.
NOTE:
If any problem persists after checking the above list, please consult your nearest
service dealer.
Never attempt to dissemble the unit by yourself!
- 24 -