1
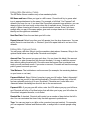
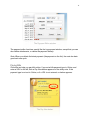
Chronicle
USER MANUAL
1st Edition
2
IN THIS MANUAL
Part One | The Chronicle Interface
• The Overview Screen
• The Bill Detail Screen
Part Two | Creating, Editing and Viewing Bills
•
•
•
•
•
Creating Your First Bill
Editing Bills : Mandatory Fields
Editing Bills: Optional Fields
Navigation: Overview Screen
Navigation: Bill Detail Screen
Part Three | Logging and Paying Bills
•
•
•
•
•
Logging Payments
Logging Partial and Historical Payments
Editing Payments
Paying Bills
Logging Payments Automatically
Part Four | Income
• Managing Income
• Understanding Your Balance
Part Five | Customizing Chronicle
•
•
•
•
•
Customizing Reminders
Working with Tags
Archiving & Deleting Bills
Syncing Data
Other Settings
3
Part One
The Chronicle Interface
The Overview Screen
1
2
4
5
3
1. Toolbar The toolbar buttons from left to right: Overview button returns to the
overview screen pictured above, showing a list of all your bills. Add Bill button creates
new repeating bills. Edit Bill button edits the selected bill.
2. Your Bills Shows information about all upcoming bills, including when they are due
and how often they are due. Double clicking a bill here switches to bill detail view.
3. Bill Action Area Shows actions available for the selected bill, or total amount due
when multiple bills are selected.
4. Month At a Glance Shows your bills on the calendar, and a summary of bills due in
the current month, due soon, and paid in the current month. Double clicking a bill here
switches to bill detail view.
5. Income and Payments Shows a summary of your monthly income compared to
your payments, and expected balance at the end of the month.
4
The Bill Detail Screen
5
1
2
4
3
1. Sticky Note The sticky note contains the most important information about your bill:
it tells you when the bill is due, and contains buttons for logging payments or paying bills
online. You can also quickly edit the amount due or next due date from the sticky note.
2. Statistics Area Shows details about your payments over time. You can scroll
through various types of statistics using the arrows in the top-right corner of the
Statistics area.
3. Payment History: Payments by Month Shows the last 24 months of payment
history. The current year’s payments are in purple, while the previous years are in
lighter shades of gray. Hover over a month to get the exact amount.
4. Payment History: All Payments Shows each payment in detail. Double click a
payment to edit or delete it.
5. Navigation Bar and Arrows Shows the bill you are currently viewing. Navigation
arrows on the right side allow you to navigate between bills.
5
Part Two
Creating, Editing and Viewing Bills
Creating Your First Bill
A bill in Chronicle represents a repeating payment. You only need to create a bill for
each payee once. For example, for your Credit Card payment, you will create one bill
that automatically repeats every month, not create a new bill each month.
To create your first bill, click the plus button on the toolbar, or press Command - N.
The New Bill toolbar button.
You will see the Bill Editor Screen, pictured below. Most items are self-explanatory,
however a brief description of the various fields follows the screenshot on the next
page.
The Bill Editor screen.
6
Editing Bills: Mandatory Fields
The Bill Editor Screen contains only a few mandatory fields:
Bill Name and Icon: When you type in a bill’s name, Chronicle will try to guess what
icon is appropriate based on the name. For example, a bill titled “Car Payment” will
default to an icon of a car. If you don’t like Chronicle’s automatic icon selection, you can
always click on the icon to see a drop down list of available icons. Click any icon to
select it. When choosing a bill name, you should make it unique. Even if you have
multiple bills you pay to the same payee, give each a unique name so it is easier to
identify and recognize on reminders.
Next Due Date: Enter the next date your bill is due.
Repeat Interval: Select how often your bill repeats from the drop down menu. You can
select Never for one-time bills, or Custom if your bill’s repeat interval is not one of the
defaults.
Editing Bills: Optional Fields
You can save a bill after filling in just the mandatory data above. However, filling in the
optional fields below can help make Chronicle more helpful.
Amount Due: The amount you pay each time. You can leave this blank if the amount
due varies, or enter the amount due the next due date. It is easy to edit this amount
later without editing the whole bill. Chronicle uses the Amount Due to estimate how
much you will owe each month. If you enter no amount, Chronicle will use the average
paid to guess how much you owe.
Total Balance: The total balance on the account (for example, the remaining balance
on your home or car loan).
Payment Method: Select Online if you plan to pay your bill online. Select Automatic if
you have set up your bill to be paid automatically. Chronicle will keep track of the bill,
and can optionally auto-log it for you. By default, Chronicle won’t count bills set to
Automatic when calculating how much is due in the current month.
Payment URL: If you pay your bill online, enter the URL where you pay your bill here,
and Chronicle will offer a Pay Now button that will allow you to pay your bill online via
Chronicle’s integrated browser, or via Safari.
Remind Me: If checked, Chronicle will remind you a number of days before the bill is
due. You can customize the time of day the alert appears in preferences.
Tags: You can use tags to sort bills on the overview (see next section). For example,
you can separate Personal and Business bills, or assign bills to certain people using
tags.
7
Navigation: Overview Screen
There are several ways to navigate from the Overview screen to the Bill Detail screen.
The three areas highlighted below in red indicate three possible ways to switch to the
Bill Detail screen:
• Double clicking any bill on the Your Bills list will take you to the Bill Detail screen for
that bill. You can also click once on the bill and press the Return key.
• Double clicking on a bill’s icon on the Month at a Glance calendar will also take you to
the bill detail screen for the selected bill. If you double click on a date on the calendar
that has multiple bills due, you will be taken to the Bill Detail screen for the first bill due
that date.
• You can also search for a bill using the search field in the toolbar. Begin typing part of
a bill’s name, and it will suggest matches. Select one of the matches, and press
Return to view that bill. In the search field, you can also click on the magnifying glass
icon to see a list of all your bills in alphabetical order. Selecting one will take you to
that bill’s detail screen.
8
Navigation: Bill Detail Screen
From the Bill Detail screen, you can switch bills by clicking the arrows highlighted in red,
or by using the search field, also highlighted in red:
• The arrows always cycle through bills in the order they are listed on the Overview
screen. By default, the overview screen sorts bills in order of when they are due. So
pressing the right arrow will move to the next bill due later than the currently viewed
bill, and the reverse for the left arrow. If you change the sort order on the Overview
screen, the sort order works the same.
• The toolbar search field works the same here as it does on the Overview.
In the statistics area, the arrows highlighted in green cycle through four different
statistics types.
In the payment history box, you can scroll left and right in the Payments by Month area
(highlighted in purple) to see more payments farther in the past. You can scroll up and
down in the All Payments area (highlighted in green) to view older or more recent
payments. Double click a payment in this area to edit or delete it.
The sticky note contains buttons for logging and paying bills, described in the next
section.
9
Part Three
Logging and Paying Bills
Logging Payments
One of Chronicle’s core functions is logging payments. When you create a bill in
Chronicle, the bill automatically updates the next due date whenever you log a payment.
The sticky note on the bill detail screen.
To log a payment for a bill, click the Log Payment button, located on the sticky note. The
Log Payment window appears:
The Log Payment window.
10
The Log Payment window is mostly self-explanatory:
Date Paid: The date you paid the bill. You can enter a future date if you have scheduled
the bill to be paid online.
Amount: The amount you paid. Chronicle automatically uses your system’s default
currency.
Note: An optional field. You can place confirmation numbers here.
Receipt: Optional. Click the Attach Receipt button to select a scanned or downloaded
receipt of your payment. Chronicle will copy the receipt to its database when you save
the payment.
After entering the above info and clicking the “Save Payment” button, Chronicle will
update the next due date and reminders, and other information like the average paid,
the total for the month, and so on.
Logging Partial and Historical Payments
Sometimes you want to log a payment without the due date changing. For example, if
you make a partial payment for a bill, or if you want to enter payments you have made
in the past for historical reasons.
To log a payment that doesn’t update the due date, hold down the Option key before
clicking on the Log Payment button on the sticky note. The button will change to display
Log Partial.
After clicking on the Log Partial payment, a window will appear that is identical to the
Log Payment window, except that the button title is Save Partial Payment.
Editing Payments
If you made a mistake logging a payment, you can easily edit it. To edit or delete a
logged payment, double click on the payment in the All Payments area of the Bill Detail
screen.
The payment editor pops up (see screenshot on next page).
11
The Payment Editor window.
The payment editor functions exactly like the log payment window, except that you can
also delete attachments, or delete the payment entirely.
Note: When you delete the latest payment (the payment on the list), the next due date
goes back one cycle.
Paying Bills
Chronicle can help you pay bills online. If you set a bills payment type to Online, and
enter a URL for the bill, then a Pay Now button appears on the sticky note. If the
payment type is not set to Online, or if a URL is not entered, no button appears.
The Pay Now button.
12
Clicking the Pay Now button takes you to the web site where you pay your bill, and pops
up the Log Payment window, so you can easily record the details of the payment you
make.
By default, the web site opens in Chronicle’s internal browser, as seen below. However,
you may prefer to have the web site open in your default browser instead. You can set
web sites to enter in your default browser instead of in Chronicle in Chronicle’s
preferences, under the Logging tab.
Paying a bill in Chronicle’s internal browser.
Logging Payments Automatically
If you want to track payments in Chronicle that you have set up to be paid automatically,
you can do so.
First, check the Log Payments Automatically box in Chronicle’s preferences, under the
Logging tab. Next, make sure that your bills which are paid automatically are set to the
Automatic payment type, and make sure an amount due is entered.
Then, Chronicle will auto-log the amount due on the date paid for automatic bills.
13
Part Four
Income
Managing Income
Your income appears in the Income and Payments section, underneath the Month at a
Glance. The income area is circled in the photo below.
To Edit Your Income Sources Click the pencil icon on the Income and Payments
screen. A new window will pop up (pictured on the next page).
To Disable Income Tracking Go to Chronicle’s preferences, and uncheck Enable
Income Management on the General tab.
14
The income sources window.
To add an income source, click the Add Income button. The help for adding income
sources is located in the window itself. Income sources can repeat every month (on the
same day of the month), or not at all. Other repeat options are not available at this time.
Double click an income source to edit or delete it.
Understanding Your Balance
On the overview screen, under the Income and Payments area, your income is
compared with your balance. The information is as follows:
Income to Date: All income as of the current date.
Paid This Month: Amount you have logged in payments in the current month.
Current Balance: Income to date minus amount paid.
Expected Balance: Expected balance after all monthly income (including future
incomes), minus all paid and scheduled bills in the current month.
15
Part Five
Customizing Chronicle
Customizing Reminders
On Mountain Lion, notifications are delivered via notification center as banners that
disappear after a moment by default. They then slide in to your notification center
sidebar, and stay there until you log a payment for the bill. You have a couple options to
make the reminders more noticeable:
Enable Calendar Reminders
Chronicle can add your bill reminders to your calendar in addition to notification center.
To add bills to your calendar, go to Chronicle’s preferences, and select the Reminders
tab. Check the box labeled Add Reminders to Calendar, and then choose the calendar
to which you would like to add notifications. Calendar reminders are enabled by default
on Lion.
Customize Notification Center
You can set Notification Center alerts to appear as alerts instead of banners. Alerts stay
on your screen until you dismiss them. To change this setting, go to System
Preferences and select Notifications. Then, select Chronicle on the list of applications.
Change the alert style to Alerts. Now, the reminders will stay on your screen until you
dismiss them.
Tip You can view all of Chronicle’s reminders settings in Chronicle’s preferences,
under the Reminders tab. You can customize the time of day for reminders to pop up,
and which calendar (if any) you want reminders to be added to.
Working with Tags
When adding or editing a bill, you can add a tag to the bill by entering an item in the
Tags field. On the Overview screen, you can filter your bills to see only bills that match a
certain tag (see the screenshot in the Archiving section on the next page for the
Overview bill filter).
You can use tags to divide bills into groups. For example, you can use it to divide bills
between roommates, or separate business and personal expenses.
Tip You can edit the list of tags that appear on the filter by going to Chronicle’s
preferences, and switching to the Advanced tab.
16
Archiving and Deleting Bills
You can archive a bill when you no longer need to actively monitor it, but want to keep
the payment history intact. Archived bills appear on the Archived bill list. To view
archived bills, click the Overview bill filter, which by default says “All Active Bills” (it is
circled in the screenshot below), and select “Archived Bills”
The Overview Bill Filter
The Overview bill filter also contains a list of all tags you have created (see previous
section). Clicking on any tag shows only bills matching that tag.
To Archive a Bill: Right-click on an active bill and select Archive Bill.
To Restore a Bill: Right-click on an archived bill and select Restore Bill.
To Delete a Bill: Right-click a bill and select Delete Bill (deleting is permanent!).
Note If you edit an archived bill, it will be moved back to the active bills list.
Tip Before your last payment of a bill, change the repeat interval to Never. Then, when
you log your last payment, it will say “Never due” instead of a due date.
17
Syncing Data
Syncing your Chronicle data with other Macs is simple, and uses the free Dropbox
service. If you don’t have Dropbox installed, you can download and install it for free from
Dropbox.com.
Once Dropbox is installed and running, go to Chronicle’s preferences, and select
the Sync tab. Click the Turn On button to enable syncing. Chronicle will then prompt you
to select your Dropbox folder. Once selected, Chronicle will move your database to your
Dropbox Apps folder, under a subfolder named Chronicle.
You can proceed to follow this same procedure on other Macs, and Chronicle will
automatically load your database stored on Dropbox.
Note iPhone syncing is coming soon.
Other Settings
Chronicle has several other customizable options. We recommend browsing through
Chronicle’s preferences window to view various other features.