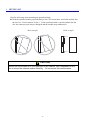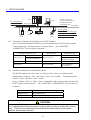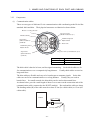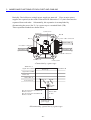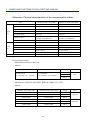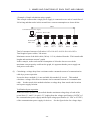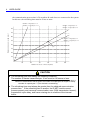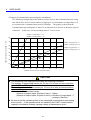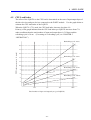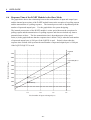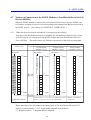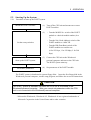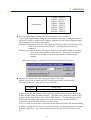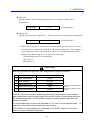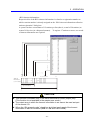
1
S10mini HARDWARE MANUAL First Edition, June 2001, SME-1-106 (C) (out of print) Second Edition, May 2002, SME-1-106 (D) All Rights Reserved, Copyright 2001, 2002, Hitachi, Ltd. The contents of this publication may be revised without prior notice. No part of this publication may be reproduced in any form or by any means without permission in writing from the publisher. Printed in Japan. BI-KB-HS<IC-IC> (FL-MW20, AI8.0) SAFETY PRECAUTIONS Be sure to read this manual and all other attached documents carefully before installing, operating inspecting or conducting maintenance on this unit. Always use this unit properly. Be sure to carefully read the information about the device, the safety information and precautions before using this unit. Be sure that the person(s) responsible for maintenance receives and understands this manual completely. This manual divides the safety precautions into DANGERs and CAUTIONs. DANGER : Failure to observe these warnings may result in death or serious injury. CAUTION : Failure to observe these cautions may result in injury or property damage. Failure to observe any CAUTION may lead to serious consequences. All of these DANGERs and CAUTIONs provide very important precautions and should always be observed. Additional safety symbols representing a prohibition or a requirement are as follows: : Prohibition. For example, “Do not disassemble” is represented by: : Requirement. For example, if a ground is required, the following will be shown: 1. Installation CAUTION ! Use this product under the environment conditions specified in the catalogs and manual. Utilizing this product in a hot, damp, or dusty atmosphere or in an atmoshpere of corrosive gas, vibration or impact may lead to a malfunction, shock hazard or fire. ! Install this product according to the procedure outline in the manual. Imperfect installation may lead to a part drop, failure malfunction. ! Do not put any wire chip or other foreign matter into this product. This may cause a malfunction, failure or fire. 2. Wiring REQUIREMENT ! Be sure to ground this product with FG. Failure to ground this product may lead to a malfunction or shock harzard. CAUTION ! Connect this product to a power supply with the same ratings. Connecting this product to a power supply exceeding its voltage rating may lead to a fire. ! Wiring must be conducted by a qualified technician. Miswiring may lead to failure, shock hazard or fire. 3. Handling precautions CAUTION ! Read this manual thoroughly and follow all the safety precautions and instructions given in this manual before operations such as system configuration. ! Keep this manual handy so that you can refer to it any time you want. ! If you have any question concerning any part of this manual, contact your nearest Hitachi branch office or service engineer. ! Hitachi will not be responsible for any accident or failure resulting from your operation in any manner not described in this manual. ! Hitachi will not be responsible for any accident or failure resulting from modification of software provided by Hitachi. ! Hitachi will not be responsible for reliability of software not provided by Hitachi. ! Make it a rule to back up every file. Any trouble on the file unit, power failure during file access or incorrect operation may destroy some of the files you have stored. To prevent data destruction and loss, make file backup a routine task. DANGER ! Do not touch any terminal while this product is live, as this may lead to a shock hazard. ! Configure an emergency stop circuit, interlocking circuit and related circuitry outside the programmable controller. A programmable controller failure may lead to general breakdown or an accident. CAUTION ! Make sure that everything is safe before changing programs, running or stopping this product while on the fly or producing forced output. Mishandling may lead to product breakdown or an accident. ! Turn on the product according to the correct power – on procedure. Mishandling may lead to product breakdown or an accident. 4. Maintenance PROHIBITION ! Do not disassemble or remodel this product, as this may lead to a malfunction, failure or fire. CAUTION ! Power off this product before attaching or detaching any module or unit as this may lead to a malfunction, failure or shock hazard. WARRANTY AND SERVICING Unless a special warranty contract has been arranged, the following warranty is applicable to this product. 1. Warranty period and scope Warranty period The warranty period for this product is for one year after the product has been delivered to the specified delivery site. Scope If a malfunction should occur during the above warranty period while using this product under normal product specification conditions as described in this manual, please deliver the malfunctioning part of the product to the dealer or Hitachi Engineering Service Co., Ltd. The malfunctioning part will be replaced or repaired free of charge. If the malfunctioning is shipped, however, the shipment charge and packaging expenses must be paid for by the customer. This warranty is not applicable if any of the following are true. ! The malfunction was caused by handling or use of the product in a manner not specified in the product specifications. ! The malfunction was caused by a unit other than that which was delivered. ! The malfunction was caused by modifications or repairs made by a vendor other than the vendor that delivered the unit. ! The malfunction was caused by a relay or other consumable which has passed the end of its service life. ! The malfunction was caused by a disaster, natural or otherwise, for which the vendor is not responsible. The warranty mentioned here means the warranty for the individual product that is delivered. Therefore, we cannot be held responsible for any losses or lost profits that result from the operation of this product or from malfunctions of this product. This warranty is valid only in Japan and is not transferable. 2. Range of services The price of the delivered product does not include on-site servicing fees by engineers. Extra fees will be charged for the following: ! ! ! ! ! Instruction for installation and adjustments, and witnessing trial operations. Inspections, maintenance and adjustments. Technical instruction, technical training and training schools. Examinations and repairs after the warranty period is concluded. Even if the warranty is valid, examination of malfunctions that are caused by reasons outside the above warranty scope. THIS PAGE INTENTIONALLY LEFT BLANK. PREFACE We greatly appreciate your making use of the CPU option D.NET module. This S10mini hardware manual on the option D.NET describes how to handle the D.NET module. Read this manual carefully to use the module properly. In the description of this manual, the following abbreviations are used for the microprogram* versions/revisions of the D.NET module. Microprogram version/revision Ver.1 Rev.0 Ver.2 Rev.X (X: 0 to F) Ver.3 Rev.0 Abbreviation used in this manual V1.0 V2.X (X: 0 to F) V3.0 Indication of CPU indicator DN* 1.0 DN* 2.X (X: 0 to F) DN* 3.0 *Microprogram … Software to control the hardware mounted on the ROM in the D.NET module. The relation between the D.NET module models and microprogram versions/revisions is shown below. Microprogram version/revision Ver.1 Rev.0 Ver.2 Rev.X (X: 0 to F) Ver.3 Rev.0 D.NET module model LQE070 LQE070 LQE170/175 Note for storage capacity calculations: ! memory capacities and requirements, file sizes and storage requirements, etc. must be calculated according to the formula 2n. The following examples show the results of such calculations by 2n (to the right of the equals signs): 1 KB (kilobyte) = 1024 bytes 1 MB (megabyte) = 1,048,576 bytes 1 GB (gigabyte) = 1,073,741,824 bytes ! As for disk capacities, they must be calculated using the formula 10n. Listed below are the results of calculating the above example capacities using 10n in place of 2n: 1 KB (kilobyte) = 1000 bytes 1 MB (megabyte) = 10002bytes 1 GB (gigabyte) = 10003 bytes i CONTENTS 1 BEFORE USE ............................................................................................................................... 1 1.1 CPU Mount Base .................................................................................................................... 2 1.2 Mounting Modules ................................................................................................................. 2 1.3 Ground Wiring........................................................................................................................ 5 2 SPECIFICATIONS ........................................................................................................................ 7 2.1 Application ............................................................................................................................. 8 2.2 Specifications.......................................................................................................................... 8 2.2.1 System specifications....................................................................................................... 8 2.2.2 Transmission specifications............................................................................................. 9 2.2.3 Types of communication ............................................................................................... 10 3 NAMES AND FUNCTIONS OF EACH PART AND CABLING.............................................. 13 3.1 Names and Functions of Each Part ....................................................................................... 14 3.2 Cabling.................................................................................................................................. 17 3.2.1 Interface signals and connection .................................................................................... 17 3.2.2 Hardware configuration ................................................................................................. 19 3.2.3 Components ................................................................................................................... 21 3.2.4 Restriction of cable lengths............................................................................................ 31 3.2.5 Consideration on disposition of a communication power supply.................................. 35 3.2.6 Grounding specification................................................................................................. 43 4 USER GUIDE.............................................................................................................................. 45 4.1 Software Configuration of the D.NET System ..................................................................... 46 4.2 Slave Timeout Flag............................................................................................................... 48 4.3 S Register.............................................................................................................................. 49 4.4 Communication Time ........................................................................................................... 50 4.4.1 When the D.NET module is connected to slaves (for the LQE070).............................. 50 4.4.2 When the D.NET module is connected to peer devices (for the LQE070).................... 53 4.4.3 For LQE170 and LQE175.............................................................................................. 55 4.5 CPU Load Index ................................................................................................................... 57 4.6 Response Time of the D.NET Module in the Slave Mode ................................................... 58 4.7 Notices on Connection of the D.NET Module to Non-Hitachi DeviceNet I/O Devices (DI/DO)...................................................................... 59 4.7.1 When the bit reversal mode is disabled (V1.0 always has this setting.)........................ 59 4.7.2 When the bit reversal mode is enabled (This setting is valid for V2.0 or later.) ........... 60 4.7.3 Handling analog data in bytes and words or longer....................................................... 61 4.7.4 Data reversal mode in V3.0 or later............................................................................... 63 4.8 Setting of CPU Module Switches and D.NET Module Operation ....................................... 65 ii 5 OPERATION................................................................................................................................67 5.1 Before Starting Up the System ..............................................................................................68 5.1.1 System configuration......................................................................................................68 5.2 Starting Up the System..........................................................................................................69 5.2.1 Procedure to start up the D.NET system ........................................................................69 5.2.2 Function system..............................................................................................................70 5.2.3 Required hardware and software ....................................................................................71 5.2.4 Starting the D.NET system.............................................................................................71 5.3 Change Connecting PCs........................................................................................................72 5.4 Channel (C) and Mode of Operation (M)..............................................................................74 5.5 Setting Parameters.................................................................................................................75 5.5.1 Setup system parameters ................................................................................................75 5.5.2 Setup station parameters.................................................................................................78 5.5.3 Setup of D.Station data format conversion ....................................................................98 5.6 S Table Information.............................................................................................................106 5.7 Hard Error Information .......................................................................................................108 5.8 Slave Error Information.......................................................................................................109 5.9 F/D Function ....................................................................................................................... 111 5.10 DeviceNet Serial No. ..........................................................................................................112 5.11 Version Information.............................................................................................................113 5.12 Log Information of Refresh Time .......................................................................................114 6 MAINTENANCE.......................................................................................................................115 6.1 Maintenance & Checks .......................................................................................................116 6.1.1 Periodic checks.............................................................................................................116 6.2 T/M (Test & Maintenance Program) ...................................................................................117 6.2.1 Hardware configuration for test and maintenance........................................................117 6.2.2 Executing the T/M........................................................................................................118 6.2.3 T/M functions and operations ......................................................................................118 6.2.4 CPU areas used by the T/M..........................................................................................119 6.3 Troubleshooting...................................................................................................................120 6.3.1 Troubleshooting flow ...................................................................................................120 6.3.2 First checks before troubleshooting .............................................................................121 6.4 Errors and Repairing ...........................................................................................................124 6.4.1 Messages indicated by CPU indicators ........................................................................124 6.4.2 Error indication and repairing ......................................................................................125 APPENDIXES..................................................................................................................................127 APPENDIX A.1 CPU Memory Map.........................................................................................128 APPENDIX A.2 Installation Check List ...................................................................................129 APPENDIX A.3 Trouble Report ...............................................................................................130 iii THIS PAGE INTENTIONALLY LEFT BLANK. 1 BEFORE USE 1 1.1 BEFORE USE CPU Mount Base A CPU mount base is needed to use this module. CPU mount bases are available in three types: ・ Two-slot mount base (Type: HSC-1020) ・ Four-slot mount base (Type: HSC-1040) ・ Eight-slot mount base (Type: HSC-1080) As an example, the eight-slot mount base houses up to eight optional modules. Figure 1-1 Mount Base 1.2 Mounting Modules CPU slot PS slot Slots 0 thru 7 Optional module, I/O module CPU module Power supply module Figure 1-2 Mounting Modules -2- 1 BEFORE USE PS slot: Mount one of the following power supply modules: ・ LQV000 ・ LQV100 ・ LQV020 CPU slot: Mount one of the CPU modules: ・ LQP000 ・ LQP010 ・ LQP011 ・ LQP120 Slots 0 thru 7: Mount optional modules, such as the LQE050, and I/O modules. Insert optional modules into slots, starting from slot 0, with no intervening vacant slots. Do not leave any slot vacant or insert an I/O module between the CPU module and the optional module that follows. CAUTION z Always mount the D.NET modules in sequence from the leftmost slot. Do not install any I/O module between the CPU module and the D.NET module, or create any vacant slot between them. z When using only one D.NET module, be sure to set the MODU No. to “0”. z When using two or more D.NET modules, be sure to set one of the MODU No. for the D.NET modules to “0”. -3- 1 BEFORE USE Note the following when mounting an optional module: z Hold the optional module perpendicularly to the CPU mount base, and fit the module into the slot (see “Good example” below). If the optional module is inserted aslant into the slot, the connector pins may be damaged and the module may malfunction. Good example Bad examples CAUTION Where the mount base is on the upper part of the cabinet, use a stepladder or the like to mount the optional module correctly. Do not mount the module aslant. -4- 1 1.3 BEFORE USE Ground Wiring Carry out ground wiring as shown in Figure 1-3 by following these steps: ① ② ③ Connect the FG terminals of the power supply module, CPU module and optional modules by crossover wiring to the mount base's grounding seat, a hexagon nut fitted to the mount base (with a wire diameter of 2.0 mm2 or more). ・ For information on how to make a connection to the FG terminal of the LQE050, see Chapter 3, "NAMES AND FUNCTIONS OF EACH PART AND CABLING". (Some optional modules do not have an FG terminal.) Wire the mount base's grounding seat to the PCs grounding terminal of the cubicle in which the mount base is housed (with a wire diameter of 2.0 mm2 or more). Perform Class D grounding from the PCs grounding terminal of the enclosure using a wire with a wire diameter of 5.5 mm2 or more. 2 FG terminal to each individual module 2.0 mm or more PCs grounding terminal of the cubicle 2 To the mount base's grounding seat 2.0 mm or more 2 5.5 mm or more Class D grounding Figure 1-3 Ground Wiring * Class D grounding is defined in the Technical Standard for Electrical Facilities of Japan. This standard states that the grounding resistance must be 100 ohms or less for equipment operating on 300 VAC or less, and 500 ohms or less for devices that shut down automatically within 0.5 seconds when shorting occurs in low tension lines. -5- 1 BEFORE USE DANGER Turn off the power before making connections to the terminal block. the power turned on may incur electrical shock hazards. Wiring with REQUIREMENT An electric shock may lead to a deatch or burn. Noise may cause the system to malfunction. Ground the line ground (LG), frame ground (FG), and shield (SHD) terminals, as described below. • Electrically insulate the mount base from the cubicle. remove the insulating sheet from the mount base. To assure this, do not • Ground the LG and FG terminals separately to prevent mutual interference. The LG terminal is grounded to prevent intrusion of power line noise, while FG and SHD terminals are grounded to suppress intrusion of line noise into external interfaces for remote I/O modules, interface modules, and other modules. -6- 2 SPECIFICATIONS 2 SPECIFICATIONS 2.1 Application The D.NET module (model: LQE070, LQE170, LQE175) conforms to the DeviceNet (*1) standard and performs data communication with various types of devices for DeviceNet connected to the network as a master module, peer module, or slave module depending on the setting. (In V1.0, the D.NET module can be set as a master module or peer module only.) The LQE170 is positioned as the succeeding model of the LQE070. As compared with the LQE070, the transmission cycle setting method is improved and the input/output data transmission area support range is extended in the LQE170. The model LQE175 has a different network power supply method from that of the LQE170. 2.2 2.2.1 Specifications System specifications Item Model Number of networks Maximum number of D.NET modules mountable Mass Specifications LQE070, LQE170, LQE175 1 network/module 4 modules per CPU mount base (installed from left to right on the mount base without creating any vacant slot in between) 230 g -8- 2 2.2.2 SPECIFICATIONS Transmission specifications MAC layer Item Model Transmission path accessing Protocol Maximum number of nodes connectable Transmission speed Transfer word size Transmission medium Coding method/insulation Transmission power Transmission power supply Connector Physical TAP layers Cables Terminator (Terminating resistor) Specifications LQE070 LQE170 LQE175 CSMA/NBA (Carrier Sense Multiple Access with Non-destructive Bitwise Arbitration) CAN (Control Area Network) protocol Supporting a master/slave transmission and a peer transmission (*2) 64 nodes per network Variable (selected from 125, 250, and 500 kbps) Master/slave transmission (Poll) and peer transmission: Up to 256 bytes per transmission Master/slave transmission (Bit Strobe): Up to 8 bytes per transmission NRZ (Non Return to Zero) / photocoupler 500 V 24 VDC (Ripple voltage, 250 mVp-p; Rush current, 65 A or less) Individual power supply (self-feeding) External power feeding Open plug connector and shield connector Open-type TAP and shield-type TAP Trunk line 125 kbps – 500 m Total distance extended 250 kbps – 250 m (variable according to the 500 kbps – 100 m transmission speed) 5-wire thick cable Total 125 kbps – 156 m Drop line: Up to 6 m per branch line length of 250 kbps – 78 m branch 5-wire thin cable 500 kbps – 39 m lines Power line: 3 m max. Connector including a terminating resistor, or 121Ω ± 1% (1/4 W or more); metal film resistor (*1) DeviceNet is a trademark of ODVA (Open DeviceNet Vender Association). (*2) List of supported functions DeviceNet FEATURES Device Type Communication Adapater Master/Scanner Supported Explicit Peer to Peer Messaging Supported I/O Slave Messaging I/O Peer to Peer Messaging Supported · Bit Strobe Supported Configuration Consistency Value Not supported · Polling Supported Faulted Node Recovery Not supported · Cyclic Not supported Baud Rates 125k, 250k, 500k Supported · Change of State (COS) Not supported (*3) Not supported by V1.0 -9- (*3) 2 SPECIFICATIONS 2.2.3 Types of communication (1) Master function (a) Polling transmission This is a transmission technique in which a master submits transmission requests in sequence to slaves and the slave answers to it. The master transmits a polling request to each slave at preset time intervals to transfer control data to and from the slave. The slave is not allowed to send data until a polling request comes from the master. With a polling request, the master sends control data to the slave. Similarly, with a polling response, the slave sends control data back to the master. The polling transmission is automatically carried out at intervals of a constant master/slave refreshing time set by the D.NET system (see CHAPTER 5, “OPERATION”). Therefore, you need not start it from a user application program. Polling request: Sends control data from the master to a slave and requests the slave to send its control data. Master DeviceNet Slave Slave Slave Polling response: Sends control data from a slave to the master. (b) Bit Strobe transmission (function added to V2.0) This is a transmission technique in which a master submits a single Bit Strobe request and more than one slave returns a Bit Strobe response. This is a one-to-multiple inquiry transmission. The master transmits a single Bit Strobe request to each slave at a preset time interval. The slave is not allowed to send data until a Bit Strobe request comes from the master. With a Bit Strobe request, the master sends control data to the slave. Similarly, with a Bit Strobe response, the slave sends control data back to the master. The Bit Strobe transmission is automatically carried out at intervals of a constant master/slave refreshing time set by the D.NET system (see CHAPTER 5, “OPERATION”). Therefore, you need not start it from a user application program. - 10 - 2 Bit Strobe request: Sends control data from the master to a slave and requests the slave to send back its control data. (A single Bit Strobe request is sent to each of slaves at a preset time interval.) SPECIFICATIONS Master Bit Strobe response: Sends control data from a slave to the master. DeviceNet Slave Slave Slave (2) Slave function (function added to V2.0) (a) Polling transmission In this transmission, the D.NET module works as a module and transfers data to and from a master D.NET module or other manufacturer’s master module by a polling transmission technique. The D.NET module as a slave automatically sends data back to the master in response to a polling request from the master. Therefore, you need not start it from a user application program. The D.NET module as a slave supports a polling transmission only. Polling request: Sends control data from the master to a slave and requests the slave to send back its control data. Master D.NET module or other manufacturer's master module DeviceNet D.NET module as a slave Slave Slave Polling response: Sends control data from a slave to the master. (3) Peer function A transmitting peer broadcasts data together with a message ID at preset time intervals. A receiving peer selectively receives the data according to this message ID and the sender MAC ID. Only the nodes supporting the peer transmission function can receive data in this transmission. The peer transmission is automatically carried out at intervals of a constant peer refreshing time set by the D.NET system (see CHAPTER 5, “OPERATION”). Therefore, you need not start it from a user application program. - 11 - 2 SPECIFICATIONS Peer Peer Peer transmission: Sends data together with a message ID. Peer * Peer Peer Peer (4) A node selectively receives data which is broadcasted by the transmitting peer. DeviceNet Peer reception: Selectively receives the data according to this message ID and the sender MAC ID. Transmission functions and settings for the D.NET module Select a transmission function and set an operation mode for the D.NET system and the “Transmission type” system parameter, as shown below. (See CHAPTER 5, “OPERATION,” for procedures to set them.) Transmission function used Operation mode Polling transmission Master function Slave function Poll Bit Strobe transmission Polling transmission Peer function (5) Transmission type Master-peer mode Bit Strobe transmission Bit Strobe reception Slave mode Poll Master-peer mode Peer transmission Peer reception Available combination of transmission modes The D.NET module can work as any of a master, a slave, and a peer and only mode combinations of “Master - Peer” and “Slave - Slave” are available. You cannot specify “Master - Slave” and “Peer - Slave” modes. Select a “Master - Peer” or “Slave - Slave” combination and set the operation mode for the D.NET system, as shown below. (See CHAPTER 5, “OPERATION,” for procedures to set them.) Combination Operation mode set for the D.NET system “Master - Peer” Master-peer mode “Slave - Slave” Slave mode CAUTION V1.0 supports the polling transmission of the master function and the peer function only. Therefore you cannot specify the Bit Strobe transmission of the master function and the slave function. - 12 - 3 NAMES AND FUNCTIONS OF EACH PART AND CABLING 3 3.1 NAMES AND FUNCTIONS OF EACH PART AND CABLING Names and Functions of Each Part LQE070 D.NET LQE170 D.NET LQE175 D.NET U MNS MNS NA MNS L DR U MODU NO U NA L DR DR MODU No. MODU No. V+ CAN-H SHD CAN-L V- No. ① ② ③ Name Module/Network Status Indicator (green) Module/Network Status Indicator (red) Node Address setting switch ④ Data Rate setting switch ⑤ MODU No. setting switch ⑥ DeviceNet interfacing connector NA L Function The on/off status of these indicators in combination indicates the operating status of the D.NET module and the network. (For meanings of the combined indicator status, see the next page.) Used to set an MAC ID (/0 to /3F) The values /40 through /FF are reserved. (See the table below.) Used to set a baud rate (transmission speed). 0 for 125 kbps, 1 for 250 kbps, 2 for 500 kbps The values 3 through F are reserved. Used to set a module number. (See the next page for available module numbers.) Connector for DeviceNet interface - 14 - 3 NAMES AND FUNCTIONS OF EACH PART AND CABLING Conversion table for NA (Node Address) values (in hexadecimal) and MAC IDs (in decimal) NA U L 0 0 0 1 0 2 0 3 0 4 0 5 0 6 0 7 0 8 0 9 0 A 0 B 0 C 0 D 0 E 0 F MAC IDs (in decimal) 0 1 2 3 4 5 6 7 8 9 10 11 12 13 14 15 NA U L 1 0 1 1 1 2 1 3 1 4 1 5 1 6 1 7 1 8 1 9 1 A 1 B 1 C 1 D 1 E 1 F MAC IDs (in decimal) 16 17 18 19 20 21 22 23 24 25 26 27 28 29 30 31 NA U L 2 0 2 1 2 2 2 3 2 4 2 5 2 6 2 7 2 8 2 9 2 A 2 B 2 C 2 D 2 E 2 F MAC IDs (in decimal) 32 33 34 35 36 37 38 39 40 41 42 43 44 45 46 47 NA U L 3 0 3 1 3 2 3 3 3 4 3 5 3 6 3 7 3 8 3 9 3 A 3 B 3 C 3 D 3 E 3 F MAC IDs (in decimal) 48 49 50 51 52 53 54 55 56 57 58 59 60 61 62 63 CAUTION z Be sure to operate the NA (Node Address), DR (Data Rate), and MODU No. switches while the D.NET module is powered off. If any of the switches is operated while the D.NET module is ON, the normal operation of the D.NET module is not guaranteed. z When mounting only one D.NET module on the CPU unit, always set the module number (MODU No.) to “0”. z Also when mounting two or more D.NET modules on the CPU unit, always set MODU No. equal to “0” for one of those modules. Values of the MODU No. switch are assigned as shown below. Up to four D.NET modules can be mounted in one single CPU unit. Set an appropriate number for the module of each channel according the table below. (For details of T/M, see Section 6.2, “T/M (Test/Maintenance Program).”) Number 0 1 2 3 4-7 8-B C-F Description Channel-0 module Channel-1 module Channel-2 module Channel-3 module Reserved T/M setting (for maintenance purposes) Reserved CAUTION When you set one of the “Reserved” values, the following warning will be given. ・ The D.NET module stops transmission and the red MNS indicator lights. ・ The CPU LED unit shows “DN* MDSW” (wherein “*” is a channel number of 0 to 3). - 15 - 3 NAMES AND FUNCTIONS OF EACH PART AND CABLING The on/off status of MNS indicators in combination indicates the operating status of the D.NET module and the network as shown below. ○: ON MNS (green) MNS (red) ● ● ● ● ◎ ● ○ ● ● ○ The specified MAC ID already exists. ● ◎ The bus is OFF. ● ○ A fatal fault occurred. Meanings ●: OFF ◎: Flashing Remarks The D.NET module is not powered on. · Now initializing the objects · Now checking whether the specified MAC ID already exists. · Now receiving configuration information · Now building up objects · A parameter setting error occurred. Now transmitting (including the occurrence of a non-fatal fault) – The D.NET module has started but cannot communicate with the network. For repairing, see item (1), “Factors that disable the D.NET module to communicate,” in Section 6.3.2, “First checks before troubleshooting.” The green MNS indicator seems to be flashing when the bus is turned off and on repeatedly. This indicator status takes place when no remote node is registered yet. In the master mode, the remote node (slave) is not connected or powered off. In the slave mode, no transmission is in progress. (This is the case when the slave is powered on first and waiting for data from the master.) Same indication as that of “A fatal fault occurred.” Read the indication on the CPU LED, or use the S table to distinguish “The specified MAC ID already exists” from “A fatal fault occurred.” The red MNS indicator flashes at a time interval of 0.5 seconds. A certain bus-ON and bus-OFF time may make flashing of the MNS indicator invisible. Same indication as that of “A fatal fault occurred.” Read the indication on the CPU LED, or use the S table to distinguish “The specified MAC ID already exists” from “A fatal fault occurred.” Supplement: When the D.NET module is powered on, the green and red MNS indicators turn on and off as shown below as far as no error occurs. Self-diagnosing Initializing 0.25 s MNS (green) 0.25 s ON n MNS (red) Transmitting ON ON Time The D.NET module is powered on. - 16 - 3 3.2 NAMES AND FUNCTIONS OF EACH PART AND CABLING Cabling 3.2.1 Interface signals and connection (1) LQE070 interface signals and wiring method LQE070 Signals D.NET Symbol V+ CAN-H SHD CAN-L V- U MNS NA L DR MODU NO Name Network power (+24V) Signal line (High) Shield Signal line (Low) Network power (GND) Cable-fixing screw Connector Red (Power wire) White (Signal wire) Cable V+ CAN-H SHD CAN-L V- Black (Power wire) Blue (Signal wire) PG terminal Bare wire (shielded wire) Fit each wire of the cable to a PG terminal and crimp the PG terminal to clamp the wire. (For specifications, see “Reference: Physical characteristics of the communication cables” of Subsection 3.2.4 “Restrictions on cable lengths”.) Orient the connector correctly, insert each PG terminal into the corresponding hole of the connector, and firmly tighten each terminal screw (with a tightening torque of 5±1 N·m). Make sure that the connector is oriented correctly, fit the connector to the connector on the front panel of the D.NET module, and plug it firmly. CAUTION z Be sure to turn off the power to the S10mini, all connected DeviceNet devices, and the communications equipment before connecting the cable to the connector of the LQE070. z As the LQE070 separately supplies power to the communications equipment (self-feeding), it need not be supplied externally. Naturally, the power lines can be connected to the D.NET module. - 17 - 3 NAMES AND FUNCTIONS OF EACH PART AND CABLING (2) LQE170 and LQE175 interface signals and wiring method Wire color Abbreviation Use Black VNetwork power supply (+24 V) Blue CAN-L Signal line (H side) (Bare wire) SHD Shield White CAN-H Signal line (L side) Red V+ Network power supply (GND) T D.NET LQE170 MNS U NA L DR MODU No. Cable-fixing screw (rear view) PG terminal Bare wire Black Blue Cable White Red Connector-fixing screw (2 positions) Connector Fit each wire of the cable to a PG terminal and crimp the PG terminal to clamp the wire. (For specifications, see “Reference: Physical characteristics of the communication cables” of Subsection 3.2.4 “Restrictions on cable lengths”.) Orient the connector correctly, insert each PG terminal into the corresponding hole of the connector, and firmly tighten each terminal screw (with a tightening torque of 5±1 N·m). Make sure that the connector is oriented correctly, fit the connector to the connector on the front panel of the D.NET module, and plug it firmly. CAUTION z Be sure to turn off the power to the S10mini, all connected DeviceNet devices, and the communications equipment before connecting the cable to the connector of the LQE170. z As the LQE170 separately supplies power to the communications equipment (self-feeding), it need not be supplied externally. Naturally, the power lines can be connected to the D.NET module. z Check the cable connector periodically (every 3 to 6 months) for any loosened connector-fixing screw, and tightly screw the connector, if necessary. - 18 - 3 3.2.2 NAMES AND FUNCTIONS OF EACH PART AND CABLING Hardware configuration An example of a DeviceNet hardware configuration is shown below. In the DeviceNet network, a control device connected to the network is called a “node” and the D.NET module is one of the nodes. Nodes can be classified into two: a slave which transfers information to and from the outside and a master which collectively controls and manages slaves in the network. 24 VDC Trunk line Trunk line Trunk line Trunk line Node Branch line Branch line Branch line Node Branch line Node Node Branch line Node Trunk line Branch line Branch line Branch line Trunk line Node Branch line Node Node The DeviceNet network has the following components: ① Nodes Nodes can be classified into two: a slave which transfers information to and from the outside and a master which collectively controls and manages slaves in the network. In the network, the master and slaves nodes can be placed anywhere independently of their roles. ②③ Trunk line and branch line Communication lines connected to the network are classified into two types: trunk line and branch line. A trunk line is a bundle of cables having a terminating resistor at each end. A cable branching from the trunk line and a cable branching from a branch line are respectively called a branch line. A node is connected to a branch line. Dedicated 5-wire cables (thick cabled and thin cables) are used as communication lines. ④ T-branch tap The DeviceNet network uses T-branch taps to branch a cable from the trunk cable and to branch a cable from a branch cable. It is also possible to use a terminal block to connect and branch cables. ⑤ Connector There are two types of connectors that connect communication cables to a node and to a T-branch tap: open and closed. The open-type connector is preferably used to connect a communication cable to a D.NET module and to a T-branch tap. - 19 - 3 NAMES AND FUNCTIONS OF EACH PART AND CABLING ⑥ Terminating resistor In the DeviceNet network, each end of the trunk cable must be terminated with a terminating resistor (121 Ω±1%). There are many ways of termination, but it is recommended to use terminal blocks (TBs) and their terminating resistors. ⑦⑧ Power taps and communication power supply For communication in the DeviceNet network, 24-VDC power must be supplied to each node connected to the network through power taps. It is also possible to supply power through T-branch taps and terminal blocks (TBs). ⑨ Network grounding The shield of the network cable must be grounded only at a point near the center of the network so that a grounding loop may not be formed. There are many ways of grounding: grounding at a D.NET module, grounding from a tap, and grounding from a terminal block (TB). In the above configuration example, the communication cable is grounded from a T-branch tap. Other recommended components of a DeviceNet control mechanism (than the nodes) are listed below When a terminal block (TB) is used, a terminal block, screws for the terminal block, and solderless terminals for the communication cables are required in addition to the components listed below. No. Part name ② Thick cable 5-wire communication cable ③ Thin cable 5-wire communication cable ④ T-branch tap Open-type T-branch tap Open-type 3-branch tap Connector Recommended product Model Manufacturer Specifications UL20276-PSX1P×18AWG+1P ×14AWG(*1) UL20276-PSX1P×24AWG+1P ×24AWG(*1) DNC1-1C DNC1-3C MSTB2.5/5-ST-5.08-AU: Open type OMRON Corporation MSTB2.5/5-STF-5.08-AU: Applicable model … LQE170, LQE175 PG terminal Hitachi Cable, Ltd. Applicable model… LQE070, LQE170, LQE175 ⑤ PG terminal Hitachi Cable, Ltd. for connecting a thick cable (signal) to a A1-6 connector for connecting a thick cable (power) to a A2.5-7 connector for connecting a thin cable to a connector VPC-0.5-F8 for a terminal block MFB120ΩCT1 ⑥ PG terminal Terminating resistor ⑦ Power tap equipped with a reverse current stopper and a grounding terminal 1485T-P2T5-T5 ⑧ Communication power supply 24 VDC S82J-5524 Phoenix Contact GmbH & Co. JST Mfg. Co., Ltd. Tama Electric Co., Ltd. Rockwell Automation Japan Co., Ltd. OMRON Corporation (*1) The cable length is specified separately. - 20 - 3 3.2.3 (1) NAMES AND FUNCTIONS OF EACH PART AND CABLING Components Communication cables There are two types of dedicated 5-wire communication cable conforming to the DeviceNet standard: thick and thin. Their physical structures are identical as shown below. Plastic covering (sheath) DC power wire (black insulation) (V-) Braided shield Aluminum-plated Mylar shield Signal wire (white insulation) (CAN-H) Drain wire Aluminum-plated Mylar shield DC power wire (red insulation) (V+) Signal wire (blue insulation) (CAN-L) Cable type Thick cable Thin cable Outer diameter (mm) 11.2 to 12.1 6.9 The thick cable is hard to be bent, and less signal attenuating. So the thick cables are fit for communications over a comparatively long distance. Usually thick cables are used as long trunk lines. The thin cables are flexible and easy to be bent but apt to attenuate signals. So the thin cables are not fit for communications over a long distance. Usually, they are used as branch lines. In a small network, the thin cables can be used as short trunk lines. As shown below, provide a stub length of about 5 cm or more on the connection end of the communication cable (connected to the D.NET module). Do not bend the cable too sharp. The bending radius (R) of the cable must be at least 25 cm (for a thick cable) or 15 cm (for a thin cable). D.NET 5 cm or more Bending radius - 21 - 3 NAMES AND FUNCTIONS OF EACH PART AND CABLING CAUTION z Cables of the same type (e.g. communication cables) must not be mixed up with cables of other types (e.g., network power cables and high-power cables). Particularly, communication lines must be isolated at least 300 mm from power lines for inverters, motors, and power regulators. Do not put both the communication cables and the power cables in the same pipe or conduit. z Always use the dedicated 5-wire communication cables conforming to the DeviceNet standard. Do not use any other cables for communication. z Do not wire cables tautly. Provide enough allowances in cable connections for future re-cabling (for repairing or device movement). z Do not clamp or tie cables tightly. Clamp or tie the cables loosely so that you can move the cables later for adjustment. Applying an excessive force to cables may damage the cables. z Do not yank the communication cable or pull it strongly. Exerting an excessive force on such a cable may cause disconnection or break of the cable. z Do not put a heavy object on the communication cable (to prevent disconnection or break of the cable). (2) Connector Removable connectors are used to connect communication cables to nodes and to branch taps. The DeviceNet system can use two types of connector: open and closed. However the open-type connectors, particularly plug-type screw connectors, are recommended to connect cables to the D.NET modules and T-branch taps. The plug-type screw connector enables removal of a node without breaking the network. Below are shown the external view and pin assignment of an open-type connector. Female connector (at the network end) 5 4 3 2 1 Male connector (at the device end) 1 2 3 4 5 - 22 - V+ CAN-H Drain (SHD) CAN-L V- Red White Bare wire Blue Black 3 NAMES AND FUNCTIONS OF EACH PART AND CABLING CAUTION z Always use PG terminals to connect wires of the communication cable to the plug-type screw connector. If such a cable is connected to the plug-type screw connector without PG terminals, it may be easily disconnected. z Do not wire cables tautly. Provide enough allowances in cable connections so as not to give an excessive force to the connector. z If you use a non-D.NET node which may require a connector other than the open type, refer to the user’s manual for the node to connect your node to the communication cable. z Connect the signal wires, power wires, and the drain wire correctly to the connector. Note that the power wires of the thick cable require different PG terminals than the other wires of the same cable. (3) T-branch taps T-branch taps are used to branch a cable from the trunk cable and to branch a cable from a branch cable. Two types of T-branch taps are available to the DeviceNet network. They are open-type taps and closed-type taps. The open-type tap is preferably used. Further, the T-branch taps are classified into two types: 1-branch and 3-branch. However their connecting methods are identical. Below are shown the structures and connections of the 1-branch type and 3-branch type T-branch taps. The resistance between these connectors is reduced to a minimum. 3-branch type 1-branch type Connectors of a T-branch tap has different resistances between every two of them. The top two connectors of the T-branch tap has the smallest resistance and it is recommended to connect the longest branches to these connectors. - 23 - 3 NAMES AND FUNCTIONS OF EACH PART AND CABLING CAUTION Each T-branch tap has holes for fixing the tap. After connecting the communication cables to the tap, secure the tap firmly with screws. The communication cables can also be branched by terminal blocks (TBs). Connect each cable wire to the terminal block with an appropriate solderless terminal. See the TB connection example below. CAN-H (white) V+ (red) TB Solderless terminal Trunk or branch line Trunk or branch line V+ (red) Drain (bare wire) CAN-L (blue) V- (black) CAN-L (blue) CAN-H (white) Drain (bare wire) V- (black) Branch CAUTION In most cases, two wires must be connected to a single terminal of a terminal block. To assure close contact of solderless terminals to the block terminal, put the two solderless terminals of the wires back to back on the block terminal and tighten the screw. If the solderless terminals are not put back to back, the incomplete terminal contact may cause a communication error. Screw Solderless terminal TB - 24 - 3 (4) NAMES AND FUNCTIONS OF EACH PART AND CABLING Terminating resistor Each end of the trunk line of the DeviceNet network must always be terminated with a terminating resistor. The physical characteristics of the terminating resistor are as follows: Physical characteristics Resistance: 121 Ω Tolerance: ±1 % Permissible loss: 1/4 W Type: Metal film There are many ways to connect terminating resistors but it is recommended to use a terminal block to connect a terminating resistor. Solder an appropriate solderless terminal to each end of the terminating resistor, then cover the bare part of each resistor wire with a piece of Teflon tube, and finally connect the solderless terminals to the terminal block. The terminating resistor need not be oriented but always connect between the signal wires (CAN-H and CAN-L). See the connection example of a terminating resistor below. CAN-H (white) V+ (red) TB Solderless terminal Teflon tube Trunk line Terminating resistor Drain (bare wire) CAN-L (blue) V- (black) CAUTION When connecting a terminating resistor to a terminal block (TB), always connect it between the signal wires (CAN-H and CAN-L). When the terminating resistor is connected to other terminals, the communication may be disabled. (5) Power supply tap and communication power supply The DeviceNet communication cable contains power lines to directly supply power from the network to the nodes. No additional power supply is required for each individual node . Therefore, a communication power supply rated at 24 V must be connected to the trunk line. There are two ways of connecting power lines to the trunk line: by a dedicated power tap and by a terminal block (TB). T-branch taps can be used if the current consumption is 3 A or less. - 25 - 3 NAMES AND FUNCTIONS OF EACH PART AND CABLING Basically, DeviceNet uses a single power supply per network. If two or more power supplies are required (as the result of discussion in Subsection 3.2.5), their lines must be separated from each other. Substantially, this separation is accomplished by disconnecting the power line V+ by a power tap or a terminal block (TB). These separation methods are shown below. Connector C Power tap Fuse B Fuse A for power cable connection Power cable for cable A connection Trunk line B Trunk line A for cable B connection Connector A Connector B <Connection by a power tap> Trunk line A Signal wire CAN-H Trunk line B Power tap Signal wire CAN-L Drain wire Power line VPower line V+ Fuse A Fuse B Schottky diode For disconnection of trunk line A: Remove fuse A. For disconnection of trunk line B: Remove fuse B. Power cable or wire V- V+ Communication power supply <Disconnecting a power line by a power tap> - 26 - 3 NAMES AND FUNCTIONS OF EACH PART AND CABLING Connect the left and right V+ power wires to different terminals. V+ (red) V+ (red) Trunk line A CAN-H (white) CAN-H (white) Drain wire Trunk line B Drain wire CAN-L (blue) CAN-L (blue) V- (black) V- (black) Communication power supply A Communication power supply B <Connecting and disconnecting power lines by a terminal block> Below are listed physical characteristics of the communication power supply conforming to the DeviceNet standard. Item Specifications Initial power setting 24 VDC ± 1% (23.76 to 24.24 V) Maximum rating Output current of 16 A or less Voltage fluctuation 0.3% max. Load fluctuation 0.3% max. Influence by ambient temperature 0.3%/°C max. Input voltage range 120 V ± 10% 230 V ± 10% (if necessary) or automatically selected in the range of 95 V to 250 V Input frequency range 48 to 62 Hz Output ripple 250 mVp-p Electrostatic capacitance of load 7000 µF max. Ambient temperature Operating: 0 to 60ºC Non-operating: -40 to 85ºC Restriction of a rush current from power supply Restricted to less than 65 A Protection against overvoltage Provided (no specified value) Protection against overcurrent Provided (Maximum current: 125%) Time required for power activation 250 ms to reach 5% of the final output voltage Overshoot at startup 0.2% max. Insulation between output and AC power supply and between output and frame ground Standards Required: UL Recommended: FCC Class B, CSA, TUV, VDE Ambient relative humidity 5 to 95% (Non-condensing) Surge current withstand Reserve capacity of 10% - 27 - 3 NAMES AND FUNCTIONS OF EACH PART AND CABLING CAUTION Always use a communication power supply having the overvoltage and overcurrent protecting functions. REQUIREMENT z Make sure the cables are correctly connected before turning on the power supply. z Add a line filter to the primary side of the communication power supply. (6) Network grounding If not grounded, the network may be affected by emission of static electricity and external power noise, resulting in malfunction or, in the worst case, failure. To prevent this, DeviceNet is grounded at a single point. If DeviceNet is grounded at more than one point, a grounding loop may be formed. In addition, the network must be grounded only at a point near the center of the network. The grounding must be Class D grounding. Connect the drain wire from the shield of the trunk line to a T-branch tap or a terminal block (TB) and lead a single wire, stranded wire or braided copper wire from that point to a complete grounding rod or grounding part of the building. Below are shown how the drain wire is connected for grounding from a T-branch tap or terminal block. - 28 - 3 NAMES AND FUNCTIONS OF EACH PART AND CABLING Trunk line Trunk line T-branch tap Insert a ground wire into the "drain wire" hole of the connector, secure it firmly, then plug it into one of the connectors of the T-branch tap. Ground wire CAN-H (white) TB V+ (red) Trunk line Trunk line Drain (bare wire) CAN-L (blue) Connect the ground wire to a solderless terminal and connect the solderless terminal to the "drain wire" terminal of the terminal block. Ground wire V- (black) Additionally, it is possible to ground from the D.NET module connected near the center of the network. As the drain terminal of the D.NET module is not grounded, this grounding is done as follows: (1) uncover the braided shield of the communication cable, (2) solder a ground wire to it, (3) attach an M3 solderless terminal to the free end of the ground wire, and (4) connect the solderless terminal to the cable shield connection terminal on the mount base of the D.NET module. Open-type connector Taping M3 solderless terminal (connected to the cable shield of the mount base) Communication cable Uncover the braided shield of the communication cable and attach a ground wire to the braided shield. - 29 - 3 NAMES AND FUNCTIONS OF EACH PART AND CABLING PROHIBITION z Do not connect the ground wire to the drain terminal of the open connector which already has a drain wire connected as shown below. Ground wire Drain wire Communication cable z Do not ground the communication cable and the power cable to the same grounding point. If done, power noise will be induced into the communication cable through the ground wire. - 30 - 3 3.2.4 (1) NAMES AND FUNCTIONS OF EACH PART AND CABLING Restriction of cable lengths The lengths of cables in DeviceNet are restricted. Note the following when building up a DeviceNet network. Maximum network length The maximum network length is a distance between two nodes which are located furthest from each other, a distance between two terminating resistors, or whichever longer, and is dependent upon the type of the trunk line cable and the transfer rate of the network. See the figure below. 24 VDC Terminating resistor Distance L1 between two terminating resistors Terminating resistor Distance L2 between two nodes which are located furthest from each other Node Node Node Node Node Maximum network length: L1 if L1 > L2 or L2 if L1 < L2 Trunk line cable Transfer rate Thick cable only 500 kbps 100 m or shorter 250 kbps 250 m or shorter 125 kbps 500 m or shorter Thin cable only Thick and thin cables L THICK + L THIN≦100 m 100 m or shorter L THICK + 2.5 × L THIN≦250 m L THICK + 5 × L THIN≦500 m “LTHICK” represents the length of a thick cable and “LTHIN” represents the length of a thin cable. - 31 - 3 NAMES AND FUNCTIONS OF EACH PART AND CABLING (2) Branch length The branch length is a distance between a point at which a communication cable branches from the trunk line and a point at which the branch ends. The maximum branch length is 6 meters. The maximum length of a power cable from the trunk line is 3 meters. Trunk line Trunk line 3 m max. Branch length (6 m max.) 24 VDC Node Trunk line Trunk line 2m Branch length A 4m Branch length B Node A Branch length C Branch length D 4m Node B 3m Node D 4m Node C - 32 - Branch length A: 4 m Branch length B: 4 m Branch length C: 6 m (2 m + 4 m) Branch length D: 5 m (2 m + 3 m) 3 (3) NAMES AND FUNCTIONS OF EACH PART AND CABLING Total branch length The total branch length represents a total of lengths of all branch cables in the network and does not represents a total of lengths between each node and the branch tap of the trunk line. For example in the network below, the total branch length is 40 meters and the available transfer rate are 125 kbps or 250 kbps. 24 VDC Branch tap Trunk line 2m 2m 3m 4m 4m 3m 2m 3m 4m 3m Node 4m Node Node 2m 2m Node Node 2m Node Node Node Node Transfer rate Total branch length 500 kbps 39 m or shorter 250 kbps 78 m or shorter 125 kbps 156 m or shorter - 33 - Node 3 NAMES AND FUNCTIONS OF EACH PART AND CABLING Reference: Physical characteristics of the communication cables Item Signal line Power line Trunk line cable (Thick cable) Branch line cable (Thin cable) Cross section of conductor AWG18 AWG14 Outer diameter of insulator 3.81 mm 1.96 mm Color Blue and white Blue and white Impedance 120Ω ± 10% 120Ω ± 10% Propagation delay 4.46 ns/m 4.46 ns/m Attenuation factor 500 kHz: 0.820 dB/100 m 125 kHz: 0.426 dB/100 m 500 kHz: 1.640 dB/100 m 125 kHz: 0.951 dB/100 m Conductor resistance 22.6Ω / 1000 m 91.9Ω / 1000 m Cross section of conductor AWG15 AWG22 Outer diameter of insulator 2.49 mm 1.40 mm Color Red and black Red and black Conductor resistance 8.9Ω / 1000 m 57.4Ω / 1000 m Maximum current 8A 3A 10.41 to 12.45 m 6.10 to 7.11 mm Outer diameter of cable product Recommended cables: ・ Manufacturer: Hitachi Cable, Ltd. ・ Models Trunk line cable (Thick cable) UL20276-PSX 1P × 18AWG + 1P × 14AWG Branch line cable (Thin cable) Length Color 100 m UL20276-PSX 1P × 24AWG + 1P × 22AWG 300 m Gray 500 m ・ Manufacturer: SHOWA ELECTRIC WIRE & CABLE CO., LTD. ・ Models Trunk line cable (Thick cable) Branch line cable (Thin cable) Length TDN18-100G TDN24-100G 100 m TDN18-300G TDN24-300G 300 m TDN18-500G TDN24-500G 500 m TDN18-100B TDN24-100B 100 m TDN18-300B TDN24-300B 300 m TDN18-500B TDN24-500B 500 m - 34 - Color Light gray Light blue 3 3.2.5 NAMES AND FUNCTIONS OF EACH PART AND CABLING Consideration on disposition of a communication power supply In the DeviceNet network, each node is supplied power from a 5-wire communication cable through a communication connector. Therefore, it is necessary to check whether each node can be supplied power from a planned power supply location independently of the cable length restriction (see Subsection 3.2.4). Calculate the following in advance before consideration: ・ Current consumption (the amount of required current) of each node ・ Type (Thick or Thin) and length of each communication cable determined in Subsection 3.2.4 First, make sure the total of required currents of all nodes is under the current capacity of the communication power supply. If the total current consumption of the nodes is greater than the current capacity of the communication power supply, replace the power supply by a power supply of a larger current capacity or divide the system into two or more parts and provide a power supply for each of the parts. Check the maximum current capacity of each cable. The maximum current capacity of the trunk line cable is 8 A (for a thick cable) or 3 A (for a thin cable). Therefore, a single communication power supply can feed a current of up to 16 A (for a thick trunk line) or 6 A (for a thin trunk line). <Thick trunk line> 8A Trunk line <Thin trunk line> 8A Power tap 3A Trunk line 16 A Trunk line 3A Power tap Trunk line 6A Communication power supply 24 VDC Communication power supply 24 VDC If the total amount of the required currents of nodes connected to a thin trunk line is greater than 6 A, a thin cable is not enough for the current (even when the position of the power supply is changed). Consider replacement of the thin cables by thick cables. Further, the maximum current capacity of a branch line becomes smaller as the branch line becomes longer, which is true to both thick and thin cables. The maximum current capacity I (a total amount of currents consumed in the branch) of a branch is expressed by I = 4.57/L (less than 8 A for the thick cable or less than 3 A for the thin cable) Wherein I: Current capacity of a branch (A) L: Branch length (m) - 35 - 3 NAMES AND FUNCTIONS OF EACH PART AND CABLING If the maximum current capacity of branch is less than the total amount of currents consumed by nodes connected to the branch, take the following measures: ・ Shorten the branch. ・ If the branch line has a plurality of nodes, branch some of the nodes to the other branch line. After making sure the total amount of currents consumed by nodes is less than the maximum current capacity of branch, determines the position of the power supply considering a voltage drop of the trunk line. There are two ways of determined a power supply position. ・ Using a maximum-current-capacity vs trunk-length curve and a simple expression ・ Calculating a voltage drop from a resistance and a consumed current of a communication cable by a preset expression If the method a) is satisfactory, the power supply can be placed on the calculated point. The method b) assumes the worst power supply condition. Therefore, even when the conditions are not satisfied, the expression can be valid. In this case, the power supply can be placed on the calculated point. (1) Using a maximum-current-capacity vs trunk-length curve and a simple expression This is the fast and easy method of determining a power supply position. Note that the graphs to be used are different according to the type of a trunk line cable (thick cable or thin cable). First read the maximum current capacity of the cable on the maximum-current-capacity vs trunk-length curve by the type and the total length of the trunk cable. When the total current consumption of all nodes does not exceed the maximum current capacity read from the graph, the power supply can be placed anywhere along the trunk line. If the total current consumption of all nodes exceeds the maximum current capacity read from the graph, take the measures listed below. If any of these measures cannot reduce the total current consumption of all nodes, calculate a voltage drop by the expression (2) which assumes actual node disposition. z Replace the thin cable (when it is used) by a thick cable and get the maximum current capacity of the thick cable. z Move the communication power supply toward the center of the trunk line so that the power supply may be in the center of the nodes, get the maximum current capacity of the left trunk cable (in the left side of the power supply) and the maximum current capacity of the right trunk line, and compare the total current consumption of all nodes connected to the left trunk line by the total current consumption of all nodes connected to the right trunk line. - 36 - 3 NAMES AND FUNCTIONS OF EACH PART AND CABLING z If the total current consumption of all nodes connected to the left trunk line is greater, move the power supply leftward. Contrarily, if the total current consumption of all nodes connected to the right trunk line is greater, move the power supply rightward. Repeat the above step once more for reconfirmation. CAUTION The current consumption of the LQE070 and LQE170 is not included in the above calculation of current consumption because the D.NET module contains a communication power supply (for individual self-power feeding). The network power lines can be connected to the D.NET module because the power lines are connected anywhere in the D.NET module. - 37 - 3 NAMES AND FUNCTIONS OF EACH PART AND CABLING 350 0.89 400 0.78 450 450 0.69 500 0.63 500 300 1.03 400 250 1.23 300 200 1.53 250 150 2.01 200 50 0 8 7 6 5 Max. current 4 3 (A) 2 1 0 100 2.93 150 50 5.42 100 0 25 Max. current (A) 8.00 8.00 Trunk length (m) 350 <Thick trunk cable lengths and maximum currents> Trunk length (m) <Thin trunk cable lengths and maximum currents> Trunk length (m) 0 10 20 30 40 50 60 70 80 90 100 Max. current (A) 3.00 3.00 3.00 2.06 1.57 1.26 1.06 0.91 0.80 0.71 0.64 3.0 2.5 2.0 1.5 1.0 Trunk length (m) - 38 - 500 450 400 350 300 250 200 150 100 0 50 0.5 0 Max. current (A) 3 NAMES AND FUNCTIONS OF EACH PART AND CABLING <Example of simple calculation using a graph> This example assumes that a single power supply is connected to one end of a trunk line of 300 m long and that nodes in this network have current consumptions as shown below. 300 m Communication power supply 24 VDC Branch line: Thin cable Trunk line: Thick cable Node Node Node Node Node Node 0.25 A 0.10 A 0.15 A 0.05 A 0.20 A 0.10 A Total of consumed currents of all nodes: 0.25+0.10+0.15+0.05+0.20+0.10=0.85 A Total length of power cables: 300 meters Maximum current of the thick cable (300 m): 1.03 A (obtained from the “Thick trunk cable lengths and maximum currents” graph) In this example, as the total current consumption of all nodes does not exceed the maximum current capacity read from the graph, it is apparent that the power supply can feed power to all nodes. (2) Calculating a voltage drop from a resistance and a consumed current of a communication cable by a preset expression In case the above method (1) is not available, this method (2) is used. This method calculates a voltage effect from a resistance and a consumed current of a communication cable. In other words, this method calculates a voltage drop from actual node locations and a power supply location. Verification by an expression In the DeviceNet system, it is prescribed that the maximum voltage drop of each of the power lines (V+ and V-) in pair is 5 V judging from the voltage specification (24 VDC) of the communication power supply and the input voltage specification (11 VDC to 25 VDC) of the communication power supply for devices. See the figure below for voltage drops. - 39 - 3 NAMES AND FUNCTIONS OF EACH PART AND CABLING Voltage V1 Voltage drop of voltage V+ VA V2 Voltage drop of voltage V- V1 V1: Supply voltage of the communication power supply V2: Voltage supplied to each node VA: Voltage drop of the power cable (V+) VB: Voltage drop of the power cable (V-) Wherein VA and VB is equal to or less than 5 V. VB 0 As DeviceNet prescribes that the supply voltage of the communication power supply is 24 VDC and its tolerance is 4.0%, we use “V1 = 23 V” including a margin. Further, the voltage drops of the power cables V+ and V- are prescribed to be 5 V or less, the voltage V2 supplied to each node is equal to or greater than 13 V. This voltage contains a more margin than the minimum supply voltage (11) supplied to each node. The permissible voltage drop (5 V) of the power cables are divided for the trunk line and the branch line as follows: z Calculation of a permissible voltage drop of the branch line When the maximum branch length is 6 m, the current I flowing through the branch line is calculated from the maximum current capacity by I = 4.57/6 = 0.761 (A) The resistance R of the maximum branch line is calculated (as the maximum resistance of the thin cable is 0.069 Ω/m) by R = 0.069 × 6 = 0.414 (Ω) Therefore, the permissible voltage drop for the maximum branch length is IR = 0.761 × 0.414 = 0.315 (V) The final voltage drop for the branch is 0.33 V including a margin. z Calculation of a permissible voltage drop of the trunk line As the permissible voltage drop of each of the power lines (V+ and V-) in the DeviceNet system is prescribed to be 5 V, the permissible voltage drop of the trunk line is calculated by 5.0 – 0.33 = 4.67 (V) The method of calculating a voltage drop from a preset expression uses the above permissible voltage drop of the trunk line (4.67 V) and the above permissible voltage drop of the branch line (0.33 V) for verification. - 40 - 3 NAMES AND FUNCTIONS OF EACH PART AND CABLING z Conditional expression for a voltage drop of the trunk line Σ (L(n) × R(c) + N(t) × 0.005) × I(n)≦4.67 L(n): Distance between the power supply and a node (excluding a branch length) R(c): Maximum cable resistance (0.015 Ω/m for a thick cable or 0.069 Ω/m for a thin cable) N(t): Number of branch taps between each node and the communication power supply I(n): Current required by the transmission section of each node 0.005 Ω: Contact resistance of a branch tap As far as the above conditional expression is satisfied, the power supply at an estimated position can supply power to every node. However, the total current of the nodes must not exceed the maximum current capacity of the trunk cable (8 A for a thick cable or 3 A for a thin cable). If the above conditional expression is not satisfied, take the following measures: z Replace the thin cable (when it is used) by a thick cable and calculate the conditional expression again. z Move the communication power supply toward the center of the trunk line so that the power supply may be in the center of the nodes, and calculates the conditional expression on each of the left and right trunk cables (relative to the power supply position) again. z If the total current consumption of all nodes connected to the left trunk line is greater, move the power supply leftward. Contrarily, if the total current consumption of all nodes connected to the right trunk line is greater, move the power supply rightward, and calculates the conditional expression on each of the left and right trunk cables (relative to the power supply position) again. z Reposition a node which consumes a great current closer to the communication power supply and calculate the conditional expression again. If the conditional expression cannot be satisfied after all of the above measures are carried out, divide the system into two or more parts and provide a power supply for each of the parts. - 41 - 3 NAMES AND FUNCTIONS OF EACH PART AND CABLING <Example of calculating a voltage drop by an expression> This example assumes that a single power supply is connected to the center of a trunk line of 240 m long (120 m from each end) and that nodes in this network have current consumptions as shown below. 120 m 120 m 60 m 60 m Communication power supply Trunk line: Thick cable 24 VDC Branch line: Thin cable Node 0.05 A Node Node 0.3 A 0.15 A Node 0.05 A Node 0.05 A Group 1 Node Node Node 0.15 A 0.20 A 0.10 A 0.10 A 0.30 A Node Node Group 3 Group 2 Group 4 To calculate the left side of the conditional expression, a voltage drop of each group is calculated. Left side of the trunk line Voltage drop of group 1 (120 × 0.015 + 2 × 0.005) × 0.35 = 0.634 V Voltage drop of group 2 (60 × 0.015 + 1 × 0.005) × 0.45 = 0.407 V Total of voltage drops in the left trunk line = 0.634 + 0.407 = 1.041 V Right side of the trunk line Voltage drop of group 3 (60 × 0.015 + 1 × 0.005) × 0.35 = 0.317 V Voltage drop of group 4 (120 × 0.015 + 2 × 0.005) × 0.30 = 0.543 V Total of voltage drops in the right trunk line = 0.317 + 0.543 = 0.860 V The voltage drop of the left trunk line and the voltage drop of the right trunk line respectively satisfy the conditional expression. Therefore, it is apparent that the power supply can supply power to all nodes in the network. CAUTION When the system is divided into two or more parts and changed to provide a power supply for each of the parts, repeat the above on each power supply and make sure that the power supply can feed power to all nodes. - 42 - 3 3.2.6 NAMES AND FUNCTIONS OF EACH PART AND CABLING Grounding specification The transmission path must be grounded at a single point. Therefore, always insulate the communication section of a node which is connected to the transmission path and ground the node at one point only. When two or more power supplies (individual power supply or network power supply) are used, select one of the power supplies in the network, and ground the shield line and the V- power line of the transmission line through it as shown below. - 43 - - 44 - Insulated Shield line V- V+ CAN-L CAN-H TAP Node Connector Insulate the communication section from the other circuits in the node by using a photocoupler or the like. 120 Terminator Class D grounding Ground the V- and shield lines to one point. FG Node Class D grounding Do not ground the Vand shield lines. Node FG PS Connector PS Insulated V+ V- Connector TAP V+ V- TAP 120 Terminator 3 NAMES AND FUNCTIONS OF EACH PART AND CABLING 4 USER GUIDE 4 4.1 USER GUIDE Software Configuration of the D.NET System This section outlines the configuration of software of the D.NET system. The communication control program and the sub-OS are ROM programs and need not be loaded to the system. Slave timeout flag ROM S register Communication control program I/O area I/O buffer Communication control circuit Parameter table Communication control circuit User program DeviceNet devices Sub-OS (Mounted in the LQE070 only) CPU Cable D.NET : ROM program : User-created program : Tables and buffers - 46 - 4 USER GUIDE z Communication control program The major function of this program is shown below. ・ The communication control program communicates with DeviceNet devices. CPU D.NET I/O area I/O buffer DeviceNet devices Input data Output data CAUTION Data is transferred word by word between the I/O area of the CPU and the I/O buffer of the D.NET module. Therefore, the transfer unit that can assure the simultaneousness of data is one word. z Sub-OS (Mounted in the LQE070 only) The subsidiary operating system (Sub-OS) starts by an interrupt from the communication control program. z Slave timeout flag and S register The communication control program sets data transmission reception information and error information in this register. The user program processes errors according to these pieces of information. z I/O area Below are listed areas that can communicated as I/O areas. Name Symbol range Number of points External input XW000(X000) – XWFF0(XFFF) 256 words (4096 points) External output YW000(Y000) – YWFF0(YFFF) 256 words (4096 points) Internal register RW000(R000) – RWFF0(RFFF) 256 words (4096 points) Global link register GW000(G000) – GWFF0(GFFF) 256 words (4096 points) Transfer register JW000(J000) – JWFF0(JFFF) 256 words (4096 points) Receive register QW000(Q000) – QWFF0(QFFF) 256 words (4096 points) Event register EW400(E400) – EWFF0(EFFF) 192 words (3072 points) Extension internal register MW000(M000) – MWFF0(MFFF) 256 words (4096 points) Function work register FW000 – FWBFF 3072 words Extension memory /100000 – /4FFFFF 4 MB Function data register DW000 – DWFFF 4096 words - 47 - Remarks Selectable in microprogram V3.0 or later 4 USER GUIDE 4.2 Slave Timeout Flag The slave timeout flag informs of information about the occurrence of a reception timeout for each MAC ID of a slave device in the master-slave communication. This flag can be read by the ladder program. Select a slave timeout detection register from the areas shown below by the D.NET system and register it. (See CHAPTER 5, “OPERATION.”) The slave timeout flag is formatted as shown below. The following eight areas can be selected for a slave timeout detection register: XW000 – XWFF0, YW000 – YWFF0, JW000 – JWFF0, QW000 – QWFF0, GW000 – GWFF0, RW000 – RWFF0, EW400 – EWFF0, MW000 – MWFF0 The slave timeout flag is registered for each module and requires a size of 64 points. (For example, the area of “X500” to “X53F” is occupied as a slave timeout flag when it starts at “X500.”) X5 0 X5 XW500 0 1 2 3 4 5 6 7 8 9 A B C D E F XW510 10 11 12 13 14 15 16 17 18 19 1A 1B 1C 1D 1E 1F XW520 20 21 22 23 24 25 26 27 28 29 2A 2B 2C 2D 2E 2F XW530 30 31 32 33 34 35 36 37 38 39 3A 3B 3C 3D 3E 3F F Corresponding to the MAC ID of a slave (0: Normal, 1: Reception timeout occurred) The use of the slave timeout flag can be specified on the setting screen only in the master-peer mode. This function is not available in the slave mode. CAUTION The slave timeout flag is turned on (value: 1) when no signal is received from slave devices. Because reception monitoring is started after transmission is normally completed, the timeout flag is not turned on in the status where normal transmission cannot be performed (CAN transmission timeout or bus-off status). The CAN transmission timeout and bus-off status can be confirmed in Section 4.3, “S Register”. - 48 - 4 4.3 USER GUIDE S Register The S register stores information of errors which occurred in a related module and can be read by a ladder program. The related bit turns on when any one of DeviceNet devices connected to the module has an error. E D C B A 2 0 S9*F 7 9 2 8 8 7 6 5 4 3 2 2 1 SW9*0 15 S9*0 2 ON when the communication starts OFF when a fatal error occurs ON in the slave mode OFF in the master-peer mode 17 frames or more at a cycle of 10 ms was specified for the station parameter (Communication speed = 500 kbps, 250 kbps). The communication stops. 9 frames or more at a cycle of 10 ms was specified for the station parameter (Communication speed = 125 kbps). The communication stops. Station parameter setting error. The communication stops. CAN transmission timeout. The communication stops during the occurrence of the timeout. Duplicated MAC IDs. The communication stops. Bus-off occurred. The communication stops during the occurrence of this error. Fatal error occurred. The module operation stops. SW9*0 MODU No. switch value = 0: SW980 Channel 0 module MODU No. switch value = 1: SW990 Channel 1 module MODU No. switch value = 2: SW9A0 Channel 2 module MODU No. switch value = 3: SW9B0 Channel 3 module CAUTION The “Buss-off” and “CAN transmission timeout” bits turn off when the error is removed. Therefore if the connection of the communication cable or the communication connector is loose and incomplete, these bits may turn on and off repeatedly. Keep this in mind when reading this register by the ladder program. - 49 - 4 4.4 USER GUIDE Communication Time The communication time of the D.NET module is dependent upon the type and setting of devices connected to the module. 4.4.1 When the D.NET module is connected to slaves (for the LQE070) (1) Master/slave refreshing time and transmission cycle D.NET module Slave Slave Slave Slave For data transfer to and from a slave (master-slave transmission), the D.NET module automatically determines a transmission cycle (a time interval at which the D.NET module repeats communication with the same slave) from the preset refreshing time. The transmission cycle is automatically determined from the setting of the “Master/slave refreshing time” parameter (see CHAPTER 5, “OPERATION”) of the D.NET module as shown below. Master/slave refreshing time setting and transmission cycles Master/slave refreshing time setting V1.0 V2.X 10 to 19 ms 10 ms 20 to 40 ms 20 ms 50 to 99 ms 50 ms 100 to 199 ms 100 ms 200 to 499 ms 200 ms 500 to 999 ms 500 ms 1000 to 3000 ms 1000 ms Transmission cycle 10 ms 20 ms 50 ms 100 ms 200 ms 500 ms 1000 ms The master/slave refreshing time and the transmission cycle are related as shown below. S10mini Memory in S10mini CPU Memory in D.NET module Master/slave refreshing time Asynchronous - 50 - Slave device Transmission cycle 4 USER GUIDE For example, when a master/slave refreshing time of 30 ms is set, the transmission cycle is 20 ms. Therefore, the maximum delay in data transmission from memory in S10mini CPU to a slave device is 50 ms (30 ms + 20 ms). (2) Guide to setting of the refreshing time The transmission cycle is automatically set from a refreshing time setting. Calculate the total communication process time that the D.NET module requires to process communications with slaves and set a refreshing time greater than the obtained total time period. The total communication process time is expressed by Total communication process time (ms) = Sum of processing periods (per slave) of all slaves Processing period per slave (ms) = (94 + 8Ns + 8Nr) × V + 0.5Fs + 0.3Fr Wherein Ns: Nr: V: Fs: Fr: Number of output bytes Number of input bytes Coefficient of transmission speed (depending upon the transmission speed) 0.002 for 500 kbps 0.004 for 250 kbps 0.008 for 125 kbps Number of transmission frames (depending upon the number of output bytes) 1 when the number of output bytes is 0 to 8 bytes Number of output bytes / 7 (rounding up the decimal) when the number of output bytes is 9 to 256 bytes Number of reception frames (depending upon the number of input bytes) 1 when the number of input bytes is 0 to 8 bytes Number of input bytes / 7 (rounding up the decimal) when the number of input bytes is 9 to 256 bytes As seen from the above, the “Total communication process time” expression includes the number of input bytes and the number of output bytes. Therefore, if the slaves connected to the D.NET module have different numbers of input and output bytes, the total communication process time is the sum of the process times of all slaves. Example: Calculation of a communication process time A sample relationship between the number of slaves and the communication process time is shown below. This example assumes that the D.NET module transfers data (8 input bytes and 8 output bytes) to and from slaves at 500 kbps. Point (a) of the graph indicates that - 51 - 4 USER GUIDE the communication process time is 50 ms when 40 such slaves are connected to the system. In this case, the refreshing time must be 50 ms or more. Number of input bytes = 32 Number of output bytes = 32 Number of input bytes = 8 Number of output bytes = 8 80 Communication process time (ms) 70 60 Number of input bytes = 2 Number of output bytes = 2 50 40 (a) 30 20 10 10 20 30 40 50 60 Number of slaves connected (units) CAUTION z The refreshing time must satisfy the following conditions: The number of frames transmitted per 10 ms must be 16 frames or less. Number of transmission frames (when the number of output bytes is 8 bytes or less): 1 Number of transmission frames (when the number of output bytes is 9 bytes or more): Number of output bytes / 7 (The decimal is rounded up.) z The refreshing time must always be greater than the obtained communication process time. If the refreshing time is smaller, the D.NET module cannot process properly and causes a communication error (CAN transmission timeout), transmission cycle delay, and frame missing due to overflow of the internal buffer. - 52 - 4 4.4.2 USER GUIDE When the D.NET module is connected to peer devices (for the LQE070) D.NET module Peer Peer Peer Peer For data transfer to and from a peer device (peer transmission), the D.NET module automatically determines a transmission cycle (a time interval at which the D.NET module repeats transmission of a frame of a certain message ID) from the preset refreshing time. The transmission cycle is automatically determined from the setting of the “Master/slave refreshing time” parameter (see CHAPTER 5, “OPERATION”) of the D.NET module as shown below. The number of frames transferred in the network is limited by the transmission cycle. Peer refreshing time setting V1.0 V2.X 10 to 19 ms 20 to 40 ms 50 to 99 ms 100 to 199 ms 200 to 499 ms 500 to 999 ms 1000 to 3000 ms 10 ms 20 ms 50 ms 100 ms 200 ms 500 ms 1000 ms Transmission cycle 10 ms 20 ms 50 ms 100 ms 200 ms 500 ms 1000 ms Total number of frames transferred in the network * Transfer speed Transfer speed 250/500 kbps 125 kbps 8 4 16 8 64 32 64 128 128 * “The total number of frames transferred in the network” means the number of frames that are transferred by all nodes connected to the network in a preset time period. The total number of frames transferred in the network is 1 when the number of output bytes is 8 bytes or less. When the number of output bytes is 9 bytes or less, the bytes are divided into frames for transmission (fragment transmission). In this case, the number of frames is calculated by Number of frames = Number of output bytes ÷ 7 (The decimal is rounded up.) - 53 - 4 USER GUIDE The total number of frames per transmission cycle must not exceed the above restriction. The peer refreshing time and the transmission cycle are related as shown below. S10mini Memory in S10mini CPU Memory in D.NET module Peer refreshing time Peer device Transmission cycle Asynchronous For example, when a peer refreshing time of 30 ms is set, the transmission cycle is 20 ms. Therefore, the maximum delay in data transmission from memory in S10mini CPU to a peer device is 50 ms (30 ms + 20 ms). - 54 - 4 4.4.3 (1) USER GUIDE For LQE170 and LQE175 Refreshing time and transmission cycle Data transmission/reception (master/slave communication) and peer transmission to slave devices are performed according to the set refreshing time as the cycle. Unlike the LQE070, both refresh operation and transmission operation are performed in synchronization with each other as shown in the following figure. S10mini Memory in S10mini CPU Memory in D.NET Slave device or peer device Transmission Reception Master/slave or peer refreshing time Transmission cycle Synchronization (2) Accordingly, if the master/slave or peer refreshing time is set to 30 ms, the transmission cycle becomes 30 ms, so that the maximum communication delay time becomes 30 ms when data is transmitted from the memory in the S10mini CPU to a slave device or peer device. Guide to setting the refreshing time Calculate the total communication processing time by using the following formula for D.NET communication processing time, and set a large value than the total as the refreshing time. Communication processing time [ms] = Sum total of processing time per slave, peer transmission time per message ID, peer reception time per message ID, and peer frame transmission time through the network Processing time per slave [ms] = (Fs + Fr) × Vt + 0.015 × Ns + 0.013 × Nr + 0.12 Peer transmission time per message ID [ms] = 0.015 × Ns + 0.1 Peer reception time per message ID [ms] = 0.013 × Nr + 0.02 Peer communication frame transmission time through the network [ms] = Fa × Vt Ns: Number of output bytes Nr: Number of input bytes Vt: Transmission time of a frame (below the communication speed) At 500 kbps = 0.222, at 250 kbps = 0.444, at 125 kbps = 0.888 Fs: Number of transmitting frames (below the number of output bytes) Number of output bytes = 0 to 8 bytes → 1 Number of output bytes = 9 to 256 bytes → Number of output bytes ÷ 7 (raising of fraction) Fr: Number of receiving frames (below the number of input bytes) Number of input bytes = 0 to 8 bytes → 1 Number of input bytes = 9 to 256 bytes → Number of output bytes ÷ 7 (raising of fraction) Fa: Total number of peer communication frames through the network The processing time per slave device, the peer transmission time per message ID, and the peer reception time per message ID include the number of input/output bytes as shown above. Accordingly, when multiple slave devices with a different number of input/output bytes are connected, the communication processing time is a sum total of processing time per slave device, peer transmission time per message ID, and peer reception time per message ID. - 55 - 4 USER GUIDE <Example of communication processing time calculation> The following example shows the number of slave devices and communication processing time when slave devices whose number of input bytes is 8 and number of output bytes is 8 are connected at a communication speed of 500 kbps. The graph (a) shows that the communication processing time is about 32 ms when 40 slave devices of the above type are connected. In this case, set the refreshing time to 32 ms or more. Number of input bytes = 32 Number of output bytes = 32 Communication processing time(ms) 80 70 Number of input bytes = 8 Number of output bytes = 8 60 Number of input bytes = 2 Number of output bytes = 2 50 40 30 (a) 20 10 10 20 30 40 50 60 70 80 Number of slave devices connected (units) CAUTION z The refreshing time setting should satisfy the following conditions. The number of transmitting frames per 10 ms is 16 or less (at communication speed = 500 or 250 kbps) The number of transmission frames per 10 ms is 8 or less (at communication speed = 125 kbps) Number of transmission frames (Number of output bytes: 8 bytes or less) = 1 frame (Number of output bytes: 9 bytes or more) = Number of output bytes ÷ 7 (raising of fraction) z Be sure to set the refreshing time to the calculated communication processing time or more. If this requirement is not satisfied, the D.NET communication capacity is exceeded, thereby causing a delay of transmission cycle. - 56 - 4 CPU Load Index The effect of the LQE070 on the CPU load is determined on the sum of input/output bytes of the slave devices and peer devices connected to the D.NET module. Use the graph below to estimate the CPU load index of the LQE070. When the LQE170 /175 is used, the CPU load index increases less than 1%. Point (a) of the graph indicates that the CPU load index per LQE070 increases about 7% under conditions that the total number of input and output bytes is 512 bytes and the refreshing cycle is 30 ms. (For setting of a refreshing cycle, see CHAPTER 5 “OPERATION.”) Refreshing cycle: 20 ms 20 18 CPU load increase ratio (%/units) 4.5 USER GUIDE 16 Refreshing cycle: 30 ms 14 12 10 Refreshing cycle: 50 ms 8 (a) 6 Refreshing cycle: 100 ms 4 2 256 512 768 Total number of input and output bytes (per LQE070) - 57 - 1024 4 USER GUIDE 4.6 Response Time of the D.NET Module in the Slave Mode The graph below shows the relationship between the total number of input and output bytes and the internal process time of the D.NET module between the reception of a polling request and the transmission of a polling response. The internal process time is dependent upon the number of input and output bytes. Use the graph below for system designing. The internal process time of the D.NET module is a time period between the reception of a polling request and the transmission of a polling response and does not include any time to transmit frames to lines. The line transmission time is dependent upon a line speed. Point (a) in the graph indicates that the response time is about 1700 µs when the total number of input and output bytes is 128 bytes if the LQE070 is used. Point (b) shows that the response time is about 1000 µs when the total number of input and output bytes is 128 bytes if the LQE170/LQE175 is used. LQE070 4500 Response process time ( s) 4000 LQE170/LQE175 3500 3000 2500 2000 (a) 1500 1000 (b) 500 128 256 384 Total number of input and output bytes - 58 - 512 4 4.7 USER GUIDE Notices on Connection of the D.NET Module to Non-Hitachi DeviceNet I/O Devices (DI/DO) When the D.NET module is connected to a non-Hitachi DeviceNet I/O device (DI/DO), the I/O numbers assigned to bits are reversed according to the setting of the Bit Reversal mode in the D.NET system. (For setting, see CHAPTER 5, “OPERATION.”) 4.7.1 When the bit reversal mode is disabled (V1.0 always has this setting.) Note that, when the Bit Reversal mode is disabled, the I/O numbers assigned to bits of each word (16 bits) are reversed between the D.NET module and a non-Hitachi DeviceNet I/O device (DI/DO). This will not have any influence upon numeric data such as analog data. Non-Hitachi DeviceNet I/O device S10mini CPU D.NET I/O number 000 8-point module (Module / 1 byte) I/O number 2 15 F (MSB) 16-point module (Module / 2 bytes) I/O number 2 15 (MSB) F E E 002 D D 003 C 004 B 005 A 006 9 007 2 008 2 8 7 7 (Ignored) 001 8 2 2 7 (MSB) 8 2 7 2 5 5 00B 4 4 00C 3 3 00D 2 2 1 0 (LSB) 2 15 (MSB) 9 8 00A 2 (MSB) A 6 00F 15 B 6 0 2 C 009 00E Analog module (1 channel / 2 bytes) 8 2 7 2 8 7 1 2 0 (LSB) 0 2 0 (LSB) 2 0 (LSB) Reversed The I/O numbers of each word for a non-Hitachi DeviceNet ( : Register symbol) I/O device is opposite to those for the S10mini CPU. Numeric data will not be affected. By the inversion of the I/O numbers, the input signal “0” for non-Hitachi DeviceNet I/O devices is represented by “□**F” by the ladder program of the S10mini. (□: Register symbol, *: Register address assigned) - 59 - USER GUIDE 4.7.2 When the bit reversal mode is enabled (This setting is valid for V2.0 or later.) When the Bit Reversal mode is enabled, the D.NET module internally reverse the order of word bits (LSB to MSB and MSB to LSB) before inputting and outputting data. Therefore, you can transfer data between the D.NET module and the non-Hitachi DeviceNet I/O device (DI/DO) regardless of the order of the bit I/O numbers. However, this mode cannot be set for slave devices which contain numeric data such as analog data because it affects the data. Non-Hitachi DeviceNet I/O device D.NET S10mini CPU I/O number 000 8-point module (Module / 1 byte) I/O number 2 15 0 (MSB) 16-point module (Module / 2 bytes) 2 15 (MSB) 0 001 1 1 002 2 2 003 3 3 004 4 4 005 5 5 006 6 007 2 008 2 7 2 7 8 2 9 00A A 00B B 00C C 00D D 00F 8 7 (MSB) 2 0 F (LSB) 15 (MSB) 2 15 (MSB) 7 2 8 2 8 2 7 2 8 7 9 A B C D E 00E 2 6 8 009 Analog module (1 channel / 2 bytes) I/O number (Ignored) 4 E 2 0 (LSB) F 2 0 (LSB) 2 0 (LSB) Reversed internally by the D.NET module The I/O numbers of each word for a non-Hitachi DeviceNet ( : Register symbol) I/O device is equal to those for the S10mini CPU Do not set the Bit Reversal mode for analog modules which handle numeric data. CAUTION z The Bit Reversal mode is set for each slave individually. z When the D.NET module is connected to a slave device (AI/AO) which handles numeric data such as analog data, do not set the Bit Reversion mode for the slave device. If done, the data may not be assured. z Similarly do not set the Bit Reversion mode for a slave device which handles both analog and digital data. If done, the data may not be assured. z In V3.0 or later, the byte reversal mode has been added. Basically, use the D.NET module in the byte reversal mode. Invalidate the setting (by removing the check mark) only to rearrange data elements. - 60 - 4 USER GUIDE 4.7.3 Handling analog data in bytes and words or longer (1) Analog data in bytes ・ Endian The DeviceNet system uses the “little endian” memory addressing technique (defined by the DeviceNet protocol) to handle messages, but S10mini uses a “big endian” CPU. You can handle digital data of digital devices (DI/DO) by using the Bit Conversion mode without being conscious of the type of memory addressing technique (big or little endian). However, as analog devices (AI/AO) handling analog data cannot use the Bit Conversion mode, you must exchange analog data bytes (when transferring two bytes or more) as shown below. In V3.0 or later, if the byte reversal mode is invalidated (by removing the check mark), data sorting is not required on the user side. Example: In case of transferring 4 data bytes Bit number 7 0 0 7 07 07 Data on the network Byte 0 Byte 1 Byte 2 Byte 3 When data is transferred (Little endian) between S10mini and the D. NET module, the upper byte and the lower byte of each data word are exchanged (automatically by the D.NET Bit number 7 0 module). 0 7 07 07 Data on the D.NET module In V3.0 or later, the user can Byte 1 Byte 0 Byte 3 Byte 2 select it. (Byte reversal mode setting) Bit number 7 Data on the S10mini CPU 0 7 Byte 0 Byte 1 0 07 07 Byte 3 Byte 2 (Data transferred from the D.NET module) Bit number 7 Data on the S10mini CPU 0 7 Byte 0 07 Byte 1 07 Byte 2 (Big endian) - 61 - 0 Byte 3 You (user) must exchange the upper byte and the lower byte of each data word. 4 USER GUIDE (2) Analog data in long words or longer ・ Assurance of data simultaneousness The D.NET module can assure the simultaneousness of I/O data for every one word. Therefore the D.NET module cannot assure the simultaneousness of analog data of a long word (4 bytes) or longer. ・ Endian The DeviceNet system uses the “little endian” memory addressing technique (defined by the DeviceNet protocol) to handle messages, but S10mini uses a “big endian” CPU. You can handle digital data of digital devices (DI/DO) by using the Bit Conversion mode without being conscious of the type of memory addressing technique (big or little endian). However, as analog devices (AI/AO) handling analog data cannot use the Bit Conversion mode, you must exchange analog data bytes of a longer word (when transferring four bytes or more) as shown below. Example: In case of transferring a long word (4 bytes) 0 15 8 23 16 31 24 Bit number 7 Lower byte Upper byte Lower byte Upper byte Data on the network When data is transferred between S10mini and the D. Lower word Upper word NET module, the upper byte and the lower byte of each data word are exchanged (automatically by the D.NET 8 7 0 31 24 23 16 module). Bit number 15 In V3.0 or later, the user can Data on the D.NET module Upper byte Lower byte Upper byte Lower byte select it. (Byte reversal mode setting) (Little endian) Lower word Bit number 15 Data on the S10mini CPU (Data transferred from the D.NET module) Bit number 31 Data on the S10mini CPU Upper word 87 Upper byte 0 31 Lower byte Upper byte Lower word 16 Lower byte Upper word 24 23 Upper byte 24 23 16 15 Lower byte 8 7 Upper byte 0 The user must exchange the upper and lower words. Lower byte (Big endian) Upper word Lower word CAUTION Only when data is made up in bytes or long words, the user must rearrange data elements regardless of the number of data bytes which are input or output. For example, when data is transferred to and from a 4-channel AI slave (1 word/channel), the number of input bytes is 8 (bytes), but as data is transferred in words, you need not rearrange the data elements. - 62 - 4 4.7.4 (1) USER GUIDE Data reversal mode in V3.0 or later In V3.0 or later, the bit reversal mode or byte reversal mode can be set individually for each slave unit or peer device unit. Data conversion in each mode is described below. Non-conversion mode (No check of bit reversal mode and byte reversal mode) In this mode, the data on the S10mini CPU is transmitted onto the DeviceNet line without rearranging data elements. Or the data on the DeviceNet line is transferred onto the CPU without rearranging the data elements. bit S10mini data (2) 15 8 7 0 0 1 2 3 4 5 6 7 8 9 AB CD E F D.NET 0 1 2 3 4 5 6 7 8 9 AB C D E F Data on the line bit 0 1 2 3 4 5 6 7 8 9 AB C D E F 15 8 7 0 Bit conversion mode (Check of bit reversal mode only) In this mode, the data on the S10mini CPU is transmitted onto the DeviceNet line after MSB and LSB are replaced with each other in each word. Or the data on the DeviceNet line is transferred onto the CPU after MSB and LSB are replaced with each other in each word. bit S10mini data 15 8 7 0 0 1 2 3 4 5 6 7 8 9 AB C D E F 0 1 2 3 4 5 6 7 8 9 ABC D E F D.NET F E D C B A 9 8 7 6 5 4 3 2 1 0 Data on the line bit F E D C B A 9 8 7 6 5 4 3 2 1 0 15 8 7 0 - 63 - 4 USER GUIDE (3) Byte conversion mode (Check of byte reversal mode only) In this mode, the data on the S10mini CPU is transmitted onto the DeviceNet line after the high-order byte and the low-order byte are replaced with each other in each word. Or the data on the DeviceNet line is transferred onto the CPU after the high-order byte and the low-order byte are replaced with each other in each word. bit S10mini data 15 8 7 0 0 1 2 3 4 5 6 7 8 9 A BC D E F 0 1 2 3 4 5 6 7 8 9 ABC D E F D.NET 8 9 ABCD E F 0 1 2 3 4 5 6 7 Data on the line bit (4) 8 9 ABCD E F 0 1 2 3 4 5 6 7 15 8 7 0 Bit/byte conversion mode (Check of both bit conversion mode and byte reversal mode) In this mode, the data on the S10mini CPU is transmitted onto the DeviceNet line after (2) and (3) are performed in each word. Or the data on the DeviceNet line is transferred onto the CPU after (2) and (3) are performed in each word. bit S10mini data 15 8 7 0 0 1 2 3 4 5 6 7 8 9 ABC D E F 0 1 2 3 4 5 6 7 8 9 AB C D E F D.NET F E D C BA 9 8 7 6 5 4 3 2 1 0 7 6 5 4 3 2 1 0 F E DC B A 9 8 Data on the line bit 7 6 5 4 3 2 1 0 F E DC B A 9 8 15 8 7 0 CAUTION z The setting of the bit reversal mode and the byte reversal mode depends on how the application program handles data and the specifications of the devices to be connected. z Regarding the area where the D.Station data format conversion is set, the bit conversion mode is invalid and no bit conversion is performed. - 64 - 4 4.8 USER GUIDE Setting of CPU Module Switches and D.NET Module Operation The D.NET module operation is determined by the setting of the LADDER (ladder program) switch and the MODE (mode setting) switch of the CPU module. For more information of the switches, refer to the S10mini HARDWARE MANUAL (Manual Number SME-1-100). (1) When the microprogram version is V1.0 or V2.0 When the microprogram version is V3.0 and the non-linkage with the PCs OK signal is set Ladder program switch (LADDER) Mode setting switch (MODE) D.NET module operation STOP NORM Starts communication. STOP SIMU Starts communication. RUN NORM Starts communication. RUN SIMU Stops communication. In the following cases, the D.NET module also stops communication. ・ The CPU has gone down (“CPU DOWN” appears on the CPU indicator). ・ A power of 12 VDC to 24 VDC is connected to the RI/O STOP contact on the CPU terminal block. (2) When the microprogram version is V3.0 and the linkage with the PCs OK signal is set Ladder program switch (LADDER) Mode setting switch (MODE) D.NET module operation STOP NORM Stops communication. STOP SIMU Stops communication. RUN NORM Starts communication. RUN SIMU Stops communication. In the following cases, the D.NET module also stops communication. ・ The CPU has gone down (“CPU DOWN” appears on the CPU indicator). ・ A power of 12 VDC to 24 VDC is connected to the STOP/START contact on the CPU terminal block. - 65 - THIS PAGE INTENTIONALLY LEFT BLANK. 5 OPERATION 5 OPERATION 5.1 5.1.1 Before Starting Up the System The optional D.NET system is used to start up the D.NET modules. The D.NET system is a man-machine tool which sets information on communication between the D.NET modules and DeviceNet devices in the system. System configuration D.NET module (No.0) D.NET module (No.1) D.NET module (No.2) D.NET module (No.3) S10mini CPU unit LQE070 D.NET U MNS NA L DR MODU Module No. 0 No.0 (Channel 0) 1 MODU NO 2 No.1 (Channel 1) No.2 (Channel 2) 3 No.3 (Channel 3) DeviceNet (Channel 3) DeviceNet (Channel 2) DeviceNet (Channel 1) Windows® personal computer Terminator (Terminating resistor) Power tap Drop line (thin cable) DeviceNet (Channel 0) Terminator (Terminating resistor) T-shaped branch tap Trunk line (Trunk: Thick cable) Drop line (Branch: Thin cable) DeviceNet DeviceNet DeviceNet device device device Communication power supply CAUTION z Be sure to operate the NA (Node Address), DR (Data Rate), and MODU No. switches while the D.NET module is powered off. If any of the switches is operated while the D.NET module is powered on, the operation of the D.NET module is not assured. z When mounting only one D.NET module on the CPU unit, always set “0” as the module number (MODU No.). z Also when mounting two or more D.NET modules on the CPU unit, always set MODU No. = 0 for one of the modules. z When mounting both D.NET module V1.0 and V3.0 or later on the same mount base, mount the D.NET module V1.0 with MODE No. “0”. If it is set to any value other than “0”, the D.NET module V1.0 cannot be operated. - 68 - 5 5.2 5.2.1 OPERATION Starting Up the System Procedure to start up the D.NET system Mount the D.NET modules. (1) Turn off the CPU unit and mount one or more D.NET modules. (2) ・ Turn the MODU No. switch of the D.NET module to a desired module number (0 to 3). ・ Turn the NA (Node Address) switch of the D.NET module to a MAC ID. ・ Turn the DR (Data Rate) switch of the D.NET module to a transfer rate. Set the rotary switches. (0 for 125 kbps, 1 for 250 kbps, 2 for 500 kbps) (3) Connect the CPU unit to the Windows® personal computer and turn on the CPU unit. The D.NET system starts up. (4) Set parameters of the D.NET module. Start up the D.NET system. Set D.NET parameters. The D.NET system is distributed in system floppy disks. Insert the first floppy disk in the Windows® personal computer, run the setup program, and follow the on-screen instructions. CAUTION The D.NET system is available only when the CPU unit is connected to the Windows® personal computer. Note you cannot set parameters while the CPU unit is not connected to the Windows® personal computer. * Microsoft® Windows®, Windows® 95, Windows® 98 are registered trademarks of Microsoft Corporation in the United States and/or other countries. - 69 - 5 OPERATION 5.2.2 Function system Function system Change connecting PCs Channel (0 to 3) Mode of operation (Master-peer mode or Slave mode) Setup system parameters Refresh time Slave timeout detection register D.Station data format conversion S table information Setup station parameters (This can be selected in V3.0 or later only.) Select port Communication kind Hard error information MAC ID Slave error information Message ID Log information of refresh time (This can be selected in V3.0 or later.) F/D function Save Send Compare DeviceNet Serial No. - 70 - Input address and output address Input bytes and output bytes 5 OPERATION 5.2.3 Required hardware and software The following hardware and software are required to run the D.NET system: ・ Personal computer of a Pentium CPU of 133 MHz or faster (abbreviated as a personal computer) ・ Display of SVGA resolution or higher ・ Windows® 95 or Windows® 98 ・ RAM of 32 MB or more ・ Hard disk having a free area of 10 MB or more ・ S10mini CPU module ・ S10mini power module ・ S10mini CPU mount base ・ Cable for connecting a personal computer and the S10mini CPU module ・ S10mini D.NET module ・ Other modules and cables required 5.2.4 Starting the D.NET system Begin at the Windows desktop. Click the Start button, point to “Programs,” and then point to “D.NET system.” CAUTION z The user to use this product must have good knowledge about Windows® environment and user interface. The D.NET system basically conforms to the Windows® Standards and this manual is written for the users who are familiar with the operation of Windows®. z Always turn off the SUSPEND function if the personal computer has the function. The D.NET system may malfunction if the SUSPEND function starts when the D.NET system is running. - 71 - 5 5.3 OPERATION Change Connecting PCs This function selects a type of communication between the CPU module and the personal computer. (1) From the startup dialog box shown below, choose “Change connecting PCs (P).” (2) Select a communication type. ・ For selection of the RS-232C communication type Check the RS-232C option button and select a communication port. - 72 - 5 OPERATION ・ For selection of the Ethernet communication type Check the Ethernet option button and enter an appropriate IP address. For more information about Ethernet connection, refer to the S10mini HARDWARE MANUAL ET.NET (Manual number SME-1-103). - 73 - 5 OPERATION 5.4 (1) Channel (C) and Mode of Operation (M) From the startup dialog box shown below, select a channel number (equal to the MODU No. value) and an operation mode, click their option buttons, and then click the “OK” button. Operation modes and available communication types are as shown below. (For more information of the communication types, see Subsection 2.2.3, “Types of communication.” Communication form Master Operation mode Master-peer mode Peer Slave Master-peer mode Slave mode Applicable communication type Poll, Bit Strobe transmission, and Bit Strobe reception Peer transmission and peer reception Poll CAUTION The slave mode is not available to V1.0 because it is not supported by V1.0. (2) Click the “OK” button after selecting a channel number and an operation mode. This basic screen appears. - 74 - 5 OPERATION 5.5 Setting Parameters 5.5.1 Setup system parameters System parameters are loosely divided into two: parameters related to I/O data refreshing time and parameters related to a slave timeout detection register. The setting of a refreshing time automatically determines the polling cycle of the peer transmission and the master/slave transmission. (1) From the D.NET system basic window, click the “Setup system parameters” button. (2) Set system parameters as shown below. The appearance and content (entries) of the “Setup system parameters” window vary according to the operation mode selected in Section 5.4. a. When “Master-peer mode” is selected (V1.0 always shows this mode.) - 75 - 5 OPERATION z Peer refresh time Specify a cycle time at which the D.NET module transfers send/receive data to or from the I/O area of the CPU in the peer transmission. The range of cycle time varies according to the version. Version V1.0 V2.X V3.0 or later Range of cycle time 10 to 3000 ms (in units of 1 ms) Selected from 10, 20, 50, 100, 200, 500, 1000 ms 3 to 1000 ms (in units of 1 ms) z Master/Slave refresh time Specify a cycle time at which the D.NET module transfers send/receive data to or from the I/O area of the CPU in the master-slave transmission. The range of cycle time varies according to the version. Version V1.0 V2.X V3.0 or later Range of cycle time 10 to 3000 ms (in units of 1 ms) Selected from 10, 20, 50, 100, 200, 500, 1000 ms 3 to 1000 ms (in units of 1 ms) The setting of this refreshing time automatically determines the peer transmission cycle and the polling cycle of the master/slave transmission. In version V1.0 or V2.X, the transmission cycle is fixed to 10, 20, 50, 100, 200, 500, or 1000 ms. Accordingly, the transmission cycle is equal to the set refreshing time or is the smaller value nearest to that value. (Example 1) If the selected refreshing time is 30 ms, the transmission cycle is 20 ms. (Example 2) If the selected refreshing time is 100 ms, the transmission cycle is 100 ms. In version 3.0 or later, the module is operated as set refreshing time = transmission cycle. z Slave timeout detection register A slave timeout detection register is a memory space which stores information about the occurrence of response timeouts (Poll and Bit Strobe) in the master-slave transmission. The memory area is in the I/O area of the CPU (for 64 points in the area range below) and can be browsed by the ladder program. If you do not use the slave timeout detection function, click the “No use” check button. - 76 - 5 OPERATION XW000 – XWFC0 YW000 – YWFC0 JW000 – JWFC0 QW000 – QWFC0 GW000 – GWFC0 RW000 – RWFC0 EW000 – EWFC0 MW000 – MWFC0 Setting range z PCs OK signal linkage setting (This can be selected in V3.0 or later.) The PCs OK signal linkage setting specifies whether a start/stop of communication of the D.NET module is made or not in linkage with the PCs OK contact output provided on the terminal block of the CPU module. With check: Regardless of the PCs OK signal, the D.NET module is always in the state where communication can be started. (Setting at delivery from our company) Without check: When the PCs OK signal is turned on, the D.NET module is put in the state where communication can be started. When the same signal is turned off, the module is put in the state where communication is stopped. When “Slave mode” is selected (This can be selected in V2.0 or later.) z Master/slave refresh time (This can be selected in V2.X only.) Specify a cycle time at which the D.NET module in the slave mode transfers send/receive data to or from the I/O area of the CPU. Version V2.X Setting range Selected from 10, 20, 50, 100, 200, 500, 1000 ms In the slave mode, immediately when receiving a polling request from the master, the D.NET module returns a polling response. Therefore, the refresh time set here is not related with the transmission cycle of the D.NET module. The transmission cycle is determined according to the transmission cycle of the master which establishes a connection with the D.NET module in the slave mode. In V3.0 or later, received data is transferred to the input area of the CPU with the timing at which a polling request was received from the master and transmitting data is fetched from the output area. As a result of this improvement, the cycle does not need to be set. - 77 - 5 OPERATION 5.5.2 Setup station parameters The appearance and content (entries) of the “Setup station parameters” window vary according to the operation mode selected in Section 5.4. (1) When “Master-peer mode” is selected (V1.0 always shows this mode.) The D.NET communication setting consists of assigning port numbers to station parameters. You can use any port number (/01 to /A0, a total of 160 ports). Port numbers to be assigned need not be consecutive. The D.NET module internally assigns a buffer for communication of eight transmission bytes and eight reception bytes to one port. If the number of input/output bytes is greater than eight bytes, two or more ports are used. For example, when the specified number of output bytes is 24 bytes, three consecutive ports of No.1 to No.3 are used (because eight bytes per port by 3 is 24 bytes). In this case, port No.2 and port No.3 are already occupied and cannot be assigned to any other parameters because port No.1 is representatively used. However, V1.0 assigns only one port to system parameters because the number of input/output bytes is 0 to 8 bytes. Example: Example of port setting Port 1 Port 2 Port 3 Port 4 Port 5 Port 6 Port 7 : Already-assigned port1 Port No.1 is assigned to 24 output bytes. Port No.2 and Port No.3 are occupied and cannot be assigned any more. Port No.4 is available. Port No.5 can be assigned to a maximum of 17 input/output bytes (because port 7 is already assigned and only port No.5 and port No.6 are available.) Port No.7 is assigned to 8 input bytes and 8 output bytes. Port /A0 Port No. /A0 can be assigned to a maximum of 8 input/output bytes. (If the input/output bytes are 9 bytes or more, the system parameters overflows the last port.) CAUTION z In V2.0 or later, when two or more ports are required for 9 input/output bytes or more, the ports must not include a port which is already occupied. For example, port No.9 is already assigned to 8 output bytes, port No.8 can be assigned to a maximum of 8 input bytes. z You cannot assign system parameters over the last port (port No./A0). You cannot assign the last port to 9 input bytes or more. (You can assign the port to a maximum of 8 bytes.) - 78 - 5 OPERATION ① From the “Setup system parameters” dialog box, click the “Setup station parameters” button. ② Select a port number whose station parameters you want to edit and click the “Edit” button. - 79 - 5 OPERATION ③ Specify station parameters on this “Parameter edit” dialog box. z Communication kind V1.0 and V2.0 or later have different communication types to be selected as shown below. V1.0 Not use Peer transmission Peer reception Master/slave V2.0 or later Not use Peer transmission Peer reception Master/slave Poll Bit Strobe transmission Bit Strobe reception CAUTION z The master/slave function of V1.0 is equivalent to the poll function of V2.0. (It has been simply renamed.) z The Bit Strobe transmission and the Bit Strobe reception are not available to V1.0. z Only one communication type can be specified for a port. z In the master/slave transmission, one slave uses 1 to 32 ports. (In V1.0, one slave uses only one port. See the description under the title “Input bytes and output bytes.”) Although 160 ports are provided, but up to 63 slaves can be registered because available MAC IDs are /0 to 3F. - 80 - 5 OPERATION z MAC ID Specify the MAC ID of a remote party in the peer reception or master/slave transmission. Setting range 0 – /3F (in hexadecimal) z Message ID Specify any value in the range below. The message ID is used in the peer transmission. Setting range 0 – /F (in hexadecimal) * When “Peer reception” is selected as a communication type, data to be received is determined by a combination of the MAC ID and the message ID. For example, to receive data from a node specifying MAC ID of /3F, communication type of Peer transmission, and message ID of /F, specify the following: Communication type: Peer transmission MAC ID: /3F Message ID: /F CAUTION Although 160 ports are provided, their assignment is limited as follows: No. Communication type Maximum number of ports assigned 1 Peer transmission 16 ports 2 Peer reception 144 ports 3 Master/slave, Poll 63 ports 4 Bit Strobe transmission 5 Bit Strobe reception 1 port 63 ports This can be selected in V2.0 or later. This can be selected in V2.0 or later. However, the total number of ports assigned to peer transmission, peer reception, and master/slave communication types or the total number of ports assigned to poll, Bit Strobe transmission, and Bit Strobe reception communication types must not exceed 160 ports. If 9 input/output bytes or more are specified in V2.0, two or more ports are used. this case, a set of the ports is assumed to be one port. The limitation on port assignment is checked by the D.NET system, so the user does not need to consider it specially. - 81 - In 5 OPERATION z Input address and output address Specify the address of a memory area which stores input data for “Input address” and the address of a memory area which stores output data for “Output address,” See the address table below. Input address XW000 – XWFF0 YW000 – YWFF0 RW000 – RWFF0 MW000 – MWFF0 GW000 – GWFF0 Setting EW400 – EWFF0 FW000 – FWBFF range DW000 – DWFFF JW000 – JWFF0 QW000 – QWFF0 /100000 – /4FFFFE (Extension memory) Output address XW000 – XWFF0 YW000 – YWFF0 RW000 – RWFF0 MW000 – MWFF0 GW000 – GWFF0 EW400 – EWFF0 FW000 – FWBFF DW000 – DWFFF JW000 – JWFF0 QW000 – QWFF0 SW000 – SWBF0 /100000 – /4FFFFE (Extension memory) CAUTION The area “SW000 to SWBF0” is a system register and available to microprograms of version V2.1 or later only. DW000 to DWFFF can be set in microprograms of version V3.0 or later only. z Input bytes and output bytes Specify the size of data transferred to and from a remote node in words or bytes. The allowable sizes are listed below. Note that V1.0 and V2.0 or later have different setting ranges and that the setting range of V2.0 or later varies according to communication types. V1.0 Communication type Setting range (in bytes) Peer transmission Peer reception Master/slave 0–8 (in hexadecimal) 0 – /100 (in hexadecimal) Bit Strobe transmission 0 or 8 (in hexadecimal) Bit Strobe reception 0–8 (in hexadecimal) Peer transmission Peer reception V2.0 Poll In case 9 bytes or more is specified for “Input bytes” or “Output bytes” in V2.0, the D.NET module divides the data by 8 bytes (for fragmental reception or transmission). - 82 - 5 OPERATION CAUTION z “Input bytes” and “Output bytes” must be always specified. Specify “0” for them if you do not use them. z Specify the data size in bytes only. z Even when “1 byte” is specified for “Input bytes” or “Output bytes,” the CPU area specified by “Input address” or “Output address” is used by one word. z When 9 bytes or more is specified for “Output bytes,” the D.NET module divides the data by 8 bytes for fragmental transmission. Similarly, when 9 bytes or more is specified for “Input bytes,” the D.NET module divides the data by 8 bytes for fragmental reception. Therefore, the D.NET module as a master checks the maximum transmission data size and the minimum reception data size of the communicating slave. If the master and the slave are not in the “fragmental transmission - fragmental reception” or “non-fragmental transmission non-fragmental reception” relationship, a connection between them is not established. In this case, the slave error information contains either of the following slave status values: (See Section 5.8 for slave error information.) · /31: I/O (Poll) The produced connection size of the slave is not equal to that of the D.NET module. · /32: I/O (Poll) The consumed connection size of the slave is not equal to that of the D.NET module. Further, the connection is not established when “Maximum transmission data size ≦ Minimum reception data size” is not satisfied. Also in this case, the slave error information contains either of the above slave status values: In the peer mode, the D.NET module does not check the data size. You must check the size of data transferred to a device in advance. z Bit reversal mode (This can be selected in V2.0 or later.) Click the “Bit reversal mode” check box when connecting the S10mini series to a non-Hitachi slave device whose bit I/O numbers are reversed. When this check box is clicked, the D.NET module reverses the arrangement of bits of each data word (MSB to LSB and LSB to MSB) to make the bit order of each data word equal to that of the non-Hitachi device. Leave this check box open when the bit reversal mode is not required (when only D.NET modules are interconnected). (For more information of the bit reversal mode, see Section 4.7,. “Notices on Connection of the D.NET module to non-Hitachi DeviceNet I/O Devices (DI/DO).” When this check box is clicked, “Enabled” is displayed in the “Bit reversal mode” column of the “Setup station parameters” dialog box (see Subsection 5.5.2, “Setup station parameter”). When this check box is not clicked, a “-” mark is displayed in the column. - 83 - 5 OPERATION Bit 0 Data (example) F 0x1234 CPU I/O area Bit Reversed inside the D.NET module F 0 0x2c48 CAUTION z Do not use the bit reversal mode when connecting to a slave device (AI/AO) which handles numeric data such as analog data. If used, the input/output data is not assured. z Do not use the bit reversal mode also when connecting to a slave device which handles both digital data and analog data. If used, the input/output data is not assured. z Byte reversal mode (This can be selected in V3.0 or later) This mode is use to connect such a device whose byte arrangement is different from that of the S10mini series as other manufacturer’s slave device. When the byte reversal mode is checked off, input/output data is input or output with other manufacturer’s salve device after the upper byte and the lower bytes are replaced with each other in each word. Usually, use the module in the status where this mode is checked off. (The mode is checked off at delivery from our company.) In the checked off status, only when data exchange cannot be normally performed with other manufacturer’s device, remove the check mark. When this mode is checked off, “Valid” appears in the byte reversal mode on the station parameter setting screen (“5.5.2 Setup station parameters”, ②). When the mode is not checked off, “-” is displayed. Bit 0 7 8 F 0 0 0 1 0 0 1 0 0 0 1 1 0 1 0 0 CPU I/O area F0 7 Bit 8 Reversed inside the 0 0 1 1 0 1 0 0 0 0 0 1 0 0 1 0 D.NET module - 84 - Data (example) 0x1234 0x3412 5 OPERATION CAUTION z In the area specified as an input/output area of “5.5.3 Setup of D.Station data format conversion”, bit reversal is not caused by checking off the bit reversal mode. (In an analog module (including a pulse counter), bit reversal is not caused even if bit swap is specified by the rotary switch on the D.Station side.) z For connecting the D.Station, adjust the bit reversal mode and the byte reversal mode to the data swap setting performed by the rotary switch on the D.Station side. For example, when the D.Station side is set to “Bit/byte swap”, check off the bit reversal mode and the byte reversal mode on the D.NET side. z Connection timeout monitoring (This can be selected in V3.0 or later.) This setting specifies whether the slave devices connected to the D.NET module are caused or not to detect a D.NET module error. When this setting item is checked off, the occurrence of an error in the D.NET module can be detected by slave. For the slave operation at occurrence of a D.NET module (master) error, see the manual for each slave device. Without check: Even if the communication from the D.NET module stops, the slave does not detect a connection timeout. With check: When the communication from the D.NET module stops, the slave detects a connection timeout and the NS or MNS LED blinks in red at intervals of 0.5 sec. Operations other than LED differ depending on each slave. As the value to be set for the connection timeout monitoring time, an eightfold value of the time set for the master/slave refreshing time in “5.5.1 Setup system parameters” is automatically set. The time required for the slave to detect a D.NET error is 4 times as large as this value. For example, if the master/slave refreshing time is set to 100 ms, the slave detects a connection timeout when the communication with the D.NET stops for 3200 ms. z D.Station status information collection (This can be selected in V3.0 or later.) This item is set when the opposite party (slave) of communication is the D.Station and D.Station status information must be collected at establishment of a connection. Without check: D.Station status information is not collected. For making communication with any slave other than the D.Station, be sure to remove the check mark. With check: At establishment of a connection with the D.Station (slave), D.Station status information is collected only once and saved in the area set at the information save address. A collecting operation is automatically performed by the D.NET module. - 85 - OPERATION The setting range of the information storage address is shown below. Setting range XW000 – XWFF0 JW000 – JWFF0 YW000 – YWFF0 QW000 – QWFF0 GW000 – GWFF0 RW000 – RWFF0 MW000 – MWFF0 EW400 – EWFF0 FW000 – FWBFF DW000 – DWFFF /100000 – /4FFFFE (Extension memory) The D.Station status information has a fixed 2-word length and its details are as follows. 20 (MSB)215 28 27 (1st word) 1/0 …………… 1/0 1/0 …………… 1/0 … Slot 7 mounting information Slot 0 mounting information 1: I/O module mounted 0: No I/O module mounted … Slot 7 fuse blown information (*) Slot 0 fuse blown information (*) 1: Fuse blow 0: No fuse blown 20 (MSB)215 28 27 (2nd word) 1/0 …………… 1/0 0 …………… 0 Always 0 for future use Slot 7 I/O type information … 5 Slot 0 I/O type information 1: Analog I/O (including a pulse counter) 0: Digital I/O (*) Because there is no PI/O module mounting a fuse at present, “No fuse blown” is always set but this bit is reserved for future use. - 86 - 5 OPERATION CAUTION z This function is available only when the opposite party of communication is the D.Station. If any party other than the D.Station is set, a connection is not be established because of an error. This status can be checked by “3.5 Slave Error Information”. The slave status value becomes 0x2F (failure in acquisition of I/O status information). z D.Station status information collection is performed only when a connection is established with the D.Station. Accordingly, even if the status changes on the D.Station side after establishment of a connection, this status change is not incorporated into the D.NET. To perform monitoring at all times, add status information to the input/output data by using the I/O error/mounting information adding function of the D.Station. Regarding the I/O error information/mounting information adding function, refer to the HARDWARE MANUAL D.STATION (Manual number SME-1-119). ④ After setting parameters, click the “OK” button. The “Setup system parameters” dialog box appears. Click the “Write” button and reset or restart the PCs according to the on-screen instructions. The new parameters are written in the D.NET module. - 87 - 5 OPERATION (2) Example of setting station parameters This example sets parameters to perform Bit Strobe transmission with slaves of MAC ID = 0 and MAC ID = 1 and polling transmission with a slave of MAC ID = 2. MAC ID=/3F D.NET (Master) 8-point DI (Slave) 16-point DI (Slave) Slave of 24 input bytes and 24 output bytes MAC ID=0 MAC ID=1 MAC ID=2 Setting example Port number Communication type MAC ID Message ID Number of input bytes Number of output bytes 01 Bit Strobe reception 0 - 1 0 02 Bit Strobe reception 1 - 1 0 03 Poll 2 - /18 /18 04 Poll - - - - 05 Poll - - - - 06 Bit Strobe transmission - - 0 07 All ports below are not used 0 Three ports are used to handle 24 input/output bytes. Always register “Bit Strobe transmission” to enable Bit Strobe ⋮ CAUTION Always register “Bit Strobe transmission” for “Communication type” to use Bit Strobe transmission. When only “Bit Strobe reception” is registered, the D.NET module cannot transfer data to and from the slave. Register “1 port, Bit Strobe transmission” to transfer data to and from the slave. - 88 - 5 (3) OPERATION When “Slave mode” is selected (This can be selected in V2.0 or later.) The slave mode has one dedicated port and you need not select a port. ① From the “Setup system parameters” dialog box below, click the “Setup station parameters” button. ② Follow the instructions below to set system parameters. z Communication type Select “No use” or “Poll.” CAUTION When “No use” is selected, transmission is disabled. - 89 - 5 OPERATION z Input address and output address Specify the address of a memory area which stores DeviceNet input data (reception data) for “Input address” and the address of a memory area which stores DeviceNet output data (transmission data) for “Output address,” See the address table below. Setting range XW000 – XWFF0 YW000 – YWFF0 RW000 – RWFF0 MW000 – MWFF0 GW000 – GWFF0 EW400 – EWFF0 FW000 – FWBFF DW000 – DWFFF JW000 – JWFF0 QW000 – QWFF0 /100000 – /4FFFFE (Extension memory) z Input bytes and output bytes Specify the size of data transferred to and from the master in bytes. The allowable size is listed below. Setting range (in bytes) 0 – /100 (in hexadecimal) In case 9 bytes or more is specified for “Input bytes” or “Output bytes,” the D.NET module divides the data by 8 bytes (for fragmental reception or transmission). CAUTION z “Input bytes” and “Output bytes” must be always specified. them if you do not use them. Specify “0” for z Specify the data size in bytes only. z Even when “1 byte” is specified for “Input bytes” or “Output bytes,” the CPU area specified by “Input address” or “Output address” is used by one word. z When 9 bytes or more is specified for “Output bytes,” the D.NET module divides the data by 8 bytes for fragmental transmission. Similarly, when 9 bytes or more is specified for “Input bytes,” the D.NET module divides the data by 8 bytes for fragmental reception. z When the slave mode is used, the D.NET module does not check the data size. You must check the size of data transferred to the master in advance. - 90 - 5 OPERATION z Bit reversal mode Click the “Bit reversal mode” check box when connecting the S10mini series to a non-Hitachi master device whose bit I/O numbers are reversed. When this check box is clicked, the D.NET module reverses the arrangement of bits of each I/O data word (MSB to LSB and LSB to MSB) to make the bit order of each data word equal to that of the non-Hitachi device. Leave this check box open when the bit reversal mode is not required (when only D.NET modules are interconnected). (For more information of the bit reversal mode, see Section 4.7, “Notices on Connection of the D.NET Module to Non-Hitachi DeviceNet I/O Devices (DI/DO).” Bit 0 F 0x1234 CPU I/O area Bit Reversed inside the D.NET module Data (example) F 0 0x2c48 CAUTION Do not use the bit reversal mode when connecting to a master device which handles numeric data such as analog data. If used, the input/output data is not assured. z Byte reversal mode (This can be selected in V3.0 or later.) This mode is used to connect such a device whose byte arrangement is different from that of the S10mini series as other manufacturer’s slave device. When the byte reversal mode is checked off, input/output data is input or output with other manufacturer’s salve device after the upper byte and the lower bytes are replaced with each other in each word. Usually, use the module in the status where this mode is checked off. (The mode is checked off at delivery from our company.) In the checked off status, only when data exchange cannot be normally performed with other manufacturer’s device, remove the check mark. When this mode is checked off, “Valid” appears in the byte reversal mode on the station parameter setting screen (“5.5.2 Setup station parameters”, ②). When the mode is not checked off, “-” is displayed. - 91 - 5 OPERATION Bit 0 7 8 F Data (example) 0001001000110100 0x1234 F0 7 Bit 8 0 0 1 1 0 1 0 0 00010010 Reversed inside the D.NET module 0x3412 CPU I/O area z Collect RI/O timeout information (This can be selected in V2.1 or later.) Specify this parameter to use the “Collect remote I/O timeout information” function (which causes the D.NET module in the slave mode to collect timeout information of input and output devices mounted on the S10mini remote I/O station and to sent it to the master). Leave this parameter unspecified when you do not use this function. For more information about parameters to be set, see item (4), “ ‘Collect remote I/O timeout information’ function.” ③ After setting parameters, click the “OK” button. The “Setup system parameters” dialog box appears. Click the “Write” button and reset or restart the PCs according to the on-screen instructions. The new parameters are written in the D.NET module. - 92 - 5 (4) OPERATION ‘Collect remote I/O timeout information’ function <Outline> For example, this function is used when remote I/O data (of the S10mini) is sent to the master via DeviceNet in the network configuration shown below. In other words, this function sends timeout information of the remote I/O station (from the system register “S380 to S3FF” of the S10mini) together with I/O data to the master. Master PS CPU D.NET module DeviceNet S10mini PS CPU Slave PI/O D.NET module (LQE070) Remote I/O PS RI/O ST PI/O Remote I/O PS RI/O ST PI/O - 93 - 5 OPERATION As seen from the figure below, the S10mini D.NET module in the slave mode creates timeout information of the specified remote I/O devices, stores it in the specified addresses and sends it together with I/O data to the master. With this, the master can read the timeout information of the remote I/O. Master See the address corresponding to the timeout information address specified by the slave S10mini D.NET module. The PI/O data in the timeout information storing area is lost as timeout information is written over it.) Input area XW Output area Timeout information YW PI/O data PI/O data DeviceNet transmission path S10mini slave Collects RI/O timeout information. This collection automatically starts when this function is registered by station parameters. System register Input area Output area XW YW Timeout information S380 - S3FF PI/O data PI/O data Timeout information 1-2W Specified by "Output address" and "Output bytes" on the "Setup station parameter" dialog box. Specified by "Input address" and "Input bytes" on the "Setup station parameter" dialog box. Remote I/O CAUTION This function is available to microprograms of version V2.1 or later only. - 94 - 5 OPERATION <Setting the “RI/O timeout information collection” parameter> This parameter is set on the “Setup station parameter” dialog box when “Slave” is selected. When this function is not required, leave the “Remote I/O timeout information collection parameter” field blanked. ① Specify in the “RI/O timeout information address” box after setting a communication type, input and output addresses, and input and output bytes, then click “RI/O timeout information collection station registration.” z RI/O timeout information address Specify a location in output data (address) in which you want to set the remote I/O timeout information. The address to be specified must be in the output area which is limited by “Output address (D)” and “Output bytes (Y).” In the above screen example, the timeout information is set at address XW000 in the output area “XW000 to XW030.” XW000 XW010 XW020 XW030 Output area Timeout information I/O data I/O data I/O data CAUTION The timeout information is 1 or 2 words long, depending upon the setting of a remote I/O station to which parameter information is registered by the “RI/O timeout information collection station registration” button. - 95 - 5 OPERATION ② From the “RI/O timeout information collection station registration” dialog box, you can register the collected RI/O timeout information for a station. To register, double-click a selected registration number or click a selected registration number and the “Regist” button in that order. ③ Register the remote I/O station from the “Station No. Registration” dialog box shown below. z Station No. Specify a station number from which the remote I/O timeout information is collected. (The station number is set by the STATION NO. switch on the front panel of the remote I/O station module. Setting range 0 – /7F - 96 - (in hexadecimal) 5 OPERATION <RI/O timeout information> Respective bits of the RI/O timeout information is related to a registration number to which a station number is already assigned on the “RI/O timeout information collection station registration” dialog box. A system can have a maximum of 12 stations per line (that is, a total of 24 stations) as remote I/O devices (in a dispersed manner). To register 17 stations or more, two words of timeout information are required. 0 1 2 15 16 21 22 23 24 31 Timeout information (1 or 2 words) For registration of up to 16 stations For registration of 17 to 24 stations CAUTION z This function is available only in the slave transmission mode (output) only. (This function is not available in the master-peer mode.) z The output area in which the timeout information is set cannot be used as input of the remote I/O. z When the “Bit reversal mode” check box is clicked, each word of the timeout information is also bit reversed (MSB to LSB and LSB to MSB). - 97 - 5 OPERATION 5.5.3 Setup of D.Station data format conversion <Outline> This function converts the input/output data formats of the analog module and pulse counter module mounted in the D.Station inside the D.NET module. This function is available in V3.0 or later. The formats to be converted are shown below. <Analog input/output data> D.Station module side 15 14 4 3 2 1 0 Analog/digital conversion data S 0 0 0 0 S: Sign At an output, the data of the I/O area in the CPU module is left-shifted 4 bits. At an input, the data of the D.Station module side is right-shifted 4 bits. I/O area in the CPU module 15 14 13 12 11 10 S S S S S 0 Analog/digital conversion data S: Sign (Without sign extension, bit 12 to bit 15 are 0.) <Pulse counter data> D.Station module side 15 14 S 2 1 0 Code Read/write count data S: Sign Code: Control code for reading and status code for writing At an output, the data of 1st word and 2nd word of the I/O area in the CPU module are coupled into a single word. At an input, the data of the D.Station module side is extended to 3rd word and 4th word. I/O area in the CPU module 15 14 13 1st word S S S 2nd word 3rd word 4th word 4 3 0 Write count data Invalid Control code Write count data S S S Invalid S: Sign (Without sign extension, bit 14 and bit 15 are 0.) - 98 - Status code 5 OPERATION ・ Contents of control codes of the pulse counter (Operation mode 1) Control code Contents 8 Counter stop 4 Preset start 2 1 Others Comparison value set Latch reset Operation for setting Stops the pulse measurement. Sets the preset value in the counter and starts a measurement. Sets the comparison value in the comparison register and starts a measurement. Resets the matching signal that is latched and starts a measurement. Invalid (Operation mode 2) Control code Contents 8 Counter stop 4 Preset start 2 1 Others Comparison value set Latch reset Invalid Operation for setting Stops the pulse measurement. Sets the preset value in the counter and starts a measurement. Sets the comparison value in the comparison register. Resets the matching signal that is latched. ・ Contents of status codes of the pulse counter (Operation mode 1) Control code Contents 8 Counter stop 4 R>C 2 1 R=C R<C Status Counter stop status The comparison data value is larger than the count value. The comparison data value is equal to the count value. The comparison data value is smaller than the count value. (Operation mode 2) Control code Contents 8 Counter stop 4 Preset start 2 Comparison value set 1 Latch reset Status The control code transferred previously is set. For the details of usage of the pulse counter, refer to the instruction manual attached to the module. - 99 - 5 OPERATION <Setup of D.Station data format conversion> Perform D.Station data format conversion setting only when the D.Station is connected as a slave of the D.NET module and the data formats of the AI/AO and pulse counter must be converted for use as described in the outline shown in “5.5.3 Setup of D.Station data format conversion”. When the D.Station is not connected, do not perform any setting. ① On the “Setup system parameters” screen shown in the following figure, click the “Setup data format conversion of D.STATION” button. ② Select a No. to be set and click the “Edit” button. No.1 to No.20 (hexadecimal) are available. Up to 32 modules can be registered. Any No. can be used for a setting. - 100 - 5 OPERATION ③ On the “Setup data format conversion of D.STATION” screen shown in the following figure, perform format conversion setting for each PI/O module. z Module Select a type of I/O module to perform data format conversion. The D.NET module converts the data format according to the contents of this selection. Contents of selection AI (with sign extension) AI (without sign extension) AO Pulse counter (with sign extension) Pulse counter (without sign extension) z Input/output address Set the range of input/output addresses set on the Parameter editing screen of “5.5.2 Setup station parameters” for data conversion. Specify the starting address of the conversion location. The addresses to be set should be within the area set by the input address and the number of input bytes or the output address and the number of output bytes on the parameter editing screen of “5.5.2 Setup station parameters”. Setting range XW000 – XWFF0 YW000 – YWFF0 RW000 – RWFF0 MW000 – MWFF0 GW000 – GWFF0 EW400 – EWFF0 FW000 – FWBFF QW000 – QWFF0 /100000 – /4FFFFE(extension memory) - 101 - 5 OPERATION z Number of input/output bytes Set the number of bytes for data format conversion within the following range. Data format conversion is performed about the data for the number of input/output bytes specified here out of the addresses specified as input/output addresses. Module Setting range (unit: byte) AI, AO (both with and without sign extension) 0 to /40 Pulse counter Always 2 (The user cannot change the setting.) CAUTION z The input/output area to be set by the input/output addresses and the number of input/output bytes should be within the input/output area set by the input/output addresses and the number of input/output bytes on the parameter editing screen for station parameter setting. If the input/output area is set out of the range, an out-of-range error is displayed by the tool and the setting is not written into the D.NET module. Review the setting and retry writing. z The data format conversion setting permits registering a total of 32 cases. However, up to 8 cases can be registered per D.Station. If more than 8 cases are registered, an error of “Registration number over” is displayed by the tool and the setting is not written into the D.NET module. Review the setting and retry writing. - 102 - 5 OPERATION <Setting example> This setting example shows a case to convert the data format of the AI modules (slot No.0 to 3) and the pulse counter module (slot No.7) mounted in the D.Station in the following configuration. Master PS CPU D.NET module (V3.0 or later) DeviceNet Slave PI/O module HSC-1000 PS AI AI AI AI AO AO AO Pulse counter D.Station module (1) Setup of the D.Station module Switch name Set point Contents of setting NA Any value can be set in the range of 00 to 3F. However, the value must not be duplicate with the D.NET module setting. MAC ID of the D.Station module SLOT 2 64-point setting, normal transfer mode FUNC1 0 to 2 (Set a value in accordance with the baud rate to be used.) No module information FUNC2 0 Byte swap, RESET, FREE - 103 - 5 OPERATION (2) D.NET module setting The following settings are for the case where the input area is set to XW800 and upward, the output area is set to YW800 and upward, and the pulse counter assignment area is set to FW000 and upward. ・Setup of station parameters When the D.Station side is set to Byte swap, check off the byte reversal mode on the D.NET side. Because the number of input/output bytes of the D.Station is 64 points × 8 slots = 64 bytes, set /40 (hexadecimal). ・Setup of D.Station data format conversion - 104 - 5 OPERATION Setup of AI Starting address of slot 0 Because 4 words (64-point setting) × 4 slots (slot 0 to slot 3) = 32 bytes, set /20 (hexadecimal). Setup of pulse counter Starting address of slot 7. Starting address of the pulse counter assignment area - 105 - 5 5.6 OPERATION S Table Information This function shows information of non-hardware errors such as network errors that the D.NET module caused. (1) Click the “S table information” button on the D.NET system basic window shown below and select a channel. (2) In case an error has already occurred, the S table shows the error code and the error contents. (3) Click the “Cancel” button to close the “S table” window and the D.NET system basic window returns. - 106 - 5 OPERATION An extension error code may be added to some errors that are saved in the S table. The extension error code represents the following contents. Error Contents of error code 0x7381 Occurrence of transmission path bus-off 0x4281 Duplicate MAC ID 0x5188 Communication number setting error 0x5189 Parameter setting error 0x8181 Occurrence of CAN transmission timeout Extension error code Upper byte Lower byte Contents of extension error code None None MAC ID(0x0000 to 0x003F) None Duplicate MAC ID None 0x01 (Port No. error) 0x02 (Message ID error) 0x03 (Cycle error) Port No. (0x01-0xA0) Port No. (0x01-0xA0) Port No. (0x01-0xA0) 0x04 (Transferred word number error) 0x05 (Communication form mixed) 0x06 (MAC ID error) Port No. (0x01-0xA0) The port No. is set out of the range of port No./1 to /A0. The message ID is set out of the range of /0 to /F. The transmission cycle is not set to 10, 20, 50, 100, 200, 500, or 1000 ms. (This error does not occur in V3.0 or later.) The word number is set out of the range of /0 to /100 bytes. Port No. (0x01-0xA0) The master/peer made and the slave mode coexist. Port No. (0x01-0xA0) 0x07 (Communication type error) 0x08 (Transfer address error) 0x0A (Transferred word number error) 0x0B (Registration number error) Port No. (0x01-0xA0) The MAC ID is set out to the range of 0 to 3F or the local MAC ID is set. The communication type is not set to Peer transmission, Peer reception, Poll, or Bit Strobe. The transfer address is set out of the range. 0x10 (Transmitted word number error) 0x11 (Received word number error) 0x12 (Communication form mixed) 0x13 (Communication type error) 0x14 (Transfer address error) CAN ID Always 0x00 Port No. (0x01-0xA0) Always 0x00 The word number is set out of the range of /0 to /8 bytes. MAC ID (0x00-0x3F) The data format conversion registration number of the D. Station is exceeded. (Up to 8 cases can be registered for each D. Station.) Slave mode The transmitted word number is set out of the range of /0 to /100 bytes. Slave mode The received word number is set out of the range of /0 to /100 bytes. Slave mode The master/peer mode and the slave mode coexist. Always 0x00 Always 0x00 Always 0x00 Slave mode The communication type is not set to Poll. Always 0x00 Slave mode The transfer address is set out of the range. CAN ID in the transmitting frame at occurrence of transmission timeout Corrective measure (*1) (*2) Check the parameter settings. (*1) (*3) (*1) Check the connectors for looseness, cable wiring, and communication speed setting, MAC ID setting, and MODU No. setting. (*2) Check the set point of the Node Address setting switch. (*3) A CAN transmission timeout occurs in the following cases. In these cases, the D.NET module remains normal. ・The D.NET communication connector is not connected. ・The other station does not exist or the power supply of the other station is OFF. ・The transmission speed of the other station does not match. The CAN transmission timeout error does not occur if any module other than the D.NET exists on the network. (This error does not occur if only there is any party with which the D.NET does not communicate directly.) (*4) When the communication speed is set to 500 kbps or 250 kbps, the transmission of more than 17 frames per 10 ms was set. When the communication speed is set to 125 kbps, the transmission of more than 9 frames per 10 ms was set. - 107 - 5 5.7 OPERATION Hard Error Information This function shows information of hardware errors that the D.NET module detected. (1) Click the “Hard error information” button on the D.NET system basic window shown below and select a channel. (2) In case an error has already occurred, this function shows the error code, the error contents, CAN memory address, write data, and read data. (3) Click the “Close” button to return to the D.NET system basic window. - 108 - 5 5.8 OPERATION Slave Error Information This function shows Information of errors of slaves connected to the D.NET module. This Information is valid only when the master-peer mode is selected. When the slave mode is selected, all state values (except the state of the current D.NET module) are “/00” (No registration). (1) Click the “Slave error information” button on the D.NET system basic window shown below and select a channel. (2) The slave state of each MAC ID is displayed as shown below. - 109 - 5 OPERATION The table below lists slave state values and their description. <Slave state table> 1 2 3 4 5 6 7 Slave state value 0x00 0x01 0x02 0x80 0x81 0x82 0x83 8 9 10 11 12 13 14 15 16 17 18 0x84 0x85 0x86 0x87 0x88 0x89 0x90 0x91 0x11 0x12 0x13 19 20 0x14 0x15 21 22 23 0x16 0x17 0x18 24 25 0x19 0x1A 26 27 0x1B 0x1C 28 0x1D 29 0x1E 30 31 32 33 34 35 36 37 38 39 40 41 42 43 44 45 46 0x21 0x22 0x23 0x24 0x31 0x32 0x33 0x34 0x2D 0x2E 0x2F 0x50 0x51 0x52 0x70 0x8A ―― No. Description No registration A connection is being established. A connection has been normally established. A timeout occurs. (Establishment of Explicit connection fails.) A timeout occurs. (Establishment of I/O (Poll) connection fails.) A timeout occurs. (Establishment of I/O (Bit Strobe) connection fails.) A timeout occurs. (Establishment of I/O (Bit Strobe) connection fails. Establishment of I/O (Poll) connection is successful.) A timeout occurs. (Acquisition of Produced connection size of the I/O (Poll) slave side fails.) A timeout occurs. (Acquisition of Consumed connection size of the I/O (Poll) slave side fails.) A timeout occurs. (Setup of Explicit EPR fails.) A timeout occurs. (Setup of Poll EPR fails.) A timeout occurs. (Setup of Bit Strobe EPR fails.) A timeout occurs. (Setup of Bit Strobe EPR fails. Setup of Poll is successful.) A Poll response timeout occurs. A Bit Strobe response timeout occurs. Establishment of Explicit connection fails. (Open Explicit error) Establishment of Explicit connection fails. (As Explicit is already opened, it cannot be opened.) Establishment of Explicit connection fails. (As Explicit is already connected to another master, it cannot be opened.) Establishment of Explicit connection fails. (Because of an M/S service error, Explicit cannot be opened.) Establishment of Explicit connection fails. (As the MS service is already established, Explicit cannot be opened.) Establishment of I/O (Poll) connection fails. (An error response is received.) Establishment of I/O (Poll) connection fails. (I/O connection is already established.) Establishment of I/O (Poll) connection fails. (The I/O is already connected to another master, it cannot be opened.) Establishment of I/O (Bit Strobe) connection fails. (An error response is received.) Establishment of I/O (Bit Strobe) connection fails. (An error response is received.) I/O (Poll) connection is successful. Establishment of I/O (Bit Strobe) connection fails. (I/O connection is already established.) Establishment of I/O (Bit Strobe) connection fails. (I/O connection is already established.) I/O (Poll) connection is successful. Establishment of I/O (Bit Strobe) connection fails. (As the I/O is already connected to another master, it cannot be opened.) Establishment of I/O (Bit Strobe) connection fails. (As the I/O is already connected to another master, it cannot be opened.) I/O (Poll) connection is successful. Setup of EPR fails. (Explicit) Setup of EPR fails. (I/O (Poll)) Setup of EPR fails. (I/O (Bit Strobe)) Setup of EPR fails. (I/O (Bit Strobe)), Setup of I/O (Poll) is successful. The Produced connection size of the I/O (Poll) slave side does not match with the D.NET. The Consumed connection size of the I/O (Poll) slave side does not match with the D.NET. Acquisition of the Produced connection size of the I/O (Poll) slave side fails. Acquisition of the Consumed connection size of the I/O (Poll) slave side fails. Setup of EPR at I/O communication fails. (An error response is received.) Setup of EPR at I/O communication fails. (A response timeout occurs.) Acquisition of I/O status information fails. Establishment of Explicit connection fails. (Already assigned) Establishment of Explicit connection fails. (Already opened, other than assigned) Establishment of Explicit connection fails. (Already opened) Release of Group 3 Explicit connection fails. Establishment of Explicit connection fails. (A response timeout occurs.) Local station This state is selected in normal communication. When an error status (excluding a “Normal communication in progress” status) occurs, check and correct the parameter setting and the wiring. - 110 - 5 5.9 OPERATION F/D Function This function “saves” the system parameters and the station parameters which are set for the D.NET module to the personal computer, “sends” (downloads) the parameters from the personal computer to the D.NET module, and compares the saved parameters by the parameters set for the D.NET module. Click the “F/D function” button on the D.NET system basic window shown below and select a channel. Select an operation, click the “Save” button, “Send” button, or “Compare” button, select a channel, and start the operation. CAUTION You can add a comment to a file to be saved (up to 128 characters). - 111 - 5 OPERATION 5.10 DeviceNet Serial No. A DeviceNet serial number is a product-specific number conforming to the DeviceNet Standard. This parameter requires no setting. Click the “DeviceNet Serial No.” button on the D.NET system basic window shown below and select a channel. A DeviceNet serial number is displayed as shown below. - 112 - 5 OPERATION 5.11 Version Information This function shows you the version of the D.NET system running in the personal computer. This is not the version and revision of the D.NET module. Click the “D.NET” icon on the D.NET system basic window shown below and select “Version information.” The version of the D.NET system is displayed as shown below. - 113 - 5 OPERATION 5.12 Log Information of Refresh Time (1) (2) This function indicates the actual refreshing cycle of peer transmission and master/slave communication. This function allows you to know the actual cycle in which refreshing is performed. This function is available in V3.0 or later only. Click the “Log information of refresh time” button on the basic screen of the D.NET system shown in the following figure. The “Log information of refresh time” screen shown in the following figure appears. Each refreshing time is the time provided when the screen appears. To display the latest refreshing time, click the “Update” button. To clear the refreshing time, click the “Clear” button. To quit the log information display of refreshing time, click the “OK” button. - 114 - 6 MAINTENANCE 6 MAINTENANCE 6.1 6.1.1 Maintenance & Checks Periodic checks Item Description of checks Frequency Unit cleaning Shut off all powers and vacuum-clean clearances between each D.NET module and the slot. Once per year Mechanism check Check the D.NET modules and communication cables for loose mounting screws and damages. Tighten loose screws if any and replace the module if it is damaged. Once per year - 116 - 6 6.2 MAINTENANCE T/M (Test & Maintenance Program) The Test & Maintenance program (T/M) is used to check and maintain the D.NET modules. The D.NET module contains the T/M and you can operate the T/M easily. Operate the NA (Node Address), DR (Data Rate), and MODU No. (Module Number) switches, shut off and restart the PC. The T/M starts. The T/M is not available to V1.0. CAUTION z The T/M writes new data on the BD area in the CPU. For protection of data, make a backup copy of the BD area (BD000 to BD037), isolate the D.NET module from the system (offline), then start the T/M. z V1.0 does not support the T/M and all operations of the rotary switches are discarded. 6.2.1 Hardware configuration for test and maintenance S10mini CPU unit D.NET module (No.0) D.NET module (No.1) D.NET module (No.2) D.NET module (No.3) Drop line (Branch: Thin cable) Terminator (Terminating resistor) T-branch tap Terminator (Terminating resistor) Trunk line (Trunk: Thick cable) CAUTION The T/M can test two to four D.NET modules at a time. Before starting the T/M, be sure to install D.NET modules with MODU No. set to 8. - 117 - 6 MAINTENANCE 6.2.2 Executing the T/M (1) Mounting the D.NET modules and cabling (2) Mount the D.NET modules (see Subsection 6.2.1, “Hardware configuration for test and maintenance”) and connect the cables. The T/M requires two (minimum) to four (maximum) D.NET modules for test and maintenance. Switch setting Set the rotary switches of the D.NET modules to start the T/M as shown below. Channel Switch Channel 0 Channel 1 Channel 2 Channel 3 (NA-U) Set to “0.” Set to “0.” Set to “0.” Set to “0.” (NA-L) Set to “0.” Set to “1.” Set to “2.” Set to “3.” DR (Data Rate) switch Set to “0” (125 kbps). Set to “0” (125 kbps). Set to “0” (125 kbps). Set to “0” (125 kbps). MODU No. (Module Number) switch Set to “8.” Set to “9.” Set to “A.” Set to “B.” NA (Node Address) switch (3) Executing the T/M To start the T/M, reset or restart the CPU module. 6.2.3 T/M functions and operations (1) T/M functions (2) The test and maintenance is executed in the peer mode. First channel 0 sends data to channel 1 to channel 3. Channel 1 to channel 3 loop back the received data to channel 0. Channel 0 compares the received data by the transmitted data. Normal operation (3) The green MNS indicators of all D.NET modules on the CPU unit turn on and the error flag of a tested channel in the BD area of the CPU module remains “0x00000000”. The error counter of a tested channel in the BD area of the CPU module also remains “0x00000000”. (For details of the CPU BD area, see Subsection 6.2.4.) When a communication error occurs The error flag of a tested channel in the BD area of the CPU module changes to “0x00000001” (indicating that an error occurred) and the error counter of a tested channel in the BD area of the CPU module is incremented by one. (For details of the CPU BD area, see Subsection 6.2.4.) At the same time, “DN* TMER” (wherein “*” is a channel number which caused the error) appears on the LED of the CPU module. - 118 - 6 6.2.4 MAINTENANCE CPU areas used by the T/M Below are listed CPU areas used by the T/M. Address Description Size BD000 Channel 0 transmission area, Message ID = 1 8 bytes BD002 Channel 0 transmission area, Message ID = 2 8 bytes BD004 Channel 0 transmission area, Message ID = 3 8 bytes BD006 Channel 0 reception area, MAC ID = 1, Message ID = 0 8 bytes BD008 Channel 0 reception area, MAC ID = 2, Message ID = 0 8 bytes BD00A Channel 0 reception area, MAC ID = 3, Message ID = 0 8 bytes BD00C Channel 1 transmission area, Message ID = 0 8 bytes BD00E Channel 1 reception area, MAC ID = 0, Message ID = 1 8 bytes BD010 Not used 8 bytes BD012 Channel 2 transmission area, Message ID = 0 8 bytes BD014 Channel 2 reception area, MAC ID = 0, Message ID = 2 8 bytes BD016 Not used 8 bytes BD018 Channel 3 transmission area, Message ID = 0 8 bytes BD01A Channel 3 reception area, MAC ID = 0, Message ID = 3 8 bytes Remarks BD01C to Not used BD01F BD020 Channel 0 and channel 1 monitoring timer 4 bytes BD021 Channel 0 and channel 2 monitoring timer 4 bytes BD022 Channel 0 and channel 3 monitoring timer 4 bytes BD023 to Not used BD031 BD032 Channel 1 error flag (Error occurred: 0x00000001) 4 bytes BD033 Channel 1 error counter 4 bytes BD034 Channel 2 error flag (Error occurred: 0x00000001) 4 bytes BD035 Channel 2 error counter 4 bytes BD036 Channel 3 error flag (Error occurred: 0x00000001) 4 bytes BD037 Channel 3 error counter 4 bytes - 119 - Not cleared by recovery from an error Not cleared by recovery from an error Not cleared by recovery from an error 6 MAINTENANCE 6.3 6.3.1 Troubleshooting Troubleshooting flow Generation of a trouble Follow the instructions of "6.3.2 First checks before troubleshooting." Checks OK? OK NG Remove the cause of the trouble. Recovered? NO Repair according to the indication of the CPU error indicators and error information of the D.NET system. YES YES Recovered? NO Fill in the trouble report. (*) Call your local Hitachi distributor or customer service center. End (*) See Appendix A.3, "Trouble Report." - 120 - 6 MAINTENANCE 6.3.2 First checks before troubleshooting (1) Factors that disable the D.NET module to communicate The D.NET module is disabled to communicate in the following cases. Repair according to the repairing procedure. No. Factor Repairing 1 The network has only one D.NET module. (The D.NET module requires the other node to communicate.) This is not a trouble. Connect the other node to the network and turn on power. The D.NET module can start communication. 2 Two or more nodes in the network have different transmission speeds. Set so that all nodes in the network may have an identical transmission speed. 3 Two or more nodes are in the network and the line load is too high for transmission. (This trouble may occur when the MAC ID priority of this node is lower than that of the other node. The priority becomes higher as the MAC ID goes smaller.) Reduce the network load by prolonging the transmission cycle of each node, reducing the number of nodes, and the like. 4 The network power is not supplied. The D.NET module does not need a network power but the other manufacturer’s DeviceNet devices require a network power. Connect the network power. 5 A network power is supplied but its capacity is lower than required. Check and correct the capacity of the network power. (See Subsection 3.2.5.) 6 The cable length is greater than the maximum cable length. Check and correct the cable length. (See Subsection 3.2.4.) 7 The terminating resistor is missing. Connect a terminating resistor. Subsection 3.2.3.) 8 The connector of the D.NET module is Check for loose connectors and tighten loose. them firmly. 9 The CAN-H or CAN-L cable of the connector is loose. - 121 - (See Check for a loose cable and connect it firmly. 6 MAINTENANCE (2) Are cables connected correctly and firmly? Check the cables for disconnection, loose connection, and the like. (3) Are the modules mounted correctly and tightly? Check the location of the D.NET modules and whether the mounting screws are tightened firmly. - 122 - 6 MAINTENANCE (4) Is the module grounded correctly? ・ Ground the module apart from the grounding point of a strong-power unit. ・ The grounding must conform to the Class D Grounding Standard. (5) Is the LG separated from the FG? ・ Power noise may enter the FG through the LG and may cause the system to malfunction. Be sure to separate the LG from the FG. ・ The LG of the power supplier must be grounded. LG is here! FG is there! - 123 - 6 MAINTENANCE 6.4 Errors and Repairing 6.4.1 Messages indicated by CPU indicators The indications by the CPU indicators are classified by module numbers. Module number Module number 0 Module number 1 Module number 2 Module number 3 Indication Description Repairing DN0 @. @ The D.NET module number 0 has started normally. This is not an error. EXF0 A parity error occurred when the CPU read memory of the D.NET module number 0. Reset the CPU once. If the indication still remains, replace the D.NET module. PTY DN0 □□□□ An error was detected in the D.NET See Subsection 6.4.2. module number 0. DN1 @. @ The D.NET module number 1 has started normally. This is not an error. EXF1 A parity error occurred when the CPU read memory of the D.NET module number 1. Reset the CPU once. If the indication still remains, replace the D.NET module. PTY DN1 □□□□ An error was detected in the D.NET See Subsection 6.4.2. module number 1. DN2 @. @ The D.NET module number 2 has started normally. This is not an error. EXF2 A parity error occurred when the CPU read memory of the D.NET module number 2. Reset the CPU once. If the indication still remains, replace the D.NET module. PTY DN2 □□□□ An error was detected in the D.NET See Subsection 6.4.2. module number 2. DN3 @. @ The D.NET module number 3 has started normally. This is not an error. EXF3 A parity error occurred when the CPU read memory of the D.NET module number 3. Reset the CPU once. If the indication still remains, replace the D.NET module. PTY DN3 □□□□ An error was detected in the D.NET See Subsection 6.4.2. module number 3. “@. @” represents the version and revision of the D.NET module. - 124 - 6 6.4.2 MAINTENANCE Error indication and repairing When the D.NET module detects an error, the LED of the CPU module shows an error message. The error messages are listed below. Message displayed MPUR MPUA CANM SHM ROMC ROM1 RAMC PRCP TIM MDSW Error code 1401 1402 1403 1404 1405 1406 1407 1408 1409 140A MPU Register Compare Error MPU Operation Check Error CAN Register Compare Error MPU Built-in Memory Compare Error FROM Compare Check Error FROM Checksum Error (microprogram) SRAM Compare Check Error Microprogram Copy Error MPU Built-in Timer Diagnosis Error Invalid MODU No. switch setting SBCP ROM2 ROM3 CANA PTY1 WDT RSTO ILLG SLOT ADDR EXCP PTY2 140B 140C 140D 2401 2403 2404 2405 3404 3406 3409 34XX 346C OS Copy Error FROM Checksum Error (sub-OS) FROM Checksum Error (parameter) CAN Access Timeout Error Shared Memory Parity Error Watch-Dog-Timer Timeout Error Reset Timer Overflow Error General Invalid Instruction Slot Invalid Instruction Address Error SRAM Parity Error MPU Exception Error MACD 4281 Duplicated MAC ID Network error (Transmission stopped) PRM2 PRM1 BOFF CANT 5188 5189 7381 8181 Invalid Number of Input/Output Bytes Invalid Parameter Setting Transmission Bus Off CAN Transmission Timeout Error (*) T/M error TMER 9001 Communication Error in T/M Operation Module state Initial diagnosis Hardware error In operation Description Repairing Reset the CPU module. If the error message still remains, the D.NET module may be disabled. Replace the D.NET module. Check and correct the MODU No. switch setting. Reset the CPU module. If the error message still remains, the D.NET module may be disabled. Replace the D.NET module. Check and correct the NA (Node Address) switch setting. Check and correct the parameter setting. Check and correct loose connection of connectors, cabling, and settings (transmission speed, MAC ID, and MODU No.). See Section 6.2. (*) A CAN transmission timeout occurs also in the following cases, but the D.NET module is normal: ・ When the communication connector of the D.NET module is disconnected ・ When the remote station is not found or powered off ・ When the transmission speed of the remote station is invalid This timeout error will not occur when the network has another remote station except this D.NET module (even when the station does not communicate with the D.NET module directly). CAUTION When the red MNS indicator of the D.NET module lights and the LED of the CPU module shows nothing, the module may be faulty. Replace the D.NET module. - 125 - THIS PAGE INTENTIONALLY LEFT BLANK. APPENDIXES APPENDIXES CPU Memory Map Address MSB Address MSB LSB /000000 /060000 LSB System table OS-ROM /010000 /060BF0 LPET /061000 Data register DW000 - DWFFF System hardware area (4 k words) /063400 /060000 /063600 Set values /063000 T000 - T1FF U000 - U07F C000 - C07F Sequence RAM /063800 /080000 Ladder program area OS-RAM /0A0000 PI/O Bit type (28 k step) /07FFFE /0C0000 Not used /0E0000 PI/O /0F0000 Word type /0F0000 /0F0400 OS RAM /0F0600 /0FFFFE Extension memory (1 MB) /100000 Extension memory for computer processing /1FFFFE Extension memory (1 MB) /200000 Extension memory for computer processing /2FFFFE - 128 - Count values APPENDIX A.1 T000 - T1FF U000 - U07F C000 - C07F APPENDIXES APPENDIX A.2 No. 1 Installation Check List Part to be checked Item Result of check Checking NA switch Is the MAC ID set by the NA switch unique (different from any other MAC IDs)? 2 DR switch Is the baud rate (transfer speed) set by the DR switch equal to the baud rate of the system? 3 MODU No. switch Are the module numbers set by the MODU No. switches unique (different from those of the other modules)? Does one of the modules have module number “0”? Cable length Check the total cable length and the total length of branch lines in the network. Do they satisfy the requirements limited by the transmission speed? (See Section 3.2, “Cabling.”) 5 Environment Are the network cables fully away from power lines and lines which generate induction noise? 6 Ampacity Are the currents flowing through cables within tolerances? (See Section 3.2, “Cabling.”) 7 Cable specification Do the cables all satisfy the requirement? Section 3.2, “Cabling.”) Cable connection Check the connection of cable wires by colors. Are they connected correctly? (See Section 3.2, “Cabling.”) 9 Shield type connector Are the connectors engaged correctly and firmly? Are the connectors mounted firmly with upright screws? 10 Open-type connector Are the solderless terminals of the cables crimped and screwed with proper torque (5±1 N·m)? 4 8 D.NET module Cable Connectors 11 12 Two wires must not be connected to a single terminal of the open-type connector. Is there any double-wire connection? Terminators 13 14 15 (See Grounding Connection Is the terminator terminating the CAN-H and CAN-L signal lines correctly at each end of the trunk line? Resistance error Is the terminator resistance 121 Ω±1% (1/4W or more)? Grounding point The shield of the communication cable must be grounded at a point near the center of the network. Is the grounding point right? Is the V- power line grounded only one power supply in the network? Grounding environment Does the grounding satisfy the Class D grounding standards away from any power ground wires (for motors and the like)? - 129 - APPENDIXES APPENDIX A.3 Trouble Report Trouble Report Company name Person in charge Date of trouble generation (MM/DD/HH/MM) Address Correspondence TEL FAX Type of faulty module CPU model OS Ver. Rev. Program name: Ver. Rev. Support progarm Program name: Ver. Rev. Symptom Type Model Wiring Connection load System configuration and switch setting Comment/Remarks - 130 -