1
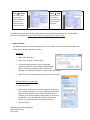
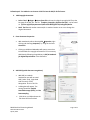
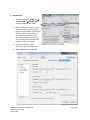
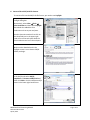
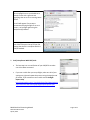
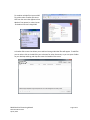
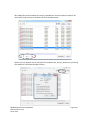
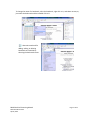
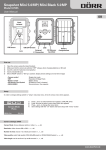
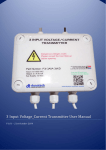
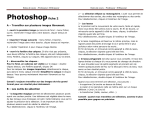
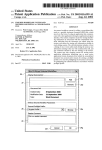
PDF/A Procedures Using Adobe Acrobat Pro v. 11 to Process PDF/A-1b Files The tasks involved in processing a PDF/A file include: 1. 2. 3. 4. 5. 6. 7. Make thumbnail Add digital copyright statement Enter document properties (descriptive metadata and copyright information) Add OCR (for scanned images of typed text) Optimize file for smaller size Convert to PDF/A-1b file format Verify compliance with PDF/A-1b • Almost every step you need to perform uses a function from the default tool sets accessed via the Tools pane on the right hand side. • When you open the Tools pane, a list of various tool sets appears. These sets group similar functions together. Clicking on the arrow next to a set in the tool list will open or close that set within the tool pane. • Clicking on the show/hide icon allows you to add or remove tool sets. • Adobe Pro has default, common, and customizable tool sets you can change as you wish. Four alternate methods can be used to access the Tools pane: Method 1: Tools Toggles the tools pane on and off. Be aware the Tools label will change depending on which tool set you last used. MNHS Archival Processing Manual PDFA Procedures.docx April 8, 2014 Method 2: Customize This option allows you to switch between tool sets, to create custom tool sets and to manage your tool sets. Page 1 of 11 Method 3: View Tool Sets This menu allows you to switch between different tool sets or to create your own custom tool sets. Method 4: View Tools Selecting a tool set from this menu will open the set in your tool pane. For additional help and tutorial information about how to use Adobe Acrobat Pro v.11, see the Adobe Acrobat Pro User Manual: http://helpx.adobe.com/en/pdf/acrobat_reference.pdf 1. Make thumbnail: Use Adobe Acrobat Pro to extract a page and save it as a JPG file. Then open the JPG file in Microsoft Office Picture Manager and make it smaller. Adobe Pro • Open a PDF document • Select Tools Pages Extract page • In the dialog box that opens, enter the PDF page number you want for your thumbnail image (typically page 1). Leave both checkboxes blank and click OK. The page you specified will appear in a new Acrobat Pro window. • Select File Save As and change the file type from PDF to JPG. Microsoft Office Picture Manager • Open the JPG file • Select Picture Resize and resize the thumbnail to 90 pixels on its longest dimension (To resize an image that results in 90 pixels on the longest dimension in Microsoft Office Picture manager, enter a custom width x height of 90 x 90. Note that thumbnail size may vary depending on dimensions of the original, e.g. a panorama may need a larger pixel size) • Save the JPG file. MNHS Archival Processing Manual PDFA Procedures.docx April 8, 2014 Page 2 of 11 Follow Steps 2-7 in Adobe Pro to Convert a PDF File into the PDF/A-1b file format. 2. Add Copyright Statement: • Select Tools Pages Insert from File and insert the digital copyright PDF file as the last page of the PDF file. The file: Template_Copyright_digitalversion.pdf can be found at: \\mnhs.org\DFS\Departments\Collections Management\FindingAids\Drafts • SAVE The File with another name and/or in another location so as not to change the original document! 3. Enter Document Properties: • Add metadata by either selecting FileProperties, right clicking and choosing Properties, or, using the shortcut Control+D. • Clicking on Additional Metadata will open a screen that includes fields for copyright information. Fill in necessary XMP data by following the guidelines in PDF/A Standards for Digital Reproductions in the CMToolkit. 4. Add OCR (optical character recognition): • Add OCR (as needed = handwritten text will not need OCR) Select Tools (right hand side of screen) Text Recognition AA In This File • A dialog box will appear. The settings should be: English, Searchable Image (Exact), and No Downsampling. • Click OK to run OCR and save the file when OCR has finished. MNHS Archival Processing Manual PDFA Procedures.docx April 8, 2014 Page 3 of 11 5. Optimize File: • To Optimize the PDF: Select File Save As Other… Optimize PDF. Another dialog box will appear… • Make sure that the settings on your computer match those in the PDF Optimizer screen below. The settings should remain the same after the first adjustment, but check them every time you do this process just to be sure because sometimes new updates will clear all settings. • Click OK to optimize. Larger documents may take longer to run. • After Optimization, save the file. MNHS Archival Processing Manual PDFA Procedures.docx April 8, 2014 Page 4 of 11 6. Convert File to PDF/A-1b File Format: To convert a file into the PDF/A-1b file format, you need to run Preflight: Control+Shift+X is the shortcut to the Preflight dialog box. Alternatively, select View Tools Print Production and then select Preflight after Adobe has added the Print Production tool set to your tool pane. Another alternative method is to click on the show/hide icon in the upper righthand corner of the tools pane show the Print Production tool set in the tool pane. Make sure the Standards tab in the Preflight screen is set to Save as PDF/A before you begin. In the Profiles tab select PDF/A compliance Convert to PDF/A-1b and either click Edit or click the Analyze and fix button in the lower right-hand corner. MNHS Archival Processing Manual PDFA Procedures.docx April 8, 2014 Page 5 of 11 Once Preflight has run you should see a Results screen with a green arrow signifying that no errors or warnings were found. A red X will appear If errors were encountered during Preflght. If an error occurs, run Preflight again using the Analyze and fix button. When Preflight has finished, you should see a blue bar across the top of your file stating that the file is compliant with the PDF/A standard. 7. Verify Compliance With PDF/A-1b: • The last step is to run verification of your PDF/A file to make sure it has been converted. • If you see a red X after you run preflight, make sure all of your settings are right and repeat the process using the Analyze and fix button. If you continue to see a red X consult Preflight Report Help: http://www.enfocus.com/~/media/enfocus/files/downloads/pit stop%20server%20manuals/pspreflightreporthelpenus.pdf MNHS Archival Processing Manual PDFA Procedures.docx April 8, 2014 Page 6 of 11 Adobe Acrobat Pro Tips Create Custom Tool Sets Using either View Tool Sets Create New Tool Set or Customize Create New Tool Set, you can create a custom tool set that includes all the Adobe Pro steps used to save an extract as a JPG file and to convert a file into the PDF/A-1b file format. Select options from the left pane and add them to the right pane to create a custom tool set. Options can also be moved up or down the tool set list to refine the order of your processing steps. Combine Multiple Files Into a Single PDF File Multiple files of varying file formats can be combined together in Adobe Acrobat Pro to create one PDF file. Combining files together has two advantages. When a collection component consists of item-level files, combining the items together provides fuller access to the whole component and better preserves its context. Additionally, combining multiple files into a single component can result in processing efficiencies by saving encoding time and file management costs. A wide variety of common file formats are supported by Adobe Acrobat Pro. The variety of formats can include PDF, AutoCAD, image, multimedia, html, textual, and Microsoft Office files. File formats that are supported by Adobe Acrobat Pro are shown in the screenshot below: MNHS Archival Processing Manual PDFA Procedures.docx April 8, 2014 Page 7 of 11 To combine multiple files into one PDF file, either select Combine files into a PDF from the menu that appears when Adobe is first opened, or select Create Combine Files into a Single PDF. A Combine Files screen that allows you to add and arrange individual files will appear. To add files you can either click on the Add Files icon to browse for other directories, or you can open a folder on your desktop and drag and drop files onto the Combine Files screen. MNHS Archival Processing Manual PDFA Procedures.docx April 8, 2014 Page 8 of 11 After adding files to the Combine Files screen, individual files can be moved up or down or be removed by using the icons in the lower left of the Combine Screen. Options you can adjust for the resulting PDF file include file size, file type, bookmarks, processing error detection, and thumbnail page numbers. MNHS Archival Processing Manual PDFA Procedures.docx April 8, 2014 Page 9 of 11 File Size: Options include smaller, default, or larger resulting file sizes. File Type: Select Single PDF. Bookmarks: Bookmarks act like a table of contents to a PDF file and provide navigational links to that content. When multiple files are combined into a PDF, Adobe offers you the option of adding a bookmark for each individual source file to the resulting PDF. When this option is turned on, the resulting PDF file will contain bookmarks that list the filename of each individual source file. The option of including bookmarks should be determined by whether or not master files are stored on a preservation server and by considering whether or not the filenames are meaningful Include bookmarks when master files will be stored on a preservation server in order to pair the access copy with those master files. When source files will not be retained as master preservation files, consider whether or not the individual filenames would provide meaningful navigation to content within the resulting file. Include bookmarks when the filenames are meaningful. Error Detection: Turn this option on in order to verify that all added files have been combined. If an error occurs, the combination will stop mid-process at the point where the error occurs. Thumbnail Page Numbers: Turn this option on to provide a graphical page by page navigation pane to the content within the PDF file. Checking and Editing Bookmarks Click on the bookmark ribbon to open the bookmarks pane. Select a single bookmark or select multiple bookmarks and click on the garbage can to delete them. Add a bookmark by selecting a page in the file where you want the bookmark to link, then click on the new bookmark icon and type in a title for the bookmark. MNHS Archival Processing Manual PDFA Procedures.docx April 8, 2014 Page 10 of 11 To change the name of a bookmark, select the bookmark, right click on it, and select rename, or, just select the bookmark and then double click on it. Alternative methods for adding, editing, or deleting bookmarks are available by selecting the bookmarks menu. MNHS Archival Processing Manual PDFA Procedures.docx April 8, 2014 Page 11 of 11