1
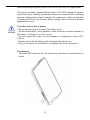
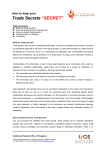
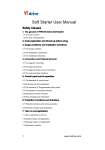
USER MANUAL: Please read the manual before use. WELCOME: Thank you for choosing YAKOYA HIRO. After reading this guide, you will be able to fully master the use of your YAKOYA HIRO and appreciate all its functions and case of use. DECLARATION: This manual as device use instruction does not represent the explanation of the device’s software and hardware, the features possibly is different refer to the different area. YAKOYA HIRO is compatible with GSM/GPRS/EDGE/WCDMA/HSDPA technology. Some functions referred in this guide also need the support from network operators or service providers. In order to ensure your safety, please read the “Safety Notice”. MANUAL ICON: Indicates warning information. Indicates caution information. Indicates device tips. [ ] BOLD Indicates function key. Indicates a menu or an icon. 1 SAFETY NOTICE: Before using the YAKOYA HIRO, please read and follow the rules below carefully. If you dial or answer a call while driving, please use the hands-free device (e.g. earphone, vehicle hands-free system, YAKOYA HIRO hands-free system) or use your YAKOYA HIRO after parking the vehicle. Please switch off your YAKOYA HIRO where you see signs forbidding PAD use. Such signs can be found in medical centers or establishments containing medical equipment. YAKOYA HIRO may interfere with the communication network of airplanes, so please make sure your YAKOYA HIRO is switched off during the flight. To avoid the risk of any explosion, please switch off YAKOYA HIRO at petrol stations and places which are near fuel, chemical solvent or other dangerous substances. Please switch off your YAKOYA HIRO in areas where there could be a risk of explosion and in areas where you are asked to switch off bidirectional radios. Pay attention and adhere to any rules and regulations concerning pad use. YAKOYA HIRO can be subject to interference, which could affect its performance. In order to ensure high performance and to avoid damage the YAKOYA HIRO, please use the original accessories and battery. Avoid using devices which are not compatible. Keep this device away from excessive moisture and extreme temperatures. 2 Please neither burn YAKOYA HIRO battery nor use it as ordinary rubbish, as this could endanger life and damage to the environment. Please obey the environmental policy of the local government and dispose of and recycle them in time. If you need to connect your YAKOYA HIRO to other devices, please read the user guide carefully to ensure the procedure is carried out safety. Keep small parts (e.g. SIM card) out of the reach of children to prevent batteries from being swallowed or causing other dangers. Please back up the important information of YAKOYA HIRO and be sure to have a second copy in case data is lost from your YAKOYA HIRO. Make sure YAKOYA HIRO is switched on and has service coverage SOS before inputting the emergency number. Press the call key for your position to be located. Please don’t end call unless told to do so. 3 Contents I. GETTING TO KNOW YOUR YAKOYA HIRO ………………..……....……………...5 1. KEYS…………………………………………………………………………………..………..7 2. GETTING TO USE YOUR YAKOYA HIRO……………………………………………..….7 - Insert SIM Card…………………………………………………………………..…...7 - INSERT A MEMORY CARD………………………………………………………..……9 - BATTERY CHARGING……………………………………………………………..……9 - TURN YOUR YAKOYA HIRO ON AND OFF……………………………………...11 - PASSWORD…………………………………………………………………………….11 II. MAINTENANCE …………………………………………………………………….………..12 1. BATTERY MAINTENANCE…………………………………………………………………...12 2. DEVICE MAINTENANCE……………………………………………………….…………….12 3. TROUBLESHOOTING…………………………………………………………………………13 4 I. Getting To Know Your YAKOYA HIRO Front Back 5 Below Side 6 1. Keys key function Power Key: By pressing for 1 second, screen backlight will turn off. By pressing for 2-3 seconds, shutdown menu appear. By pressing for 6-8 seconds, device restart. Volume: Adjust YAKOYA HIRO’s volume. Home Key: Tap in any interface to quit and back to the standby interface; Press for a while in any interface to obtain lately used 6 menu options. Menu Key: Tap for more options Back: Tap to go back to the previous menu 2. Getting To Use Your YAKOYA HIRO Insert SIM Card: Always switch off your device before installing or removing SIM card. In order to protect SIM card when plugging or unplugging in use, the system will shut down automatically! SIM card is provided by the service provider, which can store some basic data, such as contact names and telePADs, ect. Some SIM card may not 7 match with this pad, please resort to the service provider for replacement. This device includes original lithium battery. DO NOT attempt to open or repair this battery. Battery performance depends on many factors, including network configuration, signal strength, the temperature of the environment to operate the device, the features and/or settings select and used, and other application services. To reduce risk of fire or burns: - Do not attempt to open or repair the battery pack. - Do not disassemble, crush, puncture, short circuit the external contacts of the battery, or dispose it in fire or water. - Do not expose the battery in environments of temperatures above 60 oC (140oF). - Replace only with the battery pack designated for this device. - Recycle or dispose of used battery as stipulated by local regulations. Instructions: - Insert the SIM card into the slot (please pay attention to card direction to insert). 8 Insert a Memory Card Insert a memory card to expand the memory space (This device employs Micro SD card). Instructions: - Insert a memory card: insert into the slot with the side of the golden contacts facing down, push in the direction as indicated in the picture to make a click. - Take out a memory card: slightly push down the Micro SD card, and take out the popup card. Recommend to use originally equipped Micro SD card, or Micro SD card of San Disk or Kingston and other leading brands. Please confirm the compatibility of Micro SD card with this device. Please keep the children from Micro SD to avoid any unexpected swallow. Battery Charging Charging the battery by the travel charger: 1. Connect the USB cable to the travel charger. Insert the USB cable to the USB port on the YAKOYA HIRO carefully, and connect the charger to a standard wall outlet. 9 2. During normal charging, battery status icon charged icon will show up when charging ends. will show up. The fully 3. After fully charged,please disconnect charger from power supply,and then disconnect the YAKOYA HIRO. New batteries are shipped partially charged. Before start using your device, it is recommended to charge the battery as new batteries perform best after several full charge/discharge cycles. Please charge timely as over discharge will damage the battery. It is normal that YAKOYA HIRO generates slight heat in charging. This device only supports exclusive charger, and other PC or laptop could not fully charge the device. After shut down with low battery, this device takes 5-10 minutes in charging to switch on. This is a normal phenomenon. 10 Turn Your YAKOYA HIRO On and Off Please first check there is battery with enough power in your YAKOYA HIRO, and press [Power Key] for 2-3 seconds to turn your PAD on and off. Password PIN Code: PIN code (Personal Identification Number) avoids your SIM card being used illegally. PIN code is provided with SIM card. If wrong PIN code is input for continuous three times, you should unlock it by PUK code. For more information, please consult the network operator. PIN2 Code: You need to enter PIN2 code to start some functions. If wrong PIN2 code is input for three times, you should unlock it by PUK2 code. For more information, please consult the network operator. PUK and PUK2 Code: PUK and PUK2 code may be provided with SIM card. If wrong PIN/PIN2 code is input for three times, the device requires PUK/PUK2 code. Please consult the network operator if such codes are not available. If wrong PIN code is input for three times continuously, SIM card will be locked. Please resort to the network operator for help to decode. Decoding by you may result in a permanent invalid SIM card. 11 II. Maintenance 1. Battery Maintenance 1. This device could use rechargeable battery as power supply. Please recharge the battery with inadequate power. To maintain battery life, it is better to consume all the power before recharge. 2. When charger is not used, please separate it from the power supply. Do not connect the charger with battery more than a continuous week, as overcharge will shorten battery life. 3. Temperatures influence the battery limit to be charged. So before charge, battery may need to be cooled or warmed. If battery temperature is over 40℃, battery may not be charged immediately. 4. Please use the battery on the original purposes to avoid short circuit. Short circuit may happen when conducting substances connect the anode and cathode of battery. 5. Do not use damaged battery. 6. Keeping battery in extreme cold or extreme hot places leads to shorten battery life. Battery being exposed in cold or hot places may lead to abnormal function, even battery is fully charged. 7. Do not put the battery in the fire! Please dispose of dead batteries according to local regulations. 2. Device Maintenance 1. Please keep children out of reach of YAKOYA HIRO and the accessories. 2. Avoid YAKOYA HIRO from direct contact with water or other liquids. If liquids enter the pad, this could cause a short circuit, battery leak or other malfunction. 3. Please keep YAKOYA HIRO away from the high temperature, as it will shorten the life of the pad, melt the plastic and damage the battery. 4. Do not disassemble or modify YAKOYA HIRO, as it will cause damage to the pad such as battery leakage or circuitry failure. 12 5. Do not use acid or alkali to clean YAKOYA HIRO. 6. Do use the original accessories otherwise the warranty will be failed. 3. Troubleshooting Problems Unable to turn on SIM card malfunction Poor reception Echo or noise Unable to call Unable to charge Cause and Solution The battery is used up; Charge the pad. SIM card is damaged; Contact your network service provider for help. SIM card is not properly inserted; Confirm SIM card is properly inserted. There is a foreign substance on the metal surface of the SIM card; Use a clean cloth to wipe off the metal contact point of the SIM card Using the pad in an area with poor reception such as near tall buildings or in a basement where radio waves cannot be reached; Try in an open field. Using the pad when the network is busy, such as during rush hour, making it impossible to get through; Try with available network. Far away from the base station built by the network; You may request the network service provider for a service area plan. Caused by poor network trunks, it is a regional problem with poor connection; Hang up and redial, or renew the trunks. The call barring being activated; Deactivate the barring. The fixed dialing being activated; Deactivate the fixed call. Battery or charger is damaged; Replace the battery or charger. Recharging in the environment of less than -10C or higher than 55C; Try to charge in an appropriate environment. Poor contact; Check if the plug is properly connected 13 Unable to connect to the network Standby time being shortened Incorrect PIN number Unable to add new contact Unable to set some functions Expired SIM card; Contact your network service provider. Out of the GSM service area; Consult your network provider on the service area. Poor signal; Please move to a place with a better signal and try again Standby time is related to the settings of network system; Please temporarily turn off your pad, as you are located in an area with poor reception. Batteries need to be replaced. When no signal is available, the pad will continue to transmit the signal to find a base station, so large amounts of power will consume the standby time; Pleas move to an area with a strong signal or temporarily turn off the pad. Consecutively enter the wrong password for three times; Contact your network provider. The storage space of the contacts is full; Delete a portion of the contact entries. Your network provider does not support this function or you did not apply for it; Consult your network provider for help. 14