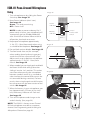
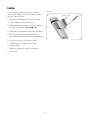
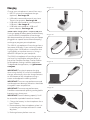
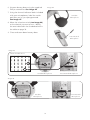
1
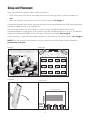
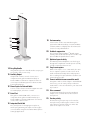
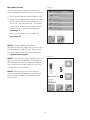
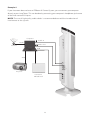
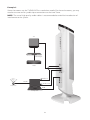
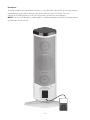
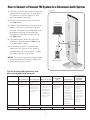
USER GUIDE
ITR-01 Tower Receiver
ITM-01 Pendant Microphone
ISM-01 Pass-Around Microphone
IMC-01 Microphone Charger
Contents
Important Safety Instructions . . . . . . . . . . . . . . . . . . . . . . . . . . . . . . . . . . . . . . . . . . . . . . . . . . . . . . 1
Electrical Warnings . . . . . . . . . . . . . . . . . . . . . . . . . . . . . . . . . . . . . . . . . . . . . . . . . . . . . . . . . . . . . . . . 2
System Contents, Optional Components & Expansion Modules . . . . . . . . . . . . . . . . . . . . . . . 3
Setup and Placement . . . . . . . . . . . . . . . . . . . . . . . . . . . . . . . . . . . . . . . . . . . . . . . . . . . . . . . . . . . . . . 4
Volume Setting Guidance . . . . . . . . . . . . . . . . . . . . . . . . . . . . . . . . . . . . . . . . . . . . . . . . . . . . . . . . . . 5
System Integration Guidelines . . . . . . . . . . . . . . . . . . . . . . . . . . . . . . . . . . . . . . . . . . . . . . . . . . . . . . 5
Features
ITR-01 Juno Tower Receiver . . . . . . . . . . . . . . . . . . . . . . . . . . . . . . . . . . . . . . . . . . . . . . . . . . . . . 6-7
ITM01 Pendant Microphone . . . . . . . . . . . . . . . . . . . . . . . . . . . . . . . . . . . . . . . . . . . . . . . . . . . . . . . 8
ISM-01 Pass-Around Microphone . . . . . . . . . . . . . . . . . . . . . . . . . . . . . . . . . . . . . . . . . . . . . . . . . . 9
Activate Tower and Microphone . . . . . . . . . . . . . . . . . . . . . . . . . . . . . . . . . . . . . . . . . . . . . . . . . . . 10
Sleep Mode . . . . . . . . . . . . . . . . . . . . . . . . . . . . . . . . . . . . . . . . . . . . . . . . . . . . . . . . . . . . . . . . . . . . 10
Tower Controls
Home Screen . . . . . . . . . . . . . . . . . . . . . . . . . . . . . . . . . . . . . . . . . . . . . . . . . . . . . . . . . . . . . . . . . . . 11
Volume . . . . . . . . . . . . . . . . . . . . . . . . . . . . . . . . . . . . . . . . . . . . . . . . . . . . . . . . . . . . . . . . . . . . . 12-13
Settings . . . . . . . . . . . . . . . . . . . . . . . . . . . . . . . . . . . . . . . . . . . . . . . . . . . . . . . . . . . . . . . . . . . . . 14-17
OptiVoice . . . . . . . . . . . . . . . . . . . . . . . . . . . . . . . . . . . . . . . . . . . . . . . . . . . . . . . . . . . . . . . . . . . 14
PrioriTeach . . . . . . . . . . . . . . . . . . . . . . . . . . . . . . . . . . . . . . . . . . . . . . . . . . . . . . . . . . . . . . . . . . 15
Voice Command . . . . . . . . . . . . . . . . . . . . . . . . . . . . . . . . . . . . . . . . . . . . . . . . . . . . . . . . . . . . . 15
Speaker Balancing . . . . . . . . . . . . . . . . . . . . . . . . . . . . . . . . . . . . . . . . . . . . . . . . . . . . . . . . . . . . 16
Restore Defaults . . . . . . . . . . . . . . . . . . . . . . . . . . . . . . . . . . . . . . . . . . . . . . . . . . . . . . . . . . . . . 16
About . . . . . . . . . . . . . . . . . . . . . . . . . . . . . . . . . . . . . . . . . . . . . . . . . . . . . . . . . . . . . . . . . . . . . . . 17
Locking the LCD . . . . . . . . . . . . . . . . . . . . . . . . . . . . . . . . . . . . . . . . . . . . . . . . . . . . . . . . . . . . . 17
LCD Calibration . . . . . . . . . . . . . . . . . . . . . . . . . . . . . . . . . . . . . . . . . . . . . . . . . . . . . . . . . . . . . . . . . . . 18
Firmware Update . . . . . . . . . . . . . . . . . . . . . . . . . . . . . . . . . . . . . . . . . . . . . . . . . . . . . . . . . . . . . . . . . 18
Voice Command . . . . . . . . . . . . . . . . . . . . . . . . . . . . . . . . . . . . . . . . . . . . . . . . . . . . . . . . . . . . . . . . . . 19
Lesson Capture through Juno . . . . . . . . . . . . . . . . . . . . . . . . . . . . . . . . . . . . . . . . . . . . . . . . . . . . . 20
Collaborative Learning Using Class 2 Class . . . . . . . . . . . . . . . . . . . . . . . . . . . . . . . . . . . . . . . . . 21
Connecting to other Classroom Media . . . . . . . . . . . . . . . . . . . . . . . . . . . . . . . . . . . . . . . . . . 22-26
Rebroadcasting to Personal FM Receivers . . . . . . . . . . . . . . . . . . . . . . . . . . . . . . . . . . . . . . . . . . 27
ITM-01 Pendant Microphone
Using . . . . . . . . . . . . . . . . . . . . . . . . . . . . . . . . . . . . . . . . . . . . . . . . . . . . . . . . . . . . . . . . . . . . . . . . . . 28
Battery . . . . . . . . . . . . . . . . . . . . . . . . . . . . . . . . . . . . . . . . . . . . . . . . . . . . . . . . . . . . . . . . . . . . . . . . 29
Charging . . . . . . . . . . . . . . . . . . . . . . . . . . . . . . . . . . . . . . . . . . . . . . . . . . . . . . . . . . . . . . . . . . . . . . 30
ISM-01 Pass-Around Microphone
Using . . . . . . . . . . . . . . . . . . . . . . . . . . . . . . . . . . . . . . . . . . . . . . . . . . . . . . . . . . . . . . . . . . . . . . . . . . 31
Labeling . . . . . . . . . . . . . . . . . . . . . . . . . . . . . . . . . . . . . . . . . . . . . . . . . . . . . . . . . . . . . . . . . . . . . . . 32
Battery . . . . . . . . . . . . . . . . . . . . . . . . . . . . . . . . . . . . . . . . . . . . . . . . . . . . . . . . . . . . . . . . . . . . . . . . 33
Charging . . . . . . . . . . . . . . . . . . . . . . . . . . . . . . . . . . . . . . . . . . . . . . . . . . . . . . . . . . . . . . . . . . . . . . . 34
Microphone Configuration . . . . . . . . . . . . . . . . . . . . . . . . . . . . . . . . . . . . . . . . . . . . . . . . . . . . . . . . 35
Using Multiple Microphones . . . . . . . . . . . . . . . . . . . . . . . . . . . . . . . . . . . . . . . . . . . . . . . . . . . . 36-37
IMC-01 Microphone Charger . . . . . . . . . . . . . . . . . . . . . . . . . . . . . . . . . . . . . . . . . . . . . . . . . . . . . . 38
Troubleshooting . . . . . . . . . . . . . . . . . . . . . . . . . . . . . . . . . . . . . . . . . . . . . . . . . . . . . . . . . . . . . . . 39-40
Regulatory . . . . . . . . . . . . . . . . . . . . . . . . . . . . . . . . . . . . . . . . . . . . . . . . . . . . . . . . . . . . . . . . . . . . 41-42
Important Safety Instructions
13.
Refer all servicing to qualified service
personnel. Servicing is required when
the apparatus has been damaged in any
way, such as power-supply cord or plug
is damaged, liquid has been spilled or
objects have fallen into the apparatus,
the apparatus has been exposed to rain
or moisture, does not operate normally,
or has been dropped.
1. Read these instructions.
2. Keep these instructions.
3. Heed all warnings.
4. Follow all instructions.
5. Do not use this apparatus near water.
6. Clean only with dry cloth.
7.Do not block any ventilation openings.
Install in accordance with the manufacturer’s instructions.
14.Do not use batteries that have been
dropped or otherwise damaged.
15.The apparatus shall not be exposed to
dripping or splashing and no objects
filled with liquids, such as vases, shall be
placed on the apparatus.
8.Do not install near any heat sources
such as radiators, heat registers,
stoves, or other apparatus (including
amplifiers) that produce heat.
16.Discoloration of the materials with this
product may occur over time, especially
if exposed to direct sunlight. This is
cosmetic and will not affect the safety
or usability.
9.Protect the power cord from being
walked on or pinched particularly at
plugs, convenience receptacles, and
the point where they exit from the
apparatus.
10.Only use attachments/accessories
specified by the manufacturer.
11.Use only with the cart, stand, tripod,
bracket, or table specified
by the manufacturer, or
sold with the apparatus.
When a cart is used, use
caution when moving the
cart/apparatus combination to avoid injury from tip-over.
12. U
nplug this apparatus during lightning
storms or when unused for long periods
of time.
1
Electrical Warnings
Locate cord so that it will not be stepped
on, tripped over, or otherwise subject to
damage or stress. DO NOT lay extension
cord on charger. DO NOT operate the
power supply with damaged cord or plug replace them immediately.
1. Avoid Abuse to the Power Supply
To reduce risk of electric shock, unplug
the power supply from outlet before
attempting any maintenance or cleaning.
Turning off controls will not reduce this risk.
WARNING: To reduce the risk of fire or
electric shock, do not expose this
apparatus to rain or moisture.
Electrical Safety Information:
DO NOT disassemble the power supply.
Return the apparatus to FrontRow for
qualified service and repair if required.
Incorrect reassembly may result in a risk of
electric shock or fire.
!
PRECAUTIONS & SAFETY
RECOMMENDATIONS
Follow Manufacturers' Recommendations
Before using the Tower and power supply,
read all instructions for, and caution markings
on the receiver and power supply and in this
user guide.
DO NOT expose the power supply to rain,
snow, water, gas, oil, etc.
O NOT operate the power supply if it
D
has received a sharp blow, been dropped,
or otherwise damaged in any way; return
the apparatus to FrontRow for qualified
service and repair.
O NOT block or cover the apparatus
D
and impede ventilation.
O NOT expose batteries (battery pack
D
or batteries installed) to excessive heat
such as sunshine, fire, or the like or
excessive cold.
2.Proper Use of the Power Supply
and Wiring
An extension cord should not be used
unless absolutely necessary. Use of
improper extension cord could result in
a risk of fire and electric shock. The cord
MUST be plugged into a grounded outlet.
Make sure it is properly wired, in good
electrical condition, and wire size is large
enough for AC ampere rating of the power
supply or charger. To reduce risk of damage
to plug and cord when disconnecting the
power supply or charger, ALWAYS pull on
plug - NEVER on cord.
2
System Contents
ITR-01 Juno Tower
Amplifier / Receiver
Power supply
ITM-01 Pendant
Microphone
Lithium Ion
Battery
Aux-in cord
1 meter micro
USB cable
Phillips head
screwdriver
Wall mounting
screw set
4 meter USB cable
AC cable
Optional components
Expansion Modules
3 Channel Expansion Module
Add up to 3 additional microphones
ISM-01
Pass-Around
Microphone
IMC-01
Microphone
charger
Speaker Expansion
Module
Page Override
Module
Juno Connect
Communications Module
3
Setup and Placement
Your Juno Tower will perform best when you place it:
• Even with either the front or rear edge of the main listening area (i.e. where students sit)
and
• With the speaker facing the center of the listening area. See Image 1
Choose the location that allows connection to the teaching computer (4m USB cable provided)
and other audio sources (e.g. DVD player)
You can either mount the Juno Tower on a wall using a standard 100mm VESA mount
(recommended) or simply place it on a table using the stand provided. In any case, the bottom
edge of the Tower should be at least 4.5 feet (1.3m) from the floor. See Image 2
If wall mounting, angle the tower down to point at the center of the listening area. See Image 2
NOTE: For wall mounting instructions, please see the Juno Installation Guide available at
gofrontrow.com/juno
Top View
OR
Image 1
Listening Area
Image 2
Side View
Wall
Listening Area
4.5 ft
(1.3m)
minimum
4
Volume Setting Guidance
Your Juno Tower is equipped with a powerful Adapto™ feedback suppression engine that helps
avoid harsh squealing noise that would normally occur when a microphone gets too close to a
speaker. Nevertheless, try to use volume settings for daily use that give good audibility without
constantly activating the feedback suppression engine.
The chart below shows the volume settings for the Pendant and Pass-Around microphones that are
adequate for a typical classroom environment (600 - 900ft2 /56 - 84m2). If more volume is required
for a large or noisy room, you may notice the Adapto engine activating and at a high volume or
short distance, the engine may not be able to maintain a pleasant audio quality. If feedback occurs,
move away from the Tower, remain behind it while talking, or lower either the master volume or the
volume for the microphone that is causing the feedback. (See pages 12, 13)
Recommended:
Master Volume
Pendant Microphone Volume
Student Microphone Volume
18 - 20
5-6
4-5
System Integration Guidelines
Today’s modern classroom has a host of electronic devices used to support the instructional
environment. Many of these devices are connected together via a Personal Computer that typically acts as the control point for these devices. Projectors, Interactive White Boards, Document
Cameras, Paging Interfaces, etc, are all typically connected to a classroom PC. In addition to these
devices there are often other support devices used to make these connections.
Your new Juno Tower is another electronic device that can also be connected to your classroom
PC. But unlike the other electronic devices mentioned above, the Juno Tower contains a sensitive
Infrared radio receiver. To ensure that the Juno Tower is providing good performance, it is important to follow good installation practices.
When the Juno Tower is connected to the classroom PC, it is now sharing a common ground reference with all the other devices connected to the PC. If one or more of the devices has a poor
or noisy ground reference, its poor performance can influence other devices connected to the
same reference and this includes your Juno Tower. To help ensure the best performance possible,
please refer to the installation guidelines below:
1. C
onnect the Juno Tower’s external power supply to a wall outlet. Do not use extension cords
and if a power strip is needed, ensure that it is of good quality.
2. Do not position the Juno Tower where sunlight can directly shine on the Tower. The Tower uses
infrared signals to link the transmitter to the receiver. Sunlight contains infrared energy and will
reduce the system’s performance.
3. Use good quality audio cables when connecting the Tower to the classroom PC.
4. T
he USB cable provided with your Tower System has been qualified by FrontRow. Use this cable
whenever possible. If another length of cable is needed, it must be certified for USB 2.0 or better.
5. C
onnect the USB cable directly to the classroom PC. Do not connect via an External USB Hub device.
6. A
void running the USB and audio cables connecting your Juno Tower to the classroom PC with
other cables. Noise can be present on the other cables that can be transferred to the cables
connecting the Juno Tower to the classroom PC.
NOTE: Your Juno Tower has 2 ports for charging and programming FrontRow microphones. These
ports should not be used to connect other devices to your computer.
5
Features
ITR-01 Juno Tower Receiver
Back
Front
1
6
7
8
2
9
10
11
12
3
13
14
4
5
1 Integrated Sensor
8Wall Mount Screw Taps
Integrated high sensitivity infrared diode array
covers a typical classroom without the need for
additional sensors.
100mm VESA mount compliant.
9 Transmitter/USB Cable Hook
Neatly hang your transmitters while charging
2 2.1 Speaker Array
from the tower. When not charging, the USB cable
hangs from the center of the hook.
Two mid-range/HF drivers and one woofer provide
full, rich stereo sound. The array design ensures
good room coverage even with just one Tower.
10 Speaker Expansion Module Bay
Install the optional module to add additional
3 LCD Touchscreen
speakers (up to six) for expanded audio coverage.
Full-color touch screen puts daily system
11 Juno Connect Module Bay
controls in one easy-to-find place.
Optional module for adding software and voice
4
Stereo Quick Connect
control of AV devices plus, in conjunction with
Conductor, two-way communication between
classroom and front office.
Easily and quickly connect an MP3 player or
other audio device.
5
Table/shelf/desk Stand
12 Page Override Module Bay
Simply install the optional module to mute all
Sturdy desk stand is easily removed for wall mounting.
audio whenever an announcement is made over
the school's public address system.
6Additional Sensor Ports
Two ports for adding sensors for use in large or
13 Power Jack
14 Power Switch
odd shaped rooms.
7Channel Expansion Module Bay (behind main cover)
Add the optional Channel Expansion Module to
use up to five microphones with the Juno Tower.
6
Side
14
15
19 Custom naming
Tower name can be customized using the
16
optional FrontRow Desktop or Teacher Edition
software. Name is displayed on the LCD touch
screen for easy identification.
17
18
20 Feedback suppression
The next-generation Adapto™ digital engine
actively scans audio 375 times per second to suppress feedback squeal before it starts.
21 Optimized speech clarity
FrontRow’s patented OptiVoice technology is
designed to emphasize critical speech sounds,
so kids comprehend even more.
22 Easy lesson capture
With a few simple voice commands, the Juno
14 Easy Grip Handle
Integrated ergonomic handle makes carrying or
lesson capture system records screen and
audio and automatically titles and prepares
the recordings for upload where students can
review them at night.
moving the Juno Tower easy.
15 Auxiliary Output
Output with volume control. Connect to a
computer running the FrontRow Desktop or
Teacher Edition software to capture lectures or
connect personal FM systems for listeners with
hearing impairment.
23 Connect with classrooms around the world
Using Juno with tools like Skype™ and Adobe®
Connect™, you can easily set up a real-time
audio/video connection between your class and
any location.
16 Stereo Inputs for External Audio
Connect other classroom A/V equipment such
24 Voice command
Control important functions by speaking
as a DVD player, television or VCR.
17 Serial Port
simple voice commands into the teacher
microphone.
Using the included USB cable, connect to a
computer running the FrontRow Desktop or
Teacher Edition software application for remote
control of the Juno Tower.
25 Teacher priority
PrioriTeach™ gives priority to the teacher
microphone by reducing the volume of all
other devices and microphones when the
teacher microphone is used.
18 Integrated Serial Hub
Two serial ports for charging microphones,
and for programming microphones through a
connected PC using the FrontRow Microphone
Settings application.
7
ITM-01 Pendant Microphone
Front
1 Amazing Sound Quality
With FrontRow's ClearVoice™ digital
synthesis technology, the ITM-01 uses a
single cardioid microphone element to
deliver superb pickup and audio quality.
And combined with a high-isolation, lownoise, open air microphone suspension,
the ITM-01 minimizes noise from friction
against clothing, buttons or jewelry.
1
5
2
3
6
7
4
2 Mute Indicator
OFF/STANDBY . . . . . . . . . . . . . . . Un-muted
SOLID RED . . . . . . . . . . . . . . . . . . . . . Muted
Bottom
3 Power Indicator
SOLID GREEN . . . . . . . . . . . . . . . . . Power On
OFF . . . . . . . . . . . . . . . . . . . . . . . . . . Standby
4 One-Touch Button
Controls all of the features of the Pendant
Microphone. Use with voice command to
activate the Juno lesson capture software
and control your Juno Tower.
10
9
10
8 Charging / Programming Jack
When the Pendant Microphone is in
standby mode:
or charging via USB cable or for
F
configuring settings using the FrontRow
Microphone Settings application.
PRESS MOMENTARILY . . . . . . . . . . . Awaken
When the Pendant Microphone is active:
9 Portable Audio Interface
PRESS MOMENTARILY . . . . Mute / Un-mute
PRESS AND HOLD . . . . Issue Voice Command
3.5mm audio input jack lets you use the
Pendant Microphone to transmit audio
from any secondary audio source such as
a computer or MP3 player.
5 Superior Comfort
Lightweight (just 73.7g/2.6oz) with soft
backing that provides comfort and reduces
friction noise from contact with clothing,
buttons or jewelry.
10 Charge Contacts
For use with the optional IMC-01
microphone charger.
6 Battery Indicator
11 Adjustable power
In Use
OFF . . . . . . . . . . . . . . . . . . Battery Charged
FLASHING RED . . . . . . . . . . . . . Battery Low
djust the power to increase either
A
battery life or range.
12 Programmable channels
When Charging
SOLID RED . . . . . . . . . . . . . . . . . . . Charging
SOLID GREEN . . . . . . . . . . . . . Fully Charged
FLASHING RED/GREEN . . . . . Charge fault
rogram the switch positions to 2 of 5
P
available channels.
13 Custom naming
ssign custom names to microphones for
A
easy identification on the Tower LCD or in
the optional FrontRow Desktop or Teacher
Edition software.
7 Lithium Ion Battery
3 -year life expectancy, lightweight,
rechargeable lithium ion battery.
8
8
ISM-01 Pass-Around Microphone
Front
1 Amazing Sound Quality
1
With FrontRow's ClearVoice™ digital
synthesis technology, the ISM-01 uses a
single cardioid microphone element to
deliver superb pick up and audio quality.
And combined with a high isolation, low
noise, open air microphone suspension –
the ISM-01 minimizes handling noise.
2
3
6
7
4
2 360˚ Emitter Diodes
360˚ emitter diodes let students hold the PassAround Microphone the way it's most comfortable for them without worry of dropout.
8
5
Lavaliere
clip
3 Power Indicator
SOLID GREEN . . . . . . . . . . . . . . . Power On
OFF . . . . . . . . . . . . . . . . . . . . . . . Power Off
4 Battery Indicator
Bottom
In Use
OFF . . . . . . . . . . . . . . . . . . Battery Charged
FLASHING RED . . . . . . . . . . . . Battery Low
12
9 10
When Charging
SOLID RED . . . . . . . . . . . . . . . . . . Charging
SOLID GREEN . . . . . . . . . . . Fully Charged
FLASHING RED/GREEN . . . . . Charge fault
10 Portable Audio Interface
3.5mm audio input jack lets you use the
Pass-Around Microphone to transmit
audio from any secondary audio source
such as a computer or MP3 player.
5 Small and Lightweight
At less than 15cm/6in tall and just 73.7g/2.6oz
the microphone is much easier for even young
students to use than a standard-sized mic.
11 Charge Contacts
6 Power/Push-to-talk Switch
For use with the optional IMC-01
microphone charger.
The push-to-talk option makes transitions
when passing the microphone between
students easier (e.g. no need to take time
from the conversation to turn the mic on
and off during transition).
12 Comfortable Hands Free Option
Easy, comfortable lavaliere clip makes
reading in front of class simple and lets
the Pass-Around Microphone double as a
lightweight teacher microphone.
PRESS AND HOLD . . . . . . . . . Push-to-talk
PRESS AND SLIDE UP . . . . . . . . Power On
13 Adjustable power
7 Name Plate
djust the power to increase either
A
battery life or range.
Perfect for adding a name or room number
for easy identification.
14 Programmable channels
8 Lithium Ion Battery
rogram the switch positions to 2 of 5
P
available channels.
3-year life expectancy, lightweight,
rechargeable lithium ion battery.
15 Custom naming
9 Charging / Programming Jack
For charging via USB cable or for
configuring settings using the FrontRow
Microsoft Settings application.
11
11
9
ssign custom names to microphones for
A
easy identification on the Tower LCD or in
the optional FrontRow Desktop software.
Activate Tower and Microphone
Image 3
1. Turn Tower on. See Image 3
2.Place microphone around neck and
connect clasp.
3.Adjust neck straps to position microphone
approximately 5in (14cm) from mouth.
See Image 4
Power
switch
4.Press One-Touch button to wake microphone. Power indicator (chair icon) should
be green. See Image 5
Sleep Mode
Image 4
For daily use, you do not need to
turn the Tower on and off. The Tower will
wake up from its energy-saving standby mode
whenever you turn on a microphone or play
audio through one of the audio connections.
The Tower will go back to sleep 30 minutes
after your microphones enter sleep mode or
you stop playing audio. After 2 hours and 30
minutes, the Tower will enter an energy-saving
deep sleep mode. When waking up the
Tower from this state, it will take approximately
30 seconds.
5in/14cm
NOTE: If playing audio through one of
Juno's auxiliary inputs, set the volume
on the device (MP3 player, computer, etc.)
to its maximum level. Failure to do so may
result in the Juno Tower going into sleep
mode unexpectedly.
Image 5
Power
indicator
One-Touch
button
10
Tower Controls
Home Screen
Displays the current master volume
Master Volume Up
(press and hold to increase volume quickly)
Master Mute
Master Volume Down
(press and hold to decrease volume quickly)
Room 10
Name of Tower
(set via FrontRow Desktop or Teacher Edition
software)
Settings
Menu
Device
Volume
Menu
Microphone
Volume
Menu
11
Volume
Image 6
Master Volume
Your Juno system has a master volume control that increases or decreases the mixed
volume of all devices and microphones.
From the home screen you can adjust or
mute the master volume of your Juno Tower.
See Image 6
Room 10
Device Volume
You can control the individual volume of each device connected to your Juno Tower. Devices that
are currently playing audio will appear in white text and have a green check mark in the far right on
the orange bar.*
1. Press the Device Volume Menu icon.
2.Select the audio device for which you want to change the volume. See Image 7
3.Adjust the volume of the connected device using the up or down arrow. See Image 8
Image 8
Image 7
Audio 2
DVD Player
NOTE: Using the optional FrontRow Desktop or Teacher Edition software, you can name the devices
used with your Juno system for easier identification. For more information visit gofrontrow.com/juno.
*For best results, the volume on the device should be at least 75% of its maximum volume.
12
Microphone Volume
Image 9
You can separately control the volume of
each microphone used with your Juno Tower.
1.Press the Microphone Volume Menu icon.
2.Select the microphone for which you want
to change the volume (microphones that
are active – on and unmuted – will appear
in white text and will have a green checkmark in the far right of the orange bar).
See Image 9
3.Adjust the volume of the microphone.
See Image 10
NOTE: Using the optional FrontRow
Microphone Settings application, you can name
the microphones used with your Juno system
for easier identification. For more information
visit gofrontrow.com/juno.
Image 10
NOTE: A Juno system comes standard with the
ability to use two microphones simultaneously.
With the optional Channel Expansion Module
your Juno system can be used with up to five
microphones simultaneously.
NOTE: When playing music from a device
connected to the Microphone's Audio In jack,
check the Music Audio In box for best audio
performance.
Music Audio in?
13
Settings
Image 11
From the Settings Menu, you can customize
some of your Juno Tower's available features.
See Image 11
1.Select the feature you would like
to configure.
2.See details for each feature below.
NOTE: Additional settings are available
through the optional FrontRow Desktop or
Teacher Edition software application.
OptiVoice™
Image 12
A powerful tool for test taking, directions
and ESL instruction. Fragile consonant
sounds carry 75% of the meaning in speech
but are easily destroyed by background
noise. OptiVoice strengthens these critical
sounds, doing the work of a 12-band
equalizer with a single switch.
For low background noise environments
and for a more natural reproduction of your
voice, use the low setting. For environments
with higher background noise, use the mid
or high setting (see Image 12). Experiment
with the right mix of microphone volume and
OptiVoice setting to find the optimal solution
for your environment.
NOTE: OptiVoice affects microphone
audio only; auxiliary audio sources can be
adjusted using the equalizer adjustment in
the optional FrontRow Desktop or Teacher
Edition software application.
14
PrioriTeach™
Image 13
Use PrioriTeach to have the Juno Tower
automatically reduce the volume of all
other audio sources including Pass-Around
Microphones when you speak into the
Pendant Microphone. See Image 13
NOTE: Advanced settings for PrioriTeach
are available through the optional FrontRow
Desktop or Teacher Edition software.
NOTE: The PrioriTeach feature is only
activated by a Pendant Microphone and only
when on channel A or B.
Voice Command
Image 14
Your Juno System can be controlled using
your ITM-01 Pendant Microphone and your
voice. See page 19 for details, a list of
available voice commands, and instructions
for use.
Voice Command can be used on only one
channel at a time. Set the command channel
to A or B depending on the channel you are
using with your Pendant Microphone.
See Image 14
NOTE: Advanced settings for Voice
Command are available through the optional
FrontRow Desktop or Teacher Edition
software application.
15
Speaker Balancing
Image 15
With the optional Speaker Expansion
Module, your Juno tower can be connected
to external speakers mounted in the ceiling
or on the wall. Use the Speaker Balancing
option to adjust the balance between the
Tower’s internal speakers and the external
speakers. See Image 15
Restore Defaults
Image 16
Your Juno Tower can be restored to factory
defaults if necessary. See Image 16
NOTE: If turning off Tower after restoring
defaults, wait 10 seconds.
16
About
Image 17
The About screen displays your Tower serial
number, firmware version and DSP version.
See Image 17
Locking the LCD
Image 18
To prevent tampering with settings, the LCD
on your Juno Tower can be locked using a
voice command or the optional FrontRow
Desktop or Teacher Edition software. To
lock or unlock your Tower LCD using Voice
Command, say “LCD”. For details on using
the voice command feature of your Juno
System, see page 19. See Image 18
The display is locked
NOTE: When the display is locked and you
attempt to make a selection, the lock screen
will appear for approximately 10 seconds.
17
LCD Calibration
Touch Screen Calibration
Image 19
Although unlikely, the Juno Tower's touch
screen may drift out of alignment over time.
If it does not respond accurately when you
touch it, it will need to be calibrated.
1. Turn the Tower off.
Calibrating Touch Screen
2.Press and hold the touch screen while
turning the Tower back on.
Touch the target in the
upper-left screen corner
3.Continue pressing the touch screen until
the screen turns black.
4.Release the touch screen and wait for
calibration screen. See Image 19
5.Follow the on screen instructions.
NOTE: Use a stylus intended for touch
screens or similar soft-tipped object for
best accuracy.
Firmware Update
From time to time, FrontRow may
make improvements or enhancements
to your Tower's firmware. Use the
FrontRow Desktop or Teacher Edition
software application to update the
Tower firmware (download from
gofrontrow.com/juno).
If using the FrontRow Desktop:
1.Connect the Tower to a computer running
the FrontRow Desktop application.
2.Open the Tower settings menu by clicking
the Tower settings button.
3.Click the Check for Update button and
follow the on screen prompts.
If using Teacher Edition:
The software will notify you automatically if a
firmware update is available.
18
Voice Command
Your Juno System lets you remotely control parameters of your
Juno Tower using a few simple voice commands.
To issue a voice command:
1. Press and hold the One-Touch button on the Pendant Microphone.
2. Wait for Voice Command tone and Tower LCD background to turn green.
3. Keeping the button pressed, issue one of the commands below.
4. Wait for confirmation tone and Tower LCD background to return to white.
5. Release the button.
For best performance:
• Follow the sequence above precisely when issuing voice command.
• Avoid brushing the microphone against clothing, jewelry, etc. while issuing voice command.
• Speak clearly with a normal conversational tone.
•When issuing the Finish command, wait until the LCD background returns to white before
releasing the button.
•Avoid holding the microphone close to the mouth with speaking a command. The
microphone is optimized to understand commands when it is sitting flat on the chest.
Say:
When you want to:
Increase
Increase the volume by 2 steps
Reduce
Reduce the volume by 2 steps
LCD
Toggle Juno Tower LCD lock on/off
Begin
Begin or resume a suspended recording through
the optional Juno lecture capture application
Suspend
Suspend a recording through the optional Juno
lecture capture application
Finish
top, encode and automatically name a recording
S
based on your personalized settings using the
optional Juno lecture capture application
Commands available with Juno Connect Communications Module installed
Intercom
Make an intercom call request
Power Up
Turn display on
Shut Down
Turn display off
Freeze Screen
Freeze/Unfreeze projector image
Blank Screen
Blank/Show projector image
Source One
Switch AV input
Source Two
Switch AV input
Source Three
Switch AV input
Source Four
Switch AV input
Source Five
Switch AV input
19
NOTE: Voice command
works only with the
Pendant (teacher)
Microphone, and only on
either channel A or B.
NOTE: While recording,
voice command tone and
confirmation tones are not
heard so they will not be
recorded.
NOTE: In some cases, if
the Tower does not recognize a command, the LCD
will remain green for up
to 10 seconds. During this
time, audio will not transmit
from the microphones.
Using Lesson Capture through Juno
FrontRow's superior microphone and optional Juno lecture capture system open
a world of lesson capture and sharing possibilities – without tying teachers to
the computer.
Image 20
•
Absent students can still
access the original lesson
– a huge time saver
•
Makes flipped classrooms
possible, and allows learning at one's own pace
Computer
3.5mm – 3.5mm
Line In
Line Out
3.5mm – RCA
Audio Out
Audio In
• Makes podcasting easy
USB
• S
tudents with mobile devices
can get lessons on the go
•Helpful tool for keeping
parents involved with
reinforcing your lessons
Connect the Juno Tower to your computer
1.
Using a 3.5mm to 3.5mm cable, plug the Audio Out from the Tower to the "microphone" or "line
in" on your computer. See Image 20
2.
Using a 3.5mm to RCA cable, plug the "audio" or "headset" out on your computer to one of
the audio in connections on the Tower. See Image 20
N
OTE: Some computers have a single audio combination jack for both microphone and headset
use. If your computer has this type of jack, you must use a headphone/microphone combo jack
splitter. This adapter has a single 3.5mm male connector and two 3.5mm female connectors.
3.Using the supplied USB cable, connect the Juno Tower to your computer.
4.Set the auxiliary output volume dial between 4 and 6.
5.Install the FrontRow Desktop or Teacher Edition software which includes the Juno lecture
capture system. Download from gofrontrow.com/juno.
6.Follow the easy on-screen configuration instructions.
7.
Using the ITM-01 Pendant Microphone, and the voice commands on page 19, begin, suspend,
and finish your recording. The Juno lecture capture system automatically names and saves your
recordings (screen and audio) to your computer's hard drive. Follow the software's guidance to
help you upload it to Google Apps for Education or another host of your choice.
NOTE: Test the audio quality of your recording. If the volume is too low or too high, check
your computer's microphone or line input volume settings and adjust.
8.Share the location of your uploaded files with your students according to the host's instructions.
9.Students can benefit from the recordings anytime, anywhere – files are not only accessible
by students using any computer but are also accessible on most portable devices including
iPad™, iPhone™, iPod Touch™, and Kindle Fire™.
NOTE: To learn more about the FrontRow Juno lecture capture system, visit
gofrontrow.com/juno.
N
OTE: The use of high quality audio cables is recommended to avoid the introduction of
interference to the system.
N
OTE: If you are also using Juno to rebroadcast via a personal FM transmitter, you will need
a splitter cable. See page 27 for details.
*These applications are not supplied or supported by FrontRow.
20
Collaborative Learning using Class2Class
Class collaboration expands the reach of your lesson and introduces your class
to new and exciting experiences. The Juno system ensures everyone can hear
equally and participate in the learning forum.
Numerous online resources such as education.skype.com provide opportunities for your classroom to participate in live educational events and projects with other classes and programs such
as Skype™, Adobe® Connect™ and others* provide the medium to see and hear your collaborative
classroom partners. Use the Juno Tower to ensure all students are able to effectively participate in
the learning session by easily hearing the conversation as well as sharing their thoughts during the
session using the optional Pass-Around Microphones. For example, FrontRow classrooms have used
this technique to simultaneously connect 14 different classrooms to a live talk with an Olympic athlete, and let students communicate with a NASA Command Center during an emergency simulation.
In both classrooms:
1.
Using a 3.5mm to 3.5mm cable, plug the Audio Out from the Tower to the "microphone" or "line in"
on your computer. See Image 21
2.
Using a 3.5mm to RCA cable, plug the "audio" or "headset" out on your computer to one of
the audio in connections on the Tower. See Image 21
NOTE: Some computers have a single audio combination jack for both microphone and headset
use. If your computer has this type of jack, you must use a headphone/microphone combo jack
splitter. This adapter has a single 3.5mm male connector and two 3.5mm female connectors.
3.Using the supplied USB cable, connect the Juno Tower to your computer.
4.Using the optional FrontRow Desktop or Teacher Edition software (download from
gofrontrow.com/juno), enable the Class2Class option.
5.Install and run the communication software application (e.g., Skype™, Adobe ® Connect™)
6. Connect to other classroom or collaborator using the communication software.
7.Speak into the Juno microphones; all microphone audio will be transmitted between
classrooms and audible via the Tower speakers.
8.If you like, you may start a recording of the session. Note that media audio originating from the
computer and audio from the remote classroom will not be recorded.
9.
When finished, disable the
Class2Class option to
ensure that computer
audio is recorded during
normal recording sessions.
NOTE: To learn more about
FrontRow software, visit
gofrontrow.com/juno.
Image 21
Computer
Line In
Line Out
NOTE: The use of high quality
audio cables is recommended
to avoid the introduction of
interference to the system.
3.5mm – 3.5mm
3.5mm – RCA
USB
*These applications are not supplied or supported by FrontRow.
21
Audio Out
Audio In
Connecting to other Classroom Media
Your FrontRow Juno System can connect to other media to enhance the overall audio experience
in your classroom. Ideally, these connections were made during installation; however, they can easily
be made after the unit is installed using standard audio cords from your local electronics store.
Example 1
Many classrooms use a FrontRow EZRoom™ AV control system to manage projectors and other
equipment online. If your classroom uses EZRoom™, you'll connect your computer audio and
video into your AV wallplate and connect your Tower to the TB350 adapter via a 3.5mm cable.
NOTE: The use of high quality audio cables is recommended to avoid the introduction of
interference to the system.
LAN
Juno
AUDIO OUT
AUDIO1
AUDIO2
AUDIO3
AUDIO1
AUDIO2
AUDIO3
Audio
COMPUTER
AUX
A/V
Video
COMPOSITE
TB350
Audio + Video
POWER IN
Power
TB12
RS232
TB225
IR
Projector
CB6000
Control
Screen or interactive
Panel
white board
MP3 Player
CP650
AV Connection
Wallplate
Cat 5 cable
Serial cable
Audio cable
RCA cable
Speaker cable
Sensor cable
Other cable
NOTE: This is a schematic illustration
intended to clarify the relationship of
components to each other. The location
of jacks shown here may not reflect their
true position on specific devices.
22
USB
DVD
Player
AUDIO IN
Control + power
VGA
AUX
A/V
VGA2
VGA1
NETWORK
AUX
IR #1
AUX
Teacher’s
Computer
Example 2
If your classroom does not have an EZRoom AV Control System, you can connect your computer
directly to your Juno Tower. This can be done by connecting your computer’s headphone jack to one
of the three stereo RCA inputs.
NOTE: The use of high quality audio cables is recommended to avoid the introduction of
interference to the system.
Computer
Audio
Internet
Video
Audio In
Audio Out
USB
VGA
Projector
Interactive
Whiteboard
23
Example 3
Some classrooms use the TV/DVD/VCR as stand-alone media. For these classrooms, you may
need to use two auxiliary audio input connections to the Juno Tower.
NOTE: The use of high quality audio cables is recommended to avoid the introduction of
interference to the system.
TV
DVD Player
VCR
Audio In
Audio
Video
Audio Out
Internet
USB
Computer
24
Example 4
To amplify audio from portable electronics, it may be most convenient to connect these as
needed through the quick connect jack on the front of the Juno Tower. Turn the
volume on the MP3 player at least 75% of the way up for best sound quality.
NOTE: The use of high quality audio cables is recommended to avoid the introduction of
interference to the system.
25
Example 5
Connect either the ITM-01 Pendant or ISM-01 Pass-Around Microphone to any audio source
that's too far from the Juno Tower to conveniently connect directly.
ISM-01
Wireless Transmission
Aux In
Audio Out
OR
MP3 Player
Computer
The ITM-01 Pendant or the ISM-01 Pass-Around Microphones can be used to transmit audio
from a secondary audio source (MP3 player, computer, portable radio/CD/tape player) to
the receiver.
1. P
lug one end of the audio adapter cord (included) in the Audio Out/headphone jack of the
secondary audio source. Plug the other end of the adapter cord to the Audio In jack on the
Microphone.
2. On the Juno Tower LCD, check the "Music Audio in" box on the Microphone's Volume
Setting screen. (See page 13)
3. Turn on the secondary audio source.
4. Turn the volume on the secondary audio source at least 75% of the way up and adjust the
microphone volume using the Juno Tower LCD to obtain the optimal volume. (See page 13)
NOTE: The use of high quality audio cables is recommended to avoid the introduction of
interference to the system.
26
How to Connect a Personal FM System to a Classroom Audio System
Image 22
1.Connect an audio cable to the classroom
audio receiver output jack. If recording,
first connect a splitter cable (1a), then
attach the audio cable (1b).
2. T
urn on the student's PFM transmitter.
See Tips below.
Teacher's
Computer
3.Connect the audio cable to the transmitter
audio in jack (or, if using Amigo T30, the
mic jack). Straighten the microphone cord
(or optional antenna) for Personal FM
Transmitters other than Amigo T30/T31.
See Tips below.
5
4.Set audio output volume on classroom
receiver as recommended in Tips below,
or as desired by student.
4
1a
1
2 1b
5.If recording, connect a second audio
cable from the splitter to the audio in
(microphone) jack of a computer. Follow
recording software instructions.
3
NOTE: The use of high quality audio cables
is recommended to avoid the introduction
of interference to the system.
Personal
FM Transmitter
Tips for Specific PFM Transmitters and
Classroom Amplification Receivers:
Phonak EasyLink
(SmartLink+,
Phonak Campus
ZoomLink+,
Oticon Amigo T5
Oticon Amigo T10
Oticon Amigo T30
S/SX
Phonak Inspiro
EasyLink+):
On PFM transmitter,
connect cable to...
Notes
Audio In (3.5mm)
• Mute the
transmitter
Audio In (3.5mm
Mic In (2.5mm)
Audio In (3.5mm)
Audio In (3.5mm)
Audio In (3.5mm)
• Turn the
transmitter OFF
(don't worry; it
will detect the
audio signal and
transmit)
• Skip Step 3 –
patch cord acts
as antenna
• Turn capsule on
MM8 lapel mic
to 'X' to mute
the mic
• Phonak disables
"Dynamic FM"
when connected
to classroom
amplification
• Link+ transmitters
require a separate
adapter to
connect the
audio cord (see
User Manual)
• Note that the Mic
in jack is 2.5mm –
an adapter may
be needed or use
2.5mm to 3.5mm
patch cord
• Audio Input setting must be set
to "iPod Nano"
from "General"
• Settings > Audio
input > iPod nano
• Mute the
transmitter
• Turn the transmitter on first, then
connect for best
results
• Mute the
transmitter
Suggested Classroom Audio Output Settings (adjust as needed for student preference)
FrontRow Juno
8
8
1 / 2.5*
*A higher output setting may be needed if using a splitter cable for recording.
27
8
7 / 8*
8
ITM-01 Pendant Microphone
Using
Image 23
1. P
lace microphone around neck and
connect clasp.
2. Adjust neck straps to position microphone
approximately 5in (14cm) from mouth.
See Image 23
3. Press One-Touch button to wake microphone.
Power indicator should be green.
See Image 24
5in/14cm
NOTE: Your microphone will go into standby
mode (off) automatically after 10 minutes in
mute mode or 10 minutes of silence. Press
One-Touch button to wake.
4. Momentarily press One-Touch button to mute
as needed for private conversations. Mute
indicator light will turn red. See Image 24
5. Press and hold One-Touch button to issue a
voice command. For detailed instructions on
using Voice Command see page 19.
Image 24
power indicator
mute
indicator
6. When the battery in your microphone gets
low, the battery indicator will flash red.
See Image 24
battery
indicator
7. At the end of the day, charge your
microphone. (See page 30)
One-Touch
button
28
Battery
Image 25
Installing the battery
1.
Unscrew battery door on the back of the
microphone using the supplied Phillips
screwdriver. See Image 25
2. L ocate the charge contacts on the battery
and on the microphone. See Image 26
3.Insert battery into compartment - battery
contacts first, then push the battery into
place. See Image 27
4.Replace battery door.
5.For best performance, charge battery
overnight before initial use.
Image 26
Moisture
indicator
NOTE: When the battery is removed, it will
take 2-3 charge/discharge cycles for the battery to report accurate status to the FrontRow
Desktop or Teacher Edition application.
Battery Safety
Warning: To reduce risk of fire or burns:
•Do not use batteries that have been
dropped or otherwise damaged.
•Do not attempt to open, disassemble or
service the battery pack.
•Do not crush, puncture or short external
contacts or dispose of in fire or water.
Image 27
•Do not use battery if exposed to moisture.
When exposed to moisture, red checked
pattern of moisture indicator will disappear.
See Image 26.
•Do not expose to temperatures above
40°C (104°F)
• Replace only with the battery pack
designed for this product.
• Batteries shall not be exposed to excessive
heat such as sunshine, fire or the like, or
excessive cold.
29
Charge
contacts
Charging
Image 28
Charge your battery in one of four ways:
• IMC-01 universal microphone charger
(optional). See Image 28
• USB cable connected to one of your Juno
Tower’s charge ports. See Image 29
• USB cable connected to your computer’s
USB port*. See Image 30
• USB cable connected to a USB to AC power
adapter. See Image 31
*NOTE - When charging from a computer USB port:
If using a laptop on battery power and the battery
is low, the ITM-01 microphone will not charge.
We recommend that you always have your laptop
plugged in to a power source when attempting
to charge or program your microphone.
Image 29
The ITM-01 microphone will not charge from a
low-power USB port. If you are having trouble
charging from a USB port on a computer that
is plugged in to a power source, try using a
different USB port on your computer.
The ITM-01 microphone will not charge unless
you have first installed the software drivers as
part of the FrontRow Desktop, Teacher Edition
or Microphone Settings software application.
To download the application, visit gofrontrow.
com/juno.
Image 30
IMPORTANT! To maintain proper charging
when using the IMC-01 universal microphone
charger, occasionally clean the charge contacts
on the bottom of the microphone using a
cotton swab dipped in rubbing alcohol.
IMPORTANT! To ensure top performance and
avoid equipment damage, batteries should be
charged at room temperature.
IMPORTANT! To ensure top performance,
FrontRow recommends replacing rechargeable
batteries every three years.
Image 31
IMPORTANT! Store the battery properly if it will
be unused for a period of more than 2 weeks.
1.Charge the battery in the microphone for at
least 2 hours.
2.Remove battery from microphone, place it
in its own bag or envelope and store in a
cool dry place.
3. Recharge battery before next use.
30
ISM-01 Pass-Around Microphone
Using
Image 32
1.Turn microphone on by sliding the Power
Switch up. See Image 32
2. Note Power Indicator (chair icon).
See Image 32
Green = On and transmitting
Off = Power is off
NOTE: In order to conserve battery life, if
power switch is left on, your microphone will
automatically go into Standby Mode (off)
after 10 minutes of silence. Move switch to
off position, then back on to reset.
3.Keep top of microphone approximately
3 - 4in. (7.5 – 10cm) from mouth when using
as a hand-held microphone. See Image 33
Power
indicator
Emitter diodes
Battery
indicator
Power/
Push-to-talk
switch
Image 33
4. Do not block emitter diodes. See Image 32
5.To allow hands-free use (for example,
when reading aloud and turning pages),
attach the lavaliere clip and neck strap.
Adjust neck strap to position microphone
approximately 4 - 5in (10 - 13cm) from
mouth. See Image 34
3-4in. (7.5-10cm)
6.When needed, you can simply push and hold
the Power Switch while talking rather than
sliding it into the "on" position. This makes
transitions when passing the microphone
between students easier (e.g., no need to
take time from the conversation to turn the
mic on and off during transition). For best
results, when using the push-to-talk function,
be sure to press on the lower section of the
switch. See Image 32
Image 34
4-5in. (10-13cm)
7.When the battery in your microphone gets
low (approximately 1/2 hour of use time
left) the battery indicator will flash red.
See Image 32
8.Turn off microphone and charge at the
end of the day. (See page 34)
NOTE: The ISM-01 is factory set on Channel
B. Each microphone must be on a separate
channel. See Programming and Switching the
Microphone Channels on page 36.
31
Labeling
Image 35
Your Pass-Around Microphone includes a
location for adding a name or room number
for easy identification.
clear window
1. P
lace the microphone on a stable surface
with the battery door facing up.
2. Remove the battery door using the supplied
Phillips screwdriver. See Image 35
3. Slide the clear window out of the battery door.
4. W
rite the name of the microphone on a
blank label that came with your microphone.
5. Place the name in the battery door.
6. S
lide the clear window back into the
battery door.
7. Replace the battery door and tighten
the screw.
32
Battery
Image 36
Installing the battery
1.Unscrew battery door on the back of the
microphone using the supplied Phillips
head screwdriver. See Image 36
2.Locate the charge contacts on the battery
and on the microphone. See Image 37
3.Insert battery into compartment - battery
contacts first, then push the battery into
place. See Image 38
4. Replace battery door.
5.For best performance, charge battery overnight before initial use.
Image 37
Moisture
Indicator
NOTE: When the battery is removed, it will
take 2-3 charge/discharge cycles for the battery to report accurate status to the FrontRow
Desktop or Teacher Edition application.
Battery Safety
WARNING: To reduce risk of fire or burns:
•Do not use batteries that have been
dropped or otherwise damaged.
•Do not attempt to open, disassemble or
service the battery pack.
Image 38
•Do not crush, puncture or short external
contacts or dispose of in fire or water.
•Do not use battery if exposed to moisture.
When exposed to moisture, red checked
pattern of moisture indicator will disappear.
See Image 37
•Do not expose to temperatures above
40°C (104°F).
• Replace only with the battery pack
designed for this product.
• Batteries shall not be exposed to excessive
heat such as sunshine, fire or the like, or to
excessive cold.
33
Charge
contacts
Charging
Image 39
Charge your microphone in one of four ways:
•IMC-01 universal microphone charger
(optional). See Image 39
•USB cable connected to one of your Juno
Tower’s charge ports. See Image 40
•USB cable connected to your computer’s
USB port*. See Image 41
•USB cable connected to a USB to AC
power adapter. See Image 42
*NOTE - When charging from a computer USB port:
If using a laptop on battery power and the battery
is low, the ISM-01 microphone will not charge.
We recommend that you always have your laptop
plugged in to a power source when attempting
to charge or program your microphone.
Image 40
The ISM-01 microphone will not charge from a
low-power USB port. If you are having trouble
charging from a USB port on a computer that
is plugged in to a power source, try using a
different USB port on your computer.
The ISM-01 microphone will not charge unless
you have first installed the software drivers as
part of the FrontRow Desktop, Teacher Edition
or Microphone Settings software application.
To download the application, visit gofrontrow.
com/juno.
Image 41
IMPORTANT! To maintain proper charging
when using the IMC-01 universal microphone
charger, occasionally clean the charge contacts
on the bottom of the microphone using a
cotton swab dipped in rubbing alcohol.
IMPORTANT! To ensure top performance and
avoid equipment damage, batteries should be
charged at room temperature.
Image 42
IMPORTANT! To ensure top performance,
FrontRow recommends replacing rechargeable
batteries every three years.
IMPORTANT! Store the battery properly if it will
be unused for a period of more than 2 weeks.
1.Charge the battery in the microphone for at
least 2 hours.
2.Remove battery from microphone, place it in
its own bag or envelope and store in a cool
dry place.
3. Recharge battery before next use.
34
Microphone Configuration
Your microphones can be configured using the FrontRow Microphone Settings application*.
Microphone name – You can name your microphone for display on the Juno Tower LCD
screen, making it easier to identify when changing volume.
Channel assignment – Assign the operating channels for your microphone.
VoiceChoice – Set the balance of microphone range and battery life that's right for you.
Increase range when you need it for use in large or odd shaped rooms. Increase battery life
when you need more talk time from your microphone.
Restore defaults – Restore the microphone settings to factory defaults.
Firmware updates – From time to time, FrontRow may make improvements or enhancements to
your microphone's firmware. Use this function to periodically check for updates.
* The Microphone Settings application is available at gofrontrow.com/juno.
35
Using Multiple Microphones
Your Juno system is designed to receive up to 5 microphone signals at once*. Any combination
of Pass-Around and Pendant Microphones is possible. For example, use two Pendant Microphones
(one for a teacher and one for a teacher’s aide) and three Pass-Around Microphones for students,
or one Pendant Microphone for a teacher and four Pass-Around Microphones for students.
Microphones must be on different channels or interference will occur. You can quickly
program them to properly operate on different channels.
NOTE: If you are using the ITM-01 Pendant Microphone with just one ISM-01 Pass-Around
Microphone, you probably don't need to program or set anything. The ITM-01 Pendant
Microphone is factory set to transmit on Juno channel A and the ISM-01 Pass-Around Microphone
is factory set to transmit on Juno channel B.
If you have the Channel Expansion Module installed in your Juno Tower and are using multiple
microphones, you must assign channels using the Microphone Settings software and set mic
switch positions so that each ITM-01 Pendant and ISM-01 Pass-Around Microphone transmits on
a unique channel. Use the Recommended Channel Setting guide below to program channels and
choose switch positions for your microphones.
Programming and switching the microphone channels
1.
Use a USB cable to connect the
microphone to a computer with the
FrontRow Microphone Settings software
application** installed.
Image 43
2. O
pen the Microphone Settings software
application.
3.Click the Microphone Settings button.
4.Click the Channel Assignments button.
5.Using the dropdown choices on the right,
assign the desired channels to the switch
positions (see guide below) and click OK.
See Image 43
Recommended Channel Setting
Microphone 1
Microphone 2
Microphone 3
Microphone 4
Microphone 5
Switch
Position
1
Switch
Position
2
Switch
Position
1
Switch
Position
2
Switch
Position
1
Switch
Position
2
Switch
Position
1
Switch
Position
2
Switch
Position
1
Switch
Position
2
A
B
A
B
C
D
C
D
E
C
*The Juno Tower comes standard with 2 channels. Add 3 additional channels with the optional Channel
Expansion Module.
**The Microphone Settings application is available at gofrontrow.com/juno.
36
6.Unscrew battery door using the supplied
Phillips screwdriver. See Image 44
Image 44
7.
Using the channel indicator labels included
with your microphones, label the switch
positions you've just reprogrammed.
See Image 45
Pendant
Microphone
8.Move the selection switch (see Image 46)
to the channel you want to use – ideally,
the one indicated in the shaded column in
the table on page 36.
9.
Close and screw down battery door.
Pass-Around
Microphone
Image 45
Channel Label Sheet
Pendant Microphone
Pass-Around Microphone
Image 46
Pendant
Microphone
Pass-Around
Microphone
37
IMC-01 Microphone Charger
Image 47
Charger setup
1. Insert microphones in either of the two
charge pockets. See Image 47
2.Find the power plug that is appropriate for
the power outlet style in your country.
See Image 48
3.Slide power plug onto the power supply.
See Image 49
4.Plug the power supply into the power
outlet and into the back of the charging
base. See Image 49
Battery Indicator
When Charging:
SOLID RED = Charging
SOLID GREEN = Fully Charged
Image 48
Image 49
Charger back
Power
Jack
38
Troubleshooting
remove the battery (see pages 29, 33).
After about 15 seconds, replace the battery and battery door and then reconnect
the USB cable to the computer and microphone. The following message should now
be displayed: Click Start Update to proceed. The microphone will have the original
version of the firmware installed. After this
completes, click Check Now to update the
microphone to the current version of the
firmware.
Microphone will not charge from the USB
jack on my computer
•Verify that you have the Juno microphone
drivers installed. To install the drivers, you
will need to install the FrontRow Microphone
Settings application, the FrontRow Desktop
or Teacher Edition application. You may need
to reconnect your microphone after installation.
•If using a laptop computer, verify that it is
plugged into a power outlet.
The Battery Indicator on the Pendant or
Pass-Around Microphone is flashing green/red
•If using a computer (desktop or laptop)
that is plugged into a power outlet, you
may be using a low power USB jack. Try
other USB jacks on the computer.
•
Make sure the unit is not excessively hot or cold.
•
Remove microphone from charger for
5 minutes and then try again.
Microphone is not recognized by
my computer
•
The battery needs to be replaced
The Push-to-Talk function is not working on
the Pass-Around Microphone
•Verify that you have the Juno microphone
drivers installed. To install the drivers,
you will need to install the FrontRow
Microphone Settings application, the
FrontRow Desktop or Teacher Edition
application*. You may need to reconnect
your microphone after installation.
•
Verify you are pressing on the lower section of
the switch (see page 31).
•
Verify the battery is charged.
No signal reception (display indicates
inactive channel)
Microphone is connected to a Tower
charge jack but it will not charge
•Check that the microphone is on
(see pages 28, 31).
•Disconnect and reconnect the microphone
to the Tower.
•Check that the microphone is not muted
(see page 28) (ITM-01 only).
•If the Tower is connected to a computer
via a USB cable, disconnect the Tower
from the computer.
•Verify that you are not blocking either the emitters on the microphone or the sensor at the top
of the Juno Tower (see pages 6, 8 & 9).
All the lights are flashing on my Pendant
or Pass-Around Microphone
•If reception is interrupted when facing a certain direction, install an additional sensor in
that area of the room (see Installer Guide) or
adjust VoiceChoice settings (see page 35).
•If all lights are flashing after attempting a
firmware update, open the Microphone
Settings application and connect the
microphone to the computer with the USB
cable. After a short time, a message will
be displayed that the microphone needs
to be updated. If this message is not displayed, disconnect the USB cable and
• If using more than one microphone, verify
that they are not on the same channel
(see page 36).
Tower will not 'wake up' from standby mode
•
Volume level on auxiliary audio device is set
too low.
•Make sure microphone is on and working
correctly.
*Available at www.gofrontrow.com/juno
39
Tower is not recognized by my computer
Weak or no output from speaker(s)
•
Verify that you have the Juno Tower drivers
installed. To install the drivers, you will need
to install the FrontRow Desktop or the
Teacher Edition application*. You may need
to reconnect your Tower after installation.
•
Increase the Master, Device or Microphone
Volume control(s) on the Tower
(see pages 12, 13).
• Position the microphone closer to mouth.
•Verify that the microphone is on and not muted.
•
Verify the Tower is turned on.
High- or low-pitched whine or hum coming through Tower speakers
•
Verify the Tower is connected to the
computer via the USB cable.
•
There may be a ground loop with the
system. Install a ground loop isolator
(see Installer Guide).
•
If using a HUB or USB extension cable, verify
that it is USB 2.0 compliant.
•
Disconnect and reconnect the USB cable.
•There may be "noisy" electrical wiring. Install
an AC line filter (see Installer Guide).
When I turn the Tower on, all I get is a
white screen on the LCD
Charging light won't come on
•
Check that the charger is connected to a
working power outlet.
•
Turn the power off, wait 60 seconds and turn
it back on.
When playing audio from an audio device
such as an iPhone™ or other MP3 player,
I can hear background noise through the
speakers
Tower won’t turn on (LCD does not turn on)
• Verify that the power supply is plugged into
both the receiver and a working wall outlet.
•
Your device may be emitting a low level
hum that is amplified by the Juno Tower.
Use a filtering cable such as a ground loop
isolation transformer cable to eliminate or
reduce the noise.
•Verify the Tower power switch is on (see page 6)
• Test with another power supply.
’Dead spots’ or microphone crackling/noise
•Verify that you are not blocking either the
emitters on the microphone or the sensor at
the top of the Juno Tower (see pages 6, 8 & 9).
My voice commands are not being
recognized
•If reception is interrupted or noisy when facing a certain direction, install an additional
sensor in that area of the room (see Installer
Guide) or adjust VoiceChoice settings
(see page 35).
•
Make sure there is not excessive background
noise while issuing command
•
Make sure the microphone is not being
moved around, brushing on clothing, buttons
or jewelry.
• If using more than one microphone, verify
that they are not on the same channel
(see page 36).
•
Make sure you are following the correct
sequence when issuing command (see page 19).
• There may be "noisy" electrical wiring.
Install an AC line filter (see Installer Guide).
PrioriTeach not working
•
Verify that the "Music Audio In" check box in
the Teacher Microphone's volume screen (see
page 13) is not checked.
Feedback (squealing)
•
Lower the Microphone Volume control(s) on the
Tower (see page 13).
•
Adjust the drop down level from the
FrontRow Desktop or Teacher Edition
software application.
• Position the microphone closer to mouth.
•Verify that the Music Audio In option is not
checked in the Microphone Volume screen
(see page 13).
•
Verify that PrioriTeach is turned on (see page 15).
•
Increase the volume level for the Pendant
Microphone (see page 13).
40
Regulatory
without the express approval of FrontRow
Calypso LLC in writing, could void the user's
authority to operate those elements of the system.
receiver: part 15, subpart A
FrontRow Juno Receiver
FrontRow Juno Transmitter
FrontRow Juno Transmitter
ITR-01
ITM-01
ISM-01
This product conforms with the
essential requirements of European
Union Directive /EU Directive
2004/108/EC EMC Directive and 2002/95
ROHS Directive. This product can be subject
to interference at our operational frequency
bands of 2.1, 2.4, 2.8, 3.3, and 3.6 MHz.
Tested to comply with
FCC Standards
FOR HOME OR OFFICE USE
This equipment has been tested and found
to comply with the limits for a Class A digital
device, pursuant to Part 15 of the FCC Rules.
These limits are designed to provide reasonable protection against harmful interference
in a residential installation. This equipment
generates, uses and can radiate radio frequency energy and, if not installed and used
in accordance with the instructions, may cause
harmful interference to radio communications.
However, there is no guarantee that interference will not occur in a particular installation. This product conforms to the essential
requirements of European Union Directive /
EU Directive 2004/108/EC EMC Directive and
2002/95 ROHS Directive. This product can be
subject to interference at our operational frequency bands of 2.1, 2.4, 2.8, 3.3, and 3.6 MHz.
Electrical and electronic equipment (EEE)
contains materials, components and substances that could be dangerous or detrimental to human health and the environment
if waste electrical and electronic equipment
(WEEE) is not disposed of correctly. Products
marked with the crossed-out
dustbin shown here are electrical
and electronic equipment. The
crossed-out dustbin indicates that
waste electrical and electronic
equipment may not be disposed of with
unsorted household waste and that it must
be collected separately. In developing and
manufacturing your FrontRow Calypso LLC
product, we used high-quality materials and
components that can be reused. Thus, when
disposing of your waste electrical and electronic equipment, you must use a collection
system designated for this purpose, regardless of whether you dispose of your waste at
your local waste site or it is collected from
your home. Please contact your local authority
for further information.
FCC notes
The Juno system is approved by the FCC
(Federal Communications commission).
The use of the system may be governed by
specific FCC rules and FCC licensing or
notifications may be required. Consult your local
FCC office for detailed information. FrontRow
Calypso LLC receivers and transmitters,
when required, are approved by the Federal
Communications Commission (FCC) in the
U.S. and Industry Canada. Other government
approvals are available upon request. (Other
international regulations may also apply.) Any
changes or modifications made to any government-approved element of this instrument,
IC notes
This Class A digital apparatus complies with
Canadian ICES-003.
Cet appareil numérique de la classe A est
conforme à la norme NMB-003 du Canada.
The term "IC:" before the radio certification
number only signifies that Industry of Canada
technical specifications were met.
41
Batteries
Batteries contain substances that can be
harmful to human health and the environment if not handled correctly.
Batteries are marked with the WEEE symbol. This symbolises that exhausted batteries must not be disposed of together with
unsorted rubbish, but are to be collected
separately.
Some batteries are also marked with the
chemical symbol Hg (mercury), Cd (cadmium)
or Pb (lead). These substances are particularly harmful, so it is important that they are
collected and disposed of via an established
recycling scheme. This ensures that your batteries are reused in compliance with regulations and do not damage the environment.
Therefore, when disposing of exhausted batteries, make sure that you use an established
recycling scheme. This might involve delivering them to a designated collection point or
recycling center.
42
USA/Global
1690 Corporate Circle
Petaluma, CA 94954-6712
United States
toll-free: 800.227.0735
tel: 707.769.1110
fax: 707.769.9624
www.gofrontrow.com
Canada
6950 Creditview Road,
Unit 1
Mississauga, ON L5N 0A6
Canada
toll-free: 800.340.9894
tel: 905.461.5300
www.gofrontrow.com
Australia
629 Nudgee Road
Nundah QLD 4012
Australia
tel: 1 800 746 642
fax: 1300 737 983
www.gofrontrow.com
Scandinavia
Kongebakken 9
2765 Smørum
Denmark
tel: +45 3917 7101
fax: +45 3927 7900
www.gofrontrow.com
© 2014 FrontRow Calypso LLC Phonic Ear, FrontRow, Calypso and the names of Phonic Ear, Calypso, and FrontRow products
are trademarks or registered trademarks of FrontRow Calypso LLC in the U.S. and other countries.
821-5082-112/Rev G 0914