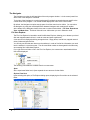
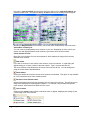
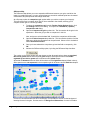
1
Progenesis PG200/PG220 User Manual v2006 Email: [email protected] | web: www.nonlinear.com Nonlinear Dynamics Ltd | Cuthbert House | All Saints | Newcastle upon Tyne | NE1 2ET | UK | tel: +44 (0)191 230 2121 | fax: +44 (0)191 230 2131 Nonlinear USA Inc | toll free: 1-866 GELS USA | 4819 Emperor Blvd | Suite 400 | Durham | NC 27703 | tel: 919 474 5177 | fax: 919 474 5050 Should you require assistance our Technical Support team will be happy to help you. Tel: +44 (0) 191 230 2121 Fax: +44 (0) 191 230 2131 Email: [email protected] No matter how trivial you might think the problem is, please let us know. Contacting us could save you time and help us improve our software. Trademarks The following are either registered trademarks or trademarks of the named company in the United States, United Kingdom and/or other countries. MODAS, Pro, Progenesis, TotalLab, and Phoretix - Nonlinear Dynamics Ltd. Microsoft and Windows - Microsoft Corporation. Adobe and Acrobat - Adobe Systems Inc. © Nonlinear Dynamics Ltd. - All rights reserved. March 2006 Contents Introduction 7 Welcome to the software ..............................................................................................7 Key Product Points........................................................................................................7 Getting Started 9 Starting the software .....................................................................................................9 Using the Tutorials ........................................................................................................9 Technical Support .........................................................................................................9 Familiarise Yourself 11 General .......................................................................................................................11 Starting the software for the first time .........................................................................11 Main Screen Layout ....................................................................................................12 Gel Status Icons..........................................................................................................13 Program Interface 15 The Main Program Window ........................................................................................15 Title Bar..........................................................................................................15 Menu Bar........................................................................................................15 Main Toolbar ..................................................................................................15 Navigator........................................................................................................16 Program Window Selector .............................................................................16 Status Bar ......................................................................................................17 Workspace area .............................................................................................17 The Navigator..............................................................................................................18 File View Explorer ..........................................................................................18 Files................................................................................................................19 Experiment View Explorer..............................................................................21 Resizing the Navigator...................................................................................26 Hiding the Navigator ......................................................................................26 Mode Specific Toolbar ...................................................................................26 Program Modes and Sub-Modes ................................................................................28 Program Modes..............................................................................................28 Program Sub Modes ......................................................................................29 Options........................................................................................................................30 Display tab .....................................................................................................30 General tab ....................................................................................................32 Printing tab .....................................................................................................34 Copying tab ....................................................................................................36 Detection tab ..................................................................................................37 Comparisons tab ............................................................................................38 Mode Defaults tab ..........................................................................................40 3D tab.............................................................................................................42 Image and Experiment Files .......................................................................................43 Image file types ..............................................................................................43 Experiment file types......................................................................................43 The Current Selection .................................................................................................44 Current Experiment........................................................................................44 Current Gel.....................................................................................................44 Current Spot...................................................................................................44 Current Mode .................................................................................................44 PG200/PG220 User Manual Contents • i The Program Windows 45 Selection mode window facilities ................................................................................ 45 Main Image window.................................................................................................... 45 Image window Toolbar .................................................................................. 45 Zooming in the Image window....................................................................... 46 Contrast and Colour ...................................................................................... 47 Image Window Display Options .................................................................... 50 Further Display Options................................................................................. 53 Other Options ................................................................................................ 55 Zoom window.............................................................................................................. 55 Measurements window............................................................................................... 56 Field Selection ............................................................................................... 56 Second Image window ............................................................................................... 63 Comparisons window ................................................................................................. 64 Expression window..................................................................................................... 66 Histogram window ...................................................................................................... 68 Histogram Options......................................................................................... 68 Grouping ........................................................................................................ 70 Interaction ...................................................................................................... 70 Montage window......................................................................................................... 71 Display Options of the Montage window ....................................................... 71 Select Gels .................................................................................................... 71 Zooming and Scrolling................................................................................... 71 Protein window ........................................................................................................... 72 Report window ............................................................................................................ 73 Spot Report ................................................................................................... 73 Gel Report ..................................................................................................... 73 Experiment Report......................................................................................... 74 Exporting Reports.......................................................................................... 74 Report Options .............................................................................................. 74 Profile window............................................................................................................. 75 Animation window....................................................................................................... 76 Animation Frames ......................................................................................... 76 Display Options of the Animation window ..................................................... 76 Save Video Clip ............................................................................................. 77 3D window .................................................................................................................. 77 Colour Scheme.............................................................................................. 77 Display Options of the 3D window................................................................. 79 Animation....................................................................................................... 80 Default Viewpoint........................................................................................... 81 Experiment Operations 83 Experiments Overview................................................................................................ 83 Create a New Experiment .......................................................................................... 83 Open an Existing Experiment ..................................................................................... 83 Saving Changes to the Experiment............................................................................ 84 Save............................................................................................................... 84 Save As ......................................................................................................... 84 AutoRecover.................................................................................................. 84 Import/Export XML...................................................................................................... 85 Backing up and Restoring Experiments ..................................................................... 86 Backup........................................................................................................... 86 Restore .......................................................................................................... 86 Adding Gels to your Experiments............................................................................... 88 Moving Between Gels................................................................................................. 89 Sending Data to the Database ................................................................................... 90 ii • Contents PG200/PG220 User Manual Analysis Procedures 91 Overview .....................................................................................................................91 DIGE ...........................................................................................................................91 DIGE image naming convention ....................................................................92 Analysis Wizard...........................................................................................................94 Welcome page ...............................................................................................94 Select Images page .......................................................................................95 Group DIGE Images page .............................................................................95 Selecting a multiplex group............................................................................96 Changing the image used as the Internal Standard ......................................97 Preview Images page ....................................................................................97 Define Averaged Gels page...........................................................................98 Analysis Protocols page...............................................................................101 Reference Gel Management page...............................................................102 Set Averaging Parameters page..................................................................103 Replicate groups ..........................................................................................104 Setting Parameters for replicate groups ......................................................105 Detect Spots page .......................................................................................106 Background Subtraction page......................................................................108 Spot Matching page .....................................................................................108 Volume Normalisation page.........................................................................109 Save Analysis Protocol page .......................................................................112 Summary page.............................................................................................113 Perform Analysis page.................................................................................114 Spot Detection...........................................................................................................115 2005 Detection .............................................................................................115 Detect Spots.................................................................................................115 Manual Editing .............................................................................................115 Navigator Editing Tools................................................................................115 Vertical Toolbar Spot Editing Tools .............................................................117 Other Spot Detection Methods.....................................................................120 2003 Standard Detection .............................................................................120 Spot Detection Plug-Ins ...............................................................................121 Background Subtraction............................................................................................122 Performing Background Subtraction............................................................122 Background Subtraction Methods................................................................123 Reference Gels .........................................................................................................125 The Reference Gel Wizard ..........................................................................125 Warping.....................................................................................................................130 Warping Display Options .............................................................................130 Warping tools ...............................................................................................131 Warping - Areas of Interest ..........................................................................131 Manual Warping ...........................................................................................131 Matching....................................................................................................................135 Clear User Matches .....................................................................................135 Clear Auto Matches .....................................................................................135 Match ...........................................................................................................136 Matching Parameters...................................................................................136 Adding User Matches...................................................................................137 Matching Modes...........................................................................................137 Adding Spots to the Reference Gel ..........................................................................139 Automatic Method ........................................................................................139 Manual Method ............................................................................................140 Adding Unmatched Spots from a Sub-Gel...................................................140 Normalisation ............................................................................................................140 Ratiometric Normalisation............................................................................141 Total Spot Volume Normalisation ................................................................141 Single Spot Normalisation............................................................................141 Value ............................................................................................................142 PG200/PG220 User Manual Contents • iii Match Ratio ................................................................................................. 143 Total Volume Ratio ...................................................................................... 144 Peak Adjustment ...................................................................................................... 145 Protein Lists .............................................................................................................. 146 Protein Lists Dialog...................................................................................... 146 2D Calibration ........................................................................................................... 150 Assigning Proteins....................................................................................... 150 Performing Calibration................................................................................. 151 1D Calibration ........................................................................................................... 152 Creating and Editing Ladders...................................................................... 152 Insert and Position a Ladder........................................................................ 153 Deleting Ladders ......................................................................................... 154 Calibrated value Graph and Table .............................................................. 154 Calibration ................................................................................................... 154 Profiling..................................................................................................................... 155 Generating an intensity profile..................................................................... 155 Deleting profiles........................................................................................... 156 Renaming a profile ...................................................................................... 156 Spot Filtering............................................................................................................. 157 Choosing the images................................................................................... 157 Manual Filtering ........................................................................................... 158 Automatic Filtering....................................................................................... 159 Tabular filtering............................................................................................ 161 Intensity Calibration .................................................................................................. 163 How to Define Your Step Wedge Points ..................................................... 163 Positioning your Sample Points................................................................... 164 How to Calibrate Gels.................................................................................. 168 Spot Picking.............................................................................................................. 169 Triangulation................................................................................................ 170 Ettan Picking................................................................................................ 172 Differential Analysis .................................................................................................. 175 Creating Averaged Gels ........................................................................................... 176 Using the Averaged Gels Wizard ................................................................ 177 Averaged Gels............................................................................................. 179 An Introduction to SameSpots Outline ..................................................................... 181 The Dilemma ............................................................................................... 181 The Solution ................................................................................................ 181 Using the SameSpots Outline Tool .......................................................................... 182 Workflow for a DIGE Experiment in PG220 ................................................ 182 Workflows for a Single Stain, Average Gel Experiment in PG200 - 220..... 183 Workflow for a Single Stain, Flat Experiment in PG200 - 220..................... 185 Non-Analytical Operations 187 Selection Mode ......................................................................................................... 187 Annotating your Gel Images ..................................................................................... 188 Manual Annotations..................................................................................... 188 Context Menus in Annotations Mode .......................................................... 193 Data Annotations ......................................................................................... 194 Internet Query........................................................................................................... 195 Image Manipulation .................................................................................................. 196 Web Page Construction............................................................................................ 197 Launching the automatic web-page builder................................................. 197 Specifying the information ........................................................................... 197 Printing...................................................................................................................... 198 Image Window Print Options ....................................................................... 198 Copying to File.......................................................................................................... 198 Exporting to Microsoft Excel ..................................................................................... 199 User Defined Fields .................................................................................................. 199 Creating User Defined Fields ...................................................................... 199 iv • Contents PG200/PG220 User Manual Attaching Documents...................................................................................202 Entering Values for User Defined Fields......................................................203 Introducing User Defined Fields in Other Experiments................................204 Reference 205 Menus .......................................................................................................................205 File Menu .....................................................................................................205 Edit Menu .....................................................................................................210 View Menu ...................................................................................................213 Analysis Menu..............................................................................................214 Tools Menu ..................................................................................................216 Window Menu ..............................................................................................218 Help Menu....................................................................................................219 The Main Toolbar buttons .........................................................................................220 Image Input Devices .................................................................................................221 Differences between Scanning Devices ......................................................221 Image Capture Tips...................................................................................................222 What resolution should I scan my gels at? ..................................................222 Context Menus ..........................................................................................................223 Keyboard Shortcuts...................................................................................................224 Help 225 Main Online Help.......................................................................................................225 Contents.......................................................................................................225 Restore Tutorial............................................................................................225 Restore Default Parameters ........................................................................225 Run Activation Wizard..................................................................................225 Technical Support ........................................................................................225 About............................................................................................................226 Index PG200/PG220 User Manual 227 Contents • v This page is left blank deliberately Introduction Welcome to the software This gel analysis software has been designed to be as flexible as possible and yet easy to use. All operations are performed from within an easy to use framework. The product is the result of a considerable research effort, resulting in the development of several unique algorithms that offer an unprecedented level of automation and hands-free analysis. We provide a revolutionary new analysis wizard, which guides you systematically through the major analysis procedures. The procedures and analysis options that you choose can be stored as a protocol, so that they can be applied automatically to future experiments. Key Product Points Analysis Wizard Provides a simple guided set up. Only takes moments to complete. User can choose whether to perform DIGE. PG220 only Provides a quick review of the image set. Save and recall routine wizard set up. Select area of interest before analysis. Averaged gel creation during wizard set up. Automated Spot Detection Accurate boundary definition. All spot material captured. Automatic splitting of overlapping spots. Apply filtering before or after detection. Every gel is analysed in the same way. Faint, weakly expressed spots detected alongside saturated spots. Accurate, objective detection of spot shoulders drives accurate mass spectrometry. Increases the number of detected proteins and therefore potential targets. DIGE Experiment Support (DIGE) PG220 only Enhanced image group management, enabling consistent spot detection and improved matching. Allows comparison of spot measurements within and between gels, on normalised image data produced from each gel. Such normalised measurements enable expression change identification. Editing in spot detection, warping and matching modes cascades through all DIGE images within an experiment. Improves the viewing of data for different levels of groups. Automated Image Warping Every pixel in the image is used to calculate image warping. Reconciles intra- and inter-experimental variation. All gels are compared to a single Reference Gel, thereby avoiding the limited approach of pair-wise matching. PG200/PG220 User Manual Introduction • 7 Drives accurate matching and instant visualization of differential expression analysis. Manual warping enables simple, interactive editing. Data Visualisation Flexible and powerful data display and analysis tools: - Spot measurements tables. - Histograms display spot measurements across gel series. - 2D Montage of areas of interest. - 3D display of 2D gel analysis. - Animation across areas of interest. Data presentation tools enable simple determination and examination of the real spots of interest. Synchronised data display allows a spot of interest to be viewed in all windows simultaneously. A report window to create electronic or hard copy of data analysis. 8 • Introduction PG200/PG220 User Manual Getting Started Starting the software Click the desktop icon or select the program from the Start | Programs menu to start the software. When the software is started for the very first time, the Analysis Wizard displays. Use the Analysis Wizard to automatically create your experiments. Note: the Analysis Wizard displays automatically by default, but you can use the commands on the Analysis menu to change this option. When you start the software and it is not the very first time that it has been used, either of the following may occur. The software loads the settings of the previous user, which may display the Analysis Wizard or a recovered experiment. Alternatively, if the last user closed their experiment you will see a message asking, 'Would you like to load a demonstration experiment?' Using the Tutorials The tutorial features are not available in the PG220 Editor software. If you are new to the software, we strongly recommend that you use the tutorials. They show you how to set up experiments using the Analysis Wizard and give you a flavour of the tools and facilities of the software. You should receive the Book of Tutorials with your software. We also provide a pdf copy, which requires the appropriate pdf reader software. You can obtain a free copy of Adobe Reader from www.Adobe.com. To access the tutorial pdf select Help | Tutorial Help. Technical Support The software has been designed to be easy to use. However, should any problems arise with the installation or use of the software, please contact us. Our Technical Support team will be happy to help you. You will receive technical support as outlined in your support contract if you are a current subscriber of the support package for this software. No matter how trivial you may think the problem is, please let us know, we could save you time and help us improve the software. Technical Support contact details can be found in the front of the manual. Alternatively, you can submit your support request from within the software. From the Help drop-down menu select Technical Support. You will find links that allow you to request support, request a new feature or report a bug. We would also appreciate any comments, criticisms or ideas that you may have to offer. PG200/PG220 User Manual Getting Started • 9 This page is left blank deliberately Familiarise Yourself General We recommend that you familiarise yourself with the online tutorials. You will be taken through basic tutorials systematically, giving you an insight into the power of the software. These tutorials are supplied as a variety of data files, including raw images. You must restore these tutorial files before going through the tutorial steps. The Book of Tutorials tells you how to restore the tutorial images that are used in conjunction with the lessons. Starting the software for the first time When the program first opens, you are presented with the first page of the Analysis Wizard. Only Single stain analysis is available in Progenesis PG200. This analysis wizard guides you systematically. through the essential stages of creating and analysing an experiment. These include selecting a single or DIGE experiment, specifying the images to analyse and what analysis procedures are to be performed on them. The wizard allows you to save a Protocol, which includes every stage of the analysis, so that you will be able to apply the same analysis to other experiments in the future. A comprehensive description of the wizard is provided in the accompanying Analysis Wizard section. PG200/PG220 User Manual Familiarise Yourself • 11 Main Screen Layout After the analysis wizard sequence is completed or where the program is started on subsequent occasions, the main program screen opens with an experiment loaded. The screen will appear with the Menu bar and Main Toolbar at the top of the screen. Below the Main Toolbar, the panel to the left is the Navigator and is the main control panel, specific for each analysis mode. The Navigator is comprised of a series of tab views. To the right of the Navigator is a vertical sub-mode toolbar, on which are located mode-specific tool buttons, as well as a help button. The main part of the screen is the workspace area, in which the various component windows are displayed, including the Image and Measurements Windows. Towards the bottom of the screen is the Window Selector Bar, from which the various component windows are displayed or removed. Finally, at the extreme bottom of the program screen is the Status Bar, providing the user with program status information and image coordinate data. 12 • Familiarise Yourself PG200/PG220 User Manual Gel Status Icons Throughout the program, various types of gels are indicated in experiments. The status of the various gels is indicated by a specific colour-coded icon: As you gain experience with the program, the significance and status of a particular gel colour coding will become familiar to you. PG200/PG220 User Manual Familiarise Yourself • 13 This page is left blank deliberately Program Interface The Main Program Window The main window will appear when you start the program. It contains various program windows, which you will use to analyse your data. The colour of the software windows is dependent upon your own system display settings. Title Bar At the top of the main program window, you will find the title bar. It will show the software logo and name, followed by the name of the current experiment. Menu Bar Below the title bar is the menu bar. The menu bar is used to start the analysis functions of the software as well as performing functions such as printing or exporting data to other programs. Main Toolbar Immediately below the menu bar is the main toolbar. Click the buttons to perform common operations, or switch between the various program modes. These buttons, along with the others on the toolbar, are discussed in The Main Toolbar Buttons section. In order to keep the main toolbar concise but flexible, the less commonly used analysis modes have been placed in the Analysis Menu. PG200/PG220 User Manual Program Interface • 15 Navigator Occupying the left-hand side of the main area in the program window is the Navigator. The Navigator is a control panel, which allows you to browse through your files, make changes to your data and control the analysis modes. Attached to the right of the Navigator is a vertical bar. This is the mode-specific toolbar, the contents of which will vary, depending on which analysis mode you are using. See the Navigator topic for more information. Program Window Selector The program window selector is a toolbar located at the bottom of the main program window. It allows you to control which windows are displayed. Each button on this bar represents a different view window, which you can use to look at your data or perform a particular analysis. For example, the image view window shows a picture of the current gel you are working with. Click the buttons to open the windows. The windows are as follows: Main Image window Zoom window Measurements window Second Image window Comparisons window Expression window Histogram window Montage window Protein window Report window Profile window Animation window 3D window 16 • Program Interface PG200/PG220 User Manual Status Bar While you are using the software, the status bar at the very bottom of the main program window shows messages to help you. When you move the pointer over toolbars or menus, the status bar will indicate the purpose of the feature. During various operations such as spot detection, the status bar will indicate the completed percentage of detecting and measuring. In addition, when you move the pointer over the gel image, the status bar will tell you the coordinates of the pointer and the image intensity at that point. Workspace area The rest of the main program window is occupied by the program windows, which can be moved and resized within the workspace in the same way as you move and resize windows on the Windows desktop. If you are working with only a single window, you can maximise it so that it takes up the whole of the workspace and gives you as large a viewing area as possible. Should you need more space to work in, you can resize or hide the Navigator temporarily to increase the available area in the workspace. You can also create your own workspaces that can be recalled when doing specific tasks. See File menu | Workspaces for more information. PG200/PG220 User Manual Program Interface • 17 The Navigator The Navigator occupies the left-hand side of the main program window. It is the control panel from which most of the analysis is controlled. To the right of the Navigator is a vertical mode-specific toolbar that contains buttons specific to the current mode of the program. The vertical toolbar displays the name of the current mode. By default, the Navigator occupies enough space for all the controls to be visible. You can resize the Navigator, by using the vertical splitter bar between Navigator and mode-specific toolbar. At the bottom of the Navigator window, there are a number of tabs visible – File View, Experiment View, and Mode View. The Mode View tab is not visible when you are in Selection mode. File View Explorer The File View Explorer is intended to work like Windows Explorer, allowing you to browse your hard disk and mapped network drives, in order to create and open experiments. A tree structure is displayed showing storage devices - floppy drives, hard drives, mapped network drives, folders and specific files. You will only see files that are relevant to the software, in order to fit all of the information you need into the window in a concise manner. The drive and folder nodes are interrogated in the same way as accessing files in Windows Explorer. If you right click on a folder or file in the File View Explorer, the context menu associated with that item will be displayed. The following commands are available from the context menu. Open At the experiment folder level, Open expands the tree structure for that folder. Explore From Here Upon selecting this option, a File Explorer dialog opens, displaying the files relative to the selected folder. 18 • Program Interface PG200/PG220 User Manual Cancel This command closes the menu. A context menu will also close when you click on the software anywhere other than on the menu. Files The types of files available in the software's File Explorer are: Experiment, Image, Reference Gel, Protein List and Backup. You can find more information about these in the following sections. Experiment Files Click to select an experiment file and display the associated image files. The buttons of the image files relating to the currently loaded experiment are shown as rotating gel icons. The currently loaded experiment file has a red outline around the experiment icon. If the experiment icon has a + symbol next to it, it can be expanded in the same way as a directory. This will reveal the reference gel and any protein lists contained in the experiment. These can be used in the same way as other reference gel and protein list files, described later in this section. Double click on an experiment file to open that experiment and then right click to view the context menu. Open Experiment Opens the selected experiment. Delete Experiment The Delete Experiment command is not available in the PG220 Editor software. This command deletes the experiment along with associated data files (but not the image files). Do not delete the .2Dx file in Windows Explorer, since Windows Explorer will not automatically delete the other files used by that experiment. Backup Experiment This allows you to save an experiment backup file of the selected experiment. Import Gel This feature allows you to copy gels from the selected experiment into the current experiment. All analysis information will be imported (including matching information, provided both experiments are matched to the same reference gel). Cancel Use this command to close the context menu. PG200/PG220 User Manual Program Interface • 19 Image Files Image files will appear in the File View Explorer if they are .tif, .tiff, .gel, .mel or .img files. This feature is not available in the PG220 Editor software. Double click on an image file to create an experiment containing the selected image. If your image is one of several image files that share the same base name, i.e. all images that are named identically with exception to the last character before the file extension, which is used to differentiate gels in a series, then you will be given the opportunity to include the other files in the new experiment. It is not necessary for all images in an experiment to share the same base name. Right click on an image file node to see the pertinent context menu. Creating Experiments This will create an experiment from the selected file(s). The experiment will be given a default name and will be created using the current settings from the Experiment dialog. Add to Experiment Choose this option to add the selected file to your experiment. Modify Image This option allows you to crop, rotate or flip an image and then save it, in place of the original image or with a different file name. Remember that modifying an image that has already been analysed may result in that analysis becoming invalid. Reference Gel Files The file tree can display two types of reference gel files. Shared reference gels are files that have been created in another experiment, but then made available for use by other experiments. The icon of these files has a small arrow in the bottom left corner. Shared reference gels may be found as files in the folder that they were created in, or in any experiment that uses them. Reference gels that have not been shared, can only be found inside the experiment that uses them. It is possible to share these files and use them in another experiment, but this should only be done with the permission of the user that created the file. To use either sort of reference gel in a current experiment, double click on the file. Protein List Files Protein List files can normally be found inside the experiment in which they were created. It is possible to share these protein lists and use them in another experiment, but this should only be done with the permission of the user that created the file. When a reference gel is shared between experiments, the protein lists of that reference gel also become shared. Shared protein lists will also appear in the folder that contains their reference gel. 20 • Program Interface PG200/PG220 User Manual To use a protein list in a current experiment, double click on the file. It is not necessary to import protein lists individually, if you also intend to import the reference gel that contains them. Backup Files A backup file appears as a group node in the File Explorer tree. You can look at the files which have been saved in the backup, by double clicking on the filename or clicking on the expand node. Right clicking on a backup file displays the context menu. Restore Backup Choosing this command displays a dialog allowing you to select the target folder. The restored experiment will be loaded once it has been decompressed. Experiment View Explorer This shows you details about your current experiment and the data in it. The Experiment View Explorer shows a tree-structure, displaying an experiment, a reference gel and any associated gels, in a hierarchical structure. Using the tree structure is similar to using the folder tree inside Windows Explorer. Each item on the tree is called a node. Each node represents an item of information or a group of items. You can open group nodes or individual nodes, by clicking on them. Right clicking on each node will present a context menu of commands, specific to that node. The Experiment View Explorer has several main types of node: Experiment Node This is the top-level node representing the currently loaded experiment. It displays the name of the experiment you are using, which can be copied, backed up, or renamed using this node. You will find a node for each of the gels in the experiment, as a sub-node of this experiment. Right click on the experiment to open the pertinent context menu. Backup Experiment With this command, you can save a backup file of the current experiment. For more information, see the section on Backing up and Restoring Experiments. Multiplex Groups This feature is not available in Progenesis PG200. This command option is only active if a DIGE experiment has been loaded. When selected, the DIGE Groups information dialog box is displayed, showing the multiplex group selections made during the Analysis Wizard setup. PG200/PG220 User Manual Program Interface • 21 The structure of the multiplex groups can be reviewed in this dialog. However, it is not possible to make changes to group, internal standard or group sample gel names in the dialog. Number of Spots Selecting this command displays the Number of Spots in Gels information dialog box. Within the dialog, the user can review the number of spots in the various component gels of the experiment. Rename This selection opens an edit box over the name of the node, allowing you to enter a new name (inplace editing). You can also display this edit box by clicking on the node, while it is already selected. Cancel Use this command to close the context menu. 22 • Program Interface PG200/PG220 User Manual Experiment Node – DIGE Experiments This feature is not available in Progenesis PG200. In the case of DIGE experiments, the gel node structure below the experiment node is also displayed in a Replicate Group structure. Each replicate group – control, treated, standard – ( the matched spots within its members. ) is produced by averaging the values of Reference Gel Node This node represents the reference gel in your experiment. It is an artificial gel, acting as an index of the spots in your experiment. All spots of interest in the experiment should be mapped into the reference gel, so that they can be cross-referenced with equivalents in other gels and be identified. You can only have one reference gel per experiment. Double click on the gel to make it the current gel and then right click to open the context menu. Select Gel This command sets the selected gel as the current gel. Create Protein List With this selection, a new protein list is created in the reference gel. Rename This causes an edit box to appear over the name of the node, allowing you to enter a new name (in-place editing). You can also bring up this edit box by clicking on the node, while it is already selected. PG200/PG220 User Manual Program Interface • 23 Gel Node These nodes represent the gels in the experiment. Double click on the gel to make it the current gel and then right click to display the relevant context menu. Select Gel This command sets the selected gel as the current gel and displays it in the Image window. Create Reference Use this command to create a new reference gel based on the selected gel. You will also be given the option to maintain existing matching, or to automatically reference other gels. See the sections on Reference Gels and Matching for more information. You will be asked for confirmation, if there is a reference gel already present in the experiment. Create Averaged Gel This option allows several experiment gels to be combined as a statistical mean, to produce an averaged gel. Move Up This command allows you to change the order of the gels in the experiment. All selected gels will be shifted one place up the experiment tree. Be aware that you cannot place a slave gel above the reference gel. Move Down This command allows you to change the order of the gels in the experiment. All selected gels will be shifted one place down the experiment tree. Remove Gel Remove the selected gels from the experiment, deleting all analysis data. You will be asked for confirmation before this operation is carried out. Rename This causes an edit box to appear over the name of the node, allowing you to enter a new name (in-place editing). You can also bring up this edit box by clicking on the node while it is already selected. Averaged Gel Node The spots in an averaged gel will have mean values for the measurement data and standard deviation information will also be available. Double click on the gel to make it the current gel and then right click to display the relevant context menu. 24 • Program Interface PG200/PG220 User Manual See the Gel node section for information about the remaining commands. Averaging Parameters You can specify several criteria that a spot must conform to, before it can be considered of sufficient quality to form part of an Averaged gel. It is possible to specify the number of gels that a spot must appear in, before it is included (by default the spot must be present in all the sub-gels). It can be specified, whether absent spots should be represented, when calculating mean and standard deviation. For example, should absent spots be treated as being present but with zero volume? You can specify whether to apply a maximum level of variation either in terms of coefficient of variation, or in terms of percentage standard error of the mean, for any numeric field beyond which a spot will not be included. This option allows you to modify these parameters and rebuild the averaged gel, according to the new settings. Sub Gel Node Sub-gels are used to construct an averaged gel. Each may be one of a triplicate set of gels, for example. Any modifications to such a sub-gel will immediately be reflected in the averaged gel. Double click on the sub-gel to make it the current gel and then right click to display the pertinent context menu. Recreate Average This command allows you to choose the gel image that will be used for the averaged gel. You will also be given options to maintain existing matching or to automatically reference other gels. Remove from Average This command removes the selected sub-gel from the average, making it a normal gel in the experiment again. The effect of this on the average will be seen immediately. See the Gel node section for information about the remaining commands. PG200/PG220 User Manual Program Interface • 25 Protein List Node A Protein List contains the details of one or more proteins that can be assigned to your spots, once they have been identified. Information stored about each protein includes, but is not limited to, an identifying name and theoretical or experimental pI / MW information. See the section on 2D Calibration for more information. Right click on the protein list to display the relevant context menu. Select Protein List This command makes a protein list the current protein list. The current protein list is shown in the Protein Window. Copy Protein List This option makes an exact copy of the protein list using a different name. You can now modify the copy without affecting the original list. Modify the list via the Protein Window. See the Protein window section for more information. Remove Protein List With this command, the selected protein list is removed from the reference gel. This will cause the list and all associated proteins to be deleted. Any spots, to which one of these proteins has been assigned, will no longer have a protein assignment. You will be asked for confirmation before this operation will be carried out. Resizing the Navigator If you wish to make more space in your workspace area for the program windows, or if you want to see more of one of the views inside the Navigator, you can resize the Navigator. To resize the Navigator. 1 Move the pointer over the splitter bar - the vertical separator between the shape, when you navigator and vertical toolbar. The pointer changes to a are over the splitter bar, signifying that you can now move the separator. 2 Click and drag the splitter bar left or right. 3 Release the pointer when the splitter bar is in the required position. Hiding the Navigator At the top left of the Navigator window there is a button, which you can click to hide the Navigator. When you hide the Navigator, only the splitter is visible at the left of the main program window. When the Navigator is hidden, the displayed arrow changes direction . To make the Navigator Show/Hide button again, or resize the Navigator using the splitter bar. re-appear either click the Mode Specific Toolbar The vertical toolbar displays various tools and buttons, the number and type being dependant upon the mode selected. Only one button is always visible in this toolbar - Help Topics. This is located at the bottom of the toolbar and when selected displays the Online Help. When editing tools are shown in Detect Spots mode, you will also see an Undo button just above the Help Topics button. 26 • Program Interface PG200/PG220 User Manual Other Tools and Buttons These buttons appear in the top part of the toolbar, according to the mode selected. They are mutually exclusive, which means that only one of the buttons can be active at any one time. They indicate the sub-mode of the analysis operation you are working on. Depending on the button selected, the pointer will perform different functions. Mode Name The name of the mode that you are currently using appears between the fixed buttons and the mode-specific buttons on this vertical toolbar. PG200/PG220 User Manual Program Interface • 27 Program Modes and Sub-Modes You can perform several different kinds of analysis on your gel images. Each type of analysis requires a different set of controls and pointer operations. Therefore, we have split the operation of the program into modes. Only one mode is active at any one time. The selected mode button appears with an indented appearance. Program Modes You will find various program modes to help you analyse your images. A description of these modes now follows: Selection Mode This mode is the normal mode of the program, used for experiment, file and feature selection only. Spot Detection Mode Spot Detection allows the automatic detection and manual editing of spots in the gels of your experiment. See the Spot Detection section for more information. Background Subtraction Mode Background Subtraction is performed on your gels to account for the background intensity of your gel material on the image. See the Background Subtraction section for more information. Warping Mode The warping mode allows you to warp automatically the gel images into alignment with a reference gel. You can optionally view the warped image overlaid on the parent image, as a complementary colour image pair. See the Warping section for more information. Matching Mode Selecting Matching allows you to identify those spots that represent the same protein in different gels. See the Matching section for more information. Add to Reference Gel Mode This mode allows you to map those unmapped spots into the Reference Gel, so that they can be matched and identified in the experiment. See the Adding Spots to Reference Gels section for more information. Normalisation Mode Normalisation mode allows you to normalise the volume of the spots in your gels, allowing you to compare accurately the measurements of spots in different gels. See the Normalisation section for more information. 2D Calibration Mode In 2D Calibration mode, the pI and MW of spots in the gels can be calibrated, when the identities of some of the spots are already known. This is achieved by the use of marker proteins or mass spectrometry. See the 2D Calibration section for more information. 1D Calibration Mode This mode can be used to calibrate the pI and MW of spots in a gel when 1D calibration lanes have been run alongside the 2D gel. Alternatively, it is possible to calibrate gels using arbitrary units of your own. See the 1D Calibration section for more information. Spot Filtering Mode With spot filtering mode, you can specify that only certain spots should be displayed within the program, the rest being filtered out. 28 • Program Interface PG200/PG220 User Manual Manual selection of spots can be performed or automatic selection by applying several different criteria. The Spot Filtering section provides details on this mode. Intensity Calibration Mode The Intensity Calibration mode is used to relate the numerical values stored in your gel image files into real-world values of optical or diffuse density. See the Intensity Calibration section for more information. Annotations Mode This mode allows you to put comments, arrows and text boxes on to your Image window, to annotate features of the gel or analysis. See the Annotations section for more information. Internet Query Mode Use this mode to enable Federated 2DE Databases on the Internet to be queried automatically, for proteins matching information stored in the spots of your gels. See the Internet Queries section for more information. Peak Adjustment Mode This mode allows you to specify which algorithm to apply in order to generate the coordinates of your spots, and manually adjust the location of the coordinate within any given spot. It is particularly useful in connection with spot picking. See the Peak Adjustment section for more information. Profiling Mode With profiling mode, you can view an intensity profile of selected areas of the gel image. See the Profiling section for more information. Spot Picking Mode This mode allows you to map the coordinates of selected spots in the current image to coordinates relating to locations on a separate device. An example of this would be where you have analysed a high quality gel image and wish to calculate picking coordinates on a robot, with a built-in camera. See the Spot Picking section for more information. Program Sub Modes In addition to having mutually exclusive modes, the software provides sub-modes that change the behaviour of the pointer, or the sort of operation you are performing within the current mode. For instance, in Spot Detection there are many different ways of manually editing the spots. You can draw spots directly on to the gel, or you can separate merged spots by cutting a straight line through them. To choose which of these operations is performed when you click on the Image window, select the relevant sub-mode from the vertical toolbar to the right of the Navigator. PG200/PG220 User Manual Program Interface • 29 Options When the Options feature is selected from the Tools menu, a dialog is displayed, divided into various tabs. On each tab, you can customise the way the program appears and behaves. Select each tab at the top of the dialog to switch between the various option types. Display tab From this tab, you can change the various display options. Annotations Manual Annotations To display any manual annotations that have been added to your gels, select this check box option. See the section on Manual Annotations for further information on how to add manual annotations. Data Annotations The program stores data about each spot that has been detected and it is possible to have this information appear as text labels on the image. To show these labels, select the Data Annotations check box option. Opening the drop-down list beneath this checkbox, allows you to select the information that will be shown in the labels. This includes all of the information that known about the spot, including the identification number, known protein identity and any user-defined values that the user may have entered. Another option in the drop-down list is <Use mode default>. With this option, the field displayed will vary according to current mode selected. See the section on the Mode Defaults tab, for information on how to set the default data annotation field for each mode. Depending on the field selected and the density of the gel, selecting this option may cause the display to become “cluttered”. See Annotating Your Gel Images in the Analysis section, for information on formatting these labels. Units Coordinate If your gels contain information about the resolution at which they were scanned, you can use the Coordinate drop-down list on this tab to specify which units will be displayed on the scrollbars, and in the Area field of the Measurements Table. 30 • Program Interface PG200/PG220 User Manual See Scaling for information about how to add or modify scaling information for a gel image. Molecular Weight This drop-down list allows you to select the units used in the Molecular Weight field. There are two options of Molecular Weight to choose from: daltons (d) or kilodaltons (kd). You can also enter your own unit name. Windows Options Click on the Window Options button to access additional options relating to activation and scrolling of windows. Scrolling Tick the Link Image windows scrolling option to make the Main Image window and the Second Image window display the same area and magnification. See the section on Zoom Window for an alternative way to set this option. Activation Select this option if you wish the windows, which are relevant to a mode, to activate automatically when you enter the mode. This feature is active by default. PG200/PG220 User Manual Program Interface • 31 General tab It is possible to make some changes to the program display, in order to produce a working environment that is more suitable for you. On this Options page, you can set the Image display and AutoRecovery optimisation. Image Display Optimisation Depending on the size of your images and the resolution at which you scan them, you may find that your image files are very large. The result of this can be sluggish program response, due to the amount of processing time required to display such images on the screen. This option is designed to help with this problem. When the option is active, the resolution of the image displayed is reduced to keep the image within a defined size limit. This does not affect the analysis, but only the image that is displayed on-screen. This may result in the image appearing pixelated, but the benefits in terms of performance often make this worthwhile. It is possible to turn this option on or off in this dialog and specify the maximum size of the image displayed. This option is Off by default. Maximising the size of the image 1 Select the Image display optimisation checkbox. 2 Type a new value into the Restrict memory usage to entry box. This entry box is disabled if the option is not selected. If you do find that your image files are very large (40mb or greater, as a very rough guide), it may be that you are scanning your gels in an unnecessarily high resolution. Due to the way scanners deal with high resolutions, this may actually be detrimental to the quality of your results. Please contact our support desk, for more information on this subject. 32 • Program Interface PG200/PG220 User Manual On some computer systems, the video hardware may not be capable of displaying an image, above a certain size. Saving Options You can set the various options to perform Autorecover at a set frequency, and whether to reload the previously used experiment, when you next use the software. The Perform save for AutoRecover check box controls whether a backup copy of the current experiment will be made at regular intervals. This is so that in the event of the computer crashing, you can restore the most recent backup to minimise the amount of work lost. You can use the edit box to specify how often the backups should occur. The Reload previous experiment on program startup check box controls whether the most recently accessed experiment or completed backup, should be loaded when the program starts. PG200/PG220 User Manual Program Interface • 33 Printing tab Selecting the Printing tab allows you to set the print range and scale. Set your print choices, and then select OK to confirm your choices. Print Range In this section of the dialog, you can specify how much of a window is printed. When you have zoomed in on an image, it is possible that not all of the data that could be displayed is visible in the window. You can choose to print the visible area or the entire image for that window. Print Scale Images can be printed using one of three scaling methods. Select from the Fit to the page, Actual size or Scaled options. If you select Scaled, the scale percentage can be typed in the text entry box, alongside the option. The software is capable of printing at an arbitrary size or at a size where the output is as large as possible without going over the edge of your page. The Scaled default is set to 100% of the original size, using the current zoom factor. Click on OK to confirm your choices. Histogram Print Options Clicking the Histogram print options button, displays the Histogram Print Options dialog. 34 • Program Interface PG200/PG220 User Manual Histograms use their own independent set of options for printing. They do not respond to print options set elsewhere. This dialog allows you to set the scale at which to print the histograms and to control the inclusion of keys, explaining the histogram contents. Setting the print scale for histograms Clicking the spin control buttons increases or decreases the print scale. To change whether keys appear on every page or only the final page: 1 Click on the Show key(s) on each page check box. The contents of the keys can be set, using the Histogram window’s Histogram Options button. 2 Select OK to confirm your choices. PG200/PG220 User Manual Program Interface • 35 Copying tab From the Copying tab dialog you can specify the copy range and the default copy to file settings, which affects the Copy to File facility from the Edit menu. Changing the copy range Select either Visible area of the image or Whole of the image. To change the filenames of copy to file settings: 1 Enter the Text file, Bitmap file and Export tables with Template pathnames by either typing them into the text entry boxes, or clicking on the button alongside the text entry boxes and selecting the sub-folder and file from the resulting dialog box. 2 Click OK to confirm your choices. Images or data copied to the files will overwrite any previously saved files of the same name, unless you specify a new filename at the time of copying. The Export tables with template option, allows you to select a template (.xlt) file, which can optionally be used when you export tables to Excel. If the chosen template contains macros (series of Visual Basic commands used to automate certain tasks), you will be able to use them with the data in Excel. 36 • Program Interface PG200/PG220 User Manual Detection tab From the Detection tab, you can specify algorithms and values to be used when detecting spots. Detection method If the Show Detection methods check box is selected, the available spot detection methods will display in the drop-down list at the top of Navigator, in the Detect Spots mode. Clearing this check box means that only the default detection method will be available. In the case of DIGE experiments, the default Detection method is selected automatically. Parameters You can enter values for Minimum spot area and Split factor spot detection parameters, to specify the area in pixels of the smallest spot that you are interested in detecting, and how vigorously the software should attempt to split merged spots. This parameter is not applicable to DIGE experiments. Peak Location By default, spot coordinates are assigned to the centre of mass of each spot. We also provide an alternative algorithm, which assigns the coordinate to the area of highest intensity inside the spot. Use the check box to select which of the two methods you want to use by default. The spot picker will pick at the point specified in the measurements table as the coordinate. We provide two alternatives for specifying which point of the spot to pick as the coordinate. See the Analysis Procedures | Peak Adjustment section for more information. PG200/PG220 User Manual Program Interface • 37 Comparisons tab The Comparisons tab contains drop-down lists that allow you to select the comparison gel and the numerical field to be used as the basis for creating difference maps, calculating t-test, ANOVA and the Difference field. In addition, you can set the threshold at which statistical values are highlighted in tables. Difference maps provide a graphical representation of which matched spots have been upregulated or down-regulated from a specified gel relative to the gel currently being examined, using a specified numeric measurement, e.g. volume. For more information on Difference Maps see The Program Windows | Main Image window | Further Display Options | Difference Map section. Similarly, for further information on data fields, see Program Windows | Measurements window | Field Selection | Data Fields. Compare with Gel By activating this drop-down list, you can select which gel in your experiment is used as the baseline, for calculating the differences that the Difference Maps and Difference field use. In order to utilise the statistical analysis tools available in the software, the loaded experiment must be comprised of two or more averaged gels. Displaying this drop-down list enables the user to select a comparison averaged gel, against which the averaged gel data for a selected field can be compared. Field to Compare From this drop-down list, you can select the numeric field parameter, used to determine differences and also undertake the statistical analyses. 38 • Program Interface PG200/PG220 User Manual Select a field from the list. Include internal standards in ANOVA calculations By default, internal standards are not included in ANOVA calculations. Select this option only if the gels you are treating as internal standards are not really internal standards, otherwise they will skew the results. Highlight p-Values This check box option at the bottom of the Comparisons tab enables the user to set the statistical significance highlight threshold value and colour, for emphasizing significant p-value results in the Expression, Measurements and Comparisons windows. 0.05 is the default threshold p-value below which colour highlighting is applied. 1 Type in a preferred p-value, if required. 2 Click in the colour well to select a preferred highlight colour. PG200/PG220 User Manual Program Interface • 39 Mode Defaults tab This tab allows you to choose for each mode, which spot measurement field will be displayed in Data Annotations and which fields will be displayed in data-tips when the pointer is over a spot in the image window. Setting the parameters for the Mode Defaults 40 • Program Interface 1 In the Select Mode drop-down list, click on an analysis mode for which you wish to select the data fields. 2 Now select a field from the Select Data Annotation field drop-down list. 3 From the Select Data-tip field checklist, select as many of the boxes adjacent to the field names, as required. PG200/PG220 User Manual When the specified mode is active, the selected annotation data is displayed once the pointer is stationary over a spot for a few seconds. PG200/PG220 User Manual Program Interface • 41 3D tab This tab allows you to enable/disable the 3D features of the software. The 3D tab dialog contains a check box to enable/disable 3D features (default enabled), along with Troubleshooting Technical Support contact options, to deal with video card and driver problems. 42 • Program Interface PG200/PG220 User Manual Image and Experiment Files The following sections describe the files that the software uses to analyse your data. Image file types For each gel you intend to analyse, you should capture an image of that gel, using a camera or scanner and save it as a TIFF image file or Molecular Dynamics GEL file or Melanie's MEL file. The software also supports the file formats produced by Fuji’s BAS, FLA and LAS systems. TIFF Files This acronym represents Tagged Image File Format and is the standard used by most scanner and camera packages. Files are saved with either a .tif or .tiff extension. The software can load many forms of TIFF, except those with compressed image data, or those that contain colour information. GEL Files GEL files are generated by Molecular Dynamics densitometers and can be loaded into this software. MEL Files These are TIFF files produced by the Melanie gel analysis package and contain additional information specific to that package. You can load these images for analysis, but this software does not support any additional information that has been produced using the Melanie package. FUJI Files This is a family of several slightly different, image types produced by Fuji’s BAS / FLA / LAS systems. Images consist of two files, one with an .img extension and the other with an .inf extension. This software supports these file types. Experiment file types For the software to store the data of the analysis from your gels, it must use the image file of each gel and create some files containing analytical data in our proprietary format. The number of files used varies, depending on the sort of analysis you perform. The software handles all the loading and saving for you, using an index file called an Experiment file. These experiment files have the extension .2dx and are stored in the same folder as the images and associated data files. The Gel files have the extension .2dg and are stored in the same folder as the images. For images to be included in an experiment, they must all be in the same folder as that experiment. Other experiment files you may encounter include shared reference gel files with the extension .2dr, protein list files with the extension .2dp, and 1D Calibration ladders with the extension .lad. Do not attempt to move or delete experiment files yourself outside the software, since you might omit some of the required analysis files and lose your data. You can produce an experiment backup file that contains all of the files needed to reconstruct that experiment in any folder on any machine. An image file can only be included once in a particular experiment, but it is possible to include an image file in several experiments. This can be useful if you want to try analysing your data in several different ways. PG200/PG220 User Manual Program Interface • 43 The Current Selection Throughout the documentation, you will find references to current experiment, current gel, current spot, current protein and current mode. Current Experiment This refers to the experiment that is currently loaded in the software. It is only possible to work on a single experiment at a time. Consequently, an experiment must first be opened, before it can be studied. Current Gel The current gel is the gel that is currently loaded and displayed in the Main Image window. This can also be checked using the Navigator Experiment view and can be changed from there, or from the main toolbar. Current Spot Many of the software windows show you data relating to the current spot. This selection is indicated within the Image windows, by highlighting the spot with a different coloured outline (green by default, although this can be changed). The precise behaviour of each window, in relation to the current spot, is described in the relevant section. You can change the current spot by clicking on a different spot in any of the windows, e.g. the Measurements, Comparisons or Histogram windows. Current Mode You can use different modes and the same set of windows to do different sorts of analysis. The current mode is indicated in three ways: the indented button on the main toolbar. by the third tab visible in the Navigator. the tools and text displayed on the vertical toolbar, to the right of the navigator. 44 • Program Interface PG200/PG220 User Manual The Program Windows Selection mode window facilities The software windows provide different facilities when in Selection mode, or in Analysis mode. This section is intended to explain how to use the windows in Selection mode. For descriptions of how to perform analysis using the various windows, see the relative analysis mode section. Main Image window This window shows the image of the current gel you are working on and provides the main interface for analysing the gels. Depending on the analysis mode and display options you are using, this image is overlaid with graphical information relating to the analysis of your gel. This might include: The positions and shapes of the spots Lines showing how spots match to each other Spot labels (e.g. the name of the protein assigned to a spot) Image window Toolbar At the top of the window is a toolbar with the following features: Contrast and Colour button This button activates the Contrast and Colour dialog. The dialog allows you to perform several operations that affect the way the image is displayed, including changing the contrast of the image and selecting a colour palette. The dialog is explained in more detail in the Contrast and Colour section. Display Options button Selecting this button activates the Display Options dialog. The dialog box allows you to select the overlays that will be shown on the image (spot shapes, match vectors, etc.) and their colours. It also lets you choose whether to see a normal image of the current gel or alternatively, examine the effects of background subtraction. The dialog is described fully in Display Options, later in this section. Further Display Options button This button activates the Further Display Options dialog. This dialog allows you to activate the advanced overlay options, Saturation Maps and Difference Maps. Again, the dialog will be explained in Further Display Options, later in this section. Zoom one to one button Choose this button to adjust the magnification of the image, so that it is viewed at the original size. Zoom to Fit button While this button is selected, the image will be scaled to fill the window. If you resize the window, the image will automatically be resized. PG200/PG220 User Manual The Program Windows • 45 Zooming in the Image window The image area of the Image window is bordered to the right and at the bottom, by scaled scroll bars. In the bottom right hand corner of the window there is a zoom button, which can be used to adjust the magnification of the image. What is Zooming? Zooming is a method that allows you to see a specific area of your image in detail, or see more of your image in less screen space. Terms often used are Zoom in and Zoom out, which increase and decrease the magnification respectively, so that your image can be seen in a specific area of the screen. Using the Zoom Button In the bottom right hand corner of the Image window, there is a zoom button, which for changing the magnification of the Image window. is used Click this button to turn on the zooming tool. The pointer will only perform zooming operations in the Image window, until this tool is turned off. With the zooming tool turned on, click will zoom in on your image. To zoom out, use right click and to zoom fully out from your image, right click and drag. You can press the ESCAPE key or click on the zoom button when it is available, to turn off the zooming tool. With the zooming tool active, the pointer changes to a magnifying glass. When the pointer is moved over any other part of the screen other than the image window, the pointer reverts to the standard arrow pointer. If you click when the standard arrow pointer is showing, then you will immediately turn off the zooming tool. Using the zooming tool: 1 Click on the Zoom button at the bottom of the image window. 2 Move the pointer over the image. The pointer will change to a magnifying glass. 3 Click the image as many times as desired. The image will be positioned so that the feature, on which you click, moves to the middle of the screen, wherever possible. Magnifying a feature is similar to zooming. Magnifying a feature: 1 Click on the Zoom button at the bottom of the Image window. 2 Move the pointer over the image. The pointer will change to a magnifying glass. 3 Click and drag out an area in the Image window. When you release the pointer, the image is magnified so that the area you have chosen is as large as possible and will be centred. The zooming tool will automatically turn itself off, after being used to drag out an area on the image. What is Scrolling? If you have zoomed in on your image, it is likely that you will only be able to see a section of it in the Image window. To select the section you are to look at, scroll the image using the scroll bars provided. Using the Scaled Scroll Bars The scaled scroll bars show you which area of the image is presently visible in the X and Y directions. Since the scroll bars show a scale, you can also use them to see where you are viewing on the image, in pixels or inches. 46 • The Program Windows PG200/PG220 User Manual Changing the area you are viewing: Drag the raised part of the scroll bar (the scroll box) to a new position, or Click on one of the arrow buttons to move along a short distance, or Click between an arrow button and the scroll box to move a greater distance. Since the width of the scroll box represents the amount of image shown in the Image window, resizing the scroll box will change the magnification. This is because the same screen space is being used to show more or less of the image. Similarly, increasing the size of the window will affect the width of the scroll box. Resizing the scroll box to change the magnification: 1 Place the pointer on the edge of the scroll box. 2 Drag the edge of the scroll box along the scaled scroll bar to resize it. As you drag, the Image window will update. Contrast and Colour This dialog allows you to modify the contrast settings and colour scheme that are used to display your images. Colour Scheme This is a drop-down list containing the names of all of the colour schemes installed on the system. There are several colour schemes supplied with the software. These include Coomassie Blue or Silver Stain. When selected, they cause the displayed images to appear as if they had been stained using those methods. In addition there are two pseudo-colour schemes, which can be useful for visualising faint spots, as the human eye is often more sensitive to colour than to shades of grey. You can change the colour scheme used by the gel in the window, by selecting a different scheme in the list. Three colours define each colour scheme - the low-end colour used to represent pixels of low intensity, the mid-point colour used to represent pixels of medium intensity and finally, the highend colour used to represent pixels of high intensity. The palette for the image is calculated by changing smoothly between these three colours. If the image is currently displayed using the Overlaid or Warped setting, the colour scheme will be defined by two complementary colours: the alpha colour and the beta colour. The slave gel (in the PG200/PG220 User Manual The Program Windows • 47 beta colour, green by default) and the parent gel (in the alpha colour, magenta by default) are overlaid on each other. The spots will display as black when the two overlays are well aligned. Besides the Magenta-Green colour scheme, we provide other complementary colour schemes – Yellow-Blue and Red-Cyan. You can create a complementary colour scheme of your own. Depending on which colours you choose, the well-aligned features could combine to give some colour other than black. Colour Scheme Preview Below the Colour Scheme List is a horizontal panel, which displays the range of the currently selected colour scheme. New button If you wish to create your own custom colour scheme, click on this button. A small dialog will appear asking you to enter a name for the new scheme. Type in a name and click OK. The colour scheme will be identical to the current colour scheme at first. You can change this using the Colour Button described below. Delete button Clicking this button will cause the current colour scheme to be deleted. This option is only available for colour schemes that you have created yourself. Reverse Colour Scheme button Selecting this button will reverse the orientation of the current colour scheme. This will cause your image to be displayed like a photographic negative. For example, using the default Greyscale colour scheme, white will become black and vice versa. Colour button Clicking on the Colour button causes a drop-down menu to appear, displaying the settings for the current image view colour scheme. 48 • The Program Windows PG200/PG220 User Manual Click in the colour block (well) of the appropriate item in the menu to change any of these colours. A standard colour palette will then appear, allowing you to select the colour that will be used. Expand button Clicking on the Expand button >> on the right hand side, causes the dialog to expand, allowing you to alter the region of the gel that is used to calculate the palette. The expanded dialog includes a panel that shows a small image of the entire gel image. If the Adjust contrast according to this region check box is not ticked, the entire image will be used to calculate the palette. When this check box is ticked, a rectangle will be displayed, showing the area of interest on the image from which the palette is calculated. You can change the rectangle by clicking on the image and dragging out a new rectangle, or adjust the existing rectangle by clicking on and dragging one of rectangle sides or corners. The image will update immediately. When editing very faint spots, this feature can be very useful. You can set the area of interest to a very small area around the spot, or what you think may be a spot and you will then get very good separation in this area. However, this is likely to have the side effect of making other areas of the gel appear very pale. When the Affect all gels check box is ticked, any change you make in the dialog will be applied to every gel in the experiment. To Adjust the Contrast Settings In the remainder of the Contrast and Colour dialog, you can adjust the contrast of the gel image. Precise adjustment of brightness and contrast is a matter of personal taste and is likely to vary from user to user and gel to gel. The panel labeled Contrast Adjustment contains a graph that displays the frequency with which each pixel intensity occurs, within the area of interest. Peaks on the graph represent pixel intensities that occur most frequently within the current area of interest. Low-end and high-end sliders below the graph, display the pixel intensities associated with the low-end and high-end colours. They define the range of pixel intensities in the image that will be mapped to different colours in the display image. You can directly modify the brightness and contrast of the display, by moving these sliders. Movement is performed by clicking on them and dragging them along the graph. Moving these sliders closer together will increase the contrast and vice versa, while moving them to the right will increase the brightness. PG200/PG220 User Manual The Program Windows • 49 Auto Levels When this option is activated, the low-end slider will be set at the minimum pixel intensity in the sampled rectangle. The high-end-slider will be set at the maximum. Image Histogram Section This section of the dialog allows you to modify the way the palette of the display image is created. Contrast Slider The slider at the bottom of the dialog controls the contrast. Dragging it to the right will increase the contrast. This may make it easier for you to visualise the faint spots in the gel, although it may also tend to emphasise noise in the image. Image Window Display Options This dialog allows you to control the overlays that will appear on the image. You can select/deselect any overlay and define the colour in which they appear. The colours that are used remain consistent throughout the program. Changing a colour in this dialog will change it in all other windows in which that colour is used. Slave Spots This is a check box that allows you to control whether or not spots that have been detected in the gel will be shown on the image. The colour well to the right of the label shows you the colour in which they will be drawn (blue by default). Clicking on the colour well will activate a Colour dialog, which will allow you to change the colour that is used. Reference Spots Selecting this check box enables you to display spots from the current reference gel on the image. The colour well to the right of the label shows you the colour in which they will be drawn (red by default). Clicking on the colour well will activate a Colour dialog, which will allow you to change the colour that is used. Current Spot When enabled, the currently selected spot is highlighted with a coloured outline. 50 • The Program Windows PG200/PG220 User Manual The colour well to the right of the label shows you the colour of the outline (dark green by default). Clicking on this colour well will activate a Colour dialog, which will allow you to change the colour that is used. This colour is used throughout the program, to indicate data relating to the current spot. As an example, in the Measurements window the row containing the current spot will have a background of this colour. Current Area Selecting this check box highlights the currently selected area with a coloured outlined circle. The colour well to the right of the label shows you the colour of the outline (yellow by default). Clicking on the colour well will activate a Colour dialog, which will allow you to change the colour that is used. Match Vectors With this option enabled, match vectors will be shown on the image. A match vector is a line that connects a spot on the image with any reference spot to which it is matched. The colour well to the right of the label shows you the colour of the outline (magenta by default). Clicking on the colour well will activate a Colour dialog that will allow you to change the colour that is used. Grid Use this option to show a grid on the image with grid spacing of 100 pixels. The colour well to the right of the label shows you the colour of the vector (light green by default). Clicking on the colour well will activate a Colour dialog that will allow you to change the colour that is used. Spot Styles This option provides you with a drop-down list, allowing you to specify the way that spots and reference spots are drawn on the image, if they are active. Standard The spots are shown with their actual shape overlaid on the image. If the spot is matched, only the spot outline will be shown. Otherwise, the spot will be shown as a solid block of colour. Outline This style is identical to the Standard method described above, except that all spots are shown as outlines, whether matched or not. This can be useful when editing the gel. Filled With this style, all spots are shown filled with a solid block of colour. Other than reference spots, which are filled with the default reference spot colour, all spots are filled with the slave spot colour. Crosshairs If this style is selected, each spot is represented by a small cross at the spot centre. This can be useful if you are only interested in spot positions. Ellipses This style is identical to the Outline type described earlier, except that the spots are highlighted as ellipses. Crosshairs and Ellipses are not available in Spot Editing mode, as they would make editing impossible. PG200/PG220 User Manual The Program Windows • 51 Image This is a drop-down list allowing you to specify the way that the gel image will be displayed. Normal The gel image will be displayed normally, without any modification. Overlaid In this view, the current gel and the parent gel are shown overlaid on each other using complementary colours. Warping information is not utilised in the display. Warped Again, the current gel and the parent gel are shown overlaid on each other using complementary colours. In this case, however, the current gel is warped (assuming that warping has been calculated). Overlaid and Warped views are not available from the image drop-down list when in Spot Detection mode. Minus Background If you have performed background subtraction on the gel, you can select this option to remove the background from the display image itself. The spots will be displayed at the grey level intensity minus the background level. This will result in a white gel with faint spots. Background Only Where you have performed background subtraction on the gel, you can select this option to show only the background of the gel. The spots are removed from the image and the spot background level replaces them. This can be a very useful tool when judging the quality of background subtraction and spot detection. If spot material is still visible after removing the background, then further editing is probably required. None With this option selected, no gel image will be shown in the window, but only a flat white background. This can be useful when trying to judge the quality of matching. You can look for anomalies in the match vectors, without the distraction of the gel image itself. 52 • The Program Windows PG200/PG220 User Manual Further Display Options This dialog allows you to control the advanced display options for the window. Saturation Map This special overlay is designed to show you the level of saturation, within the image created by the scanning process. Due to the way scanners work they are less accurate as they approach the extremes of their optical sensitivity. It is also possible to exceed the optical sensitivity of the scanner, resulting in areas of the image that are flat areas of the maximum or minimum possible intensity. This is known as saturation. The result of this can be that, instead of having a smooth peak for a spot, the image actually has a plateau and the peak is cut off half way up. This makes it more difficult to detect the shape of the spot accurately and makes it impossible to quantify the spot adequately. Saturation Map is a feature that is designed to show you where saturation may have occurred in the image. It is then your decision whether to continue with the analysis, or return to the scanning process to obtain a better image. When you activate this option, a coloured overlay will appear on the image to show you where the pixel intensities are approaching the extremes. The more pixels in the gel that are saturated, especially those of high intensity that are part of a spot, the worse the problem. You can modify the map by adjusting the tolerance for pixels that will be regarded as saturated, at both the upper and lower ends. By default, the tolerance for both ends is set to 5. Therefore, in an 8-bit image with a range of pixel intensities 0 to 255, pixels with an intensity in the range 0-4 (inclusive) will be regarded as low saturation and pixels with an intensity in the range 251-255 (inclusive) will be regarded as high saturation. It is also possible to change the display colours of saturated areas, by clicking in the colour wells. PG200/PG220 User Manual The Program Windows • 53 Difference Map The Difference Map allows you to see expression differences between your gels, overlaid on the image in a graphical format. You can use this feature to see which matched spots have increased or decreased, beyond specified fold-change thresholds. As a first step, select the comparison gel, against which you wish to compare your image(s). This will remain fixed, no matter which gel you have selected in the window, allowing you to compare several gels to a control gel easily. 1 To select the comparison gel from the Further display Options dialog, click the Settings button on the dialog. This opens the Tools Menu | Options | Comparisons tab dialog. 2 Open the Compare with gel drop-down list. The list contains all the gels in the experiment. Select the gel you wish to compare to in this list. Next, we have to select the data field, for which the comparison will be made. 3 Open the Field to Compare drop-down list. This list contains the titles of all the fields upon which the comparison can be performed. Select a field - the default field is Normalised Volume. 4 Once you have selected the comparison gel and the field to compare by, click OK. 5 Activate the Difference Map option, by ticking the Difference Map checkbox. The overlay on the Image window will now change so that all spots that have been up-regulated, two fold or greater will be shown as solid green shapes, while spots that have been downregulated by two fold or greater will be shown as solid yellow shapes. Spots that fall between these two limits will be shown as solid light blue shapes (default colours), while spots that are not expressed in the comparison gel will be shown as solid dark blue shapes. In order for volumetric differences to be meaningful, it is important to account for the background intensity inherent in the gels. See the section on Background Subtraction, for more information. 54 • The Program Windows PG200/PG220 User Manual This display is customisable, so that you can choose the spots that will be shown by using the checkboxes. For example, you may choose not to see spots that are not present in the comparison gel. You can also modify the tolerance to allow spots to become highlighted, when they have changed by more or less than two fold. This is achieved by changing the numbers in the entry boxes next to the relevant option. Show Spot Montage Area This option controls whether in the Main Image window, a rectangle is shown on the image indicating the area selected for display in the Montage window. See The Program Windows | Montage window section for more information. If the area is enabled, it can be resized by dragging the handles at the rectangle corners and edges, or you can drag out a rectangle to assign a new area. The montage will be updated immediately. Other Options Two other options that affect the Image window are available through the Tools | Options dialog. Image Display Optimisation See the Program Interface | Options | General Tab | Image Display Optimisation section for general information on turning this option on or off. Depending on the size of your gels and the resolution you scan them at, you may find that your image files are very large. This may result in the program slowing, due to the amount of processing time required to draw such images on to the screen. When this option is active, the image that is displayed has a reduced resolution, to keep the image within a defined size limit. This may result in the image appearing pixelated, but the benefits in terms of performance, often make this worthwhile. Data Annotations See the Program Interface | Options | Display Tab | Annotations section, for information on this option. Keyboard Shortcuts of the Image window Many keyboard shortcuts are provided for using tools or commands in the Image window. See the Keyboard shortcuts section for more information. Zoom window The Zoom window shows the image of the current gel and / or the gel shown in the Second Image window. There is a rectangle overlaid on the image that shows the area of the gel that can currently be seen in the Image window. This rectangle can be moved to scroll the Image window to a new location. This window is intended to give you an overview of the gel you are working on and show you the area of the gel that can currently be seen in the Image window. It also allows you to scroll the Image window to a new location, quickly and easily. If you click in the image in the Zoom window, the rectangle will move so that it is centred around that point and the Image window will immediately scroll to show the new area. It is possible to configure the Zoom window so that it controls the Main Image window, the Second Image window or both. This is done using the toolbar at the top of the window. The toolbar has two buttons on it. When the first button is clicked, the Zoom window controls the Main Image window. When the second button is selected, the Zoom window controls the Second Image window. PG200/PG220 User Manual The Program Windows • 55 It is possible to link the scrolling and zooming of the two Image windows, without going through the Zoom window. This is done via Tools | Options | Display tab, clicking the Windows Options button and then ticking the Link Image windows scrolling checkbox. Measurements window This window contains a table showing information about each of the spots in the current gel. There will be one row in the table for each spot in the gel and one column for each data field. The current spot will be highlighted in this table by means of a coloured background to the data row of the selected spot. The colour corresponds to that used to highlight the current spot in the Image window. Clicking on a row in the table will change the current spot. All other windows will automatically scroll to show this spot. By clicking on the column heading of a numerical field, the table is sorted in descending order. An arrow will appear in the heading, to show the direction of the sort. If the table has already been sorted, clicking on the heading of the column it is sorted by will change the sort direction. Right clicking on the column heading of a numerical field that also displays an error value (in brackets), displays a context menu offering the option of ordering by the error value – either ascending or descending. As with sorting by value, an arrow will appear in the heading in order to show the direction of the sort. Field Selection By default, the table will show each spot's Number and Volume. To modify the fields that will be shown, activate the Field Selection dialog by clicking the Select Fields button on the Measurements window toolbar. Field Type The Field Type drop-down list allows you to choose the type of fields that appear in the dialog below. 56 • The Program Windows PG200/PG220 User Manual Fields have been grouped, allowing you greater ease to select the desired fields. The types of fields are: Spot Fields - standard data fields. Statistics Fields – specific statistics test fields. Protein Fields - data about any protein assigned to the spot. User Defined Spot Fields - this type of field will be displayed in the drop-down list if the user has created a user-defined spot field. User Defined Protein Fields - similarly, this type of field will be displayed in the drop-down list if the user has created a user-defined protein field. User Defined Fields If you have any user-defined fields for the spots of your experiment, the values can be edited directly in the Measurements window. To edit a value directly: 1 Double click in the cell that you wish to edit. 2 Type the new value. The value of the field will be updated immediately. If you wish to cancel the editing of a field, click the Esc key on your keyboard. You can only edit the user-defined fields of spots in this way. Calculated measurement information of spots or the values of assigned proteins are not editable in the Measurements window. User-defined fields are created via the Edit menu | Modify Fields option. You can directly enter data into individual field cells in the table, or as a group via a spreadsheet package using the copy and paste method. Data Fields The main area of the Field Selection dialog consists of a list of the data fields that you can add to and remove from the table. 1 Click on the check box next to a field name and that field will immediately be added to the Measurements window table. 2 Select the check box again to turn the field back off. Initially, the list only includes fields relating to the spots themselves. In order to see information about the proteins assigned to the spots, use the drop-down list labeled Field Type and select Protein Fields. You will then be able to select various protein fields, such as Protein Description, in the Measurements window. Similarly, to see information about statistical tests performed, select Statistics Fields from the Field Type drop-down and then select the appropriate check boxes displayed for the three available statistics tests: t-Test, paired t-Test and ANOVA. If you have any user-defined fields in your experiment, it will also be possible to see them in the Measurements window. To see the list of user-defined fields, change the selection in the Field Type list to User-Defined fields. You will only be able to select the User Defined Field type if you have defined one in your experiment. The dialog also contains two buttons labeled Move Up and Move Down, which can be used to change the order of the fields in the table. Select a field by clicking on it in the field list and then click one of these buttons. The order of the fields in the table will be changed. It is also possible to change the order of fields by dragging the column headers in the table itself. PG200/PG220 User Manual The Program Windows • 57 Data Fields Available Area The total surface area of the spot can be displayed in pixels or real-world units (mm2 for example). Background Total background intensity of the image in the region of the spot. Circularity Circularity is a measurement that indicates the roundness of a spot (0-1.0). The closer the value is to 1.0, the more circular is the spot. The main use is to warn you that a detected spot might actually consist of more than one protein. Comment Displays text entered directly into the data field by the user. Difference Shows how a spot's value has changed when compared to its counterpart in a selected "comparison" gel. The result is calculated based on a particular "comparison" field. A positive difference means that the spot has a larger value; negative means smaller. You can define the criteria for comparison in the Options dialog box. Note: for most fields the difference is calculated as "fold-change", i.e. proportion of the larger to the smaller value. For log-based fields (e.g. Log Norm. Vol.) the result is the numeric difference of the values (i.e. spot value - counterpart value). For most fields a value of one will mean no change, but for log-based fields a value of zero will mean no change. Eq. Radius This is the Equivalent Radius of a perfect circle with the same area as the spot. It can be displayed in pixels or real world units, such as millimetres. Height/Area The ratio of spot peak height intensity to spot pixel area, on the original image. Mapped Coords Coordinates that have been calculated for a spot, based on an alternative image used to calibrate a spot picking robot. Match Number The number of the spot in the parent gel, to which this spot is matched. Norm. Vol. The volume of the spot normalised to an alternative scale, to allow quantitative comparisons between proteins in different gels. Log Norm. Vol. This is the log (base 10) of the normalised volume. For composite spots (i.e. in an average gel or a replicate group), this is the average of the “Log Norm. Vol.” values of the members of the group. Peak Height Gives the intensity of the highest point in the spot, with background removed. Picked This Yes/No field indicates whether a spot has been exported to a robot picking file. 58 • The Program Windows PG200/PG220 User Manual Protein When you have identified a protein in the gel, it is possible to attach additional information to the spot, containing details of the protein itself. This field shows the name of the protein. Scaled Coords The position that is regarded as the centre of the spot. This can be the centre of mass or the point of highest intensity and can be displayed in pixels or real world units, such as millimetres. Spot The identifying number of the spot, unique within the gel. Spot Edited This Yes/No field indicates whether the spot has been edited by the user, in spot detection mode. Volume The integrated intensity of the spot with any calculated background removed. Volume/Area A value of the ratio of spot volume to spot pixel area, on the original image. Vol + BkGnd This is the sum of the Volume and Background fields. It is equivalent to the sum of the pixel intensities in a spot, prior to Background Subtraction. If Background Subtraction has not been performed on a gel, the Measurements window will display volume-related data (including Volume, Norm. Vol., Background and Peak Height), in bold and red as a reminder. In order for volumetric data to be meaningful, it is important to account for the background intensity inherent in the gels. See the section on Background Subtraction for more information. X Coord and Y Coord These fields are equivalent to the Scaled Coords field, but separated into two columns. st nd 1 Dimension and 2 Dimension These are the horizontal and vertical components of your gel image. They will generally be the Molecular Weight (MW) and Isoelectric Point (pI) of the protein respectively. See the 1D Calibration section for more information. PG200/PG220 User Manual The Program Windows • 59 Statistics Fields Available There are three statistics fields available for Measurements and Comparisons windows presentation - t-Test, Paired t-test and ANOVA. The relevance of a particular test will depend upon the structure of your experiment and the number of averaged gels created. There must be more than one averaged gel created, for the two t-tests to provide meaningful results and in the case of the ANOVA statistic, at least two groups should be used. Please note that if the internal standards are grouped into a replicate then these will be treated as a population for the ANOVA test – therefore we advise that you do not group your internal standard images into a replicate group. t-Test A t-test can identify those spots in two averaged gels, which differ significantly from each other in a chosen spot property, with reference to spots in an associated reference gel. The result is expressed as significance (p-level). The p-level reported with a t-test represents the probability of error involved in accepting our research hypothesis about the existence of a difference. Technically speaking, this is the probability of error associated with rejecting the hypothesis of no difference between the two categories of observations (corresponding to the groups) in the population when, in fact, the hypothesis is true. In this software, the two-sided test is used. The column header for this field will display whichever field was selected from the File to compare list in the Options | Comparisons tab. Paired t-Test This test is used to investigate the significance (p-value) of the difference between two population means. No assumption is made about the population variances. A principal limitation of the test is that the observations for the samples must be obtained in pairs. Consequently, associated gels must be labeled as such. For both the Measurements and Comparisons windows, if labels have not been assigned to the replicates, then a hyperlink is shown in the cells. Clicking on the link text opens a Define Pairs ID dialog, in which those replicates without labels are indicated. You should type in an appropriate label ID for each unlabelled replicate. 60 • The Program Windows PG200/PG220 User Manual The test is accurate if the populations are normally distributed. If they are not normal, the test should be regarded as approximate. Again, the test result is expressed as a significance value (p level). ANOVA This test is a one-way ANalysis Of VAriance (ANOVA) and investigates whether the mean of a variable differs among two or more groups. Single factor (or one way) ANOVA compares the effect of an independent factor on some biological response. The subjects are divided into two or more groups and different levels of the factor are applied to each group. The ANOVA tests the hypothesis that there is no significant difference in the mean of the variable of interest over the groups. The result is again expressed as a significance value (p-value). If the p-value is outside the specified limits, we accept that the group means are not all equal. For example, you might compare control with drug treatment with drug treatment plus antagonist. Alternatively, you might compare control with five different drug treatments. For all three statistics fields, significance level threshold and colour highlighting is set using the Tools Menu | Options | Comparisons tab dialog. Protein Fields Available Listed below is a brief description of the various protein fields available in this software. Accession No. The database accession number of the protein. Description PG200/PG220 User Manual The Program Windows • 61 A comprehensive description of the protein. Protein pl The isoelectric point (pl) of the protein. This can be used to estimate the pI of other proteins in the gel. Protein MW The molecular weight (MW) of the protein. This can be used to estimate the MW of other proteins in the gel. Error Type The Error Type drop-down list lets you select which measure of error you wish to display, alongside fields of any averaged gels you may have. Selections include None, Standard Deviation, Coefficient of Variation (the Standard Deviation expressed as a percentage of the mean), Standard Error of Mean (SEM) and Percentage SEM (the SEM expressed as a percentage of the mean). 62 • The Program Windows PG200/PG220 User Manual Second Image window This window is very similar to the Main Image window, in that it shows all the same information of a gel image and may optionally show all of the same overlays as the Main Image window. All of the display options accessed from the toolbar are identical to those of the Main Image window. See the main Image window for more information. However, most of the analysis features that exist in the Main Image window are not available here, to avoid confusion. The gel that is shown in this window can be selected from the list on the window toolbar, or by dragging a gel from the Experiment Tree in the Navigator to this window. The only difference between the two Image windows is that the Second Image window does not necessarily show the currently selected gel. You can view any gel in your experiment in this window at any time. To view any gel in your experiment: 1 Select the gel you wish to see from the drop-down list that appears in the Second Image Window toolbar. 2 Alternatively, you can drag a gel from the Experiment Tree in the Navigator and drop it in the window. The Second Image window may behave differently to the Main Image window in some analysis modes. This will be described in the Analysis section. PG200/PG220 User Manual The Program Windows • 63 Comparisons window This window contains a table showing information about all the matched spots in the current experiment. The table is arranged so that all spots that are matched together appear on the same row of the table. Each row represents a single spot from the reference gel. As with the Measurements window, there is a column for each spot data field that is selected, but these are repeated here for each gel in the experiment, starting with the reference gel. Where a gel has a spot that matches one of the reference gel spots, the data relating to that spot will appear in the reference gel spot row in this table. If there is no match for a particular spot in one of the gels, the cells will be filled with dashes. Spots that have not been matched will not appear in this table. The information shown in the window for each spot can be modified in the same manner as in the Measurements window. It is also possible to show the name of the gel that the reference spot was originally added from and all protein information attached to the reference spot. The columns containing this information (if active) appear in a section to the left of all the data columns concerning the individual gels, as in the example below The Source Gel field describes which gel from which the reference spot was added. If you draw a spot directly on to the reference gel, this field will show as a blank entry. If the current gel is a sub-gel of an Averaged gel, the table will show matching information relating to the Averaged gel, rather than the experiment's Reference gel. Highlighting of the currently selected spot in this table is by means of a coloured background to the row. The colour used will be the same as that used to highlight the current spot in the Image window – green by default. Clicking on a row in the table will change the current spot. All other windows will automatically scroll to show this spot. By default, the table will show the Number and Volume of each spot. To modify the fields that will be shown, activate the Select Fields dialog by clicking the Select Fields button on the Comparison window toolbar. This dialog works in an identical way to that of the Measurements window. Similarly, all statistics field features in the Comparisons window are similar to those described for the Measurements window. See the Measurements window | Field Selection | Data Fields section for more information on the fields. 64 • The Program Windows PG200/PG220 User Manual If Background Subtraction has not been performed on both gels, the Comparison window will display volume-related data (including Volume, Norm. Vol., Background and Peak Height) in bold and dark red, as a warning. In order for volumetric comparisons to be meaningful, it is important to account for the background intensity inherent in the gels. See the section on Background Subtraction for more information. Clicking on the column heading of a numerical field will sort the table column data in descending order. An arrow will appear in the heading to show the direction of the sort. If the table has already been sorted, clicking on the heading of the column will change the sort direction of the column. It is possible to reorder the fields in the same way as in the Measurements window, but all fields for a given gel must remain together. The program will not allow you to separate the fields relating to a given gel. In addition, it is possible to select the gels that will be shown in this table. To do this, activate the Gel Selection dialog by clicking the Select Gels button on the Comparisons Window toolbar. By default, all gels are shown when the window is first opened. The dialog contains a list of all of the gels that are shown with a check box alongside each one. You can then choose the gels that will be shown in the Comparisons table, by selecting/clearing the check boxes. The user can control whether the averaged gels, sub-gels, all gels or even gels in the current multiplex group of a DIGE experiment, appear in the list, by selecting one of the commands in the View menu. PG200/PG220 User Manual The Program Windows • 65 Expression window The Expression Window displays numerical data about all matched spots in the current experiment. The window behaves in a similar manner to the Comparisons window, but instead of showing the values of the spot field, it shows the difference between the spot and its matched counterpart on the comparison image. This is particularly useful with DIGE images. Note: for most fields, the difference is calculated as "fold-change", i.e. proportion of the larger to the smaller value. For log-based fields (e.g. Log Norm. Vol.) the result is the numeric difference of the values (i.e. spot value - counterpart value). If Background Subtraction has not been performed on both gels, the Expression window will display volume-related data, such as Volume, Norm. Vol., Background and Peak Height in bold and dark red, as a warning. In order for volumetric comparisons to be meaningful, it is important to account for the background intensity inherent in the gels. See the section on Background Subtraction for more information. You can select which gels and fields will be displayed via the Select Gels and Select Fields buttons on the Expression window toolbar. The user can control whether the averaged gels, sub-gels, all gels or even gels in the current multiplex group of a DIGE experiment, appear in the list of gels in the Gel Selection dialog, by selecting one of the commands in the View menu. The Expression window displays changes in expression of matched spots in terms of fold change. In this case, the current gel is used as a baseline. Positive numbers indicate up-regulation from the current gel to the comparison gel, while negative numbers indicate down-regulation. The table shows by what degree of fold-change a numerical field for a particular spot has, relative to that of a matched spot counterpart, in a particular comparison gel. For example, if the spots both have the same value, the difference field will display 1.000. If the spot value in the comparison gel is twice as large, the difference field will display –2.000, indicating 2-fold down-regulation. Conversely, if the spot value in the comparison gel is half as large, the difference field will display 2.000, indicating 2-fold up-regulation. To select which numerical measurement field is used and which gel is used as the comparison gel, go to the Tools Menu | Options | Comparisons tab. The comparison gel can also be selected from the Expression window toolbar Select Gel dropdown list. Highlighting Changes The table is colour-coded to highlight spots that are up or down regulated beyond user-specified thresholds. By default, spots that are up regulated by at least two fold will be highlighted in green, and spots that are down regulated by at least two fold will be highlighted in yellow. You can set which thresholds and colours to use by clicking on the Highlight Changes button on the toolbar. The Highlight Expression Changes dialog will appear. 66 • The Program Windows PG200/PG220 User Manual As it is only possible to compute ratios for spots that are present in the current gel, only these spots are displayed in the table by default. If you wish the table to include all spots, untick the Show only the comparison gel’s spots checkbox. You can turn the option off if you wish spots to remain in the same position when you change the current gel. Doing so will probably lead to rows containing only dashes appearing in the table, corresponding to those spots that are not present in the comparison gel. PG200/PG220 User Manual The Program Windows • 67 Histogram window This window shows expression patterns for every set of matched spots in the experiment. The expression patterns are shown in the form of histograms, one for each set of spots. Each set is equivalent to one spot in the reference gel. The histogram can contain any or all of the measurement information that has been calculated for the spots and can be used to view / compare expression patterns of spot series in the experiment. It is possible to show several different types of data in the histogram simultaneously, although scaling on the vertical axis will be disabled. The histograms are intended to show the ratio of the changes. All series are shown against a normalised vertical axis. Histogram bars that represent averaged gels will provide information about the error, both in the data tip and as an error bar of appropriate height on top of the bar. If you move the pointer over a bar in the histogram and wait a few seconds, a data-tip will appear containing the value of the field in the represented spot. To modify the number of histograms displayed, click the Select Gels button in the Histogram Window toolbar and uncheck gels as required in the Gel Selection dialog. The user can control whether the averaged gels, sub-gels, all gels or even gels in the current multiplex group of a DIGE experiment, appear in the list of the Gel Selection dialog, by selecting one of the commands in the View menu. Histogram Options By default, the histograms show how the Volume of the spot changes between the gels. It is also possible to show a histogram for other spot properties. To do this, click the Histogram Options button on the Histogram window toolbar. 68 • The Program Windows PG200/PG220 User Manual The Histogram Options dialog will be displayed. The main area of this dialog is occupied by the list of the fields that can be included in the histograms. Adding a field to the histograms 1 Click on the check box next to a field name and that field will immediately be added to the table. 2 Clear the check box to remove any selected field. The colour well to the right of each field in the list shows you the colour in which the histogram bar will be drawn. Clicking on the colour well will activate a Colour Select dialog allowing you to change the colour used for that field. Below the field selection list are two buttons labeled Move Up and Move Down, which allow you to change the order in which the fields will be shown in the histogram. Re-ordering the field list 1 Click on a field in the list. 2 Select either the Move up or Move down button to move that field up or down the list. Sort the list into the order in which you want the bars to appear in the histogram. Further down the dialog is a section labeled Keys. This section contains two checkboxes, labeled Colours and Fields and Gel Names and Numbers. These check boxes allow you to control the key that appears at the bottom of the Histogram window. To control whether keys containing lists of Colours and fields or Gel names and numbers should be displayed, you can select the check boxes in the Keys section of the dialog. At the bottom of the dialog is the Error Type drop-down list, which allows you to specify which measure of error will be used when displaying error bars above the bars of the fields of Averaged gels. Use the Error Type drop-down list to select which kind of measure of variability will be displayed for averaged gels’ bars. The options are: None: Error information will not be displayed. Standard Deviation (SD): The sample standard deviation. 3 x Standard Deviation (SD) Coefficient of Variation (CV): This is the SD expressed as a percentage of the mean. Standard Error of Mean (SEM): This is equivalent to the Standard Deviation divided by the square root of the number of spots contributing to the average. 3 x Standard Error of Mean (SEM): Percentage SEM (SEM %): This is the SEM expressed as a percentage of the mean. PG200/PG220 User Manual The Program Windows • 69 Grouping By default, the histograms are arranged so that all the bars of a given field are grouped together. For example, all the bars describing the volume of the spots will appear first, then all of the bars describing area and so on. It is possible to configure the histograms so that they are grouped by gel. The histogram will show the volume and area of the spot in the first gel, then the volume and area of the spot in the second gel, and so on. To make the histograms group in this manner, click the Group by Gel button on the toolbar. Click again to revert to the default setting. Interaction A histogram representing the current spot will be highlighted by means of a shaded background and a coloured outline. The outline colour used is the same as that used to highlight the current spot in the Image window. Clicking on a histogram will make that spot the current spot. The other windows will automatically scroll to show this spot. You can change the size of the histograms to make the small details clearer, or to fit more histograms on the screen at once. Changing the size of the histograms 1 Click to highlight a histogram of interest. 2 Now click on the edges or corners of the outline box and drag the box into a new position, changing the size of the histogram. When you release the pointer, all of the histograms in the window will change shape and size to match. In the event that you make the histograms too small, the window may adjust the size to avoid overlapping. Double click on a histogram to examine it in greater detail. A pop-up window will appear containing only that histogram. The pop-up window can be resized by dragging corners and edges. In addition, the window contains buttons labeled Print and Copy, allowing you to export that histogram alone. To close the pop-up window, click on the anywhere outside the window. 70 • The Program Windows button in the top-right corner of the window, or click PG200/PG220 User Manual Montage window The Montage window is designed to show you several images, representing the same area of each gel in the experiment simultaneously. This can be used both for visual comparison, and for performing analysis operations such as spot editing on several gels at the same time. The window will normally show the area surrounding the current spot in each gel. If one of the gels does not contain the spot, the area shown will be where the spot would appear, if it were present. See the Selection Mode section for more information on selecting an area for display in the Montage window. Display Options of the Montage window The controls in this dialog are very similar to those in the Image window’s Display Options dialog. They allow you to decide whether spots, reference spots and match vectors will be shown on the images and the colours in which they will be shown. It also allows you to select the Spot Style e.g. Standard, Outline, Filled, Crosshairs or Ellipses. Select Gels Clicking this button activates a dialog that allows you to select the images to be shown in the montage. You can change this selection by using the check boxes in this dialog. The user can control whether the averaged gels, sub-gels, all gels or even gels in the current multiplex group of a DIGE experiment, appear in the Gel Selection dialog list, by selecting one of the commands in the View menu. Zooming and Scrolling Zooming and scrolling in this window are identical to the methods used in the Image window, including the Zoom one to one and Zoom to Fit buttons on the window toolbar. PG200/PG220 User Manual The Program Windows • 71 Protein window This window contains known or theoretical information about proteins, which may be present in your gel. Each protein can store several pieces of information, including a name, description, theoretical pI / MW values and identification number for Internet databases. The data in this table is modified directly by double clicking on a cell and typing a new value. Each protein list appears in a separate table, accessed via a set of tabs at the bottom of the window. Information that can be shown about each protein is initially limited to a name, description, pI / MW values, and Federated 2D Database Accession Number. It is also possible to define your own fields in the proteins for storing additional information e.g. Gene sequence. See User Defined Fields in the Non-Analytical Operations section for more information on creating user-defined fields. The proteins can be assigned to the spots in your gels once they have been identified. Each protein is part of a Protein List and must have a unique name within that list. You may have as many protein lists as you like, within an experiment and you can classify the proteins by grouping them into different lists. Since protein assignments are only made on reference gel spots, you cannot add protein lists to an experiment with no reference gel. The window is arranged as a table, with each row representing a single protein. There is a separate page for each protein list you have in your experiment, selected using the tabs at the bottom of the window. Highlighting of the current protein in the list is by means of a coloured background to the row. The colour used will be the same as that used to highlight the current spot in the Image window. Clicking on a protein in the table will make it the current protein. Use of the current protein is explained in the Analysis Procedures | Protein Lists section. By default, the table will show all information known about the protein. To modify the fields that will be shown, click the Select Fields button on the toolbar. This dialog works in an identical way to the protein fields selection section of the Measurements window Select Fields dialog. It is also possible to reorder the fields in the same way as in the Measurements window. If you change the order of the fields in one page of the window, all pages will be affected in the same way. Adding new proteins to a list You can add a new protein to a protein list at any time, by clicking the Add Protein button the toolbar of the window. on A new protein will be added to the table with default values. Editing a protein list To change the value of a data field for a particular protein, double click in the appropriate cell and type in the new value. Deleting a protein from a list You can remove a protein from a protein list, by clicking on it in the table to make it the current protein and clicking the Delete Protein button before the protein is deleted. 72 • The Program Windows on the toolbar. A confirmation dialog appears PG200/PG220 User Manual Report window The window can be used to produce formatted reports about experiments and their associated spots and gels. The reports that are shown in this window cannot be edited directly and the window plays no part in the analysis procedure. Reports can be printed out directly, or saved as Portable Document Files (.pdf), or as Report Template Files (.rpt) files, so that they can be edited before publication. Three kinds of report are available in this window - Spot Report, Gel Report and Experiment Report. Spot Report To create a Spot Report: 1 Select a spot by clicking on it in the Image window, or other program window that allows spot selection. 2 Click the Generate Spot Report button on the Report window toolbar. 3 The Customize page dialog will be displayed, from which you can select the elements that will be included in the report. By default, they are all selected. Removing the Spot Tables element from the list of selected elements, will speed up the generation of some reports. A Spot Report will include all information that is known about the selected spot, including a montage of images showing the spot in each gel, a histogram showing the expression pattern and a table of measurement information. The report will also show the details of any protein that has been assigned to the spot. Each section of the report will reflect the display settings of the relevant window within the program. For example, the table in the report will show the same fields as the Comparisons window. Gel Report In order to create a Gel Report on the current gel, click the button Generate Gel Report on the Report window toolbar. The Customize page dialog is displayed, from which you can select the elements that will be included in the report. As with the Spot report, removing the Spot Measurements Table from the list of selected elements can speed up the generation of some reports. A Gel Report includes all information that is known about the current gel. This includes any comments that have been entered in the Gel Header dialog, accessed through Edit Menu | Edit Gel Header, the time and date that the gel was created and last modified, an image of the gel, and a table of spot measurements. Each section of the report will reflect the display settings of the relevant window within the program. For example, the gel image in the report will show the overlays that are currently displayed in the Image window. PG200/PG220 User Manual The Program Windows • 73 Experiment Report In order to create an experiment report on the current experiment, click the Generate Experiment report button on the report window toolbar. An experiment report will include all information that is known about the current experiment. This includes any comments that have been entered in the Gel Header dialog, the time and date that the gel was created and last modified, an image of the gel, a gel report, and a spot report. Exporting Reports Reports may be saved in two formats .rpt and .pdf. .rpt An .rpt file is not a readable format – it is a Report Template Format that specifies the layout of a report for future use. It contains the Spot information, Montage, Table and Graph sections. .pdf A .pdf file - is a Portable Document Format that is used for electronic document distribution. A report saved in this format can be viewed using Adobe Reader and edited with Adobe Acrobat Distiller or comparable software. To save a report: 1 Click on the Save Report button on the Report window toolbar. A standard Windows Save As dialog will appear. 2 Select the folder in which you wish to save the file. 3 Enter a filename and select a file type, either .rpt or .pdf, then click Save. Report Options Clicking the Report Options button on the report window toolbar, will display the Report Options dialog. Use the dialog to control the content of the reports. The dialog shows three tabs – Headers & Footers, Gel Report and Notes. 74 • The Program Windows PG200/PG220 User Manual Headers and Footers tab Tick the Use Enhanced Headers and Footers check box. This enables the title and logo options, otherwise your report will display a page number, and the last used report title. Title The title text will appear on the top-right corner of the report. You can specify this text in the entry box. Logo Select this option if you want a graphical logo to appear in the top-left corner of the report. You can use the browse button to locate the image, or enter the full path for the image that you want to use. The logo must be in .bmp format. Gel Report tab-Information Display Show Additional Gel Information When this option is turned on, the Gel Report will show the values of any user defined fields that have been created in the gel. Show Additional Experiment Information With this check box ticked, the report will show the values of any user defined fields that have been created in the experiment. Show Analysis Parameters When this option is turned on, the Gel Report will display the spot detection parameters that were used to analyse the gel. It will also display whether any manual editing was performed on the gel. Gel Report tab-Image Display Draw overlays This option will modify the appearance of the gel image by drawing overlays. Select the check box to activate this option. Notes tab User Notes With this option, you can add any additional information to the report. Select the check box and enter text in the entry box. Profile window This window allows you to view intensity profiles, extracted from areas of the gel image selected in the Image window, along with the image of the area itself. This can be very useful during spot editing, especially when verifying splits made between spots that may have merged. At the top of the window is a graph showing the average pixel intensity along the length of the region you have selected. Each area you select will result in a different coloured line on the graph, allowing you to see a profile of several areas at once. Beneath the graph are images of the areas you have selected. These areas are outlined in the same colour as shown in the profile for the related area. See Profiling in the Analysis Procedures section for information on selecting areas to view in the Profile window. PG200/PG220 User Manual The Program Windows • 75 Animation window This window is similar to the Montage window, in that it is used to show the same images as the Montage window, but it shows them in sequence, one after the other. The result is an animation effect, allowing you to see how protein expression changes across the gels. The speed of the animation is controlled by using the slider on the toolbar. Animation Frames At the right-hand side of the window is a list of the images that will be shown in the animation. Each one is identified by the name of the gel from which the image was obtained. You can prevent certain images from being shown in the animation by unchecking them in this list. You can control what images appear in the Animation Frames list, by selecting one of the commands in the View menu. The Animation Frames list also highlights the image that is currently visible in the window. You can jump directly to any image by clicking on the image name in the list. Display Options of the Animation window Clicking the Display Options button in the window toolbar opens the Display Options dialog. The controls in this dialog are very similar to those in the Image window Display Options dialog. They allow you to decide whether spots, reference spots and match vectors will be shown on the images and the colours in which they will be shown. It also allows you to select the Spot Style, e.g. standard, outline, filled, crosshair, ellipse or bullet. Animation Control The window toolbar contains a slider that is used to control the speed and direction of the animation. When the slider is in the central (Stop) position, the window stays fixed on the current frame. By moving the slider to the left or right, the animation plays backwards or forwards through the images. The further from the centre the slider is positioned, the faster the animation plays. See Selection Mode in the Non-Analytical Operations section for further information on selecting an area for display in the Animation window. 76 • The Program Windows PG200/PG220 User Manual Save Video Clip Saving the animation as a video clip .avi file 1 Select the Save Video Clip button on the Animation window toolbar. A standard Windows Save dialog will appear, allowing you to save the file containing the field format in any folder you choose. 2 Select the folder to which you wish to save your file. 3 Use the Number of frames per second entry box and spin control, to select the speed at which your animation should play. 4 Enter a new filename if desired and click Save. The Video Compression dialog will display. 5 Select the method of compression you wish to apply. We recommend that you save the file with the default Full Frames (Uncompressed) compressor unless you have a good reason to do otherwise, as it may not be possible for your player to handle some other methods of compression. If you choose to change the compression method, you may be able to use the Compression Quality slider and the Configure button, to control the output quality. 6 Click OK to save the video clip file, or Cancel to close the dialog without saving a file. 3D window This window provides a 3D view of the current gel montage area. It can be a very useful tool in demonstrating the quality of the spot detection. You can rotate and zoom the image in real time, within the window. The window is effectively a 3D version of the Animation window. You can control the animation by using the slider and list of Animation frames in the same manner as you would in that window. With this window active, you can print the image from this window via the File menu | Print option. The Print Preview facility is not available. The 3D window toolbar has four buttons that are discussed in the sections below. Colour Scheme When clicked, the Colour Scheme button PG200/PG220 User Manual displays the Colours dialog. The Program Windows • 77 All of the colour schemes installed are listed in the Colour scheme drop-down list. There are several colour schemes supplied with the software, including two false colour schemes. These can be useful for visualising faint spots, as the human eye is often more sensitive to colour than to shades of grey. To change the colour scheme used by the gel in the software windows, select a different scheme from the list. Creating New Colour Schemes button. A small dialog appears, If you wish to create your own custom colour scheme, click the prompting you to enter a name for the new scheme. Type in a name and click OK. The new colour scheme will be identical to the Greyscale scheme at first. You can change this using the Colour Wells described below. button and select the colours by clicking on the colour Click the well for each feature. Colour Wells This group of seven controls displays the colours that define the current colour scheme. The palette for the image will be calculated by changing smoothly between these colours. If you are using a custom colour scheme, you may change the colours that are used by clicking in one of the wells. A standard colour palette will then appear, allowing you to select the colour that will be used in that well. Reversing the Colour Order You can reverse the order of the colours in the current colour scheme, by clicking the button. Note that the shaded bar of the colour scheme dialog changes, when the button is clicked. Deleting a Colour Scheme Selecting the button will cause the current colour scheme to be deleted. This option is only available for colour schemes that you have created yourself. Upon deleting the scheme, the system will revert to the previous scheme in the list. 78 • The Program Windows PG200/PG220 User Manual Display Options of the 3D window When the Display Options button is clicked, the 3D Gel Options dialog is displayed. Within this dialog, you can select how you wish to view the current gel image. You can enlarge or shrink the image in the window by right clicking and then dragging either forwards or backwards. Viewing the Gel Show gel spots only This option displays a 3D equivalent of the Image window's Minus Background display option. The spots will be displayed at the grey level intensity, minus the background level. This will probably result in a flat white gel, with very faint spots. Show gel background only With this option, a 3D equivalent display of the Image window Background Only is shown. If you have performed background subtraction on the gel, you can select this option to show only the background of the gel. The spots themselves will be removed from the image and the spot background level will replace them. Show all This option displays the unmodified 3D image, equivalent to the Image window's Standard display option. Select a Contrast for the Surface Use the slider to set a contrast level between Flatter and Taller, for the surface of the selected area of the image. Scale Surface for Maximum Contrast This feature finds the minimum and maximum height of the selected area in the Image window and stretches everything to emphasize spots. PG200/PG220 User Manual The Program Windows • 79 Customise the 3D Surface Appearance Show grid - displays a crosshatched grid over the gel image. Show spot outlines - displays the outline of detected spots. Use fogging - This is used to show the depth of the aspects on the image. The image in the viewpoint will fade, depending upon the distance. Animation Clicking the animation button displays the following dialog: From this dialog, you are able to rotate and animate selected gels. Rotate This feature rotates the image in the window. Select to rotate the selected gels in the reverse direction. Rotate in the forward direction. Stop rotation. This is the default state. Animate The window can be used as a 3D version of the animation window. Animate gels in reverse order. Animate the gels in listed order. stop the animation at any time. The default is stop. You can change the running speed of the animation by dragging the slider. Include these Gels In the lower part of the dialog is a list of the images that will be shown in the animation. Each one is identified by the name of the gel from which the image was obtained. You can prevent certain images from being shown in the animation, by unchecking them in this list. The default setting is all files selected. This list also highlights the image that is currently visible in the window. You can jump directly to any image, by clicking on the image name in the list. 80 • The Program Windows PG200/PG220 User Manual You can control what images appear in the list, by selecting one of the commands in the View menu. See Selection Mode in the Non-Analytical Operations section for more information on selecting an area for display in the animation. Default Viewpoint Clicking this button on the 3D window toolbar will restore the default view of the image, after any rotation or tilt has been applied. PG200/PG220 User Manual The Program Windows • 81 This page is left blank deliberately Experiment Operations Experiments Overview An experiment in this software is a data file stored on your computer that is used to link a series of gel image files with the analysis you have performed on them. There are various options for creating and opening experiments. You can also backup your experiments. This option allows you to save all of the data relating to your experiment in a single file on your hard disk, floppy disk or backup cartridge. When saving to a removable media, the backup file can be split across several disks or cartridges, if necessary. This topic describes how to: Create a new experiment Open an existing experiment Save changes to the experiment Import/Export XML Backup and restore experiments Add gels to your experiments Move between gels Send data to the database Create a New Experiment This feature is not available in the PG220 Editor software. From the main toolbar or from the File menu, choose the New Experiment option. Alternatively, you can create a new experiment by selecting the command from the context menu that is displayed by right clicking on a set of image files in the Navigator Experiment View. The Analysis Wizard will display allowing you to set up the new experiment. Refer to the Analysis Wizard section for more information. Open an Existing Experiment 1 From the main toolbar or from the File menu, choose the Open Experiment option. 2 Select the experiment you want to open, from within this dialog and click the Open button. With your experiment loaded, check the Experiment View Explorer to see which gels are contained. The Image window will show the current gel from the experiment. When the software opens, it automatically loads the last experiment you were using. You can prevent this by turning off the Reload previous experiment on program startup checkbox, accessed via the Tools Menu | Options | General tab. Double-clicking on a .2dx file in the Windows Explorer will load that experiment, launching the software if it is not already running. PG200/PG220 User Manual Experiment Operations • 83 Saving Changes to the Experiment Save This option, available from the main toolbar and the File menu, causes all changes you have made to your experiment to be saved to disk. The experiment will be saved using the file name previously used, which will cause it to overwrite the previous version of the data. Save As This option, available only from the File menu, allows you to save the changes you have made to your experiment, using different file names to those used previously. Such a command allows you to save your changes to disk, without overwriting previous versions of your experiment. This could be useful if you decide to backtrack in the analysis, or simply for keeping a record of the analysis you have performed. If you choose to save the experiment in a different folder to the one it is currently in, the required image files will also be copied if necessary. The program may modify the names of the image files slightly, if it needs to do so, to avoid overwriting existing images. AutoRecover We have included an AutoRecover option in the program. When this option is active, the program will automatically save backup copies of your changes at regular intervals. In the event of the system crashing, the next time you load the experiment the most recent backup will be loaded and the program will inform you of this. You then have three choices: Save the experiment, in which case the most recent backup will overwrite the experiment and you will be able to continue working, having lost only the changes made since the last backup. Use Save As to save the restored backup to a different set of file names. You will then be able to compare the restored backup with the last version of the experiment you saved and decide for yourself, which one to keep. Close the experiment without saving it, in which case the next time you load the experiment it will load the last version you saved. By default, the program will perform an automatic backup of the changes to your data every 10 minutes. If you want to change this interval, or turn the backup off completely, you can do via the Tools | Options | General tab. If you attempt to close the experiment or the program, when you have not saved all the changes you have made to the experiment, the program will warn you. You will be offered the chance to save the experiment, continue without saving, or continue working. The program will also offer to save the experiment at certain other times, for example before creating a backup archive. 84 • Experiment Operations PG200/PG220 User Manual Import/Export XML XML (Extensible Markup Language) is a tagged text format, which allows generic data transfer. You can load and save files, describing your 2D experiments in a standard XML format. With your data stored in this format, you will find it possible to access your data outside the analysis software, even within other programs. It will also make it a great deal easier to store the data about your gels, in your own database system. To save your experiment in XML format, or to load an experiment that was already saved in this format, select Import/Export XML… from the File menu then select either Save Experiment or Open Experiment. PG200/PG220 User Manual Experiment Operations • 85 Backing up and Restoring Experiments Backup Backing up an experiment involves creating a single, compressed archive, containing all the files that make up the experiment and optionally including the images. This can then be used for archiving purposes, or as a convenient method of packaging an experiment to send to another user. Backing up an experiment 1 Select the Backup command option from File Menu | Experiments. The Save backup archive dialog will appear. 2 In this dialog, choose the folder and drive to which you want to save your backup file. 3 If you want to give your backup file a different name to the default, which is the name of the experiment, then change the name in the File name entry box. 4 Where appropriate you can click on the check boxes to include image files and any cached files. 5 Backup your experiment by selecting the Save button. To exit without backing up, click the Cancel button. The backup process can take some time because the data is compressed before storage, in order to save disk space. A progress bar will appear, displaying how far the backup process has to go. When the backup is complete, the backup file appears in the selected folder as a .2bk file. You can use the File Explorer to check the contents of the .2bk files. Expand a file and a list of the files it contains is displayed. It is possible to backup an experiment that is not currently loaded. To do this, right click on the .2dx file in the File Explorer and select Backup Experiment from the context menu. This will display the Save backup archive dialog which can be used to backup the experiment as described above. Restore 1 To restore a backup experiment, select the command File | Experiments | Restore and the Restore a backup archive dialog will appear. 2 Select the backup file containing the experiment you wish to restore and click Restore. The Select a location for the experiment dialog will appear. 3 Select or create the target folder and click Restore to start the restore or Cancel to abort. You will not be allowed to restore to a folder that has a file in it with the same name as one of those in your backup. 4 The restore process will start and a progress bar will show you how far you are through the process. 5 If the experiment is successfully decompressed, the program will immediately load it. You can also choose to restore your experiment by right clicking on the .2bk file in the File Explorer and then selecting Restore Backup from the context menu. 86 • Experiment Operations PG200/PG220 User Manual If you are backing up or restoring from removable media, then the system will automatically manage multiple disks/cartridges for the operation. When storing, you will be told how to label the media. Where you are restoring, you will be asked for each disk/cartridge, as it is required. The index file is stored at the end of the backup data and so you should start the restore by using the last disk/cartridge of your backup set. If you should accidentally put in a different disk to the last one, when you start the restore or attempt to look at the contents, you will be asked for the last one. PG200/PG220 User Manual Experiment Operations • 87 Adding Gels to your Experiments This feature is not available in the PG220 Editor software. When you create your experiment, you specify the files containing the images of the gels you wish to include. However, it is possible that you will want to add further gels to the experiment in the future. Consequently, the program allows you to add images to an experiment at any time. To do this, select Add/Remove Gels from the File menu and then select the Add Gels option. The Add New Gels dialog will appear. 1 If you need to make any changes to the Invert Measurements or Apply last calibration options on this dialog, then do so now. 2 Select the file or files you want to add to your experiment and click the Add button. The selected gels selected are added to your experiment and the first of them appears in the Image window. 88 • Experiment Operations PG200/PG220 User Manual Moving Between Gels There are three methods for changing the current gel, as displayed in the Image window: The easiest method uses the Navigator Experiment View. This view shows your experiment as a tree, with all the gels listed as nodes of the tree. The current gel icon is highlighted with a green outline box. You can change the current gel to any other preferred gel in the experiment by double clicking on the preferred gel. Another method of selecting the current gel is to choose a gel from the drop-down list of the Select Gel display in the main toolbar. and Next Gel buttons on the main Alternatively, you can use the Previous toolbar. These buttons change the selection to the previous / next gel image in the tree. If you click the Next Gel button when the last gel in the tree is selected, the program will loop around and select the first gel. A similar loop around occurs when you click the Previous Gel button with the first gel in the tree selected. PG200/PG220 User Manual Experiment Operations • 89 Sending Data to the Database If you have purchased the accompanying database software that links to this program, you can send data directly to it. To do this, select the Open Database button on the main toolbar. The database software will be loaded and will automatically take control to import the data from the experiment. 90 • Experiment Operations PG200/PG220 User Manual Analysis Procedures Overview The basic steps of analysis involve: Detecting the spots. Removing the background from the spots. Warping and matching the spots to a reference gel. There are, however, other calibrations and functions provided in the software that you could use to analyse your gels further. The Analysis Wizard guides you through these analysis modes automatically. DIGE This feature is not available in Progenesis PG200. The comparative analysis of 2D gel images using conventional electrophoresis is currently complicated by inherent gel-to-gel variation and poor reproducibility. This makes it virtually impossible to generate two images that are directly super-imposable. Such a limitation makes protein expression comparisons between samples using 2D gels complex and time consuming. To help resolve this problem we have developed a group of software features named DIGE (DIGE). These features complement our existing 2D gel electrophoresis (2DE) image analysis software by allowing you to analyse images after stains have been applied to samples using a multiplexing approach. Multiplexing within 2DE describes how multiple stains can be applied to a heterogeneous sample, pre- or post-separation by 2DE. Each stain is applied to detect particular spots within the sample and each stained spot is resolved at spectrally different wavelengths. This allows the direct comparison of different samples labeled with different dyes on a single gel. The current version of DIGE enables the analysis of dye labeled samples, incorporating ratiometric normalisation both within and between gels, as illustrated in the example below: PG200/PG220 User Manual Analysis Procedures • 91 Within a DIGE experiment, one of the gel images is selected as the Internal Standard - which consists of pooling the other samples of the experiment and labelling the combined sample, for example with Cy2™. The Internal Standard is used to reduce the gel-to-gel variability; it is also used for normalisation. In our software, DIGE experiments are designed so that detected spots on the internal standard image are cascaded through the other images in the multiplex group and re-grown. There must be the same number of spots on the images within a multiplex group. Consequently each spot on the internal standard will have an equivalent spot, with the same spot number, on all of the images within the multiplex group.. DIGE image naming convention If you choose to follow the file naming convention, your DIGE experiment’s Multiplex and Replicate groups will be identified automatically in the Analysis Wizard. You should name your files before analysis. Where image filenames do not comply with the naming convention you will need to manually define the multiplex and replicate groups. 92 • Analysis Procedures PG200/PG220 User Manual Naming convention rules: <Gel name>_<Replicate name>_<cy channel>.<extension> (separated by underscores) <Gel name> <Replicate name> <cy channel>.<extension> (separated by spaces) Note: the naming convention is not case sensitive. Gel name This must be Gel_<number> or Gel <number> - e.g. Gel_01 or you can omit the underscore or space - e.g. Gel12. Replicate name This can be omitted. However, the internal standard of each multiplex must be named Standard or the software will not recognise its multiplex grouping. You can enclose the replicate name in brackets for clarity; the brackets will be removed when the replicate group is defined. Cy channel This must be Cy<number> - e.g. Cy2. Extension The file extension of the image file - e.g. .gel or .tif Example: Gel23_standard_cy2.gel Gel23_Treated_cy3.gel Gel23_(Control)_cy5.gel Gel24_standard_cy2.gel Gel24_(Control)_cy3.gel Gel24_Treated_cy5.gel These images form Gel23 and Gel24 multiplex groups and Control, standard and Treated replicate groups. Note on multiplexes and replicate groups A group can only be automatically created if there is more than one image to go in it. Multiplex groups require an internal standard, indicated by standard in the filename. PG200/PG220 User Manual Analysis Procedures • 93 Analysis Wizard This feature is not available in the PG220 Editor software. The Analysis Wizard guides you through the essential stages of creating and analysing an experiment. These include specifying the images to analyse, and which analysis procedures are to be performed on them. The wizard allows you to save a Protocol, which includes the chosen parameters for every stage of the analysis. You can then apply the same analysis protocol to other experiments in the future. The Analysis Wizard can be set to appear automatically when the software starts up by selecting Launch Analysis Wizard on startup from the Analysis menu. If the Analysis Wizard appears automatically and you do not want to use the Wizard, click Cancel on the Welcome page to display the software interface. Welcome page This page welcomes you to the Analysis Wizard and allows you to select either a single stain experiment or DIGE experiment, and choose a name for this new experiment. Only Single stain analysis is available in Progenesis PG200, therefore some of the following information may not be applicable to users of that software. Select Experiment Type and Name 1 Select the experiment type. 2 Type in the experiment name. If you leave this box blank, the program will choose a name based on the names of the images you select. 3 Click the Next button to proceed. 94 • Analysis Procedures PG200/PG220 User Manual Select Images page This page allows you to create a new experiment and specify which images it will contain. Select the Images to Analyse Locate and select the images that you want to analyse. 1 Click the Add button, the Select Images dialog box will display. 2 Locate and select the desired images for the experiment. 3 Click Next to proceed when the images have been selected. You can only create DIGE experiments by using the Analysis Wizard. Imported images cannot form multiplex groups. Note: if your images have already been aligned in the TT900 S2S Advanced Alignment Tool it is important that you know the reference gel image that was selected, when you created the warp image set. This will be needed later during this wizard. If necessary, return to TT900 S2S and reload your warped set to confirm the identity of the reference gel image. Group DIGE Images page If you are analysing a DIGE experiment and your image filenames comply with the naming convention, multiplex groups are automatically created with internal standards defined, by selecting the stained images from the same physical gel. If your image filenames do not comply with the naming convention, you will need to create them manually by following the steps below. All Images must be included in one of the multiplex groups. Failure to group all images generates a warning message when you attempt to proceed. PG200/PG220 User Manual Analysis Procedures • 95 In addition, the multiplex groupings should be symmetrical with each other, for example, if the grouping in one multiplex group is Cy2, Cy3, Cy5 then all the other groups should be similarly structured. This is because the internal standard must be present in each multiplex group and by implication, the same component samples of that internal standard must also be present. Failure to structure the multiplex groups correctly will generate various warning messages, depending upon the type and degree of asymmetry. Imported images cannot form multiplex groups once the analysis has completed. Selecting a multiplex group 1 Click on the first image then hold down the Ctrl key and click on the required images for the multiplex group. 2 Release the Ctrl key and then click Group. 3 Repeat the steps above until you have created all the multiplex groups. Use the Rename button to rename your groups, where appropriate, once you have created the groups. Your wizard page should then resemble the following example: Ensure that the internal standard is selected for each multiplex group. If you omit this step a warning message appears later in the wizard when creating Replicate groups. The gel image icon colours have the following meaning: These icon colours are only relevant to the Analysis Wizard. By default, the first gel selected for a multiplex group is made the internal standard of that group. Therefore, you must next examine the various multiplex group structures to establish whether the icon and the nominated internal standard is correct. The internal standard is represented by the image name is in bold text. 96 • Analysis Procedures PG200/PG220 User Manual Changing the image used as the Internal Standard Right click on the desired image then select Use as Internal Standard from the context menu or click the Set Standard button. After creating the multiplex groups click Next to proceed. Preview Images page For both single and DIGE images, the following page allows you to preview the gel images that you have selected. Selected Image You can choose an image to preview from this drop-down list. You can then review the following properties of the image. Invert Intensities The software assumes that spots are more intense than the background that surrounds them. If your images use the opposite convention, but store no information to indicate that this is the case, you can turn on the Invert intensities feature to compensate for this. As you move the pointer over the preview image, the intensity of the pixel below the pointer is displayed below the preview image. This allows you to check that the pixel intensities are correctly oriented. Click the Invert intensities button to toggle the option on or off. Contrast and Colour You can use the Contrast and Colour button to alter the way in which the image is displayed. See the Contrast and Colour section for more information. Affect all Gels If this check box option is ticked when you change any of the settings on this page, the new settings will also be applied to any other gels in the experiment. Note: if your images have already been aligned in the TT900 S2S Advanced Alignment Tool it is important that any changes that you make on this page of the wizard are applied to all the images in the experiment. Consequently, ensure that this check box is ticked. Area of Interest Initially the preview pane will display a rectangle around the whole image. If you want to specify an Area of Interest (AOI), within which to detect spots, you can modify this rectangle by clicking on and dragging one of the edges or corners. Alternatively, you can drag out a completely new rectangle to replace the old one. Right clicking resets the entire image. PG200/PG220 User Manual Analysis Procedures • 97 You can double click in the AOI to activate the resizable popup window. By dragging out a corner, you can enlarge this AOI. If desired, you can set a different AOI for each gel, when selected from the image list on the wizard page. At a later stage on the Matching page of the wizard, the areas of interest will be used to improve the quality of the warping. When you are happy with the Area of Interest, click Next. Define Averaged Gels page This page provides the option of creating Averaged gels in your experiment. An Averaged gel is produced by statistically combining several other gels to produce a gel that has mean measurements values together with an error term. This error term provides a measure of the variation of the values that were averaged. See the Measurements Window | Error Type section for more information on error types. See the Analysis Procedures | Creating Averaged Gels section for more information on Averaged gels. If your images have already been aligned in the TT900 S2S Advanced Alignment Tool, refer to the procedures described in the Using the SameSpots Outline Tool section. To Create an Averaged Gel 1 98 • Analysis Procedures Create your averaged gel by selecting your replicate gels using CTRL+click. PG200/PG220 User Manual 2 Click on the Group button. Alternatively, right click after selecting your gels and then choose Create Averaged Gel from the context menu that appears. To display the sub-gels contained within an averaged gel, you can click on the node of the averaged gel to expand it. 3 Having created your averaged gel(s), you may want to create a base gel within one of the averaged gels. To do this, right click on a preferred sub-gel of an averaged group - this displays the context menu. 4 Select Use as Base Gel from the context menu. The icon of the modified gel now reflects the completed action. If you choose not to select a base gel at this stage, a base gel will be created automatically during the subsequent analysis. The base gel selected will be that sub-gel in the averaged gel with the greatest number of detected spots. It will be shown in the completed analysis experiment view file structure. To Remove a Gel from an Averaged Gel 1 Select one or more gels within the Averaged gel. 2 Click on the Ungroup button. The gel(s) are removed from the Averaged gel and restored to the main list of gels in the experiment. Alternatively, if you are working in the main program window, right click on the selection and then select the Remove from Average command from the context menu displayed. You can drag gels from inside an Averaged gel to the experiment icon. As you drag, the pointer appearance changes to the following: PG200/PG220 User Manual Analysis Procedures • 99 This signifies that it is not possible to place the gel in the current pointer location. When the selection is dragged to the experiment icon, the pointer again changes: This indicates that the gel can be added to the experiment root level. Caution should be exercised when undertaking this action with a DIGE experiment, because there is a risk of producing inconsistent multiplex image grouping. You will be warned of this when you attempt to proceed. To Remove an Averaged Gel 1 Select the Averaged gel. 2 Click on the Ungroup button. The gels present within the Averaged gel, will be restored to the main list of gels in the experiment and the Averaged gel will be removed. Alternatively, right click on the Averaged gel and then choose Remove from the context menu. To Rename an Averaged Gel 1 Select the Averaged gel that you wish to rename. 2 Click on the Rename button. Alternatively, right click on the Averaged gel and select the Rename option from the context menu. 3 Type a new name into the in-place edit box that appears. To Add Gels to an Averaged Gel 1 Select one or more gels by highlighting them. 2 Drag the selection to an Averaged gel. As you drag, the pointer appearance changes to the following: This signifies that it is not possible to place the gel in the current pointer location. When the selection is dragged to an Averaged gel, the pointer again changes: This indicates that the gel can be added to the Averaged gel, when you release. 100 • Analysis Procedures PG200/PG220 User Manual Analysis Protocols page At the next stage a small dialog appears, asking whether you wish to load an analysis protocol. If you choose Yes, the Load a protocol file dialog will appear. When you choose to load an analysis protocol, a standard Windows file dialog appears. This dialog allows you to search for and select a .pcl protocol file. Click Open to load the protocol file. The protocol can be reviewed through the remainder of the Analysis Wizard screens. An opportunity to save a modified analysis protocol is provided towards the end of the Analysis Wizard. Loading a previously saved Protocol file, allows you to apply options to an experiment without having to repeat the steps taken to set them. The next stage of the Analysis Wizard requires you to select a reference gel, the spots of which will be used as a comparison basis in order to perform matching of spots across the gel series. PG200/PG220 User Manual Analysis Procedures • 101 Reference Gel Management page To be able to match the spots between the gels of your experiment, it is necessary to select a reference gel, which will be used as an index for all of the spots in your experiment. Auto-select one of the gels in this analysis - the reference gel chosen will be the one from the current experiment that contains the most detected spots. Select a specific gel in this analysis - use the drop-down list to choose which one of the gels in your experiment is used as the reference gel. For a DIGE experiment, this list will only contain the internal standard gel images. If your images have already been aligned in the TT900 S2S Advanced Alignment Tool, then it is important that you select the same gel image that was chosen as the reference gel during your alignment work in TT900 S2S. Refer to the procedures described in the Error! Reference source not found. section. Use an external shared reference gel - you can use a shared reference gel from any folder on your computer. For more information, see the section on Reference Gels. button on the wizard page becomes active. Click on it to display a With this selection, the dialog that allows you to select a shared reference gel. 102 • Analysis Procedures PG200/PG220 User Manual Locate and select a shared reference gel in the tree and then click OK. Alternatively, click Cancel to return to the Reference page. Now click Next to move to the next stage of the Analysis Wizard. Set Averaging Parameters page If you have created one or more Averaged gels, it is then possible to specify several criteria that a spot must meet before it can be considered good enough to form part of the Averaged gel. PG200/PG220 User Manual Analysis Procedures • 103 By default, the spot must be present in all of the sub gels. You can specify whether absent spots should be represented when calculating mean and standard deviation. If so, absent spots will be treated as being present, but with zero volume. You can specify whether to apply a maximum level of variation beyond which a spot will not be included, either in terms of coefficient of variation, or in terms of percentage standard error of the mean for any numeric field. This option allows you to modify these parameters and rebuild the averaged gel according to the new settings. When you have set the parameters, click Next to proceed. Replicate groups For DIGE experiments, the creation of replicate groups enables the investigator to study the statistical variations between the various populations. 1 Hold down the Ctrl key and click on the desired images to make the replicate group. 2 Repeat this step to create subsequent replicate groups. 3 Remember that while there is complete freedom to structure your replicate groupings in any way you wish, once you click Next to proceed, then that replicate structure is fixed from then on. Renaming replicate groups 1 Right click on the replicate group name and select Rename from the context menu. 2 Type the new name and click anywhere outside the edit box. 104 • Analysis Procedures PG200/PG220 User Manual Setting Parameters for replicate groups This wizard page only appears if a DIGE experiment is selected. If your experiment contains one or more Replicate groups you can specify several criteria that a spot must meet before it can be considered ‘good enough’ to form part of the Replicate group. It is possible to specify the number of images that a spot must appear in before it is included. By default, the spot must be present in all the sub-images. You can specify whether absent spots should be represented when calculating mean and standard deviation (for example, whether absent spots should be treated as present with zero volume). You can specify whether to apply a maximum level of variation (either in terms of coefficient of variation or in terms of percentage standard error of the mean) for any numeric field, beyond which a spot will not be included. When you have set the parameters click Next to proceed. PG200/PG220 User Manual Analysis Procedures • 105 Detect Spots page In this next stage, the user can enable/disable spot detection, and also optionally set detection method and define spot inclusion criteria. If the Options | Detection Tab Show Detection Methods check box is cleared, or if a DIGE experiment is being created, then this wizard page will not show a drop-down list selection of detection methods. The default detection method will be applied, if spot detection is enabled. Where the Options | Detection Tab Show Detection Methods check box is selected, or if a single stain experiment is being created, then this wizard page will show a drop-down list selection of detection methods. It is also possible to use customised spot detection methods in the program. See the Analysis Procedures | Spot Detection | Spot Detection Plug-Ins section for more information. Detect Spots Check box If this check box is selected (default), spots will be detected as part of the protocol. Where you are only interested in warping your images to compare them for common spots, clear the check box. Note however, any analysis task that is dependent upon spot detection will not be performed. 106 • Analysis Procedures PG200/PG220 User Manual Detection Methods drop-down This drop-down list of detection methods is available, if the Tools Menu | Options | Detection Tab Show Detection Methods check box is selected and if a single stain experiment is being created. 2005 Detection 2005 detection is the default, and recommended, spot detection method. It uses our fully optimised algorithm, which automatically detects spots without requiring the user to input any parameters. For DIGE experiments, it is the only method available. 2003: Standard Detection The 2003 Standard Detection method is also fully automatic but uses a slower execution algorithm. This method is not available for DIGE experiments. Various tuning files can be applied to this detection method and are shown listed beneath the 2003 Standard Detection method. Select the tuning file that you wish to apply to the 2003 Standard Detection method. Plug-in Methods of Detection It is possible to use customised spot detection methods in the program. See the Analysis Procedures | Spot Detection | Spot Detection Plug-Ins section for more information. If any plug-in methods are present, their names will appear in the list. Only Include Spots that Meet these Criteria This panel on the wizard page displays a list of clauses that detected spots must fulfil. Initially, this panel is empty. 1 To edit or add a new clause to the list, click the Add button. The Add Range Threshold dialog appears. 2 In this dialog, select a spot or statistics field from the drop-down list. 3 Select an operator (<, <=, =, >= or >) and type a value in the edit box. You can also edit an existing clause by highlighting the clause of interest and double clicking on it, to bring up the Edit Range Threshold dialog. You can add as many clauses as you like to the filter, but remember that a spot will need to fit all of the clauses to be detected. If you want to remove a clause from the filter, select it from the list and click the Remove button or press the Delete key on your keyboard. 4 PG200/PG220 User Manual Click Next to move to the next stage. Analysis Procedures • 107 Background Subtraction page This page allows you to specify how background subtraction, which compensates for the background intensity inherent in the gels, is performed on gel images. Subtraction Method The drop-down list allows you to choose which method of subtraction should be applied. See the section on Background Subtraction for more details. The Analysis wizard applies the chosen background subtraction method to all images in a DIGE experiment. Having selected the method of background subtraction and set parameters, where required, click Next to proceed. Spot Matching page This page allows you to specify whether the protocol should include: Warp the gel images to the reference gel – default enabled. Match detected spots to spots in the reference gel – default enabled. Add unmatched spots to the reference gel – default enabled. Caution: If your images have already been aligned in the TT900 S2S Advanced Alignment Tool, then it is important that you refer first to the procedures described in the SameSpots section, before completing this page of the wizard. Once you have made your choices, click Next to proceed. 108 • Analysis Procedures PG200/PG220 User Manual Volume Normalisation page Volume Normalisation allows accurate comparison of the measurements of spots in different gels. Ticking the Normalise spot volumes using this method check box activates a normalisation method drop-down list. The following methods are available. Ratiometric This normalisation method is not available in PG200. This method is only available if a DIGE experiment is being analysed and in such instances, it is the default method selected. Since the internal standard consists of a combination of all the samples in an experiment, it will consequently contain every protein from all of those samples. Therefore, each protein can be compared to itself in the internal standard, to generate a ratio of relative expression - Ratiometric normalisation. Thus, all spot volumes in Cy5 will be normalised relative to the counterparts in the Cy2 internal standard, namely (Cy5/Cy2). Similarly, all spot volumes in Cy3 will be normalised to the counterparts in the Cy2 internal standard, namely (Cy3/Cy2). The specific ratiometric normalisation algorithm used in the program is a more complex derivative of the simple ratio described above. This is because the algorithm must apply a correction factor based on the difference in total spot volumes between the two populations. This then takes account of any possible staining differences in the dyes used. Total Spot Volume Normalisation In this method, the volume of each spot is divided by the total volume of all of the spots in the gel. Since this tends to produce extremely small values, the result is multiplied by a scaling factor. PG200/PG220 User Manual Analysis Procedures • 109 If you select the Use only spots that are present in all gels checkbox, then instead of dividing by the total volume of all the spots in the gel, the operation will only use spots that are present in all of the gels. You have two options for the scaling factor selected by the option buttons. Multiply by the total area of all the spots in the gel - Gels with more spots would have a higher total spot volume, usually resulting in a lower normalised volume. This method compensates for the differences in spot density. The ratio is multiplied by a constant factor - This can be entered in the Multiply by box. The default value is 100, producing a Spot Percentage volume. Value The software multiplies the volume of each spot in each image by a value (which you can enter in the dialog), then by the area of a single pixel in mm2 if scaling information is present. Where: Match Ratio PGxxx software calculates for each matched spot (present in both the study image and a base gel image), a complex ratio (R) of the spot’s volume in the base / normalising image to its volume in the study image. This is then multiplied by the area of a single pixel in mm2, if scaling information is present. Where: R Derivation 1 For each matched spot, calculate the volume ratio. 2 Calculate the natural logs of each value derived in step 1. 3 Sort the values of step 2 into ascending order. 110 • Analysis Procedures PG200/PG220 User Manual 4 Divide the values of step 3 into (X – (bin size - 1)) overlapping bins, each of which has a bin size of X/4 (where X is the number of matched spots). 5 Identify the bin with the lowest range (i.e. the bin with the lowest difference between the first and last item). 6 Calculate the average value of the bin identified in step 5. 7 Calculate the natural antilog of the value determined in step 6. The principal reason for the complexity of this algorithm is the need to provide backwards compatibility with OEM partner software. Total Volume Ratio With this selection, the software multiplies the volume of each spot in each gel by the ratio of the sum of the volumes of all spots in the base gel to the sum of the volumes of all the spots in the study gel, and then by the area of a single pixel in mm2, if scaling information is present. The base gel is selectable from a drop-down list and there is a check box option to use only those that are present in all the gels. Where: Once you have selected your normalisation method, click Next. PG200/PG220 User Manual Analysis Procedures • 111 Save Analysis Protocol page In this next page of the wizard, you will be allowed to save the options you have chosen as a protocol file (with the extension .pcl). You can save the analysis settings that you have just specified as a protocol, enabling you to apply identical analyses to other gel images in future experiments. If you want to save the analysis protocol, ensure that the Save an analysis protocol check box is ticked. If you choose to save your analysis protocol, you are also given the option to include the reference gel in the protocol. This shared reference gel can be selected in the future, when using the Analysis Wizard to create a new experiment. The reference gel created may not necessarily be an existing reference gel of the experiment. On this page, you can choose to export the experiment automatically, once the analysis stage is completed. The options include exporting as an .xml file, exporting to any accompanying database program, or choosing not to export. Where you want to share the reference gel, ensure that you select the Include the reference gel in the protocol checkbox. Now select Next to proceed. If the Save an analysis protocol check box was ticked, you will then see the Save a protocol File dialog. 112 • Analysis Procedures PG200/PG220 User Manual Select the folder in which you want to store the protocol, enter the protocol name and then click Save. If you chose to save the reference gel information as part of your protocol, a further dialog will appear, for you to specify a folder in which the shared reference gel will be stored. Summary page This feature is not available in Progenesis PG200. This page contains a list of the experiments ready for analysis. If it is necessary to create further experiments for analysis, then click the Add button. The wizard will then switch back to the Welcome page, ready for further experiment creation. PG200/PG220 User Manual Analysis Procedures • 113 Selecting any experiment in the list activates additional buttons on the wizard page, whereby you can edit or delete the selected experiment. In this manner, a stack of experiments can be created, ready for analysis. When you are ready to proceed, click Next. Perform Analysis page This is the final page of the Analysis Wizard. When you click on the Finish button, your experiment will be analysed. If you wish to return to any stage of the wizard then click the Back button. As the analysis proceeds, a list of stages performed will be displayed, together with progress bars. If you wish to stop the analysis at any point, click on the Cancel button. After a period of time the analysis will be cancelled. You will then be offered the choice of retaining the analysis that had been performed, up to the point at which you cancelled. When the analysis is finished, an information box is displayed, giving the analysis duration. Click OK to display the analysed experiment. 114 • Analysis Procedures PG200/PG220 User Manual Spot Detection Spot Detection of your gel images is one of the first and most important steps of the analysis. It involves locating the spots in the gel image, defining their shape and calculating measurement information such as volume and area. The software provides an optimised, fully automatic algorithm – 2005 Detection, to automatically locate the spots in your images. In addition, other detection methods are available with tuning files, in support of those users with previous versions of the software. For single stain experiments, the detection method can be selected from a drop-down list in the Analysis Wizard or the Detect Spots mode Navigator. This drop-down is activated from the Show Detection Methods check box in the Tools Menu | Options | Detection tab dialog. 2005 Detection This is an advanced, fully automatic detection algorithm, launched by clicking a single button. It does not require any parametric input from the user. 2005 Detection is the default detection method and is the only method available for DIGE experiments. Detect Spots This feature is not available in the PG220 Editor software. Having selected the mode from the main toolbar, when you click the Detect Spots button in the Navigator, the spot detection will be performed on the current gel. If the All gels in experiment option is selected from the Affect these gels drop-down menu, it will then go on to detect spots in all the other gels. The software will not allow the creation of spots smaller than a certain size. By default, a spot cannot be smaller than 16 pixels in area. This value can be changed via the Parameters | Minimum Spot Area entry box on the Tools Menu | Options | Detection tab dialog. Where the experiment contains averaged gels and Detect Spots mode is selected, then no spot detection editing tools are available, other than the Area of Interest tool. Manual Editing No matter how good the automatic spot detection, you may still wish to make some manual adjustments. The software includes a set of tools on the vertical mode toolbar, allowing you to make any amendment quickly and easily. With the Spot Detection method selected, the Automatic Splitting check box controls whether the software attempts to automatically split spots that may have merged. See the Split Spots section for more information. Navigator Editing Tools In the case of DIGE experiments, the functionality of the editing tools affects all images in the current multiplex group and may affect the associated averaged gel. For example, when the Renumber Spots command is applied after deleting or splitting spots, the spot(s) will be renumbered and the original spot number removed. This occurs simultaneously to the equivalent spot(s) in each image. PG200/PG220 User Manual Analysis Procedures • 115 Copy AOI to Other Gels If the Copy AOI to other Gels check box in the Navigator is selected, and then the Area of Interest is “dragged out”, the area will be passed to the other gels of the experiment. Affect these Gels Opening this drop-down menu, allows you to specify whether you want the detection and AOI to apply to the current gel, all gels on the current level, all gels in the experiment or all sub-gels in experiment. The choices available will depend upon the structure of your experiment. Depending upon the experiment structure, this drop-down list offers the following options to which editing applies: Current gel - This affects only the current gel of the experiment. Note that for a DIGE experiment, this choice will affect all members of the relevant multiplex group. Gels on current level – Editing will affect the current gel and other gels on the current level. All sub-gels in experiment - This option is only offered if there are any sub-gels present in an experiment. All gels in experiment - This affects all the gels in the current experiment, regardless of grouping. Depending upon the experiment structure, not all of the above gel selection options will be visible. Renumber Spots When you click the Renumber Spots button in the Navigator, all detected spots will be renumbered in ascending order from top left to bottom right. Clear Spots When you click the Clear Spots button in the Navigator, the program will prompt you to confirm. If you select Yes then all spots in the current gel will be deleted. Undo Changes While in Spot Detection mode, the software records the last 10 changes made to each image, including all manual editing and automatic detection. Clicking the Undo button steps back through the changes that have been made. This tool is extremely useful if any mistakes occur during editing. If you accidentally delete all the spots using Clear Spots, you can restore them using the Undo button at the bottom of the vertical toolbar. If the All gels in the experiment option is selected from the Affect these gels drop-down menu, you will be given the option of clearing all gels or just the current one. 116 • Analysis Procedures PG200/PG220 User Manual Vertical Toolbar Spot Editing Tools The vertical toolbar spot editing tools are applied only to the Main Image and Montage Windows. They do not operate in the Second Image Window. If you have selected an area of the gel to display in the Montage window, then you can use the editing tools there. This allows you to make manual adjustments in the same area of several different gels simultaneously, which can often be much easier than editing one gel at a time. Note that when you manually edit the spots in the gel, any Background Subtraction, Volume Normalisation or pI / MW Calibration you have performed will be lost. The system will retain as much matching information as possible, but if you edit an existing spot, then the related matching information may be lost. When editing a DIGE experiment, some of the editing tools are not available. The actions of the Add, Delete, Merge and Autosplit editing tools when chosen in a DIGE experiment, are applied simultaneously to the equivalent spot(s) in each image of the multiplex group and this may affect associated gels. The following table provides a summary of those tools available in DIGE and Non-DIGE experiments: Tools DIGE experiments Single Stain Analysis experiments Area of Interest Available Available Draw / Freehand split spots Available Erase Spot Available Available Add Spot Available Available Split Spot Available Auto Merge Spots Available Available Autosplit Spot Available Available Select Available Available Area of Interest When you perform automatic spot detection on your image, you may wish to specify an Area of Interest (AOI), within which you wish spots to be detected. No spots will be detected outside this area. 1 Click the Area of Interest button on the vertical toolbar. 2 Select a small, representative area of the gel by placing the pointer over the image and then click and drag out a rectangle. You can adjust the size of your rectangle by moving the pointer over one of the sides of the rectangle and then dragging it to a new position. 3 Repeat until you are satisfied with the AOI location and size. By default, the AOI is set to include the entire image. You can change this by clicking on the image and dragging out another rectangle. When you release the pointer, the area will be set. PG200/PG220 User Manual Analysis Procedures • 117 For a DIGE experiment, the selected AOI is applied to all images of the same multiplex group as the edited gel. You can reset the AOI to include the entire image, by right clicking anywhere in the image. If you do not set an AOI of your own and you are using the Spot Detection algorithm, it will automatically set an AOI to avoid detecting any extraneous matter, such as calibration strips that may be present at the gel edges. Draw Spots This tool allows you to draw directly on to the image to indicate the location of spots. The Drawing tool is not available for DIGE experiments. 1 Select the Draw Spots button on the spot detection mode vertical toolbar. 2 Click or click and drag the pointer over the desired area. Spot pixels will be added at the pointer point. 3 If you right click and drag, spot pixels will be removed at the pointer point. You can control the size of the added area, by using the Pen Diameter entry box in the Navigator. The changes you have made will be re-measured as soon as you release the pointer. If you have drawn a circle around the edge of a spot, it will be filled at this point. When you add spots by drawing outlines around them, ensure that the circle drawn is a closed loop. If it is not closed then the spot will not be filled, which will lead to incorrect measurements being generated. It should be noted that if you have set the Image window Spot Style to Outlines, it may not be obvious that the spot has not been filled correctly. Erase Spots This tool allows you to completely remove spots that have been detected. 1 Select the Erase Spots button on the spot detection vertical toolbar. 2 Click on a spot and it will be removed. Alternatively, click and drag out a rectangle to erase all spots in an area. Right click anywhere in the Image window to undo the Erase Spots process. In a DIGE experiment, when you delete a spot on any of the images, the equivalent spot(s) will be erased simultaneously on all images of the same multiplex group and this may affect associated averaged gels. Add Spot The Add spot tool allows you to add additional spots to an image with detected spots. 1 118 • Analysis Procedures Select the Add Spot button on the spot detection vertical toolbar. PG200/PG220 User Manual 2 Click at the required position on the gel image and the spot will be added automatically. Right click anywhere in the Image window to undo the process. For DIGE experiments, when you add a spot to any of the images, a corresponding spot will be added simultaneously to all images of the same multiplex group. If the newly added spot overlaps any existing spots, the boundaries of the original spot and the new spot will be adjusted to give the best split. Split Spots This option allows you to quickly separate merged spots by dragging a straight line along the join. The spot will then be split along this line. The Split Spots tool is not available for DIGE experiments. 1 Click the Split Spots button on the spot detection vertical toolbar. 2 Click at the point on a spot where you want the separation to begin. 3 Now drag out a line to the point where you want the separation to end. Release the pointer. Spots will then be split along the line. The new spots are assigned two new numbers. Spots can also be split with a freehand line - see Draw Spots for more information. Auto Merge The Auto Merge spots tool allows you to accurately merge split spots. 1 Select the Auto Merge button on the spot detection vertical toolbar. 2 Click on the first spot and drag the pointer across the boundary with the adjacent spot, with which you wish to merge. The spot outlines automatically join. More than two spots can be merged if they are adjacent to each other. The merged spots are re-numbered using one of the original numbers, while deleting the remaining number(s) of the merged spots. When you merge two or more spots, then the equivalent spots will be merged simultaneously on all images of the same multiplex group and this may affect associated averaged gels If the two spot boundaries on any of the images are more than a pixel apart, then merging of the spots will not occur on any of the images. Auto Split The Auto Split tool provides a rapid way of accurately splitting spots automatically. 1 Click the Auto Split button on the spot detection vertical toolbar. 2 Position the pointer at the approximate centre of the first spot and then click and drag the pointer to the approximate centre, of what will become another spot. PG200/PG220 User Manual Analysis Procedures • 119 The new spots are assigned two new numbers. When you use the Auto Split tool to split spots on any one of the images in a current DIGE experiment, the equivalent spots will split simultaneously on all images of the same multiplex group and this may affect associated averaged gels. Select Spot This tool allows you to select a new current spot or area of the gel to display in the montage. It is particularly useful if you are editing in the Montage window, as it allows you to edit different areas of the gels more easily. 1 Click the Select Spot button on the spot detection vertical toolbar. 2 Click on a spot to make it the current spot. It will be highlighted in the data tables and the Montage window will update to show it in each gel. 3 Click anywhere else in the image to show that area of each gel in the Montage. 4 Right click anywhere in the image to clear the current spot. When you select a new spot or area using this tool, the program will automatically switch back to whichever tool you were previously using. This is to allow you to proceed with the editing process as quickly as possible. Undo While you are in Spot Detection mode, the last 10 changes you make to each gel, including all manual editing and automatic detection, are recorded. By selecting the Undo button at the bottom of the vertical toolbar, you can step back through the changes you have made. This tool is extremely useful if you have made mistakes during editing. on the Navigator, the program will advise, you that If you click the Renumber Spots button all undo information will be lost. Also, if you change main program mode, all undo information will be lost and it will no longer be possible to undo changes you made. The Undo button will not be available if you are editing in the Montage window, although the right click undo feature will still be available in some of the other spot detection tools. Other Spot Detection Methods The other spot detection methods that can be used for single stain experiments are: 2003: Standard Detection Plug-in Methods of Detection (optional) Selection of the detection method is made via the Tools menu | Options | Detection tab. In this dialog box, select the Show Detection Methods check box and then click OK. The result of this will be that the various methods will be listed in a drop-down on the Detect Spots Page of the analysis wizard and also in the Detect Spots mode Navigator. 2003 Standard Detection The 2003 Standard Detection method is a fully automatic method, but uses an alternative execution algorithm to that used by the 2005 Detection method. This method is not available for DIGE experiments. 120 • Analysis Procedures PG200/PG220 User Manual Various tuning files can be applied to this detection method and are shown listed beneath the 2003 Standard Detection method in the Detect Spots Navigator or Detect Spots Page of the wizard. Select the tuning file that you wish to apply to the 2003 Standard Detection method. Spot Detection Plug-Ins It is possible to use customised spot detection methods in the program. If you have developed your own method, please contact us to find out how it might be interfaced with this software. PG200/PG220 User Manual Analysis Procedures • 121 Background Subtraction All gel images contain levels of background intensity inherent in the image capture process. If accurate spot measurements are to be obtained, it is necessary to account for this. Background Subtraction mode provides several methods of determining the background levels for each spot in the gel. The method chosen depends upon your gel images and personal preference. Various methods of Background Subtraction can be selected from the Subtraction Method dropdown menu at the top of the Navigator. Beneath the description of the selected method is the Affect these gels drop-down menu, where you can select the range of gels on which the background subtraction is to be performed. The choices available in the drop-down will depend upon the experiment structure, but can include: All gels in experiment Gels on current level Current gel All sub-gels in experiment Under normal circumstances, you will want to use the same method of background subtraction on all of your gels. Otherwise, it will be extremely difficult to make accurate comparisons between them. If for some reason you need to use a different method on different gels in your experiment, use this drop-down menu, in conjunction with the Subtraction Method menu to make your selections. When you click the Subtract Background button, background subtraction takes place for your selected gel(s), using the selected method. Performing Background Subtraction 1 Choose an image from the experiment group or from within a multiplex group of a DIGE experiment. 2 Choose a subtraction method from the list in the Navigator. 3 Set any required parameters. 4 Select the scope of gels to be modified from the Affect these gels drop-down list. Remember that for a DIGE experiment, choosing Current gel will apply changes to all members of the associated multiplex group. 5 Click the Subtract Background button below the list. The subtraction is performed immediately on the selected gel(s), using the chosen method and the data windows display the calculated measurements. When the background is subtracted from any image that is part of a DIGE multiplex group, the same background method is automatically applied to the other images within the multiplex group, 122 • Analysis Procedures PG200/PG220 User Manual for example: Cy 2 (IS), Cy 3 and Cy 5. This may also affect the averaged gels containing those multiplex group members. To subtract background in the different multiplex groups, the Analysis wizard applies the chosen background subtraction method to all images in a DIGE experiment. Background Subtraction Methods The following sections describe the five methods of background subtraction. You can use the Background Only display option in the Image windows to verify the results of background subtraction. This visually shows you the exact effects of the subtraction that has been performed. See the Main Image Window of The Program Windows section for more information. If you perform background subtraction after you have normalised the spots in Normalisation mode, the normalisation will be lost. Normalised volumes should be calculated after background subtraction has been performed, in order to obtain accurate results. No Background In this mode, when you click the Clear Background button, all background subtraction that has been performed will be erased. This includes background values that have been calculated for the spots in the gel. Mode of Non-Spot The Mode of Non-Spot method is fully automatic and works by first finding the rectangle that completely encloses each spot. This rectangle is then expanded by a set number of pixels, to give an area for examination. The number of pixels, which the area is expanded, can be set using the Margin entry box beneath the Subtraction Method drop-down menu in the Navigator. Default setting is 45 pixels in every direction. Pixels in this area that are not part of any spot are then examined and the most frequently occurring pixel intensity is deemed to be the background value for that spot. In 12 and 16-bit images, the number of different pixel intensities possible means that simply using the most frequent pixel value is unlikely to produce good results. When this method is used on such an image, each pixel intensity is assigned to one or more overlapping groups of intensities. The background value is then calculated as the average of the most heavily occupied group. Lowest on Boundary This is a fully automatic method of background subtraction. The background value for each spot is calculated by tracing a line just outside the boundary of each spot. The lowest pixel intensity that is encountered during this process is deemed the background intensity for that spot. To use this method click the Lowest on Boundary button in the Navigator. PG200/PG220 User Manual Analysis Procedures • 123 Average on Boundary Average on Boundary is a fully automatic method of background subtraction. The background value for each spot is calculated by tracing a line just outside the boundary of each spot. The background intensity for that spot is calculated as the mean value of the pixels outside the spot. To use this method, click the Average on Boundary button in the Navigator dialog. 124 • Analysis Procedures PG200/PG220 User Manual Reference Gels In order to compare gels, it is necessary to create a Reference Gel. A Reference Gel acts as an index to the spots in the experiment. Each spot of interest in the experiment is mapped into the Reference Gel, which is then used as a basis for matching. The measurement values assigned to each spot in a reference gel are the average values the spot takes, in all of the gels that are matched to it. These values will be updated as changes are made to the matching within the experiment. A Reference Gel may be used in a single experiment or in several experiments, in order to allow comparisons between them. If a Reference Gel is used in several experiments, changes that are made to it in one experiment will affect all of the other experiments. When you load an experiment that uses a shared Reference Gel, you will be informed of any changes that have been made to it in other experiments. You will then be given the option of accepting the changes that have been made. If you do not wish to accept the changes, you can stop sharing the Reference Gel. In this case, your reference gel will be unaltered, but will no longer be shared with other experiments. All operations involving the creation and sharing of Reference Gels are controlled through the Reference Gel Wizard. To activate the wizard, select either the Gel from the Edit menu. button on the Main Toolbar, or Choose Reference The Reference Gel Wizard The first page of the wizard allows you to choose the general type of operation you want to perform. The three options are: Share or remove the current reference gel. Create a new reference gel in this experiment. Import a reference gel from another experiment. PG200/PG220 User Manual Analysis Procedures • 125 If you already have a reference gel in the current experiment, then the Share or remove the current reference gel option will be selected by default. Otherwise, the default will be Create a new reference gel in this experiment. Select the option you want and then click Next. Share or Remove the Current Reference Gel This next page allows you to make the reference gel available to other experiments, or remove it from the current experiment. At the top of the page is a panel describing the reference gel in the current experiment, the reference gel name and shared status. 126 • Analysis Procedures PG200/PG220 User Manual Remove this reference gel from this experiment If you click this button, the reference gel will be removed from your experiment. This will result in all matching information in the experiment being lost, as well as other information that relies on matching. Consequently, you are prompted for confirmation before the operation is carried out. Make this reference gel available to other experiments Clicking this button will share the reference gel, creating a file on disk that can be imported by other experiments, allowing them to use the same reference gel. In order to perform this operation, it is necessary to ensure that all information regarding the experiment is fully saved. You will be asked for permission to save the current experiment, if required. When you share a reference gel, making it available to other experiments, any protein lists stored within that reference gel are also shared automatically. Create a New Reference Gel in this Experiment With this wizard option selected, the next page allows you to create a new reference gel for your experiment, based on one of the existing gels. The new reference gel will use the same image as the gel it is based on and all spots from the base gel will automatically be added to the reference gel. If there are any proteins in your experiment that have not been expressed in the gel you select, as the basis for your reference gel, it will be possible to add them later using Add to Reference Gel mode. At the centre of the wizard page is a list of all the gels in your experiment, from which you can create a reference gel. The list also displays the number of spots in each gel. Select one from the list and click the button labeled Create a reference gel from the gel selected above. PG200/PG220 User Manual Analysis Procedures • 127 The new reference gel will be created and added to your experiment. If there is already a reference gel in the experiment and you try to create a new reference gel, you will be asked for confirmation before proceeding. If you choose to continue, the original reference gel will be removed. Under these circumstances, the software will maintain as much matching information as possible, but it is still likely that you will need to rematch the gels in your experiment to the new reference gel. Import a Reference Gel from another Experiment With this wizard option, the next page allows you to select and share a reference gel that has been created within another experiment. If you share a reference gel between experiments, you will be able to compare them directly using the unique spot numbers of the spots in the reference gel. Any changes that you make to the reference gel in one experiment are propagated to the other experiments that use it, although an option is given to reject such changes. A tree showing the folder structure of your computer occupies the bulk of this dialog. The tree will also contain the file representing any reference gels that have been made available from other experiments (.2dr files). To use one of these gels in your experiment, select it in the tree and then click the Share the selected reference gel with this experiment button. If you already have a reference gel in your experiment, you will be asked for confirmation before the operation is carried out. If you choose to continue, the existing reference gel will be removed. The experiment will now contain the shared reference gel. It is also possible to share a reference gel directly from another experiment, even if it has not been explicitly made available. To do this on this Wizard page locate the experiment that you want to share the reference gel from, and expand it by clicking on the + node. Now select the experiment reference gel and share it by clicking the Share the selected reference gel with this experiment button. Again, you will be asked for confirmation if you already have a reference gel in your experiment. 128 • Analysis Procedures PG200/PG220 User Manual Note: an alternative method to import a reference gel into the currently open experiment is to locate the desired reference gel via the File View explorer and either double click on the image or right click and select Use with current experiment from the context menu. PG200/PG220 User Manual Analysis Procedures • 129 Warping This process aligns the features in your gels, to compensate for differences in running and scanning conditions. Warping can be performed either before or after detection. It enables the differences between gels to be seen more easily and the warping information can be used, to improve the quality of the matching of spots between gels. Warping the images will have no effect on either spot detection, or the data shown in the Measurements window. This is because only the original images are used for detection and measurement. To activate the warping mode, click the Warp Gels button Warping… from the Analysis menu. on the Main Toolbar or select In order to perform warping, you must first create a reference gel to which the gels will be warped. See the Reference Gels section for more information. If you attempt to perform warping without first creating a reference gel, the program will offer to activate the Reference Gel Wizard for you. Warping Display Options The first section of the Navigator dialog comprises a drop-down list of display styles, from which you can select which style will be used to display gels in the Main Image window. Normal The current gel is displayed in the standard style. Overlaid The current gel and the parent gel are shown, overlaid one on top of each other, using complementary colours. Warping information is not utilised in the display. Warped The current gel and the parent gel are again shown, overlaid one on top of each other, using complementary colours. In this display view, the current gel is distorted in accordance with any warping that is present. More information on changing the colour scheme can be found in the Main Image window | Contrast and Colour section. Below the list of display styles is the Affect these gels drop-down menu. Opening this drop-down menu, allows you to specify whether you wish the warping to apply to the Current gel, All gels on the current level, All gels in experiment or All sub-gels in experiment. 130 • Analysis Procedures PG200/PG220 User Manual The actual choices available in the drop-down will depend upon the experiment structure. Remember that for a DIGE experiment, choosing Current gel will apply changes to all members of the associated multiplex group and associated averaged gels. Warping tools Below these controls in the Navigator dialog, there are four buttons: Warp to matches, Perform automatic warp, Clear interactive warping and Clear all warping. Their respective actions affect the gel range selection specified in the Affect these gels dropdown. Warp to matches This warps the image using all spot matches as anchor points. Perform automatic warp This aligns the slave gel(s) to the parent gel. Clear interactive warping Clear interactive warping clears any vectors and pins that may have been added in the Manually assisted warping sub-mode. Pin - When using manual warping on a region of an image where the automatic warp has not succeeded, it can be useful to ‘pin’ several spots at the interface where the warping has started to fail. This places a constraint on the extent to which the manual warping affects that area. Clear all warping Clear all warping clears any vectors and pins that may have been added in the Manually assisted warping sub-mode, but additionally clears any automatic warping that may have been performed. This therefore removes any alignment between the slave gel(s) and the parent gel. Warping - Areas of Interest You can optionally specify Warping Areas of Interest using the Area of Interest button on the vertical mode toolbar. Drag out a rectangle in the reference gel and in one or more of the slave gels. The warping algorithm will pay no attention to anything outside the Areas of Interest. The warping algorithm should be capable of coping with differences between gels in terms of cropping and any non-spot matter, such as calibration strips in the margins. However, if there are any problems specifying warping, Areas of Interest may improve the quality of the warping. We recommend that warping should be performed before matching. This will cause the gels to be well aligned with the reference gel, so an initial seed vector will not be required. Manual Warping In addition to automatically warping gels, it is possible to manually warp gels. This is achieved by manually adding Pins or Vectors. To activate this feature, click the Manual warping button on the vertical mode toolbar. PG200/PG220 User Manual Analysis Procedures • 131 When manually warping your gels you should have the difference map option turned off. You can find this on the Image window | Further Display Options dialog. Manual warping can only be applied to a slave gel, not a reference gel. If you attempt to apply warping to a reference gel, you will be taken out of manual warping mode and placed into the Warping Area of Interest (AOI) default warping mode. Generally, you would perform automatic warping first. You would then perform manual warping to produce the best results. Alternatively, you could clear any previous automatic warping, perform manual warping by placing vectors and pins and then apply the automatic process to enhance your warping. Switching on the Image Display Optimisation via the Options | General tab will help speed up the display refresh rate. The Context Menu of Manual Warping If you right click on the image, you will get the mode-specific context menu. From this menu, you can insert pins. This command allows you to pin the overlay at desired points and therefore, stabilise the overlay. When in Overlaid view, you will also see the Reverse vector command in the context menu. You can also delete vectors and pins, along with the following display command options. Show Warp Grid With this command a grid is overlaid on the image. Depending upon the degree of warping, the grid may be comprised of a 1 x 1, 2 x 2, 4 x 4 or 8 x 8 cell arrangement. You will notice that the grid distorts when in Warped display. Show Drift Field This option displays small red arrows showing the stress/drift, when you place the vectors and pins. This gives you an overall effect of your manual warping. 132 • Analysis Procedures PG200/PG220 User Manual Show Vector and Pins You would normally work with this option selected. It displays the Vector icon as a small blue cross The Vector link icon is shown as a blue arrow The Pin icon is displayed as a small blue Pin signifying zero length. of variable direction. shape. It is only possible to place vectors or pins if this option is selected. Show Standard Overlays With this selection, the standard overlays are shown with vectors etc., once you have stopped dragging the vectors. Unwarped View This view shows the pins and vector links without amending the overlay immediately. When the Warped View is selected, the links will change to vectors and the warping will be displayed. If you have big differences, this feature will give you a clear view of the selection, before you actually apply the warping. Tips on Performing Manual Warping You may first want to place a vector at the largest offset area, to correct the image and then select the next obvious spot to transpose. Continue placing vectors, the objective being to make the image as grayscale as possible. Once you can see the two images, i.e. immediately after loading them in or after an auto warp, single click the areas that are aligned, thus placing the pins. If the images are very misaligned, choose a spot near the middle and drag it to correct for translation. Select a spot near the edge and drag it into alignment. This will rotate and scale the gel. If you think you could improve the initial alignment, you can right click on a pin or a vector and delete it, via the context menu and start again. When you are adding vectors, do not concentrate too much on the image aligning perfectly. Focus on the current selection and try to end the drag on the same point on the reference spot, as you clicked on the slave image. In other words, if you choose a spot, click the spot centre, and start to drag, release when the pointer is over the same PG200/PG220 User Manual Analysis Procedures • 133 spot centre in the reference image. This may sound obvious, but it is easy to get distracted by what the warp is doing. If the image does not correct fully for a spot and you are sure that you have clicked the same points in both spots, then ignore it for a while and add more correction vectors, across the image. Do not try for a perfect alignment on the warped image - it may snap into place when you add more vectors. The best procedure is to try and add 5 -10 vectors, spread across the image and check the results. After this, add vectors to areas that are still misaligned. Do not be afraid to delete pins and vectors - it is remarkably easy to link spots together that you may later find were not good selections. These may be displayed as the vector link icon. A long vector that cannot be corrected usually means either one of two things - the correction required is beyond the variability afforded by the grid, or it is actually due to experimental variation. How to Add or Remove Vectors and Pins For manual warping, you need to enter the Warping mode. This is accessed from the Warp Gels button on the toolbar (or the Warping option in the analysis menu). You also need to select the manual warping tool on the vertical mode toolbar. Adding Vectors Before you can add vectors to an image, you should select Warped from the Main Image Display drop-down list at the top of the Navigator. Assuming that you use the default colours, the pointer will change to a green arrow. Move the pointer over a green spot and then click and drag the green spot to the corresponding magenta spot, releasing at the same position. If they are lined up correctly, the transposition will be marked with a blue cross. If the vector is slightly off, a blue arrow will mark the position. If you are in Overlaid view, you will see a blue arrow marker. If however the vector is very small, you will see the blue cross marker. The image will only warp immediately when you select the warped view. Removing Vectors To remove a vector, place the pointer over it and right click. Alternatively, from the context menu, select Delete Vector. Add Pins If there is a point on the image that looks warped to your satisfaction, you can stabilise the warping by placing a Pin at that point. Click on the point and a Pin will be dropped. Repeat as necessary. Remove Pins To remove a pin, place the pointer over it and right click. From the context menu, select Delete Pin. 134 • Analysis Procedures PG200/PG220 User Manual Matching Matching is the process where gels that have had spot detection performed on them are compared to identify the spots that represent the same proteins. These are then linked, so that you can compare the expression of the proteins in the different gels. In order to perform matching you must first create a reference gel. See the Reference Gels section for more information. If you attempt to perform matching without first creating a reference gel, the program will offer to activate the Reference Gel Wizard for you. Having created a reference gel you can proceed to enter the Matching mode, by clicking the button on the Main toolbar, or by selecting Analysis Menu | Matching. In the top section of the Matching Navigator that appears, there are various entry boxes and check boxes for setting some of the matching parameters. These are discussed later in this section. Beneath these is the Affect these gels drop-down menu, where you can select the range of gels to be matched. The choices available in this drop-down will depend upon the structure of your experiment. Remember that for a DIGE experiment, choosing Current gel will apply changes to all members of the associated multiplex group. Finally, in the lower half of the Navigator, the following three buttons perform different operations on the gel. Clear User Matches Click the Clear User Matches button to remove any user matches that you have assigned from the current gel. See Adding User Matches. This will also cause the matches of those spots to be broken. Clear Auto Matches Click the Clear Auto Matches button to clear all matching information in the gel that has been automatically generated by the program. You will be asked for confirmation before this operation is carried out. This action will not clear user matches. PG200/PG220 User Manual Analysis Procedures • 135 Match Click the Match button to match the spots in the selected gel to those in the reference gel, using the current parameters. Any matches that you have entered manually will also be taken into account. Automatic Matching The system uses a spot-matching algorithm based on the spot coordinates. The algorithm automatically matches spots between gels in a given series. Match Finding The Match Finding algorithm (Match Finder) propagates matches from at least one initial seed match, which is automatically chosen according to the parameters. See the Seed Generation section for more information on how the initial match is obtained. Seed Generation Match Finder requires at least one seed match in order to function. To obtain this seed match, the system generates different seed matches and passes them on to the Match Finder repeatedly. The system then analyses the matching that is produced because of using each seed and chooses the best one, for use by the match finder. Operating in this way, the system can be left unsupervised to detect, measure and match the spots in a series of gels. Incorrect matches may be removed, or new ones added. If you have entered your own seeds by hand - see Adding User Matches - you can tell the software not to generate a seed by unchecking the Always generate auto seed option in the Matching Navigator. This can significantly speed up the matching process. Matching Parameters The first section of the Navigator allows you to set some parameters for the matching mode. These are Vector Box Size and Search Box Size. Vector Box Size The Vector Box size controls the leeway given to the vector of a potential match, to diverge from the vectors of previously assigned matches in the vector neighbourhood. It is an integer with range 1 to 100. Increasing the Vector Box size increases the chance that the software will be able to successfully follow large swirls in the gel, but at the expense of increasing the possibility that the software will detect spurious matches. Search Box Size The Search Box size controls the number of potential matching pairs that are considered when the software is searching for the initial auto seed. It is an integer with range from 1 to 2048. Increasing the Search Box size may help the software to compensate for images that are offset from one another, but at the expense of increased processing time. Beneath these controls are check boxes controlling various matching options. 136 • Analysis Procedures PG200/PG220 User Manual Always Generate Auto Seed If you have entered your own seeds by hand, you can tell the software not to auto-generate a seed by turning off this option. The Search box size will have no effect on matching if the Always generate auto seed check box option is not ticked, and at least one user seed is present. Keep Existing Matches If this option is selected, the system will retain any matches that are already present and add further matches where it can. You may wish to relax the parameters and match again following an initial match, in order to add more matches. User Matches are Seeds Any user matches added while this option is selected will be treated as user seeds and will have an S annotation. They will influence the matching of spots in their neighbourhood. If the check box is not selected, any user matches added will be indicated by the annotation M and will have no influence on the matching of their neighbours. These non-seed user matches are useful, when a spot has moved relative to those around it and you would not wish that spot match vector to be passed to neighbouring spots. Use Warping If slave gels have been warped to their parent and this option is selected, this information will be used to improve the quality of the matching. The Search Box size will have no effect on matching if Warping has been performed prior to Matching and Use warping is selected. Copy Settings to Other Gels This option copies all matching settings to other gels. Adding User Matches In addition to the seed match that may be automatically generated by the system when matching is performed, it is possible to manually add as many user matches as you like. The Match Finder will take all these into account, while endeavouring to improve the quality of the matching information generated. There are three methods of assigning a user match in your experiment. They all involve selecting a spot in the reference gel, by clicking on it in a window and then clicking on the spot that you wish to match. The only difference between the three methods relates to the windows you use to select the spots. Select the method you wish to use by selecting a button on the Matching vertical toolbar. Whenever you assign a user match, a small label containing the letter M or S will appear next to the spot, showing that it is now a user match or user seed. In all of the matching modes described later, right clicking on a matched spot will break the match. Matching Modes Overlay Matching Overlay Matching is the default method of assigning seeds. It is normally the quickest and easiest method to use. Having selected the Overlay Matching button, all the work is then done in the Main Image window. PG200/PG220 User Manual Analysis Procedures • 137 To match spots: 1 Select a reference spot (red) by clicking on it in the window. The pointer will change to a red arrow, to show that it is over a reference spot. 2 Click on a spot in the gel. The pointer will change to a blue arrow, to show that it is over a slave spot. If a reference spot and a slave spot are overlapping and you click at a point they both occupy, they will be matched immediately. The pointer changes to a double-headed red and blue arrow to indicate that this will happen. Dual Window Matching When selecting this mode button, seeds are assigned using both the Main and Second Image windows. Each should be showing a different gel. To assign a user match, select a spot that is matched in one of the gels, or a spot in the reference gel if you have that gel selected in one of the windows. Now select the spot that should be matched to it in the other window. This method is useful if the spot you wish to match is totally overlapped by a reference spot that is not the one to which it should be matched. In Overlay Matching, it would not be possible to correctly match the spot. Dual Window matching can also be useful if your gels change considerably through the experiment, as it allows you to match to another gel that has already been matched, rather than being forced to match directly to the reference gel. This means you can start by matching one gel to the reference and then match your other gels to a slave gel that has already been matched. This reduces the differences between the gel you are matching and the gel to which you are matching. The following two features can be used with the Overlay Matching and the Dual window matching modes. Match in Area If you click and drag out a rectangle in the main image window, the software will attempt automatically to match all slave spots in that area. Break matches in area Right click and dragging a rectangle will break any matches for slave spots inside the rectangle, excluding user matches or seeds. Montage Matching When selecting this mode button, you can assign a user match in all the gels simultaneously using the Montage window. First, you should select either a reference spot or a spot that has already been matched in one of the Image windows. An image of this spot will appear in the Montage window, along with the images of the same area of all the other gels. You can now assign a match by clicking on any spot in any gel to which you wish to match. This allows you to select very quickly a single spot that will act as a seed in all of your gels. It is also possible to change the reference spot, to which you are matching within the Montage window itself, by clicking on a spot in the image obtained from the reference gel. When adding a user match, holding down the Shift key while you add the match, will reverse the meaning of the User matches are seeds check box for that match. This is so that if you are adding both user seeds and user matches it will not be necessary to keep going back and forth between the image window and the Navigator, to turn the box on and off. 138 • Analysis Procedures PG200/PG220 User Manual Adding Spots to the Reference Gel This analysis mode is selected by clicking the button on the main toolbar, or via the Analysis Menu | Add to Reference Gel selection. When you first created your reference gel, it was based on a single gel and it is extremely unlikely that all proteins occurring in your experiment were expressed in this one gel. It is therefore necessary to map protein spots that are expressed in any other gels into the reference gel, so that they too can be matched. Adding spots allows you to build up a composite reference gel, containing information about all the proteins that have been expressed in your experiment(s). The easiest way to accomplish this is to use the automatic Add to Reference Gel feature, although it is also possible to select individual spots to map into the reference. It is strongly recommended that you detect and match all of your gels before you use this feature. Until matching is complete, the system cannot be certain whether there is a representation of a given protein spot already present in the reference gel. Automatic Method In the Navigator for this mode, when you click the Add to Reference Gel button, the software will process every gel in your experiment in an attempt to map new spots into the reference gel. To do this, the software will analyse every spot in the gel that has not yet been matched. It will then attempt to copy the spot into the reference gel, adjusting the spot position to account for the match vectors of other spots in the vicinity. If the new reference spot is within the reference gel image and does not overlap an existing reference spot, then it will be successfully mapped. Once this process is complete, you will receive a report. Under certain circumstances, you may not want to map reference spots from all of the gels in your experiment, i.e. if you have not yet completely analysed them all. In such a case, you can use the checklist labeled Select gels to add that appears at the top of the dialog. This list contains an entry for all the gels in your experiment. By turning gels on or off in this list, you can control which gels the system will attempt to map spots from. By default, when a gel is processed for new reference spots, the system will examine all unmatched spots and add them to the reference if possible. However, you may only want some of the spots to be mapped. In this case, you should select the Confirm modifications check box in the Navigator. When this option is turned on, the software will inform you about every spot it intends to map into the reference gel. It will update all of the program windows to reflect the addition of the spot and show a message box, containing some information about the new reference spot. You then have the option to accept or reject the addition, or to cancel the whole process. It is suggested that you rearrange the windows and change zoom factor in the Main Image window before you begin, so that you will be able to see the additional reference spots you are asked to confirm. You may need to move the confirmation message box when it appears, to see the spot. If there are only a few spots you wish to add, it is recommended that you use the manual method of mapping the spots, or use Spot Filtering, to temporarily disable any spots that you do not wish to add. PG200/PG220 User Manual Analysis Procedures • 139 Manual Method If there are only a few spots in your gel that you wish to add into the reference gel, you may find it more convenient to add them by hand. To do this, click on the spot that you wish to map into the reference gel. The pointer will change to a blue arrow when it is over a spot that may be added. The spot will then be copied into the reference gel, the position being adjusted to account for the match vectors of other spots in the vicinity. This is performed so that it is added in the correct place. It is also possible to add a spot at any point you like in the reference gel by clicking at the point you wish to add the spot in the reference gel image. If the prospective new reference spot is going to lie outside the reference gel image, or is going to overlap an existing reference spot, then it will not be possible to map it into the reference gel. To remove a spot from the reference gel, right click on it in any gel in the Image window. You will be prompted for confirmation before the spot is removed and advised of how many spots in the experiment are matched to it. Any spots that were matched to this reference spot will become unmatched. If you find you have added a merged spot to the reference gel, you can edit it by selecting the reference gel and Spot Detection mode. Adding Unmatched Spots from a Sub-Gel You should note that if your experiment contains averaged gels and you wish to add unmatched spots from one of the sub-gels, then for both the automatic and manual methods, performing the Add to Reference Gel operation would initially add these spots only to the averaged gel. It is then necessary to add the spots of the modified averaged gel to the reference gel. Normalisation This analysis mode is selected by clicking the button on the main toolbar, or via the Analysis Menu | Normalisation selection. Normalisation allows you to normalise the volumes of the spots in your gels, allowing you to compare accurately the measurements of spots in different gels. When you activate this mode, the Normalised Volume field will be activated automatically in the Measurements window. You select a method from the drop-down list in the Navigator. Some of the controls in the Navigator will change, depending upon which method you have chosen. For a loaded DIGE experiment, the normalisation method indicated will default to Ratiometric Normalisation, for which no parameters need be set. There are always two buttons present in the Navigator - Perform Normalisation and Clear All Normalisation. Volume normalisation is intended to allow accurate comparison of measurements between gels. It is therefore essential that all gels in an experiment being normalised use the same method. When you activate a normalisation operation, all gels in the experiment are always processed. The calculations that are performed when normalising spot volumes, take background subtraction information into account. If you perform background subtraction after you have performed normalisation, the normalisation information will be invalid and will need to be recalculated. If Background Subtraction has not been performed on all of the gels in the experiment, a warning will be displayed when you click the Perform Normalisation button. For normalised volumes to be 140 • Analysis Procedures PG200/PG220 User Manual meaningful, it is important to account for the background intensity inherent in the gels. See the section on Background Subtraction. Ratiometric Normalisation This feature is not available in Progenesis PG200. This method is only available if a DIGE experiment is being analysed and in such instances, it is the default method selected. Since the internal standard consists of a combination of all the samples in an experiment, it will consequently contain every protein from all of those samples. Therefore, each protein can be compared to itself in the internal standard, to generate a ratio of relative expression – Ratiometric normalisation. Raw ratiometric spot values are calculated as ratios to the spots on the internal standard image for each multiplex group, and then multiplied by a normalising factor to account for total spot volume differences between images. Thus, all spot volumes in Cy5 will be normalised relative to the counterparts in Cy2, i.e. (Cy5/Cy2). Similarly, all spot volumes in Cy3 will be normalised to the counterparts in Cy2, i.e. (Cy3/Cy2). The specific ratiometric normalisation algorithm used in the program is a more complex derivative of the simple ratio described above. This is because the algorithm must apply a correction factor based on the difference in total spot volumes between the two populations. This then takes account of any possible staining differences in the dyes used. Total Spot Volume Normalisation In this method, the volume of each spot is divided by the total volume of all of the spots in the gel. Since this tends to produce extremely small values, the result is multiplied by a scaling factor. When you select the Use only spots that are present in all gels checkbox, any spots that are not present in every gel in the experiment will be ignored when computing the total spot volume for each gel. You have two choices for the scaling factor, each selected by an option button. Multiply by the total area of all the spots in the gel - Gels with more spots would have a higher total spot volume, usually resulting in a lower normalised volume. This method compensates for the differences in spot density. The ratio is multiplied by a constant factor - This can be entered in the Multiply by box. Default value setting is 100, which produces Spot Percentage volume. When you have selected the scaling factor, normalise the gels by clicking the button labeled Perform Normalisation. Single Spot Normalisation In this method, the volume of each spot is scaled linearly, according to a known value for a single spot. Either this value can be a known quantity measurement based on a marker protein, or it can be an arbitrary value used simply to allow comparisons. To use the single spot normalisation method: 1 PG200/PG220 User Manual Choose a spot to base the normalisation on (the base spot). Click on a spot in the Image window to select it. Analysis Procedures • 141 2 Ensure that you chosen the Single Spot method from the drop-down menu in the Navigator. 3 Then enter the normalised volume for the base spot in the entry box. All other spots will be scaled according to this value. 4 Finally, click the Perform Normalisation button. The normalised volume for each spot in the gel will then be calculated by dividing the spot volume by that of the base spot, then multiplying by the value that has been entered for the base spot. This process is repeated for each gel in the experiment. For each gel, the base spot is determined by finding the spot in the gel that is matched to the base spot originally selected. Then the same scaling process is applied. If one of the gels does not have a spot matched to the original base spot, then it will not be possible to normalise the spot volumes and they will be set to Unknown. Value The software multiplies the volume of each spot in each image by a value (which you can enter in the dialog), then by the area of a single pixel in mm2 if scaling information is present. Where: 142 • Analysis Procedures PG200/PG220 User Manual Match Ratio PGxxx software calculates for each matched spot (present in both the study image and a base gel image), a complex ratio (R) of the spot’s volume in the base / normalising image to its volume in the study image. This is then multiplied by the area of a single pixel in mm2, if scaling information is present. Where: R Derivation 1 For each matched spot, calculate the volume ratio. 2 Calculate the natural logs of each value derived in step 1. 3 Sort the values of step 2 into ascending order. 4 Divide the values of step 3 into (X – (bin size - 1)) overlapping bins, each of which has a bin size of X/4 (where X is the number of matched spots). 5 Identify the bin with the lowest range (i.e. the bin with the lowest difference between the first and last item). 6 Calculate the average value of the bin identified in step 5. 7 Calculate the natural antilog of the value determined in step 6. The principal reason for the complexity of this algorithm is the need to provide backwards compatibility with OEM partner software. PG200/PG220 User Manual Analysis Procedures • 143 Total Volume Ratio The software multiplies the volume of each spot in each gel by the ratio of the sum of the volumes of all spots in the base gel to the sum of the volumes of all the spots in the study gel, and then by the area of a single pixel in mm2, if scaling information is present. If the Use only spots that are present in all gels check box is ticked, any spots that are not present in every gel in the experiment will be ignored, when computing the total spot volume for each gel. Where: 144 • Analysis Procedures PG200/PG220 User Manual Peak Adjustment This analysis mode is accessed via the Analysis Menu | Peak Adjustment command. The coordinates of each spot are of great importance, for example in spot picking. By default, the software assigns each spot’s coordinates by calculating the spot’s centre of mass. This is the spot’s average pixel position, weighted using each pixel’s intensity. While this works well for most spots, we provide an alternative method, which will assign the coordinates to the most intense area in the spot. To automatically recompute the spot coordinates, select the Use centre of mass as peak check box and click the Recalculate button. This parameter can also be set via the Advanced button of the Detection tab of the Tools Menu | Options dialog and will be applied to automatic spot detection. You can select the range of gels affected, when the Recalculate button is clicked, from the Affect these gels drop-down menu. The choices available in this drop-down will depend upon the structure of your experiment. Remember that for a DIGE experiment, choosing Current gel will apply changes to all members of the associated multiplex group. If you are not happy that the automatically computed coordinates provide an accurate location for a spot’s protein, you can manually adjust the coordinates by clicking at any point on the spot. Where you are performing spot picking and wish to pick at multiple points on a spot, you could revisit this mode to specify new coordinates at which to pick. PG200/PG220 User Manual Analysis Procedures • 145 Protein Lists Protein lists contain known information about the proteins that may have been expressed in your gels. A protein list may contain any number of proteins, which may be assigned to the spots in your reference gel, once they have been identified. A protein can have fields containing protein name, a description line, theoretical pI /MW values and an accession number (a unique code that can identify the protein, used especially in Federated 2DE Databases, available on the Internet). You can also create new fields for the proteins, using the features described in User Defined Fields. Protein lists are stored with the reference gel. Consequently, if you are sharing a reference gel between experiments, the protein lists will also be shared. It is also possible to share protein lists between reference gels, using the same protein list in different reference gels. You may have as many protein lists as you like in an experiment and as many proteins as you like in each list. The only restriction is that each protein must have a unique name within its list. In order to manage the protein lists in your experiment use the Protein Lists dialog, activated by selecting Create Protein Lists… from the Edit menu. See the 2D Calibration section for information on how to assign proteins to the detected spots in your gels. Protein Lists Dialog This dialog allows you to create new protein lists, remove existing protein lists from your experiment and share protein lists between experiments. If you activate this dialog and you do not have a reference gel in your experiment, you will be prompted to create one using the Reference Gel Wizard. At the top of the dialog is a list of any protein lists you already have in the experiment. 146 • Analysis Procedures PG200/PG220 User Manual You can change the name of any of the protein lists by clicking once on the list you want to change so that it becomes selected. If you then click on it again, you will be able to edit the name of the protein list inside the list box. Below the list box are two buttons Create new protein list and Delete selected list. Create New Protein List When you select this button, a new protein list will be created in the reference gel of your current experiment. A new protein list will appear in the list immediately, with a default name. The protein list will be highlighted for renaming automatically, allowing you to immediately type in a new name if you wish. Each protein list, within an experiment, must have a unique name. The program will adjust the name of your protein list, if necessary, to ensure that it is unique. Delete Selected List If you wish to remove a protein list from your experiment, you can do so using this option. Select the protein list you want to remove in the list box and click the Delete selected list button. You will be asked for confirmation before the list is removed. If the protein list is shared by other experiments, they will not be affected. However, if the protein list exists only in the current experiment, deleting it in this manner will cause it to be removed from disk and you will not be able to retrieve it. Sharing Protein Lists The bottom section of the dialog allows you to select protein lists, which have been created in other experiments, and use them in the current experiment. PG200/PG220 User Manual Analysis Procedures • 147 A tree is displayed, showing the folder structure of your computer, and any experiment and protein list files present. If you expand the node representing an experiment, any protein lists contained within it will be shown. To share a protein list, select it in the tree and click on the button labeled Use selected protein list with current reference gel. The protein list will now be shared in your experiment. Any changes that you make to this protein list will affect all other experiments that use it and vice versa. If you load an experiment that uses a shared protein list, you will be informed of any changes that have been made to it in other experiments. You will then be given the option of accepting the changes that have been made. Should you not wish to accept the changes, you can stop sharing the protein list. In this case, your protein list will be unaltered, but will no longer be shared with other experiments. Editing Proteins You can edit the values of individual proteins using the Protein window, selected from Window Selector toolbar at the bottom of the program window. This window contains one page for each protein list in your experiment. You can use the tabs at the bottom of the window to select the list that will be shown. To add a new protein to the selected protein list, click on the Add Protein button on the window toolbar. A new protein will be added immediately with a default name. If you try to add a protein and you do not have any protein lists in your experiment, one will be created automatically with a default name. This can then be changed using the Protein Lists dialog, as explained previously. To remove a protein from the list, select it by clicking on it in the table, then click the Delete Protein button on the window toolbar. 148 • Analysis Procedures PG200/PG220 User Manual You will be asked for confirmation before the protein is deleted. To edit the value of a particular field of a protein, double click on the cell in the table containing the piece of information you want to alter. You will then be able to type the new information directly into the table. Some fields are limited as to the values they can accept. For example, pI must be a number greater than 0 and less than or equal to 14. If you enter an illegal value for any field, it will revert automatically to the previous value. The name of each protein must be unique within the list and if you enter a duplicate name for a protein in the table, the system will alter it to avoid a conflict. PG200/PG220 User Manual Analysis Procedures • 149 2D Calibration This analysis mode is selected by clicking the button on the main toolbar, or via the Analysis Menu | 2D Calibration command. 2D Calibration is the process used to calculate the positions of protein spots, in terms of their isoelectric point (pI) and Molecular Weight (MW) values, rather than in terms of pixels. It is useful to deal in real world values, since comparisons can be made much more easily between gels. In addition, it facilitates the building up of databases and other data relationships. If you have a quantity of marker proteins distributed throughout the gel, or you are able to identify some of the proteins using mass spectrometry, then you may be able to use the 2D Calibration method. This allows pI and MW to be calibrated simultaneously in two dimensions, by interpolating between the known values. The two methods of 2D and 1D calibration are mutually exclusive. You cannot use the two methods on different gels in the same experiment. In order to use the 2D Calibration method, you must identify several of the spots in your reference gel, providing pI and MW information for them. To do this you must create a protein list in your experiment (or share one from another experiment) and enter pI and MW information for as many proteins as you can identify in your experiment. See Protein Lists for more information on how to do this. You must then assign the proteins from the protein list to the appropriate spots in the reference gel using the 2D Calibration mode. Assigning Proteins 1 Select the protein you wish to assign using the controls in the Navigator or the Protein window itself. 2 Now select the spot to which you wish to assign the protein. This spot either must be in the reference gel, or matched to a spot in the reference gel. All matched spots represent the same protein and this information is stored in the reference gel. 3 Do this by clicking on the spot in any of the program windows in which it is shown - the Image window, for example. 4 Click the Assign button in the Navigator to assign the protein to the spot. If you are using the Image window to select the spot for assignment, you can double click the spot to assign the selected protein to it immediately. You do not need to click the Assign button after this. When the assignment has been made, a label will appear next to the spot containing the name of the protein that it represents. A spot may only have one protein assigned to it. If you assign a protein to a spot that already has a protein assigned, the program will replace the original protein with the new one. 150 • Analysis Procedures PG200/PG220 User Manual Similarly, a protein may only be assigned to one spot in the reference gel. If you attempt to assign a protein to a spot and that protein is already assigned to another spot, the program will ask if you want to remove the assignment from the original spot. Where you find that you have mistakenly assigned a protein to a spot, this can be corrected by selecting the spot that the protein is assigned to and clicking the Clear Assignment button in the Navigator. You will be asked for confirmation before the assignment is cleared. If you wish to remove all of the protein assignments you have made, click the Clear All button. This will remove all protein assignments in the experiment and clear any calibrated pI / MW values in the spots of the experiment. Performing Calibration Once you have assigned all known proteins to the spots of the reference gel, click the Calibrate button to begin the calibration. The system will begin by calibrating the values for all spots in the reference gel that do not have proteins assigned. For every uncalibrated reference spot, the system searches for the nearest calibrated spot in each quadrant surrounding it - think of axes centred on the spot. The system will not calibrate a spot if it cannot find a calibrated spot in each quadrant, as it does not have enough information to calculate an accurate result. Assuming it locates a spot with known values in each quadrant, the system performs a transformation between the known values to obtain a result for the spot being processed. Once the reference gel has been fully calibrated, the results will be passed on to the matched spots in the other gels. Finally, the calibration process will be repeated for the other gels in the experiment, in order to calibrate any spots that have not been matched to the reference gel. PG200/PG220 User Manual Analysis Procedures • 151 1D Calibration This analysis mode is selected by clicking the button on the main toolbar, or via the Analysis Menu | 1D Calibration command. If you are not able to use 2D Calibration, you can still calculate pI / MW for the spots in your gels using the 1D Calibration method. To use this method, you must run 1D standard lanes in either or both dimensions on your gel. These can then be used to calibrate in each dimension independently. In 1D Calibration, you can apply different scales for the different axes. You will then create a ladder of the known values for the bands in the standard(s). This ladder will then be positioned on the gel image to create a gradient in the first or second dimension (horizontal and vertical axis, respectively). It will then be possible to calibrate values in that dimension for each spot in the gel, using a curvefitting algorithm. 1D Calibration mode has two modes, chosen using the buttons on the vertical mode toolbar. One mode allows you to calibrate the first dimension, while the other allows you to calibrate the second dimension. It is not possible to perform calibration in both dimensions simultaneously, although you can perform one and then the other, to obtain values for both fields, provided you have markers running in both dimensions. When you are in the Calibrate first dimension mode, only information relating to first dimension calibration will be displayed - you will not be able to see any second dimension ladders on the gel or in the dialog and vice versa. Creating and Editing Ladders In order to create new ladders or to import them from other experiments, click the Edit Ladders button in the dialog. The Edit Ladders dialog appears. 152 • Analysis Procedures PG200/PG220 User Manual This dialog allows you to create and edit ladders. Existing ladders appear in a tree on the left of the dialog. Selecting a ladder in the tree allows the ladder values to be edited, using the controls on the right of the dialog. You can use the Ladder Orientation selector to set which dimension the current ladder relates to and whether the ladder values are ascending or descending. The Mapping Units selector can be used to set which units will be used by the current ladder. Pre-defined unit schemes include MW (which can be expressed in daltons, kilodaltons, bases, kilobases, base pairs or kilobase pairs) and pI. It is also possible to create Mapping Units schemes of your own. The buttons above the Mapping Units selector allow you to create a new Mapping Units scheme based on the current one, edit the current scheme or delete the current scheme if it is not one of the pre-defined schemes. If you create or edit the Mapping Units of a scheme, the Ladder Units dialog will appear. In this dialog, you can enter a name for the scheme units, specify whether the units are expressed in whole numbers only (as bases and base pairs are) and optionally, limit the range by specifying minimum and maximum values. With many gels, it may be appropriate to calibrate the first dimension using an ascending ladder with pI as the units and the second dimension using a descending MW ladder. With DNA gels, it may be appropriate to calibrate both dimensions in MW. Buttons above the ladder tree allow new ladders to be created and existing ones to be duplicated, renamed or deleted. Click Done when you have finished. Any ladders that you create will be stored in a sub-folder of the main program folder in the current user’s application area. A .lad file is created for each ladder. If you have .lad files elsewhere on your machine, or on another machine on the network, you can import them into the software by using the Import Ladders button in the Edit Ladders dialog. This will make copies of the .lad files in the Ladders directory. It will not affect the original files. Insert and Position a Ladder 1 Once you have created a ladder, ensure you are in the correct mode for the dimension you are calibrating and select the ladder in the Ladder drop-down menu. 2 You can now add this ladder to the current gel. If you click the Insert Ladder button on the Navigator, a copy of your chosen ladder will appear on the gel. 3 Now select a curve type to use for the calibration from the drop-down menu at the top of the Navigator. There are several curve types to choose from and selection depends upon the standard lanes you have run. As you move various ladders around, you will see the lines move around. This ladder can be dragged with the pointer to a position that corresponds to the location of the standard on your gel. You can also move the various values within the length of the ladder, or stretch the ladder so it should be possible to line up exactly with the values in the standard. If you have run more than one standard lane on your gel, you can now repeat the process, adding the ladder again as many times as necessary and lining it up with the standards. You cannot mix standards on a gel. Once you have added a ladder to a gel for a particular dimension, you will not be able to add a different ladder for that dimension. The gel will have contours drawn across it in the Image window that indicate lines of equal calibrated value on the gel (vertical lines for first dimension sub-mode, horizontal for second dimension sub-mode). If you add more than one ladder, these lines will pass through all matching points on all ladders on your gel. By default, these are straight lines, but it is possible to use curves if you select the Use a curved line check box in the Navigator. PG200/PG220 User Manual Analysis Procedures • 153 If after moving ladders to where all your standards are, the contour lines do not pass through what you think are appropriate places on the gel, you can add a resize ladder. To do this, click on a contour where it is not passing through a ladder. A resizer will be added at the point where you clicked. You can only move the end-points of a resizer, but it should allow you to line up your contours. Deleting Ladders Ladders and resizers can be deleted by right clicking on them. If you want to remove everything you have done in 1D calibration mode, you can click the Remove All button on the Navigator and all ladders and calibrated values will be removed from your gel. You will be asked for confirmation before this operation is carried out. Calibrated value Graph and Table At the bottom of the Navigator, there is a graph of pixel position against calibrated value for the points in the selected ladder. You can use this to get some idea of how accurately the curve is fitting your points. A table showing this information can be displayed using the tab control connected to the graph. If you right click on the graph, a menu will appear giving you several options, including the ability to print the graph or copy it to the Windows clipboard. It also gives you the option to make the graph pop up. If you select this option, a new window will appear containing the graph, which can be resized to gain a better view of the graph. Calibration When you have positioned your ladders on the gel and selected a curve type, click the Calibrate button and the gel will be processed. Values for all the spots in the gel will be calculated in the selected dimension. 154 • Analysis Procedures PG200/PG220 User Manual Profiling This analysis mode is selected via the Analysis Menu | Profiling command. It can sometimes be extremely difficult to distinguish features on a gel image by eye alone. This is because the human eye is not particularly sensitive to slightly different shades of grey. For example, a patch of slightly darker pixels may be a protein spot, or they may just be background noise on the image. This problem is even more pronounced with darker greys. Distinguishing between black and very dark grey is particularly difficult, especially when trying to decide if a single spot, detected by the system, actually represents several protein spots that have merged and therefore require splitting. For this reason, the software includes a Profiling tool. This tool allows you to draw a lane on the image and then generates a graph of the pixel intensity along the lane. This graph provides a far clearer representation of the intensity changes in the gel, making it much easier to make decisions about the gel. Generating an intensity profile To generate an intensity profile, click anywhere in the Main Image window and drag out a rectangle. When you release the pointer, the profile will be generated and will appear in the Profile window. You can then repeat this process to generate as many profiles as you like. By default, each profile will be generated along the longer dimension of the area you selected. However, it is possible to force all of the profiles to be generated horizontally or vertically, using the Method drop-down menu at the top of the Navigator. This is useful if the lanes you are creating are roughly square shaped. It enables you to ensure that all profiles are generated in the same dimension. The Navigator contains a section providing information about the profile currently selected in the list, or the last profile you created. This information includes the profile size and position, along with the maximum, mean and total pixel intensities. PG200/PG220 User Manual Analysis Procedures • 155 Deleting profiles Every profile you create appears in a list labeled Profiles in the Navigator dialog. This list contains a name for each profile and an icon that indicates the dimension in which the profile has been generated. To delete a profile, select it from the list and click the Delete Profile(s) button beneath the list. You will be asked for confirmation before deleting the profile. If you have several profiles selected, they will all be deleted at the same time. You can also delete a selected profile by right clicking on the profile label in the Main Image window and selecting Delete profile from the context menu. Once you have finished using the profiles, you can delete them all in one go by clicking the Clear All Profiles button in the Navigator. You will be asked for confirmation before all the profiles are deleted. Renaming a profile You can rename a profile by selecting it in the list and clicking the Rename Profile button just beneath the list. Type in the new name and press Enter on your keyboard. 156 • Analysis Procedures PG200/PG220 User Manual Spot Filtering This analysis mode is selected by clicking the button on the main toolbar, or via the Analysis Menu | Spot Filtering command. In a 2D gel, it is common to find that thousands of proteins are expressed and are subsequently identified as separate spots during the analysis process. This can mean that interesting information is obscured by the bulk of data presented by the software. Perhaps you are only interested in the behaviour of a few of the proteins that have been expressed, or perhaps you wish to perform an analysis operation, such as mapping unmatched spots into the reference gel on just a few of the detected spots. In this case, you can use Spot Filtering mode to filter out the spots that are not of current interest. Spots that are displayed by the software are referred to as selected spots. Those that have been filtered out are termed unselected. Applying a filter to your gels allows you to select the spots that will be displayed by the program. The others will all be hidden and will not be displayed by the program in any of the windows. Note that applying a filter does not remove the spots - it only hides them. They can be recovered again at any time. While you are using the Spot Filtering mode, unselected spots will still be visible in the Image window. Spots that are selected are highlighted with a coloured outline (green, by default), while spots that have been filtered are shown with a blue outline. The software will not perform analysis on unselected spots. This includes all matching, calibration and reference gel mapping operations. Choosing the images Regardless of which method of filtering and image you choose from the drop down list on the main toolbar, you should also select which images to apply the filter to from the Affect these gels dropdown list. The options on the Affect these gels drop-down list differ depending upon whether you are analysing single stain analysis (SSA) or DIGE (DIGE) experiments. Options for single stain analysis: Current gel - affects only the current image of the experiment. Gels on current level - affects the current image and its siblings, if there are any. All gels in experiment – affects all the images in the current experiment, regardless of grouping. Options for DIGE: Current image - if the current image is the reference gel, only the reference gel is affected. If the current image belongs to a multiplex group only the current channel is affected, however changes to this channel will affect any replicate group to which it belongs. Current Multiplex group - all channels in the current multiplex group are affected as a multiplex i.e. if the spot passes the filtering criteria on any of the channels the spot is selected consistently throughout the multiplex group. This filter does not affect the PG200/PG220 User Manual Analysis Procedures • 157 reference gel; however, it will affect any replicate groups that contain the multiplex channels being filtered. All gels except the reference –filters all images within the multiplex groups as multiplexes (see Current multiplex group below), and any picking gels, but not the reference image. This filter will also affect the replicate groups since spots filtered out on multiplex channels will affect the replicate groups to which they belong. Current Replicate Group – if a replicate group is selected, the replicate group’s averaged values are used to determine which spots are unselected across the replicate group itself and the channels that comprise it. If a channel from a multiplex group is selected, the filter is performed on the replicate that channel belongs to as above. Manual Filtering The easiest method of applying a filter to your gels is by manually selecting / deselecting them. Manual Filtering is probably the best method to use if you know exactly those spots that are of interest. You can deselect a spot by right clicking on it in the Image window, then selecting Deselect Spot in the context menu that appears. The green highlight outline will disappear and the spot will appear as if it is unmatched, even if it was previously matched. Although deselected, the matching information for the spot has not been lost. It is displayed this way, so that you can see that matching information for the spot has been hidden. If you re-select the spot, the matching information will be restored. You can select a spot that has previously been deselected by clicking on it in the Image window. The coloured outline will appear again and the matching information will be restored. It is also possible to select / deselect spots in an area simultaneously. To deselect a group of spots, right click and drag out an area on the Image window. When you release the pointer, all spots that are entirely within the rectangle will be deselected. To select a group of spots, click and drag out an area on the Image window. When you release the pointer, all spots that are entirely within the rectangle will become selected. Beneath the Range and Comparison tabs at the top of the Navigator, there are Matched and Unmatched checkboxes. Ticking these will ensure that both matched and unmatched spots will be included optionally in any spot filter applied. There are three buttons displayed at the bottom of the Navigator dialog. They may be used in conjunction with manual filtering. The Navigator also features an Affect these gels drop-down menu, in which you can select the range of gels affected by the filtering process. The gel selection choices within this menu will vary depending upon experiment structure. (See “Choosing the images” above). 158 • Analysis Procedures PG200/PG220 User Manual Invert Selection The Invert Selection button inverts the current selection. Any selected spots will become unselected and vice versa. Delete unselected spots When you click the Delete unselected spots button, all unselected spots will be permanently deleted. You will be asked for confirmation before this operation is carried out. The operation cannot be undone. Eliminating large numbers of spots using the Delete unselected spots option, will reduce the size of the gel files on disk and improve the performance of the program. Select all spots in experiment This button selects all the spots in the experiment. Automatic Filtering Automatic Filtering is a simple query facility that allows you to select / deselect spots based on the properties of the spots, rather than by picking them manually. There are several different methods that you may apply when constructing your filter query, the controls for which appear in the upper section of the Navigator. All the methods you select are applied and a spot must fit all the parameters you define in order to be selected. At the top of the Navigator, there are two tabs, containing the sections Range and Comparison. In the Range tab, you specify explicit ranges of measurement field values that a spot must have in order to be selected. The Comparisons tab allows you to select spots, based on comparisons with spots that are matched to them in other gels. If you specify the Range and Comparison parameters, they will both be applied, no matter which page you are looking at in the Navigator. You can also specify whether the filter will select only spots that are matched, spots that are not matched or both. This is done using the check boxes beneath the Range and Comparison pages. Beneath these check boxes is the Affect these gels drop-down menu. The last control in this section is the Apply Filter button. When this button is clicked, the filter defined in the other controls will be applied, changing the spots that are selected / deselected. Range Tab This section of the Navigator allows you to specify explicit ranges of values that a spot must have in measurement fields in order to be selected. PG200/PG220 User Manual Analysis Procedures • 159 The bulk of the tab is occupied by a list of the clauses that you have added to the filter. Initially, this will be empty. To edit or add a new clause to the filter, click on the Add New Clause button and the Add Range Threshold dialog will appear. Select a spot field. Any numerical spot field may be selected, including those fields that have been defined by the user. Now select an operator (<, <=, =, >= >) to apply to a value. Spot-Based Filter It is possible to add a spot-based filter clause, which uses the value of a measurement field of a spot as the range threshold value. For example, you may wish to filter out all spots smaller than a given spot, without spending time looking for the spot’s area in the measurement table. To do this, right click on a chosen spot and select Spot-Based Filter from the context menu that appears. Then choose a field and operator (<, <=, =, >= >). Note that the value box contains the spot’s value for the chosen field. Click OK to accept the clause or Cancel to close the dialog, without adding the clause. You can also edit an existing clause by highlighting the clause of interest and double clicking on it to bring up the edit dialog, which will allow you to amend the fields, operator and values. For example, you may create a clause for the query that will stipulate that selected spot have an Area greater than 50. This will cause spots with an area less than 50 to become unselected. You can add as many clauses as you as if to the filter, but bear in mind that a spot must fit all of the parameters before the filter selects it. If you wish to remove a clause from the filter, select it from the list and click the Remove Clause button in the Navigator, or press the Delete key on your keyboard. Filters of this type can often be useful while manually editing spots. As an example, they can be used to highlight those spots of low circularity, which are likely to need attention. If you do edit the spots in a gel, while there is a filter applied to it, please bear in mind that the unselected spots still exist. They can be affected by edits to the gel itself. Comparison Tab This section of the dialog allows you to select spots, based on comparisons with their matched counterparts in other gels. 160 • Analysis Procedures PG200/PG220 User Manual Applying a filter of this type is only valid after matching has been completed in the experiment. The Compare Differences controls allow you to select spots based on the comparison of a property such as volume, with matched spots in another gel. For example, you may choose to select only the spots, whose volumes are at least twice the size of their counterparts in a control gel. First, select the gel that you wish to compare with from the drop-down menu and then specify the ratio of volumes that must be met in order for the spot to be selected. You may specify an upper and / or lower ratio by activating the relevant check box and then typing a value into the appropriate entry box. Examples: To specify that the spot must be at least twice the size of the matched spot in the control gel (e.g. up regulated by at least 2 fold), turn on the Lower Limit and set it to a value of 2. In order to specify that the spot must be no more than half the size of the matched spot in the control gel (e.g. down regulated by at least 2 fold), turn on the Upper Limit and set 0.5 for the value. To specify that the spot must be at least as large as the spot in the control gel, but no more than twice the size (e.g. up-regulated by no more than 2 fold) turn on the Lower Limit and Upper Limit and set them to values of 1 and 2 respectively. When you turn on both limits, the Find spots outside limits check box becomes active. With this check box ticked, the filter will select only those spots outside the set limits. The second set of controls on this page allows you to select only spots that are NOT in a selected gel. Turn on the option by activating the check box: Now select the control gel in the drop-down list. When you apply the filter, spots that were expressed in the selected gel will be de-selected. If you try to perform a comparison filter based on a volume-related property (for example, Volume, Vol+BkGnd, Norm. Vol., Background or Peak Height) and Background Subtraction has not been performed on the gels being compared, you will be asked for confirmation before the filter is applied. In order for volumetric comparisons to be meaningful, it is important to account for the background intensity inherent in the gels. See the section on Background Subtraction for more information. Tabular filtering In the Measurements, Comparisons and Expression windows you can perform table-based filtering. You will be able to filter out spot data above or below a chosen row. To perform tabular filtering: button on the toolbar or by 1 Activate the Spot Filtering mode by clicking the selecting Spot Filtering from the Analysis menu. 2 Display the Measurements, Comparisons or Expression Windows. 3 In any of the data windows, right click on an appropriate spot data row and select the required command from the displayed context menu. PG200/PG220 User Manual Analysis Procedures • 161 4 162 • Analysis Procedures Prior to performing tabular filtering, you may want to sort the column of data by clicking the column heading. PG200/PG220 User Manual Intensity Calibration This feature is not available in the PG220 Editor software. The Intensity Calibration mode is selected via the Analysis Menu. The Intensity Calibration mode enables you to match the intensity values in your image, measured in arbitrary units, to real-world values of optical density, diffuse density or counts. This can account for the response of your image capture device, which may not have a linear relationship between the values it stores in the image and the original intensity of your gels. Calibration is not usually necessary when using densitometers to acquire your image, as they can supply calibration data with the images directly. You can also use the accompanying scanning software to calibrate your image, instead of using the Intensity Calibration mode in this program. To perform intensity calibration, you need to scan a step wedge alongside your gel image. Alternatively, you can scan an image containing only a step wedge and then apply the calibration for this image to a set of images scanned at the same time. A step wedge contains areas of equal and known intensity. These areas are ordered in increasing intensity. In order to connect the image intensity values of the scanned step wedge with their real world values, you must enter the intensities of your step wedge sections as a step wedge list in the Intensity Calibration mode. Each value you enter is assigned to one of a string of sample points, which you position on the image. You move these sample points around until each point aligns with the appropriate section on the step wedge. The mode controls are displayed in the Navigator. At the top of the Navigator is the Step Wedge panel, where your list of step wedge values is created. Below this are drop-down menus of Units and Curve, from which you select to define the basic characteristics of your calibration. In the middle section of the Navigator are various option check boxes and buttons. Finally, at the bottom of the Navigator is a section showing the relationship of raw pixel value to calibration value. This can be viewed either in the form of a graph or in tabular form. Performing intensity calibration after you have detected the spots in the gel, results in the volume measurements for the spots being recalculated automatically, when you leave the mode. However, any Background Subtraction that might have been performed will have been lost. How to Define Your Step Wedge Points The step wedge list panel is found at the top of the Navigator. Each line on the list displays a single value of intensity in units specified in the Units drop-down menu. You can add and delete values from the list and use the adjacent check boxes to disable some of the values. This can be useful if the ends of your step wedge have scanned badly on the current gel and you do not want to change the step wedge list for use with other gels. PG200/PG220 User Manual Analysis Procedures • 163 It is likely that you will habitually use a single sort of step wedge and will only need to set up the list occasionally. Editing the step wedge list 1 Set the units for the step wedge in the Units drop-down menu to Diffuse Density (default). You can also choose from Optical Density or Counts. Set the curve type to Log Linear. 2 or click on the <new To add a value to the list, click the New value button value> list entry. An in-place edit box will appear, to allow you to enter the value to add. 3 Type in the value you require, e.g. 0.05 for diffuse density and press ENTER to accept it. You can press Esc to cancel without accepting the value. Clicking outside the edit box will have the same effect as pressing ENTER. If you wish to delete your created value, click the Delete button. Your new value will now appear on the image as a tag. 4 You should now repeat steps 2 and 3 until say, eight desired values have been added to the list. After you have added two values to your list, you will find that the software suggests the next value, when you choose to add a new value. This can speed up addition when there is an equal gap between the values you are entering. You can choose to accept or change the suggested value. When you reach the end of the range of acceptable values, the software will stop suggesting values. If the string of sample points lies on the image in such a way that the intensity calculated under each point, does not increase along the string, then you will be warned that the calibration cannot be performed with this configuration. Selecting values within the step wedge list 1 To see if a value is being used, look at the Image window or the Step Wedge list. If a value is in use, it will have a ticked check box adjacent to it, in the Step Wedge list in the Navigator. It will also have a sample point drawn for it in the Image window. 2 In order to prevent an existing value being used, uncheck it in the Step Wedge list. The string of sample points and intensity calibration data will be updated. 3 To select or deselect all the values at once, click the Select All / Deselect All button. Positioning your Sample Points When you have defined your step wedge list, you will find that a string of sample points has been placed over the gel image, in the Image window. This string shows the value to which each sample point relates, in a number box next to that point. You must position and size this string so that each sample point falls over the area on the scanned step wedge, to which the sample value corresponds. 164 • Analysis Procedures PG200/PG220 User Manual The string can be stretched and rotated by moving the end-points. To do this, move the pointer over one of the ends in the Image window. The pointer will change to show that you are over the point. You can now click on it and drag it to a new position. When you release the pointer, the intensity calibration curve and data are recalculated, to account for the new positions of the sample points. You can also move all of the points in the string at the same time. To do this, move the pointer over one of the inner points of the string. You can now click on it and drag it to a new position. All of the points will move together. It should be noted however, that this only occurs if the Lock calibration points option is selected from the image string context menu (see later). Having positioned your string of points correctly, your string position and calibration curve will resemble the following example: PG200/PG220 User Manual Analysis Procedures • 165 The sample points use the average intensity of an area of 64 pixels over which they are placed, in order to compensate for noise in the image. If the string of sample points lies on the image in such a way that the intensity calculated under each point does not increase along the string, then you will be warned that the calibration cannot be performed with this configuration. It is best practice to perform intensity calibration before you detect your spots. Otherwise, the volume measurements are recalculated along with the intensity calibration curve. If you have detected your spots, you can use the Re-measure spots instantly check box to prevent the measurements from being recalculated until you leave the Intensity Calibration mode. In the image window, right click on the string to see the context menu. 166 • Analysis Procedures PG200/PG220 User Manual Exclude this Point This option will only appear if you have clicked on an actual point in the string. Selecting the option will disable the point, so that the sample value is not used for the calibration. Reverse Order This option simply switches the string so that the values run in the opposite direction. The gaps between the various points themselves will not be affected. Lock Calibration Points Under normal circumstances, all the points used for Intensity Calibration would be evenly spaced. However, under some experimental conditions the wedge used for calibration does not contain evenly spaced sections. When the Lock Calibration Points option is activated (as it is by default), the program will not allow you to change the gaps between the points in the string. If you need to have unequal gaps between your points, you will need to turn this option off. When the points are not locked, the interface described above will change slightly, in that dragging a mid-point in the string will move it and only it, allowing you to change the gaps between the points. If you turn this option back on having adjusted the gaps between the points, the gaps will remain as you have set them, but you will not be able to adjust them further. Space Points Evenly This option is only of use if you have unlocked your points and changed the gaps between them. It simply moves all the midpoints in the string so that they are evenly spaced between the end-points. Point List This shows the values of all the points in your wedge, and whether they are currently active. If they have been excluded from the wedge, they will not have a selected tick icon next to them. PG200/PG220 User Manual Analysis Procedures • 167 How to Calibrate Gels To calibrate your gel, you need to create an appropriate step wedge list and move the sample points of the list into place over your step wedge. The final stage is setting the curve parameters. To Calibrate gels 1 From the Curve type drop-down list, select the type of curve you want to use from Linear, Quadratic, Cubic Spline, Log Linear or Log Quadratic. As an example, select Log Linear as it is suitable for most scanners. For calculating the curves shown in the graph: x = Raw Pixel Value y = Calibrated Value (usually diffuse density). 2 If you want to force the curve to go through the point (0,0), select the Force curve through origin checkbox. 3 The intensity calibration graph will be updated to reflect your choices and the table at the bottom of the Intensity Calibration Navigator will show the raw pixel value, calibrated value and distance of that point from the fitted curve for each sample point. 4 Repeat until you are satisfied that your intensity calibration is configured correctly. 5 Now apply the calibration to all of the gels in your experiment by clicking the Apply calibration to all gels button in the Navigator. Alternatively, if you want to use this calibration with the next gel you add to the current experiment or create an experiment from, ensure that the Use last calibration option is set in the Experiment dialog when you create the experiment or add the gel. Finally, if you are not satisfied with the calibration you have performed, you can revert the gel to the calibration state it was loaded with by clicking the Revert to Default Calibration button. This will either remove all calibration data, or reload any calibration, performed on the image file within a scanner program. 168 • Analysis Procedures PG200/PG220 User Manual Spot Picking The purpose of the Spot Picking mode is to map the coordinates of selected spots in the current gel to coordinates relating to locations on a separate device, such as a robot spot-picker. Before entering Spot Picking mode, you may wish to use Spot Filtering mode to filter out temporarily, those spots that you do not wish to map to the second image. Spots that have been filtered out can still be used as anchors. In Spot Picking mode, spots in the main image window will be displayed as they would be in Spot Filtering mode, i.e. spots that have not been filtered out will be highlighted with a green outline and any other spots will be displayed without the highlight. 1 Activate the Spot Picking mode via the Analysis Menu command. When this command is activated, an Open Second Image for Triangulation dialog may appear, prompting you to select an appropriate image corresponding to the gel from which you wish to pick or excise spots. Locate and Open your picking image. Alternatively, you can click Cancel and then open the second image later, using the Open Second Image button in the Navigator. 2 PG200/PG220 User Manual The Navigator structure changes to the Spot Picking mode and the Second Image Window displays your selected picking image. Analysis Procedures • 169 3 At the top of the Navigator is a Robot drop-down list of all robots currently supported. Should you have no robot, then select <None>. Mapped coordinates will be computed for display in the Measurements window. You will be able to export the coordinates later via the clipboard. If your robot’s name is not on the list, you can select <Generic>. A generic .csv file of mapped coordinates, in comma-separated format, will be created. It should then be quite simple to convert this file into a format that your robot can deal with. The spot picker will pick at the point specified in the measurements table, as the coordinate. We provide two alternatives for specifying which point of the spot to pick as the coordinate. See the Analysis Procedures | Peak Adjustment topic for more information. Triangulation The purpose of Triangulation is to map the coordinates of selected spots in the current gel to coordinates in a second image, relating to locations on a separate device, such as a robot spotpicker. If you use the Ettan Spot Picker robotic system, see the Ettan Picking section for details of an alternative method created specifically for that system. The mapping is produced by placing anchors on spots in the current gel. Equivalent anchors are then placed at corresponding points in the second image, to which these spot coordinates are to be mapped. Mapped coordinates for other spots can then be interpolated using a triangulation algorithm and stored, ready for spot picking. Adding anchors to the main image 1 Ensure that the Edit Anchors option button in the Interaction section of the Navigator is selected. 2 Click on a spot in the Main Image window. Red crosshairs will be displayed on the spot and a label will appear, with the number that was displayed in the Anchors section Primary drop-down list in the Navigator. The number in the drop-down will be incremented by one, in readiness for the next anchor. 3 Repeat step 2 to add anchors to further spots. When three or more anchors have been placed, green triangles will be displayed, dividing the area between anchors into non-overlapping regions. As you add anchors, you will see the configuration of triangles update itself in accordance with the algorithm, to provide the best fit to all the anchors that are present. Anchors may be added to the second image in a similar fashion. The Secondary drop-down list displays the number of the anchor, to which the next interaction with the second image will relate. When three or more anchors are present and every anchor in the Main Image window has been given a counterpart in the Second Image window, green triangles will also be displayed in the Second Image window. It is not possible to add an anchor to the second image window, before the spot it corresponds to in the Main Image window has an anchor attached. You may choose to add all of your anchors to the main image, and then proceed to add their mapped counterparts to the second image. Alternatively, you could repeatedly go back and forth 170 • Analysis Procedures PG200/PG220 User Manual between the two images, adding an anchor to the main image and then adding the counterpart to the second image. Editing existing anchors 1 Ensure that the Edit Anchors option button in the Interaction section of the Navigator is selected. 2 Select the anchor number in the appropriate Anchors drop-down list, i.e. Primary for anchors in the Image window and Secondary for the second Image window. The selected anchor will be highlighted with a red circle. 3 Clicking on another spot in either Image window, will cause the selected anchor to move there. In the second image window, you can also click on an anchor and drag it to a new location. It will then become the selected anchor in the Secondary drop-down list. Deleting Anchors To delete a single anchor, right click on the anchor in the Main Image window. The counterpart in the Second Image window will also be removed and the anchors in both windows will be renumbered, to avoid having gaps in the list. You cannot use the Second Image window to delete anchors. To delete all anchors, click the Clear All button in the Navigator. Selecting spots to pick 1 Ensure that the Select Spots To Pick option button is selected. 2 Click on a spot in the main Image Window. If the spot is inside a triangle, yellow crosshairs will be displayed at the coordinates. PG200/PG220 User Manual Analysis Procedures • 171 If the spot can be mapped into the second image, yellow crosshairs will be displayed at the mapped coordinates, together with a yellow circle of the same area as the spot. Where the orientation of a triangle has been flipped between the two windows, it will not be possible to map the coordinates of the spots it contains. Where this happens, it may suggest that there has been an error in the placement of one or more anchors in the Second Image window. Selecting or deselecting all spots to pick 1 Click the Select/Deselect All Spots button in the Navigator. This will toggle all of the spots on or off. 2 When you are satisfied that the selected spots are mapped to the correct points in the second image click the Export to Robot button at the bottom of the Navigator. The name of this button will reflect the choice of robot. This will send the mapped coordinates to the Measurements table and if appropriate, generate a file for export. You can use Spot Picking mode for direct picking, if you analyse the image from the robot as part of your experiment, and detect spots in it. Then, without adding triangulation anchors, select spots in the Main Image window as described above. The raw coordinates of the spots in the Main Image window will be used for picking. Ettan Picking If you use backed Ettan DALT II pre-cast or self-cast 2-D gels that are used with the Ettan Spot Picker robotic system available from Amersham BioSciences, you can select Ettan from the Robot drop-down list in the Navigator. The image must contain two circular reference markers of 5mm diameter. These are placed on the gel backing (glass or plastic). Before entering the mode, you should have performed the required image analysis procedures (spot detection, matching, filtering etc), in order to have a Measurement Window table containing only the spots to be picked. Creating a picking list of mapped spot coordinates for the Ettan spot picker 1 Ensure that the Edit Anchors option button in the Interaction section of the Navigator is selected. 2 In the Image window, click near the centre of the first spot to identify it. A label will appear - IR1. 3 Click near the centre of the second spot. A second label will appear - IR2. 4 If you want, you can modify the location of the spot marker by click and dragging. 5 If you do not want to pick all of the spots in the gel, then you can select the Select Spots to Pick option button and then click on individual spots to select them, or right click to deselect them. Spots that are selected for picking will be highlighted with yellow crosshairs at their centre. You can use the Select/Deselect All Spots button to toggle all of the spots on or off. 172 • Analysis Procedures PG200/PG220 User Manual 6 Click the Export to Ettan button in the Navigator. The Open a Scanner Correction File dialog will be displayed. Flatbed scanners often produce an image with slight distortions, due to mechanical and optical imperfections. Scanner Correction files are used in these circumstances. 7 Select an Umax scanner correction file. Scanner correction files may be stored in separate folders from experiments. They are stored in designated folders when using the Amersham Biosciences scanner software. The naming of these files is arbitrary. Upon selecting the scanner correction file and clicking Open, the Save a spot list file dialog will be displayed. You can save the spot list file with the experiment, or in a separate folder. Where appropriate, you will be asked for confirmation that you wish to pick all selected spots in the current gel. 8 PG200/PG220 User Manual If you confirm this, a standard File Save dialog will appear, enabling you to save the picking list as a text file. Otherwise, locate the folder in which you want to save the spot list to and enter a filename. Finally click Save. Analysis Procedures • 173 9 Where you want to delete both markers, click the Clear Both Markers button in the Navigator. If you have selected the markers in the wrong order, you can transpose them, by clicking on the Swap Marker IDs button in the Navigator. The labels will change places. Some scanners may store incorrect data about the resolution at which an image was scanned. If this is the case, it may lead to your picking markers being drawn at the wrong size. Should this happen, we recommend that you use the Edit Menu | Scaling command, to enter the correct information about the image’s scale, before you proceed with spot picking. 174 • Analysis Procedures PG200/PG220 User Manual Differential Analysis Differential Analysis allows series of matched spots to be selected, based on whether the series falls within specified parameters. It is essentially a type of spot filtering and therefore does not delete spots, but simply hides those spots that belong to a series that does not match the required pattern. Differential Analysis can be accessed from the Tools menu. The Differential Analysis dialog requires you to select a spot property, to base the analysis on. This can be any numeric property of a spot, including any numeric user-defined fields that have been added. You are then required to set the ratio threshold that will determine whether a spot series is accepted (selected) or rejected (deselected). In order to understand exactly what affect this feature has, it is useful to understand the process involved when it is run. The software starts with the reference gel and goes through the list of spots that it contains. For each of these reference spots, it attempts to find a matched spot in each slave gel. For each matched spot, it records the value of the chosen property in that spot, so if volume was chosen in the dialog, it will record each spot’s volume. If a matched spot is not present in a slave gel, it will be treated as though it were present, but with value zero. If the chosen property is volume-related (e.g. Volume, Vol.+BkGnd, Norm. Vol., Background or Peak Height) and Background Subtraction has not been performed on both the current gel and the gel being compared with, you may be asked for confirmation before the Differential Analysis is performed. In order for volumetric differences to be meaningful, it is important to account for the background intensity inherent in the gels. See the section on Background Subtraction for more information. Once a value has been recorded for each gel, the ratio of the highest value in the series to the lowest is calculated. If this ratio is less than or equal to the ratio that was specified in the dialog, then the series is accepted and every spot in it will be selected. Where it is not, the series will be rejected and all of the spots in it will be deselected. The software then moves on to the next reference spot. When the analysis is complete, the selected spots will be those reference spots whose matched spots fell within the limit required. Differential Analysis can therefore be used to identify spot series that may be of interest and to exclude possible outliers - points that lie some distance away from the majority of spots. PG200/PG220 User Manual Analysis Procedures • 175 Creating Averaged Gels Averaged gels can only be created for a DIGE experiment by using the Analysis Wizard. We strongly recommend that you use the Analysis Wizard to create your Averaged gels. However, Averaged gels can be created from within the software using the Averaged gels wizard if you want to do this. We recommend you take the following steps. 1 First, analyse your gels in the normal manner - detecting spots, performing background subtraction, matching to a reference gel, etc. 2 Once the analysis process is complete, select Averaged Gels from the Edit menu to activate the Create/Modify Averaged Gels Wizard. See the Using the Averaged gel wizard section for more information. 3 Activate the Warping mode then warp the images in the Averaged group to the reference gel. To do this, view an image in the group, other than the base gel: you can either select the image from the experiment tab or from the drop down list on the toolbar. In the Navigator select gels in current level and click the perform automatic warp button. Repeat for each averaged group. At this stage, you should edit the warping where necessary. See the Warping section for more information. 4 Activate the Matching mode then match the images in the Averaged gel to the reference gel. To do this, view an image in the group, other than the base gel, select gels in current level and perform matching by clicking the Match button. Repeat for each averaged group. At this stage, you should edit the matching where necessary. See the Matching topic for more information. 5 Now, add any unmatched spots to the reference gel. To do this, select Add to reference gel from the Analysis menu. Again, view an image in the group. At the top of the Navigator ensure that all the images in the group are selected and then click the Add to reference gel button. Repeat for all Averaged groups. See the Adding spots to the reference gel section for more information. 6 Create a new top Reference gel based on one of the Averaged gels in your experiment. To do this, select Choose Reference gel from the Edit menu. Alternatively, you can right click on an Averaged gel in the Experiment tab and select Create Reference. See the Reference gel section for more information. 7 Activate the Warping mode and warp all Averaged gels to the new top Reference gel. To do this, view an Averaged gel and select gels in current level. Click the Perform automatic warp button. At this stage, you should edit the warping where necessary. 8 Activate the Matching mode and match all Averaged gels to the new top Reference gel. To do this, view an Averaged gel then select gels in current level and perform matching. At this stage, you should edit the matching where necessary. 9 Lastly, we need to add any unmatched spots from the Averaged gels to the top Reference gel. Do this by selecting Add to reference gel from the Analysis menu. Ensure you are viewing an Averaged gel and that all the Averaged gels are selected in the Navigator before clicking the Add to reference gel button. 176 • Analysis Procedures PG200/PG220 User Manual Our Technical Support team will be happy to help if you need more information. 2D gel electrophoresis is a very difficult process and despite rapid advances in the technology, it is still extremely difficult to reproduce gels, even when run from identical samples under identical laboratory conditions. In order to obtain accurate and meaningful results, it is essential to minimise and quantify errors as much as possible. To achieve this, it is becoming common practice to run multiple gels of each sample - two, three or more gels run from the same sample under the same conditions. Each gel can then be analysed separately and the differences between the gels quantified. The software has the ability to create Averaged Gels which are artificial gels created from a statistical combination of several normal gels. The spot values in an averaged gel are calculated from the mean values of the spots in the gels that were used to construct them, with error information to measure the variation among the averaged values. These calculations are performed automatically, whenever you make any modifications to any of the gels that have been used to construct the average. For example, if you edit the spots in one of the gels or alter the matching, the changes will be reflected in the average values immediately. Using the Averaged Gels Wizard To construct an averaged gel you should first analyse your gels in the normal manner - detecting spots, performing background subtraction, matching to a reference gel, etc. and only then use the Averaged gel wizard. The first page of the wizard allows you to select the averaged gel that you wish to modify. Altering an existing averaged gel If you want to alter an existing averaged gel, you should select that gel in the experiment tree that appears inside the dialog. Creating a new averaged gel If you want to create a new averaged gel, type a name for it into the entry box labeled Averaged Gel. Each gel in the experiment must have a unique name. The wizard will not let you proceed until you enter a unique name for your averaged gel, or enter the name of an existing averaged gel, in which case that gel will be modified. Once you have selected the averaged gel you wish to adjust, click on the Next button and the wizard will move on to the next page. Selecting the gels This wizard page allows you to select the gels that will form the average. There are two lists of gels on this page. The list on the left contains the names of the Available gels in the experiment that could possibly be added to the average. On the right side of the page, the Selected gels list contains the names of the gels that are already part of the averaged gel, selected on the previous page. The order in which you select the images is important - the first image selected is nominated as the Base Gel. Adding additional gels to the average Select the images from the list on the left and then click the PG200/PG220 User Manual button. Analysis Procedures • 177 Removing gels from the average 1 Choose the image to be removed from the list on the right and click on the button. 2 As soon as you click one of these buttons, the gels are transferred to the other list. 3 When you have selected the gels that you want to form the average, click Next. 4 If you selected an existing averaged gel on the first page and you remove all of the gels from it on the second page, the Next button will change to a Delete button. Clicking this button will remove the averaged gel from the experiment. Specifying parameters In the final page of the wizard, you specify some parameters that will control the creation of the averaged gel. Using these parameters it is possible to specify a tolerance for error, beyond which a spot will not be considered good enough to include in the average. The first parameter is Max. number of gels from which spot may be absent, activated by ticking the check box and set using the entry box and spin control at the top of the page. If a spot is absent from a greater number of gels than the specified maximum, it will be excluded from the average. Default setting for this parameter is 0, which means that a spot must be present in all of the subgels before it is represented in the average. If you change this parameter to 1, then the spot can be missing from one of the sub-gels and still be represented in the average. The Represent absent spots in calculations check box controls the effect that any absent spots will have on the computed average. If the option is selected, as it is by default, absent spots will be regarded as having zero volume when computing the volume of the averaged spot. If you deselect the option, the absent spots will not be represented in the calculation and the computed value will be the average value of the spots that are present. The other controls allow you to specify a criterion for the maximum variability that the spots may have in a chosen measurement field before they are excluded from the average. For example, you can state that all spots, whose Normalised volume has a coefficient of variation above 50%, will be excluded from the average. By default, this option is turned off. All spots will be included in the average, irrespective of their variability. select the Reject spots whose variation exceeds these tolerances check box to turn the option on, and then specify the criterion using the entry boxes. The measurement field used in the criterion can be selected from the Field drop-down list. 178 • Analysis Procedures PG200/PG220 User Manual The form in which the error is specified can be selected from the Variation Type dropdown. The options are: CV: the Coefficient of Variation, essentially the sample standard deviation, expressed as a percentage of the mean. SEM%: the Standard Error of the Mean, expressed as a percentage of the mean. Whichever error type you choose, you can set the upper limit value in the Limit edit box, by either typing the value or using the spin buttons. When you have set these parameters, click on the Finish button and the averaged gel will be created. These parameters can be changed at any time. Right click on an Averaged gel in the Navigator Experiment tree and select the Averaging Parameters command from the context menu. Averaged Gels Averaged gels update automatically whenever you modify a sub-gel. For example, if you change the matching inside the average, the mean values and standard deviations are updated immediately. If you are concerned that modifications you are making may destroy data you wish to keep, you should first make a backup of the data using Save As or Backup. There is an additional option available when you first create an averaged gel from gels on which you have performed spot detection, but not yet matched. If your gels are very similar, the system may be able to match them automatically, without the need for user seeds. The method used for this matching is very quick, but it does require that the spots in your gels have very similar positions. When you create an averaged gel from gels that may be matched using this method, the following dialog box will appear: If you select Perform Automatic Matching, the system will match the spots based on mutual proximity. The term mutual proximity means that spots will be matched if they are the nearest spots to each other. It is possible to further refine this matching, by insisting that the spots be within a given number of pixels from each other. If they are further apart than the distance you enter, they will not be matched. To activate this further limitation, select the box labeled Maximum distance between spots and enter a distance in the text box to the right. PG200/PG220 User Manual Analysis Procedures • 179 When the current gel is a sub-gel (e.g. when you are looking at a sub gel in the Image window) the program windows show the averaged gel information, where they would normally show reference gel information. This allows you to see how the averaged gel is constructed and perform alterations to the sub-gels. Examples The Reference Gel overlay on the Image windows shows the spots from the averaged gel. In the Comparisons window, the spots in the averaged gel are shown in the Ref. Spot column. The column shows how the sub-gels are matched to the average. One way to look at it is that the Averaged gel is in effect a sub-experiment, with all of its own matching information. When the averaged gel is being displayed as a reference gel, all of its spots are displayed, whether or not they fit the averaging parameters. 180 • Analysis Procedures PG200/PG220 User Manual An Introduction to SameSpots Outline If your experiment images have previously been warped using TT900 S2S Advanced Alignment Tool, then they are suitable for analysis by the Same Spots Outline technique. The development of the SameSpots Outline technique by the research team at Nonlinear Dynamics is a novel and effective solution to the dilemma faced by proteomics researchers everywhere. The Dilemma Proteomics researchers want to use advanced statistical tools on their gel data. To apply such tools the researcher: Needs more replicates Needs fewer missing values When considering the Missing values factor, the researcher knows that: Missing values relate to any spot that is not matched in every gel of the experiment By producing more replicates, the researcher generates more missing values! Repeatedly, the researcher faces the dilemma that more replicates results in reduced matches. The Solution Various approaches were considered for solving the replicates – matches relationship. These included: Remove all those protein spots that are not present on every replicate. Nonlinear rejected this approach because too much valuable data would be lost. Replace the missing values with “something”. Replacing with “zero” would produce a data bias. Using a model value might produce a lower data bias but could increase masking of data trends. These approaches were rejected. Finally, it was decided that copying spot outlines from those gels where the spot exists to those gels where they do not exist, could provide the greatest promise. To do this, it is required that a near-pixel level geometric correction (warping) be carried out to co-register all the images in the experiment. This is what the TT900 S2S Advanced Alignment Tool provides the proteomics researcher. Once this geometric correction has been performed, a “same spot” pattern is applied from the selected reference gel to all the experiment images. Statistical tools then get to work to discard the 95% of unchanging spot data, and then validate the remaining interesting spot data. This is the purpose of the SameSpots Outline tool. PG200/PG220 User Manual Analysis Procedures • 181 Using the SameSpots Outline Tool In order to use the Same Spots Outline technique your experiment images must have previously been warped using TT900 S2S Advanced Alignment Tool. Only if your experiment images have been previously co-registered using this software, will the image alignment be sufficiently accurate for a spot pattern from the reference gel to be applied reliably to all of your experiment images by the Same Spots Outline technique. Workflow for a DIGE Experiment in PG220 1 Warp images using TT900 S2S and then set up the experiment structure in the PG220 wizard using the saved warped images but with the following provisos. 2 If changes are made on the Preview Images wizard page, such as inverting intensities, contrast & colour, area of interest, ensure that the Affect all gels checkbox is ticked. 3 On the reference gel management wizard page, ensure that the same reference is selected as that used in TT900 S2S. If necessary, open TT900 S2S and reload your warped set to confirm the reference gel identity. 4 There is no need to set any Replicate group parameters. 5 Make your Spot detection, Background subtraction and Normalisation selections in the normal way, accepting the default values suggested. 6 On the Matching / Warping / Add to Reference wizard page uncheck the Warp the gel images to the reference gel checkbox. 7 Following completion of the analysis, the program window appears with your experiment structure displayed in the Experiment View. 8 Now select the Tools Menu | Use SameSpots… command. If SameSpots has been licensed on your computer, the software prompts you to confirm that you wish to replace the spots on every gel with those from the reference gel. Select Yes to proceed. 9 182 • Analysis Procedures After some moments, the application of the SameSpots algorithm is completed and your program window displays the SameSpots analysed spot data for your experiment images. PG200/PG220 User Manual Workflows for a Single Stain, Average Gel Experiment in PG200 - 220 At the time of writing, it is recommended that the user should follow one of three alternative workflows for applying SameSpots to an average gel experiment. Workflow Option 1 1 Set up your averaged gel experiment structure in the PG200-220 wizard, creating your average groups but do not perform any detection, warping or matching. You merely wish to use the wizard to create the experiment structure. 2 On the Save/Export page of the wizard, select the XML File export option from the dropdown list provided. 3 Complete the wizard and click Finish. The “analysis”, such as it is, will complete very quickly. 4 Now switch to TT900 S2S and open your saved experiment XML file – note that the XML file must be in the same folder as your experiment images. 5 Align only your average images to the reference gel image – this saves considerable time in the amount of warping required. After warping to vectors is complete, export your warped images. 6 Now switch back to your PG200-220 analysis wizard and create a new experiment using the TT900 S2S warped images. Follow the wizard as normal with the following exceptions. 7 If changes are made on the Preview Images wizard page, such as inverting intensities, contrast & colour, area of interest, ensure that the Affect all gels checkbox is ticked. 8 On the reference gel management wizard page, ensure that the same reference is selected as that used in TT900 S2S. If necessary, open TT900 S2S and reload your warped set to confirm the reference gel identity. In addition, you must ensure that this reference gel is also the base gel for the top (first) average gel created. When making your average gels there is no need to set averaging parameters. 9 Make your Spot detection, Background subtraction and Normalisation selections in the normal way, accepting the default values suggested. 10 On the Matching / Warping / Add to Reference wizard page uncheck the Warp the gel images to the reference gel checkbox. 11 Following completion of the analysis, the program window appears with your experiment structure displayed in the Experiment View. PG200/PG220 User Manual Analysis Procedures • 183 12 Select the Tools Menu | Use SameSpots… command. 13 If SameSpots has been licensed on your computer, the software prompts you to confirm that you wish to replace the spots on every gel with those from the reference gel. 14 Select Yes to proceed. After some moments, the application of the SameSpots algorithm is completed and your program window displays the SameSpots analysed spot data for your experiment images. Workflow Option 2 1 Warp images using TT900 S2S and then set up the experiment structure in the PG200-220 wizard but with the following provisos. 2 If changes are made on the Preview Images wizard page, such as inverting intensities, contrast & colour, area of interest, ensure that the Affect all gels checkbox is ticked. 3 On the reference gel management wizard page, ensure that the same reference is selected as that used in TT900 S2S. If necessary, open TT900 S2S and reload your warped set to confirm the reference gel identity. In addition, you must ensure that this reference gel is also the base gel for the top (first) average gel created. When making your average gels there is no need to set averaging parameters. 4 Make your Spot detection, Background subtraction and Normalisation selections in the normal way, accepting the default values suggested. 5 On the Matching / Warping / Add to Reference wizard page uncheck the Warp the gel images to the reference gel checkbox. 6 Following completion of the analysis, the program window appears with your experiment structure displayed in the Experiment View. 7 Select the Tools Menu | Use SameSpots… command. If SameSpots has been licensed on your computer, the software prompts you to confirm that you wish to replace the spots on every gel with those from the reference gel. Select Yes to proceed. 8 184 • Analysis Procedures After some moments, the application of the SameSpots algorithm is completed and your program window displays the SameSpots analysed spot data for your experiment images. PG200/PG220 User Manual Workflow Option 3 1 Warp images using TT900 S2S and then set up the experiment structure in the PG200 - 220 wizard but with the following provisos. 2 If changes are made on the Preview Images wizard page, such as inverting intensities, contrast & colour, area of interest, ensure that the Affect all gels checkbox is ticked. 3 Set the experiment up as a flat experiment. 4 On the reference gel management wizard page, ensure that the same reference is selected as that used in TT900 S2S. If necessary, open TT900 S2S and reload your warped set to confirm the reference gel identity. 5 Make your Spot detection, Background subtraction and Normalisation selections in the normal way, accepting the default values suggested. 6 On the Matching / Warping / Add to Reference wizard page uncheck the Warp the gel images to the reference gel checkbox. 7 Following completion of the analysis, the program window appears with your experiment structure displayed in the Experiment View. 8 Create your average groups. 9 Select the Tools Menu | Use SameSpots… command. If SameSpots has been licensed on your computer, the software prompts you to confirm that you wish to replace the spots on every gel with those from the reference gel. Select Yes to proceed. 10 After some moments, the application of the SameSpots algorithm is completed and your program window displays the SameSpots analysed spot data for your experiment images. Workflow for a Single Stain, Flat Experiment in PG200 - 220 1 Warp images using TT900 S2S and then set up the experiment structure in the PG200 - 220 wizard but with the following provisos. 2 If changes are made on the Preview Images wizard page, such as inverting intensities, contrast & colour, area of interest, ensure that the Affect all gels checkbox is ticked. 3 On the reference gel management wizard page, ensure that the same reference is selected as that used in TT900 S2S. If necessary, open TT900 S2S and reload your warped set to confirm the reference gel identity. 4 Make your Spot detection, Background subtraction and Normalisation selections in the normal way, accepting the default values suggested. 5 On the Matching / Warping / Add to Reference wizard page uncheck the Warp the gel images to the reference gel checkbox. 6 Following completion of the analysis, the program window appears with your experiment structure displayed in the Experiment View. PG200/PG220 User Manual Analysis Procedures • 185 7 Select the Tools Menu | Use SameSpots… command. If SameSpots has been licensed on your computer, the software prompts you to confirm that you wish to replace the spots on every gel with those from the reference gel. Select Yes to proceed. 8 186 • Analysis Procedures After some moments, the application of the SameSpots algorithm is completed and your program window displays the SameSpots analysed spot data for your experiment images. PG200/PG220 User Manual Non-Analytical Operations Selection Mode This mode is used solely for browsing the data without altering any analysis information. While in this mode, clicking on a spot in the Image window will make it the current spot. This spot will be highlighted in all of the other program windows and the Montage window will update (if visible) to show the area containing this spot in each gel in the experiment. If you click in the Image window at a location that does not contain a spot, the Montage window will update to show the equivalent of that region in each of the gels. It will use any matching information that exists in the experiment, to try to get the same area of each gel. You can specify which area is used more precisely by clicking in the Image window and dragging out a rectangle. If you want to locate or adjust the area of each gel displayed in the montage window, open the Further Display Options dialog by clicking this button on the Image window toolbar. Tick the option at the bottom of this dialog labeled Show spot montage area. When this option is turned on, a rectangle will appear on the Image window showing the area of the gel that will appear in the Montage window. This rectangle can be resized by dragging the boundaries to new positions. Alternatively, you can replace the current area by dragging out a new rectangle. Right clicking in the Image window will clear the current spot if there is one selected and will clear the Montage window. PG200/PG220 User Manual Non-Analytical Operations • 187 Annotating your Gel Images It is sometimes desirable to highlight features of interest on your gels, or to add text to the image to display certain information. This is possible in the software by selecting Analysis Menu | Annotations. Annotations are text labels with optional arrows, pointing at a certain area of the gel. There are two types of annotation available in the software, Manual Annotations and Data Annotations. Manual Annotations are fully customisable and allow you to add whatever text you like. Data Annotations are generated automatically and can be used to display the values of the spot properties on the image. Annotations mode allows you to interact with these two types of annotation independently. The type of annotation you want to interact with can be altered using the buttons on the vertical toolbar. While you are using Annotations mode, you will be able to see Manual or Data Annotations, but not both. The type of annotation you can see is dictated by the annotation mode you have selected, regardless of other display options. Manual Annotations The Annotations Navigator allows you to control the format of the annotations. It has two forms, a Simple version for those users who wish to use only a subset of the features and an Advanced version, which is more flexible and thus more complex. At the bottom of the Navigator, there is a button allowing you to toggle between the two forms of control. You can prevent manual annotations being displayed on the image by turning off the Manual Annotations option, which appears on the Tools menu | Options | Display tab. However, annotations are always drawn when you are using Annotations mode. Adding and Editing Annotations in the Image window In Annotations mode, the controls in the Navigator are used to set the style for the currently selected annotation. When you add an annotation, the current style is immediately applied to it. If you select an existing annotation, the controls change to reflect the style of that annotation. The following section deals with Adding, Moving, Selecting and Editing the text of annotations in the Image window, by use of the pointer and keyboard. It is assumed that you are using the default settings for annotations. If not, the response to mouse interactions may be slightly different. See the section on Setting annotation options, Advanced method for more information. Adding an Annotation To add an annotation to the gel showing in the image window: 1 Place the pointer over the location in the Image window that you wish to annotate. The pointer should be the standard pointer, indicating that you are not over any other items in the window. 2 Click to add an annotation box. An anchor arrow will appear pointing to the point where you clicked. An entry box will appear over the image at the tail of the arrow. 3 Type your text into the entry box. 4 Press ENTER to accept the text or press the ESC key to stop editing without accepting any text. You will be able to enter text later. 188 • Non-Analytical Operations PG200/PG220 User Manual You can select which font your annotation text uses by clicking the Font button in the Navigator. You can also set other annotation options by clicking the Advanced button in the Navigator. You have now added an annotation. It will be denoted as the currently selected annotation by an outline box. You can add as many annotations as you like by following the above steps. As an alternative to just clicking on the image to add a comment, you can position both the arrowhead and the text box of your annotation with a single pointer interaction. 1 Click and hold down the pointer at the point where you want the arrowhead. 2 Move the pointer to the position where you want the text to be centred. As you drag the pointer, the annotation text box will appear and stretch away from the arrowhead. 3 When you release the pointer, the text box will go into in-place editing mode. Enter your text and press ENTER when finished. Moving Annotations To move an annotation: 1 Place the pointer anywhere on the line between the arrowhead and annotation text box. You may need to move the text box to see the line. 2 The pointer will change to a hand indicating that you are in position. If this does not happen, then you can zoom in on the area of the Image window to increase the amount of line available, to pick up the annotation. 3 Now drag and drop to move the annotation to a new location. You will not be able to move the annotation outside of the Image window. Moving Part of an Annotation You can also move the position of an annotation anchor arrow or text box. 1 Move the pointer over the anchor arrow or text box you wish to move. The pointer will change to a crosshair for the anchor arrow and the text box will become outlined. 2 Drag and drop the arrow or text box to the desired location. Selecting Annotations To select a single annotation, click on either the arrow, the line between the arrow and the text box, or the text box. Alternatively, you could also press the TAB key to move between annotations, provided that one of them is currently selected and that a control in the Navigator does not have the input focus. You can also use the Next and Previous Annotation options from the context menu in this mode. See the Context menus in Annotations mode section. If you wish to select all of the annotations you have created, click the Select All button in the Advanced Navigator dialog, or the context menu for this mode. To deselect all of the annotations, click the Deselect All button. PG200/PG220 User Manual Non-Analytical Operations • 189 In order to make an arbitrary selection of annotations, select the first using one of the methods above and then hold down the CTRL key on your keyboard. You can now click on each annotation you wish to include in your selection. To deselect an annotation, hold down the CTRL key on the keyboard and click on the annotation. The Advanced Navigator shows the styles common to all of the annotations you have selected, but will show indeterminate states for those styles where the selected annotations are not consistent. When you change the style in the Navigator, the changes you make are applied to all annotations that are currently selected. Editing the Text of an Annotation After adding annotations, you can edit the text in the annotation by: Right clicking on the outlined text box and selecting Edit text from the context menu or Clicking on the text box itself. While editing comments, an outline box appears around the selected text box. This outline box does not appear on any printouts. Annotation boxes are not included on report printouts. Setting Annotation Options - Simple Method The Simple version of the Annotation Navigator contains three options you can use to edit your annotations. Using Opaque Background This check box determines whether the text of the annotation is drawn over a coloured background, or directly on to the image. Choosing a Font style This button brings up the standard windows font dialog, allowing you to select the font options for your annotations. Deleting Comments This button deletes all comments that are currently selected. If you repeatedly click this button, your annotations will be deleted in the reverse order that they were added. There is no undo facility. 190 • Non-Analytical Operations PG200/PG220 User Manual Setting Annotation Options - Advanced Method The Advanced version of the Annotations Navigator contains many more options for the customisation of your annotations. Preview The current font style is displayed at the top of the Advanced dialog, below which is a preview window. Choose Font Style This button brings up the standard Windows font dialog, allowing you to select a font for your annotations. Text Outline Use the drop-down list to select the shape of the border around the text of your annotations. You can select a rectangle, rounded rectangle or no outline. PG200/PG220 User Manual Non-Analytical Operations • 191 Fill Colour Fill colour drop-down list allows you to select the colour used to paint the background of the text area of your annotations. This option is disabled if you have chosen a transparent background. The selected fill colour is also applied to the preview at the top of the dialog. Use Opaque Background This check box determines whether the text of the annotation is drawn over a coloured background, or directly on to the image. Line Thickness A line thickness drop-down list allows you to select the weight of the lines used to draw the anchor arrow of the annotations on the image. You can choose a size line thickness or No line. If you choose No line, your annotation will appear as a moveable text box only. Delete Comment(s) This button deletes all selected annotations. Colour A drop-down colour list allows you to select the colour that is used to draw the arrow line and outline of the annotation text box. The default outline colour is green. Select All This button selects all of your annotations. Deselect All Click this button to deselect all selected annotations. 192 • Non-Analytical Operations PG200/PG220 User Manual Context Menus in Annotations Mode There are two context menus available in the image windows when in Annotations mode; the first accessed from within an annotation box and the second from the main image area. The first context menu is accessed by right clicking inside the annotation text box and displays the following commands. Edit Text This brings up the in-place editing entry box for the annotation. Send to Back Send to back causes the selected annotation to be reordered in the list, so that it is overlapped by any other annotation in the same area of the image. Bring to Front This causes the annotation to be reordered in the list so that it is drawn last and so overlaps any annotations in the same area of the image. Delete Choose this option to delete the current annotation. The second context menu is accessed by right clicking outside any annotation text box, anywhere in the Image window where there are no annotations, or when you have a multiple selection of annotations. The context menu will display the following commands. New Annotation Here With this selection, a new annotation is created at the point where you click and displays a text box for that annotation. PG200/PG220 User Manual Non-Analytical Operations • 193 Next Annotation This option selects the next annotation in the list of annotations for the gel. Previous Annotation The previous annotation in the list is selected when you select this option. Select All This option selects all annotations. Deselect All All of the annotations are deselected with this option selected. Delete This option deletes all of the currently selected annotations. Data Annotations Data Annotations show information about a selected property of the spots in your experiment. The Data Annotations appear in the Main and Second Image windows. To activate Data Annotations, open the Display tab from the Tools Menu | Options command. In the Annotations section, select the check box labeled Data Annotations, and then select a spot property from the drop-down list. You may select any spot property to show as a Data Annotation, including any user-defined fields. If you select <Use Mode Default>, the field displayed will depend upon which mode the program is in. The default annotation field for each mode can be set in the Mode Defaults tab of the Options dialog. When you close the options dialog, the Image window will update to show an annotation for every spot that has data for the selected field. You can use the controls in the Navigator to alter the style of Data Annotations in exactly the same way as manual annotations. However, it is not possible to select or set different styles for individual Data Annotations. All Data Annotations are drawn in the same format. It is not possible to move or alter individual Data Annotations. 194 • Non-Analytical Operations PG200/PG220 User Manual Internet Query There are a number of protein databases available on the Internet, containing information from different sources. You can generate queries from the information in your experiments and apply them to these databases. In order to perform an Internet query you must first provide some information about the proteins in your gels. This can be achieved by creating a protein list and assigning the proteins to your spots, as described in the section on 2D Calibration. Assuming you have assigned proteins to some of your spots, you may then use Internet Query mode. This mode is selected via Analysis Menu | Internet Query. 1 First, select the spot upon which you want to base the query, by clicking on it in the Image window. 2 Then select the field that you wish to query (e.g. Protein name, description or Accession number), using the drop-down list labeled Search On in the Internet Query mode Navigator. 3 Select the database on which you wish to perform the query, using the dropdown list labeled Database in the Navigator. The choice will be limited to those databases that provide the facility to search on the field you have selected. 4 Now click the Query button at the bottom of the Navigator and the search will be performed. The results will be shown in the Internet Browser. You are required to have an Internet browser installed and an appropriate Internet connection for this facility to work. PG200/PG220 User Manual Non-Analytical Operations • 195 Image Manipulation This feature is not available for DIGE experiments. Under normal circumstances, it is strongly advised that you perform all necessary manipulation of your images before using them in the software. This includes any rotation, cropping or alignment of the images that may be necessary. However, the software does include a set of tools that allow you to make basic modifications to the images if required. Great care should be taken when using these tools, especially if the images have already been analysed in an experiment, as this may result in a loss of data. Selecting Image Manipulation from the Tools menu opens the Load a Gel Image dialog. In this dialog, you can select the image that you wish to adjust and click Open. This opens your selected image in the Image Manipulation dialog. If you want to modify a particular image from the File View in the Navigator, you can choose Modify Image from the context menu, opened by right clicking on the file. Caution should be exercised when using this command. You can now make modifications, using the buttons on the right-hand side of the dialog. When you have finished making your modifications, you can save the image using the Save As button. If you overwrite an image that has already been analysed within an experiment, you will be informed of this fact the next time you load a gel that uses that image. You will then be warned that any analysis you have performed may be invalid and asked if you want to erase it. You can undo any changes you have made to the image at any time by clicking on the Revert button. This will restore the image to the state it was in when it was last saved. Rotate Clockwise / Anticlockwise Rotate the image 90° in the selected direction. Mirror / Flip Flip the image around the vertical / horizontal axis. Crop to Area Before you can use this tool, you must select an area of the image. Clicking on the image and dragging out a rectangle achieves this. When you click on the crop button, everything outside the selected area will be removed. Right click anywhere in the image to remove the cropped area. Contrast and Colour The Contrast and Colour control allows the image view to be visually optimized to aid in accurate image cropping. See the Main Image window | Contrast and Colour section for more information. 196 • Non-Analytical Operations PG200/PG220 User Manual Web Page Construction Publishing experimental results on the Internet is now becoming commonplace. This normally involves spending many hours producing HTML (HyperText Markup Language) files, containing images and tables of data. The Web Page Construction feature eliminates this time-consuming and error-prone task by compiling the HTML files for you automatically. Even if policy or confidentiality issues prevent you from publishing your results on the Internet, you may find this tool useful for generating reports on your results in a format that can be published on your local network, allowing you to share the information with your colleagues. Launching the automatic web-page builder 1 Select Tools | Web Page Builder. The Web Page Builder dialog contains many tabs that allow you to specify which information will be included in the final output. 2 Set the options on the various tab pages and then click OK to begin the compilation process. The resulting report will appear in your Internet browser. Your Internet window will only function if you have an Internet browser installed. However, if you do not have one installed you can still use the Web Page builder tool, though the report will not be displayed. Specifying the information Use the following tabs to specify what information you want to display on your web page. Output tab Specify the folder into which the web pages will be stored. Home tab Specify the location of the Home page produced by this module. Summary tab You can specify the contents of the Summary page to optionally include user defined experiment information, a scroll thumbnail image of the reference gel and a table of spot measurements. Gel tab You can specify the contents of the Gel page. An image of the gel containing spots that may be clicked on (to access the relevant spot page) is always included. You can control the size of the image that will be displayed. You can also choose to include user defined experiment information. Spot tab This tab allows you to specify whether the spot pages will include montages or histograms, and their sizes if they are to be included. It also allows you to include a comparisons table, protein information and a link to the related protein page on an Internet database. PG200/PG220 User Manual Non-Analytical Operations • 197 Printing The software can print the contents of all of the analysis windows directly. You can adjust how the contents of these windows are printed. In general, the software will print the contents of the selected window (indicated by the window with the highlighted title bar), when you choose Print from the File menu. Any window that can be printed can also be print-previewed, except where otherwise stated. Choosing the Print Preview option in the File menu, will cause the window to go into a preview mode. This is intended to show you how the window will be printed according to your current printer settings. If a window is in Print Preview mode, you can return it to Normal mode by using the Close button at the top of the window. Image Window Print Options The dialog which controls the printing options is launched from Tools | Options | Printing tab, or from the Scale button of the windows when they are in Print Preview mode. Sometimes it is better to adjust your print options while in Print Preview mode, so that you can see the effects of your selections immediately. Area to Print Options When you have zoomed in on a window, it is possible that not all of the data that could be displayed is visible in the window. You can choose to print just what you see, or the entire image for that window, using the option buttons. Scaling Options When the software prints, it can print at an arbitrary size or at a size where the output is as large as possible, without going over the edge of your page. Choose the Fit to Page option for the largest size, or choose the Scaled option and use the spin buttons to set the printing size (as a percentage). At a scale of 100%, the print out should show the image at approximately the same size as it would appear on the screen. Histogram Options These options allow you to specify whether a key should be printed on every page or not and to set the scale of the print separately for the histograms. Histograms do not respond to the other print options. Copying to File As well as copying the data to the clipboard, you can copy data from those windows containing text to an ASCII (text only) file, or save data from those windows containing images in .bmp (bitmap) or .jpg (JPEG) file format. To do this, select Copy To File from the Edit menu. The copying parameters are set via the Options | Copying tab. Copy Range Options here allow you to modify how much of each window is copied into the clipboard. Either the amount visible or all of the possible data can be copied. 198 • Non-Analytical Operations PG200/PG220 User Manual Copy Text to File As well as copying the data to the clipboard, data from those windows containing text can be saved in an ASCII (text only) file by selecting Copy To File from the Edit menu. This section allows you to set the default name for that file. Copy to Bitmap As well as copying the data to the clipboard, data from those windows containing images can be saved in .bmp (bitmap) file format by selecting Copy To File from the Edit menu. This section allows you to set the default name for that file. Copy Tables with Template You can specify filenames for the exporting of tables with Excel templates, via Tools Menu | Options | Copying tab. Either type in the filename or click the tables with template text box and browse for the template file. button, adjacent to the Export Exporting to Microsoft Excel This option is only compatible with Microsoft Excel 97, or a later version. If you do not have Excel 97 (or later) installed on your computer, this option will do nothing. Upon selecting the Copy to Excel option from the Edit menu, the Select an Excel Template dialog opens, enabling you to export your data from the measurements table to a Microsoft Excel spreadsheet. Microsoft Excel will be automatically launched (if is not already active) and the current measurements table data is pasted into a new worksheet. See the Copying tab in the Program Interface | Options section for details of how to specify the default template that will be used to export the data. User Defined Fields A great deal of information about the gel images in an experiment can be stored in the software. Much of this is automatically calculated - the volume of a spot for example. Other information can be entered manually and then used by the software. For example, it is possible to enter the pI and MW values of a protein and then use these to calibrate values for unidentified spots. However, it is likely that at some point you will want to add information to your experiment that is not supported by the software. You may want to enter additional information of interest about a certain spot for example, or enter the gene sequence of a known protein. For this reason, it is possible to create your own fields within the experiment. The program will then treat these User Defined Fields in the same way as all other information in the experiment. You will be able to see the values in the tables, in the reports, as annotations on the gel images, etc. Creating User Defined Fields To create User Defined Fields in your experiment, select Edit Menu | Modify Fields. The Modify User Defined Fields dialog will appear. PG200/PG220 User Manual Non-Analytical Operations • 199 This dialog shows you all the User Defined Fields you have created and allows you to add new User Defined Fields to the list. It also allows you to delete User Defined Fields that were added incorrectly, or which are no longer of interest. The controls for defining a User Defined Field appear on the right hand side of the dialog. As a first step, choose the object to which you want to add a User Defined Field. You can add User Defined Fields to the experiment, the gels, the spots or the proteins. Use the first drop-down list labeled Modify Fields of: to make this selection. The list on the lefthand side of the dialog will update to show any User Defined Fields that already exist, in objects of the type you have selected. You should now enter a title for your new field by typing it into the entry box labeled Field Title. You cannot create two fields with the same title in the same set of objects. For example, you cannot add two fields called Gene Sequence to your proteins, although you could add fields called Gene Sequence 1 and Gene Sequence 2 if you wish. You can have fields with the same name in different objects in your experiment. For example, you could have a field called Gene Sequence in your proteins and another field of the same name in your spots, although this is not recommended. Once you have entered the title for your new field, you must select the type of data you want to store in it. This is an important choice, as it restricts the information you can enter for the field and the uses to which the field may be put later. You have four choices for the type of field you can create. When you have completed your modifications to the fields of your experiment, click OK. The data in your experiment will not be affected until you click OK. If you do make a mistake while you are modifying the fields, the safest solution may be to click Cancel and start again. Whenever you do make a mistake while modifying your User Defined Fields (e.g. if you accidentally delete the wrong field), close your experiment without saving it and load it back in again. This will restore any fields and associated data that existed the last time you saved the experiment. 200 • Non-Analytical Operations PG200/PG220 User Manual Types of User Defined fields String In fields of this type, you can enter any character you wish. It should be used for labels, comments or any other field that may contain a combination of alphabetic and numeric characters. The drawback of fields of this type is that they cannot be used for numeric comparisons, in Spot Filtering or Difference Map generation, for example. Integer Integer fields may store any value that is a whole number. They cannot store alphabetic characters, nor can they store a number containing decimal points. Real Number Fields of this type may store any numeric value, including those with decimal points. They will also accept values entered in standard form, although the values will not be displayed in this form in the program. Such fields cannot store alphabetic characters. Document Document fields allow you to make links between the data in your experiment and other documents you have stored on your computer. When you have defined the field you wish to add, click on the button labeled << Add Field and the new field will be added to the list, on the left-hand side of the dialog. If you want to delete a User Defined Field from the experiment, select it in the list on the left-hand side of the dialog and click the Remove Field >> button. In the event that you use this option, any information that has been entered for this field in your experiment will be lost, so it should be used with caution. PG200/PG220 User Manual Non-Analytical Operations • 201 Attaching Documents Once you have created a Document field, you can attach documents to your proteins, spots, gels or experiment using the Edit Attachments dialog accessed by selecting Edit Attachments from the Edit menu. This dialog also allows you to launch an attached document in the appropriate software. You can also modify or activate document hyperlinks for spots or proteins in the Measurements or Protein windows. Double clicking on an attached document in one of these tables will automatically launch the appropriate document. If no document has been attached, you can attach one. Double click on a document field table cell and select the document you want to attach from the Select a hyperlink document dialog. Alternatively, right clicking on a Document field table cell displays a context menu, from which you can perform the same operation. 202 • Non-Analytical Operations PG200/PG220 User Manual Entering Values for User Defined Fields The method used to enter values for your User Defined Fields depends on the type of object in which they been created. Each method is explained below. Experiment Fields To enter values for the User Defined Fields in an experiment, activate the Experiment Header dialog by selecting Edit Experiment Header from the Edit menu. This dialog contains a section labeled User Defined Fields. If your experiment contains any User Defined Fields, they will be contained in the drop-down list labeled Field. Select the field from the list that you want to enter a value for and then type the value into the entry box. When you have entered the new value, click on the Set button and the information will be stored in the current experiment. Gel Fields To enter values for the User Defined Fields in a gel, first select the gel that you wish to modify. Then activate the Gel Header dialog by selecting Edit Gel Header from the Edit menu. This dialog contains a section labeled User Defined Fields. If your gel contains any User Defined Fields, they will be contained in the drop-down list labeled Field. Select the field from the list that you want to enter a value for and then type the value into the entry box. When you have entered the new value, click on the Set button and the information will be stored with the current gel. Spot Fields There are two ways to enter values for User Defined Fields in a spot. The first is to use the Edit Spot Fields dialog, accessed by selecting Edit Spot Fields from the Edit menu. This dialog allows you to enter values for the current spot. If there is no spot currently selected, the controls in the dialog will be deactivated. You can select a current spot at any time using any of the usual methods, even when the dialog is active. If you do have a spot selected, you can select a field to enter a value, using the drop-down list labeled Field. When you have a field selected in the list, the Image windows will update to show labels on each spot that has a value stored in this field. This label will contain the value for that spot. When you have selected a field, type the value you wish to assign into the entry box labeled Value and then click the Set button. The value will then be stored in the appropriate field of the current spot. If you have the check box labeled Set Value in all matched spots turned on when you click the Set button, the current spot and all those matched to it in the experiment will receive the new value for the selected field. You can also edit the spot Comment field using this dialog. PG200/PG220 User Manual Non-Analytical Operations • 203 It is also possible to edit the values of User Defined Fields for a spot directly in the Measurements window. To do this, double click on the appropriate cell in the table and type in the new value. If you type in an illegal value, such as alphabetic characters in a numeric field, the field will revert to the previous value. Protein Fields User defined protein fields are edited in exactly the same way as any other protein field, using the Protein window. To enter a new value, double click on the appropriate cell in the table and type in the new value. If you type in an illegal value, such as alphabetic characters in a numeric field, the field will revert to the previous value. Introducing User Defined Fields in Other Experiments Once you have defined your User Defined Fields, it is likely that you will want to use the same fields in other experiments. To avoid the necessity of adding the fields every time you create a new experiment, it is possible to save the structure of your User Defined Fields and then import them into another experiment at any time. Saving the structure of your User Defined Fields 1 Select File, User Fields then Export Fields from the main menu. An Export User Defined Fields dialog will appear, allowing you to save the file containing the field format in any folder you choose. By default, the file will be given the same name as your experiment, although you can change this if you wish. 2 Select the folder to which you wish to save your file. 3 Enter a new filename if desired and click Save. Loading the field structure into another experiment 1 Open that experiment, if it is not already loaded. 2 Select File, User Fields then Import Fields from the main menu. 3 An Import User Defined Fields dialog will appear, allowing you to locate the file containing the field format and load it into your experiment. When you load the file, the User Defined Fields in it will be merged with any User Defined Fields you already have in your experiment. In other words, any User Defined Fields that already exist in your experiment will be preserved. Only new fields specified in the file will be added to your experiment. 204 • Non-Analytical Operations PG200/PG220 User Manual Reference Menus There are seven drop-down menus on the main menu bar. File Menu The File drop-down menu contains numerous commands relating to experiment, project, gel, filter set and user defined field file management and also print options. New Experiment This feature is not available in the PG220 Editor software. Choose this option when you want to create a new Experiment to work with. This will bring up the Experiment File dialog to allow you to select the image files that are to be used in the new experiment. See Create a New Experiment for more information. Open Experiment Use this command to open an existing experiment that you created using the software on a previous occasion. See Open an Existing Experiment for more information. Close Experiment Select this command to close the experiment you currently have loaded. If you have made changes to the experiment that you have not yet saved, the program will ask whether you wish to save them. You can choose to save, discard your changes, or stop the closure in order to continue working on the experiment. Save Experiment This command allows you to save any changes you have made to your experiment. Upon selecting this option, all data that has changed since you last saved the experiment will be saved. See Saving Changes to the Experiment for more information. When using any software it is advisable to save your work regularly, especially after making time consuming or difficult changes. This software has an auto save facility, which periodically saves to a backup file. Save As This command allows you to save your experiment with a different name. See the Save As topic for more information. Import/Export XML This software allows you to load and save files describing your 2D experiments, in a standard XML (Extensible Markup Language) format. See the Import/Export XML section for more information. Open Database If you have bought the accompanying database this saves the current experiment, then launches the login dialog for the database. When you have successfully logged into the database the Experiment Loader wizard is displayed. PG200/PG220 User Manual Reference • 205 The current analysed experiment will be sent to the database and the experiment information will be added to the database automatically. Add / Remove Gels Add Gels This feature is not available in the PG220 Editor software. This command allows you to add new gels to the experiment at any time. The dialog works in almost the same way as the New Experiment dialog, in that you must select the image files you wish to add to the experiment. When you select the Add button, those images will be added to the current experiment. See the Adding Gels to your Experiments section for more information. All the images in a single experiment must be located in the same directory. Each image can only be used once in an experiment. Remove Gel This feature is not available in the PG220 Editor software. Select this command to remove gels from the current experiment. The dialog that opens contains a list of all gels in the experiment. You can select as many as you wish and then click the Delete button. After confirming that you wish to remove the gels, the program will delete them from the experiment. Note that this operation is permanent. All analysis performed on the gels you remove will be lost. Import Gels With this command, you are able to transfer analysed images between experiments. Select the experiment that you want to import images from, by choosing the experiment file and clicking the Import button. You will then be presented with the experiment tree for that experiment, containing all of the component images. Choose any image in that experiment to import, by selecting it in the tree and clicking the Import button. The selected image will then be added to the current experiment. Be aware that if the current experiment uses a different reference gel to the one you are importing from, the matching information will not be maintained in the new image. 206 • Reference PG200/PG220 User Manual Experiments Delete This feature is not available in the PG220 Editor software. This command allows you to permanently delete an experiment that you no longer require from disk. Select the experiment you wish to delete from the list shown in the dialog and click the Delete button. Backup Choose this command to create a single compressed archive, containing all the files comprising a particular experiment and optionally, the associated images. You can specify whether to Include image files and cached files in the backup. By default, the image files will be included and the cache files excluded. The check boxes can be deselected if you wish to reduce the size of the archive. This is particularly useful if you wish to send the backup file via email, or make multiple backup files of the same experiment. To use the command, select an experiment from the dialog list and click the Backup button. Use the Restore command to decompress a backup archive. Restore This command allows you to decompress archives created using the Backup command. To restore a backup file, search for and select the .2bk file using the Restore a backup archive dialog and click Open. The software will load the decompressed experiment. See Backing up and Restoring Experiments for more information. Filter Sets Import Filter Set This command allows you to restore the spot filtering within your experiment to settings you have saved previously. Selecting the command will activate a standard Windows File Open dialog, from which you can select a Filter Set to load. Upon loading a file, the spots within your experiment will be filtered, according to their status when the filter set was created. It is also possible to import a Filter Set that has been created outside the software. For example, you may have analysed the spot data in Excel and may wish to select a subset of spots based on this analysis. A Filter Set file should have the extension .txt and should contain the name of the gel, followed by a list of numbers of selected spots, with one number on each line. PG200/PG220 User Manual Reference • 207 Export Filter Set This command allows you to create a Filter Set File, ready to be loaded at a later point using the Import Filter Set option. Selecting the command will activate a standard Windows Save As dialog, which allows you to specify a name and folder for the file. The file will contain all the information about the filtering status of the spots in the current gel. User Fields Import Fields This command allows you to add new fields to the current experiment, according to the format specified in a file previously created by this software. Selecting the command will activate a standard Windows File Open dialog, from which you can select a User Field File to load. Upon loading a file, all user fields specified within it will be added if necessary, to the objects in the current experiment. Export Fields This command allows you to create a User Field File, ready to load into another experiment using the Import Fields option. Selecting the command will activate a standard Windows Save As dialog, which allows you to specify a name and folder for the file. The file will contain all the information about the User Defined Fields, contained within the current experiment. These fields define the extra data a user can add to spots, proteins, gels and experiments. These files allow you to create standard sets of extra data fields that will be used by all of your experiments, without having to add them manually each time. Workspaces submenu To save you repeatedly selecting program windows, views and parameters used in the analysis modes you can create your own workspace file. For example, you could create a file called Spot Editing workspace. This workspace could contain the Montage, 3D and Image windows. The Navigator would display the Spot Detection mode. The Image window can be set with the Display options of Slave gel, Current gel and the Outline spot style selected. You may also choose to select the Further display option for Showing the montage area. From the View menu, you could select View current level. Once saved, this workspace can be recalled whenever you want to perform spot editing. Open Workspace This command allows you to select and open a previously saved Workspace file. From the Open workspace dialog choose a workspace from the list and click the Open button. All parameters stored in the workspace (including the analysis parameters) will then be loaded immediately. Save Workspace A Workspace file contains all the settings that you are currently using in the software, including window positions, display settings and analysis parameters. This facility allows you to create several standard sets of parameters and store them on disk so they can be used to analyse other experiments without needing to set all the parameters by hand. 208 • Reference PG200/PG220 User Manual Enter the name you want to give your workspace and click the Save button. Invert Intensities This feature is not available in the PG220 Editor software. The software assumes that light-coloured material is less dense than dark-coloured material. Some image files may contain the opposite of this and although it is possible that they also contain data informing the software of this, it may not be the case. The Invert Intensities option can be turned on or off, to ensure that the data from your image file is read the correct way. When this option is on, a selected icon appears to the left of the Invert Intensities text in the menu. When you select this option, you will be asked if you wish to invert the intensities for all images in the current experiment. If all of your images were acquired the same way, you would normally wish to do this. Print This option prints the active program window. The active window is indicated by the title bar being displayed in your desktop active window colour. Print Preview This option makes the current program window enter the Print Preview mode. In Print Preview mode, the window shows a picture of the printable page, along with a representation of how the printed contents of the window would appear. Print Setup With this command, you can adjust the settings of your current printer. Most Recently Used List This section displays the names of the four experiments that were loaded most recently. You can load one of these experiments by clicking on the name in the list. Exit Selecting Exit from the file menu allows you to terminate your current use of the software. If you have made changes to the data that have not yet been saved to disk, you will be asked if you wish to save them before the program closes. PG200/PG220 User Manual Reference • 209 Edit Menu The Edit menu contains commands associated with the editing and copying of various data, creation and editing of averaged gels, protein lists and fields, along with renaming, scaling and spot navigation and numbering features. Averaged Gels With this command, you can create or modify Averaged gels in your experiment. An Averaged gel is produced by statistically combining several other gels to produce a gel that has mean values for measurements, together with an error term, which provides a measure of the variation of the values that were averaged. See the Measurements Window | Field selection | Error Type section for more information. See the Analysis Procedures | Creating Averaged Gels section for more information on Averaged Gels. Scaling If the image files in your experiment contain information about the resolution at which they were captured, it is possible to express co-ordinate information in real-world units such as millimetres or inches, rather than being limited to pixels. See Program Interface | Options | Display Tab for details of how to choose which units coordinates will be displayed. Not all scanners store such information. Consequently, a Scaling feature is provided in the software, which allows you to specify the resolution yourself. You will probably wish to express your scale in terms of pixels per unit - for example, an image scanned at 200 DPI would have a scale of 200 pixels per inch. Scales are also allowed to be specified in terms of units per pixel - for example, 200 DPI equates roughly to 127 microns per pixel. Adding scaling information to the current gel 1 Select a unit from the Units drop-down list. Options include Inch, cm, mm and micron. 2 Click on one of the two option buttons above the dropdown, to specify Pixels per unit or Units per pixel. 3 Enter numbers into the edit boxes at the top of the dialog to specify the horizontal (X) and vertical (Y) resolutions. It is likely that the numbers you enter will be the same for both. To pass the current scaling information to other gels in the experiment, click on the Pass on to All button. If you wish to clear the scaling information, click on the Clear Scaling button. This will cause the current gel to revert to using whatever scaling information may have been present in the gel image file. To see the effect of the scaling information you will need to select a unit, other than pixels in Program Interface | Options | Display Tab. The scales on the Image window scrollbars and the units used to express coordinates in the tables will then be updated. Synchronise Spot Numbers Using this option synchronises the numbers of the spots in an experiment. After synchronisation, all matched spots in the experiment will have the same spot number and all unmatched spots will have a number, unique within the experiment. 210 • Reference PG200/PG220 User Manual You will therefore by able to identify that two spots represent the same protein, by virtue of the fact that they share the same spot number. If you edit the gels after synchronisation by for example, adding spots or changing the matching, you will need to synchronise again. Choose Reference Gels This command activates the Reference Gel Wizard - a dialog that allows you to create and modify reference gels, as well as sharing reference gels between experiments. See the Analysis Procedures | Reference Gels section for more information. Create Protein Lists Via this command, the Protein List dialog is activated. It allows you to create and delete protein lists, as well as sharing them between reference gels. See the section on 2D Calibration for more information about protein lists and their uses. Modify Fields With this command, you can add new data fields to the spots, proteins, gels and experiments. This allows you to store extra information alongside your data that is particularly useful to you. See the section on Non-Analytical Operations | User Defined Fields for more information. Edit Spot Fields This option allows you to set the value of the Comment field or any user-defined field, in any of the spots in your experiment. See the section on Non-Analytical Operations | User Defined Fields for more information. Define Pair Ids Selecting this command opens a Define Pairs ID dialog, in which those replicates without labels are indicated. You should type in an appropriate label ID for each unlabelled replicate. See the Statistics Fields Available section for more information. Edit Gel Header Using this command, you can edit gel information, such as the Title and Comment fields, as well as any user-defined fields. The dialog also displays the creation date of the current gel, the date and time it was last modified and information about the number of spots and the percentage of spots that are matched. Edit Experiment Header This option allows you to edit experiment information such as the Title and Comment fields, as well as any user-defined fields. The dialog also displays the creation date of the experiment and the date and time, it was last modified. In addition, the Number of Spots in gels can be viewed. Edit Attachments Using this command, you can attach documents to your experiment data. Goto Spot Selecting this command opens a Goto Spot dialog, from where you can highlight spot(s) with a specific spot/match number. PG200/PG220 User Manual Reference • 211 Copy Filter Set With this command selected a Copy Spot Filtering dialog box opens, within which the user can copy a spot filter set from one of the gels in the currently open experiment, to other gels in that experiment. Copy to Clipboard Using this command, the contents of the current window are sent to the Windows clipboard. Copy to File When this command is selected, the contents of the current window are saved in a file. The format of the file will depend on the window being copied. A table window will be copied as a text (.txt) file. A graphical window will be copied as either a bitmap (.bmp) or a JPEG (.jpg) file, according to which option you select from the Save as type: drop-down in the dialog that will appear. Copy to Excel This option, which is available for the table windows, allows the contents of the selected window to be sent directly to Microsoft Excel, launching that program if necessary. In order for this function to work, Microsoft Excel 97 (or later) must be installed on the machine. 212 • Reference PG200/PG220 User Manual View Menu From this menu, you can select which images are to be displayed in the various data comparison and visualisation windows – Comparisons, Expression, Histogram, Montage, Animation and 3D windows. All Gels With this view option selected, all gels in the experiment are available to select/deselect in the respective window Gel Selection/Animation Frames dialog boxes. Only the Current Level Selecting this command modifies the list of available gels in the respective window Gel Selection/Animation Frames dialog boxes, such that only those gels at the current level selected on the Navigator | Experiment View tab, are available to select/deselect. Only the Sub-Gels Using this View Menu command, all gels that are not part of an averaged gel are available to select/deselect in the respective window Gel Selection/Animation Frames dialog boxes. Only the Current Multiplex Group This command is only active when a DIGE experiment is loaded. With this command, those gels that are member gels of a currently selected multiplex group, are available to select/deselect in the respective window Gel Selection/Animation Frames dialog boxes. Only the Current Replicate Group This command is only active when a DIGE experiment is loaded. With this command, those images that are members of a currently selected replicate group, are available to select/deselect in the respective window Gel Selection list. PG200/PG220 User Manual Reference • 213 Analysis Menu The Analysis menu contains all of the analysis mode commands and a specific command to open the automatic analysis wizard. Automatic Analysis This feature is not available in the PG220 Editor software. Selecting automatic analysis activates the Analysis Wizard for the definition of the criteria to analyse your gel images. See the Analysis Procedures | Analysis Wizard section for more information. Launch Analysis Wizard on startup This feature is not available in the PG220 Editor software. The Analysis Wizard appears automatically on startup by default. If you do not want the Analysis Wizard to appear when the software is started, de-select this command. Selection This mode is used for browsing your data without making changes. It is the default mode. See the Selection mode for more information. Detect Spots/Edit Spots Spot Detection allows the automatic finding of spots and manual editing of spots in the gels of your experiment. See the Spot Detection section for more information. Background Subtraction Background Subtraction is performed on your gels to account for the background intensity of the gel material on each image. See the Background Subtraction section for more information. Warping This mode allows the user to automatically warp the gel images into alignment with a reference gel. The user can optionally view the warped image overlaid on the parent image, as a complementary colour image pair. See the Warping section for more information. Matching Matching allows you to identify those spots that represent the same protein in different gels. The Matching section provides the comprehensive details. Add To Reference Gel With this mode, you can map unmatched spots into the Reference Gel, so that they can be identified in the experiment. See Adding Spots to Reference Gels section, for full details. Normalisation Normalisation enables you to normalise the volume of the spots in your gels, allowing you to accurately compare the measurements of spots in different gels. More information is available in the Normalisation section. 214 • Reference PG200/PG220 User Manual 2D Calibration This mode can be used to calibrate the pI and MW of spots in the gels, when the identities of some of the spots are already known, either through use of marker proteins or mass spectrometry. See the main section on 2D Calibration for more information. 1D Calibration This mode can be used to calibrate the pI and MW of spots in a gel, when 1D calibration lanes have been run alongside the 2D gel. It is also possible to calibrate gels using arbitrary units of your own. The 1D Calibration section gives a comprehensive description of this mode. Annotations This mode allows you to put comments, arrows and text boxes on to the Image window to annotate features of the gel or analysis. See the Annotations section for details on this feature. Intensity Calibration This feature is not available in the PG220 Editor software. The Intensity Calibration mode is used to relate the numerical values stored in your gel image files to real-world values of optical density, diffuse density or counts. See the Intensity Calibration section for more information. Internet Query Using this option allows Federated 2DE Databases on the Internet to be queried automatically, for proteins that match the information stored in the spots of your gels. See the main Internet Query section for more information. Peak Adjustment This mode allows you to specify which algorithm is applied to generate the coordinates of your spots and to manually adjust the location of the coordinate within any given spot. It is particularly useful in connection with spot picking. See the Peak Adjustment section for more details. Profiling This mode allows you to define areas of the gel image where you wish to view intensity profiles. See the Profiling section for a comprehensive description of this mode. Spot Filtering Use this command to specify that only spots that meet certain criteria are displayed within the program, the rest being filtered out. Selection of spots is performed manually or by applying criteria for automatic selection. See the Spot Filtering section for details. Spot Picking This mode allows you to map the coordinates of selected spots in the current image to coordinates relating to locations on a separate device. An example would be where you have analysed a high quality gel image and wish to calculate picking coordinates on a robot, with a built-in camera. See the Spot Picking section for more information. PG200/PG220 User Manual Reference • 215 Tools Menu The Tools drop-down menu contains commands and features relating to image manipulation and differential analysis, as well as critical program option definition. Differential Analysis This option allows you to perform a Differential Analysis on the spots in your experiment. See the section on Analysis Procedures | Differential Analysis for more information. Image Manipulation This option allows you to crop, rotate and flip image files, to make them easier to analyse. This command is not available for DIGE experiments. See the section on Non-Analytical operations | Image Manipulation for more information. Use SameSpots If your experiment images have previously been warped using TT900 S2S Advanced Alignment Tool, then this command enables the application of the Same Spots Outline to your images. See the Use SameSpots section for details. Web Page Builder In order to aid the publication of experiment data on the Internet or on your organisation Intranet, the program can automatically produce a report on the experiment in HTML format. See the Non-Analytical Operations | Web Page Construction section for more information. Image Preprocessing This feature lets you control the maximum size and location of the filtered image caches. The caches speed up processing by storing noise correction information for the most recently processed gels, which means that when you perform spot detection or warping for the second and successive times, it reduces the processing time. Note: Only an Administrator can change the settings on the Cache tab. If you are logged on as an administrator, the Cache tab displays the following information. 216 • Reference PG200/PG220 User Manual Local cache size You can change the local cache size by use of the spin buttons. Incrementing the value increases the information storage space; decrementing the value decreases the storage space. If you decrease the value below what is already stored e.g. 5 GB > 1 GB you will lose 4 GB of information, although, this information can be regenerated. Local cache folder This shows the location of the folder where the information is stored on the local drive. Remote cache folder This shows the location of the folder where the information is stored on a remote drive i.e. on a Network, allowing files to be shared. Options Because of the amount of information on this feature, we have dedicated a separate section to it. See the Program Interface | Options section for more information. PG200/PG220 User Manual Reference • 217 Window Menu The Window menu contains various commands and features relating to window display and selection. Close all Windows With this command, all of the open component windows that are currently open in the software are closed. Default Window Positions This option restores all program windows to their default positions. Tile Horizontally Selecting this command resizes all of the open program windows in the software, so that the available space is filled with horizontal windows. Tile Vertically This option resizes all of the open program windows in the software, so that the available space is filled with vertical windows. Window List The window list is a list of all open program windows and is displayed at the bottom of this menu. Selecting a window from this list will bring it to the front. The window list is a useful shortcut. Rather than minimising the windows that are covering the one you wish to view, you can use this to bring your preferred window to the front. 218 • Reference PG200/PG220 User Manual Help Menu The tutorial features are not available in the PG220 Editor software. From this menu, you can access the Help Contents, tutorial pdf files and the tutorial images. You can also restore the default parameters, run the activation wizard and use the various links to request support via the Technical Support option. This menu also displays a list of several examples of completed experiment files for viewing, from the Restore Tutorial option. PG200/PG220 User Manual Reference • 219 The Main Toolbar buttons New Experiment This feature is not available in the PG220 Editor software. Choose this button when you want to create a new Experiment to work with. This will bring up the Create an Experiment dialog, which allows you to select the image files that are to be used in the new experiment. Open Experiment This command allows you to open an experiment that you created, using the software on a previous occasion. Save Use this command to save any changes you have made to your experiment. Upon selecting this operation, all data that has changed since you last saved the experiment, or since it was opened, is saved. Selection This mode is the default mode of the program, used for browsing your data without making any changes. Detect Spots Spot Detection allows the automatic finding and manual editing of spots in the gels of your experiment. Background Subtraction Background Subtraction can be performed on your gels, to account for the background intensity of the gel material on the image. Warp Gels This mode allows the user to automatically warp the gel images into alignment with a reference gel. You can optionally view the warped image overlaid on the parent image, as a complementary colour image pair. Matching Matching allows you to identify those spots that represent the same protein in different gels. Add to Reference Gel This mode allows you to map spots that have not been matched into the Reference Gel, so that they can be matched and identified in other gels in the experiment. Normalisation Using this button, you can normalise the volume of the spots in your gels, allowing you to accurately compare the measurements of spots in different gels. 220 • Reference PG200/PG220 User Manual 2D Calibration This mode can be used to calibrate the pI and MW of spots in the gels when the identities of some of the spots are already known, either through use of marker proteins or mass spectrometry. 1D Calibration Use this selection to calibrate the pI and MW of spots in a gel when 1D calibration lanes have been run alongside the 2D gel. It is also possible to calibrate gels using arbitrary units of your own. Spot Filtering With this selection, you can specify that only certain spots should be displayed within the program, the rest being filtered out. Selection of spots can be performed manually or by applying several different criteria for automatic selection. Select Gel This drop-down list can be used to select any gel in the experiment, as the current gel. Previous Gel Select this button to change to the previous gel in the experiment. Next Gel Choose this button to switch to the next gel in the experiment. Choose Reference Gel This button activates the Reference Gel Wizard, a dialog that allows you to create and modify reference gels, as well as sharing reference gels between experiments. See the Reference Gel Wizard for more information. Open Database This button is enabled when you have the accompanying Database installed. When this button is clicked, the database login dialog will display. Once you are logged in, the information from the current analysed experiment will be sent and added automatically to the database. Image Input Devices In this section, we discuss two differences between scanning devices, which are Pixel Depth and Spatial Resolution. The section also covers Buying devices and Image Capture tips. Differences between Scanning Devices Pixel Depth This is the most important difference between devices. In general, Desktop Scanners and cameras typically have a Pixel Depth of 8 bits. Densitometers have a pixel depth of 12 or even 16 bits. PG200/PG220 User Manual Reference • 221 Many scanners can produce images with a greater pixel depth, but check that the device is scanning at this depth. If it is not, then the depth is likely to be attained through multiplication of the numbers read. This cannot improve your results and needlessly takes up extra disk space and processing time. A volume is defined as the sum of the intensity values of every pixel that is part of the spot. Therefore, 16 bit images from a densitometer produces larger volume measurements than 8 bit images if you do not perform intensity calibration. Performing intensity calibration converts the image pixel values into real world units. This means that the range of values is the same, no matter what the original pixel depth. The advantage of having more bits per pixel in your image is that you get a greater resolution within the range when you calibrate. Some densitometers like those from Molecular Dynamics and BioRad, give images that are already calibrated. Spatial Resolution Different devices capture images at different resolutions. These different resolutions can lead to different volume measurements. For example, if a scanner with a resolution of 300 dpi were used to capture an image, an area that is one-inch square would be represented by 90000 pixels. If a scanner with a resolution of 1200 dpi were used the same area would be represented by 1440000 pixels. Scanners can often store the resolution with the image and therefore this software can show the size of the images in mm or inches, rather than pixels. Another problem is that camera-based systems do not capture at a set scale. Capturing at different levels of magnification will change the number of dots per inch in the final image. Image Capture Tips When you capture an image with a scanner, we recommend that you use the 1:1 (equivalent to 100%) zoom. This is because shrinking the image can often lead to a loss of quality, or the inability to resolve data. Increasing the size of an image does not add any information. At best, you will get interpolated values for the extra pixels; at worst, you will get pixelation, which can affect your measurements and lane profiles. If your scanner offers an Enhanced resolution option, we recommend that you do not use it. For example, a scanner with an optical resolution of 300dpi might be able to output an image of 600dpi. This is computed by pixel interpolation. This would not provide you with any additional information, processing will take four times as long, and the disk file will be four times the size. In addition, the interpolation algorithm may subtly alter the results of the measurements, since these algorithms are optimised for photographic clarity, rather than for gel electrophoresis. What resolution should I scan my gels at? Using a desktop scanner we recommend a resolution of 100 - 300dpi (dots per inch). The precise resolution depends on the gels, but 300 dpi will provide an image that is large enough for accurate analysis and small enough for efficient processing. Scanning at a resolution of 300dpi rather than 600 (for example) will result in an image that is one quarter the size, which is much more efficient in terms of storage and processing time. 222 • Reference PG200/PG220 User Manual Context Menus In many places, we use context menus to present a series of commands that are relevant to the item or area on the screen, from where the menu was launched. To launch a context menu right click on the relevant area, or click the context menu key on your keyboard. Context menus can be launched from nodes on tree-structures and from certain places on the Image window. More information is given in the relevant sections. PG200/PG220 User Manual Reference • 223 Keyboard Shortcuts To speed up your use of the program, you might find it useful to know the keyboard shortcuts, which help with the common operations. Underlined Letters In menus and dialogs, certain options will have a single letter in them underlined. This means that if you press and hold down the ALT key on your keyboard and then press the key corresponding to the underlined letter, the command will be selected. For example, to drop-down the File menu from the menu bar, press Alt+F. When selecting options from menus after they have been dropped down, you do not use the ALT key, just press the relevant letter for the item. For the convenience of users, the Image window supports several keyboard shortcuts, which are as follows: 224 • Reference PG200/PG220 User Manual Help Main Online Help Clicking Help on the Main Menu invokes the Help drop-down menu for the Online Help and Tutorials. The Online Help can be searched by various techniques similar to those used in most Windows applications. Contents The main Online Help file is accessed from the Contents command on the Help menu. Selecting this option will display the Help Topics window in which you can find information by searching on: Subject area (Contents tab) Keyword (Index tab) Topic text (Search tab) The online help is displayed in a small HTML browser window that displays a Toolbar, Navigation pane and a Content pane. You will notice that the content tab of the Navigation pane stays synchronised to the current topic displayed in the Content pane. You can re-size the Content pane by placing the pointer over the dividing line and dragging it left or right. In addition, you can re-size the entire Help window, by dragging any corner. Restore Tutorial Choose this option to open a drop-down menu and select any of the tutorials, to use in conjunction with the Tutorial documentation or the Online Tutorial Help. This menu also displays a list of several examples of completed experiment files for viewing. Restore Default Parameters This restores the default window positions and analysis parameters, for use with your current experiment. Run Activation Wizard When you select this command, you are prompted to insert your Security Access Disk. After the disk is inserted, the Activation Wizard starts, prompting you for your supplied Activation Code. Following activation, the software will run, with all features fully available. If for whatever reason, you wish to stop the activation process, it can be restarted at any time by launching your software in demonstration mode and choosing Run Activation Wizard from the Help menu. Technical Support Selecting this option provides you with a drop-down list, enabling you to select either: Request Technical Support Request a New Feature Report a Bug Each of these options will display a reporter form, requesting you to enter information. The dialog for these forms also detects system settings from your PC. This information is then generated into the completed form, but can be deleted from the bottom of the email or physically cut from the bottom of a printed form if you do not want it disclosed. The system information is used solely to assist our Technical Support staff and is kept confidential. PG200/PG220 User Manual Help • 225 About Selecting About will display an information box with the program name and version number of the software. 226 • Help PG200/PG220 User Manual perform analysis 114 perform spot detection 106 preview images 97 save analysis protocol 112 spot matching 108 summary page 113 welcome page 94 Anchors adding 170 deleting 171 editing 171 Animation Frames 76 Animation window 76 display options 76 display speed 76 Annotations 215 creating 188 data 55, 194 gel images 188 manual 188 mode 29 moving 189 options 30, 190 selecting 189 text 190 AOI - Area of Interest 132 Assigning Proteins 150 Attach Documents 202, 211 Auto Merge 119 Auto Split 119 Automatic analysis 214 filtering 159 matching 136 Automatically adding spot to reference gel 139 Automatically saving an experiment 33 Autorecover 84 Averaged Gel Node 24 Averaged Gels 179 automatic matching 136 creating 24, 176 criteria 25 maximum absences 178 parameters 25 recreating 25 removing 178 AVI files 77 Index 1 100 - 300dpi 222 1D Calibration 28, 152, 215 ladders 43 2 2003 Standard Detection 107, 120 tuning files 107, 121 2003 Standard Detection method 120 2005 Detection 107, 115 2BK Files 86 2D Calibration 28, 150, 215 2D Database federated 29, 72, 146 2DG Files 43 2DX files 83 2DX Files 43 3 3D options tab 42 3D window 77 animation options 80 animation speed 80 customising the 3D surface appearance 80 default viewpoint 81 rotating images 80 scaling the surface for maximum contrast 79 Selecting a Contrast for the surface 79 selecting gels 80 viewing gels 79 A Activating windows relevant to mode 31 Activation Wizard 225 Add to Reference Gel Mode 28 Adding additional images to an Averaged gel 177 pins 134 vectors and pins 134 Adding Gels 88, 206 Adding new proteins to a list 72 Adding Unmatched Spots from a SubGel 140 Adjusting the Contrast Settings 49 Affect these Gels 116 Analysis Menu 214 Analysis Protocols 101 Analysis Wizard 94 analysis protocols page 101 background subtraction 108 define averaged gels 98 group DIGE images 95 image selection 95 PG200/PG220 User Manual B Background Subtraction 28, 122, 214, 220 average on boundary 124 DIGE 122 lowest on boundary 123 mode of non-spot 123 performing 122 removing 123 Backing up experiments 19, 21, 86, 207 Base gel 99, 177 Buttons 1D calibration 221 2D calibration 221 add to reference gel 220 Index • 227 background subtraction 220 choose reference gel 221 detect spots 220 matching 220 new experiment 220 next gel 221 normalisation 220 open database 221 open experiment 220 previous gel 221 save 220 select gel 221 selection 220 spot filtering 221 warp gels 220 C Calibration 1D 28, 152, 215 2D 28, 150, 215 intensity 163, 215 Choosing a Base gel 99, 177 Choosing a field type 56 Clearing all Warping 131 automatic matches 135 spots 116 user Matches 135 Closing all Windows 218 experiments 205 software 209 Closing a context menu 19 Colour current area 51 scheme 47 Comparisons tab 38 compare with gel 38 field to compare 38 highlight p values 39 Comparisons window 64 Context Menu closing 19 from experiment view level 21 from file view level 18 general 223 Contrast and Colour 47, 49 Coordinates 30 mapped 58 peak adjustment 145 peak location 37 X and Y 59 Copy Filter Set 212 Copying options 36 options tab 36 protein lists 26 spot filter set 212 to clipboard 212 to Excel 212 to file 198, 212 Creating annotations 188 averaged gels 24 228 • Index experiments 20, 83, 205 filter sets 208 gels 210 protein lists 23, 146, 147, 211 reference gels 24, 127 sub gels 25 workspace files 208 Creating my own workspace 208 Current area 51 experiment 44 gel 44 mode 44 spot 44, 50 Customising the 3D surface appearance 80 D Data annotations 30, 55 Data fields 56, 57 Database Internet 197 protein 195 sending information to 221 Default Viewpoint 81 Deleting all Spots 116 anchors 171 colour schemes 78 experiments 19 individual spots 118 ladders 154 profiles 156 protein lists 147, 211 proteins from a list 72 vectors and pins 134 Detecting Spots 214 changing algorithms 37 using the Analysis Wizard 106 Detection 2003 standard detection method 107, 120 2005 detection method 107 options tab 37 plug-in methods 107 show detection methods 37 Differences Map 54 Differential Analysis 175, 216 DIGE background subtraction 122 group images 95 internal standard 92 navigator editing 115 spot editing tools 117 DIGE Analysis 91 background subtraction 122 navigator editing 115 ratiometric normalisation 109, 141 spot editing tools 117 Display further options in Image window 53 image optimisation 32 options in 3D window 79 options in Animation window 76 PG200/PG220 User Manual 2bk 21 adding attachments 211 copying to 198 displaying list 18 experiment 19, 43 image 20, 43 reference gel 20 viewing 18 Filter Set exporting 208 importing 207 FUJI Files 43 options in Image window 45, 50 options in Montage window 71 options tab 30 warping options 130 Drawing Spots 118 E Edit Menu 210 Editing a protein list 72 Erasing Spots 118 Error Type Field 62 Excluding calibration points 167 Exiting 209 Experiment node 21 report 74 view explorer 21 Experiments adding attachments 202, 211 adding files 20 adding gels 88 backing up 19, 21, 86, 207 closing 205 creating 20, 83, 205 current 44 deleting 19, 207 exporting to XML 85 fields 211 files 19, 43 importing from XML 85 opening 19, 83, 205 renaming 22 restoring 21, 86, 207 saving 84, 205 stacking 114 working with 83 Explore From Here 18 Exporting fields 208 filter sets 208 reports 74 to Excel 199 to XML 85, 205 Expression window 66 highlighting changes 66 G GEL Files 20, 43 Gel Node 24 Gel report 73 Gel Status Icons 13 Gels 24 adding to experiments 88, 206 affect these 116 analysing 91 calibrating 168 changing list order 24 creating 210 current 44 fields 211 header 211 importing 19, 206 matching 135 modifying 210 moving between 89 reference 125 removing 24, 206 removing from average 178 renaming 24 report 73 selecting 24, 71 sub gel 25 General options tab 32 Generating Intensity profiles 155 Getting started 9 Goto Spot 211 Grids 51 showing 132 Growing peaks 118 F Familiarise yourself with the software 11 Fields adding 211 data 57 editing 211 exporting 208 importing 208 modifying 211 protein 61 selecting 56 spots 58 statistics 60 user defined 57, 199, 203, 204 File Menu 205 File View Explorer 18 Files 19 PG200/PG220 User Manual H Headers experiment 211 gel 203, 211 Headers and Footers tab 75 Help menu 219, 225 online 225 Hiding the Navigator 26 Highlighting expression changes 66 p-Values 39 Histogram adding fields 69 error bars 69 Index • 229 grouping 70 options 68 printing options 34 reordering list 69 size 70 window 68 excluding calibration points 167 locking calibration points 167 mode 29 positioning calibration points 164 Interaction between histograms and other windows 70 Internal Standard 92 Internet pages 197 queries 195, 215 query mode 29 Inverting Intensities 209 Isoelectric Points 150 I Icons averaged gel 13 base gel 13 experiment 13 reference gel 13 shared reference gel 13 slave gel 13 sub-gel 13 Identifying the image icons 13 Image capture 221 capture tips 222 files 20, 43 input devices 221 Image Display colour scheme 47 contrast and colour 47 further display options 53 grids 51 histograms 50 maximum size 32 optimisation 32, 55 options 52 refresh rate 132 saturation 53 scaling 210 Image Manipulation 196, 216 adding anchors 170 annotations 215 cropping 196 drawing 118 expression differences 54 intensity profiles 215 mirroring 196 modifying 20 rotating 196 Image window main 45 second 63 toolbar 45 zooming 46 Images removing 178 selecting 177 IMG Files 20, 43 Importing fields 208 filter sets 207 from XML 85, 205 gels 19, 206 images 206 reference gels 128 INF Files 43 Input Devices image 221 Intensity Calibration 163, 215 230 • Index K Key Product Points 7 Keyboard shortcuts general 224 Image window 55 L Ladders 1D Calibration 43, 152 creating 152 deleting 154 editing 152 inserting 153 positioning 153 Launching the Analysis wizard manually 214 Launching the Analysis wizard on startup 214 Locking calibration points 167 M Magnifying the image 46 Main Screen Layout 12 Main Toolbar 15 Manual annotations 30 Manual Editing auto merge 119 auto split 119 Manually adding spot to reference gel 140 Match Vectors 51 Matching 135 automatic 136 clear auto matches 135 clear user matches 135 dual window 138 mode 28 montage window 138 mutual proximity 179 overlay 137 parameters 136 seed generation 136 user-defined 137 vectors 51 Measurements window 56 MEL Files 20, 43 Menu analysis 214 PG200/PG220 User Manual edit 210 file 205 Help 219 tools 216 view 213 window 218 Menu Bar 15, 205 Merging Spots 119 Mode 28 Add to reference gel 28 annotations 29 background subtraction 28 current 44 intensity calibration 29 Internet query 29 matching 28 normalisation 28 peak adjustment 29 profiling 29 selection 28 spot detection 28 spot filtering 28 spot picking 29 sub 29 warping 130 Mode Defaults options tab 40 Mode Specific Toolbar 26 Modify fields 211 Modifying Images 20 Molecular Weight 31 values 150 Montage Area displaying 55, 187 Montage window 71 Moving between gels 89 N Navigator 16, 18 hiding 26 resizing 26 Normalisation 28, 140, 214 matching ratio 143 mode 28 multiply by fixed value 142 single spot 141 total spot volume 141 total volume 144 Notes tab 75 Number of spots in gels 22 Numbering Spots 116, 120 O Online Help 225 browser buttons 225 Open experiment 18 Opening 2dx files 83 database 205, 221 experiments 19, 83 most recently used files 209 workspace 208 Options PG200/PG220 User Manual 3D tab 42 comparisons tab 38 copying tab 36 detection tab 37 display tab 30 general tab 32 mode default tab 40 printing tab 34 saving 33 P Peak Adjustment Mode 29 Peaks adjustment 29, 215 growing 118 location 37 Perform Background Subtraction 122 Picking Spots 29, 169, 215 Pixel depth 221 intensity 155 Plug-in Detection Methods 107, 120 Positioning calibration points 164 Print Range 34 Printing 198, 209 histograms 34 image window 198 options 34 preview 209 range 34 scale 34 setup 209 Printing options tab 34 Profile window 75 Profiling 29, 155 Program modes and Sub-modes 28 options 30 restoring the default settings 225 sub modes 29 window selector button toolbar 16 Protein Fields accession number 61 description 61 error type 62 MW 62 pl 62 Protein List Files 20 Protein List Node 26 Protein lists 146, 211 adding new proteins 72 copying 26 creating 23, 146, 147, 211 deleting 147, 211 deleting proteins 72 editing 72 editing values 148 files 20, 43 node 26 removing: 26 selecting 23, 26 sharing 147 Protein window 72 Protocol files 101 Index • 231 R Ratiometric Normalisation 109, 141 Reference Gel Files 20 Reference Gel Node 23 Reference Gels 23, 125 adding spots 139 choosing 221 creating 24, 127, 211, 221 files 20 importing 128 mapping to unmatched spots 214 removing 126 selecting 23 sharing 126, 211, 221 wizard 125 Reference Spots 50 Removing background subtraction 123 calibration points 167 gels 24, 206 images 178 pins 134 protein lists 26 spots 79 vectors 134 Renaming experiments 22 gels 24 profiles 156 reference gel 23 Renumbering Spots 116, 120 Replicate groups Analysis Wizard page 104 criteria 105 renaming 104 Report window 73 Reports experiments 74 exporting 74 gel 73 html format 197, 216 options 74 saving 74 spot 73 Resizing the Navigator 26 Resolution images 210 optimisation 32 Restoring default parameters 225 default settings 225 default window positions 218 experiments 21, 86 spot filtering 207 Restoring experiments 207 Robots 170, 172 Rotating images 80, 196 S SameSpots 181, 182, 186, 216 analysis wizard 182 Saturation Map 53 232 • Index Saving automatically 33 autorecover 84 experiments 84 options 33 reports 74 save as 205 video clips 77 workspaces 208 Scaling images 210 options 198 printed output 34 the surface for maximum contrast in 3D window 79 units 30 Scanning Devices 221 Scanning resolution 222 Scroll box 46 Scrollbars 46 Search Box Size 136 Second Image window 63 Seed Generation 136 Selecting a Base gel 99, 177 areas 120 current spots 120 fields 56 gels 24, 71 images 177 modes 187 multiplex groups 95 protein lists 26 reference gels 23 Selection Mode 28 Sending data to the database 90, 221 Sharing protein lists 147 reference gels 126, 211, 221 Show Spot Montage Area 55 Slave Spots 50 Software version 226 Spatial Resolution 222 Splitting Spots 119 Spot Detection 28, 115, 214 editing 115 parameters 37 undoing tasks 120 Spot Detection Methods 2003 standard detection 120 Spot Detection Parameters 37 Spot Detection Plug-Ins 121 Spot Display coordinates 145 numbering 116, 120, 210 styles 51 Spot Editing 214 Spot Editing Tools DIGE 117 DIGE analysis 117 Spot Fields 40, 211 st 1 dimension 59 2nd dimension 59 area 58 background 58 PG200/PG220 User Manual circularity 58 comment 58 difference 58 equivalent radius 58 height/area 58 mapped coordinates 58 match number 58 normalised volume 58 peak height 58 picked 58 protein 59 scaled coordinates 59 spot 59 spot edited 59 volume 59 volume and background 59 volume/area 59 x coordinates 59 y coordinates 59 Spot Filtering 157 automatic 159 comparison parameters 160 deselecting all 159 manual 158 mode 28, 215 selecting all 159 spot based 160 tabular 161 Spot Manipulation add to reference gels 139 automatic filtering 159 clearing 116 coordinates 215 deleting 116, 118 drawing on image 118 filtering 157 growing peaks 118 matching 135, 214 normalising volume 140 separating 119 splitting 119 Spot Picking 29, 169, 215 ettan 172 peak adjustment 145 triangulation 170 Spot Report 73 Spot Selection 120, 159 current 44, 50 deselecting all 159 differential analysis 175 Spot Styles 51 Spot Types reference 50 slave 50 Stacking Experiments 114 Starting the software for the first time 11 Statistical Analysis compare with gel 38 Statistics ANOVA 61 paired t-Test 60 t-Test 60 Status Bar 17 Step wedges defining 163 PG200/PG220 User Manual editing lists 164 excluding calibration points 167 locking calibration points 167 selecting values 164 spacing points 164 spacing points evenly 167 Sub Gel Node 25 Sub Gels 25 Support 225 Synchronise Spot Numbers 210 T Technical Support 9, 225 The Current Selection 44 The Main Program Window 15 The Navigator 18 The Reference Gel Wizard 125 TIF Files 20 TIFF Files 20, 43 Tips on Performing Manual Warping 133 Title Bar 15 Toolbar 3D window 77 image window 45 main 15, 220 mode specific 26 Tools Menu 216 Total Spot Volume Normalisation 109 Triangulation 170 adding anchors 170 deleting anchors 171 editing anchors 171 selecting spots 171 Tuning Files 107, 121 Tutorial restoring files 225 Tutorial images 9 U Undo 120 Units of Measurement 30 Use SameSpots 181, 182, 186, 216 User Defined Fields 57, 199, 203 Using the Averaged Gels Wizard 177 Using the Scaled Scroll Bars 46 Using the Zoom tool 46 V Vector Box Size 136 Vectors 51 adding 131, 134 clearing 131 displaying 133 drift field 132 removing 134 Video clips 77 View Menu 213 Viewing files 18 Volume Normalisation 140, 141 Index • 233 W Warping 130, 214 area of interest 131 clearing all 131 Warping Mode 28 Web Page Builder 216 Web Page Construction 197 What dpi resolution? 222 What is Scrolling? 46 What is Zooming? 46 Window Menu 218 Windows default positions 225 list 218 options 31 selector buttons 16 tile 218 Workspace 17 creating your own 208 saving 208 X XML 85 Z Zoom window 55 Zooming 46 image window 46 montage window 71 234 • Index PG200/PG220 User Manual