1
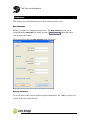
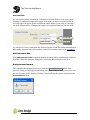
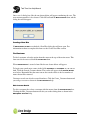
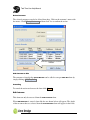
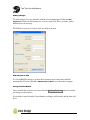
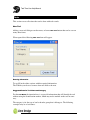
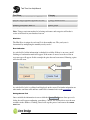
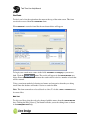
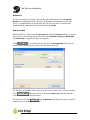
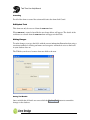
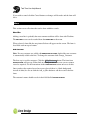
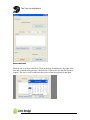
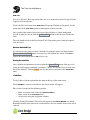
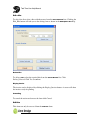
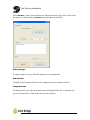
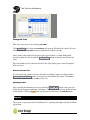
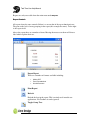
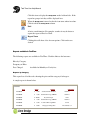
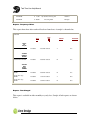
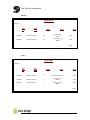
Lime Design
Tool Time User Manual
Adam Esposto
Cassie Martin
David Xalfa
Glenn Eaton
Shawn Reece
Simon Jones
Table of Contents
Tool Time Help ....................................................................................................1
Introduction ...................................................................................................1
Features........................................................................................................1
Installation.....................................................................................................1
Getting Started ....................................................................................................2
The Main Screen ..........................................................................................2
Switch Box ....................................................................................................2
Customers ...........................................................................................................3
New Customer..............................................................................................3
Entering Information..............................................................................3
Error Indication ......................................................................................4
Add Customer to Hire...................................................................................4
Saving the new Customer............................................................................4
Creating a New Hire.....................................................................................5
Find Customer..............................................................................................5
Edit Customer Details ...........................................................................5
Delete Customer ...................................................................................6
Add Customer to Hire ...........................................................................6
Cancelling ..............................................................................................6
Edit Customer...............................................................................................6
Making Changes ...................................................................................7
Add Customer to Hire ...........................................................................7
Saving Customer Details ......................................................................7
Tools.....................................................................................................................8
New Tool.......................................................................................................8
Entering Information..............................................................................8
Suggested Data for Tool Name and Category....................................8
Hire Price ...............................................................................................9
Error Indication ......................................................................................9
Saving the new Tool .............................................................................9
Find Tools ...................................................................................................10
Edit Tool...............................................................................................10
Delete Tool ..........................................................................................11
Add Tool to Hire ..................................................................................11
Cancelling ............................................................................................12
Edit/Update Tools.......................................................................................12
Making Changes ........................................................................................12
Saving Tool Details .............................................................................12
Hires ...................................................................................................................13
New Hire .....................................................................................................13
Add Customer .....................................................................................13
Choose Hire Date................................................................................14
Add Tool ..............................................................................................15
Remove Selected Tool...............................................................................15
Saving the new Hire ...................................................................................15
Find Hires....................................................................................................15
Edit a Hire ...................................................................................................16
Delete Hire...........................................................................................16
Display Invoice ....................................................................................16
Cancelling ............................................................................................16
Edit Hire ......................................................................................................16
Making Changes .................................................................................17
Add Customer .....................................................................................17
Change Hire Date ...............................................................................17
Change the Tools .......................................................................................18
Remove Selected Tool .......................................................................18
Updating the Hire ................................................................................18
Reports...............................................................................................................18
Report Controls ..........................................................................................19
Reports available in ToolTime ...................................................................20
Reports -by Category..........................................................................20
Reports - Frequency of Hires .............................................................21
Reports - Fees Charged .....................................................................21
FAQ (Frequently Asked Questions).................................................................23
How do I delete a customer?..............................................................23
How do I delete a hire no longer required?........................................23
What makes customer information valid?..........................................23
What is valid Tool Data?.....................................................................24
Tool Time User Help Manual
Tool Time Help
Introduction
Tool Time is an application to manage the hiring out of tools from a library of tools. The
menu system is easy to use, with all functions readily accessable. The program opens up
with the two most used functions ready to go.
Features
The software has the following features:
•
•
•
Easy to install
Easy to use
Additional reports can be created using Access.
Installation
To install the application insert the CD into your computer CD drive. Copy the contents
of the Install folder to a convenient place onto your Hard Disk.
The suggested location is: c:\Program Files\ToolTime
Once copied right click on the ToolTime.exe file and select:
Send To/Desktop(create shortcut)
There should now be a ToolTime icon on the desktop.
PAGE 1 OF 25
Tool Time User Help Manual
Getting Started
The Main Screen
When the application is first started the main screen, as shown below, will open. At the
top a menu showing the objects Customer, Hire, Tool and Reports. Each of these has a
sub-menu, as can be seen with the opened Customer submenu.
Each object has the options New and Find. These are also available at other locations.
Switch Box
Switch Box
The switch box at the centre gives fast access to Create Hire and Create Customer.
To get started enter a new customer by clicking on the Create_Customer button. This
will take you to the New Customer screen. Before hires can be done ensure that the tools
have been entered, see the New Tool section for details. Once entered tools can be hired
out to customers by clicking the Create_Hire button.
PAGE 2 OF 25
Tool Time User Help Manual
Customers
This section covers all actions that can be done with customer records.
New Customer
Adding a customer is a straight forward process. The New Customer screen can be
reached from the Switch Box, the menu, or from a New Customer button that can be
seen on many other forms.
When opened the following New Customer form will appear.
Entering Information
To use fill in the white sections with the required information. The TAB key can be used
to move from one field to the next.
PAGE 3 OF 25
Tool Time User Help Manual
Error Indication
As each field is left the information is checked for validity. If there is an error a small
flashing red exclamation mark will appear. If the mouse is moved over the red dot an
error message will appear. In this example the email address is not valid (it's missing a
dot in the domain name). Changing the email to [email protected] will stop the error.
Error Indicator
Error message
As each field is left it is formatted and displayed on the screen. For further infomation on
what makes customer data valid and how each field is formatted refer to the appendices.
Add Customer to Hire
If the Add Customer to Hire is checked the new customer will be automatically added to a
new Hire. When the customer dialog box is closed the Hire dialog box will open.
Saving the new Customer
Once satisfied the information is correct click the Create_Customer button. Once
pressed a dialog box will appear confirming your choice. Choose Yes if you wish to save
the new customer in the database. Clicking Cancel will stop the process and remove the
Create Customer form.
PAGE 4 OF 25
Tool Time User Help Manual
Once saved a dialog box, like the one shown below will appear confirming the save. The
new customer number is also shown. Click OK and both the New Customer form and the
dialog box will disappear.
Creating a New Hire
If Add Customer to Hire was checked a New Hire dialog box will now open. For
information on how to complete this form see the Create New Hire section.
Find Customer
To find a customer select the option from the menu at the top of the main screen. This
form can also be accessed from the Create Hire form.
When Find Customer is started a form like the one shown below will appear.
To begin your search enter a name in the fields First Name or Last Name or you can use
both. Click the Search_Customer button. The results will appear in the Search Results
area below. Remember that the more narrow the search criteria is the less number of
names that will be returned.
Customer records can also be created from here. Click the Create_Customer button and
you will get a screen as shown in the New Customer help.
Edit Customer Details
To edit a customer first select a customer with the mouse from the Search Results box.
Clicking the Edit_Customer button will take you to the editing form as shown in the
Edit/Update Customer help.
PAGE 5 OF 25
Tool Time User Help Manual
Delete Customer
The selected customer can also be deleted from here. Click on the customer's name with
the mouse. Click Delete_Customer and then click Yes to confirm the action.
Click here to delete the customer
selected.
Add Customer to Hire
The customer selected in the Search Results can be added to an open New Hire form by
simply clicking Add_To_Order.
Cancelling
To cancel the action and remove the form click Cancel.
Edit Customer
This form can only be accessed from the Find Customer form.
When Edit Customer is started a form like the one shown below will appear. The details
of the customer that was selected from the Find Customer form will appear in the fields.
PAGE 6 OF 25
Tool Time User Help Manual
Making Changes
To make changes over type the fields with the correct information. Unlike the New
Customer the fields are not formatted as you leave each field. This way names such as
McDonald can be fixed up.
The TAB key can be used to move from one field to the next.
Add Customer to Hire
If a Create/Edit Hire dialog is open the new customer can be entered into the Hire
automatically. If desired check the Add Customer to Hire box to allow this to happen.
Saving Customer Details
Once satisfied that all details are correct click the Update_Customer button to commit
the changes to the database.
If you wish to cancel click the Cancel button; no changes will be made and the form will
close.
PAGE 7 OF 25
Tool Time User Help Manual
Tools
This section covers all actions that can be done with tool records.
New Tool
Adding a new tool dialogue can the menu, or from a New Tool button that can be seen on
many other forms.
When opened the following New Tool form will appear.
Entering Information
To use fill in the white sections with the required information.
The TAB key can be used to move from one field to the next.
Suggested Data for Tool Name and Category
For the Tool Name the intention here is to provide information that will identify the tool
without using the identification number, which may not be marked on the tool in some
way.
The category is for the type of tool or broader group that it belongs to. The following
examples may be of assistance:
PAGE 8 OF 25
Tool Time User Help Manual
Tool Name
Black and Decker Orbital Sander PS1998
Hitachi Cordless Hammer drill HD-4333PN
Sidchrome Claw Hammer, Blue
Makita Power Planer, MPP-33
Stanley Plane, No 4
Category
Orbital Sander
Cordless Hammer Drill
Claw Hammer
Planer, power
Planer, hand
Note: Using a consistent method of selecting tool names and categories will make it
easier to find tools in your database later on.
Hire Price
The Hire Price is unique for each tool. It is the monthly rate. The yearly rate is
determined by multiplying the monthly rate by twelve.
Error Indication
As each field is left the information is checked for validity. If there is an error a small
flashing red exclamation mark will appear. If the mouse is moved over the red dot an
error message will appear. In this example the price has not been entered. Entering a price
will clear the error.
Error indication
As each field is left it is validated and displayed on the screen. For further infomation on
what makes tool data valid and how each field is formatted refer to the appendices.
Saving the new Tool
Once satisfied the information is correct click the Create_Tool button. Once pressed a
dialog box will appear confirming your choice. Choose Yes if you wish to save the new
customer in the database. Clicking Cancel will stop the process and remove the Create
Tool form.
PAGE 9 OF 25
Tool Time User Help Manual
Find Tools
To find a tool select the option from the menu at the top of the main screen. This form
can also be accessed from the Create Hire form.
When Find Tool is started a form like the one shown below will appear.
To begin your search enter a name in the fields Tool Name or Category or you can use
both. Click the Search_Tool button. The results will appear in the Search Results area
below. Remember that the more narrow the search criteria is the less number of tools that
will be returned.
Using a consistent method of selecting tool names and categories when they are being
entered into the database will make it easier to search for them.
Note: This form cannot be used to add tools to a hire. To do this a hire or customer must
be created first.
Edit Tool
To edit a tool first select the tool to be changed with the mouse from the Search Results
box. Clicking the Edit_Selected_Tool button will take you to the editing form as shown
in the Edit/Update Tool help.
PAGE 10 OF 25
Tool Time User Help Manual
Delete Tool
To remove a tool first select the tool to be deleted with the mouse from the Search
Results box. Clicking the Delete_Selected_Tool button will begin the tool deletion
process. A confirmation box (not shown) will ask if you are sure. To complete the
deletion click the Yes button. To cancel the deletion click No.
Add Tool to Hire
When Add Tool is clicked from the Hire Form the following Find Tool dialog box appears.
Tools can be searched using the criteria entered in Tool Name, Category or Hire Period.
The Hire Period is required, the others are optional.
Click Search_Tool. A list of found tools will appear in Search Results. Tools that are
booked out for the hire period selected will not appear in the list.
To add to the opened Hire click on the tool (only one at a time can be selected) and then
click Add_To_Hire.. The form will close showing the Hire Form again; but with the
selected tool in the tool list for the hire.
To add more tools click Add_Tool from the New Hire form. Repeat the process until all
required tools are in the New Hire form.
PAGE 11 OF 25
Tool Time User Help Manual
Cancelling
For all of the forms to cancel the action and dismiss the form click Cancel.
Edit/Update Tools
This form can only be accessed from the Find Tool form.
When Edit Tool is started a form like the one shown below will appear. The details of the
tool that was selected from the Find Tool form will appear in the fields.
Making Changes
To make changes over type the fields with the correct information.Remember that using a
consistent method of selecting tool names and categories will make it easier to find tools
in your database later on.
The TAB key can be used to move from one field to the next.
Saving Tool Details
Once satisfied that all details are correct click the Update_Tool button to commit the
changes to the database.
PAGE 12 OF 25
Tool Time User Help Manual
If you wish to cancel click the Cancel button; no changes will be made and the form will
close.
Hires
This section covers all actions that can be done with hire records.
New Hire
Adding a new hire is probably the most common task that will be done with Tooltime.
The New Hire screen can be reached from the Switch Box or the menu.
When selected a form like the one pictured below will appear on the screen. The form is
best filled out from top to bottom.
Add Customer
Note: If a new customer was added with Add Customer to Hire checked the new customer
is automatically added to the hire. To change the customer click Change_Customer.
The first step is to add a customer. Click the Add_Customer button. The form from
Customer Find will open up. Either find an existing customer or create a new customer
record as required. See the instructions in the Customer Find section on how to do this.
Once you have the required record on screen selected (there is a black background
instead of white) be sure to click the Add_to_Hire button to add the record to the hire
form.
The customer's name should now be in the field labelled Customer Name.
PAGE 13 OF 25
Tool Time User Help Manual
Choose Hire Date
The next step is to chose a hire date. Click on the drop down button to the right of the
date and a calendar will open up as shown below. Click on the date that the customer
requires. The date is used to find tools that are free when the customer wants them.
PAGE 14 OF 25
Tool Time User Help Manual
Add Tool
Next is to add tools. This step can be done once or as many times needed to put all of the
required tools onto the hire.
Click Add_Tool and a form from Find Tool will open up. Find the tool required. See the
instructions in the Tool Find section for information on how to do this.
Once you have the required record on screen selected (there is a black background
instead of white) be sure to click the Add_to_Hire button to add the record to the hire
form.
The tool should now be in the listed under Tool's. Repeat the process until all required
tools are listed.
Remove Selected Tool
If a tool needs to be removed select it from the list using the mouse and then click the
Remove_Selected_Tool button. A message box will confirm the action. Click Yes to
remove the tool from the hire or No to leave it in.
Saving the new Hire
Once satisfied the information is correct click the Create_Hire button. Once pressed a
dialog box will appear confirming your choice. Choose Yes if you wish to save the new
hire in the database. Clicking Cancel will stop the process and remove the Create Hire
form.
Find Hires
To find a hire select the option from the menu at the top of the main screen.
When Find Hire is started a form like the one shown below will appear.
Hires can be searched by the following criteria:
•
•
•
Enter a customer name in the field Customer Name.
Enter a tools in the Tool Name field.
Select a date using the drop down calendar.
Click the Search_Hire button. The results will appear in the Search Results area below.
Remember that the more narrow the search criteria is the less number of hires that will be
returned.
PAGE 15 OF 25
Tool Time User Help Manual
Edit a Hire
To edit a hire first select a hire with the mouse from the Search Results box. Clicking the
Edit_Hire button will take you to the editing form as shown in the Edit/Update Hire help.
Delete Hire
To delete a Hire select the required hire from the Search Results list. Click
Delete_Selected. Click Yes to confirm.
Display Invoice
The invoice can be displayed by clicking the Display_Invoice button. A screen will show
the invoice ready for printing.
Cancelling
To cancel the action and remove the form click Cancel.
Edit Hire
This form can only be accessed from the Find Hire form.
PAGE 16 OF 25
Tool Time User Help Manual
When Edit Hire is started a form like the one shown below will appear. The details of the
hire that was selected from the Find Hire form will appear in the fields.
Making Changes
To make changes over type the fields with the correct information.
Add Customer
Clicking Add_Customer will allow you to change the customer that has the hire.
Change Hire Date
To change the hire date click on the blue arrow to the right of the date. A calendar will
appear as shown below. Click on the new hire date required.
PAGE 17 OF 25
Tool Time User Help Manual
Change the Tools
This is the same process for creating a New Hire.
Click Add_Tool and a form from Find Tool will open up. Find the tool required. See the
instructions in the Tool Find section for information on how to do this.
Once you have the required record on screen selected (there is a black background
instead of white) be sure to click the Add_to_Hire button to add the record to the hire
form.
The tool should now be in the listed under Tool's. Repeat the process until all required
tools are listed.
Remove Selected Tool
If a tool needs to be removed select it from the list using the mouse and then click the
Remove_Selected_Tool button. A message box will confirm the action. Click Yes to
remove the tool from the hire or No to leave it in.
Updating the Hire
Once satisfied the information is correct click the Update_Hire button. Once pressed a
dialog box will appear confirming your choice. Choose Yes if you wish to update the hire
in the database. Clicking Cancel will stop the process and remove the Edit Hire form.
Reports
The reports are generated with Crystal Reports™, a package that ships with the ToolTime
application.
PAGE 18 OF 25
Tool Time User Help Manual
Reports are only accessable from the main menu under Reports.
Report Controls
All reports share the same controls. Below is a screen shot of the report function in use.
The pane to the left is for any grouping in the report (this example has none). To the right
is the report itself.
Above the report there are a number of icons. Moving the mouse over them will show a
label which explains their use.
Export Report
There are a number of formats available including:
•
•
•
Adobe PDF
Excel Spreadsheet
Word document
Print Report
Refresh
Refresh the data in the report. This is mainly used in multi user
applications. For Tooltime it can be ignored.
Toggle Group Tree
PAGE 19 OF 25
Tool Time User Help Manual
Click this icon to display the Group Tree on the left hand side. If the
report has groups in it they will be displayed here.
When the Group Tree is turned on the the icon turns amber in colour.
Click it to hide the Group Tree column.
Find
A basic search function. For complex searches it may be better to
export the report to Excel or Word.
Report Zoom
Clicking this will show a list of zoom options. Click on the one
desired.
Reports available in ToolTime
The following reports are available in ToolTime. Click the links to find out more.
Hires by Category
Frequency of Hires
Fees Charged
Available for Monthly or Yearly fees.
Reports -by Category
This report lists all of the tools showing the price and the category it belongs to.
A sample report is shown below.
12/06/2009
Tool
Price
Name
Category
TOO00001
$
15.00
Toshiba DG2421 BLACK
Hammer
TOO00002
$
15.00
Yamaha DS2 Angry GREEN
Hammer
TOO00003
$ 200.00
Ryobi P1 Purple
Drill
TOO00004
$
15.00
Yamaha DS2 Angry GREEN
Hammer
TOO00005
$
35.00
Toshiba SH123 Light Blue
wrench
TOO00006
$
50.00
Omega Q32 Omega Red
The ultimate tool
PAGE 20 OF 25
Tool Time User Help Manual
TOO01000
$
23.00
TOO01001
$ 200.00
Ryobi G28731 Pretty pink
Hammer
Browning 2000
Handgun
Reports - Frequency of Hires
This report shows how often each tool has been loaned out. A sample is shown below.
12/06/2009
Tool
ID
Hire
Dat
e
Period
Returned
Ryobi
P1
Purple
Ryobi P1 Purple
TOO00003
12/09/4000 00:00:00
Y
True
TOO00001
12/06/2009 00:00:00
M
True
Yamaha DS2 Angry
GREEN
TOO00002
12/06/2009 00:00:00
M
True
Yamaha DS2 Angry
GREEN
TOO00004
1/01/2010 00:00:00
Y
False
Yamaha DS2 Angry
GREEN
TOO00004
3/05/2009 00:00:00
M
False
Toshiba
DG2421
BLACK
Toshiba DG2421 BLACK
Yamaha
DS2
Angry
GREEN
Reports - Fees Charged
This report is available in either monthly or yearly fees. Sample of both reports are shown
below.
PAGE 21 OF 25
Tool Time User Help Manual
Monthly
Monthly Report
12/06/2009
Hire
Date
Tool
ID
Period
Name
Price
TOO00001
12/06/2009 00:00:00
M
Toshiba DG2421
BLACK
$15.00
TOO00002
12/06/2009 00:00:00
M
Yamaha DS2 Angry
GREEN
$15.00
$30.00
Yearly
Yearly Report
12/06/2009
Tool
ID
Hire
Date
Period
Name
Price
TOO00001
12/06/2009 00:00:00
Y
Toshiba DG2421 BLACK
$15.00
TOO00002
12/06/2009 00:00:00
Y
Yamaha DS2 Angry
GREEN
$15.00
TOO00004
3/05/2009 00:00:00
Y
Yamaha DS2 Angry
GREEN
$15.00
$45.00
PAGE 22 OF 25
Tool Time User Help Manual
FAQ (Frequently Asked Questions)
This section covers the following questions.
How do I delete a customer?
How do I delete a hire no longer required?
What makes customer information valid?
What is valid Tool Data?
How do I delete a customer?
Select the option Customer/Find from the top menu.
Search for the required customer, or scroll down the list until the required customer is in
view.
Click on the customer's name. The line should now be highlighted. Click
Delete_Customer and then confirm Yes when prompted.
For more details refer to the section on Finding Customers.
How do I delete a hire no longer required?
Select the option Hire/Find from the top menu.
Search for the required hire, or scroll down the list until the required hire is in view.
Click on the hire required. The line should now be highlighted. Click Delete_Hire and
then confirm Yes when prompted.
For more details refer to the section on Finding Hires.
What makes customer information valid?
Customer
Number
Generated automatically
This is in the format of the letters CUS
followed by five digits, for example
CUS01001. The next customer number in
sequence after the last customer record saved
is used.
The minimum customer number is 1000, ie
the first one will be CUS01000.
PAGE 23 OF 25
Tool Time User Help Manual
First name
Must be entered.
Last name
Must be entered.
First letter is capitalised, eg tom changes to
Tom.
First letter is capitalised, eg smith changes to
Smith.
Must be entered.
Street
First letter is each word is capitalised, eg 14
bay street road changes to 14 Bay Street
Road
Suburb/Town Must be entered.
First letter is each word is capitalised, eg
to North Melbourne
north melbourne changes
Postcode
•
•
•
Phone
Number
•
•
•
Email
address
•
•
•
Must be entered.
It cannot start with
a 9.
Must not exceed
four digits.
No formatting is done.
Must be entered.
Can only contain
10 digits.
Must start with a
valid Australian
area code, ie 02 to
08 inclusive.
All brackets, dashes and spaces are removed.
Must be
entered
Must
contain a @
symbol
Must have
text and at least
one period (dot)
after the @
No formatting is done.
What is valid Tool Data?
Generated automatically
Tool ID
Tool Name
•
Must be entered.
PAGE 24 OF 25
This is in the format of the letters TOO
followed by four digits, for example TOO0001.
The next tool number in sequence after the last
tool saved is used.
No formatting is done.
Tool Time User Help Manual
•
•
•
•
Category
•
•
•
•
•
Hire Price
•
•
•
•
The name can only
have alphanumeric
characters.
Symbols, ie #$%&,
are not permitted.
Mnimum of 2
characters
Maximum of 50
characters
Must be entered.
The name can only
have alphanumeric
characters.
Symbols, ie #$%&,
are not permitted.
Mnimum of 2
characters
Maximum of 50
characters
No formatting is done.
Must be entered
Cannot accept
symbols e.g #$%&
Must not exceed
$10 000
Must be at least $1
No formatting is done.
PAGE 25 OF 25