1
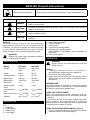
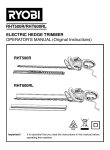
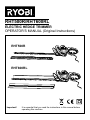
RHT500R/RHT600RL ELECTRIC HEDGE TRIMMER OPERATOR’S MANUAL (Original Instructions) RHT500R RHT600RL Important! It is essential that you read the instructions in this manual before operating this machine. ENGLISH (Original Instructions) extension cord suitable for outdoor use. Use of a cord suitable for outdoor use reduces the risk of electric shock. n If operating a power tool in a damp location is unavoidable, use a residual current device (RCD) protected supply. Use of an RCD reduces the risk of electric shock. Your hedge trimmer has been engineered and manufactured to Ryobi’s high standard for dependability, ease of operation, and operator safety. When properly cared for, it will give you years of rugged, trouble-free performance. Thank you for buying a Ryobi product. WARNING: To reduce the risk of injury, the user must read and understand the operator’s manual before using this product. PERSONAL SAFETY Stay alert, watch what you are doing and use common sense when operating a power tool. Do not use a power tool while you are tired or under the influence of drugs, alcohol or medication. A moment of inattention while operating power tools may result in serious personal injury. n Use personal protective equipment. Always wear eye protection. Protective equipment such as dust mask, non-skid safety shoes hard hat, or hearing protection used for appropriate conditions will reduce personal injuries. n Prevent unintentional starting. Ensure the switch is in the off-position before connecting to power source and /or battery pack, picking up or carrying the tool. Carrying power tools with your finger on the switch or energising power tools that have the switch on invites accidents. n Remove any adjusting key or wrench before turning the power tool on. A wrench or a key left attached to a rotating part of the power tool may result in personal injury. n Do not overreach. Keep proper footing and balance at all times. This enables better control of the power tool in unexpected situations. n Dress properly. Do not wear loose clothing or jewellery. Keep your hair, clothing and gloves away from moving parts. Loose clothes, jewellery or long hair can be caught in moving parts. n If devices are provided for the connection of dust extraction and collection facilities, ensure these are connected and properly used. Use of dust collection can reduce dust-related hazards. n GENERAL POWER TOOL SAFETY RULES WARNING: Read all safety warnings and all instructions. Failure to follow the warnings and instructions may result in electric shock, fire and serious injury. Save all warnings and instructions for future reference. The term “power tool” in the warnings refers to your mains-operated corded power tool or battery-operated (cordless) power tool. WORK AREA SAFETY n Keep work area clean and well lit. Cluttered or dark areas invite accidents. n Do not operate power tools in explosive atmospheres, such as in the presence of flammable liquids, gases or dust. Power tools create sparks which may ignite the dust or fumes. n Keep children and bystanders away while operating a power tool. Distractions can cause you to lose control. ELECTRICAL SAFETY Power tool plugs must match the outlet. Never modify the plug in any way. Do not use any adapter plugs with earthed (grounded) power tools. Unmodified plugs and matching outlets will reduce risk of electric shock. n Avoid body contact with earthed or grounded surfaces, such as pipes, radiators, ranges and refrigerators. There is an increased risk of electric shock if your body is earthed or grounded. n Do not expose power tools to rain or wet conditions. Water entering a power tool will increase the risk of electric shock. n Do not abuse the cord. Never use the cord for carrying, pulling or unplugging the power tool. Keep cord away from heat, oil, sharp edges or moving parts. Damaged or entangled cords increase the risk of electric shock. n When operating a power tool outdoors, use an n POWER TOOL USE AND CARE Do not force the power tool. Use the correct power tool for your application. The correct power tool will do the job better and safer at the rate for which it was designed. n Do not use the power tool if the switch does not turn it on and off. Any power tool that cannot be controlled with the switch is dangerous and must be repaired. n Disconnect the plug from the power source before making any adjustments, changing accessories, or storing power tools. Such preventative safety measures reduce the risk of starting the power tool accidentally. n 2 ENGLISH (Original Instructions) n Store idle power tools out of the reach of children and do not allow persons unfamiliar with the power tool or these instructions to operate the power tool. Power tools are dangerous in the hands of untrained users. n Maintain power tools. Check for misalignment or binding of moving parts, breakage of parts and any other condition that may affect the power tool’s operation. If damaged, have the power tool repaired before use. Many accidents are caused by poorly maintained power tools. n Keep cutting tools sharp and clean. Properly maintained cutting tools with sharp cutting edges are less likely to bind and are easier to control. n Use the power tool, accessories and tool bits etc. in accordance with these instructions and in the manner intended for the particular type of power tool, taking into account the working conditions and the work to be performed. Use of the power tool for operations different from intended could result in a hazardous situation. tool is maintained. HEDGE TRIMMER SAFETY WARNINGS Keep all parts of the body away from the cutter blade. Do not remove cut material or hold material to be cut when blades are moving .Make sure the switch I off when clearing jammed material. A moment of inattention while operating the hedge trimmer may result in serious personal injury. n Carry the hedge trimmer by the handle with the cutter blade stopped. When transporting or storing the hedge trimmer always fit the cutting device cover .Proper handling of the hedge trimmer will reduce possible injury from the cutter blades. n Keep cable away from cutting area. During operation the cable may be hidden in shrubs and can be accidentally cut by the blade. n ADDITION Advice to check the hedge trimmer for foreign objects, e.g. wire fences. n Recommendation for the use of a residual current device with a tripping current of 30mA or less. n Instruction to hold the hedge trimmer properly, e.g. with both hands if two handles are provided. n SERVICE Have your power tool serviced by a qualified repair person using only genuine replacement parts. This will ensure that the safety of the power n SYMBOL Important: Some of the following symbols may be used on this product. Please study them and learn their meaning. Proper interpretation of these symbols will allow you to operate the product better and safer. SYMBOL V NAME Volts Voltage EXPLANATION A Amperes Current Hz Hertz Frequency (cycles per second) W Watt Power h Hours Time Class II Construction Double-insulated construction Wet Conditions Alert Do not expose to rain or use in damp locations. Safety Alert Symbol Precautions that involve your safety. Read the Operator’s Manual To reduce the risk of injury, user must read and understand operator’s manual before using this product. Eye and ear Protection Wear eye and ear protection when operating this equipment. 3 ENGLISH (Original Instructions) Electric Shock Precaution Remove plug from the mains immediately if cable is damaged or cut. The following signal words and meanings are intended to explain the levels of risk associated with this product. SYMBOL SIGNAL MEANING DANGER: Indicates an imminently hazardous situation, which, if not avoided, will result in death or serious injury. WARNING: Indicates a potentially hazardous situation, which, if not avoided, could result in death or serious injury. CAUTION: Indicates a potentially hazardous situation, which, if not avoided, may result in minor or moderate injury. CAUTION: (Without Safety Alert Symbol) Indicates a situation that may result in property damage. SERVICE Servicing requires extreme care and knowledge and should be performed only by a qualified service technician. For service we suggest you return the product to your nearest authorized service centre for repair. When servicing, use only identical replacement parts. 5. Rear handle with trigger 6. Livetool indicator™ 7. Cord retainer 8. Lock lever for rotating handle 9. HedgeSweep™ debris sweeper (only included in RHT600RL, optional available for RHT500R) 10. Rear handle trigger WARNING: Observe all normal safety precautions related to avoiding electrical shock. OPERATION SPECIFICATION MODEL RHT500R RHT600RL Voltage: 220-240 V~ 50Hz 220-240 V~ 50Hz Power: 500 W 600 W Cutting capacity: 24 mm 27 mm Blade length 550 mm 600 mm Blade speed 1500 SPM 1500 SPM Brake time: <1s <1s Weight (without cord): 3.5 kg 3.8 kg Sound pressure level: LpA: 84 dB(A) KpA: 3.0 dB(A) Sound power level: LwA: 99 dB(A) Vibration: ah= 3.7 m/s2 KwA: 3.0 dB(A) K= 1.5 m/s2 Warning: Always remove the scabbard before using the hedge trimmer. Warning: 1. The blades continue to move for a fraction of a second after the hedge trimmer is switched off. 2. Do not touch the moving blades. 3. When using the tool always ensure that the cord is safely held in the cord retainer as described later in this manual. INTENDED USE This hedge trimmer is intended for cutting and trimming hedges and bushes in domestic use. It is not intended to be used for cutting above shoulder level. USING THE CORD RETAINER When using the hedge trimmer make sure that you secure your extension cord in the cord retainer as shown in Figure 3. If you bought this unit in the United Kingdom with a BS plug it will have a long cord attached to it. In that case please secure the cord coming out of the hedge trimmer in a similar way as shown in Figure 3. DESCRIPTION Fig.1 1. Scabbard 2. Cutting blades 3. Safety Guard 4. Front trigger USING THE ROTATING REAR HANDLE (Figure 9) 1. Place the hedge trimmer on a flat and even surface and disconnect from the power supply 4 ENGLISH (Original Instructions) 2. Make sure that you released the triggers 3. Pull the lock lever (8) out and rotate the rear handle (Figure 9c) 4. Release the lock lever and ensure that it is fully locked in before operating the hedge trimmer. USING THE HedgeSweep™ DEBRIS SWEEPER Warning: Make sure that you disconnect the hedge trimmer from the power supply before attaching or removing the HedgeSweep™ debris sweeper. LUBRICATING THE BLADE For easier operation and longer blade life, lubricate the hedge trimmer blade before and after each use. n Stop the motor and disconnect from power supply. n Lay the hedge trimmer on a flat surface. Apply light weight machine oil along the edge of the top blade. If you will be using the hedge trimmer for an extended period, it is advisable to oil the blade during use. See Figure 7 CLEANING THE HEDGE TRIMMER Stop the motor and disconnect from power supply. n Clean dirt and debris from the body of the hedge trimmer, using a damp cloth with a mild detergent. NOTE: Do not use any strong detergents on the plastic housing or the handle. They can be damaged by certain aromatic oils such as pine and lemon, and by solvents such as kerosene. n STARTING AND STOPPING Starting: Press and hold rear trigger (5) and squeeze front trigger (4) Stopping: Release any of switch levers (4) and (5) STORING THE HEDGE TRIMMER Clean all foreign material from the product. n Always place scabbard on cutting blades before storing. See Figure 8. n Store it in a well-ventilated place that is inaccessible to children. n Keep away from corrosive agents such as garden chemicals and de-icing salts. n MAINTENANCE WARNING: Before inspecting, cleaning, or servicing the machine, disconnect the plug from power source and wait for all moving parts to stop. Failure to follow these instructions can result in serious personal injury or property damage. DISPOSAL This marking indicates that this product should not be disposed with other household wastes throughout the EU. To prevent possible harm to the environment or human health from uncontrolled waste disposal, recycle it responsibly to promote the sustainable reuse of material resources. To return your used device, please use the return and collection systems or contact the retailer where the product was purchased. They can take this product for environmental safe recycling. GENERAL MAINTENANCE Avoid using solvents when cleaning plastic parts. Most plastics are susceptible to damage from various types of commercial solvents and may be damaged by their use. Use clean cloths to remove dirt, dust, oil, grease, etc. WARNING: Blades are sharp. When handling the blade assembly, wear non-slip, heavy-duty protective gloves. Do not place your hand or fingers between blades or in any position where they could get pinched or cut. NEVER touch blades or service unit with the power supply connected. BLADE MAINTENANCE n Always clean the cutting blades after operation and lubricate as described later in this manual. n Perform regular visual checks/inspection on the cutting edges of the blade and check the tightness of the blade bolts. To avoid clippings and other debris to fall back into the hedge while cutting you can use the HedgeSweep™ debris sweeper (included in RHT600RL) to sweep the cuttings off the hedge. You can attach the HedgeSweep™ debris sweeper by sliding it onto the rail as shown in Figure 2. The sloped end of it should be facing the motor housing of the hedge trimmer. To remove HedgeSweep™ just pull it towards the open end of the blade. If desired. You can use a string to help cut your hedge level. Decide how high you want the hedge. Then stretch a piece of string along the hedge at this height. Trim the hedge just above this guide line of string. See Figure 5.Trim the side of a hedge so that it will be slightly narrower at the top. See Figure 6.More of the hedge will be exposed when shaped this way, and it will be more uniform. WARNING: Do not at any time let brake fluids, gasoline, petroleum-based products, penetrating oils, etc., come in contact with plastic parts. Chemicals can damage, weaken, or destroy plastic which may result in serious personal injury. 5 LIMITED WARRANTY TTI warrants this outdoor product to be free of defects in material or workmanship for 24 months from the date of purchase by the original purchaser, subject to the limitations below. Please keep your invoice as proof of date of purchase. This warranty is only applicable where the product is used for personal and non-commercial purposes. This warranty does not cover damage or liability caused by / due to misuse, abuse, accidental or intentional acts by user, improper handling, unreasonable use, negligence, failure by end user to follow operating procedures outlined in the user’s manual, attempted repair by non-qualified professional, unauthorized repair, modification, or use of accessories and/or attachments not specifically recommended by authorized party. Please see your local dealer for list of authorized service centres in your area. This warranty does not cover belts, brushes, bags, bulbs or any part which ordinary wear and tear results in required replacement during warranty period. Unless specifically provided under applicable law, this warranty does not cover transportation cost or consumable items such as fuses and batteries. This limited warranty is void if the product’s original identification (trade mark, serial number, etc.) markings have been defaced, altered or removed or if product is not purchased from an authorized reseller or if product is sold AS IS and / or WITH ALL FAULTS. Subject to all applicable local regulations, the provisions of this limited warranty are in lieu of any other written warranty, whether express or implied, written or oral, including any warranty of MERCHANTABILITY OR FITNESS FOR A PARTICULAR PURPOSE. IN NO EVENT SHALL WE BE LIABLE FOR SPECIAL, INCIDENTAL, CONSEQUENTIAL OR INCIDENTAL DAMAGES. OUR MAXIMUM LIABILITY SHALL NOT EXCEED THE ACTUAL PURCHASE PRICE PAID BY YOU FOR THE PRODUCT. This warranty is valid only in the European Union, Australia and New Zealand. Outside these areas, please contact your authorized Ryobi dealer to determine if another warranty applies. EC DECLARATION OF CONFORMITY Manufacturer: Techtronic Product Development Ltd. Address: 24/F, CDW Building, 388 Castle Peak Road, Tsuen Wan, Hong Kong Name and address of the person authorized to compile the technical file: Name: Simon Del-Nevo (Director of Outdoor Power Equipment) Company: Techtronic Industries UK (Ltd.) Address: Medina House, Fieldhouse Lane, Marlow, Bucks, SL7 1TB, United Kingdom Herewith we declare that the products Category....................................................................................... Hedge Trimmer Model................................................................................RHT500R / RHT600RL Serial number................................................................ See products rating label Year of Construction...................................................... See products rating label n n is in conformity with the relevant provisions of the Machinery Directive 2006/42/EC is in conformity with the provisions of the following other EC-Directives 2004/108/EC (EMC-Directive), and 2000/14/EC (Noise Directive) incl. modifications (2005/88/EC) And furthermore, we declare that the following (parts/clauses of) European harmonised standards have been used EN55014-1:2006+A1:2009, EN55014-2:1997+A1:2001+A2:2008, EN61000-3-2:2006++A1:2009+A2:2009, EN61000-3-3:2008, EN 60745-1:2009+A11:2010, EN60745-2-15:2009+A1:2010 n Measured sound power level LWA: 99 dB(A); KWA:3dB(A) Guaranteed sound power level 102 dB(A) Conformity assessment method to Annex V/ Directive 2000/14/EC Place, date: Hong Kong, 2011/07/04 Signature: Andrew John Eyre (BEng, CEng, MIET) Vice President of Engineering