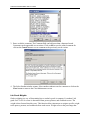
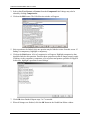
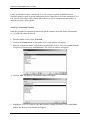
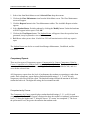
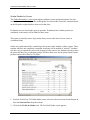
1
GradePoint 2020™ Electronic Manager and Gradebook Installation and User Guide Version 7.xx Edition 4 35116-E0 Front-page back-up FOURTH EDITION First Printing, March 2005 Copyright 2005 Lab-Volt Systems, Inc. All rights reserved. No part of this publication may be reproduced, stored in a retrieval system, or transmitted in any form by any means, electronic, mechanical, photocopied, recorded, or otherwise, without prior written permission from Lab-Volt Systems, Inc. Information in this document is subject to change without notice and does not represent a commitment on the part of Lab-Volt Systems, Inc. The GradePoint 2020 and Tech-Lab software and other materials described in this document are furnished under a license agreement or a nondisclosure agreement. The software may be used or copied only in accordance with the terms of the agreement. ISBN 0-86657-521-9 Lab-Volt, F.A.C.E.T., Tech-World, Tech-Design, Tech-Multimedia™, Tech-Lab™, and TECHLife are trademarks or registered trademarks of Lab-Volt Systems, Inc. Windows™, Works™, Microsoft Networks™, and Microsoft NT™ are trademarks of Microsoft Corp. Novell NetWare™ is a trademark of Novell Corporation. All other trademarks belong to their respective owners. Lab-Volt License Agreement By using the software in this package, you are agreeing to become bound by the terms of this License Agreement, Limited Warranty, and Disclaimer. This License Agreement constitutes the complete agreement between you and Lab-Volt. If you do not agree to the terms of this agreement, do not use the software. Promptly return the multimedia (CD-ROM) compact discs and all other materials that are part of Lab-Volt's multimedia GradePoint 2020 product within ten days to Lab-Volt for a full refund or credit. 1. License Grant. In consideration of payment of the license fee, which is part of the price you paid for this Lab-Volt product, Lab-Volt, as Licensor, grants to you, the Licensee, a nonexclusive, nontransferable license to use this copy of the CD-ROM software with the corresponding curriculum resources. Lab-Volt reserves all rights not expressly granted to the Licensee. 2. Ownership. As the Licensee, you own the physical media on which the CD-ROM is originally or subsequently recorded or fixed, but Lab-Volt retains title to and ownership of the software programs recorded on the original compact disc and any subsequent copies of the CD-ROM, regardless of the form or media in or on which the original and other copies may exist. This license is not a sale of the original software program of Lab-Volt's CD-ROM or any portion or copy of it. 3. Copy Restrictions. The CD-ROM software and the accompanying materials are copyrighted and contain proprietary information and trade secrets of Lab-Volt. Unauthorized copying of the CD-ROM even if modified, merged, or included with other software or with written materials is expressly forbidden. You may be held legally responsible for any infringement of Lab-Volt's intellectual property rights that is caused or encouraged by your failure to abide by the terms of this agreement. You may make copies of the CD-ROM solely for backup purposes provided the copyright notice is reproduced in its entirety on the backup copy. 4. Permitted Uses. This CD-ROM, Instructor Guide, and all accompanying documentation is licensed to you, the Licensee, and may not be transferred to any third party for any length of time without the prior written consent of LabVolt. You may not modify, adapt, translate, reverse engineer, decompile, disassemble, or create derivative works based on the Lab-Volt product without the prior written permission of Lab-Volt. Written materials provided to you may not be modified, adapted, translated, or used to create derivative works without the prior written consent of Lab-Volt. 5. Termination. This agreement is effective until terminated. It will terminate automatically without notice from Lab-Volt if you fail to comply with any provisions contained herein. Upon termination you shall destroy the written materials, Lab-Volt's CD-ROM software, and all copies of them, in part or in whole, including modified copies, if any. 6. Registration. Lab-Volt may from time to time update the CD-ROM. Updates can be made available to you only if a properly signed registration card is filed with Lab-Volt or an authorized registration card recipient. 7. Miscellaneous. This agreement is governed by the laws of the State of New Jersey. Limited Warranty and Disclaimer This CD-ROM software has been designed to assure correct operation when used in the manner and within the limits described in the Tech-Lab® Multimedia Installation & User’s Guide. As a highly advanced software product, it is quite complex; thus, it is possible that if it is used in hardware configurations with characteristics other than those specified in Tech-Lab® Multimedia Installation & User’s Guide or in environments with non-specified, unusual, or extensive other software products, problems may be encountered by a user. In such cases, Lab-Volt will make reasonable efforts to assist the user to properly operate the CD-ROM but without guaranteeing its proper performance in any hardware or software environment other than as described in the TechLab® Multimedia Installation & User’s Guide. This CD-ROM software is warranted to conform to the descriptions of its functions and performance as outlined in the courseware documentation. Upon proper notification and within a period of one year from the date of installation and/or customer acceptance, Lab-Volt, at its sole and exclusive option, will remedy any nonconformity or replace any defective compact disc free of charge. Any substantial revisions of this product, made for purposes of correcting software deficiencies within the warranty period, will be made available, also on a licensed basis, to registered owners free of charge. Warranty support for this product is limited, in all cases, to software errors. Errors caused by hardware malfunctions or the use of non-specified hardware or other software are not covered. LICENSOR MAKES NO OTHER WARRANTIES OF ANY KIND CONCERNING THIS PRODUCT, INCLUDING WARRANTIES OR MERCHANTABILITY OR OF FITNESS FOR A PARTICULAR PURPOSE. LICENSOR DISCLAIMS ALL OBLIGATIONS AND LIABILITIES ON THE PART OF LICENSOR FOR DAMAGES, INCLUDING BUT NOT LIMITED TO SPECIAL OR CONSEQUENTIAL DAMAGES ARISING OUT OF OR IN CONNECTION WITH THE USE OF THE SOFTWARE PRODUCT LICENSED UNDER THIS AGREEMENT. Questions concerning this agreement and warranty and all requests for product repairs should be directed to Lab-Volt field representative in your area. LAB-VOLT SYSTEMS, INC. P.O. Box 686 Farmingdale, NJ 07727 Attention: Program Development Phone: (732) 938-2000 or (800) LAB-VOLT Fax: (732) 774-8573 Technical Support: (800) 522-4436 Technical Support E-Mail: [email protected] GradePoint 2020 Installation and User Guide TABLE OF CONTENTS INTRODUCTION .......................................................................................................................................................1 INSTALLATION.........................................................................................................................................................3 INSTALLING THE MANAGEMENT SYSTEM ..................................................................................................................3 NETOP INSTALLATION INFORMATION .......................................................................................................................4 NetOp Student Install ...........................................................................................................................................4 USING GRADEPOINT 2020 .........................................................................................................................................5 BACKING UP THE DATABASE..............................................................................................................................7 RESTORING THE DATABASE.......................................................................................................................................7 USING GRADEPOINT FOR THE FIRST TIME.....................................................................................................9 CLASS MAINTENANCE.........................................................................................................................................13 CREATING CLASSES .................................................................................................................................................14 CLASS RELATIONS ...................................................................................................................................................14 Editing Class Relations......................................................................................................................................15 COMMENT STUDENT RECORDS ................................................................................................................................15 Commenting Records .........................................................................................................................................15 LAB GRADE WEIGHTS .............................................................................................................................................16 Adjusting Class Specific Weights .......................................................................................................................17 LANGUAGE SELECTION............................................................................................................................................18 Assigning a Language to a Class .......................................................................................................................18 CLASS DUPLICATION ...............................................................................................................................................18 Duplicating a Class............................................................................................................................................19 ROSTER ...................................................................................................................................................................19 Print the Student Roster:....................................................................................................................................20 SCHEDULER ............................................................................................................................................................21 TECH-LAB ROTATIONS ............................................................................................................................................22 Generating a Manual Rotation ..........................................................................................................................23 Generating an Automatic Rotation ....................................................................................................................24 How to Edit Rotations:.......................................................................................................................................25 SCHEDULING BLOCKS ..............................................................................................................................................25 Course/Student Exclusions.................................................................................................................................26 Grade Parameters..............................................................................................................................................28 Grade-Based Exclusions ....................................................................................................................................28 SET OPTIONS ...........................................................................................................................................................29 Maximum Number of Students ...........................................................................................................................29 Rotation Number ................................................................................................................................................30 "Done" Text........................................................................................................................................................30 "Bench" Text ......................................................................................................................................................31 SCHEDULER REPORTS ..............................................................................................................................................31 Print a Scheduler Report....................................................................................................................................31 TECH-LAB GRADES...............................................................................................................................................33 LAB GRADES GRID ..................................................................................................................................................34 STUDENT NAMES ............................................................................................................................................34 COURSES ..........................................................................................................................................................34 Lab Grid Layers .................................................................................................................................................34 LAB GRADES REPORTS ............................................................................................................................................35 To View a Lab Grades Report............................................................................................................................36 i GradePoint 2020 Installation and User Guide GRADEBOOK...........................................................................................................................................................37 SHEET GRIDS ...........................................................................................................................................................38 Student Names....................................................................................................................................................38 Assignments........................................................................................................................................................38 Sheet Label.........................................................................................................................................................39 Creating a Grade Sheet......................................................................................................................................39 GRADEBOOK SHEETS ..............................................................................................................................................40 Selecting a Grade Sheet .....................................................................................................................................40 Grading with Sheets ...........................................................................................................................................40 GRADE TYPES ..........................................................................................................................................................41 Create Grade Types ...........................................................................................................................................43 Use Grade Types from Other Sheets ..................................................................................................................44 Edit a Grade Type ..............................................................................................................................................44 How to Delete a Grade Type..............................................................................................................................45 GRADEBOOK ASSIGNMENTS....................................................................................................................................45 Creating Assignments ........................................................................................................................................46 Editing Assignments...........................................................................................................................................48 Delete an Assignment.........................................................................................................................................49 Sort Assignments ................................................................................................................................................49 UPDATE GRADEBOOK .............................................................................................................................................49 Import Lab Grades.............................................................................................................................................50 GRADEBOOK REPORTS ............................................................................................................................................51 View a GradeBook Report .................................................................................................................................51 STUDENT JOURNALS............................................................................................................................................53 DISTRIBUTING NOTES ..............................................................................................................................................54 Duration.............................................................................................................................................................54 Creating a Note..................................................................................................................................................55 JOURNAL REVIEW ....................................................................................................................................................56 Print Student Journal .........................................................................................................................................56 Editing Entry......................................................................................................................................................57 Delete Entry .......................................................................................................................................................58 Print Entry .........................................................................................................................................................58 THE CONFIGURATOR ..........................................................................................................................................59 STUDENT ACTIVITY WATCH .............................................................................................................................61 CLASS GRID .............................................................................................................................................................62 Student Names....................................................................................................................................................62 Time ...................................................................................................................................................................62 Course ................................................................................................................................................................63 Description.........................................................................................................................................................63 SUPERVISION AND CONTROL ...........................................................................................................................65 GRADEPOINT EDITOR .........................................................................................................................................67 CURRICULUM LAYERS OF THE LIST PANE................................................................................................................68 TECH-LAB .........................................................................................................ERROR! BOOKMARK NOT DEFINED. USER-DEFINED ........................................................................................................................................................68 Evaluations........................................................................................................................................................68 EDITING COURSEWARE TESTS .................................................................................................................................68 Editing Tests, Pretests, and Posttests................................................................................................................69 Link Questions to Competencies ........................................................................................................................71 Changing Question Order..................................................................................................................................73 Adding Questions to Courses .............................................................................................................................73 ii GradePoint 2020 Installation and User Guide Deleting a Question ...........................................................................................................................................74 COMPETENCIES ........................................................................................................................................................75 Adding a New Competency ................................................................................................................................75 Linking Competencies to Questions ...................................................................................................................77 Editing Competencies ........................................................................................................................................78 Browse and Copy Competencies ........................................................................................................................78 RUBRICS ..................................................................................................................................................................80 Create and Edit Rubrics.....................................................................................................................................80 Assessment Scoring ............................................................................................................................................82 CUSTOMIZED COURSEWARE ....................................................................................................................................82 Creating Customized Courses............................................................................................................................83 USER-DEFINED COURSES ........................................................................................................................................84 Creating User-Defined Courses.........................................................................................................................85 EVALUATIONS .........................................................................................................................................................86 Creating Evaluations .........................................................................................................................................86 GRADEPOINT EDITOR REPORTS ...............................................................................................................................87 Print Editor Reports...........................................................................................................................................87 MANAGER MAINTENANCE.................................................................................................................................87 COMPETENCY THRESHOLDS ....................................................................................................................................89 Adjusting the Default Thresholds.......................................................................................................................89 GRADE WEIGHTS .....................................................................................................................................................90 Adjusting Default Lab Grade Weights ...............................................................................................................90 GRADEPOINT OPTIMIZATION ...................................................................................................................................91 DATABASE PURGE ...................................................................................................................................................91 Resetting the Database.......................................................................................................................................91 GRID DISPLAY FONT................................................................................................................................................92 Changing Grid Display Fonts............................................................................................................................92 LANGUAGE SELECTION............................................................................................................................................93 Setting the Default Language.............................................................................................................................93 THE APPEARANCE OF GRADEPOINT 2020................................................................................................................93 Changing the Background..................................................................................................................................94 MANAGER MAINTENANCE REPORT .........................................................................................................................95 Generate the Student Roster...............................................................................................................................95 GRADEPOINT 2020 REPORTS ..............................................................................................................................97 REPORT TYPES ........................................................................................................................................................97 Viewing Reports .................................................................................................................................................99 ADMINISTRATIVE REPORTS ...................................................................................................................................100 Assignment List Report ....................................................................................................................................101 Competency List...............................................................................................................................................102 Course History by Course Report ....................................................................................................................103 Course History by Student Report....................................................................................................................104 Grade Type List Report....................................................................................................................................105 Last Locked Rotation .......................................................................................................................................106 Questions by Course Report.............................................................................................................................107 Schedule History ..............................................................................................................................................108 Student Answers Report ...................................................................................................................................109 Student Roster ..................................................................................................................................................110 COMPETENCY REPORTS .........................................................................................................................................111 Competencies by Course ..................................................................................................................................111 Competencies by Student..................................................................................................................................112 Competency Gains by Course ..........................................................................................................................113 Competency Gains by Student..........................................................................................................................115 GRADE BOOK REPORTS .........................................................................................................................................116 Assignment Grades by Assignment ..................................................................................................................116 iii GradePoint 2020 Installation and User Guide Assignment Grades by Student.........................................................................................................................118 Sheet Grades by Student...................................................................................................................................119 Sheet Grades Detailed by Student....................................................................................................................120 LAB GRADE REPORTS ............................................................................................................................................121 Evaluation Grades by Evaluation ....................................................................................................................122 Evaluation Grades by Student..........................................................................................................................123 Grades by Course.............................................................................................................................................124 Grades by Student ............................................................................................................................................125 Grades Detailed by Student .............................................................................................................................126 Grades Detailed by Course..............................................................................................................................128 Workbook Grades by Course ...........................................................................................................................129 Detailed Workbook Grades by Course.............................................................................................................130 Workbook Grades by Student...........................................................................................................................132 Detailed Workbook Grades by Student ............................................................................................................133 iv GradePoint 2020 Installation and User Guide INTRODUCTION GradePoint 2020 is a powerful classroom management system. It is designed to aid instructors who use the Tech-Lab System, although instructors who do not use Tech-Lab may find the application's online grade book useful. GradePoint 2020 makes it easy for the instructor to execute many administrative tasks, including scheduling, grading, generating reports, and monitoring student progress and activity. The program's unique editing features provide greater flexibility with creating and editing Tech-Lab curricula competencies, rubrics, and tests. The Tech-Lab System must be installed prior to the installation of GradePoint 2020. If the optional NetOp Student has been installed with Tech-Lab, GradePoint 2020 provides the means for online student/teacher interaction. Instructors gain the ability to monitor and edit the online Student Journal as well. GradePoint 2020 operates based on information obtained from the Tech-Lab System data folder. GradePoint 2020 also maintains its own database on the instructor's PC. This separate database is used to maintain student-class relations, lab grade weights, class grade books, and schedules. This database is updated whenever student data is collected and whenever the database is optimized. GradePoint 2020 is compatible with peer-to-peer or client-server based network systems such as Microsoft Network, Microsoft NT, and Novell NetWare. 1 GradePoint 2020 Installation and User Guide 2 GradePoint 2020 Installation and User Guide INSTALLATION Lab-Volt strongly recommends that Tech-Lab and GradePoint 2020 not be installed on the same workstation, except in stand-alone configurations that do not have NetOp installed. NetOp provides no benefits on a stand-alone machine; if installed there, it should be deleted to free up disk space. If installing GradePoint 2020 on to a Tech-Lab System that does not currently have NetOp installed at the workstation, the installer may wish to install NetOp Student at this point so that instructors may make full interactive use of GradePoint 2020. Instructions for installing NetOp Student follow this section immediately. To install GradePoint 2020, the Tech-Lab server name and the resource name of the data folder (the share name of the LVShare folder) are required. Installing the Management System The GradePoint 2020 Install looks for "LVTServer" as the default name of the Tech-Lab server and "TLSystem" as the default share name for the Tech-Lab systems folder. If the default names were not used during the Tech-Lab installation, be sure to obtain the exact customized names that were used. GradePoint 2020 will not be installed if the names are not exact. 1. Insert the GradePoint 2020 CD-ROM in the CD-ROM drive of the instructor machine. 2. Click on Start, Run and then, enter "D:\Setup.exe" (where D: is your CD-ROM drive) in the Open box. Click OK. 3. The Welcome window appears. Click on Next. 4. The License Agreement window appears. GradePoint 2020 will not be installed if the license isn't accepted. Select I Accept the Agreement. Click on Next. 5. The Information window appears. Read the release notes and click Next. 6. The Choose Options window appears. Check NetOp to install the student monitoring and interaction software. This option is NOT recommended for stand-alone workstations. 7. The Select Installation Type window appears. Select Stand-Alone Operation for nonnetworked workstations. Select Client-Server Operation for networked workstations. Click on Next. 8. The Choose Destination Location window appears. By default, the GradePoint 2020 Install will suggest installing GradePoint to C:\GP2020 (where C: is your hard drive). To use another folder, click on Browse. The destination folder must have a name that is eight (8) letters or less long, containing no special characters, spaces, or punctuation. The folder must 3 GradePoint 2020 Installation and User Guide not be in the root directory or Windows directory, be on a removable drive, or be "read only." When you have your target directory chosen, click on Next. 9. If installing Client-Server, the Link to Tech-Lab window appears. The target server name for the LVTServer folders will be listed as the instructor's machine. If this is not the Tech-Lab system server, select Default Computer Name or type in a different name in the Specify Computer Name field box. 10. If installing Client-Server, the default share/resource name of the Tech-Lab system folder is TLSystem. If this is not the share name of the system folder created for Tech-Lab, click on Specify Resource Name and enter the name in the accompanying field. Click on Next. 11. The Confirmation window appears. Review the information presented there. If correct, click on Next. Otherwise, use the Back button to correct the install settings. The GradePoint Install begins copying files. 12. The GradePoint 2020 icon appears on the instructor's desktop. NetOp Installation Information NetOp Teacher works in conjunction with NetOp Student to allow instructors and students to work across the computer network in real time, even if the instructor and students are in different rooms. NetOp Teacher installs, if selected, with GradePoint 2020. NetOp Student was installed with Tech-Lab, if that option was selected at the time of the "client side" install at each workstation. Some workstations may have NetOp Student and some may not. NetOp Student must be installed to at least one workstation before NetOp Teacher will function properly. The Tech-Lab installation CD-ROM will not be needed for a belated install, as the system is designed to install NetOp Student across the LAN. NetOp Student Install 1. At each Tech-Lab workstation where NetOp Student is desired, double-click on the TechLab icon on the desktop and then immediately hold down the CTRL key. Do not hold down the CTRL key while clicking on the Tech-Lab icon. 2. A Confirmation window will appear. Release the CTRL key. "You are about to install the Tech-Lab System files. Do you wish to continue?" Click Yes. Tech-Lab data will not be overwritten. 3. The Tech-Lab Installation Options window will appear. Select Install NetOp Student. Click OK. 4 GradePoint 2020 Installation and User Guide Using GradePoint 2020 Since nearly all GradePoint functions require that the instructor select a class, the first step to using GradePoint 2020 is creating a class when the program is first opened. To create a class, simply click the Yes button, and enter a class title when the next window appears. Then, select students and courses from the lists available. Create as many classes as needed by simply clicking the New Class button. Students may be edited or added at any time, so there is no need to add students or courses at this time. Every class requires a unique name. Class titles used in this program are often the instructor's name plus the homeroom number of the students or the period that class takes place in. Class titles can be anything, including phrases. However, each code must be unique. Note: If the instructor is not ready to create a class at this time, GradePoint 2020 will shut down. A class can, of course, be created without any students or courses. Students and courses may be imported through the Configurator from the Tech-Lab System at any configured workstation with or without classes. Instructors may wish to take the Quick Tour provided within the GradePoint 2020 help file to become familiar with the overall workings of the management system. 5 GradePoint 2020 Installation and User Guide 6 GradePoint 2020 Installation and User Guide BACKING UP THE DATABASE GradePoint 2020 has an automatic function that backs up your GradePoint data. However, this protection is largely to prevent data corruption. Without a separate backup copy, the databases are still vulnerable to viruses, hacker sabotage, and acts of nature. GradePoint 2020's DATA, BACKUP and TDATA (which appears only when GradePoint is closed) folders should be backed up. These can be found in the first level of whichever folder GradePoint 2020 has been installed to. For example, if GradePoint 2020 is installed on the D: drive, under the default name of "GP2020", the folders to back up would be D:\GP2020\data, D:\GP2020\backup and D:\GP2020\TDATA. Copy these folders ONLY when GradePoint 2020 is not running. Lab-Volt Systems strongly recommends creating back-up files on a regular basis, specifically to a location other than the hard drive of the instructor machine. Lab-Volt also strongly recommends backing up Tech-Lab's TLData folder files in the same manner. Restoring the Database Should it become necessary to use the backup data, it is important to restore the three data folders to a clean directory. This may be done by either deleting the three data folders, using the Purge feature in Manager Maintenance, or by reinstalling GradePoint 2020 first. This removes possible sources of corruption. With GradePoint 2020 closed, copy the contents of the three folders to the cleaned GradePoint directory. If restoring these folders from a CD-ROM, please be sure to set the attributes for the folders so that they are no longer read only, otherwise GradePoint will not function properly. Restart GradePoint 2020 to automatically reload the data. When restoring data from a previous version, please check with the new GradePoint 2020 manual to see if this version is compatible with the backed up data. 7 GradePoint 2020 Installation and User Guide 8 GradePoint 2020 Installation and User Guide USING GRADEPOINT FOR THE FIRST TIME The first time the instructor enters the instructor password and logs into GradePoint 2020, he or she will be prompted to create a class. Simply type the desired name for the class in the Title field and click OK. Once the class has been named, the Class Maintenance screen appears. Relate students, courses, evaluations, and specific lab weights to each class from this screen, if desired. These tasks are detailed further in the Class Maintenance chapter of this manual. Create as many classes as needed at this time. If there are no students available at this time, student records can be created with the Configurator, Tech-Lab's online system administration tool. If there are no Tech-Lab courses available, they must be installed to the Tech-Lab System before they will be seen by the instructor's machine. Unlike most of GradePoint 2020's functions, which require students and/or courseware loaded to the Tech-Lab System before they can be accessed, the Configurator does not. Once the class has been created, the instructor can click on the Menu button to enter the Main Menu screen. This screen is the hub for all GradePoint 2020 functions. This is where an instructor selects which class they'll be working on and which functions they'll be performing. 9 GradePoint 2020 Installation and User Guide The Selected Class displayed will be the class the instructor is currently managing, not necessarily the class in the lab at the moment. GradePoint 2020 is time insensitive. In fact, editing a class when it is not logged into the Tech-Lab System is preferable. • Class Maintenance: Create, edit, and delete classes and their related students and courses. • Scheduler: Manually or automatically schedule rotations for students. • Tech-Lab Grades: View a grid displaying student grades for the Tech-Lab courses related to the class. • GradeBook: Access a virtual grade book that merges lab results with non-lab assignments. • Student Journal: Interact with students by generating virtual notes and reviewing their online notebooks. • Configurator: Use Tech-Lab System's administration tool, used to customize Tech-Lab and its profiles. • Student Activity Watch: View a grid that monitors student progress within the Tech-Lab System. This functions whether NetOp was installed or not to workstations. • Supervision and Control: Open the third-party product, NetOp, within GradePoint 2020, if NetOp Teacher has been installed to the instructor machine. 10 GradePoint 2020 Installation and User Guide • Editor: Customize existing Tech-Lab courseware and create user-defined courses and evaluations. • Manager Maintenance: Customize the look and feel of GradePoint 2020, as well as setting default grade weights and the default language selection. The functions listed above are each discussed in detail in the following chapters, except for Supervision and Control, which is discussed in detail in NetOp's manual and the Configurator, which is discussed in detail in the Tech-Lab System manual. Some functions will not be available if there are no students or no courseware assigned to the Selected Class. The icons will always be present, in any case. When a function is accessed, it is always for the Selected Class, although functions such as Editor, Configurator, Help, and Supervision and Control are non-class dependent. The instructor must always return to the Main Menu screen to select a different class. 11 GradePoint 2020 Installation and User Guide 12 GradePoint 2020 Installation and User Guide CLASS MAINTENANCE The Class Maintenance screen is where classes to be managed by GradePoint 2020 are created and maintained. The Class Maintenance screen is divided into three sections: The Students box, the Courses box, and the toolbar. The Students box allows the instructor to edit student-class relations for the selected class. The Courses box allows the instructor to edit which Tech-Lab courses, user-defined courses, and evaluations will be assigned within the selected class. The following functions can be performed from the Class Maintenance toolbar: • Create Class • Duplicate Class • Delete Class • Edit Class Title • Generate Reports 13 GradePoint 2020 Installation and User Guide • Edit Student Comments • Select Class Weights • Select Class Language All students and courses within the Tech-Lab System are automatically imported to this screen so that class relations may be created. If a student, evaluation, or course does not appear in the appropriate pane, then the instructor should use the Configurator to create a student record or to load a module onto the Tech-Lab System. Creating Classes Any time an instructor opens GradePoint 2020 when there are no classes present, they will be prompted to create a class, skipping the first two steps below (GradePoint closes if the instructor decides not to create a class in such a case). 1. Click on the Class Maintenance icon from the GradePoint 2020 Main Menu screen. The Class Maintenance screen opens. 2. Select New Class from the Class Maintenance toolbar. The New Class Title window opens. 3. Enter a class title. The class title should be unique, so that it may be differentiated from other class titles being managed by GradePoint. Each class title may be up to 80 characters long, including spaces and special characters. Click on OK. 4. The class has been created. The instructor may now relate students and courses to this class or you may now create another class. Once created, a class exists until it is deleted. Class Relations Once a class has been created, it needs to be populated with students and linked with courses. GradePoint 2020 manages these relations and their interactions. 14 GradePoint 2020 Installation and User Guide Editing Class Relations Courses and students are added and deleted from classes in the same manner. A checked student or course is currently related to the selected class. Unchecked courses and students are not currently related to the selected class. 1. Select the class to edit relations from the Selected Class drop-down menu from the GradePoint 2020 Main Menu screen. 2. Click on the Class Maintenance icon from the Main Menu screen. The Class Maintenance screen will appear. 3. Select students and courses from the lower panes of the Class Maintenance screen to the selected class by checking the boxes next to the appropriate names. Click on the Select All button to select all from the list. Click on Clear All to deselect all items from the list. 4. Return to the Main Menu screen or perform other GradePoint functions, such as creating reports or editing student comments. GradePoint will automatically save the changes with its next action. Note: Exiting the program at this point by clicking the Close button in the upper right hand corner will not save changes to class relations. Instructors may use this method to revert to the earlier version of class relations, if they have not called upon another function while editing the class. Comment Student Records Student records can only be edited within the Configurator. Comments on a student can be added to that student’s data. Comments are not added to student records, but to the student’s data on this machine. No other machine can be used to access or print comments made on this machine, providing the instructor with a certain level of security. In fact, only the same installation of GradePoint 2020 can be used to edit and view student comments online. Student comments appear only on the Student Roster report and in this window. Commenting Records 1. Select Comments from the Class Maintenance toolbar. A list of all Tech-Lab student records will appear, regardless of the pre-selected class in the Class Title field. 2. Select a student from the list. Click on Edit. The Comments window appears. 15 GradePoint 2020 Installation and User Guide 3. Enter or edit the comment. The Comment field can hold more than a thousand words. Comments can be appended or overwritten. Click on OK to save the edited comment for click on the Cancel button to revert comment to the previously saved version. 4. The Select Student window returns. Select another student record to comment or click on the Close button to return to the Class Maintenance screen. Lab Grade Weights Grade weighting is a way of determining how a student’s grade is computed. A student’s lab grade for a Tech-Lab course is determined from pretest, posttest, and workbook scores. The weight is then factored into this score. This function allows instructors to assign a specific weight to the pretest, posttest, and workbooks from each course. Weight refers to the percentage that 16 GradePoint 2020 Installation and User Guide that score goes towards the final lab grade. User-defined courses use a grade weighting system involving only pretest and posttest scores. Evaluations do not use grade weights. Instructors have the option of selecting the default setting of lab grade weights (which is set via the Manager Maintenance screen) or using class specific lab weights. Adjusting Class Specific Weights Please note: Lab grade weights are distinct and separate from GradeBook grade weights (see the GradeBook chapter of this manual) and unit weights that appear in Tech-Lab (see the Tech-Lab User's Manual). 1. Click on the Class Weights button on the Class Maintenance toolbar. The Class Weights window appears. 2. Select the Class Specific Weights radio button from the Choose Weights portion of the Class Weights window. 3. Enter weights for the pretest, posttest, and workbooks in the Lab-Volt field. Enter weights for the pretest and posttest in the User-Defined field. Total lab weight for each field will always equal 100. The posttest score should always have more weight than any other variable. 4. Click on the OK button to accept the new weights. Lab grade weight has no effect whatsoever on student records on the Tech-Lab network. 17 GradePoint 2020 Installation and User Guide Language Selection In order to reach as many students and instructors as possible, GradePoint 2020 is internationalized. Classes may now be set either to the Default Language as set in the Manager Maintenance screen or to one of the available languages. The classes will retain their language settings. Classes set to Default will display all options and buttons in whatever the GradePoint's default language is. Classes set to English will display all options and buttons in English, regardless of the default setting. Classes set to French or Spanish will display all options and buttons in the selected class language, regardless of the default setting. Assigning a Language to a Class 1. Select the class from the Selected Class drop-down list on the Main Menu screen. 2. Click on the Class Maintenance icon. The Class Maintenance screen will appear. 3. Click on the Class Weights button on the Class Maintenance toolbar. The Class Weights window appears. 4. Select the desired class language from the Currently Selected Language drop-down menu in the Language Selection portion of the Class Weights window. 5. Click on the OK button to accept the new language. Note: Language Selection does not alter or translate names of students, courses, evaluations, assignments, or student comments. Class Duplication An instructor may create a copy of any class simply by duplicating it. By default, the duplicated class will contain: • The courses and evaluations related to the target class. • All grade sheets created for the target class, including grade types and assignments • The specific lab grade weight created for the target class, if other than default. • The same "bench" and "completed" messages as assigned for the target class. An instructor may choose to select the Include Student Info box before duplicating the class. When this option is selected, the following items are also included: 18 GradePoint 2020 Installation and User Guide • The students related to the target class. • All student comments related to those students. • Any schedule information, including the Set Options and Exclusions, related to the target class. • All assignments and grades appearing in the GradeBook of the target class. Duplicating a Class Once created, the new class is not linked to the previous class in any way. Editing the relations and settings for one does not affect the other. 1. Select the class to be duplicating from the Main Menu screen's Selected Class drop-down list. 2. Click on the Class Maintenance icon. The Class Maintenance screen will appear. 3. Click on the Duplicate Class button. A window will appear asking for a new title for the duplicated class. Enter the title. Click OK. The Duplicate Current Class window will appear. 4. Check box to Include Student Info to duplicate class in all ways but the name. Click on the OK button. The new class will appear in the Class Management screen. That class may now be edited. Roster From within the Class Maintenance screen, the Student Roster report can be printed. See the Reports chapter for more details about this report. 19 GradePoint 2020 Installation and User Guide Print the Student Roster: 1. Select a class from the Main Menu screen's Selected Class drop-down list. 2. Click on the Class Maintenance icon from the Main Menu screen. The Class Maintenance screen appears. 3. Click on the Reports button in the Class Maintenance toolbar. The Available Reports window appears. 4. Select Student Roster from the list of available reports. Students may be excluded by clicking on the Modify button and unchecking them. Unchecked students will not appear in this report. 5. Click on the View Report button. The student roster appears. Once the report has been generated, it may be printed or viewed on-screen. 6. Exit the roster. GradePoint 2020 will remain inactive while the report viewer is open. 20 GradePoint 2020 Installation and User Guide SCHEDULER The Scheduler is used to schedule students to take Tech-Lab and user-defined courses during the course of a rotation. The Scheduler screen is divided into two sections, including the List Grid and the toolbar. The List Grid allows the instructor to view, at a glance, when students are scheduled for specific courses. The list grid also allows the instructor to easily make manual changes to the current rotation. All students and courses, excluding evaluations related to the selected class are automatically in the list grid so that rotations may be created and maintained. Students and courses may be excluded or added from Class Maintenance at any time and it will not adversely affect rotations, although rotations not yet taken may require editing. The on-screen spreadsheets used in many of GradePoint 2020's functions may be too large to display on some monitors. Simply scroll the grid display by pressing and holding the right mouse button and moving the cursor across the screen. When the right mouse button is released, the grid stops scrolling. 21 GradePoint 2020 Installation and User Guide The right mouse button has no other function within most of GradePoint 2020. The following functions can be performed from the Scheduler toolbar: • Manually Create and Edit Rotations • Automatically Create Rotations • Set Rotation Options • Generate Reports • Create Course/Student Exclusions • Create Grade-Based Course Exclusions The Scheduler is also a vital tool for automatic GradeBook updating, as student lab grades are gathered based on the rotation that they were assigned them. Instructors may bypass the Scheduler and manually enter grades themselves, of course. Tech-Lab Rotations GradePoint 2020’s Scheduler creates rotations, which allow instructors to schedule students for different Courses. Generally speaking, instructors usually allow at least one week for each lab course, however, rotations are of no set length of time, allowing instructors the freedom to go to the next rotation when the time is appropriate. Rotations may be generated automatically or they may be created manually. Most instructors prefer to lock in two or three rotations at a time. This allows students who miss scheduled modules due to extended absences to be rescheduled before the marking period is over. This also allows students who may have done poorly in their first attempt to retake a lab course at the instructor’s discretion. The instructor manually edits the next rotation so that the student(s) may complete the necessary module. Instructors may also add exclusions to preclude a student from being scheduled to a module. 22 GradePoint 2020 Installation and User Guide Generating a Manual Rotation 1. Select a class to be scheduled from the GradePoint 2020 Main menu’s Selected Class dropdown list. 2. Click on the Scheduler icon. The Schedule Class screen appears. Courses will be listed across the top of the list grid and students will be listed down the side of the grid. 3. The working rotation ready to be created is listed above the Scheduler List Grid. Change the rotation by going into Set Options and changing the rotation to be created or edited, if necessary. 4. Click on the cells in the List Grid to schedule students to the course coordinated with that cell. A check mark will appear. Courses and students can be scheduled in pairs or mixed randomly, but if the maximum number of students per course selected under Set Options is exceeded, the instructor will receive a warning. This limit can be overridden simply by clicking Yes each time. 5. Click on the Lock Rotation button when all students have been scheduled in the current rotation. If a student does not have a check in his name when the rotation is locked, the Scheduler will assume he/she is benched for that rotation. A confirmation window will appear. 6. Click Lock this Rotation. This window closes. The current working rotation number appears in place of the checkmarks in the list grid, indicating that the rotation has been locked and changes in course history have been made. The working rotation automatically advances to the next number. 23 GradePoint 2020 Installation and User Guide Generating an Automatic Rotation 1. Select a class to be scheduled from the GradePoint 2020 Main Menu’s class list. 2. Click on Schedule button. The Schedule Class window will appear. 3. Click on Set Options. The Set Options window will appear. Adjust settings as needed for scheduling your students. 4. Click on the Auto Schedule button from the toolbar. The Auto Schedule window appears. All students and courses with checkmarks will be included in the generated rotation. Only students and modules that have been related to the selected class can be scheduled. Exclude students and/or courses manually from the rotation pool by deselecting them. 5. Click OK when an acceptable pool for auto scheduling has been obtained. Checkmarks will appear on the rotation spreadsheet indicating which students have been scheduled to take which module. Manually edit the suggested rotation by moving the cursor over the preferred square module. A student may not be scheduled for more than one module per rotation. 6. Click Lock Rotation when the displayed rotation is acceptable. The approved rotation is now locked in and changes in course history have been made. A rotation must be locked in before the next rotation can be generated. 24 GradePoint 2020 Installation and User Guide Prerequisite Concerns: Many Tech-Lab courses are split into "levels," such as Electronics (1), Electronics (2), and Electronics (2IS), where each proceeding lower level course is a prerequisite to the next level. The GradePoint 2020 Auto-Scheduler does not recognize prerequisites when scheduling. Therefore, it is advisable to either not relate more advanced Courses until all students have completed lower courses or for instructors to manually edit rotations carefully. How to Edit Rotations: 1. Select the class that needs to have a rotation edited from the Main Menu screen. Click on the Scheduler icon. The Scheduler screen appears. 2. Select Set Options. The Set Options window will appear. 3. Change the Working Rotation to the rotation to be edited. To change the maximum number of students to be scheduled per course, use the wheel control provided. To alter either the "Bench" text or the "Done" text to appear in the Schedule History report, replace the text in that field. Click OK when done. 4. Move the cursor to each cell to edit. All students to be scheduled to a particular course during that working rotation will have a checkmark in the corresponding cell. Students who retake a previously taken module may be scheduled in the current working rotation by clicking on the appropriate corresponding cell. No student may be scheduled to take more than one module during a rotation. 5. Lock rotation when done editing this rotation. 6. Create rotations manually or automatically to bring the rotations current. OR 7. Optional: Select Set Options. Advance the Working Rotation to the previously highest rotation and click the OK button. The previously created rotations will re-populate the gridlist; however they will overwrite any changes made to the grid if there is a conflict. Scheduling Blocks The Auto-Scheduler uses a pool of available students and available courses from a pre-selected class when creating a rotation. Exclusions modify a student's availability so they are blocked from being scheduled from one or more modules, until the block is removed. This may be especially helpful when a student is taking the same Tech-Lab course in another class or needs to take Tech-Lab courses written in 25 GradePoint 2020 Installation and User Guide another language. This scheduling block appears in the Scheduler's List Grid, in the cell for that student-module combination. This block appears only in this class. Exclusions do not rewrite previously locked rotations. If a student is scheduled to take a course, but is excluded from that course after the rotation has been locked, that student will still appear in History Reports as having been scheduled for that course. Therefore, if a student is excluded after being locked into a rotation, this will impact negatively that student's GradeBook grades if the instructor should use the GradeBook's automated update feature. Before excluding a student from a lab course that he or she has already been scheduled to take, instructors should edit that rotation, removing the conflicting data. Otherwise, the student may receive an incorrect grade. Course/Student Exclusions This block can be manually removed at any time by the instructor by clicking on the blocked cell or by following the instructions below and unchecking the blocked course. Students may be automatically excluded based on previous course history by using the Auto Exclusion function. 1. From the Scheduler toolbar, select Exclusions. The Select Student window will appear. 2. Select student to be blocked from taking a course. Only one student's availability may be edited at a time. 3. Click OK. The Select Lab Courses window will appear. 26 GradePoint 2020 Installation and User Guide 4. Select the course to block from that student's schedule. A checkmark means that the student has been excluded from the marked courses. Unchecking a course removes the block. 5. Click OK. The Select Lab Courses window will close and blocks will appear in the grid display as mandated by the exclusions. Exclusions modify a student's availability so they are blocked from being scheduled from one or more modules, until the block is removed. Auto Exclusions take this concept one step further by polling student lab grades and automatically creating scheduling blocks based on parameters set by the instructor. This may be especially helpful when a student has taken the same Tech-Lab course in another class. This scheduling block appears in the List Grid, in the cell for that student-course-grade combination. Such blocks appear only in the class they were generated for and do not automatically adjust themselves based on grade changes at a later date. The Auto Exclusion function does not rewrite previously locked rotations, although it may appear to. If a student is scheduled to take a course, but is excluded from that course after the rotation has been locked, that student will still appear in History Reports as having been scheduled for that course. Therefore, if a student is excluded after being locked into a rotation, this will impact negatively that student's GradeBook grades if the instructor should use the GradeBook's automated update feature. Before excluding a student from a lab course that he or she has already been scheduled to take, instructors should edit that rotation, removing the conflicting data. Otherwise, the student may receive an unearned grade. 27 GradePoint 2020 Installation and User Guide Grade Parameters In creating a new set of exclusions parameters, an instructor must choose to exclude students who meet either all of the selected criteria or any of the selected criteria. Such criteria may include, at the teacher's discretion: • Pretest grades equal to or greater than a given number. • Workbook grades equal to or greater than a given number. • Posttest grades equal to or greater than a given number. • Weighted grade as seen in Lab Grades equal or greater than a given number. Grade-Based Exclusions The instructor may manually remove Auto-Exclusion generated blocks at any time by clicking on the blocked cell or by following the instructions below and unchecking the blocked course. Students may be manually excluded from any course by using the Exclusion function. 1. From the Scheduler toolbar, select Exclusions. The Select Student window will appear. 2. Click on the Auto Exclusions button. The Auto Exclusions Options window will appear. The Auto Exclusion feature is fully class inclusive; all students in this class are automatically included in the polling process. 3. Select either Exclude students who meet any of the following or Exclude students who meet all of the following. 28 GradePoint 2020 Installation and User Guide 4. Select any or all of the available criteria with a checkmark in the box preceding each. Unchecked criteria will not play a part in creating exclusions. Enter selected criteria threshold fields with any grade from 0 to 100. 5. Click OK. The Update Equivalent Course List window will appear. If Internet access is available, clicking on the Yes button will update the Equivalent Course List. Clicking NO will bypass the update. In either case, a selection must be made before the pool of new exclusions can be built. 6. The Select Student window will reappear and blocks will appear in the List Grid as set. Set Options The Scheduler contains four variable options that are distinct per selected class. • The maximum number of students to be scheduled each rotation per Lab Course. • The current working rotation number. • Edit the "Done" text for the Scheduler reports. • Edit the "Bench" text for the Scheduler reports. These options can be accessed via the Set Options button from the Scheduler screen. These set options effect changes for the selected class only. Maximum Number of Students The maximum number dictates how many students may be scheduled for each module per rotation. This number not only dictates how the Auto-Scheduler assigns students to modules, but 29 GradePoint 2020 Installation and User Guide also acts as a flag to those instructors manually creating or editing the schedule, for the selected class only. To set the maximum number of students simply click on the dial to the right of the number up (for higher) or down (for a lower number) from the Scheduler Options screen. The maximum number displayed here is for the previously selected class only and does not affect previously locked schedules. Changes to the maximum number are for the selected class only. The maximum number of students can be easily overridden at anytime manually without changing the number itself simply by scheduling an extra student and accepting the override warning. While most Tech-Lab courseware is designed for students working in pairs, the maximum number of students to be assigned to a course is completely up to the instructor. Different classroom structures have different needs and each class will maintain its own set of scheduler options. However, at no time can a student be scheduled for more than one course per rotation. Rotation Number This is the current working rotation: the rotation that will be available for editing once you return to the Scheduler screen. To change the rotation number, simply click on the dial to the right of the number up (for higher) or down (for a lower number) from the Set Options screen. Changing the rotation will effectively erase previously saved scheduling data for the selected class once you select OK. Changes made to the locked schedules here are for the selected class only and do not affect lab scores in any way. "Done" Text This text appears on some Scheduler reports when a student has been scheduled for all the modules associated with the class. To change the "done" text, simply type over the text. Once instructors click OK, the changes will automatically take place, affecting reports for the previously selected class only. 30 GradePoint 2020 Installation and User Guide "Bench" Text This text appears on some Scheduler reports when a student has not been scheduled a course for a given rotation, but has yet to take all modules associated to this class. To change the "bench" text, simply type over the text. Click OK. The change affects reports for the previously selected class only. Scheduler Reports From within the GradePoint Scheduler screen, the following reports may be generated: • Last Locked Rotation • Course History by Student • Course History by Course • Schedule History • Student Roster Print a Scheduler Report 1. Select a class from GradePoint 2020’s Main Menu Selected Class drop-down menu. 2. Click on the Scheduler icon on the Main Menu screen. The Scheduler will appear. 3. Click the Reports button in the Scheduler window. The Available Reports window appears. 4. Select the desired report. Exclude students or courses related to the selected class by clicking the Modify button. Unchecked students and modules will NOT appear in the report. 5. Click the View Report button. The desired report will appear. Once the report has been generated, it may be printed or viewed on-screen. 6. Exit Report. GradePoint 2020 will remain inactive while any report is open. 31 GradePoint 2020 Installation and User Guide 32 GradePoint 2020 Installation and User Guide TECH-LAB GRADES Tech-Lab Grades tracks students’ scores within the Tech-Lab System. The Tech-Lab Grades screen is divided into two sections: the Lab Grades Grid Display and the toolbar. The Lab Grades Grid Display shows a scrollable list of students from a selected class and their scores for modules and evaluations associated with that class. The grid does not display homework assignments or tests taken outside the Tech-Lab Environment (see the GradeBook chapter). The appearance of the grid can be adjusted via the Grid Display Font control located in the Manager Maintenance section. The on-screen spreadsheets used in this screen may become too large to display on some monitors. When this happens, simply scroll the grid display by pressing and holding the right mouse button and moving the cursor across the screen. When the right mouse button is released, the grid stops scrolling. The right mouse button has no other function within most of GradePoint 2020. 33 GradePoint 2020 Installation and User Guide The following functions can be performed from the Tech-Lab Grades toolbar: • Show Pretest Grades • Show Posttest Grades • Show Workbook Grades • Show Overall Grades • Generate Lab Grades Reports Lab Grades Grid The bulk of the Tech-Lab Grades screen consists of the Grades Grid, a scrollable table of students down the vertical axis and the Tech-Lab Courses, User-defined courses, and evaluations related to the class across the horizontal axis. STUDENT NAMES Only students within the previously selected class will be shown on this grid. Students who sit in on the class, but have not been related to this class via GradePoint 2020 will not appear on the grid. COURSES Only courses and evaluations related to the previously selected class appear. If a student takes a course or evaluation NOT related to the selected class, any grades from that event will NOT appear in this grid. This allows multiple classes of Tech-Lab to exist on the same server concurrently without confusion. Lab Grid Layers The Lab Grades Grid has four layers. The Overall Grades, the Pretest Grades, the Posttest Grades, and the Workbook Grades. Switch between layers by clicking the corresponding buttons on the Tech-Lab Grades toolbar. • Overall Grades brings up the default layer when entering the Tech-Lab Grades screen. This grid layer shows students’ score after grade weighting in the related modules and evaluations. 34 GradePoint 2020 Installation and User Guide See Lab Grade Weights in the Manager Maintenance chapter for more details on how this affects overall grades. • Pretest Grades brings up the pretest scores students received on the corresponding courses. Students who have not taken a pretest, or who failed to click Grade before leaving a completed pretest, will not have a score in the corresponding cell. • Posttest Grades brings up the students’ posttest score averages for the corresponding course. Because it is possible for a student to take a posttest up to nine times, (if allowed by the instructor via the Configurator) this score may not reflect the last grade a student got from a posttest. Instructors may find the Lab Grades report, Student Answers, to be helpful in reviewing previous posttest scores. Students who have not taken a posttest, or who failed to click Grade before leaving a completed posttest, will not have a score in their cell. Evaluation test scores appear in this layer. • Workbook Grades brings up the layer containing Tech-Lab activity grades from exercises, rubrics, and workbook from the various Tech-Lab modules taken by students. Lab Grades Reports From within the Tech-Lab Grades screen, the following reports may be generated: • Competencies by Course • Grades Detailed by Course • Competencies by Student • Grades Detailed by Student • Competency Gains by Course • Student Answers • Competency Gains by Student • Workbook Grades by Course • Evaluation Grades by Evaluation • • Evaluation Grades by Student Workbook Grades by Course (Show All) • Grades by Course • Workbook Grades by Student • Grades by Student • Workbook Grades by Student (Show All) 35 GradePoint 2020 Installation and User Guide To View a Lab Grades Report 1. Select class from GradePoint 2020’s Main Menu screen, the Selected Class drop-down menu. 2. Click on the Tech-Lab Grades icon. The Tech-Lab Grades screen will appear. 3. Click on the Reports button in the Tech-Lab Grades toolbar. The Available Reports window appears. 4. Select the report to generate. Exclude students and/or courses related to the selected class by clicking the Modify button. Unchecked students and modules will NOT appear in this report. Additionally, reports automatically exclude inappropriate selections, even if manually checked. Click OK. 5. Click on the View Report button. Once the report has been generated, it may be viewed onscreen and then printed. 6. Exit the report viewer when you are done. GradePoint 2020 will remain inactive while any report is open. 36 GradePoint 2020 Installation and User Guide GRADEBOOK GradeBook is GradePoint 2020’s online class manager. The GradeBook portion of GradePoint 2020 has been simplified, with the GradeBook database no longer a separate entity. This not only allows the instructor to move gracefully between portions of the management system, but also, streamlines the back-up procedure. The GradeBook screen is divided into two sections: The GradeBook grid and the toolbar. The GradeBook Grid allows the instructor to set up a multi-layered grade book for the selected class. Each class maintains its own fully customized grade book and options, allowing the instructor flexibility in creating distinct class profiles. Each layer of GradeBook is called a sheet and is based on a subject and a selected interval as assigned by the instructor. The first time an instructor opens GradeBook for each class, he or she will be asked to create a new sheet. After that, GradeBook opens to the last sheet opened for that class. The on-screen spreadsheets used in this screen may become too large to display on some monitors. When this happens, simply scroll the grid display by pressing and holding the right mouse button and moving the cursor across the screen. When the right mouse button is released, the grid stops scrolling. The right mouse button has no other function within most of GradePoint 2020. 37 GradePoint 2020 Installation and User Guide The following functions can be performed from the GradeBook toolbar: • Generate GradeBook reports. • Create and select sheets to review and edit. • Create and edit Grade Types for each sheet. • Create assignments. • Edit and sort assignments. • Import Lab Grades. • Delete Sheets. All sheets within GradeBook are available only on the GradePoint 2020 they were created on. Sheet Grids The bulk of the GradeBook screen consists of a sheet grid, which is a scrollable table of students down the vertical axis and class assignments across the horizontal axis. Grades are entered manually and automatically in the corresponding cells. The appearance of the grid can be adjusted by changing the font by way of the Manager Maintenance screen and by sorting the order of assignments. Student Names Only students within the previously selected class will be shown on this grid. Students may only be added and removed from the class via the Class Maintenance screen. Assignments An assignment may be a course, an evaluation, a class assigned report, or even class participation. Only assignments assigned to this class for the selected subject interval appear on this sheet. Only assignments with a grade entered contribute to the student's average for this sheet by averaging within its grade type. That grade type average is then applied to the overall average for that sheet. 38 GradePoint 2020 Installation and User Guide Instructors may enter grades manually by selecting the corresponding cell and entering a whole number grade or by updating lab grades in conjunction with the Scheduler. Updated grades that are later edited appear in white text rather than black. Sheet Label The subject and interval of the current GradeBook sheet displayed appears in the upper left hand corner of the GradeBook screen, just above the grid itself. Sheets are selected and created from the toolbar button, Select Sheet. Only one sheet may be displayed at a time. The first time an instructor opens GradeBook for each class, they will be asked to create a new sheet. After that, GradeBook always opens to the last sheet opened for that class. Creating a Grade Sheet 1. Select the class desired from the Class drop-down menu on the Main Menu screen. 2. Click on the GradeBook icon. The GradeBook screen appears. The last selected GradeBook sheet for that class will be displayed, unless no sheet has been created for the selected class. Note: The first time GradeBook opens for that class, the instructor is prompted to create a sheet before GradeBook will open, skipping the next step. 3. Click on the Select Sheet button in the GradeBook toolbar. The Create/Select Sheet window appears. 4. Select a subject to name the sheet from the Subject drop-down menu or click on the New button to the right of the Subject drop-down menu and create a new subject name. 5. Select an interval for the period the sheet covers from the Interval drop-down menu or click on the New button to the right of the Interval drop-down menu and create a new interval. The Create Sheet button will now be available. If Select Sheet is available, the selected class is already using this subject/interval as a sheet. 6. Click on the Create Sheet button. GradeBook reappears with the selected sheet. The instructor will need to create or import grade types, as well as create assignments linked to those grade types. 39 GradePoint 2020 Installation and User Guide GradeBook Sheets The sheets used by GradeBook are named after a combination of the subject and the interval chosen by the instructor (subject/interval). Every subject name created by an instructor is available to every class within this instance of GradePoint 2020, as is every interval name. ALL sheets automatically include all students related to that class. Sheets can be created, edited, and deleted, but they can not be renamed. Selecting a Grade Sheet 1. Select the class desired from the Selected Class drop-down menu on the Main Menu screen. 2. Click on the GradeBook icon. The GradeBook screen appears. The last selected GradeBook sheet for that class will be displayed. 3. Click on the Select Sheet button in the GradeBook toolbar. The Create/Select Sheet window appears. 4. Select a subject to name the sheet from the Subject drop-down menu or click on the New button to the right of the drop-down and create a new subject name. 5. Select an interval for the time period the sheet covers from the Interval drop-down menu or click on the New button to the right of the drop-down and create a new Interval. Either the Create Sheet button or the Select Sheet button will now be available. If Select Sheet is available, this subject/interval is already being used by the selected class as a sheet. If Create Sheet is available, then this sheet has not yet been created. 6. Click on either the Select Sheet or Create Sheet button. GradeBook reappears with the selected sheet as a GradeBook grid. If a new sheet, the instructor will need to create or import grade types, as well as assignments associated to those grade types. Grading with Sheets Grades may be entered manually for all assignments within a sheet at any time. Only assignments created to be associated with another sheet, a scheduled lab (Tech-Lab courses or user-defined courses) or evaluation may be updated. Assignments associated with another sheet are automatically updated upon opening that sheet. While any assignment grade may be edited, grades that were updated or imported will display as white text, not black. If an update alters the originally assigned grade, the white edited grade will NOT be altered. Instead, it will remain the grade as manually entered. 40 GradePoint 2020 Installation and User Guide Any white text grade may be deleted. The last updated grade posted for that assignment would display, instead, in black text. Only marked assignments contribute towards the weighted average for that sheet, which is displayed at the far right of the sheet grid. All marked assignments are averaged within their grade type. Because the sheet averages are weighted by grade types, a grade type without any marked assignments contributes 0 (zero) of its percentile weight points to the weighted average. Sheet averages cannot be edited. They can be adjusted, however, by altering the weight of the grade types associated with the sheet, by deleting assignments, or by simply altering the grades of the assignments. Grade Types Before assignments can be related to a GradeBook sheet, there must be a type-categorized grade weighting system in place for that sheet. Each grade type is assigned a grade weight towards the overall average for that sheet. Each marked assignment related to that grade type is averaged within that grade type and applied to the overall weighted grade average for that sheet. For example, Mr. Vogt creates a GradeBook sheet for his class, Information Technology. In addition to taking a few TechWorld courses, students are also expected to do two reports on careers, keep current of advances in the field of IT, and take an exam in the first marking period. Mr. Vogt creates four grade types for each of the four different assignment types he'll be using during the school year: LABS, Reports, Events, and Exams. Each grade type is assigned a percentile for its weight (in this case: 20%@ for Reports and Events and 30%@ for Exams and LABS). As each assignment is created, it is attached to a grade type. Each marked assignment is averaged equally towards that grade type's contribution to the weighted average of that sheet. In the example below, note the assignment grades of the highlighted student. In the example below, the highlighted student, Jeff Blair, has completed all the assignments except the quarterly exam. The three assignments that make up the LABS grade type have scores of 23, 70, and 76, which averages out to 56. The LABS grade type contributes 30% of the sheets weighted average, or 17 out of possible 30 points. The Events grade type, with a weight of 20%, 41 GradePoint 2020 Installation and User Guide has an average of 59, contributing 12 points out of a possible 20. The Reports grade type, also with a weight of 20%, has an average of 87, contributing 17 points out of a possible 20. The Exam grade type, with a weight of 30%, has the one grade of 80 (the Quarterly Exam grade is unmarked and therefore not averaged), contributing 24 points out of a possible 30. Jeff Blair's weighted average of 70 was determined by adding the different grade types' scores and then rounding. 42 GradePoint 2020 Installation and User Guide Create Grade Types 1. From the Main Menu, select the class that needs the grade type(s) from the Selected Class drop-down menu. 2. Click on the GradeBook icon. The GradeBook screen will appear. Create a new sheet, if necessary. 3. Click on the Grade Types button. The Grade Types window will appear. 4. Click on the Add button. The Add Grade Types window will appear. 5. Enter the name of the grade type in the Type text field. This name may be up to 80 characters and spaces, but only the first 30 to 40 characters will display in most fields. Each type name must be unique within that sheet's set of grade types, but names may be reused from other sheets. 6. Enter the weight or points the grade type will carry towards the sheet's weighted average in the Weight text field. This should be a whole number less than 101. Click OK. 7. Repeat steps 4-6 until the OK button becomes available on the Grade Type window. The set of grade types must total exactly 100% before the set can be saved. The grade type set may be edited at any time. 8. Click the OK button. The GradeBook screen will reappear. Assignments may now be added to the sheet. 43 GradePoint 2020 Installation and User Guide Use Grade Types from Other Sheets Grade type sets from other sheets may not be copied if there are currently grade types related to the sheet. 1. From the Main Menu screen, select the class that needs the grade type(s) from the Selected Class drop-down menu. 2. Click on the GradeBook icon. The GradeBook screen will appear. Create a new sheet, if necessary. 3. Click on the Grade Types button. The Grade Types window will appear. 4. Click on the Browse button to select any set of grade types in use by another sheet, regardless of class. The Get Grade Types window will appear. 5. Select the grade type set from the list of available GradeBook sheets (listed as class-subjectinterval) by clicking on it. Click OK. The Grade Types window will reappear. 6. Edit each grade type as needed by selecting them from the list box and clicking the Edit button. Editing the copied set of grade types does not impact the original set of grade types. 7. Click OK. The Grade Types window will close. Assignments may now be added. Edit a Grade Type 1. From the GradeBook screen, click on the Grade Types button in the GradeBook toolbar. The Grade Types window will appear. 2. Select the grade type to be edited from the list box. Click on the Edit button. The Edit Grade Type window will appear. 44 GradePoint 2020 Installation and User Guide 3. Edit the name of the grade type in the Type text field, if desired. The type name may be up to 80 characters and spaces, but only the first 30 to 40 characters will display in most fields. Each type name must be unique within that sheet's set of grade types. Names may be reused from other sheets. 4. Edit the weight or points the grade type will carry towards the sheet's weighted Average in the Weight text field, if desired. This should be a whole number less than 101. Click OK. The Grade Types window will reappear. 5. Repeat as needed until the remaining weight equals 0%, at which point the OK button will become available. 6. Click on the OK button. The Grade Types window will close. How to Delete a Grade Type Only grade types without assignments may be deleted. All assignments must be moved or deleted from the grade type first. 1. From the GradeBook screen, click on the Grade Types button in the GradeBook toolbar. The Grade Types window will appear. 2. Select the grade type to be edited from the list box. Click on the Delete button. The Delete Confirm window will appear. Click on the YES button to delete the selected grade type. 3. The Grade Types window will reappear. The OK button will only be available when the total weight of grade types equals 100 points. Edit grade types accordingly. Click OK when finished. GradeBook Assignments The assignments appearing in a GradeBook sheet may be a lab course, an evaluation, a class assigned report, or even an abstract such as class participation. Only assignments assigned to this class for the selected subject interval appear on this sheet. All assignments are graded according 45 GradePoint 2020 Installation and User Guide to the set of grade types the instructor has related to this class, but only assignments with a marked grade contribute to the student's average for this sheet by averaging within its grade type. That grade type average is then applied to the overall grade for that sheet based on that type's weight. There are four kinds of assignments: Manual, Lab Course, Evaluation, and Sheet Average. Manual assignments take place outside the Tech-Lab environment. Therefore grades must be entered manually. Lab Course and Evaluation assignments are assignments based on user-defined courses, evaluations and Tech-Lab courses that take place within the Tech-Lab network. When used in conjunction with the Scheduler, these assignments may have their grades automatically updated via the Update function. Sheet Average assignments are based on weighted averages from other sheets. These assignments are updated automatically each time that sheet is entered. You may not select averages from another class or subject. Instructors may enter a grade manually by selecting the corresponding cell and entering a whole number grade or by updating evaluation grades or course grades (when used in conjunction with the Scheduler). Updated grades that are later edited appear in white text rather than black. Creating Assignments Assignments can only be used for the class they are created for. 1. From the Main Menu screen, select the class to create assignments for from the Selected Class drop-down menu. 2. Click on the GradeBook icon; the GradeBook screen will appear. 3. Click on the Assignments button in the GradeBook toolbar. The Assignments window will appear. 46 GradePoint 2020 Installation and User Guide 4. Select the type of assignment from the Add Assignments group of buttons to the right of the Assignment list box: Manual, Course, Evaluation, or Sheet Avg. The corresponding Add Assignment window will appear. 5. Select the grade type the new assignment(s) will fall under from the Grade Type drop-down menu. 47 GradePoint 2020 Installation and User Guide 6. Select the needed available, updateable titles of courses or intervals from the list box. Those titles with a checkmark will generate assignments with the same names. When adding a manual assignment, the instructor will be required to create a name for the assignment. Click the OK button. The Assignment window will reappear. 7. Repeat steps 3, 4, and 5 until enough assignments are created. More assignments may be created at anytime. Click OK when finished creating assignments. The GradeBook screen will reappear. Editing Assignments Assignment relationships to a particular course or evaluation cannot be altered once they have been created. 1. From the GradeBook screen, click on the Assignments button in the GradeBook toolbar. The Assignments window will appear. 2. Select the assignment from the assignment list box. The selected assignment will be highlighted. Only one assignment may be edited at a time. 3. Click on the Edit button. The Edit Assignment window will appear. 4. The grade type of the assignment may be changed from the Grade Type drop-down menu. Edit the Assignment Title field to change the title of the assignment as displayed in GradeBook. If related to a course or evaluation, this will not alter the title of the course. 5. Enter optional comments for the assignment by clicking on the Edit Comments button. The Enter Assignment Comments window will appear. Comments appear only in the Assignment List report. Type directly into the text field as if using Notepad. Click on the OK button when finished to close and save comments. 6. Click on the OK button when the assignment is edited. The Assignments window will reappear. 7. Continue to edit assignments or click on the OK button to close and save all changes to assignments. Otherwise, click on the Cancel button. 48 GradePoint 2020 Installation and User Guide Delete an Assignment 1. From the GradeBook screen, click on the Assignments button in the GradeBook toolbar. The Assignments window will appear. 2. Select the assignment from the assignment list box. The selected assignment will be highlighted. Only one assignment may be deleted at a time. 3. Click on the Delete button. The highlighted assignment will be removed from the list box without further prompts. 4. Click on the OK button to close the Assignments window and delete the assignment from the sheet. Otherwise, click Cancel. Sort Assignments 1. From the GradeBook screen, click on the Assignments button in the GradeBook toolbar. The Assignments window will appear. 2. Select the assignment from the assignment list box. The selected assignment will become highlighted. Only one assignment may be selected at a time. 3. Click on either the Move Up or Move Down button to the right of the list box. The selected item will move one space in the direction indicated. Up brings the item closer to the students' names while down brings the assignment closer to sheet average column on the right. The selected assignment will move up or down one space at a time, but will not "wrap" to the other end. 4. Click on the OK button when sorted properly or click Cancel to undo all changes from this session. Update GradeBook Lab Course and Evaluation assignments are assignments based on user-defined courses, evaluations and Tech-Lab courses that take place within the Tech-Lab network. These assignments may have their grades automatically updated via the Update function of GradeBook. Updated assignment grades do not override manually entered grades. Manually entered grades that differ from the posted grades will be displayed as white. 49 GradePoint 2020 Installation and User Guide Import Lab Grades Manual assignments are assignments that take place outside the Tech-Lab environment. These must be entered by the instructor onto the sheet manually. Sheet Average assignments are based on the average from other sheets. Sheet average assignments are updated automatically each time that a sheet is entered, so there is no need to poll them. 1. From the GradePoint 2020 Main Menu screen, select the class desired from the Selected Class drop-down menu. 2. Click on the GradeBook icon. The GradeBook screen will appear with the last sheet opened for this class. If this is not the desired sheet, click on the Select Sheet button and create or select a different sheet. 3. Click on the Update button in the GradeBook toolbar. The Update window will appear. 4. To update Lab Course grades, click on the Course Assignments button. The Update Course Assignments window will appear. Using the dials, adjust the Starting and Ending numbers for the Rotation Range. Click OK and the lab grades will be imported into the various course assignments, updating all pertinent grades within the rotational range, except those that have already been manually edited. 5. To update Evaluation grades, click on the Evaluation Assignment button. The Update Evaluations window will appear, split into two panes. The left pane, Students, contains a list of students associated with this class. The right pane, Evaluations, contains a list of assignments related to evaluations on this sheet. Each pane contains a Select All button, to select all items in that pane, and a Clear All button, to de-select all items in that pane. Click OK and GradeBook assignments will be updated in conjunction with the checked students and checked evaluations, except those that have already been manually edited. 50 GradePoint 2020 Installation and User Guide 6. Click on the Close button on the Update window. The GradeBook screen will now be available for editing. GradeBook Reports From within the GradeBook screen, the following reports may be generated: • Assignment Grades by Assignment • Assignment Grades by Student • Assignment List • Grade Type List • Sheet Grades by Student • Sheet Grades Detailed by Student • Student Roster View a GradeBook Report 1. Select a class from GradePoint 2020’s Main Menu screen's Selected Class drop-down menu. 2. Click on the GradeBook icon. The GradeBook screen will appear. 3. Click on the Select Sheet button in the GradeBook toolbar and select the desired sheet for the report. 4. Click on the Reports button in the GradeBook toolbar. The Available Reports window appears. 51 GradePoint 2020 Installation and User Guide 5. Select the report to generate. Exclude students and or assignments related to the selected class by clicking the Modify button. Unchecked students and assignments will NOT appear in this report. Click OK. 6. Click on View Report. Once the report has been generated, it may be viewed online and then printed. 7. Exit report viewer when you are done. GradePoint 2020 will remain inactive while any report is open. For more information on these reports, please see the Reports chapter. 52 GradePoint 2020 Installation and User Guide STUDENT JOURNALS Students and instructors can now have increased interaction via personalized, online notebooks available at each Tech-Lab workstation. Instructors may review and insert notices into each journal from this screen. The Journals screen is divided into two sections: the toolbar and the Student List Pane. The Student List Pane lists only the students currently related to the selected class. These students may be selected to have notes inserted into their Student Journals by checking the box preceding their name. An instructor may also review any Student Journal by highlighting that student's name. The following functions can be performed from the Journal toolbar: • Generate and distribute notes online • Open and edit any Student Journal 53 GradePoint 2020 Installation and User Guide Note: Instructor messages sent to Student Journals may be set to auto-delete on a certain date. Proper use of this option requires that the instructor machine and all workstations be set to the correct time and date. Distributing Notes Instructors can electronically send notes to any number of students in their class by selecting which students will receive the distribution from the Student List pane from the Student Journal screen. The student will see the date it was distributed and when it was last modified but not which instructor sent the note unless that instructor includes a signature within the note. Once distributed, an instructor may delete or alter the note one Student Journal at a time, via the Open function. Instructor notes cannot be recalled. The student cannot edit instructor notes, and cannot delete them unless the note is in an unlocked state. Entries cannot be undeleted. Duration These entries appear within the students' online journal and exist for a period of time that may be only determined by the instructor when the note is composed. The following are the three available duration modes: • Unlocked Note – may be deleted by the student at any time. • Locked Note, Semi-Permanent – may only be deleted by the student after a preset time limit. • Locked Note, Auto-Deletion – may not be deleted by a student, but will self-destruct on a preset date. 54 GradePoint 2020 Installation and User Guide Creating a Note Please be aware that variances in the date and time between machines may cause the online notebooks to not function properly. 1. Select a class to be scheduled from the GradePoint 2020 Main Menu screen’s Selected Class drop-down list. 2. Click on the Student Journal icon. The Student Journal window appears. The list of students in the class appears in the list pane. 3. Select one or more students to distribute the note to from the Students List pane by checking each box to the left of the student's name. Use the Select All button to check all the students and use the Clear All button to clear all the selections. 4. Click on the Note to Group button in the Journal toolbar. The Add Note to Student Group window appears. 5. In the Add Note window, enter a heading for the note in the Title field. 6. Type the entry in the Note field or cut and paste the message from a text file into the Note field. Use Ctrl+Tab to place a tab within the note. 7. Select a duration mode from the Duration drop-down list. If selecting a locked mode, select a date to end deletion protection from the Calendar drop-down list to the right. 8. Click on the OK button to send the note. This button will not be available until the entry has both a title and content. The window will close. The Student Journal window returns. 55 GradePoint 2020 Installation and User Guide Journal Review Instructors can review and edit Student Journals at any time; the student need not be logged in. Each student has just one journal regardless of how many Tech-Lab classes he or she may be assigned to. Any instructor can review and edit any student's journal. Each note in Student Journal gets a separate heading in the journal's Content Listing window. Clicking on a heading brings you to the Note Entry window for that note. Only one entry at a time per Student Journal may be reviewed, edited, or deleted. Print Student Journal When running virus protection software, the instructor may be warned that the document contains macros or scripts. This is a necessary part of Student Journal and should not be disabled. 1. Open desired Student Journal from the Journal Selection window. The Content Listing window appears. 2. In the Content List window, click on the Print button. 3. The Print Options window appears. Click on the OK button after making any necessary adjustments. 4. Document prints and the Content Listing window returns. 56 GradePoint 2020 Installation and User Guide Editing Entry Only an instructor may edit an entry from an instructor, locked or unlocked. If the student is reviewing their journal from his or her workstation, the journal will be available only in a readonly mode and the instructor will not be able to edit or delete any entries in the journal. 1. Open the entry from the Content Listing window. The Note Entry window will appear. 2. Overwrite or edit the heading or the note itself as if it were a document in Notepad. The Cut and paste function is permitted. Highlight the desired section and drag it into either text field. 3. To accept the changes, click on the OK button. To revert to the unaltered entry, click on the Cancel button. The Note Entry window will close and the Content Listing window will reappear. 57 GradePoint 2020 Installation and User Guide Delete Entry An instructor can delete any entry, provided the journal is not in read-only mode. 1. Open the entry from the Content Listing window. The Note Entry window will appear. 2. Click on the Delete button in the bottom left of the screen. If the Delete button is not available, the entry cannot be deleted. At the Confirm delete window, click OK. The Content Listing window will reappear with a revised content list. Print Entry When running virus protection software, the instructor may be warned that the document contains macros or scripts. This is a necessary part of Student Journal and should not be disabled. 1. Open the entry from the Content Listing window. The Note Entry window will appear. 2. Click on the Print button. The Print Options window appears. Click on the OK button after making any necessary adjustments. The entry will print out of the default printer as it appears on the screen, incorporating changes that may not have been saved yet. 3. Close the entry by clicking OK, Delete, or Cancel, or continue to edit the entry. 58 GradePoint 2020 Installation and User Guide THE CONFIGURATOR The Configurator is used to add, edit, and delete student records, as well as to configure profiles with lab settings and workstation options for the Tech-Lab System. The Configurator may be launched from GradePoint 2020 by simply clicking on the Configurator icon (the puzzle box) on GradePoint's Main Menu screen. Once launched, the instructor will select from a list of available profiles for the lab environment, which includes a general set of lab preferences and, at times, a set of workstation overrides. Instructors may also create and delete profiles as needed. The instructor may edit the selected profile's lab settings and overrides at any time, from any Tech-Lab workstation pointing to the same shared system folder. However, students currently logged into courseware may not experience these setting changes immediately. The instructor should have these students log off and log back in, if the setting changes are to have an impact on their lab grades. When editing a profile's lab setting, the Configurator has ten “tabs” of workstation preferences. The tabs are Student, Security, Media, Test, Workbook, Unit, Base Unit, Tech-Lab Launches, Tech-Lab Resources, and Courseware. These options affect settings across the entire Tech-Lab System, unless a workstation has been set with an override for that option. When editing a workstation for setting overrides, these ten tabs are also available in the Configurator, as is an additional tab marked Associated Applications. Overrides created on a workstation are for that profile only; when another profile is selected, that profile's overrides will be active and the previous overrides will become inactive. 59 GradePoint 2020 Installation and User Guide Please note that only one instance of the Configurator may be opened on the Tech-Lab Network at any time. Should an attempt be made to open a second Configurator, a warning window will appear indicating which PC currently has the Configurator open. Please see the Configurator's help file or the Configurator related chapters in the Tech-Lab Installation and User's Guide for more information. 60 GradePoint 2020 Installation and User Guide STUDENT ACTIVITY WATCH Student Activity Watch monitors students during their Tech-Lab experience. The Student Watch screen is divided into two sections: The Class Grid and the toolbar. The Class Grid allows the instructor to view which students are logged into Tech-Lab and which section of Tech-Lab they are working in at that moment. The on-screen spreadsheets used in this screen may become too large to display on some monitors. When this happens, simply scroll the grid display by pressing and holding the right mouse button and moving the cursor across the screen. When the right mouse button is released, the grid stops scrolling. The right mouse button has no other function within most of GradePoint 2020. 61 GradePoint 2020 Installation and User Guide The following functions can be performed from the Student Watch toolbar: • Set and Adjust Alarms • Mute All Alarms • Activate NetOp, if installed Only students within the previously selected class will be shown in this screen. If a student NOT related to the selected class logs into a student workstation at this time, they will NOT appear in the Student Watch Class Grid. This allows multiple classes of Tech-Lab to exist on the same server concurrently without confusion. Net-Op allows you to track workstation activity, but will not track student activity as Student Activity Watch does. Class Grid The bulk of the Student Activity Watch screen consists of the Class Grid, a scrollable table of students down the vertical axis and their Tech-Lab activities across the horizontal axis. The appearance of the grid can be adjusted by changing its font by way of the Manager Maintenance screen. Student Names The first column contains Student Names. Only students within the previously selected class will be shown in this column. If a student NOT related to the selected class logs into a student workstation at this time, they will NOT appear in this grid. This allows multiple classes of Tech-Lab to exist on the same server concurrently without confusion. Time The second column keeps track of Time. Student Watch is only active when the Student Activity Watch screen is open. Student activity that was in 62 GradePoint 2020 Installation and User Guide progress when Student Watch became active, will be annotated with a "greater than sign" (>) indicating that the student has been engaged in their current task for at least the time indicated. When a student changes tasks, the timer begins anew. The time listed is tied into Alarms and will set off an audio alarm (unless that feature is on mute or disabled) and turn the text red when the allotted time has passed. The Student Watch Alarms within GradePoint 2020 are only available with the Student Watch screen open. Leaving this screen to return to the Main Menu screen or closing GradePoint itself will disable the alarms. However, instructors may minimize this screen and multi-task with another program. Course The third column lists the course or evaluation the student is currently in. If the student is not signed into Tech-Lab or at the Tech-Lab menu, this field will remain blank. This field does not show the course or evaluation the student has been scheduled to appear in. Since the rotations are not tied into a fixed length of time, instructors may consult Course History by Students to ensure students are taking the proper module or evaluation. Description The fourth and final column lists a short description of their current Tech-Lab activity. If the student is not yet signed into the system, he or she will be listed as logged off. This column does not track non-Tech-Lab activities such as Internet browsing or composing a report in WordPad. Excessive non-Tech-Lab activity may call for the use of Net-Op to monitor workstation PC activity. 63 GradePoint 2020 Installation and User Guide 64 GradePoint 2020 Installation and User Guide SUPERVISION AND CONTROL The NetOp system allows GradePoint 2020 users to monitor computer activity across the computer network to any machine with NetOp Student installed, provided that machine is online. It can be accessed from the GradePoint 2020 Main Menu screen and from Student Activity Watch. It differs from the Student Watch Grid in three important aspects. • Student Watch produces an easy to see and review listing that tracks student progress within the Tech-Lab System. NetOp tracks workstation activity graphically, allowing instructors to see exactly what students at that workstation see. • NetOp allows instructors to override a workstation’s mouse cursor to shut down or start up programs from the instructor machine. It does not alert the instructor, however, when a workstation is being used incorrectly. Student Watch is a simple monitoring program that can be set to "flag" students when they take too long to log on to Tech-Lab or if they appear to be dallying during an exercise or test. • NetOp also has other features that make it useful outside Tech-Lab itself, such as the ability to demonstrate functions to one or more workstations at a time. For the full range of NetOp functions, please see the accompanying NetOp manual or its help file. Selecting the Supervision and Control icon from the GradePoint 2020 Main Menu screen will launch NetOp. NetOp will search the Tech-Lab network for all computers with Tech-Lab installed. Offline computers will not appear in the listing. Active workstations with NetOp deactivated will be marked with a red exclamation point (!). Note: In order for NetOp to work properly with the Tech-Lab network, the "classroom name" for the technology lab must be listed as "Lab." Some systems may experience a known "bug" where the installation fails to assign the NetOp classroom name. If NetOp fails to find any workstations over an active network, this is the likely cause. To correct this situation, select Configurations from the NetOp toolbar and then select Program Options. Select the Classroom tab from the Program Options window that will appear and enter "Lab" in the Classroom Name field. Click OK. NetOp will now locate all online Tech-Lab workstations that share this classroom name. This procedure may also be used to divide a lab between instructors. Classroom names do not change with GradePoint 2020's selected class. 65 GradePoint 2020 Installation and User Guide 66 GradePoint 2020 Installation and User Guide GRADEPOINT EDITOR The GradePoint Editor screen is where courses and evaluations can be created and edited. The GradePoint Editor screen is divided into two sections: the toolbar and Course List Pane. The Course List Pane lists all courses and evaluations available on the Tech-Lab Network. Selecting a course or evaluation to edit starts a wizard that will walk you through the editing process. Tech-Lab, User-Defined, and Evaluations are separated on three different layers. Some courses cannot be edited. When such a course is selected, a View button will replace the Edit button. If a view-only course is duplicated, the duplicate can be edited. The following functions can be performed from the GradePoint Editor toolbar: • Show Tech-Lab courses to edit • Show Evaluations to edit • Show user-defined courses to edit • • Create user-defined courses View and print GradePoint Editor reports • Create evaluations • • Duplicate courses, using the Duplicate button Create and customize courses using Tech-Lab units 67 GradePoint 2020 Installation and User Guide Curriculum Layers of the List Pane GradePoint Editor's List pane is a three-layered list box containing the courses and evaluations available on the Tech-Lab Network. While courses do not appear in Tech-Lab Grades or the Scheduler until they are related to a class, all courses and evaluations installed to this Tech-Lab system will appear in the GradePoint Editor List pane, on the appropriate layer. If the course or evaluation wanted is not listed in this pane, it does not exist on this Tech-Lab System. It may have been previously deleted via the Configurator. Switch between views of available modules and evaluations to edit with the buttons on the toolbar. Tech-Lab This button calls up all Tech-Lab courses available to edit. This action will take a moment. If a Tech-Lab module is not listed here, it has not been installed on this Tech-Lab System. Customized courses with media-rich units are handled as Tech-Lab courses. User-Defined This button calls up user-defined courses available to edit. If a user-created course is not listed here, it was either created on another Tech-Lab Network or it has been deleted via the Configurator. User-defined courses can only be created while this layer is active. Customized media-rich courses are not handled as user-defined courses. Evaluations This button calls up all evaluations available to edit on this Tech-Lab System. only be created while this layer is active. Evaluations may Editing Courseware Tests Pretests, tests, and posttests in courses can be edited for content with GradePoint 2020’s GradePoint Editor. Questions may be rephrased. Answers can be switched around. Competencies may be linked to different pretest and posttest questions. Course titles may be renamed. Instructors can also create their own user-defined courses and edit them. 68 GradePoint 2020 Installation and User Guide Note: When one instance of the GradePoint Editor is opened on the Tech-Lab network, another instance of the GradePoint Editor may also be launched. A warning message, however, will be displayed if more than one GradePoint Editor tries to edit the same course or evaluation. Until the first GradePoint Editor saves that course or evaluation, the second GradePoint Editor will only be able to view the questions, competencies, and rubrics or any course. Editing Tests, Pretests, and Posttests 1. From the Editor screen, select either Tech-Lab, User-Defined, Or Evaluation, depending on which item needs to be edited. 2. Click on the course or evaluation to be edited. Only one item may be edited at a time. 3. Click on the Edit button on the toolbar. The Edit window will appear. 4. To change the course’s title, simply type in the text field below Course Title. For all other changes, select the appropriate component to edit: Competencies, Test, Pretest, Or Posttest. 5. Click on Edit. The Edit window will appear for the component selected. 6. Highlight the selection to be edited. Only one selection may be edited at a time. 7. Click the Edit button to change the item’s wording or answer. The Edit window will appear. 69 GradePoint 2020 Installation and User Guide 8. Make changes as needed. Click on the OK button when finished. Repeat steps 4 to 7 as needed. Be sure all competencies are linked to at least one question or competency reports may not accurately reflect student needs. 9. When all changes are finished, click the OK button in the GradePoint Editor window. 70 GradePoint 2020 Installation and User Guide Note: Editing modules affects all instances of that module on the Tech-Lab system, so it is important to remember that what one instructor does may adversely affect another’s class. Changing competencies’ linkage in the middle of a semester, for example, may retroactively change Competency reports for those students who have already taken that course. Adding a competency to a course after a student has completed it will alter that student’s records by adding an "N" for that new competency. Changing an answer to Tech-Lab tests may affect reports, but will not affect the actual grades. Link Questions to Competencies Competencies are topics within the course’s subject. They are linked to test, pretest and posttest questions. When a student answers a question, his Competency Threshold and Competency Gains are affected for those competencies linked to that question. Competencies chart what students have learned and in what particular areas their strengths lie. If a pretest or posttest question has been changed significantly, then that question may need to be linked to a different Competency than before. In addition, care should be taken that all competencies are linked to at least one posttest question within that module. Otherwise, students’ threshold ratings may be adversely affected. If no question remains appropriate for the competency, it should be deleted. 1. From the Editor screen, select either Tech-Lab, User-Defined, or Evaluation, depending on which title needs to be edited. 2. Click on the courseware to be edited. Only one title may be edited at the time. The Edit window will appear. 71 GradePoint 2020 Installation and User Guide 3. Select either Test, Pretest, or Posttest from the Component List. Linkage may also be altered by clicking Competencies. 4. Click on the Edit button. The Edit Selection window will appear. 5. Select question to be linked. Only one question may be linked at a time from this screen. If linking via competency, highlight a competency. 6. Click on the Link button. A list of competencies will appear. Highlight competencies that should be linked to this question. Deselect those competencies that no longer properly apply. If linking via the competency component, a list of pretest and posttest questions will appear. In this case, highlight a question to create linkage. 7. Click OK when finished. Repeat steps 3 to 7 as needed. 8. When all changes are finished, click the OK button in the GradePoint Editor window. 72 GradePoint 2020 Installation and User Guide Changing Question Order Unless otherwise altered, most courses list questions in the pre- and posttest sections in the same order. One way question order may be changed is in the Configurator by switching to Random from the Test tab. Another way is use the GradePoint Editor to manually change the order of pretest or posttest questions. Test order changes cannot override the Random setting. 1. From the Editor screen, select either Tech-Lab, User-Defined, or Evaluations depending on which module needs to be edited. 2. Click on the course or evaluation to be edited. Only one title may be edited at a time. 3. Select Test, Pretest, or Posttest from the component list. 4. Highlight question to be moved. Only one question may be moved at a time. to move the question up or down in the order. Repeat as needed. The 5. Use the Arrows order shown is the order the questions will be presented, unless the workstation or lab profile has been set to random question order. Click OK when finished. 6. Click the OK button in the GradePoint Editor window. Adding Questions to Courses Instructors may add their own questions to Tech-Lab courses. These questions must be in the multiple choice format of "A, B, C, or D." Questions may be written in Notepad and then cutand-pasted into the proper text fields. Be sure to consider linking questions to competencies. 1. From the Editor screen, select either Tech-Lab, User-defined, or Evaluations depending on which course needs to be edited. 2. Click on the course or evaluation to be edited. Only one title may be edited at a time. 3. Select Test, Pretest, or Posttest from the component list. 4. Click on the Edit button. The Edit Selection window will appear for the component selected. 5. Click on the Add button. A blank Question & Answer window will appear. 6. Type or paste the new question into the text field. Be sure to include four possible answers: Students will be given the choice of A, B, C, or D. 7. Select Correct Answer as either A, B, C, or D. Click OK when complete. 8. Move Question with ARROW buttons, if desired. Click OK. 73 GradePoint 2020 Installation and User Guide Deleting a Question Questions may be deleted from any test, but instructors must be careful not to leave a competency without at least posttest linkage, as this will adversely affect students’ threshold ratings. 1. From the Editor screen, select either Tech-Lab, User-Defined, or Evaluations depending on which course needs to have questions deleted from its tests. 2. Click on the course or evaluation to be edited. Only one title may be edited at the time. 3. Select Test, Pretest, or Posttest from the Components list. 4. Click the Edit button. The Edit Selection window will appear for the component selected. 5. Highlight question to be deleted. Only one selection may be deleted at a time. 6. Click Delete to remove this question. The question will be deleted. 7. Click OK. The Edit Selection window will reappear. 8. Click the OK button in the GradePoint Editor window. If you click Cancel at this point, the question will be returned to the test. 74 GradePoint 2020 Installation and User Guide Competencies As mentioned previously, competencies are topics within a course or evaluation and they are linked to test questions. When a student answers a question, his Competency Threshold and Competency Gains are affected for those competencies linked to that question. Competencies scores are objective assessments that tell instructors which aspects of a course’s subject students have learned and to what degree. With GradePoint Editor, instructors may edit existing, import, or add new competencies to a preexisting Lab Course. Instructors may also browse competencies and their related questions from other courses and add them to the course or evaluation they are editing. For example, Mr. Hernandez wishes to add a competency about local airports to his user-defined course on aviation. Not only are they are often discussed in class, but a field trip is planned to a nearby airfield. Mr. Hernandez creates a competency called "Local Airports." He also adds two questions each to the pretest and the posttest: "Which field is closest to the school?" and "Which is the biggest airport in the county?" These four questions are then linked to the new competency, "Local Airports." Mr. Hernandez then browses to a competency from another user-designed course he created called, "Famous Aircraft Disasters." He copies this competency – and the associated questions – to the aviation course he is editing. Mr. Hernandez used two different methods of creating competencies for his new course. He created the first competency and he copied the second from another course, the directions for which follow below. Adding a New Competency It is imperative that the added competencies be linked to at least one test question or one pre-test and one posttest question, otherwise students will always receive a Competency Threshold Rating of "N" on that competency in Competency Reports. 1. From the GradePoint 2020 Main Menu screen, click on the Editor icon. The GradePoint Editor will appear. 2. Select Tech-Lab, User-Defined or Evaluation so that the course or evaluation to add a competency to appears in the list below the toolbar. 75 GradePoint 2020 Installation and User Guide 3. Select the course to edit and then select Edit from the toolbar. Only one course may be edited at a time. 4. Select Competencies and click Edit. The Competency List window will appear. 5. Click Add. The Competency window will appear. 6. Type in the new competency’s title and description in the proper fields. Only one Competency may be added at a time. 7. Click OK to accept the new competency. The Competency List window will reappear with the new competency added. 8. The new competency may be linked now, if desired. Highlight the new Competency and click Link. Otherwise, click OK. The GradePoint Editor window reappears. 76 GradePoint 2020 Installation and User Guide 9. Click the OK button to close GradePoint Editor and return to the Editor window. Linking Competencies to Questions Without linkage, a competency means nothing. Instructors would then have no way of tracking if students have actually mastered a topic within Tech-Lab. A competency must be linked to at least one test question or related to one pretest and one posttest question. 1. Click on the Editor icon from the Main Menu screen. GradePoint Editor will appear. 2. Select Tech-Lab, User-Defined, or Evaluation from the toolbar, depending on which course or evaluation title needs to be edited. Only one course or evaluation can be edited at a time. 3. Select the course to be edited. Click on the Edit button. The Edit window will appear. 4. Select Competencies from the Components field and click the Edit button. Linkage may also be altered by selecting the Test, Pretest, or Posttest menu items. A list of competencies (or test questions) will appear. 5. Highlight the competency to be linked. Only one competency may be linked/edited at a time, but it can be linked to any number of test questions within its course or evaluation. If linking via a test list, highlight a question. 6. Click on the Link button. A list of test questions will appear (two lists for courses and one list for evaluations). Highlight questions to create linkage. Questions may also be deselected by clicking on them. If linking via a question, a list of competencies to select will appear. Click OK when finished. 77 GradePoint 2020 Installation and User Guide 7. When all changes are finished, click the OK button in the GradePoint Edit window. Clicking Cancel at this point will negate all changes – linkage and editorial – created in this editing session. Editing Competencies The name and description of a competency can be changed without affecting linkage. 1. Click on the Editor button from the Main Menu screen. GradePoint Editor will appear. 2. Click on the Tech-Lab, User-Defined, or Evaluation button, depending on which course or evaluation needs to be edited. Only one course or evaluation can be edited at a time. 3. Select the course to be edited and then click on the Edit button. The Edit window will appear. 4. Select Competencies from the Components field. Linkage may also be altered by clicking Test, Pretest, or Posttest. 5. Click on the Edit button. A list of competencies (or test questions) will appear. 6. Select the competency or question that needs editing and click the Edit button. Change the title and description by typing over the appropriate fields. 7. Click OK when finished. Browse and Copy Competencies 1. From the GradePoint 2020 Main Menu screen, click on the Editor icon. GradePoint Editor will appear. 2. Click on the appropriate Tech-Lab, User-Defined or Evaluation button so that the course or evaluation title to add a competency to appears in the list below the toolbar. 3. Select the title to edit and then select Edit from the toolbar. Only one title may be edited at a time. 4. Select Competencies from the Components field and click on the Edit button. The Competency List window will appear. 5. Click on the Browse button. The Browse Curriculum window will appear, containing a list of the curriculum loaded into the Tech-Lab System. 78 GradePoint 2020 Installation and User Guide 6. Choose the title that contains the desired competency by double-clicking it. Only one title may be reviewed at a time. A list of that title’s competencies will appear. 7. Select the competency (or competencies) to be imported by using the cursor to place a check in the appropriate box. Use the Select All button to copy all the competencies. The competency’s linked questions may also be imported at this time by checking the box on the lower left, Include Linked Questions. Click the OK button when ready to copy. 8. The Competency List window reappears. Link the new competency (or competencies) at this point if desired, by highlighting the new competency and clicking the Link button. Otherwise, click OK. The GradePoint Edit window reappears. 9. Click the OK button to close the window and return to GradePoint Editor. 79 GradePoint 2020 Installation and User Guide Rubrics Rubrics appear within select Tech-Lab courseware. They are the observational measurements an instructor makes of the students' ability to apply the knowledge gained from that Tech-Lab course to the physical world. Rubric assessments affect the workbook portion of the students' lab grades, with each rubric counting as one activity. Rubrics are the only "activity" that can be edited by an instructor. Editing a rubric does not alter the grades of students who have already been assessed via the rubric feature. Create and Edit Rubrics Only some Tech-Lab courses contain rubrics. If the Tech-Lab title to be edited does not currently have rubrics, it cannot be configured to hold new rubrics. Rubrics may be created in Customized Courseware an instructor creates from the Tech-Lab tab. 1. From the GradePoint's Main Menu screen, click on the Editor icon. The GradePoint Editor will appear. 2. Click on the Tech-Lab button in the Editor toolbar. The list of available Tech-Lab courses will appear. 3. Select the Tech-Lab title to be edited. 4. Click on the Edit button. The Edit window will appear. 5. Select Rubrics from the Components list. Click on the Edit button in the Edit window. The Rubric List window will appear. 6. Click on the Add button. The Assessment Directives window will appear. 7. Enter the title for the new rubrics in the Rubrics Assessment Title text field, no greater than 40 alphanumeric characters. 80 GradePoint 2020 Installation and User Guide 8. Enter a short description of the task students are to perform; thus demonstrating the knowledge and skills acquired in the Rubric Scenario text field. Hard carriage returns are acceptable in this field. 9. Click on the Add button in the Assessment Directives window. The Assessment Directive window will appear. 10. Enter the name of the new rubrics directive in the Assessment Directive text field. 11. Enter between two to five assessments in the Assessments text fields. From the top, enter the assessments in order from the most correct assessment (100%) to the least correct assessment (0%). As each new assessment is added, each assessment will have a gradient score automatically assigned to it. Assessments will display in Tech-Lab in the order shown here. Click on the OK button when finished. 81 GradePoint 2020 Installation and User Guide 12. The Assessment Directives window will appear. Another scenario may be added by clicking the Add button and repeating steps 10 and 11. Directives may be reordered by selecting a scenario and using the arrow keys to move the scenario up and down in the Assessment Directives list. Click on the OK button. 13. The Rubrics List window will appear. Repeat steps 5 through 12 until all necessary rubrics have been created. Rubrics may be reordered by selecting a rubric and using the arrow keys to move the rubric up and down in the Rubrics Assessment list. 14. Click on the OK button to return to the Edit window or click on the Cancel button to erase the new rubric. 15. The Edit window will appear. Select another component to edit or click on the OK button. Assessment Scoring Rubric assessments are automatically assigned values based on the number of available assessments for that directive. Two Assessments = 100% for the correct response and 0% for the wrong response. Three = 100% for the best assessment, 50% for the better response, and 0% for the least. Four = 100% for the best assessment, 67% for the better response, 33% for the good response and 0% for the least correct response. Five = 100% for the best assessment, 75% for the better response, 50% for the good response, 25% for the response that isn't quite wrong and 0% for the least. Customized Courseware Every Tech-Lab course contains interactive content in the form of Units. Units may contain multimedia presentations, activities, diagrams, and/or educational text. Customized Tech-Lab courses are created by copying pre-existing Tech-Lab multimedia units from other Tech-Lab courses. 82 GradePoint 2020 Installation and User Guide Unlike user-defined courses, customized Tech-Lab courses are grade-weighted based on workbook grades as well as pretests and posttest scores. Instructors who create customized TechLab courses will need to create pretests and posttests, as well as competencies and rubrics, as detailed previously in this chapter. Creating Customized Courses Units may be added to customized courseware but the contents (unit tests, media, illustrations, etc.) of each unit cannot be altered. 1. From the Editor screen, select Tech-Lab. 2. Click on the Create button on the toolbar. The Create window will appear. 3. Enter the customized course’s title in the text field below Course Title. Select Units from the Components field and click the Edit button. The Unit List window will appear. 4. Click on Add. The Browse Curriculum window will appear. 5. Highlight a Tech-Lab course to copy units from by clicking on its title. Click on the Select button. The Browse Units window will appear. 83 GradePoint 2020 Installation and User Guide 6. With the mouse, place a checkmark next to each unit to be copied to the customized course. Click on the OK button. The units are copied to the course as the Unit List window reappears. 7. Repeat steps 4, 5, and 6 until all desired units have been copied to the customized course. Click OK to return to the Create window. 8. Select one of the remaining components to edit: Competencies, Test, Pretest, or Posttest. Students cannot enter customized courses without a pretest and a posttest. 9. Click on Edit. The Edit window will appear for the component selected. Add new components or Browse to copy components from other courses. 10. Edit as needed. Click on the OK button when finished. Repeat steps 8 to 9 as needed. Be sure all competencies are linked to at least one question or competency reports may not accurately reflect student needs. 11. When all changes are finished, click the OK button in the Create window. Changes are saved. User-Defined Courses User-defined courses are courses created by the technology instructors who use GradePoint 2020. Like Tech-Lab’s multimedia courses, user-defined courses contain a pretest and a posttest, and may contain competencies. They can be used to create reports. Students are graded in userdefined courses the same way as Tech-Lab courses, except with a different Grade Weight system. Unlike Tech-Lab or customized courses, user-defined courses cannot contain units, activities, or multimedia files. Instead, they supplement class discussions, filmstrips, reading assignments, and/or other activities. 84 GradePoint 2020 Installation and User Guide For example, Mrs. Goldberg decides to create a course about the Internet for her science class. She creates competencies about HTML, e-mail, search engines, browsers, home use, and business use. She also writes three or four multiple-choice questions about each to see how much her students already know about the Internet; this is her pretest. She rephrases these questions for the posttest, perhaps making the questions slightly harder. Mrs. Goldberg then links the competencies to the questions. She does all this in the GradePoint Editor. After installing the new Internet course onto a Tech-Lab workstation, Mrs. Goldberg begins scheduling students to take it in the next rotation. After the workgroup takes the pretest, Mrs. Goldberg leads them in a discussion of the Internet and computers, assigns them a video to watch, and gives them a reading list for this rotation. Near the end of the rotation, the students take their posttests. Creating User-Defined Courses Questions and Answers can be pre-written in a text program like Notepad and then cut-andpasted into the appropriate text fields. Questions must be in "A, B, C, or D" multiple-choice format. 1. Click on the Editor icon on the Main Menu screen. The GradePoint Editor will appear. 2. Click on the User-Defined button on the GradePoint Editor toolbar. A list of all user-defined courses created thus far will appear in the pane. 3. Click on the Create button. The Create window will appear. 4. Type the new course’s name in the Course Title field. 5. Begin creating the course components by selecting Competencies, Pretest, or Posttest from the Components field. 6. Click the Edit button. The Edit window will appear for the component selected. 7. Click on the Add button. A blank Edit window will appear. 8. Type or paste question and answer or competency title and description in the appropriate fields. Only one question or competency may be added at a time. You may also import competencies and their linked questions from other courses. 9. Click OK. Repeat steps 5 to 9 as needed. 10. Link questions to competencies. Check a selection and then click the Link button. If linking competencies, test questions will appear. If linking questions, competencies will appear. Click OK. Repeat as needed. 11. When all changes are finished, click the OK button in the Edit window. Do not click Cancel unless necessary. All changes and additions from this session will be deleted if Cancel is clicked. 85 GradePoint 2020 Installation and User Guide 12. A new course is available through the Configurator immediately, but must be related to a profile before students can enter the course. Evaluations Evaluations are tests created by an instructor using GradePoint 2020. Like Tech-Lab’s courses, evaluations contain competencies based on a test and testing results can appear on reports. Students are graded in evaluations strictly on the basis of one set of test questions. Lab grade weights are not used. Evaluations do not contain activities, multimedia files, or pretests. They are, in effect, exams students take electronically via their Tech-Lab workstations. Creating Evaluations Questions and answers can be pre-written in a text program like NotePad and then cut-andpasted into the appropriate text fields. Questions must be in a "A, B, C, or D" multiple-choice format. 1. Click on the Editor icon from the Main Menu screen. The GradePoint Editor will appear. 2. Select Evaluation from the GradePoint Editor toolbar. A list of all evaluations created thus far will appear in the pane. 3. Click on the Create button. The Create window will appear. 4. Type the new evaluation’s name in the title field. 5. Begin creating the evaluation components by selecting Competencies or Test. 6. Click Edit. The Edit window will appear for the component selected. 7. Click Add. A blank Edit Selection window will appear. 8. Type or paste question and answer or competency title and description in the appropriate fields. Only one question or competency may be added at a time. Instructors may also import competencies and their linked questions from other courses or evaluations. 9. Click OK. Repeat steps 5 to 9 as needed. 10. Link questions to competencies. Check selection and then click the Link button. If linking competencies, test questions will appear. If linking questions, competencies will appear. Click OK. Repeat as needed. 11. When all changes are finished, click the OK button in the Edit window. Do not click Cancel unless necessary. All changes and additions from this session will be deleted if Cancel is clicked. 86 GradePoint 2020 Installation and User Guide 12. Add the new evaluation to the workstation via the Configurator. Select Evaluations as if they were user-defined courses. GradePoint Editor Reports From within the Editor screen, the following reports may be generated: • Competencies by Course • Competency List • Questions by Course • Pretest Questions by Course • Posttest Questions by Course Print Editor Reports 1. Select an appropriate class from GradePoint 2020’s Main Menu screen Selected Class dropdown menu. The class must have the course or evaluation you want to print a report on related to it, or it will not appear as an option. 2. Click on the Editor icon. The GradePoint Editor screen will appear. 3. Click on the Reports button in the Editor toolbar. The Available Reports window appears. 4. Select the report you want to generate. Exclude course related to the selected class by clicking the Modify button. Unchecked courses and evaluations will NOT appear in this report. Only courses associated with the class at the top of the screen will appear in the menu. Click OK. 5. Click on the View Report button. Once the report has been generated, it may be printed or viewed on-screen. 6. Exit Report Viewer when you are done. GradePoint 2020 will remain inactive while any report is open. MANAGER MAINTENANCE Manager Maintenance is where the default settings for GradePoint 2020 can be found. The Manager Maintenance screen is divided into six sections: the toolbar, Default Lab Grade Weights, Competency Thresholds, Grid Display Font, Default Language Setting and Display Settings. 87 GradePoint 2020 Installation and User Guide The Default Lab Grade Weights section allows instructors to adjust how aspects of modules are computed, thus affecting how students’ grades appear in reports and in the GradeBook from this instance of GradePoint 2020. In lieu of any specific class weights selected, these are the formulations used. The Default Competency Thresholds section sets the benchmarks by which students’ competencies are measured. Instructors may also choose to select specific class thresholds for a class. Grid Display Font is the font used in the grid displays found in Lab Grades, Scheduler, Student Watch, and GradeBook. The Default Language Setting section resets the default language of GradePoint 2020 to English, French, or Spanish when that feature is enabled. The Display Settings section allows users to customize the appearance of GradePoint 2020 by altering the background of the Security screen and the Main Menu screen, as well as the placement of icons. Using the Add, Rename and Remove buttons, the instructor can import JPEG images for use as background art, change the names that will be seen in the list of art selections, and delete unwanted background art. The following functions can be performed from the Manager Maintenance toolbar: • Purge the GradePoint 2020 database. 88 GradePoint 2020 Installation and User Guide • Generate reports. Competency Thresholds Competency threshold ratings are used in the Competency Reports. Competency thresholds do not affect grades, but reflect possible opportunities for improvement a student may have. For example, instructors may wish to assign individual reading assignments to students in areas in which they may be deficient. Once a student begins a pretest, a competency threshold becomes available and will appear on related reports. Until the posttest has actually been completed, the threshold rating will always be "N." Once that posttest has been completed, a numerical rating will be determined. The actual numerical rating will likely vary from competency to competency within that module. Answers from the tests are separated into groups of competencies. The actual score for each competency is compared to the thresholds as set by the Instructor in the Default Lab Grade Weights section or in the Class Lab Grades as discussed in the Class Maintenance chapter. If the score is greater than or equal to the upper threshold, the student receives a "3" (mastered). If the score falls between the upper and lower thresholds, that student receives a "2" (requires supervision). If the score is less than the lower threshold, the student receives a "1" (not mastered). Again, until the posttest has been started, a competency threshold rating will not appear. For those students yet to finish a course’s posttest, an "N" rating for those related competencies will appear in the reports. Adjusting the Default Thresholds Adjusting default settings affects all classes on this instance of GradePoint 2020 not set to class specific weights. 1. Click on the Manager Maintenance icon from the GradePoint 2020 Main Menu screen. The Manager Maintenance screen appears. 2. In the Competency Thresholds section of the screen, adjust the Upper and Lower Thresholds. The upper threshold will never equal, or be less than, the lower threshold. The threshold setting automatically self-corrects. 89 GradePoint 2020 Installation and User Guide 3. To accept the new thresholds, simply return to the Main Menu screen. GradePoint will automatically save the data. Grade Weights Students' grades are computed based on grade weighting. A student’s lab grade for a Tech-Lab or user-defined course is determined from pretest, posttest, and workbook scores, factoring in weighting. This grade weighting function allows the instructor to assign a specific weight to the pretest, posttest, and workbooks from each course. Weight refers to the percentage that specific score goes towards the final grade. User-Defined courses use a grade weighting system involving only pretest and posttest scores. Unless an instructor chooses Specific Class Weights in the Class Maintenance screen, Default Lab Grade Weights will be used to compute lab grades. Adjusting Default Lab Grade Weights Default lab grade weights are distinct and separate from GradeBook Grade Weights, which were discussed in the GradeBook chapter. 1. Click on the Manager Maintenance icon from the GradePoint 2020 Main Menu screen. The Manager Maintenance screen appears. 2. Enter weights for the pretest, posttest, and workbooks in the Lab-Volt field. Enter weights for the pretest and posttest in the User-Defined field. Total weight for each field will always equal 100. The posttest score should always have more weight than any other variable. 3. To accept these new default weights, return to the Main Menu screen. These weights will only affect reports and final lab grades from this machine and only for those classes set for default weights. Default lab grade weights have no effect whatsoever on student records on the Tech-Lab network. 90 GradePoint 2020 Installation and User Guide GradePoint Optimization GradePoint 2020’s database is distinct from the networked database student records are drawn from. GradePoint’s database holds information such as schedules, which students and courses are related to which classes, lab grade weights, and more. From time to time, this database needs to be optimized to maintain efficiency. Optimizing the database reduces its size and speeds up GradePoint 2020 functions such as report generation. This version of GradePoint 2020 automatically optimizes when needed. This operation may take several minutes, but will greatly improve GradePoint’s performance. While the database is being optimized, instructors will not be able to access GradePoint 2020. Selecting Cancel will stop the optimization process. However, GradePoint will complete optimization of the file that is open to avoid possible corruption caused by improperly closing files. Do not try to manually end this final process; optimization will halt only when it is safe for it to do so. Database Purge The database for GradePoint 2020 can be reset. Resetting the database purges ALL of GradePoint’s current class records, relations, student comments, GradeBook, and Manager Maintenance settings. It does not erase Student Records or Courses, which are stored on the Tech-Lab Server. Resetting the Database 1. Click on the Purge button in the Manager Maintenance toolbar. 2. A Confirmation window appears. Click on the Yes button to have the database purged. Otherwise, click on No. 3. Once the GradePoint database has been reset, the program will automatically close. Upon restarting, the program will re-gather all student records and course information. 91 GradePoint 2020 Installation and User Guide Grid Display Font The display grids found in Tech-Lab Grades, Scheduler, and Student Activity Watch use the regular Arial TrueType font by default. The display font may be changed to any other TrueType font the computer has installed for better visibility. It should be noted, however, that changing the grid display font will not affect how reports are printed and viewed. Reports use the default font for the default printer in order to ensure that they will print properly. Changing Grid Display Fonts 1. Click on the Manager Maintenance icon from the Main Menu screen. The Manager Maintenance screen appears. 2. In the upper left of the screen, the name and size of the currently used grid display font will be listed. To select another font or to change its size, click on the Change button. The Font window appears. 3. Select the TrueType font from the font menu. Instructors may also select a new size or style from the other lists displayed. A sample of the font selected will appear in the sample box. 4. Click on the OK button. Clicking on the Cancel button at this point will revert the font back to what it was before the Font window was opened. 92 GradePoint 2020 Installation and User Guide Language Selection In order to reach as many students and instructors as possible, GradePoint 2020 is being internationalized. Classes may now be set either to the default language or to one of the available languages via the Class Maintenance's Class Weights function. Classes set to Default will display all options and buttons in whatever the GradePoint's default language is. Setting the Default Language Currently, the default language setting is locked to English. In the future, the procedure for changing the default language will be as follows: 1. Click on the Manager Maintenance icon. The Manager Maintenance screen will appear. 2. Select the desired default language from the Current Default Language drop-down menu in the Language Selection portion of the Manager Maintenance screen. 3. Click on the Menu button to accept the new default language. Note: Language Selection does not alter or translate courses, evaluations, assignments, Student Journals or student comments. Language selections for Tech-Lab workstations can be made via the Configurator. The Appearance of GradePoint 2020 The Display Settings section of Manager Maintenance allows users to customize the appearance of GradePoint 2020 with a selection of various backgrounds for the Security and Main Menu screens. Icon placement on the Main Menu screen can also be rearranged from this control panel as well, by manipulating the Layout and Location controls. 93 GradePoint 2020 Installation and User Guide Changing the Background The background for the Security screen will always be the same as the background for the Main Menu screen. 1. Select the Manager Maintenance icon on the Main Menu screen. The Manager Maintenance screen will appear. 2. In the Display Settings section, select an image from the Background drop-down menu. A thumbnail of that image will appear in the Preview pane. 3. Select an arrangement of icons by using the Layout spin controls to cycle through the available icon layouts. The Preview pane will reflect each choice. 4. Select a screen position for the icon grouping by using the Location spin controls to cycle through the available positions available to the selected layout. Some layouts will only have one available position. The preview pane will reflect each available choice. 5. Click on the Menu button to leave the Manager Maintenance screen. The Main Menu screen will now reflect the design as displayed in the preview pane. 94 GradePoint 2020 Installation and User Guide Manager Maintenance Report From within the Manager Maintenance screen, the following reports may be generated: • Student Roster Generate the Student Roster 1. Select a class from GradePoint 2020’s Main Menu screen’s Selected Class drop-down menu. 2. Select the Manager Maintenance icon. The Manager Maintenance screen will appear. 3. Click on the Reports button in the Manager Maintenance toolbar. The Available Reports window appears. 4. Select Student Roster. Exclude students related to the selected class by clicking on the Modify button. Unchecked students will not appear in this report. Click on OK. 5. Click on the View Report button. The Student Roster screen appears. Once the report has been generated, it may be printed or viewed on-screen. 6. Exit the roster when you are done. GradePoint 2020 will remain inactive while any report is open. For more information on the Student Roster, please see the next chapter of this manual. 95 GradePoint 2020 Installation and User Guide 96 GradePoint 2020 Installation and User Guide GRADEPOINT 2020 REPORTS Generating a report with GradePoint 2020 is an easy operation. Reports are based on different combinations of the following possible selections: assignments, student, course, evaluation, or competency. Once generated, a report can be printed or faxed easily, assuming the abilities are present on the PC used. Report Types • Competency All Competency Reports show the level of performance the students are operating at, rather than grades. • • Competencies by Course • Competency Gains by Course • Competencies by Student • Competency Gains by Student GradeBook All GradeBook Reports show the grades and averages of students as tracked within GradeBook. • • Assignment Grades by Assignment • Assignment Grades by Student • Sheet Grades • Sheet Grades Detailed History History Reports are a subset of Administrative Reports, which show the students’ experience within Tech-Lab. • Schedule History • Last Locked Rotation • Student Answers • Course History by Course 97 GradePoint 2020 Installation and User Guide • • Course History by Student Indices Index Reports are a subset of Administrative Reports, which refer to various compilations of data. • • Questions by Course • Competency List • Assignment List • Grade Type List • Student Roster Lab Grades All Lab Grades Reports show the results of various tests, activities, and evaluations used within the Tech-Lab environment. • Grades by Courses • Grades by Student • Evaluation Grades by Evaluation • Evaluation Grades by Student • Workbook Grades by Student • Workbook Grades by Student (show all) • Workbook Grades by Course • Workbook Grades by Course (show all) • Grades Detailed by Course • Grades Detailed by Students 98 GradePoint 2020 Installation and User Guide Viewing Reports Reports are created by first selecting the class you are interested in and then selecting the segment of GradePoint 2020 that the desired report relates to. Once selected, a list of available reports appears. Each screen has a different set of available reports. Some reports, such as the Student Roster, are available to more than one screen. Scheduler • Last Locked Rotation • Course History by Course • Course History by Student • Schedule History • Student Roster GradePoint Editor • Competencies by Course • Competency List • Questions by Course • Pretest Questions by Course • Posttest Questions by Course Tech-Lab Grades • Competencies by Course • Competencies by Student • Competency Gains by Student • Competency Gains by Course • Evaluation Grades by Student • Evaluation Grades by Evaluation • Grades by Course • Grades by Student • Grades Detailed by Course • Grades Detailed by Student • Student Answers • Workbook Grades by Course • Workbook Grades by Course (Show All) • Workbook Grades by Student • Workbook Grades by Student (Show All) GradeBook • Assignment Grades by Assignment • Assignment Grades by Student • Assignment List • Grade Type List • Sheet Grades by Student • Sheet Grades Detailed by Student • Student Roster Class and Manager Maintenance • Student Roster Only one report may be selected to view at a time. The appearance of each report may be modified by excluding students and curriculum via the Modify button (by default, all students and curriculum related to the pre-selected class are included in reports). = PRINT the entire report. = PRINT page displayed. 99 GradePoint 2020 Installation and User Guide = ZOOM IN. = ZOOM OUT. = DISPLAY the first page. = DISPLAY the previous page. = DISPLAY the next page. = DISPLAY the final page. = PAUSE pagination of the report. = CLOSE the report and return to the Reports window. The report will appear on the monitor. Very long reports will paginate as the report compiles. Review or print the report via the navigation buttons at the top of the Report Viewer. The report must be closed before returning to other GradePoint features. Administrative Reports The Administrative reports can be easily divided into two types: History and Index. The History reports consist of Schedule History, Last Locked Rotation, Student Answers, Course History by Course, and Course History by Student. These reports show the students’ experience within Tech-Lab during the current marking period. The Index reports consist of Questions by Course, Competency List, Assignment List, Grade Type List, and the Student Roster. With the exception of the Assignment List, these reports are the least likely to change during the course of a school year, although they may. Note: For obvious reasons, extreme care should be taken with the Student Roster, Student Answers, and the Questions by Course reports. Ideally, these reports should not be printed unless absolutely necessary. If these reports are printed, they should be shredded or disposed of properly. 100 GradePoint 2020 Installation and User Guide Assignment List Report The Assignment List contains a list of assignments from the active GradeBook sheet. Assignments are listed in the same order they appear in the active GradeBook sheet. In addition to listing all assignments, there is a field for comments from instructors for each assignment. 1. Select the class you wish to generate a report on from the Main Menu Selected Class dropdown list. 2. Click on the GradeBook icon. The GradeBook screen will appear. 3. Select the desired grade sheet if that sheet is not currently displayed by clicking on the Select Sheet button in the toolbar. The Create/Select Sheet window appears. Select the desired Interval and Subject from the appropriate drop-down lists. Click Select Sheet and that sheet will appear. 4. Select Reports from the toolbar. The Reports window appears. 5. Select Assignment List by double-clicking on it OR by clicking the Assignment List once and then pressing the View Report button. This report may be altered by selecting Modify and deselecting assignments. Modifying students will not impact the report as students do not appear in this report. 6. After the Assignment List is created, it is displayed on your screen. Use the various function buttons to navigate through the report or to print it. 101 GradePoint 2020 Installation and User Guide 7. Click on the Close button when finished. Access to GradePoint 2020 is restricted until this window is closed. Competency List The Competency List displays a list of competencies based on courses selected. Each competency is displayed with its description. This list is sorted by course. For example, if you select two different module titles, the competencies for the first title will be displayed before the competencies for the second module. Course titles are conveniently displayed at the top of each page and page breaks always occur at the start of a new course. 1. Select any class that has been related to the desired course(s) from the Selected Class dropdown menu. 2. Click on the Editor icon from the Main Menu. The GradePoint Editor will appear. 3. Click on the Reports button in the GradePoint Editor window. The Available Reports window appears. 4. Select Competency List. By default, all courses related to the selected class are included in this report. Exclude courses by clicking the Modify button. Unchecked courses and evaluations will NOT appear in this report. Click OK. 5. Click on the View Report button. The report viewer appears. Use the various function buttons to navigate through the list or to print it. 102 GradePoint 2020 Installation and User Guide 6. Click on the Close button when finished. Access to GradePoint is blocked until this list is closed. Course History by Course Report The Course History by Course report lists modules for which selected students have been scheduled. A checkmark appears next to the courses that have been scheduled. This report is sorted by course. Evaluations are excluded from this report, as they cannot be scheduled for a rotation. 1. Select a class to generate a report on from the GradePoint 2020 Main Menu screen's Selected Class drop-down menu. 2. Click on the Scheduler icon. The Scheduler screen will appear. 3. Select Reports from the toolbar. The Reports window appears. 4. Select Course History by Course. Modify the report at this time by clicking on the Modify button and deselecting unwanted courses and students. Unchecked items will not appear in the report. Evaluations will not appear in the report, even if checked. 5. Click on the View Report button. The report viewer appears displaying the Course History by Course report. Use the various function buttons to navigate through the report or to print it. 6. Click on the Close button when finished. Access to GradePoint is restricted until this window is closed. 103 GradePoint 2020 Installation and User Guide Course History by Student Report The Course History by Student report lists courses for which selected students have been scheduled. A checkmark appears next to the courses that have been scheduled. This report is sorted by students in alphabetical order. A page break occurs at the end of each student. 1. Select the class to generate a report on from the GradePoint 2020 Main Menu Selected Class drop-down list. 2. Click on the Scheduler button. The Scheduler screen will appear. 3. Select Reports from the toolbar. The Reports window appears. 4. Select Course History by Student. Modify the report at this time by clicking on the Modify button and deselecting unwanted students. Unchecked students will not appear in the report. Courses may not be excluded from this report, even if unchecked. Evaluations, which cannot be scheduled for rotations, never appear in this report, even if selected. Click OK. 5. Click the View Report button. The Report Viewer appears. Use the various function buttons to navigate through the report or to print it. 6. Click on the Close button when finished. Access to GradePoint is blocked until this window is closed. 104 GradePoint 2020 Installation and User Guide Grade Type List Report The Grade Type List contains a list of grade types from the active GradeBook sheet. In addition to listing all grade types, the report lists the weight for each grade type. 1. Select the class you wish to generate a report on from the Main Menu Selected Class dropdown list. 2. Click on the GradeBook icon. The GradeBook screen will appear. 3. Click on the Select Sheet button from the GradeBook toolbar. The Create/Select Sheet window will appear. Select the Interval and Subject for the desired sheet. 4. Select Reports from the toolbar. The Reports window appears. 5. Select Assignment List by double-clicking on it OR by clicking the Assignment History once and then pressing the View Report button. This report may be altered by selecting Modify and deselecting students. Assignments may not be modified, even if unchecked. 6. After the Assignment List is created, it is displayed on the screen. Use the various function buttons to navigate through the report or to print it. 7. Click on the Close button when finished. Access to GradePoint 2020 is restricted until this window is closed. 105 GradePoint 2020 Installation and User Guide Last Locked Rotation The Last Locked Rotation report contains the last locked rotation, which is usually the highest numbered rotation for the selected class. This report is especially helpful for posting at the beginning at each rotation. 1. From the Scheduler, create a rotation and click on the Lock Rotation button. A dialogue window will appear with four buttons to choose from: Cancel, Lock this Rotation, Lock and Print Rotation, and Help. 2. Click on the Lock and Print button. The Report Viewer will appear, displaying which courses students are scheduled to take that rotation. Use the various function buttons to navigate through the report or to print it. 3. Click Close to exit. GradePoint 2020 will remain inactive while any report is open. OR 1. From the Scheduler toolbar, click on the Reports button. The Reports window appears. 2. Select Last Locked Rotation. 3. Select View Report. The Report Viewer will appear, displaying which courses students are scheduled to take that rotation. Use the various function buttons to navigate through the report or to print it. 4. Click Close to Exit. GradePoint 2020 will remain inactive while any report is open. 106 GradePoint 2020 Installation and User Guide Questions by Course Report The Questions by Course report contains a complete list of questions of selected courses and evaluations. The correct answer for each question is also listed, effectively making this report an answer key for any Tech-Lab course or evaluation. Note: For obvious reasons, extreme care should be taken with Questions By Course reports. Ideally, this report should not be printed until necessary. If this report is printed, it should be shredded or disposed of properly, after it has been reviewed by concerned parties. Students should not see this report. 1. Select class from GradePoint 2020’s Main Menu screen via the Selected Class drop-down menu. 2. Click on the Editor icon. The GradePoint Editor will appear. 3. Click on the Reports button in the GradePoint Editor toolbar. The Available Reports window appears. 4. Select Questions by Course. Exclude courses related to the selected class by clicking the Modify button. Unchecked courses will NOT appear in this report. Click on OK. 5. Click on the View Report button. The Questions by Course report will appear. Once the report has been generated, it may be printed or viewed online. 6. Exit report viewer when done. GradePoint 2020 will remain inactive while any report is open. 107 GradePoint 2020 Installation and User Guide Schedule History The Schedule History report displays a list of students and the title of the course for which they have been scheduled. It does not indicate results or even which tests were taken or when. It is most often used in conjunction with the Scheduler. This report is sorted by rotation. Page breaks always occur at the start of a new rotation. 1. Select the class you wish to generate a report on from the Main Menu Selected Class dropdown list. 2. Click on the Scheduler icon. The Scheduler screen will appear. 3. Select Reports from the toolbar. The Reports window appears. 4. Select Schedule History by double-clicking on it OR by clicking Schedule History once and then pressing the View Report button. Selecting Modify and deselecting students can alter this report. Courses may not be excluded from this report, even if unchecked. 5. After the Schedule History is created, it is displayed in the report viewer. Use the various function buttons to navigate through the report or to print it. 6. Click on the Close button when finished. The user will be unable to access GradePoint 2020 until this window is closed. 108 GradePoint 2020 Installation and User Guide Student Answers Report The Student Answers report lists the answers given by students when tested by the Tech-Lab System. It also lists the correct answer for each question asked in each online test. Note: Extreme care should be taken with the Student Answers report. Ideally, this report should not be printed unless deemed necessary. A student could use this report as an "answer key." If this report is printed, it should be shredded or disposed of properly when finished. 1. Select the class for report generation from the Main Menu's Selected Class drop-down list. 2. Click on the Tech-Lab Grades icon. The Lab Grades screen will appear. 3. Click on the Reports button from the toolbar. The Reports window appears. 4. Select Student Answers by double-clicking on it OR by clicking Student Answers once and then clicking the View Report button. The Student Answers generation process may take a while as student files grow in size and number over time. For just the answer key for a course, consider Questions by Courses report instead. 5. After the report is created, it is displayed in the report viewer. Use the various function buttons to navigate through or to print the report. 6. Click on the Close button when you are finished. Access to GradePoint 2020 is restricted until this window is closed. 109 GradePoint 2020 Installation and User Guide Student Roster The Student Roster contains a list of students from the selected class. In addition to containing the students’ names, there is a field for comments from instructors for each student. To promote communication between instructors, the comment field is shared between classes in this instance of GradePoint 2020. For instance, should the first period instructor enter a comment about a student, the seventh period instructor sharing this machine would have access to the comment. As explained earlier in the manual, each instance of GradePoint is unique. An instructor reading a Student Roster on another machine, for example, would not see the same student comments, even if the students are exactly the same. Note: For obvious reasons, extreme care should be taken with the Student Roster. Ideally, the roster should not be printed unless absolutely necessary, as it may contain sensitive information. If this report is printed, it should be shredded, disposed of properly, or filed in a locked drawer when finished. Comments are created and edited from the Class Maintenance screen only. They can also be removed entirely by purging the system (Read the section, Restoring the Database, carefully before doing a purge.). 110 GradePoint 2020 Installation and User Guide 1. Select class from Main Menu screen’s Selected Class drop-down menu. 2. Click on the Class Maintenance icon from the Main Menu screen. The Class Maintenance screen will appear. 3. Click the Reports button in the Class Maintenance toolbar. The Available Reports window appears. 4. Select Student Roster. Exclude students by clicking the Modify button. Unchecked students will NOT appear in this report. Click OK. 5. Click on the View Report button. The Student Roster will appear. Once the report has been generated, it may be printed or viewed online. 6. Exit Roster when you are done. GradePoint 2020 will remain inactive while any report is open. The Student Roster can also be accessed from Manager Maintenance, GradeBook, and the Scheduler. Competency Reports There are four types of Competency reports: Competencies by Course, Competency Gains by Course, Competencies by Student, and Competency Gains by Student. These reports show which courses and evaluations the students are taking, have taken, or are scheduled to take, and vice versa for the selected class. All Competency reports show the level of performance the students are operating at, rather than grades. Each competency report displays student threshold ratings (3, 2, 1, or N) for each competency title selected for the report. The threshold ratings indicate the amount of skill each student has achieved. The higher the rating, the less attention needed. Competencies by Course The Competency by Course report displays student threshold ratings (3, 2, 1, or N) for each competency title selected. This report is designed to show the student’s or students’ performance level ("3" being the highest and "1" being the lowest. "N" means "not completed."). The lower the performance level, the greater the attention that student needs. 111 GradePoint 2020 Installation and User Guide This report is sorted by course. Page breaks always occur at the start of a new course or evaluation listing. 1. From the GradePoint 2020 Main Menu screen, select the class to create the competency report for using the Selected Class drop-down menu. 2. Click on the Tech-Lab Grades icon. The Lab Grades screen appears. 3. From the Lab Grades toolbar, click on the Reports button. The Reports window appears. 4. Select Competencies by Course by double-clicking on it. If modifying the selection pool, first click on the report once and then click the Modify to edit the students and courses to be considered for the report. Click OK. 5. Click on the View Report button. The Report viewer will appear. Use the various function buttons to navigate through the report or to print it. 6. Click Close to exit. GradePoint 2020 will remain inactive while any report is open. Competencies by Student The Competencies by Student report displays the student threshold ratings (3, 2, 1, or N) for each competency title selected. This report is designed to show the student’s or students’ performance level ("3" being the highest and "1" being the lowest. "N" means "not completed."). The lower the performance level, the greater the attention that student needs. These reports are sorted by student. Class codes and student names are conveniently displayed at the top of each page. Page breaks always occur at the start of a new student listing. 112 GradePoint 2020 Installation and User Guide 1. In the GradePoint 2020 Main Menu, select the class to base the report on from the Selected Class drop-down menu. 2. Click on the Tech-Lab Grades icon. The Tech-Lab Grades screen appears. 3. From the Tech-Lab Grades toolbar, click on the Reports button. The Reports window appears. 4. Select Competencies by Student by double-clicking on it. Modifications to the selection pool require the user to instead first click on the report once and then click Modify to edit the students and courses to be considered for the report. 5. Click on the View Report button. The Report viewer will appear. Use the various function buttons to navigate through the report or to print it. 6. Click Close to exit. GradePoint 2020 will remain inactive while any report is open. Competency Gains by Course The Competency Gains by Course report displays the amount of gain between the student’s pretest and posttest grades. It is not the percentage of gain but the difference between the grades expressed as a percent related to specific competencies. If a student’s pretest grade is greater than or equal to that student’s posttest grade, no amount of gain is displayed. The student threshold ratings (3, 2, 1, or N) for each competency selected and the competencies are displayed. This report is sorted by course. Page breaks always occur at the start of a new course or evaluation listing. 113 GradePoint 2020 Installation and User Guide 1. From the GradePoint 2020 Main Menu screen, select the class to base this report on from the Selected Class drop-down menu. 2. Click on the Tech-Lab Grades icon. The Lab Grades screen appears. 3. From the Tech-Lab Grades toolbar, click on the Reports button. The Reports window appears. 4. Select Competency Gains by Course by double-clicking on it. If modifying the selection pool, first click on the report once and then click Modify to edit the students and courses to be considered for the report. Click OK. 5. Click on the View Report button. The Report viewer will appear. Use the various function buttons to navigate through the report or to print it. 6. Click Close to exit. GradePoint 2020 will remain inactive while any report is open. 114 GradePoint 2020 Installation and User Guide Competency Gains by Student The Competency Gains by Student report displays the amount of gain between the student’s pretest and posttest grades. It is not the percentage of gain but the difference between the two scores expressed as a percent. If a student’s pretest score for a given competency is greater than or equal to that student’s posttest grade, no amount of gain is displayed. The student threshold ratings and the competencies for each title selected are displayed in this report. Evaluations, which do not have a second test to compare scores to, are automatically excluded, even if selected during the modification process. This report is sorted by student. The class title and student names are conveniently displayed at the top of each page. Page breaks always occur at the start of a new student listing. 1. From the GradePoint 2020 Main Menu screen, select a class from the Selected Class dropdown menu. 2. Click on the Tech-Lab Grades icon. The Lab Grades screen appears. 3. From the Lab Grades toolbar, click on the Reports button. The Reports window appears. 4. Select Competency Gains by Student by double-clicking on it. To create a report with a limited selection pool, instead click on the report once and then click the Modify button, instead, to edit the students and courses to be considered for the report. 115 GradePoint 2020 Installation and User Guide 5. Click on the View Report button. The Report viewer will appear. Use the various function buttons to navigate through the report or to print it. 6. Click on the Close button. GradePoint 2020 will remain inactive while any report is open. Grade Book Reports There are four types of grade book reports: Assignment Grades by Assignment, Assignment Grades by Student, Sheet Grades, and Sheet Grades Detailed. These reports show which assignments the students have been graded for and what the current averages are. At the end of each section, an average is displayed for that section. Unlike Tech-Lab Grades, the instructor may modify the grades posted in these reports via the online grade book itself. Grades are posted numerically, rounded off to the nearest whole number. Those students who have not been graded for a particular assignment will not have that assignment as a part of their average. Assignments excluded from the Assignment Grades reports will not be included in these reported averages. The weighted averages shown in the Sheet Grades reports are calculated based on the grade types created for that sheet. Other reports related to the online grade book include the Assignment List report and the Grade Type List report. Assignment Grades by Assignment The Assignment Grades by Assignment report displays student grades for each assignment selected from the active GradeBook sheet. These grades are computed based on the GradeBook grade weights that the instructor has assigned to the various grade types. 116 GradePoint 2020 Installation and User Guide This report is sorted by assignment. Page breaks always occur at the start of a new assignment. Grades are posted numerically, rounded off to the nearest whole number. Those students who have not been given a grade for a particular assignment will not appear. The averages posted in this report may not match the current averages posted on the selected GradeBook sheet, as the averages in GradeBook are student averages. This report only averages the scores displayed. For a report of the current weighted averages for the selected sheet, generate either the Sheet Grades by Student report or the Sheet Grades Detailed by Student report. 1. From the Main Menu screen, select the class for the assignment report from the Selected Class drop-down menu. 2. Click the GradeBook icon. The GradeBook screen appears. 3. From the GradeBook toolbar, click on the Select Sheet button. The Create/Select Sheet window appears. From each drop-down menu, select the appropriate Subject and Interval for your report. Click the Select Sheet button. 4. From the GradeBook toolbar, select Reports. The Reports window appears. 5. Select Assignment Grades by Assignment. Click the Modify button to edit the students and assignments to be considered for the report. Only checked items appear in the report. Click OK. 6. Select View Report. The Report viewer appears. Use the various function buttons to navigate through and/or print the report. 117 GradePoint 2020 Installation and User Guide 7. Click on the Close button when finished. The instructor will be unable to access GradePoint until this window is closed. Assignment Grades by Student The Assignment Grades by Student report displays student grades for each assignment selected from the active GradeBook sheet. These grades are computed based on the GradeBook grade weights that the instructor has assigned to the various grade types. This report is sorted by student data. Page breaks always occur with each new student. Grades are posted numerically, rounded off to the nearest whole number. Unmarked assignments will not appear in this report. Each assignment posted will be listed with its grade type as well as the student's grade for that assignment. The averages posted in this report will likely not match the current averages posted on the selected GradeBook sheet, as the averages in GradeBook are inclusive to all grade types. This report ignores grade type weighting. This report averages only the scores displayed. For a report of the current posted averages for the selected sheet, generate a Sheet Grades report. For a report of assignment grades with the grade type weighted average, generate a Sheet Grades Detailed by Student report. 118 GradePoint 2020 Installation and User Guide 1. From the GradePoint 2020 Main Menu screen, select the class to base this report on from the Selected Class drop-down menu. 2. Click on the GradeBook icon. The GradeBook screen appears. 3. From the GradeBook toolbar, click on the Select Sheet button. The Create/Select Sheet window appears. From each drop-down menu, select the appropriate Subject and Interval for the report. Click on the Select Sheet button. 4. From the GradeBook toolbar, select Reports. The Reports window appears. 5. Select Assignment Grades by Student. Click the Modify button to edit the students and assignments to be considered for the report. Only checked items appear in the report. Click OK. 6. Select View Report. The Report viewer appears. Use the various function buttons to navigate through and/or print the report. 7. Click on the Close button when finished. The instructor will be unable to access GradePoint until this window is closed. Sheet Grades by Student The Sheet Grades by Student report displays students' current averages for the active GradeBook sheet. These grades are computed based on the GradeBook grade weights that the instructor has assigned to the various grade types. The grades are inclusive to all grade types related to the selected sheet, including grade types that are currently unmarked, based on the weights assigned to each type. This report is sorted alphabetically by student. Grades are posted numerically, rounded off to the nearest whole number. Unlike the other GradeBook reports, the averages posted here always match the current average posted on the selected sheet. 119 GradePoint 2020 Installation and User Guide 1. From the GradePoint 2020 Main Menu screen, select the class to base the report on from the Selected Class drop-down menu. 2. Click on the GradeBook icon. The GradeBook screen appears. 3. From the GradeBook toolbar, click on the Select Sheet button. The Create/Select Sheet window appears. From each drop-down menu, select the appropriate Subject and Interval for your report. Click the Select Sheet button. 4. From the GradeBook toolbar, select Reports. The Reports window appears. 5. Select Sheet Grades by Student. Click the Modify button to edit the students to be considered for the report. This report does not exclude any assignments. Only checked students appear in the report. Click OK. 6. Click on the View Report button. The Report viewer appears. Use the various function buttons to navigate through and/or print the report. 7. Click on the Close button when finished. The instructor will be unable to access GradePoint until this window is closed. Sheet Grades Detailed by Student The Sheet Grades Detailed report displays students' marked assignments with the corresponding grade types as well as students' current weighted average for the active GradeBook sheet. These sheet grades are computed based on the GradeBook grade weights that the instructor has assigned to the various grade types. Sheet grades are inclusive to all grade types related to the active sheet (including grade types that are currently unmarked and will therefore not appear in this report), based on the weights assigned to each type. This report is sorted alphabetically by student. Grades are posted numerically, rounded off to the nearest whole number. The sheet averages posted here always match the current average posted on the selected sheet. 120 GradePoint 2020 Installation and User Guide 1. From the GradePoint 2020 Main Menu screen, select the class to base the report on from the Selected Class drop-down menu. 2. Click on the GradeBook icon. The GradeBook screen appears. 3. From the GradeBook toolbar, click on the Select Sheet button. The Create/Select Sheet window appears. From each drop-down menu, select the appropriate Subject and Interval for your report. Click the Select Sheet button. 4. From the GradeBook toolbar, select Reports. The Reports window appears. 5. Select Sheet Grades Detailed by Student. Click the Modify button to edit the students to be considered for the report. This report does not exclude any assignments. Only checked students appear in the report. Click OK. 6. Click on the View Report button. The Report viewer appears. Use the various function buttons to navigate through and/or print the report. 7. Click on the Close button when finished. The instructor will be unable to access GradePoint until this window is closed. Lab Grade Reports There are ten different types of Lab Grade reports: Grades by Courses, Grades by Student, Evaluation Grades by Evaluation, Evaluation Grades by Student, Workbook Grades by Student, Workbook Grades by Student (show all), Workbook Grades by Course, Workbook Grades by Course (show all), Grades Detailed by Course, and Grades Detailed by Student. These reports enable the instructor to check a student’s progress via completed pretest, workbook, and posttest results. 121 GradePoint 2020 Installation and User Guide Grades are posted numerically, rounded off to the nearest whole number, in these reports. Those students who have not finished a particular activity or test will be marked as "No Data." Students who have not yet begun a "workbook" or "pretest" in Tech-Lab will not appear in most grade reports. All students appear in the "detailed reports," unless excluded manually. Evaluation Grades by Evaluation The Evaluation Grades by Evaluation report displays student grades for each evaluation related to the selected class unless otherwise modified. The scores shown here are not based on grade weights. Since evaluations consist of one test only, grade weights are never used. This report is sorted by evaluation. Page breaks always occur at the start of a new evaluation listing. Grades are posted numerically, rounded off to the nearest whole number, in these reports. Those students who have not taken an evaluation do not appear in this report. 1. From the GradePoint 2020 Main Menu screen, select the class to report on from the Selected Class drop-down menu. 2. Click on the Tech-Lab Grades icon. The Tech-Lab Grades screen appears. 3. From the Tech-Lab Grades toolbar, click on the Reports button. The Reports window appears. 4. Select Evaluation Grades by Evaluation. Click the Modify button to edit the students and evaluations to be considered for the report. The report writer automatically filters Tech-Lab and user-defined modules out of this report, even if checked. Click OK. 122 GradePoint 2020 Installation and User Guide 5. Click on the View Report button. The Report viewer appears. Use the various function buttons to navigate through and/or print the report. 6. Click on the Close button when finished. The instructor will be unable to access GradePoint until this window is closed. Evaluation Grades by Student The Evaluation Grades by Student report displays student grades for each evaluation related to the selected class, unless modified. No grade weights are used in determining these scores, as evaluations have only one section to score. This report is sorted by student. Student names are conveniently displayed at the top of each page. Page breaks always occur at the start of a new student listing. Grades are posted numerically, rounded off to the nearest whole number. Those students who have not yet taken an evaluation will have "no data" listed as their average. 1. From the GradePoint 2020 Main Menu screen, select the class to base the report on from the Selected Class drop-down menu. 2. Click on the Lab Grades icon. The Tech-Lab Grades screen appears. 3. From the Tech-Lab Grades toolbar, select Reports. The Reports window appears. 4. Select Evaluation Grades by Student. Click Modify to edit the students and evaluations to be considered for the report. The report generator automatically filters Tech-Lab and userdefined courses out of this report, even when checked. Click on the OK button to approve of the modifications. 123 GradePoint 2020 Installation and User Guide 5. Click on the View Report button. Use the various function buttons to navigate through and/or print the report when the report viewer appears. 6. Click on the Close button to close the report viewer when finished. Instructors will be unable to access GradePoint while the report viewer is open. Grades by Course The Grades by Course report displays student grades for each module and evaluation selected. Grades for courses are computed based on the lab grade weights that the instructor has set. This report is sorted by course. Page breaks always occur at the start of a new course listing. Grades are posted numerically, rounded off to the nearest whole number. Students who have opened a course or evaluation, but not finished a particular graded activity, will be marked with a zero. Students who have not yet opened a graded activity on any of the courses will not appear in the report. 1. From the Main Menu screen, select the class to base the Grades by Course report on from the Selected Class drop-down menu. 2. Click on the Tech-Lab Grades icon. The Tech-Lab Grades screen appears. 3. From the Tech-Lab Grades toolbar, click on the Reports button. The Reports window appears. 124 GradePoint 2020 Installation and User Guide 4. Select Grades by Course. Click Modify to edit the students and courses to be considered for the report. Only checked items appear in the report. Click OK. 5. Click on the View Report button. The Report viewer appears. Use the various function buttons to navigate through and/or print the report. 6. Click on the Close button when finished. The instructor will be unable to access GradePoint until this window is closed. Grades by Student The Grades by Student report displays student grades for each course selected. These grades are computed based on the lab grade weights selected for that class. This report is sorted by student. Class title and student names are conveniently displayed at the top of each page. Page breaks always occur at the start of a new student listing. Grades are posted numerically, rounded off to the nearest whole number. Students who have not taken any of the selected courses or evaluations will be marked with "no data." 1. From the GradePoint 2020 Main Menu screen, select the class to base this report on from the class drop-down menu. 2. Click on the Tech-Lab Grades icon. The Tech-Lab Grades screen appears. 3. From the Tech-Lab Grades toolbar, select Reports. The Reports window appears. 4. Select Grades by Student. Click the Modify button to edit the students, courses, and evaluations to be considered for the report. Unchecked items do not appear in report. 125 GradePoint 2020 Installation and User Guide 5. Click on the View Report button. Use the various function buttons to navigate through and/or print the report when the report viewer appears. 6. Click on the Close button to close the report viewer when finished. Instructors will be unable to access GradePoint while the report viewer is active. Grades Detailed by Student The Grades Detailed by Student report displays students’ pretest and posttest grades for each course selected. It also displays the students' grades for each course, which are computed based on the lab grade weights that have been set for that class. When evaluations are listed in this report, the absence of a pretest score and a workbook score will cause the pretest entry to read zero and the workbook entry to read, "No Data." Evaluations do not use grade weights and are solely based on their test scores (listed in this report as posttest). This report is sorted by student. Student names are conveniently displayed at the top of each page. Page breaks always occur at the start of a new student listing. Grades are posted as numerical scores, except for those students who have started, but not finished, a particular activity (those instances will be marked as "0."). 1. From the GradePoint 2020 Main Menu screen, select the class to base the report on via the Selected Class drop-down menu. 2. Click on the Tech-Lab Grades icon. The Tech-Lab Grades screen appears. 126 GradePoint 2020 Installation and User Guide 3. From the Tech-Lab Grades toolbar, click on the Reports button. The Reports window appears. 4. Select Grades Detailed by Course. Click the Modify button to edit the students and courses to be considered for the report. Unchecked items will not appear in the report. Click OK. 5. Click on View Report. The report viewer appears. The instructor may use the various function buttons to navigate through and/or print the report. 6. Click on the Close button when finished. There is no access to GradePoint until this window is closed. 127 GradePoint 2020 Installation and User Guide Grades Detailed by Course The Grades Detailed by Course report displays students’ pretest and posttest grades for each module selected. It also displays the student grades for each module, which are computed based on the lab grade weights that have been set for that class. Evaluation tests are listed in the report as posttests. Evaluations have neither pretests nor workbooks so the entries will be blank for these items. This report is sorted by course. Page breaks always occur at the start of a new course or evaluation listing. Grades are posted numerically, rounded up to the nearest whole number, in these reports. Those students who have not completed a particular workbook will be marked as "no data." Students who have not yet opened the course will not appear in the course's list. Students who have taken the pretest but have not yet taken the posttest, will have their score for the pretest listed, but the posttest results will be listed as "No Data." 1. From the GradePoint 2020 Main Menu screen, select the class to base the Grades Report on from the Selected Class drop-down menu. 2. Click on the Tech-Lab Grades icon. The Tech-Lab Grades screen appears. 128 GradePoint 2020 Installation and User Guide 3. From the Tech-Lab Grades toolbar, select Reports. The Reports window appears. 4. Select Grades Detailed by Course. Click the Modify button to edit the students and modules to be considered for the report. Unchecked items will not appear in the report. Click OK. 5. Click on the View Report button. The Report viewer will appear. Use the various function buttons to navigate through and/or print the report. 6. Click on the Close button when finished. Instructors will not be able to access GradePoint until this window is closed. Workbook Grades by Course The Workbook Grades by Course report lists students’ progress on the workbook portion of TechWorld courses as well instructor-graded rubrics. The Workbook Grades report also tracks activity and exercise scores from Tech-Life and Tech-Design. Instructors can use this report to check successful completions of the workbook sections. This report is sorted by Tech-Lab course. Page breaks always occur at the start of a new course listing. Workbook grades are posted numerically, rounded up to the nearest whole number. Those students who have not finished a particular competency will be marked as "no data." Students who have not yet begun a "workbook" in TechWorld or an exercise in Tech-Life or Tech-Design will not appear in the report. User-defined course and evaluations, which never contain workbook activities, are automatically excluded from this report. 129 GradePoint 2020 Installation and User Guide 1. From the GradePoint 2020 Main Menu screen, select the class to base the grades report on from the Selected Class drop-down menu. 2. Click on the Tech-Lab Grades icon. The Tech-Lab Grades screen appears. 3. From the Tech-Lab Grades toolbar, select Reports. The Reports window appears. 4. Select Workbook Grades by Course. Click the Modify button to edit the students and courses to be considered for the report. Unchecked items do not appear in the report. Click OK. 5. Click on the View Report button. The Report viewer appears. Use the various function buttons to navigate through and/or print the report. 6. Click on the Close button when finished. There is no access to GradePoint until this window is closed. Detailed Workbook Grades by Course The Workbook Grades by Course (show all) report lists students’ progress on the workbook portion of TechWorld courses as well as instructor-graded rubrics. Workbook Grades report also tracks activity and exercise scores from Tech-Life and Tech-Design. Instructors can use this report to check successful completions of the workbook sections. This report is sorted by course. Page breaks always occur at the start of a new course listing. 130 GradePoint 2020 Installation and User Guide Workbook grades are posted numerically, rounded off to the nearest whole number. Those students who have not finished a particular activity will be marked as "no data." Unlike the shorter version, Workbook Grades by Course, this report will list all students in a given class, unless excluded, no matter what activities they may or may not have begun. User-defined courses and evaluations, which never contain workbook activities, are automatically excluded from this report. 1. From the GradePoint 2020 Main Menu screen, select the class for the grades report from the Selected Class drop-down menu. 2. Click on the Tech-Lab Grades icon. The Tech-Lab Grades screen appears. 3. From the Tech-Lab Grades toolbar, select Reports. The Reports window appears. 4. Select Workbook Grades by Course (Show All). Click the Modify button to edit the students and modules to be considered for the report. Unchecked students and modules will not appear in the report. Click OK. 5. Select View Report. The report viewer appears on the screen. Use the various function buttons to navigate through and/or print the report. 6. Click on the Close button when finished. Instructors will be unable to access GradePoint until the viewer is closed. 131 GradePoint 2020 Installation and User Guide Workbook Grades by Student The Workbook Grades by Student report lists students’ progress on the workbook portion of Tech-Lab courses as well as instructor graded rubrics. Instructors can use this report to check for successful completions of the workbook sections. This report is sorted by student. Student names are conveniently displayed at the top of each page. Page breaks always occur at the start of a new student listing. Workbook grades are posted numerically, rounded off to the nearest whole number. Those students who have not finished a particular activity will be marked as "no data." Students who have not yet begun a "workbook" or "exercise" in Tech-Lab will not have workbook data listed. Evaluations and user-defined courses, of course, do not have workbooks, and will not appear in this report. 1. From the GradePoint 2020 Main Menu screen, select the class to base the report on from the Selected Class drop-down menu. 2. Click on the Tech-Lab Grades icon. The Tech-Lab Grades screen appears. 3. From the Tech-Lab Grades toolbar, select Reports. The Reports window appears. 4. Select Workbook Grades by Student. Click on the Modify button to edit the students and courses to be considered for the report. Unchecked courses and/or students do not appear in the report. Evaluations and user-defined modules never appear in this report, even if checked. Click OK. 132 GradePoint 2020 Installation and User Guide 5. Click on the View Reports button. The Report viewer appears after the report is compiled. Use the various function buttons to navigate through and to print the report. 6. Click on the Close button when finished. There is no access to GradePoint 2020 until this window is closed. Detailed Workbook Grades by Student The Workbook Grades by Student (show all) report lists students' progress on the workbook portion of Tech-Lab courses. Instructors can use this report to check which parts of the workbook sections students have completed. Instructors may see the impact that instructor observation via rubrics has on grades. An instructor may also see which exercises in Tech-Lab a student needs to complete. Scores for each activity are listed, along with the student’s overall workbook grade for that course. This report is sorted by student. Student names are conveniently displayed at the top of each page. Page breaks always occur at the start of a new student listing. Workbook grades are posted numerically, rounded off to the nearest whole number. Those students who have not finished a particular activity will be marked as "no data." Unlike the shorter version of this report, even students who have not yet begun a "workbook" in Tech-Lab will appear in this report. User-defined courses and evaluations have no workbook activities and therefore will not appear in this report, even if selected. 133 GradePoint 2020 Installation and User Guide 1. From the GradePoint 2020 Main Menu screen, select the class to base the report on from the Selected Class drop-down menu. 2. Click on the Tech-Lab Grades icon. The Tech-Lab Grades screen appears. 3. From the Tech-Lab Grades toolbar, select Reports. The Reports window appears. 4. Select Workbook Grades by Student (Show All) by double-clicking on it or click on the report once and then click on the Modify button to edit the students and courses to be considered for the report. 5. After the report is created, it is displayed on your screen. Use the various function buttons to navigate through and/or print the report. 6. Click on the Close button when finished. There is no access to GradePoint until this report is closed. 134