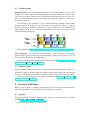
1
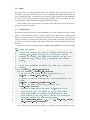
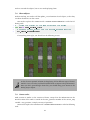
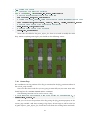
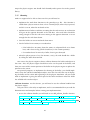
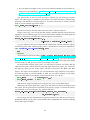
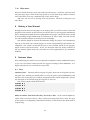
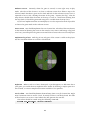
TDDD63 Project:
Capture the flag game
Cyrille Berger
September 7, 2015
The goal of this project is to develop a game. The game you are going to develop is a variation of a classical capture the flag (http://en.wikipedia.org/wiki/
Capture_the_flag), implemented in Python. In this version of the game, the players
control a tank, whose goal is to capture the flag and to bring it back to the base. There
are obstacles on the fields and also the tanks are capable of shooting: either to destroy
objects or to get the flag back from other tanks.
We are providing you with a very basic framework for the game (mostly to handle
graphics and the 2D physics engine), a set of artwork (tanks, bases, flag, obstacles,
sounds), a very basic artificial intelligence (AI) and a small tutorial that will lead you
to develop the basic components of the game: displaying the tanks and other objects,
adding walls, making it possible to control the tank using a controller or an AI, capturing
the flag and destroying enemies.
The game will look similar to the following screenshot:
1
Contents
1 Game Concept
3
2 Project outline
4
3 External libraries
3.1 Running on the University Solaris stations . . . . . . . . . . . . . . . . . . . .
4
4
4 Artwork and other assets
4
5 Game programming techniques and concepts
5.1 Display engine . . . . . . . . . . . . . . . . . . . . . . . . . . . . . . . . . . . . .
5.2 Physics engine . . . . . . . . . . . . . . . . . . . . . . . . . . . . . . . . . . . . .
4
5
5
6 Overview of libraries
6.1 pygame . . . . . . . . . . . . . . . . . . . . . . . . . . . . . . . . . . . . . . . . .
6.2 pymunk . . . . . . . . . . . . . . . . . . . . . . . . . . . . . . . . . . . . . . . . .
5
5
6
7 Tutorial
7.1 Code Structure . . . . . . . . . . . . . . . . .
7.2 Run the game . . . . . . . . . . . . . . . . .
7.3 Structure of the code . . . . . . . . . . . . .
7.4 Coordinates systems . . . . . . . . . . . . .
7.5 Display the background . . . . . . . . . . .
7.6 Maps . . . . . . . . . . . . . . . . . . . . . . .
7.7 Create boxes . . . . . . . . . . . . . . . . . .
7.8 Show objects . . . . . . . . . . . . . . . . . .
7.9 Create tanks . . . . . . . . . . . . . . . . . .
7.10 Create flags . . . . . . . . . . . . . . . . . . .
7.11 Keyboard control . . . . . . . . . . . . . . .
7.12 Grab the flag . . . . . . . . . . . . . . . . . .
7.13 Create base . . . . . . . . . . . . . . . . . . .
7.14 Victory condition . . . . . . . . . . . . . . .
7.15 AI . . . . . . . . . . . . . . . . . . . . . . . . .
7.16 Prevent objects to move out of the screen
7.17 Shooting . . . . . . . . . . . . . . . . . . . .
7.18 What next? . . . . . . . . . . . . . . . . . . .
.
.
.
.
.
.
.
.
.
.
.
.
.
.
.
.
.
.
.
.
.
.
.
.
.
.
.
.
.
.
.
.
.
.
.
.
.
.
.
.
.
.
.
.
.
.
.
.
.
.
.
.
.
.
.
.
.
.
.
.
.
.
.
.
.
.
.
.
.
.
.
.
.
.
.
.
.
.
.
.
.
.
.
.
.
.
.
.
.
.
.
.
.
.
.
.
.
.
.
.
.
.
.
.
.
.
.
.
.
.
.
.
.
.
.
.
.
.
.
.
.
.
.
.
.
.
.
.
.
.
.
.
.
.
.
.
.
.
.
.
.
.
.
.
.
.
.
.
.
.
.
.
.
.
.
.
.
.
.
.
.
.
.
.
.
.
.
.
.
.
.
.
.
.
.
.
.
.
.
.
.
.
.
.
.
.
.
.
.
.
.
.
.
.
.
.
.
.
.
.
.
.
.
.
.
.
.
.
.
.
.
.
.
.
.
.
.
.
.
.
.
.
.
.
.
.
.
.
.
.
.
.
.
.
.
.
.
.
.
.
.
.
.
.
.
.
.
.
.
.
.
.
.
.
.
.
.
.
.
.
.
.
.
.
.
.
.
.
.
.
.
.
.
.
.
.
.
.
.
.
.
.
.
.
.
.
.
.
.
.
.
.
.
.
.
.
.
.
.
.
.
.
.
.
.
.
.
.
.
.
.
.
.
.
.
.
.
.
.
.
.
.
.
.
.
.
.
.
.
.
.
.
.
.
.
.
.
.
.
.
.
.
.
.
.
.
.
.
.
.
.
.
.
.
.
.
.
.
.
.
6
7
7
7
9
9
11
11
12
12
13
14
15
15
15
15
15
16
17
8 Writing a User Manual
18
9 Features ideas
9.1 Easy . . . .
9.2 Medium . .
9.3 Hard . . . .
9.4 Be creative
18
18
19
21
23
.
.
.
.
.
.
.
.
.
.
.
.
.
.
.
.
.
.
.
.
.
.
.
.
.
.
.
.
.
.
.
.
.
.
.
.
.
.
.
.
.
.
.
.
.
.
.
.
.
.
.
.
.
.
.
.
.
.
.
.
2
.
.
.
.
.
.
.
.
.
.
.
.
.
.
.
.
.
.
.
.
.
.
.
.
.
.
.
.
.
.
.
.
.
.
.
.
.
.
.
.
.
.
.
.
.
.
.
.
.
.
.
.
.
.
.
.
.
.
.
.
.
.
.
.
.
.
.
.
.
.
.
.
.
.
.
.
.
.
.
.
.
.
.
.
.
.
.
.
.
.
.
.
.
.
.
.
1
Game Concept
This section describes the concepts for the game. Each player controls a single tank.
There is a single flag shared by all players, and to win the game a player needs to bring
the flag back to his base. The flag is captured simply by moving a tank onto the flag
icon. Since the flag is heavy, a tank that carries the flag should move slower.
Tanks are equipped with a cannon that can shoot at objects or other tanks. Some
objects are destroyed when shot at, while others are unaffected. When a tank is hit by
a shot, it should drop the flag and be teleported back to its base. When a tank shoots,
it needs to wait 10 seconds before being able to shoot again. Also, it is expected that
the tank is affected by the recoil of the shot, and moves in the opposite direction of the
shot.
The field contains several types of objects:
• walls which cannot be moved or destroyed
• steel boxes which can be moved when a tank pushes it but not destroyed (however,
if a tank shoots at a steel box, it would be a good idea to consider that the impact
of the ammunition should move the box slightly)
• wood boxes which can be moved or destroyed
• tanks which are controlled by the players
• bases, with one base as a starting point for each tank, also serving as a goal where
the player must return with the flag
• a single flag which tanks need to capture
3
2
Project outline
The development part of your project lasts for six weeks. During these weeks you are
expected to follow the steps of a tutorial that will guide you through the development of
the basic aspects of your game. After completing the tutorial, you are expected to implement new features that will enhance your game. In that phase you will be free to pick
the features you want to implement and how you want the features to be implemented.
3
External libraries
For this project, you are going to be using two external libraries:
• The Python Game framework (http://www.pygame.org/) is used for managing
the display, inputs and sounds
• The pymunk library (http://code.google.com/p/pymunk/) is used to handle
the physics aspect of the game, such as collisions between two objects
3.1
Running on the University Solaris stations
If you are developing on Solaris, the required libraries have already been compiled for
you. All you need to do is run the following commands in a shell:
module add /home/TDDD63/modulefiles/ctf
module initadd /home/TDDD63/modulefiles/ctf
4
Artwork and other assets
Since the focus of the course is on programming, it is important that if during the development of your features you feel the need to use graphics that are not already provided,
either keep it simple, or use images found on the internet. Here is a sample list of free
repositories for 2D graphics and assets that you can use:
• http://www.lostgarden.com/2006/07/more-free-game-graphics.html
• http://funplosion.com/free-assets.html
• http://www.reinerstileset.de/
• http://www.freesound.org/
5
Game programming techniques and concepts
The goal of this section is to introduce you to some of the techniques and concepts
that are useful when developing a new 2D game. This a non-exhaustive section and
we refer you to the Internet (especially http://www.google.com and http://www.
wikipedia.com) to learn about the theories behind game development.
4
5.1
Display engine
Double buffering The most straight-forward way of drawing objects on the screen
would be to clear the video memory and then draw directly inside that memory. However, since you will for example draw a background and then draw objects on top of it,
this can introduce flickering where the monitor intermittently displays a screen that is
only partly updated.
The solution to that problem is to use a double buffering technique. With double
buffering, instead of drawing in the video memory, programs will write in a separate
buffer, and once the drawing is completed, the separate buffer is then copied into the
video memory. With such a system, no intermediate results will be sent to the screen,
and the flickering disappears.
Source: Wikipedia (http://en.wikipedia.org/wiki/Multiple_buffering)
Tiles and sprites The game you are developing is a tile-based game. This mainly
means that the game area consists of smalls square graphic images (like grass or the
boxes). Objects that move are called sprites.
You can read more about tile-based games on Wikipedia: http://en.wikipedia.
org/wiki/Tile-based_video_game.
5.2
Physics engine
A physics engine provides a simulation of physical interaction among objects. While it is
possible for a physics engine to emulate all kinds of interaction among objects, including
gravity, we will mostly use the physics engine to handle collisions between two objects.
You can read more about physics engines on Wikipedia: http://en.wikipedia.
org/wiki/Physics_engine.
6
Overview of libraries
Before you get started, it is strongly advised that you have a look at the documentation,
tutorials and examples of the Python game framework we are using.
6.1
pygame
The pygame library is used for display, input, sounds, its documentation is available
online http://www.pygame.org/docs/.
For this game we mainly use three classes:
5
• display for configuring the screen (http://www.pygame.org/docs/ref/display.
html)
• surface for showing the games graphics (background and sprites) on the screen
(http://www.pygame.org/docs/ref/surface.html)
• event to handle the keyboard (http://www.pygame.org/docs/ref/surface.
html)
6.2
pymunk
The pymunk library is used to handle the physics aspect of the game, mainly to handle collisions, its documentation is available online: http://code.google.com/p/
pymunk/wiki/Documentation.
In pymunk an object in the game is represented as a body, bodies have a position
and a speed. A shape is attached to the body, the shape represents the boundaries of the
object, in this game we mostly use the rectangular shape.
• body: http://pymunk.googlecode.com/svn/tags/pymunk-2.0.0/docs/
api/pymunk.Body-class.html
• shape: http://pymunk.googlecode.com/svn/tags/pymunk-2.0.0/docs/
api/pymunk.Shape-class.html
7
Tutorial
The goal of this tutorial is to get you through the early step of the development of the
game. The early steps of the tutorial should be done very quickly, the following steps
require more development time.
It is strongly recommended that you do not copy/paste samples from this
tutorial, but retype them, and check the documentation for each function
that is used and write your own comments. Also, some of the code snippets
contain visible bugs and compilation errors that you are invited to fix on
your own.
We have created for you a skeleton of the game, which contains artworks, some
helper classes and a very basic AI. You can get the archive for the files on the Solaris
server:
/home/TDDD63/projects/capturetheflag/ctf.tar
You can unpack it in your home directory, using the following commands:
cd
tar -xf /home/TDDD63/projects/capturetheflag/ctf.tar
6
7.1
Code Structure
The first step of your work should be to look at the existing files and read through the
codes and comments and understand what they are offering.
Once you have done that, your first task is to write a small description of the
existing functionalities. For each Python file in the skeleton, you are expected
to write a small paragraph describing the content of that file, and what features
are available. Once this is done, you should bring the text to the Friday project
report.
7.2
Run the game
To run the game you simply need to go in the source code directory and run the following
command:
python3 ctf.py
If you do it now, you should get a black screen that you can simply exit by pressing
the ESCAPE key.
7.3
Structure of the code
The ctf.py file is divided into two sections, the Initialisation and the Main loop. Both
sections already contains some code.
Initialisation In the first part of this section, the two game libraries (pygame and
pymunk) are initialised. We also initialise a clock that will be used to control the framerate of the game. This is also in that section that we will create the objects needed for
the game.
Main loop In the main loop, we check for input events, and then update the physics
engine and display the result on the screen. We have already added the key for exiting
the game (ESCAPE), and the call to update the physics and to refresh the screen. At the
end of the loop, we call the function clock.tick to control the frame rate of the game, this
is to make sure that the game flow at the speed no matter what computer you are using
(it is set at 50 frame per seconds).
7
1
2
3
4
5
6
7
8
9
10
11
12
13
14
15
16
17
18
19
20
21
22
23
24
25
26
27
28
29
30
31
32
33
34
35
36
37
38
39
40
41
42
43
#-- Control whether the game run
running = True
skip_update = 0
while running:
#-- Handle the events
for event in pygame.event.get():
# Check if we receive a QUIT event (for instance, if the
# user presses the close button of the window) or if the
# user presses the escape key.
if event.type == QUIT or (event.type == KEYDOWN \\
and event.key == K_ESCAPE):
running = False
#-- Update physics
if(skip_update == 0):
# Loop over all the game objects and update their speed in
# function of their acceleration.
for obj in game_objects_list:
obj.update()
skip_update = 5
else:
skip_update -= 1
# Check collisions and update the objects' position
space.step(1 / framerate)
# Update object position that depends from an other
# object position (for instance a flag carried by a tank)
for obj in game_objects_list:
obj.post_update()
#-- Update Display
#<INSERT DISPLAY BACKGROUND>
#<INSERT DISPLAY OBJECTS>
# Redisplay the entire screen (see double buffer technique)
pygame.display.flip()
# Control the game framerate
clock.tick(framerate)
8
7.4
Coordinates systems
One of the most common bugs in the display part of a 2D game is to lose track between
the coordinate systems. For this game, we will use two coordinate systems, one that
represents the index of a tile in the map array, and the other one used for display and
by the physics engine.
The video game you are developing is tile-based (http://en.wikipedia.org/
wiki/Tile-based_video_game), meaning that the playing area consists of small
square areas (called tiles) laid out adjacently to each other in a grid. You can think
of it as a chess game, but instead of white and black tiles, there are grass tiles, box tiles,
and so on.
If we consider a map of dimension (width, height), the top left tile has index (0, 0)
and bottom right (width − 1, height − 1). While for display, the top left coordinate is
(0, 0) and the bottom right is (width, height). And if you have a tile at index (i, j) it will
be centered on the canvas coordinates (i + 0.5, j + 0.5).
The figure below shows the two coordinate systems:
(0,0)
(1,0) (2,0) (3,0) (4,0) (5,0) (6,0)
(7,0)
(6.5,0.5)
(0,1)
(7,1)
(0,2)
(7,2)
(0,3)
(7,3)
(0,4)
(7,4)
[0][0] [0][1] [0][2] [0][3] [0][4] [0][5] [0][6]
[1][0] [1][1] [1][2] [1][3] [1][4] [1][5] [1][6]
(1,1.5)
[2][0] [2][1] [2][2] [2][3] [2][4] [2][5] [2][6]
[3][0] [3][1] [3][2] [3][3] [3][4] [3][5] [3][6]
(3.5,3)
(7,5)
(0,5)
[4][0] [4][1] [4][2] [4][3] [4][4] [4][5] [4][6]
[5][0] [5][1] [5][2] [5][3] [5][4] [5][5] [5][6]
(0,6)
(1,6) (2,6) (3,6) (4,6) (5,6) (6,6)
(7,6)
The left figure shows the coordinate system used for the position of objects in the
game. Basically, if the map has a dimension of 6x5, the top left coordinate would be
(0, 0), while the top left tile is centred on the (0.5, 0.5) coordinate, and the bottom right
coordinate is (7, 6) and the bottom right tile is centred on (6.5, 5.5).
The right figure shows the index used to access tile in the map array, note that the
x and y coordinates are switched. When accessing the coordinates on the canvas, we
use the order x first and y second, but to access information in the map, the order is
switched. For instance, the tile (2, 3) is centred on (2.5, 3.5) of the canvas, but in the
array representing the map, you would need to use [3][2] to access its information, or
even better, use the helper function in the map class.
While tiles and walls are always centred on a cell of the coordinates grid, tanks, flags
and boxes (steel and wood) can be at any arbitrary position on that grid.
7.5
Display the background
The first step is going to be to display the background. For this game, it is simply a
repetition of the grass tile pattern to cover the entire screen.
The first step is then to generate the background image, you need to replace the
comment with <INSERT GENERATE BACKGROUND> with the following code:
9
1
2
3
4
5
6
7
8
9
10
11
12
13
14
15
#-- Generate the background
background = pygame.Surface(screen.get_size())
# Copy the grass tile all over the level area
# The map has dimension a width of "current_map.width" and a
#
height of "current_map.height".
# The first loop will iterate "x" between "0" and "width-1"
# And the second loop will iterate "y" between "0" and
# "height-1"
for x in range(0, current_map.width):
for y in range(0, current_map.height):
# The call to the function "blit" will copy the image
# contained in "images.grass" into the "background"
# image at the coordinates given as the second argument
background.blit(images.grass, (x*images.TILE_SIZE, y*images.TILE_SIZE))
At the beginning of each display cycle, the first step is to display the background, you
will do that by replacing the comment with <INSERT DISPLAY BACKGROUND> with the
following code:
1
2
# Display the background on the screen
screen.blit(background, (0, 0))
If everything went right, you should see the following screen:
Explain in one or two sentences, why do you think it is a good idea to generate
a static image of the background. Once this is done, you should bring the text
to the Friday project report.
10
7.6
Maps
The game you are creating should be able to use different maps to provide variety for
the players. The game skeleton contains a class called Map that defines the information
for each different map. It defines the size (width, height expressed in the dimension
of a tile) as well as the position of the flag (flag_position), the start position of robots
(start_positions) and the position and type of the boxes (boxes).
The variable current_map contains an instance of the Map class for the map that is
going to be used in the game.
7.7
Create boxes
The position and type of boxes is actually defined by an array of dimension height×width
where a value of 0 means no box, 1 means rock box (also called walls), 2 means wood
box and 3 means steel box. Therefore the creation of the box is done by reading the
calling the boxAt(x,y) function from the current_map variable, and then using the value
of the array, we can know which type of box need to be created and where is the initial
position.
You need to replace the comment with <INSERT CREATE BOXES> with the following
code:
1
2
3
4
5
6
7
8
9
10
11
12
13
14
15
16
17
18
19
20
21
22
23
24
25
#-- Create the boxes
# The initial position and type of boxes is contained in the
#
"current_map.boxes" array, which is an array that has
# the size of the map, and whose cells contain the box type
# (0 means no box, 1 means wall, 2 means wood and 3 means
# steel).
#
# As for the background we create two loops over the size of
# the map.
for x in range(0, current_map.width):
for y in range(0, current_map.height):
# Get the type of boxes for the current cell(y, x)
box_type = current_map.boxAt(x, y)
# We need to get the python object that correspond to the
# model
box_model = boxmodels.getmodel(box_type)
# If the box model is non null, create a box
if(box_model != None):
# Create a "Box" using the model "box_model" at the
# coordinate (x,y) (an offset of 0.5 is added since
# the constructor of the Box object expects to know
# the centre of the box, have a look at the coordinate
# systems section for more explanations).
box = gameobjects.Box(x + 0.5, y + 0.5, box_model, space)
game_objects_list.append(box)
You should try to run the program, however, you will not notice any difference. Since
11
we have created the objects, but we are not displaying them.
7.8
Show objects
In the main loop, we need to call the update_screen function of each object, so that they
can draw themselves on the screen.
You need to replace the comment with <INSERT DISPLAY OBJECTS> with the following code:
1
2
3
4
# Update the display of the game objects on the screen
for obj in game_objects_list:
# For each object, simply call the "update_screen" function
obj.update_screen(screen)
If everything went right, you should see the following screen:
Is this the most optimal solution for displaying all the different type of boxes?
And if it is not, what do you think should be done to improve the performance?
Once you have given thought about this, you should bring your answer to the
Friday project report.
7.9
Create tanks
Tank creation is similar to the creation of boxes, except that the information on the
initial location of the tanks is stored in the start_positions member of the current_map
variable. start_positions is simply an array of positions.
You need to replace the comment with <INSERT CREATE TANKS> with the following
code:
12
1
2
3
4
5
6
7
8
9
10
11
#-- Create the tanks
# Loop over the starting poistion
for i in range(0, len(current_map.start_positions)):
# Get the starting position of the tank "i"
pos = current_map.start_positions[i]
# Create the tank, images.tanks contains the image representing the tank
tank = gameobjects.Tank(pos[0], pos[0], pos[2], images.tanks[i], space)
# Add the tank to the list of objects to display
game_objects_list.append(tank)
# Add the tank to the list of tanks
tanks_list.append(tank)
Since tanks are added to the game_objects_list, there is no need to modify the main
loop. And if everything went right, you should see the following screen:
7.10
Create flags
The coordinates for the position of the flag is contained in the flag_position member of
the current_map variable.
This is the first bit of code that you are going to write fully on your own. Your code
should replace the <INSERT CREATE FLAG> comment.
The following function can be used to create a flag:
1
2
# This function call create a new flag object at coordinates x, y
gameobjects.Flag(x, y)
And you can access the position of the flag using the flag_position property of the
current_map variable. And after creating a flag object, do not forget to add it to the list
of game objects: game_objects_list, check how it was done for creating boxes and tanks.
13
If everything went right, you should see the following screen:
7.11
Keyboard control
Now, you need to make it possible for the player to move the robot. It should work like
this, when the player presses:
• the up key, the tank accelerates forward
• the down key, the tank accelerates backward
• the left key, the tank turns left
• the right key, the tank turns right
And when the player releases the keys the tank stops moving.
If you look in the ctf.py file, at the beginning of the main loop, there is a section called
event handler. This is basically a loop that allow you to handle the events received by
the game, and when a user presses or releases a key, it triggers an event that can be
caught in this loop.
If you look at what is in the file, you should see the following code:
1
2
3
4
#-- Handle the events
for event in pygame.event.get():
if event.type == QUIT or (event.type == KEYDOWN and event.key == K_ESCAPE):
running = False
This code checks if it receives the QUIT event (defined by the pygame framework),
or if the player presses the ESCAPE key. If either condition is true, the game exits. You
just need to add new tests to see whether the K_UP, K_DOWN, K_LEFT and K_RIGHT
keys have been pressed or release, and if so, call the correct function of the tank object.
14
To control the speed of a tank, you should check the functions accelerate, decelerate,
turn_left, turn_right, stop_moving and stop_turning of the gameobjects.Tank class.
From now on, you will not get any indication of where you are supposed
to put the code. You will need to think about it and experiment.
7.12
Grab the flag
Now you can move the tank to the flag, but the flag is not automatically picked up as it
should be. This is because you need to add code that does this if a tank is near the flag
and no other tanks have already grabbed the flag. Incidentally, there is a function in the
Tank class called try_grab_flag that checks if a tank can grab the flag and then if a tank
is near the flag, it grabs it.
7.13
Create base
If a tank has taken the flag, it is supposed to move back to its base. However, there is
currently no indication of where this base is located in the map. In practise, the base is
at the starting point of the tank. So you will need to display an indicator of the base on
the starting point of a robot.
To display the base, you can use the gameobjects.GameVisibleObject class and the
images.bases images.
7.14
Victory condition
Once a tank reaches its home base with the flag, the tank has won the game. You can
use the has_won function of the Tank class to check whenever a tank has won and then
exit the game.
7.15
AI
Right now, the game is rather boring: Only the player tank is moving, while the other
three tanks stay at their base. They are supposed to be controlled by an artificial intelligence.
The first step you need to do is to associate an AI to each of the computer tanks. We
suggest that you have a look at the class ai.SimpleAi, which contains a very simple AI
implementation. This should tell you how to associate an AI to a tank. Also, in the main
loop, do not forget to call the decide function for each of the AIs.
7.16
Prevent objects to move out of the screen
In the current implementation, objects can move out of the screen. To see for yourself,
try to move the tank toward the edge of the game. This is a bug that needs to be fixed.
One possible idea is to add some kind of barrier that goes around the border of the
15
map in the physics engine. You should check the Body and Segment class in the pymunk
library.
7.17
Shooting
Tanks are supposed to be able to shoot. For this you will need to:
• implement the Tank.shoot function in the gameobjects.py file. This function is
called when a player wants to shoot: If it is a human player, when a key is pressed,
and if it is an AI, when the AI decide to fire.
• implement recoil when a tank fires, meaning that the tank receives an acceleration
that goes in the opposite direction as the tank fires. The recoil effect should be
strong enough so that the tank starts moving in the opposite direction. It is not
enough that the tank slows down.
• show the bullets on screen and make them move
• check if bullets hit an enemy or a wooden box
– if the bullet hits an enemy, then that enemy is teleported back to its home
base, and it loses its flag (which should stay at the current position)
– if a wooden box is hit twice by a bullet, then it gets destroyed
• when the player presses a key (for instance, enter), the tank should fire a bullet
by calling the Tank.shoot function
You can use the physics engine to detect collision between the bullet and objects in
the scene. Also, the physics engine should be used to set the speed of the bullet, and
then you can read the current position of the bullet in the physics engine to update the
position on the screen.
For practical purposes, to implement the shooting of the bullet, you should implement a class that subclasses GamePhysicsObject, since this class will take care of displaying the bullet on the screen and registering it in the physics simulation. All you would
need to implement is giving the initial speed of the bullet and detect when the bullet
has collided with an other object.
Collision detection For this feature, you will need to use the collision handler from
the physics engine.
This part can be a bit tricky to implement, and it is recommended that you read the
documentation and examples before starting your implementation:
• To use the collision handler you will need to use add_collision_handler function:
http://pymunk.googlecode.com/svn/tags/pymunk-2.0.0/docs/api/pymunk.
Space-class.html#add_collision_handler as well as set the collision type
http://pymunk.googlecode.com/svn/tags/pymunk-2.0.0/docs/api/pymunk.
Shape-class.html#collision_type on the shapes
16
• You can find an example of the use of that collision handler in the breakout example of the pymunk library: http://code.google.com/p/pymunk/source/
browse/trunk/examples/breakout.py (search for add_collision_handler).
The general idea is that you will associate a collision type for each type of game
object, the collision type is a number, so for instance, the bullet will have a collision type
of 0, and a tank will have a collision type of 1. So in the constructor of a bullet, you will
need to set the collision type on the shape:
1
self.shape.collision_type = 0
You do the same for the tank constructor, but with a collision type of 1.
Then in your ctf.py, you can call the add_collision_handler function, whose first two
arguments are the collision types that you are interested to handle, the third argument
would be a function to call when the collision happens. For instance:
1
2
space.add_collision_handler(0, 1,
pre_solve = collision_bullet_tank)
pre_solve indicates that we are interested in handling the collision when two objects
are touching each other. collision_bullet_tank is a function that you need to implement:
1
2
3
def collision_bullet_tank(space, arb)
...
return 0
arb is an object of the class Arbiter (http://pymunk.googlecode.com/svn/tags/
pymunk-2.0.0/docs/api/pymunk.Arbiter-class.html). The most interesting
member of arb is shapes, as arb.shapes[0] will give you access to the shape of the bullet
and arb.shapes[1] will give you access to the shape of the tank.
In the function collision_bullet_tank, you will need to remove the bullet and the
tank from the game, which involves removing them from game_objects_list. However,
arb.shapes[0] gives you the shape object, and what you need is the Bullet and Tank
objects. The trick is that in Python, you can dynamically add a property to any object.
So when the Shape is created in Bullet or Tank, you can add a property to the Shape
object that will point to your Bullet or Tank. For instance, you can do:
1
2
self.shape
self.shape.parent
= pymunk.Poly(...)
= self
And then arb.shapes[0].body.parent will give you access to the Bullet object.
Removing the objects from game_objects_list will make the objects disappear from
the screen, but they will still be registered in the physics engine, to remove the bullet,
you will need to use the add_post_step_callback function:
1
2
space.add_post_step_callback(space.remove, arb.shapes[0],
arb.shapes[0].body)
Do not forget that the tank need to be respawn on their base, and once you have implemented collision_bullet_tank, you should be able to implement the collision handling
for the other type of objects.
17
7.18
What next?
First you should check that your code works for other maps – until now, you have been
using the maps.map0. Check in the maps.py file to see the other maps, and test whether
your code works if you use a different map. If not, fix the bugs!
And now, you are free to develop your own features. The next section gives you
some ideas.
8
Writing a User Manual
Though the main focus in this project is on writing code, you will also write a short and
pragmatic user manual. In this manual you will not have to repeat generic information
that is already known from the basic background of the project. Instead the focus should
be on providing enough information for someone to be able to both start and actually
use your software without too much previous knowledge.
The manual should be written incrementally during the project and continuously
kept up to date with your current progress in terms of programming and software development. The current version will be sent to your assistant ahead of each progress
report session as discussed above. If you are uncertain about the proper contents of
the user manual, please make sure you make use of this opportunity to get continuous
feedback.
9
Features ideas
After completing the tutorial, you are expected to complete as many additional features
as you can. The feature requests below are tagged according to their difficulties. It is
highly advised that you start with the easiest first.
9.1
Easy
Counting score. Currently, when you play the game, when one of the player has won,
the game exits. Instead you should make it so that the game is played indefinitely, and
that the score of each player is recorded, and printed in the console output once a player
has managed to successfully bring the flag back to the base.
The console output would look like this:
Player
Player
Player
Player
1:
2:
3:
4:
3
0
2
5
Make steel boxes slow down after they are hit by a shot. In the current implementation, when a steel box is hit by a shot, it will start moving until it hits a wall. The goal
of this feature is to implement some kind of friction, so that the box slow down until it
stops moving.
18
Sounds. If you intend to implement sounds in your game, you should first check that
sound is properly working on your system, try playing a sound using a media player.
The goal of this feature is to play a sound when an event occurs in the game:
• when a player has captured the flag
• when a tank is shooting
• when a tank or a wooden box is destroyed
Also the second part of the feature is to play music in the background.
Have a look at http://www.freesound.org/ to get some sounds samples that
you can use in your project.
Hot seat multiplayer. In hot seat multiplayer, two human players are playing on the
same computer. In the single player mode, the human player is using the keys up, down,
left, right and enter to control his tank. In hot seat multiplayer, you should make it so
that a second player can control his tank using the keys w (to accelerate), a (to turn
left), s (to decelerate), d (to turn right) and space (to shoot).
It should be possible to select the mode, between “single player” and “hot seat multiplayer”. At this point, we suggest using a command line option, so that typing the
following command start in single player mode:
python3 ctf.py --singleplayer
And to start in hot seat multiplayer:
python3 ctf.py --hot-multiplayer
Hit points. In the current implementation, when a shot hits an other tank or wooden
box, it gets destroyed instantly, it would be fun to make it harder to destroy an other
tank by implementing “hit points” and require a tank or wooden box to be hit several
time before it get destroyed.
respawn protection Right now, when a tank is respawned, it can get destroyed again
immediately, the idea of this feature is to introduce a small delay during which a newly
respawned tank cannot be destroyed.
9.2
Medium
Before starting implementing features in this section, you should have implemented at
least two of the easy features.
Read maps from a text file Currently maps are stored in a Python file. The idea of this
feature is to create a small text file format that will contain all the information for a map.
Think of it as a serialization (http://en.wikipedia.org/wiki/Serialization)
of the class Map. Then you could have a command line argument to load the map:
python3 ctf.py --map my\_map.txt
19
Welcome screen. Currently, when the game is started, it starts right away in play
mode. The idea of this feature is to show a welcome screen that allows a map to be
selected. Much freedom is given on the look and feel of that welcome screen, but it is
expected to have a title, showing the name of the game: “Capture the flag”. Also the
map selector should show the name of the map, as well as a small icon showing how
the map looks (it should be generated using boxes variable from the map class).
If you have implemented hot seat multiplayer, it is also expected to make it possible
to choose the game mode in the welcome screen.
Score screen You should implement the score feature first. The idea of this new feature
is that instead of showing the scores in the console, every time a tank brings a flag back
to its base, you will replace the game screen and show on screen the score of each player.
Implement fog of war With fog of war, only part of the screen is visible to the player.
See the screenshot below to see how it should look:
Explosion When a tank or a box is destroyed, it just disappears, to add more fun to
your game, you could show an explosion effect. Either by showing a simple sprite for a
few seconds, or a more complicated version would be to use particles.
Levels editor You should implement the Read maps from a text file feature first. Right
now, if someone wants to create a level, he needs to write a text file by hand. The idea
of that feature is to create a visual editor that will generate the text file.
This editor should be started using the following command:
python3 ctf-editor.py [width] [height]
20
Where [width] and [height] are parameters pass by the user which defines the size
of the map, for instance, if a user wants to create a 10x12 map, he will use the following
command:
python3 ctf-editor.py 10x12
Then the user is presented with a screen that shows the map. The map is initialised
to show only grass and not boxes. When the user clicks on a tile, it cycles through the
boxes, for instance, the first click change the tile to the stone box, the second click to
the wooden box and the third click to the steel box and a fourth click brings back the
grass. So if a user wants to put a wooden box, he needs to click twice.
Once the user is done with putting the boxes, he needs to press enter. In that mode,
the user select the starting position of the flag, the editor should refuse to put the flag
on a box, and only accept the flag to be on grass. To select the position of the flag, the
user clicks on a tile (if the flag has already been set, a new click will move the flag to
the new position).
Once the user is done with choosing the flag starting position, the next step is to
decide where to put the base. Once again, the editor should only accept to put a base
on a grass tile, where there is no flag and no other base. When the user clicks, it should
put a base on a tile, and if the user clicks a second time it put an other base for an other
player. And if the user presses the u key, it should cancel the last base that was added.
Once the user is done with setting the bases position, he presses enter, the text
corresponding to the map is displayed in the console window and can be copied to a
text file using a text editor.
Advance scoring You should implement the score feature first. Currently the only
way to get points is to bring the flag to the base. The idea behind this feature is that
completing other actions will bring points.
Here is a suggested scoring table:
• bringing the flag to the base gives a 100 points
• destroying an enemy that carries the flag gives 10 points
• destroying an enemy gives 5 points
• destroying a wooden box gives 1 point
9.3
Hard
Before starting implementing features in this section, you should have implemented at
least two of the medium features.
AI Improvements. The current implementation of the AI is very simplistic. It basically
works by looking at the current position of the flag and trying to reach it using the
following algorithm:
• If there is a tank in firing range, shoot.
21
• If there is no blocking object in front, move forward.
• If there is a blocking object in front:
– If the object can be destroyed (wooden box), shoot.
– If the object cannot be destroyed, turn left or right, in the direction of the
flag.
This is very basic. A possible improvement is to implement an algorithm that will
find the optimal path between the tank and the position of the flag, for instance, by
using A* http://en.wikipedia.org/wiki/A*_search_algorithm.
You should assume that the AI has perfect and full knowledge of the world. Also,
you should assume that wooden tiles are passable, after all, the tank just have to shoot
to destroy them. As for steel box, you might want to consider them as “fixed” obstacles.
While implementing A* is going to give the optimal trajectory to reach the flag, it is
still possible for an enemy to outsmart the AI and reach its base. Further improvement
should focus on trying to block the player that carries the flag. One possible idea is for
the AI to compute the optimal path from the tank which carry the flag to its base, and
then to try to find on that path a point that would be more accessible.
The following figure explains the problem:
The white path is the optimal path for the white tank to reach the flag, while the
orange path shows the optimal path for the orange tank to reach its home base. Even
though the orange tank is going slower because it is carrying the flag, there is still a
high chance that the orange tank will escape the white tank and reach its base and then
score. It would be better for the white tank to follow the blue path and then be able to
intercept the orange tank.
As a final improvement, when the AI tank is carrying the flag, you would need to
find and implement a good strategy for the AI to escape the pursuit from the other tanks.
22
Many other improvements can be done to the AI. If you are interested, feel free to
think about further improvements and discuss them with your advisor before starting
an implementation.
Networked multiplayer The goal of this feature is to allow players to play the game
using different computers.
This feature is very hard to implement correctly, and you should have
implemented all other of the suggested features before trying to implement this one. You should also start by getting yourself familiar
with the TCP/IP network protocols (http://en.wikipedia.org/wiki/
Internet_protocol_suite).
To implement this feature it is suggested to use a client / server architecture (http:
//en.wikipedia.org/wiki/Client-server_model). On the welcome screen of
your game, you should add two new modes “network multiplayer (host)” and “network
multiplayer (client)”.
When the user select “network multiplayer (host)”, it starts the game as a server,
and it shows a screen with a start button, when the user clicks on the button, the game
is started with the players who have connected.
When the user select “network multiplayer (client)”, it should show an input text
box (see http://www.pygame.org/pcr/inputbox/index.php) where the user can
input the address of the host (you can use the unix command hostname on the server to
figure out the address of the server), then a connect button.
A naive approach to implementing multiplayer would be to keep running the entire
game in both the host and the client. This would allow to reuse most of the code and
only exchange acceleration and turn commands. However, it is extremely likely that
the two instances of the game will run out of sync. The only way to solve that problem
is to make sure that only the server handles the physics engine and computes object
positions, while the client gets the state of the world from the server and displays it.
On the practical implementation, the server can use the same game implementation
as the current single player mode. However, the client will have to be rewritten. On
the client, you will not need to use the physics library, only to display the objects on the
screen and send input to the server.
To implement this feature you can use TCP API from Python (http://wiki.python.
org/moin/TcpCommunication and http://docs.python.org/library/ipc.html)
and you will need to define a simple protocol.
9.4
Be creative
Surprise us with your creativity and imagination to develop an exclusive feature. The
feature should not be trivial, talk with your supervisors beforehand.
23